Chapter 7
Browsing the Web and Sending E-Mail

Your iPad is fully equipped to browse the web and send e-mail via a Wi-Fi connection or cellular network.
Access Websites Quickly with Bookmarks
Create Bookmarks to Access Pages Quickly
Keep a Reading List of Web Pages
Fill In Forms Quickly with AutoFill
Reply To or Forward an E-Mail Message
Organize Your Messages in Mailbox Folders
Browse the Web with Safari
Your iPad comes equipped with the Safari app for browsing the web. You can quickly go to a web page by typing its address in the Address box or by following a link. The Address box includes a search function, so you can type in either a web page address or a search term.
You can either browse a single web page at a time or open multiple pages in separate tabs and switch back and forth among them.
Browse the Web with Safari

Open Safari and Navigate to Web Pages
![]() Press Home.
Press Home.
![]() Tap Safari (
Tap Safari (![]() ).
).
Safari opens and loads the last web page that was shown. If you closed all pages the last time you used Safari, the app displays the Top Sites screen.
![]() Tap the Address box.
Tap the Address box.
The keyboard appears.
![]() Tap Delete (
Tap Delete (![]() ) if you need to delete the contents of the Address box.
) if you need to delete the contents of the Address box.
![]() Type the address of the page you want to open.
Type the address of the page you want to open.
![]() Tap Go.
Tap Go.

Safari displays the page.
![]() Tap a link on the page.
Tap a link on the page.
Safari displays that page.
![]() After going to a new page, tap Back (
After going to a new page, tap Back (![]() ) to display the previous page. You can then tap Forward (
) to display the previous page. You can then tap Forward (![]() ) to go forward again. Tap and hold Back (
) to go forward again. Tap and hold Back (![]() ) or Forward (
) or Forward (![]() ) to display a list of pages you can go back or forward to.
) to display a list of pages you can go back or forward to.

Open Multiple Pages and Navigate Among Them
![]() Tap New Tab (
Tap New Tab (![]() ) at the right end of the tab bar.
) at the right end of the tab bar.
Safari displays a new tab.
![]() Tap the Address box.
Tap the Address box.
The keyboard appears.
![]() Type the address for the page you want to display.
Type the address for the page you want to display.
![]() If a suitable search result appears in the suggestions list, tap it to display that page.
If a suitable search result appears in the suggestions list, tap it to display that page.
Note: You can also go to a page by using a bookmark, as described in the next section, “Access Websites Quickly with Bookmarks.”
![]() Tap Go.
Tap Go.

![]() The page appears.
The page appears.
![]() To switch to another page, tap its tab.
To switch to another page, tap its tab.
![]() You can tap Close (
You can tap Close (![]() ) to close the active page.
) to close the active page.
Note: To change the order of the tabs, drag a tab to the left or right. Release the tab when it appears where you want it.
Access Websites Quickly with Bookmarks
To avoid having to type web addresses, you will probably want to use bookmarks to access websites you visit frequently.
By syncing your existing bookmarks in iCloud to your iPad, you can instantly access your preferred web pages from all your devices. You can also use the iCloud Tabs feature to view tabs that are open in Safari on your other devices or create bookmarks on your iPad, as discussed in the next section, “Create Bookmarks to Access Pages Quickly.”
Access Websites Quickly with Bookmarks

Open the Bookmarks Screen
![]() Press Home.
Press Home.
The Home screen appears.
![]() Tap Safari (
Tap Safari (![]() ).
).
Safari opens.
![]() Tap Bookmarks (
Tap Bookmarks (![]() ).
).
The sidebar appears.
![]() If the Bookmarks list does not appear, tap Bookmarks (
If the Bookmarks list does not appear, tap Bookmarks (![]() ) at the top of the sidebar.
) at the top of the sidebar.
The Bookmarks list appears.

Explore Your History
![]() In the sidebar, tap History (
In the sidebar, tap History (![]() ).
).
A scrollable list of the web pages you have recently visited appears.
![]() Safari divides the list by times, such as This Afternoon, This Morning, and specific days.
Safari divides the list by times, such as This Afternoon, This Morning, and specific days.
Note: You can delete an item from your history by swiping its button left in the History panel and then tapping Delete, which appears to the right of the button.
![]() You can tap Clear to clear your history.
You can tap Clear to clear your history.

Explore a Bookmarks Category and Open a Bookmarked Page
![]() In the Bookmarks panel, tap the bookmarks folder or category you want to see. For example, tap Bookmarks Menu.
In the Bookmarks panel, tap the bookmarks folder or category you want to see. For example, tap Bookmarks Menu.
Note: You can delete a bookmarks folder or a bookmark by swiping its button left in the Bookmarks panel and then tapping Delete, which appears to the right of the button.

The contents of the folder or category appear. For example, the contents of the Bookmarks Menu folder appear.
Note: If the folder you opened contains subfolders, tap the subfolder you want to open.
![]() Tap the page you want to view.
Tap the page you want to view.
![]() Alternatively, tap Back (
Alternatively, tap Back (![]() ) in the upper-left corner one or more times to go back.
) in the upper-left corner one or more times to go back.
![]() You can tap Bookmarks (
You can tap Bookmarks (![]() ) to close the sidebar or simply leave it open.
) to close the sidebar or simply leave it open.
Create Bookmarks to Access Pages Quickly
When you find a page you want to access again, create a bookmark for it. If you have set your iPad to sync Safari information with iCloud, that bookmark becomes available to the other devices you sync with iCloud.
If you create many bookmarks, it is usually helpful to store them in multiple folders. You can create folders easily on your iPad and choose which folder to store each bookmark in.
Create Bookmarks to Access Pages Quickly

Create a Bookmark
![]() Press Home.
Press Home.
The Home screen appears.
![]() Tap Safari (
Tap Safari (![]() ).
).
Safari opens and displays the last web page you were viewing.
![]() Navigate to the web page you want to bookmark.
Navigate to the web page you want to bookmark.
![]() Tap Share (
Tap Share (![]() ).
).
The Share sheet appears.
![]() Tap Add Bookmark (
Tap Add Bookmark (![]() ).
).

The Add Bookmark dialog opens.
![]() Edit the suggested name as needed, or type a new name.
Edit the suggested name as needed, or type a new name.
![]() Tap Location and then tap the folder in which you want to create the bookmark.
Tap Location and then tap the folder in which you want to create the bookmark.
Note: The Location button shows the last bookmarks folder you used. In this example, the last folder was Favorites.
![]() Tap Save.
Tap Save.
Safari creates the bookmark.

Create a Bookmark Folder
![]() In Safari, tap Bookmarks (
In Safari, tap Bookmarks (![]() ).
).
The sidebar opens.
![]() Tap Bookmarks (
Tap Bookmarks (![]() ).
).
The Bookmarks list appears.
![]() Tap Edit at the bottom of the list.
Tap Edit at the bottom of the list.
The Bookmarks list changes to Edit Mode.
A Delete icon (![]() ) appears to the left of each bookmark.
) appears to the left of each bookmark.
A movement handle (![]() ) appears to the right of each bookmark.
) appears to the right of each bookmark.
![]() Tap New Folder.
Tap New Folder.

The Edit Folder dialog opens.
![]() Type a descriptive name for the folder.
Type a descriptive name for the folder.
![]() Tap Location — which shows the name of the current folder, such as Bookmarks — and then tap the folder in which to store the new folder.
Tap Location — which shows the name of the current folder, such as Bookmarks — and then tap the folder in which to store the new folder.
![]() Tap Back (
Tap Back (![]() ). This button shows the name of the previous folder; if the previous folder is the Bookmarks folder, it shows All.
). This button shows the name of the previous folder; if the previous folder is the Bookmarks folder, it shows All.
![]() Tap Done in the Bookmarks list.
Tap Done in the Bookmarks list.
Keep a Reading List of Web Pages
When you want to save a web page in its current state so you can read it later, use the Reading List feature in Safari. Reading List enables you to quickly save the current web page from the Share sheet.
Once you have added pages, you access Reading List through the Bookmarks feature. When viewing Reading List, you can display either all the pages it contains or only those you have not read.
Keep a Reading List of Web Pages

Add a Web Page to Reading List
![]() Press Home.
Press Home.
The Home screen appears.
![]() Tap Safari (
Tap Safari (![]() ).
).
Safari opens and displays the last web page you were viewing.
![]() Navigate to the web page you want to add to Reading List.
Navigate to the web page you want to add to Reading List.
![]() Tap Share (
Tap Share (![]() ).
).
The Share sheet appears.
![]() Tap Add to Reading List (
Tap Add to Reading List (![]() ).
).

The first time you tap Add to Reading List (![]() ), the Automaticaly Save Reading List Articles for Offline Reading? dialog opens.
), the Automaticaly Save Reading List Articles for Offline Reading? dialog opens.
![]() Tap Save Automatically or Don’t Save Automatically, as appropriate.
Tap Save Automatically or Don’t Save Automatically, as appropriate.
Safari adds the web page to Reading List.
Note: If you tap Save Automatically, Reading List stores the web page as it exists when you tap Add to Reading List, so when you return to the page, you see it exactly as it was when you stored it, and you can read the page offline. By contrast, if you tap Don’t Save Automatically or if you create a bookmark, when you return to the page you will see the current version of the web page, which may be completely different from the previous version. For example, when you return to a news site’s home page, you see the latest stories.

Open Reading List and Display a Page
![]() In Safari, tap Bookmarks (
In Safari, tap Bookmarks (![]() ).
).
The sidebar opens.
![]() Tap Reading List (
Tap Reading List (![]() ).
).
The Reading List tab appears.
![]() You can tap Show Unread to display only unread pages. You can tap Show All, which replaces Show Unread, to display all the pages in Reading List.
You can tap Show Unread to display only unread pages. You can tap Show All, which replaces Show Unread, to display all the pages in Reading List.
![]() Tap the page you want to open.
Tap the page you want to open.

![]() The page opens.
The page opens.
![]() You can tap Bookmarks (
You can tap Bookmarks (![]() ) to close the sidebar, or simply leave it open so that you can easily access other pages on your reading list.
) to close the sidebar, or simply leave it open so that you can easily access other pages on your reading list.
Fill In Forms Quickly with AutoFill
If you fill in forms using your iPad, you can save time and prevent typos by turning on the AutoFill feature. AutoFill can automatically fill in standard form fields, such as name and address fields, using the information from a contact card you specify. AutoFill can also store usernames and passwords to enter them for you automatically. If you want, you can also add one or more credit cards to AutoFill so that you can easily pay for items online.
Fill In Forms Quickly with AutoFill

![]() Press Home.
Press Home.
The Home screen appears.
![]() Tap Settings (
Tap Settings (![]() ).
).
The Settings screen appears.
![]() Tap Safari (
Tap Safari (![]() ).
).
The Safari screen appears.
![]() Tap AutoFill.
Tap AutoFill.

The AutoFill screen appears.
![]() Set the Use Contact Info switch to On (
Set the Use Contact Info switch to On (![]() ) if you want to use AutoFill with contact info.
) if you want to use AutoFill with contact info.
![]() Tap My Info to open the Contacts dialog, and then tap the appropriate contact card.
Tap My Info to open the Contacts dialog, and then tap the appropriate contact card.
![]() Set the Names and Passwords switch to On (
Set the Names and Passwords switch to On (![]() ) to use AutoFill for names and passwords.
) to use AutoFill for names and passwords.
![]() Set the Credit Cards switch to On (
Set the Credit Cards switch to On (![]() ) to enable storing credit card information.
) to enable storing credit card information.
![]() Tap Saved Credit Cards.
Tap Saved Credit Cards.

The Credit Cards screen appears.
![]() Tap Add Credit Card.
Tap Add Credit Card.
Note: The Description field in the Add Credit Card dialog is for your benefit. If you have multiple credit cards from the same issuer, give each card a clear description — for example, “Personal Account” or “Silver card with photo” — so you can distinguish them easily.

The Add Credit Card dialog opens.
![]() You can tap Use Camera and use your iPad’s camera to photograph and recognize your credit card details.
You can tap Use Camera and use your iPad’s camera to photograph and recognize your credit card details.
![]() Enter your credit card details.
Enter your credit card details.
![]() Tap Done.
Tap Done.
The Add Credit Card dialog closes, and the card appears on the Credit Cards screen.
![]() Tap AutoFill.
Tap AutoFill.
The AutoFill screen appears.
![]() Tap Safari (
Tap Safari (![]() ).
).
The Safari screen appears again.
Tighten Up Safari’s Security
To protect yourself against websites that try to infect computers with malevolent software — malware — or lure you into providing sensitive personal or financial information, you can turn on Safari’s Fraudulent Website Warning feature, which warns you of blacklisted sites. You may also want to turn off the JavaScript programming language, a potential threat. You can also block pop-up windows, which some websites use to display unwanted information; block all cookies if necessary; and turn on the Prevent Cross-Site Tracking feature and the Ask Websites Not to Track Me feature.
Tighten Up Safari’s Security

![]() Press Home.
Press Home.
The Home screen appears.
![]() Tap Settings (
Tap Settings (![]() ).
).
The Settings screen appears.
![]() Tap Safari (
Tap Safari (![]() ).
).
The Safari screen appears.
![]() Tap Quick Website Search and set the Quick Website Search switch to On (
Tap Quick Website Search and set the Quick Website Search switch to On (![]() ) to enable yourself to use partial website names — such as “wiki” for wikipedia.org or “apple” for “apple.com” — in your searches.
) to enable yourself to use partial website names — such as “wiki” for wikipedia.org or “apple” for “apple.com” — in your searches.
![]() Set the Preload Top Hit switch to On (
Set the Preload Top Hit switch to On (![]() ) if you want Safari to preload the first search result page so it will load quickly.
) if you want Safari to preload the first search result page so it will load quickly.
![]() Set the Block Pop-ups switch to On (
Set the Block Pop-ups switch to On (![]() ) to block unwanted pop-up windows.
) to block unwanted pop-up windows.

![]() Set the Prevent Cross-Site Tracking switch to On (
Set the Prevent Cross-Site Tracking switch to On (![]() ) to prevent your browsing being tracked from one site to another.
) to prevent your browsing being tracked from one site to another.
![]() You can set the Block All Cookies switch to On (
You can set the Block All Cookies switch to On (![]() ) if you want to block all cookies. See the tip for advice about cookies.
) if you want to block all cookies. See the tip for advice about cookies.
![]() Set the Ask Websites Not to Track Me switch to On (
Set the Ask Websites Not to Track Me switch to On (![]() ).
).
Note: Ask Websites Not to Track Me requests websites not to track you but cannot prevent tracking.
![]() Set the Fraudulent Website Warning switch to On (
Set the Fraudulent Website Warning switch to On (![]() ).
).
![]() You can set the Camera & Microphone Access switch to Off (
You can set the Camera & Microphone Access switch to Off (![]() ) to prevent websites from monitoring you via the camera and microphone.
) to prevent websites from monitoring you via the camera and microphone.

![]() To clear your browsing history, tap Clear History and Website Data.
To clear your browsing history, tap Clear History and Website Data.
The Clear History and Data dialog opens.
![]() Tap Clear.
Tap Clear.
![]() If you want to turn off JavaScript, tap Advanced.
If you want to turn off JavaScript, tap Advanced.

The Advanced screen appears.
![]() Set the JavaScript switch to Off (
Set the JavaScript switch to Off (![]() ) if you want to prevent websites from using JavaScript.
) if you want to prevent websites from using JavaScript.
![]() You can tap Website Data to display the Website Data screen, which lists the websites that have stored data on your iPad. Here, you can tap Edit to remove data for individual websites or tap Remove All Website Data to remove all website data in one move.
You can tap Website Data to display the Website Data screen, which lists the websites that have stored data on your iPad. Here, you can tap Edit to remove data for individual websites or tap Remove All Website Data to remove all website data in one move.
![]() Tap Safari (
Tap Safari (![]() ).
).
The Safari screen appears again.
Read Your E-Mail Messages
After you have set up Mail, either by adding your iCloud account or by setting up accounts manually on the iPad, as described in Chapter 4, you are ready to send and receive e-mail messages using your iPad.
This section shows you how to read your incoming e-mail messages. You learn how to reply to messages and write messages from scratch later in this chapter.
Read Your E-Mail Messages

![]() Press Home.
Press Home.
The Home screen appears.
![]() Tap Mail (
Tap Mail (![]() ).
).
The Mailboxes screen appears.
Note: If Mail does not show the Mailboxes screen, tap the button in the upper-left corner until the Mailboxes screen appears.
![]() Tap the inbox you want to see.
Tap the inbox you want to see.
![]() To see all your incoming messages together, tap All Inboxes. Depending on how you use e-mail, you may find seeing all your messages at once helpful.
To see all your incoming messages together, tap All Inboxes. Depending on how you use e-mail, you may find seeing all your messages at once helpful.

The inbox opens.
![]() A blue dot to the left of a message indicates that you have not read the message yet.
A blue dot to the left of a message indicates that you have not read the message yet.
![]() A star to the left of a message indicates the message is from a VIP. See the second tip for information about VIPs.
A star to the left of a message indicates the message is from a VIP. See the second tip for information about VIPs.
![]() Tap the message you want to display.
Tap the message you want to display.
The message appears.

![]() You can tap Filter (
You can tap Filter (![]() ) to filter the message as Unread. You can then tap Unread to display the Filter dialog, in which you can choose another means of filtering, such as Flagged or To:Me. Tap Done to close the Filter dialog.
) to filter the message as Unread. You can then tap Unread to display the Filter dialog, in which you can choose another means of filtering, such as Flagged or To:Me. Tap Done to close the Filter dialog.
![]() Tap another message you want to see.
Tap another message you want to see.
The message appears.
Note: If necessary, swipe up on the message to scroll down to see parts of the message that do not appear at first.

![]() If you want to delete the message, tap Delete (
If you want to delete the message, tap Delete (![]() ).
).
![]() If the Trash Message confirmation dialog opens, tap Trash Message.
If the Trash Message confirmation dialog opens, tap Trash Message.
Note: If you want to reply to the message, see the next section, “Reply To or Forward an E-Mail Message.” If you want to file the message in a folder, see the section “Organize Your Messages in Mailbox Folders,” later in this chapter.
Note: The badge on the Mail icon on the Home screen shows how many unread messages Mail has found so far.
Reply To or Forward an E-Mail Message
After receiving an e-mail message, you often need to reply to it. You can choose between replying only to the sender of the message and replying to the sender and all the other recipients in the To field and the Cc field, if there are any. Any recipients in the message’s Bcc field, whose names you cannot see, do not receive your reply. Other times, you may need to forward a message you have received to one or more other people.
Reply To or Forward an E-Mail Message

![]() Press Home.
Press Home.
The Home screen appears.
![]() Tap Mail (
Tap Mail (![]() ).
).
The Mailboxes screen appears.
Note: When you launch Mail, the app checks for new messages. This is why the number of new messages you see on the Mailboxes screen may differ from the number on the Mail badge on the Home screen.
![]() Tap the inbox you want to see.
Tap the inbox you want to see.

The inbox opens.
![]() Tap the message you want to open.
Tap the message you want to open.
![]() Tap Action (
Tap Action (![]() ).
).
Note: You can also reply to or forward a message by using Siri. For example, say “Reply to this message” or “Forward this message to Alice Smith,” and then tell Siri what you want the message to say.
![]() Tap Reply or Forward, as appropriate.
Tap Reply or Forward, as appropriate.
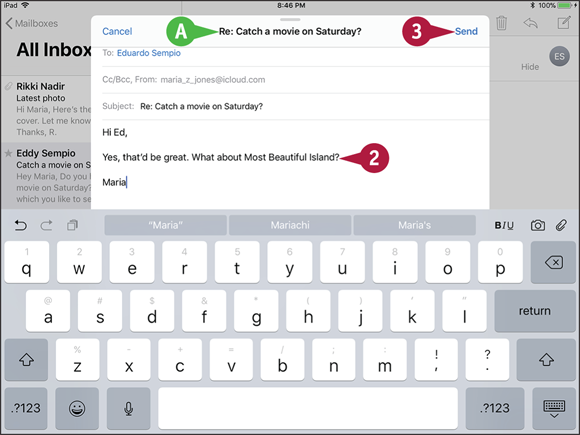
Reply To the Message
![]() In the Action menu, tap Reply.
In the Action menu, tap Reply.
Note: To reply to all recipients, tap Reply All. Reply to all recipients only when you are sure that they need to receive your reply. Often, it is better to reply only to the sender.
The reply message appears.
![]() Mail adds Re: before the subject to indicate that this is a reply.
Mail adds Re: before the subject to indicate that this is a reply.
![]() Type your reply to the message.
Type your reply to the message.
![]() Tap Send.
Tap Send.
Mail sends the message.

Forward the Message
![]() In the Action menu, tap Forward.
In the Action menu, tap Forward.
The forwarded message appears.
![]() Mail adds Fwd: before the subject to indicate that this is a forwarded message.
Mail adds Fwd: before the subject to indicate that this is a forwarded message.
![]() Type the recipient’s name or address.
Type the recipient’s name or address.
Alternatively, tap Add Contact (![]() ) and choose the recipient in the Contacts dialog.
) and choose the recipient in the Contacts dialog.
![]() Type a message if needed.
Type a message if needed.
![]() Tap Send.
Tap Send.
Mail sends the message.
Organize Your Messages in Mailbox Folders
To keep your inbox or inboxes under control, you should organize your messages into mailbox folders.
You can quickly move a single message to a folder after reading it, or you can select multiple messages in your inbox and move them all to a folder in a single action.
Organize Your Messages in Mailbox Folders

Move a Single Message to a Folder
![]() Press Home.
Press Home.
The Home screen appears.
![]() Tap Mail (
Tap Mail (![]() ).
).
The Mailboxes screen appears.
![]() Tap the inbox you want to see.
Tap the inbox you want to see.
The inbox opens.
![]() Tap the message you want to move.
Tap the message you want to move.
The message opens.
![]() Tap Move (
Tap Move (![]() ).
).

The list of folders appears in the left pane.
![]() Tap the folder you want to move the message to.
Tap the folder you want to move the message to.
Mail moves the message.
The next message in the inbox appears, so that you can read it and file it if necessary.

Move Multiple Messages to a Folder
![]() In the inbox or another mail folder, tap Edit.
In the inbox or another mail folder, tap Edit.
Note: Mail tries to guess where you will want to move a message, based on your previous activity. If Mail suggests the right folder, you can tap its name; if not, tap Other and then tap the appropriate folder. Mail’s guesses become more accurate over time.

An empty selection button appears to the left of each message, and the Mark button, Move button, and Trash button appear.
![]() Tap the selection button (
Tap the selection button (![]() changes to (
changes to (![]() ) next to each message you want to move.
) next to each message you want to move.
![]() Mail displays the selected messages as a stack.
Mail displays the selected messages as a stack.
![]() Tap Move.
Tap Move.
The list of folders appears in the left pane.
![]() Tap the folder you want to move the messages to.
Tap the folder you want to move the messages to.
Mail moves the messages.
Your inbox then appears again, so that you can work with other messages.
Write and Send E-Mail Messages
Your iPad is great for reading and replying to e-mail messages you receive, but you will likely also need to write new messages. When you do, you can use the data in the Contacts app to address your outgoing messages quickly and accurately. If the recipient’s address is not one of your contacts, you can type the address manually.
You can attach one or more files to an e-mail message to send those files to the recipient. This works well for small files, but many mail servers reject files larger than several megabytes in size.
Write and Send E-Mail Messages

![]() Press Home.
Press Home.
The Home screen appears.
![]() Tap Mail (
Tap Mail (![]() ).
).
The Mailboxes screen appears.
![]() Tap New Message (
Tap New Message (![]() ).
).

The New Message dialog opens.
![]() If you have set up a signature for this account, Mail inserts the signature at the end of the new message.
If you have set up a signature for this account, Mail inserts the signature at the end of the new message.
![]() Tap Add Contact (
Tap Add Contact (![]() ).
).
The Contacts dialog opens.
Note: You can change the Contacts list displayed by tapping Groups, making your choice in the Groups dialog, and then tapping Done.
![]() If the person you are e-mailing is not a contact, type the address in the To field. You can also start typing here and then select a matching contact from the list that the Mail app displays.
If the person you are e-mailing is not a contact, type the address in the To field. You can also start typing here and then select a matching contact from the list that the Mail app displays.
![]() Tap the contact.
Tap the contact.

![]() The contact’s name appears in the To field.
The contact’s name appears in the To field.
Note: You can add other contacts to the To field by repeating steps 4 and 5.
![]() If you need to add a Cc or Bcc recipient, tap Cc/Bcc, From.
If you need to add a Cc or Bcc recipient, tap Cc/Bcc, From.
The Cc, Bcc, and From fields expand.
![]() Tap the Cc field or Bcc field, and then follow steps 4 and 5 to add a recipient.
Tap the Cc field or Bcc field, and then follow steps 4 and 5 to add a recipient.
![]() To change the e-mail account you are sending the message from, tap From, and then tap the account to use.
To change the e-mail account you are sending the message from, tap From, and then tap the account to use.
![]() To receive notifications for replies to this e-mail thread, tap Subject, tap Notify (
To receive notifications for replies to this e-mail thread, tap Subject, tap Notify (![]() ), and then tap Notify Me (
), and then tap Notify Me (![]() changes to
changes to ![]() ).
).

![]() Tap Subject, and then type the message’s subject.
Tap Subject, and then type the message’s subject.
![]() Tap below the Subject line, and then type the body of the message.
Tap below the Subject line, and then type the body of the message.
![]() Tap Send.
Tap Send.
Mail sends the message.
View Files Attached to Incoming Messages
E-mail is not just a great way to communicate; you can also use it to transfer files quickly and easily. When you receive an e-mail message with a file attached to it, you can often quickly view the file from the Mail app. After viewing the file, you can choose the app in which you want to open the file.
View Files Attached to Incoming Messages

![]() Press Home.
Press Home.
The Home screen appears.
![]() Tap Mail (
Tap Mail (![]() ).
).
The Mailboxes screen appears.
![]() Tap the appropriate inbox.
Tap the appropriate inbox.
The inbox opens.
![]() A paper clip icon (
A paper clip icon (![]() ) indicates an attachment.
) indicates an attachment.
![]() Tap the message.
Tap the message.
The message opens.
![]() Tap the attachment’s button.
Tap the attachment’s button.
Note: If you want to open the attachment in a particular app without first viewing it in the Viewer, tap and hold the attachment’s button to display the Share sheet, then tap the app you want to use.

The attached file opens in Mail’s Viewer feature.
Note: The Viewer feature provides basic tools for viewing widely used document types, such as PDF files, Microsoft Word documents, and Microsoft Excel workbooks. If the Viewer app cannot open a file, your iPad suggests a suitable app if it has one.
![]() You can tap Instant Markup (
You can tap Instant Markup (![]() ) to mark up the attached file.
) to mark up the attached file.
![]() Tap Share (
Tap Share (![]() ).
).

The Share sheet opens.
Note: The options on the Share sheet vary depending on the file type and the apps installed on your iPad.
![]() Tap the app in which you want to open the document. For example, tap Copy to iBooks (
Tap the app in which you want to open the document. For example, tap Copy to iBooks (![]() ).
).

![]() The file opens in the app you chose.
The file opens in the app you chose.
Note: After you open an attached file in an app, your iPad stores a copy of the file in that app’s storage. You can then open the file again directly from that app.
![]() Tap Mail (
Tap Mail (![]() ) when you want to return to the Mail app.
) when you want to return to the Mail app.