Chapter 2
Personalizing Your iPad

In this chapter, you learn how to control notifications, audio preferences, screen brightness, and other key iPad behaviors.
Choose Which Apps Can Give Notifications
Configure Display, Brightness, and Night Shift
Set Home Screen and Lock Screen Wallpaper
Choose Privacy and Location Settings
Configure Search and Find What You Need
Choose Locking and Control Center Settings
Set Up and Use Do Not Disturb Mode
Secure Your iPad with Touch ID or a Passcode
Configure Restrictions and Parental Controls
Find the Settings You Need
To configure your iPad, you work with its settings using the Settings app. This app contains settings for the iPad system software, the apps the iPad includes, and third-party apps you have added.
To reach the settings, you first display the Settings screen, and then display the category of settings you want to configure. In this section, you learn how to open the Settings screen to display the main categories of settings it contains.
Find the Settings You Need

Display the Settings Screen
![]() Press Home.
Press Home.
The Home screen appears.
![]() Tap Settings (
Tap Settings (![]() ).
).
![]() You can also tap Settings (
You can also tap Settings (![]() ) on the Dock.
) on the Dock.

The Settings screen appears.
![]() You can tap Search (
You can tap Search (![]() ) and type a keyword to search for the setting you need. You may need to swipe your finger down the left column, scrolling the column up, to display the Settings box.
) and type a keyword to search for the setting you need. You may need to swipe your finger down the left column, scrolling the column up, to display the Settings box.
![]() Tap in the left column and drag up to scroll down the screen to locate the settings category you need.
Tap in the left column and drag up to scroll down the screen to locate the settings category you need.

Display a Settings Screen
![]() In the left column on the Settings screen, tap the button for the settings you want to display. For example, tap Display & Brightness (
In the left column on the Settings screen, tap the button for the settings you want to display. For example, tap Display & Brightness (![]() ) to show the Display & Brightness screen.
) to show the Display & Brightness screen.
![]() Tap a button that has > at its right end to display another screen of settings.
Tap a button that has > at its right end to display another screen of settings.
![]() Set a switch to On (
Set a switch to On (![]() ) or Off (
) or Off (![]() ) to enable or disable a setting.
) to enable or disable a setting.

Display the Settings for an App
![]() On the Settings screen, tap and drag up the left column to scroll down the screen.
On the Settings screen, tap and drag up the left column to scroll down the screen.
![]() Tap the button for the app whose settings you want to display. For example, tap iBooks (
Tap the button for the app whose settings you want to display. For example, tap iBooks (![]() ) to display the settings for the iBooks app.
) to display the settings for the iBooks app.
![]() When you finish using the Settings app, press Home.
When you finish using the Settings app, press Home.
The Home screen appears again.
Set Up and Configure iCloud
Apple’s iCloud service enables you to sync items such as your e-mail, contacts, calendars and reminders, Safari bookmarks, photos, and documents and data online. You can also use the Find My iPad feature to locate your iPad when it goes missing.
To use iCloud, you set your iPad to use your Apple ID, and then choose which features to use. If you set up your iPad using iCloud, your account is already active, but you may want to choose different settings for iCloud.
Set Up and Configure iCloud

![]() Press Home.
Press Home.
The Home screen appears.
![]() Tap Settings (
Tap Settings (![]() ).
).
The Settings screen appears.
![]() Tap Sign in to your iPad.
Tap Sign in to your iPad.
The Sign In dialog opens.
![]() Type your Apple ID.
Type your Apple ID.
![]() If you do not yet have an Apple ID, tap Don’t have an Apple ID or forgot it?, and then follow the prompts.
If you do not yet have an Apple ID, tap Don’t have an Apple ID or forgot it?, and then follow the prompts.
![]() Type your password.
Type your password.
![]() Tap Sign In.
Tap Sign In.

Your iPad starts signing in to iCloud.
If your Apple ID uses two-step verification, as Apple and security experts recommend, the Apple ID Verification Code dialog opens.
![]() Type the six-digit code sent to the iOS device or Mac you use for verification.
Type the six-digit code sent to the iOS device or Mac you use for verification.
The iPad completes the sign-in process.
Note: When you sign into iCloud, iOS automatically enables Find My iPad, enabling you to locate your iPad by signing in to your account on the iCloud website, www.icloud.com. See the section “Locate Your iPad with Find My iPad” in Chapter 12 for details.

The Apple ID screen appears.
![]() You can tap Name, Phone Numbers, Email to change your contact information.
You can tap Name, Phone Numbers, Email to change your contact information.
![]() You can tap Password & Security to change your security details.
You can tap Password & Security to change your security details.
![]() You can tap Payment & Shipping to change your payment and shipping options.
You can tap Payment & Shipping to change your payment and shipping options.
![]() You can tap Family Sharing (
You can tap Family Sharing (![]() ) to configure sharing. See the section “Set Up Family Sharing and Add Members,” later in this chapter, for details.
) to configure sharing. See the section “Set Up Family Sharing and Add Members,” later in this chapter, for details.
![]() Tap iCloud (
Tap iCloud (![]() ).
).

The iCloud screen appears.
![]() The Storage readout shows how much iCloud storage you have and how much is in use.
The Storage readout shows how much iCloud storage you have and how much is in use.
![]() In the Apps Using iCloud list, set each app’s switch to On (
In the Apps Using iCloud list, set each app’s switch to On (![]() ) or Off (
) or Off (![]() ), as needed, to control which apps can use iCloud.
), as needed, to control which apps can use iCloud.
![]() Tap Photos (
Tap Photos (![]() ).
).
On the Photos screen in iCloud Settings, you can choose to store your entire photo library in iCloud so that you can access your photos and videos from all your devices. You can also decide whether to upload photos automatically, whether to upload bursts of photos, and whether to share photos with other people via iCloud Photo Sharing.
Your other options include iCloud Keychain, which gives you a secure way to store passwords and credit card information across your Apple devices.

The Photos screen appears.
![]() Set the iCloud Photo Library switch to On (
Set the iCloud Photo Library switch to On (![]() ) to upload all your photos to iCloud.
) to upload all your photos to iCloud.
![]() Tap Optimize iPad Storage to store lower-resolution versions of photos on your iPad to save space. Tap Download and Keep Originals if you prefer to keep original, full-quality photos on your iPad.
Tap Optimize iPad Storage to store lower-resolution versions of photos on your iPad to save space. Tap Download and Keep Originals if you prefer to keep original, full-quality photos on your iPad.
![]() Set the Upload to My Photo Stream switch to On (
Set the Upload to My Photo Stream switch to On (![]() ) to use Photo Stream.
) to use Photo Stream.
![]() Set the Upload Burst Photos switch to On (
Set the Upload Burst Photos switch to On (![]() ) to upload bursts you have shot.
) to upload bursts you have shot.
![]() Set the iCloud Photo Sharing switch to On (
Set the iCloud Photo Sharing switch to On (![]() ) to enable album sharing with other people.
) to enable album sharing with other people.
![]() Tap iCloud (
Tap iCloud (![]() ).
).

The iCloud screen appears again.
![]() Toward the bottom of the screen, set the iCloud Drive switch to On (
Toward the bottom of the screen, set the iCloud Drive switch to On (![]() ) to enable iCloud Drive.
) to enable iCloud Drive.
![]() In the lower part of the screen, set each app’s switch to On (
In the lower part of the screen, set each app’s switch to On (![]() ) or Off (
) or Off (![]() ) to control which apps can use iCloud.
) to control which apps can use iCloud.
![]() You can tap Keychain (
You can tap Keychain (![]() ) to display the Keychain screen, on which you can enable or disable iCloud Keychain.
) to display the Keychain screen, on which you can enable or disable iCloud Keychain.
![]() Tap Find My iPad (
Tap Find My iPad (![]() ).
).

The Find My iPad screen appears.
![]() You can set the Find My iPad switch to Off (
You can set the Find My iPad switch to Off (![]() changes to
changes to ![]() ) to turn off Find My iPad, such as when preparing to erase the iPad so that you can sell it.
) to turn off Find My iPad, such as when preparing to erase the iPad so that you can sell it.
![]() Set the Send Last Location switch to On (
Set the Send Last Location switch to On (![]() ) if you want the iPad to send Apple its location when the battery runs critically low.
) if you want the iPad to send Apple its location when the battery runs critically low.
![]() Tap iCloud (
Tap iCloud (![]() ).
).
The iCloud screen appears again.
![]() Tap iCloud Backup (
Tap iCloud Backup (![]() ).
).

The Backup screen appears.
![]() Set the iCloud Backup switch to On (
Set the iCloud Backup switch to On (![]() ).
).
![]() You can tap Back Up Now to start a backup immediately.
You can tap Back Up Now to start a backup immediately.
![]() Tap iCloud (
Tap iCloud (![]() ).
).
The iCloud screen appears again.
Choose Which Apps Can Give Notifications
Many apps can notify you when events occur, such as a message arriving for you in the Messages app. You can choose which apps give notifications for events and which events those notifications concern. You can also control notification previews and choose which notifications appear on Cover Sheet, the iOS screen for current notifications, and in History, which contains older notifications.
iOS apps use three types of notifications: badges on app icons, temporary banners, and persistent banners. See the tip for details.
Choose Which Apps Can Give Notifications

![]() Press Home.
Press Home.
The Home screen appears.
![]() Tap Settings (
Tap Settings (![]() ).
).
The Settings screen appears.
![]() Tap Notifications (
Tap Notifications (![]() ).
).
The Notifications screen appears.
![]() To choose your default setting for notification previews, tap Show Previews, and then tap Always, When Unlocked, or Never, as needed.
To choose your default setting for notification previews, tap Show Previews, and then tap Always, When Unlocked, or Never, as needed.
![]() In the Notification Style list, tap the app for which you want to configure notifications. This example uses Messages (
In the Notification Style list, tap the app for which you want to configure notifications. This example uses Messages (![]() ).
).

The screen for the app appears.
![]() Set the Allow Notifications switch to On (
Set the Allow Notifications switch to On (![]() ) to receive notifications from the app.
) to receive notifications from the app.
![]() Set the Badge App Icon switch to On (
Set the Badge App Icon switch to On (![]() ) or Off (
) or Off (![]() ), as needed.
), as needed.
![]() Set the Show on Cover Sheet switch to On (
Set the Show on Cover Sheet switch to On (![]() ) or Off (
) or Off (![]() ), as needed.
), as needed.
![]() Set the Show in History switch to On (
Set the Show in History switch to On (![]() ) or Off (
) or Off (![]() ), as needed.
), as needed.
![]() To have notifications appear as banners, set the Show as Banners switch to On (
To have notifications appear as banners, set the Show as Banners switch to On (![]() ), then tap Temporary or Persistent, as appropriate.
), then tap Temporary or Persistent, as appropriate.
![]() To exempt this app from your default preview setting, tap Show Previews, and then tap Always, When Unlocked, or Never.
To exempt this app from your default preview setting, tap Show Previews, and then tap Always, When Unlocked, or Never.
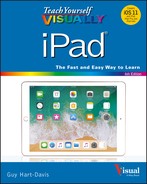
![]() Tap Sounds.
Tap Sounds.
The Sounds screen appears.
![]() Tap the sound you want to hear for the notification.
Tap the sound you want to hear for the notification.
![]() You can tap None for no sound.
You can tap None for no sound.
![]() You can tap Tone Store to browse and buy tones.
You can tap Tone Store to browse and buy tones.
Note: Scroll down the Sounds screen to display the list of ringtones. Tap Classic, at the bottom of the Alert Tones list or at the bottom of the Ringtones list, to see the selection of alert tones or ringtones from early versions of iOS.
![]() Tap the Back button (
Tap the Back button (![]() ) — in this case, the Messages button.
) — in this case, the Messages button.
The screen for the app appears again.
![]() Tap Repeat Alerts.
Tap Repeat Alerts.

The Repeat Alerts screen appears.
![]() Tap the repetition frequency you want, such as Twice.
Tap the repetition frequency you want, such as Twice.
![]() Tap the Back button (
Tap the Back button (![]() ) — in this case, the Messages button.
) — in this case, the Messages button.
The screen for the app appears again.
Choose Sounds Settings
To control how your iPad gives you audio feedback, choose settings on the Sounds screen. Here, you can set the volume for the ringer and for alerts, choose your default ringtone for FaceTime and text tone for Messages, and choose whether to receive alerts for calendar items and reminders.
Playing lock sounds helps confirm that you have locked or unlocked your iPad as you intended. Playing keyboard clicks confirms each key press on the on-screen keyboard.
Choose Sounds Settings

![]() Press Home.
Press Home.
The Home screen appears.
![]() Tap Settings (
Tap Settings (![]() ).
).

The Settings screen appears.
![]() Tap Sounds (
Tap Sounds (![]() ).
).
The Sounds screen appears.
![]() Drag the Ringer and Alerts slider to set the volume.
Drag the Ringer and Alerts slider to set the volume.
![]() Set the Change with Buttons switch to On (
Set the Change with Buttons switch to On (![]() ) if you want to be able to change the Ringer and Alerts volume by pressing the volume buttons on the side of the iPad.
) if you want to be able to change the Ringer and Alerts volume by pressing the volume buttons on the side of the iPad.
![]() Tap Ringtone.
Tap Ringtone.

The Ringtone screen appears.
![]() Tap the ringtone you want to hear for FaceTime calls.
Tap the ringtone you want to hear for FaceTime calls.
Your iPad plays the ringtone so you can decide whether to use it.
![]() You can tap Tone Store to buy extra ringtones or alert tones.
You can tap Tone Store to buy extra ringtones or alert tones.
Note: Scroll down the Ringtone screen to display the list of alert tones. Tap Classic, at the bottom of the Ringtones list or the Alert Tones list, to see the selection of ringtones or alert tones from early versions of iOS.
![]() Tap Sounds (
Tap Sounds (![]() ).
).

The Sounds screen appears again.
![]() Repeat steps 6 to 8 to set other tones, such as text tones.
Repeat steps 6 to 8 to set other tones, such as text tones.
![]() Set the Keyboard Clicks switch to On (
Set the Keyboard Clicks switch to On (![]() ) or Off (
) or Off (![]() ), as needed.
), as needed.
![]() Set the Lock Sound switch to On (
Set the Lock Sound switch to On (![]() ) or Off (
) or Off (![]() ), as needed.
), as needed.
Configure Display, Brightness, and Night Shift
To make the screen easy to see, you can change its brightness. You can let the iPad’s Auto-Brightness feature automatically set the screen’s brightness based on ambient light. You can enable the Night Shift feature to reduce the screen’s output of blue light, which can disrupt your sleep.
To make text on the screen easier to read, you can increase or decrease the text size as needed. You can also turn on the Bold Text setting and adjust the Display Zoom setting.
Configure Display, Brightness, and Night Shift
![]() Press Home.
Press Home.
The Home screen appears.
![]() Tap Settings (
Tap Settings (![]() ).
).
The Settings screen appears.
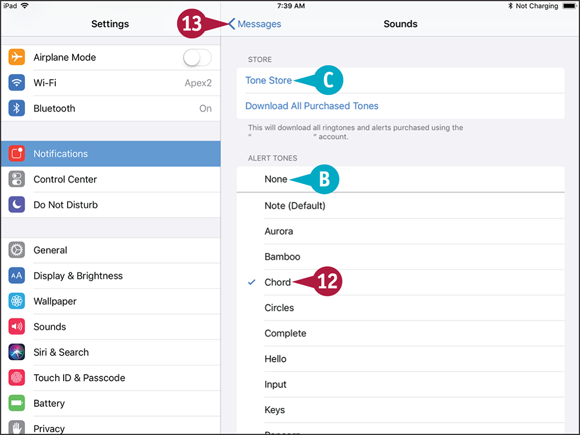
![]() Tap Display & Brightness (
Tap Display & Brightness (![]() ).
).
The Display & Brightness screen appears.
![]() Drag the Brightness slider left or right to set brightness.
Drag the Brightness slider left or right to set brightness.
![]() Set the Auto-Brightness switch to On (
Set the Auto-Brightness switch to On (![]() ) or Off (
) or Off (![]() ), as needed.
), as needed.
![]() Tap Night Shift.
Tap Night Shift.

The Night Shift screen appears.
![]() Set the Scheduled switch to On (
Set the Scheduled switch to On (![]() ) to run Night Shift each night.
) to run Night Shift each night.
![]() Tap From, To to display the Schedule screen. In the Automate Schedule box, either tap Sunset to Sunrise or tap Custom Schedule. If you tap Custom Schedule, tap Turn On At and set the start time, then tap Turn Off At and set the end time. Tap Night Shift (
Tap From, To to display the Schedule screen. In the Automate Schedule box, either tap Sunset to Sunrise or tap Custom Schedule. If you tap Custom Schedule, tap Turn On At and set the start time, then tap Turn Off At and set the end time. Tap Night Shift (![]() ) to return to the Night Shift screen.
) to return to the Night Shift screen.
![]() Drag the Color Temperature slider along the Less Warm–More Warm axis to set the color temperature.
Drag the Color Temperature slider along the Less Warm–More Warm axis to set the color temperature.
![]() Tap Display & Brightness (
Tap Display & Brightness (![]() ).
).

The Display & Brightness screen appears again.
![]() Tap Text Size to display the Text Size screen, drag the slider left or right to adjust the text size, and then tap Display & Brightness (
Tap Text Size to display the Text Size screen, drag the slider left or right to adjust the text size, and then tap Display & Brightness (![]() ) to return to the Display & Brightness screen.
) to return to the Display & Brightness screen.
Note: Adjusting the text size works only for apps that support the Dynamic Type feature, not for all apps.
![]() If you want to use bold text, set the Bold Text switch to On (
If you want to use bold text, set the Bold Text switch to On (![]() ) and tap Continue in the Applying This Setting Will Restart Your iPad dialog.
) and tap Continue in the Applying This Setting Will Restart Your iPad dialog.
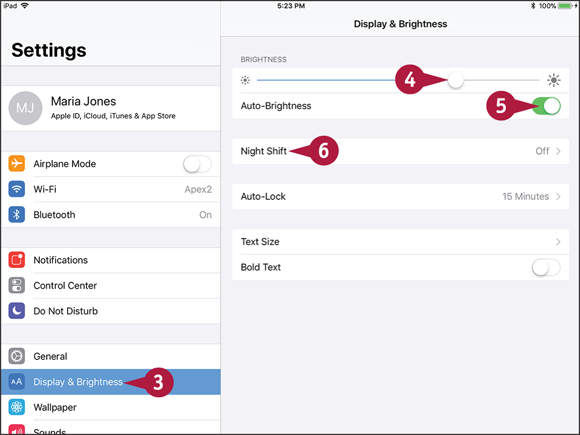
![]() Tap View.
Tap View.
The Display Zoom dialog opens.
![]() Tap Standard or Zoomed, as needed.
Tap Standard or Zoomed, as needed.
Note: You can swipe left once or twice to view other example previews.
![]() If you change the display zoom, tap Set, and then tap Use Standard in the Use Standard? dialog or tap Use Zoomed in the Use Zoomed? dialog to effect the change.
If you change the display zoom, tap Set, and then tap Use Standard in the Use Standard? dialog or tap Use Zoomed in the Use Zoomed? dialog to effect the change.
Set Home Screen and Lock Screen Wallpaper
You can choose which picture to use as the wallpaper that appears in the background. You can use either a static wallpaper or a dynamic, changing wallpaper. You can set different wallpaper for the lock screen — the screen you see when the iPad is locked — and for the Home screen.
When setting the wallpaper, you can choose whether to turn perspective zoom on or off. Perspective zoom gives the three-dimensional effect when you tilt the iPad when looking at the wallpaper.
Set Home Screen and Lock Screen Wallpaper

![]() Press Home.
Press Home.
The Home screen appears.
![]() Tap Settings (
Tap Settings (![]() ).
).
The Settings screen appears.
![]() Tap Wallpaper (
Tap Wallpaper (![]() ).
).
The Wallpaper screen appears.
![]() Tap Choose a New Wallpaper.
Tap Choose a New Wallpaper.

The Choose screen appears.
![]() At the top of the screen, tap Dynamic or Stills. This example uses Stills.
At the top of the screen, tap Dynamic or Stills. This example uses Stills.

![]() To choose a picture from a different picture category, tap that category. For example, tap All Photos to display pictures you have taken with the iPad camera or saved from e-mail messages, multimedia messages, or web pages.
To choose a picture from a different picture category, tap that category. For example, tap All Photos to display pictures you have taken with the iPad camera or saved from e-mail messages, multimedia messages, or web pages.
The Wallpaper screen appears.
![]() Tap the wallpaper you want.
Tap the wallpaper you want.

The Wallpaper Preview screen appears.
![]() Tap Perspective Zoom: On or Perspective Zoom: Off to toggle the perspective zoom on or off.
Tap Perspective Zoom: On or Perspective Zoom: Off to toggle the perspective zoom on or off.
![]() Tap Set Lock Screen, Set Home Screen, or Set Both.
Tap Set Lock Screen, Set Home Screen, or Set Both.
The Wallpaper screen appears.
![]() Tap Choose (
Tap Choose (![]() ).
).
The Choose screen appears.
![]() Tap Wallpaper (
Tap Wallpaper (![]() ).
).
The Wallpaper screen appears.
Note: To see the wallpaper, press Home to display the Home screen or press the Sleep/Wake button twice to display the lock screen.
Choose Privacy and Location Settings
Your iPad contains a huge amount of information about you, the people you communicate with, what you do, and where you go. To keep this information safe, you need to choose suitable privacy and location settings.
Privacy settings enable you to control which apps may access your contacts, calendars, reminders, and photos. You can also choose which apps can use location services, which track your iPad’s location using known wireless networks and the Global Positioning System, or GPS, on cellular iPads.
Choose Privacy and Location Settings

![]() Press Home.
Press Home.
The Home screen appears.
![]() Tap Settings (
Tap Settings (![]() ).
).
The Settings screen appears.
![]() Tap Privacy (
Tap Privacy (![]() ).
).
The Privacy screen appears.
![]() Tap Location Services (
Tap Location Services (![]() ).
).
Note: To minimize advertisers tracking you, tap Advertising at the bottom of the Privacy screen and set the Limit Ad Tracking switch to On (![]() ). Then tap Reset Advertising Identifier and tap Reset Identifier in the confirmation dialog.
). Then tap Reset Advertising Identifier and tap Reset Identifier in the confirmation dialog.

The Location Services screen appears.
![]() If you need to turn location services off completely, set the Location Services switch to Off (
If you need to turn location services off completely, set the Location Services switch to Off (![]() ).
).
![]() To control location sharing, tap Share My Location. On the Share My Location screen, set the Share My Location switch to On (
To control location sharing, tap Share My Location. On the Share My Location screen, set the Share My Location switch to On (![]() ) or Off (
) or Off (![]() ), as needed. If you set it to On, tap From and choose the sharing device on the Share Location From screen.
), as needed. If you set it to On, tap From and choose the sharing device on the Share Location From screen.
![]() Tap an app or feature. This example uses Camera.
Tap an app or feature. This example uses Camera.

The screen for the app or feature appears.
![]() In the Allow Location Access list, tap the appropriate button, such as Never or While Using the App.
In the Allow Location Access list, tap the appropriate button, such as Never or While Using the App.
![]() Tap Location Services (
Tap Location Services (![]() ).
).
The Location Services screen appears.
![]() Tap System Services.
Tap System Services.
Note: For privacy, you may want to set the Location-Based Alerts switch, the Location-Based Apple Ads switch, and the Location-Based Suggestions switch on the System Services screen to Off (![]() ).
).
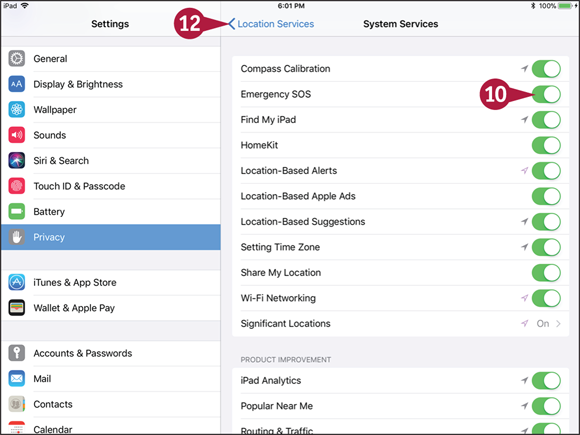
The System Services screen appears.
![]() Set the switch for each system service to On (
Set the switch for each system service to On (![]() ) or Off (
) or Off (![]() ).
).
![]() Set the Status Bar Icon switch to On (
Set the Status Bar Icon switch to On (![]() ) to display an arrow in the status bar when the iPad is being tracked.
) to display an arrow in the status bar when the iPad is being tracked.
![]() Tap Location Services (
Tap Location Services (![]() ).
).
The Location Services screen appears.
![]() Tap Privacy.
Tap Privacy.
The Privacy screen appears.
![]() Tap each app or service and choose the apps that can access that app’s information.
Tap each app or service and choose the apps that can access that app’s information.
Configure Search and Find What You Need
Your iPad can put a huge amount of data in your hand, and you may often have to search to find what you need. To make your search results more accurate and helpful, you can configure the Search feature on your iPad.
You can enable or disable suggestions from Siri, the search assistant. You can also turn off searching for items you do not want to see in your search results.
Configure Search and Find What You Need
Configure Search

![]() Press Home.
Press Home.
The Home screen appears.
![]() Tap Settings (
Tap Settings (![]() ).
).
The Settings screen appears.
![]() Tap Siri & Search (
Tap Siri & Search (![]() ).
).
The Siri & Search screen appears.
![]() Set the Suggestions in Search switch to On (
Set the Suggestions in Search switch to On (![]() ) to see Search suggestions when you search.
) to see Search suggestions when you search.
![]() Set the Suggestions in Look Up switch to On (
Set the Suggestions in Look Up switch to On (![]() ) to see Search suggestions when you use Look Up.
) to see Search suggestions when you use Look Up.
![]() Tap the button for the app you want to configure. This example uses Calendar (
Tap the button for the app you want to configure. This example uses Calendar (![]() ).
).

The screen for that app appears.
![]() Set the Search & Siri Suggestions switch to On (
Set the Search & Siri Suggestions switch to On (![]() ) if you want Calendar content to appear in Search and Look Up and for Siri to access your Calendar data.
) if you want Calendar content to appear in Search and Look Up and for Siri to access your Calendar data.
![]() Set the Find Events in Other Apps switch to On (
Set the Find Events in Other Apps switch to On (![]() ) if you want iOS to try to identify events.
) if you want iOS to try to identify events.
Note: The Find in Other Apps switch appears for only some apps. Its name varies depending on the app. For example, the Find Contacts in Other Apps switch appears for the Contacts app.
![]() Tap Siri & Search (
Tap Siri & Search (![]() ).
).
The Siri & Search screen appears again, and you can configure other apps.

Search for Items
![]() Press Home.
Press Home.
The Home screen appears.
![]() Draw your finger down the screen a short way.
Draw your finger down the screen a short way.

The Search screen appears.
![]() Tap in the Search field.
Tap in the Search field.
The keyboard appears.
![]() Type your search term.
Type your search term.
A list of results appears.
![]() You can tap a suggested search to perform that search.
You can tap a suggested search to perform that search.
![]() Tap the result you want to view.
Tap the result you want to view.
Choose Locking and Control Center Settings
To avoid unintentional taps on the screen, your iPad automatically locks itself after a period of inactivity. After locking itself, your iPad turns off its screen and goes to sleep to save battery power.
You can choose how long your iPad waits before locking itself. You may prefer to leave your iPad on longer so that you can continue working, and then lock your iPad manually. You can also choose which controls appear in Control Center and customize their order.
Choose Locking and Control Center Settings

![]() Press Home.
Press Home.
The Home screen appears.
![]() Tap Settings (
Tap Settings (![]() ).
).
The Settings screen appears.
![]() Tap Display & Brightness (
Tap Display & Brightness (![]() ).
).
The Display & Brightness screen appears.
![]() Tap Auto-Lock.
Tap Auto-Lock.

The Auto-Lock screen appears.
![]() Tap the interval — for example, 5 Minutes.
Tap the interval — for example, 5 Minutes.
Note: Choose the Never setting for Auto-Lock if you need to make sure the iPad never goes to sleep. For example, if you are playing music with the lyrics displayed, turning off auto-locking may be helpful.
![]() Tap Control Center (
Tap Control Center (![]() ).
).

The Control Center screen appears.
![]() Tap Customize Controls.
Tap Customize Controls.

The Customize screen appears.
![]() The Include section shows current controls you can remove.
The Include section shows current controls you can remove.
![]() The More Controls section shows controls you can add.
The More Controls section shows controls you can add.
![]() To remove a control from Control Center, tap Remove (
To remove a control from Control Center, tap Remove (![]() ), and then tap the textual Remove button that appears.
), and then tap the textual Remove button that appears.
![]() To change the order, drag a control by its handle (
To change the order, drag a control by its handle (![]() ).
).
![]() To add a control to Control Center, tap Add (
To add a control to Control Center, tap Add (![]() ).
).
![]() Tap Control Center (
Tap Control Center (![]() ).
).
The Control Center screen appears again.
Set Up and Use Do Not Disturb Mode
When you do not want your iPad to disturb you, turn on Do Not Disturb Mode. You can configure Do Not Disturb Mode to turn on and off automatically at set times each day; you can also turn Do Not Disturb Mode on and off manually. You can allow particular groups of contacts to bypass Do Not Disturb Mode. You can also allow repeated calls to ring when Do Not Disturb is on.
Set Up and Use Do Not Disturb Mode

Configure Do Not Disturb Mode
![]() Press Home.
Press Home.
The Home screen appears.
![]() Tap Settings (
Tap Settings (![]() ).
).
The Settings screen appears.
![]() Tap Do Not Disturb (
Tap Do Not Disturb (![]() ).
).
The Do Not Disturb screen appears.
![]() To schedule regular quiet hours, set the Scheduled switch to On (
To schedule regular quiet hours, set the Scheduled switch to On (![]() ).
).
![]() Tap From, To.
Tap From, To.
The Quiet Hours dialog opens.
![]() Tap From.
Tap From.
![]() Set the From time.
Set the From time.
![]() Tap To.
Tap To.
![]() Set the To time.
Set the To time.
![]() Tap Allow Calls From.
Tap Allow Calls From.

The Allow Calls From screen appears.
![]() Tap the group you will allow to call you via FaceTime during quiet hours.
Tap the group you will allow to call you via FaceTime during quiet hours.
![]() Tap Do Not Disturb (
Tap Do Not Disturb (![]() ).
).

The Do Not Disturb screen appears again.
![]() You can set the Manual switch to On (
You can set the Manual switch to On (![]() ) to turn on Do Not Disturb Mode from this screen. It is usually easier to use Control Center to toggle Do Not Disturb Mode on and off.
) to turn on Do Not Disturb Mode from this screen. It is usually easier to use Control Center to toggle Do Not Disturb Mode on and off.
![]() In the Silence area, tap Always or While iPad is locked, as needed.
In the Silence area, tap Always or While iPad is locked, as needed.
![]() Set the Repeated Calls switch to On (
Set the Repeated Calls switch to On (![]() ) or Off (
) or Off (![]() ), as needed.
), as needed.

Turn Do Not Disturb Mode On or Off Manually
![]() Swipe up from the bottom of the screen.
Swipe up from the bottom of the screen.
Note: You can open Control Center from the Home screen or from most other screens.
Control Center opens.
![]() Tap Do Not Disturb to turn Do Not Disturb on (
Tap Do Not Disturb to turn Do Not Disturb on (![]() changes to
changes to ![]() ) or off (
) or off (![]() changes to
changes to ![]() ).
).
![]() Tap the screen outside Control Center.
Tap the screen outside Control Center.
Control Center closes.
Secure Your iPad with Touch ID or a Passcode
During setup, you secure your iPad using Touch ID or a passcode. Touch ID uses your fingerprint to unlock the iPad, with a passcode as a backup unlock method. All recent iPad models have Touch ID; older models without Touch ID use a passcode instead. Even with Touch ID enabled, you must enter your passcode after restarting your iPad or after not using it for 48 hours or longer.
For added security, you can set the iPad to automatically erase its data after ten failed passcode attempts.
Secure Your iPad with Touch ID or a Passcode

![]() Press Home.
Press Home.
The Home screen appears.
![]() Tap Settings (
Tap Settings (![]() ).
).
The Settings screen appears.
![]() Tap Touch ID & Passcode.
Tap Touch ID & Passcode.
Note: If your iPad does not support Touch ID, tap Passcode Lock to display the Passcode Lock screen.
The Enter Passcode dialog opens.
![]() Type your passcode.
Type your passcode.

The Passcode Lock screen appears.
![]() Set the iPad Unlock switch to On (
Set the iPad Unlock switch to On (![]() ) to use Touch ID for unlocking.
) to use Touch ID for unlocking.
![]() Set the Apple Pay switch to On (
Set the Apple Pay switch to On (![]() ) to use Touch ID for Apple Pay.
) to use Touch ID for Apple Pay.
![]() Set the iTunes & App Store switch to On (
Set the iTunes & App Store switch to On (![]() ) to use Touch ID for store purchases.
) to use Touch ID for store purchases.
![]() You can tap a button in the Fingerprints box to change the button name or delete the fingerprint.
You can tap a button in the Fingerprints box to change the button name or delete the fingerprint.
![]() You can tap Add a Fingerprint to add another fingerprint to Touch ID.
You can tap Add a Fingerprint to add another fingerprint to Touch ID.

![]() You can tap Turn Passcode Off to turn the passcode off; however, this is seldom wise.
You can tap Turn Passcode Off to turn the passcode off; however, this is seldom wise.
![]() You can tap Change Passcode to change your passcode. See the tip for information on changing the passcode type.
You can tap Change Passcode to change your passcode. See the tip for information on changing the passcode type.
![]() Set the Today View switch to On (
Set the Today View switch to On (![]() ) or Off (
) or Off (![]() ), as needed.
), as needed.
![]() Set the Recent Notifications switch to On (
Set the Recent Notifications switch to On (![]() ) or Off (
) or Off (![]() ), as needed.
), as needed.
![]() Set the Control Center switch to On (
Set the Control Center switch to On (![]() ) or Off (
) or Off (![]() ), as needed.
), as needed.
![]() Set the Siri switch to On (
Set the Siri switch to On (![]() ) or Off (
) or Off (![]() ), as needed.
), as needed.
![]() Set the Home Control switch to On (
Set the Home Control switch to On (![]() ) or Off (
) or Off (![]() ), as needed.
), as needed.
![]() Set the Return Missed Calls switch to On (
Set the Return Missed Calls switch to On (![]() ) or Off (
) or Off (![]() ), as needed.
), as needed.
![]() If you want the iPad to erase all its data after ten failed passcode attempts, set the Erase Data switch to On (
If you want the iPad to erase all its data after ten failed passcode attempts, set the Erase Data switch to On (![]() ).
).

The Erase Data dialog opens.
![]() Tap Enable.
Tap Enable.
Note: The Erase Data feature provides effective protection against conventional attackers, but some law-enforcement agencies can defeat it.
Configure Restrictions and Parental Controls
Like any other computer that can access the Internet, the iPad can reach vast amounts of content not suitable for children or business contexts.
You can restrict the iPad from accessing particular kinds of content. You can use the restrictions to implement parental controls — for example, you can prevent the iPad user from buying content in apps or watching adult-rated movies.
Configure Restrictions and Parental Controls

![]() Press Home.
Press Home.
The Home screen appears.
![]() Tap Settings (
Tap Settings (![]() ).
).
The Settings screen appears.
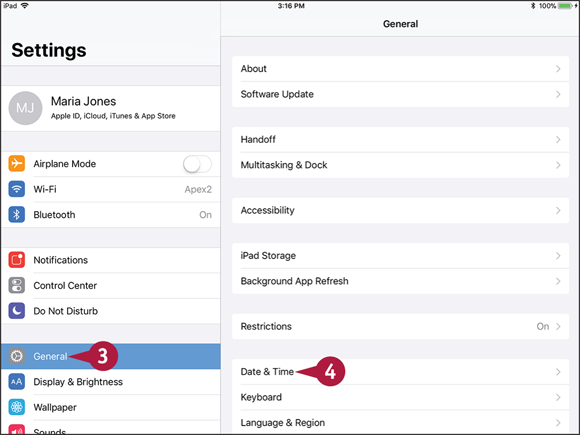
![]() Tap General (
Tap General (![]() ).
).
The General screen appears.
![]() Tap Restrictions.
Tap Restrictions.
The Restrictions screen appears.

![]() Tap Enable Restrictions.
Tap Enable Restrictions.
The Set Passcode dialog appears.
Note: The passcode you set to protect restrictions is separate from the passcode you use to lock the iPad. Do not use the same code.
![]() Type the passcode.
Type the passcode.
Note: The iPad shows dots instead of your passcode digits in case someone is watching.
The iPad displays the Set Passcode dialog again, this time with the message “Re-enter your Restrictions Passcode.”
![]() Type the passcode again.
Type the passcode again.

The Restrictions screen appears with the controls in the Allow area now available.
![]() In the Allow area, set each switch to On (
In the Allow area, set each switch to On (![]() ) or Off (
) or Off (![]() ), as needed.
), as needed.
![]() If you need to change the country used for rating content, tap Ratings For. On the Ratings For screen, tap the country, and then tap Restrictions.
If you need to change the country used for rating content, tap Ratings For. On the Ratings For screen, tap the country, and then tap Restrictions.
![]() Choose settings for items in the Allowed Content box. For example, tap Movies.
Choose settings for items in the Allowed Content box. For example, tap Movies.

The Movies screen appears.
![]() On the Movies screen, tap the highest rating you will permit.
On the Movies screen, tap the highest rating you will permit.
![]() Tap Restrictions (
Tap Restrictions (![]() ).
).
The Restrictions screen appears again.
![]() Set the In-App Purchases switch to On (
Set the In-App Purchases switch to On (![]() ) or Off (
) or Off (![]() ), as needed.
), as needed.
![]() Choose other settings in the Privacy box.
Choose other settings in the Privacy box.
![]() Choose settings in the Allow Changes box.
Choose settings in the Allow Changes box.
![]() Set the Multiplayer Games switch, the Adding Friends switch, and the Screen Recording switch to On (
Set the Multiplayer Games switch, the Adding Friends switch, and the Screen Recording switch to On (![]() ) or Off (
) or Off (![]() ), as needed.
), as needed.
Set Up Family Sharing and Add Members
Apple’s Family Sharing feature enables you to share purchases from Apple’s online services with other family members. You can also share photos and calendars, and you can use the Find My iPhone feature to find your iOS devices and Macs when they go missing.
This section assumes that you are the Family organizer, the person who sets up Family sharing, invites others to participate, and pays for the content they buy on the iTunes Store, the iBooks Store, and the App Store.
Set Up Family Sharing

To set up Family Sharing, press Home and then tap Settings (![]() ) to open the Settings app. Tap Apple ID — the button bearing your Apple ID name — at the top of the Settings screen to display the Apple ID screen, and then tap Set Up Family Sharing (
) to open the Settings app. Tap Apple ID — the button bearing your Apple ID name — at the top of the Settings screen to display the Apple ID screen, and then tap Set Up Family Sharing (![]() ) to display the Family Sharing dialog.
) to display the Family Sharing dialog.
Tap Get Started to display the Get Started dialog, and then tap the first feature you want to share. Your choices are Apple Music (![]() ), iCloud Storage (
), iCloud Storage (![]() ), iTunes & App Store Purchases (
), iTunes & App Store Purchases (![]() ), or Location Sharing (
), or Location Sharing (![]() ).
).
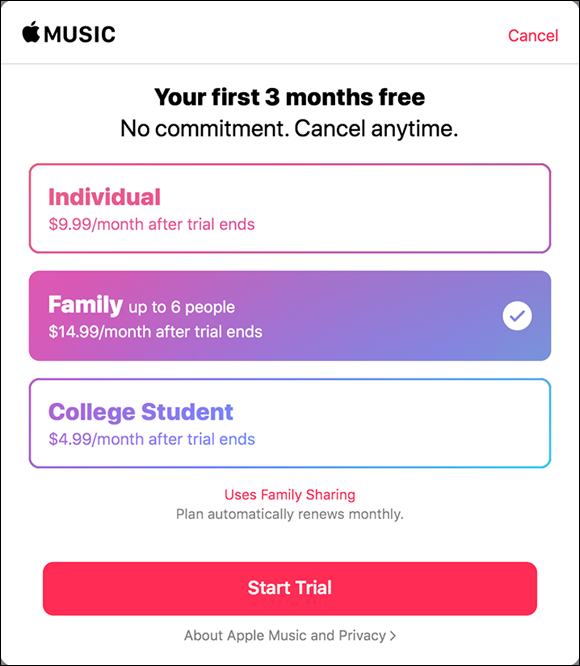
After making your choice, follow the prompts to choose the service type and set up your means of payment. For example, if you tap Apple Music (![]() ), the Apple Music dialog opens, and you can choose among Individual, Family, and College Student plans; assuming you are not yet paying for the service, you may be able to start with a free trial.
), the Apple Music dialog opens, and you can choose among Individual, Family, and College Student plans; assuming you are not yet paying for the service, you may be able to start with a free trial.
Once you have enabled Family Sharing on your account, the Family Sharing screen appears. You can then add a family member to Family Sharing, as explained in the next section.
Add a Family Member to Family Sharing

To add a family member, first display the Family Sharing screen in the Settings app by pressing Home, tapping Settings (![]() ), tapping Apple ID — the button bearing your Apple ID name — and then tapping Family Sharing (
), tapping Apple ID — the button bearing your Apple ID name — and then tapping Family Sharing (![]() ).
).
On the Family Sharing screen, tap Add Family Member to display the Add Family Member dialog, and then tap Invite via iMessage, Invite in Person, or Create a Child Account, as appropriate. Follow the prompts to create the invitation. If the Verify Security Code screen appears, enter your card’s security code and then tap Next.
Accept an Invitation to Family Sharing

When someone sends you an invitation to Family Sharing, tap Get Started in the e-mail message. If you are using an iOS device, the Family Sharing Invitation screen appears, and you can simply tap Accept to accept the invitation.
If you do not want to accept the invitation, tap Decline instead.
Choose Date, Time, and Region Settings
To keep yourself on time and your data accurate, you need to make sure your iPad is using the correct date and time. You can choose between having your iPad set the date and time automatically or setting them yourself. To choose date and time settings, you use the Date & Time screen in the Settings app. To make dates, times, and other data appear in the formats you prefer, you may need to change the Language & Region settings on your iPad.
Choose Date, Time, and Region Settings
Choose Date and Time Settings
![]() Press Home.
Press Home.
The Home screen appears.
![]() Tap Settings (
Tap Settings (![]() ).
).
The Settings screen appears.
![]() Tap General (
Tap General (![]() ).
).
The General screen appears.
![]() Tap Date & Time.
Tap Date & Time.

The Date & Time screen appears.
![]() Set the 24-Hour Time switch to On (
Set the 24-Hour Time switch to On (![]() ) if you want to use 24-hour times.
) if you want to use 24-hour times.
![]() To set the date and time manually, set the Set Automatically switch to Off (
To set the date and time manually, set the Set Automatically switch to Off (![]() changes to
changes to ![]() ).
).
![]() Tap the button showing the date and time.
Tap the button showing the date and time.
The controls for setting the date and time appear.
![]() Set the date and time.
Set the date and time.
![]() Tap General (
Tap General (![]() ).
).
The General screen appears.

Choose Language & Region Settings
![]() From the General screen, tap Language & Region.
From the General screen, tap Language & Region.
The Language & Region screen appears.
![]() If you want to change the language used for the iPad user interface, tap iPad Language, tap the language in the iPad Language dialog that opens, and then tap Done.
If you want to change the language used for the iPad user interface, tap iPad Language, tap the language in the iPad Language dialog that opens, and then tap Done.
![]() Tap Region.
Tap Region.

The Region dialog opens.
![]() Tap the region you want, which places a check mark next to it.
Tap the region you want, which places a check mark next to it.
![]() Tap Done.
Tap Done.
The Region dialog closes.
Note: From the Language & Region screen, you can also tap Calendar and then tap Gregorian, Japanese, or Buddhist to select the calendar system; or tap Temperature Unit and then tap Celsius (°C) or Fahrenheit (°F) to set the temperature unit.