Chapter 1
Getting Started with Your iPad

The iPad is a series of powerful and extremely popular touch-screen tablet computers created by Apple. You can use an iPad either as a full-powered computing device on its own or as a companion device to your Mac or PC. In this chapter, you set up your iPad, sync data to it, and learn to use the user interface.
Identify and Compare the iPad Models
Download, Install, and Set Up iTunes
Begin Setup and Activate Your iPad
Set Up Your iPad as New Using iCloud
Set Up Your iPad from an iCloud Backup
Choose Which Items to Sync from Your Computer
Sync Your iPad with Your Computer via Wi-Fi
Explore the Interface and Launch Apps
Identify and Compare the iPad Models
The Apple iPad is the most popular tablet computer on the market. Powerful, elegantly designed, and easy to use, the iPad can take over many of the tasks you normally perform on your desktop or laptop computer, such as surfing the web, exchanging e-mail messages, performing desktop publishing, and playing video games.
Understand the Choice of iPad Models
The iPad comes in three sizes: small, medium, and large. The small size consists of the iPad mini models. The medium size includes the model called simply “iPad” and the smaller iPad Pro model. The large size is the full-size iPad Pro.
Compare Screen Size and Device Size

Recent iPad mini models have a 7.9-inch screen with 2048 × 1536 pixels at a resolution of 326 pixels per inch, or ppi. The iPad has a 9.7-inch screen with 2048 × 1536 pixels at a resolution of 264 ppi. The smaller iPad Pro has a 10.5-inch screen with 2224 × 1668 pixels at a resolution of 264 ppi. The full-size iPad Pro has a 12.9-inch screen with 2732 × 2048 pixels at a resolution of 264 ppi. All of these screen measurements are diagonal.
Although the difference in diagonal measurements sounds small — less than 2 inches between the iPad mini and the iPad, and just over 3 inches between the iPad and the full-size iPad Pro — the difference in screen size is dramatic. The iPad screen is one-and-a-half times as large as the iPad mini screen. The full-size iPad Pro screen is one-and-three-quarter times as large as the iPad screen, and more than two-and-a-half times as large as the iPad mini screen.
The iPad mini measures 8 inches tall × 5.3 inches wide and weighs around two-thirds of a pound. The iPad measures 9.4 inches tall × 6.6 inches wide and weighs around 1 pound. The 10.5-inch iPad Pro measures 9.8 inches tall × 6.8 inches wide and weighs just over 1 pound. The full-size iPad Pro measures 12 inches tall × 8.68 inches wide and weighs around 1.5 pounds.
Compare iPad Storage Capacity
Apple offers the various iPad models with storage capacities ranging from 32GB to 256GB. The storage capacities available vary by model. For example, as of this writing, the iPad comes in 32GB and 128GB capacities; the iPad Pro models have capacities of 64GB, 256GB, and 512GB; whereas the iPad mini offers only a single choice, 128GB.
Having more storage enables you to install more apps and carry more music, movies, and other files with you. More storage is especially valuable if you plan to shoot videos on your iPad.
Higher capacities command substantially higher prices, so you must decide how much you are prepared to spend. Generally speaking, higher-capacity devices get more use in the long run and are worth the extra cost.
Compare iPad Processors and Coprocessors
Each iPad has a main processor from Apple’s A series of processors plus a coprocessor from Apple’s M series of coprocessors. A coprocessor is a supplementary processor that speeds up specific tasks, such as rendering graphics and interpreting input from the iPad’s sensors.
- The iPad mini 4 has an A8 processor with a non-embedded M8 coprocessor.
- The iPad model has an A9 processor and an embedded M9 coprocessor. The processor is 1.6× faster than the A8, and graphics performance is 1.8× faster.
- The iPad Pro models have an A10X Fusion processor and an embedded M10 coprocessor. The processor is 2.5× faster than the A8, and graphics performance is 4.3× faster.
Choose Between a Wi-Fi-Only iPad and a Cellular-and-Wi-Fi iPad

The iPad mini, iPad, and iPad Pro all come in Wi-Fi–only and cellular-and–Wi-Fi models.
With a Wi-Fi–only iPad, you can connect to the Internet only through wireless networks, such as those at your home or workplace, or wireless hotspots that are open to the public or to customers of the establishments that host them.
With a cellular-and–Wi-Fi iPad, you can connect both through the cellular network and through wireless networks, giving you Internet access no matter where you go. This option costs more both in the purchase price of the iPad and in the cellular service fees with either a monthly or a pay-as-you-go plan.
The front of each iPad contains a touch screen that you use for most of your interaction with the device and its interface. The front of the iPad also contains a camera, located above the screen and sometimes called the “selfie camera,” for taking self-portraits and for video chat. The rear of the iPad contains a higher-resolution camera capable of taking good-quality photos and videos.
Apart from being larger and designed for professional use, the iPad Pro models have features and accessories that the iPad mini and iPad do not have, such as the Apple Pencil stylus and the Smart Keyboard.
Touch Screen

Each iPad model has a touch screen that takes up most of the space on the front of the tablet. You use the touch screen to access everything on the iPad with your fingers and to view content. The iPad software uses gestures to scroll, rotate, and zoom in on objects on-screen.
All current iPad models have what Apple calls a Retina display, which has very high resolution.
Cameras

Each iPad has one camera on the front — the screen side — and another on the back.
The front camera is for FaceTime video calling and self-portraits. This camera’s specifications vary depending on the iPad model, but in all models the camera’s video capabilities are high enough to provide a good-quality video picture for FaceTime calls. In general, the front camera captures photos and videos at lower resolutions and has fewer capabilities than the rear camera.
The back camera is for taking photos and videos of other subjects, much as you would use a stand-alone digital camera. As with the front camera, the back camera’s specifications vary depending on the iPad model. The back camera on some iPad models can capture slow-motion video at 120 frames per second and can take bursts of photos.
Apple Pencil for iPad Pro

You can use your fingers on the touch screen to control the iPad Pro models just as you can with the other iPad models, but the iPad Pro models are also designed to use a custom stylus called the Apple Pencil. The Apple Pencil enables you to draw and make selections much more precisely than you can with a finger, giving you finer control over the documents you create and edit on the iPad Pro. The Apple Pencil and the iPad Pro screens are pressure sensitive, so you can draw lines of different thicknesses by varying the amount of pressure you apply.
The Apple Pencil contains a rechargeable battery that you can charge by plugging the Apple Pencil into an iPad Pro.
Smart Keyboard for iPad Pro

Like the iPad mini and iPad, the iPad Pro models have an on-screen keyboard that you can use to enter text as needed. You can also connect a Bluetooth keyboard to the iPad Pro models to enter text, as you can for any iPad.
But if you need to enter large amounts of text, you may prefer a Smart Keyboard, the custom keyboard models that double as covers for the iPad Pro models. The Smart Keyboard connects to the iPad Pro via the Smart Connector interface on the side of the device, which allows the Smart Keyboard not only to provide input to the iPad Pro, but also to draw power from it.
Meet Your iPad’s Controls
Your iPad has four hardware controls for essential actions: the Sleep/Wake button to control power, the Volume Up button and the Volume Down button for controlling audio volume, and the Home button below the screen.
If your iPad has cellular connectivity, it needs a SIM card. Some iPad models come with an Apple SIM that works with most carriers. Some carriers do not support the Apple SIM or impose restrictions on its use, so you must verify that your carrier does support it before you activate the iPad using the Apple SIM.
Meet Your iPad’s Controls
![]()
![]() Press and hold the Sleep/Wake button on top of the iPad for a couple of seconds.
Press and hold the Sleep/Wake button on top of the iPad for a couple of seconds.
The top of the iPad also contains:
![]() The microphone.
The microphone.
![]() The headphone socket.
The headphone socket.
As the iPad starts, the Apple logo appears on the screen.

![]() Above the iPad screen is the front-facing camera.
Above the iPad screen is the front-facing camera.
![]() Below the iPad screen is the Home button, which you press to display the Home screen.
Below the iPad screen is the Home button, which you press to display the Home screen.
At the bottom of the iPad are:

![]() The Lightning Connector.
The Lightning Connector.
![]() The speakers.
The speakers.
![]() Turn the iPad so that you can see its right side.
Turn the iPad so that you can see its right side.
![]() On an iPad model that has the side switch, move the side switch down, so that an orange dot appears, when you want to mute the iPad notifications, alerts, and sound effects.
On an iPad model that has the side switch, move the side switch down, so that an orange dot appears, when you want to mute the iPad notifications, alerts, and sound effects.
Note: On iPad models that have the side switch, you can configure the side switch to lock the screen rotation. To do so, tap Settings (![]() ), tap General (
), tap General (![]() ), and then tap Lock Rotation in the Use Side Switch To area.
), and then tap Lock Rotation in the Use Side Switch To area.
![]() Press the Volume Up ( + ) button to increase the sound volume.
Press the Volume Up ( + ) button to increase the sound volume.
Note: When the Camera app is active, you can press the Volume Up ( + ) button to take a picture with the camera.
![]() Press the Volume Down (–) button to decrease the volume.
Press the Volume Down (–) button to decrease the volume.

![]() When the lock screen appears, press Home to unlock the iPad.
When the lock screen appears, press Home to unlock the iPad.
The iPad unlocks, and the Home screen appears.
Download, Install, and Set Up iTunes
To sync your iPad with your computer, you use Apple’s iTunes application. iTunes comes preinstalled on every Mac but not on PCs; to get iTunes for Windows, you download it from the Apple website and then install it on your PC.
If you do not have a computer, or you do not want to sync your iPad with your computer, you can set up and sync your iPad using Apple’s iCloud service, as described later in this chapter.
Download, Install, and Set Up iTunes

![]() On your PC, open the web browser. This example uses Microsoft Edge, the browser that comes with Windows 10.
On your PC, open the web browser. This example uses Microsoft Edge, the browser that comes with Windows 10.
![]() Click the Address box, type
Click the Address box, type www.apple.com/itunes/download, and then press ![]() .
.
The Download iTunes web page appears.
![]() Click the check boxes (
Click the check boxes (![]() changes to
changes to ![]() ) if you do not want to receive e-mail from Apple.
) if you do not want to receive e-mail from Apple.
![]() Click Download now.
Click Download now.
![]() When the download finishes, click Run in the pop-up panel that appears.
When the download finishes, click Run in the pop-up panel that appears.
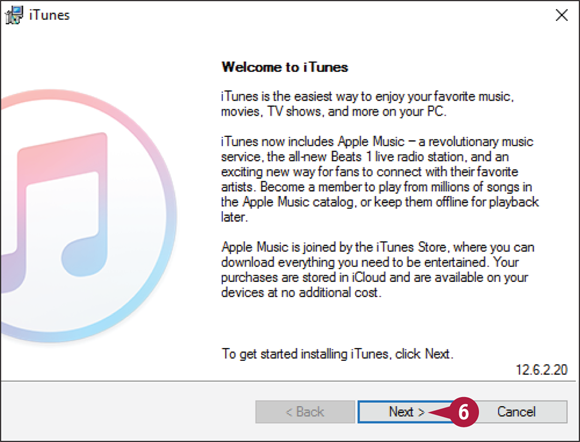
The iTunes installation begins, and the Welcome to iTunes dialog opens.
![]() Click Next, and then follow the steps of the installer.
Click Next, and then follow the steps of the installer.

Note: You must accept the license agreement to install iTunes.
![]() Click Add iTunes shortcut to my desktop (
Click Add iTunes shortcut to my desktop (![]() changes to
changes to ![]() ) unless you want this shortcut.
) unless you want this shortcut.
![]() Click Use iTunes as the default player for audio files (
Click Use iTunes as the default player for audio files (![]() changes to
changes to ![]() ) if you do not want to use iTunes as the default audio player.
) if you do not want to use iTunes as the default audio player.
![]() Click Automatically update iTunes and other Apple software (
Click Automatically update iTunes and other Apple software (![]() changes to
changes to ![]() ) if you do not want automatic updates.
) if you do not want automatic updates.
![]() Click Install.
Click Install.

When the installation finishes, the installer displays the Congratulations dialog.
![]() Click Open iTunes after the installer exits (
Click Open iTunes after the installer exits (![]() changes to
changes to ![]() ) if you do not want iTunes to launch automatically when you close the installer.
) if you do not want iTunes to launch automatically when you close the installer.
![]() Click Finish.
Click Finish.
The installer closes.
Unless you chose not to open iTunes automatically, iTunes opens.
Begin Setup and Activate Your iPad
Before you can use your iPad, you must set it up and activate it. First, you choose your language and specify your country or region. You then choose between manual setup and using the Quick Start feature to sign in to the iPad using your existing iPhone or iPad running iOS 11. In manual setup, you connect the iPad to the Internet through either a Wi-Fi network or the cellular network, and activate the iPad, registering it with the Apple servers.
Begin Setup and Activate Your iPad

![]() Turn on the iPad by pressing and holding the Sleep/Wake button for a couple of seconds until the Apple logo appears.
Turn on the iPad by pressing and holding the Sleep/Wake button for a couple of seconds until the Apple logo appears.
The Hello screen appears.
![]() Press Home, the button below the screen.
Press Home, the button below the screen.
The Language screen appears.
![]() Tap the language you want to use for the interface.
Tap the language you want to use for the interface.
The Select Your Country or Region screen appears.
![]() Tap the country or region.
Tap the country or region.

The Quick Start screen appears.
![]() If you have an iPhone or an iPad running iOS 11, you can bring it close to the iPad to sign in automatically using your Apple ID. Skip the rest of these steps. Otherwise, tap Set Up Manually and follow the rest of these steps.
If you have an iPhone or an iPad running iOS 11, you can bring it close to the iPad to sign in automatically using your Apple ID. Skip the rest of these steps. Otherwise, tap Set Up Manually and follow the rest of these steps.

The Choose a Wi-Fi Network screen appears.
![]() Tap the wireless network you want to use.
Tap the wireless network you want to use.

![]() Tap Choose Another Network to connect to a network that does not broadcast its name.
Tap Choose Another Network to connect to a network that does not broadcast its name.
Note: On a cellular iPad, you can tap Use Cellular Connection to connect to the Internet via the cellular network and set up your iPad.
![]() If the Connect to iTunes button appears, you can tap it to stop the setup process here. You can then continue as explained in the section “Set Up Your iPad Using iTunes,” later in this chapter.
If the Connect to iTunes button appears, you can tap it to stop the setup process here. You can then continue as explained in the section “Set Up Your iPad Using iTunes,” later in this chapter.
The Enter Password dialog opens.
![]() Type the password.
Type the password.
![]() Tap Join.
Tap Join.
Your iPad joins the wireless network and connects to the Internet.
During setup, you secure your iPad with a passcode. On most iPad models, you can also set up the Touch ID feature, which enables you to unlock the iPad quickly using your fingerprint or thumbprint.
After this first stage of setup, you choose among setting up the iPad as a new iPad, restoring it from an iCloud backup, restoring it from an iTunes backup, or moving data from an Android device.

The Touch ID screen appears.
Note: If your iPad does not support Touch ID, the Touch ID screen does not appear. Instead, the Passcode screen appears, prompting you to set a passcode to secure the iPad.
![]() You can tap Set Up Touch ID Later if you prefer not to set up Touch ID now.
You can tap Set Up Touch ID Later if you prefer not to set up Touch ID now.
![]() Tap Continue, and then follow the prompts to scan your fingerprint or thumbprint.
Tap Continue, and then follow the prompts to scan your fingerprint or thumbprint.

The Complete screen appears.
![]() Tap Continue.
Tap Continue.

The Create a Passcode screen appears.
![]() You can tap Passcode Options to create a custom alphanumeric code or a four-digit code instead of a six-digit code.
You can tap Passcode Options to create a custom alphanumeric code or a four-digit code instead of a six-digit code.
![]() Type a six-digit passcode, and then repeat it on the Re-Enter Your Passcode screen.
Type a six-digit passcode, and then repeat it on the Re-Enter Your Passcode screen.

The Apps & Data screen appears.
![]() Tap the appropriate button:
Tap the appropriate button:
![]() Tap Restore from iCloud Backup to set up your iPad using a backup stored in iCloud. See the later section, “Set Up Your iPad from an iCloud Backup,” for details.
Tap Restore from iCloud Backup to set up your iPad using a backup stored in iCloud. See the later section, “Set Up Your iPad from an iCloud Backup,” for details.
![]() Tap Restore from iTunes Backup to set up your iPad using a backup stored on your computer. See the later section, “Set Up Your iPad Using iTunes,” for details.
Tap Restore from iTunes Backup to set up your iPad using a backup stored on your computer. See the later section, “Set Up Your iPad Using iTunes,” for details.
![]() Tap Set Up as New iPad to set up your iPad from scratch using iCloud. See the next section, “Set Up Your iPad as New Using iCloud,” for details.
Tap Set Up as New iPad to set up your iPad from scratch using iCloud. See the next section, “Set Up Your iPad as New Using iCloud,” for details.
![]() Tap Move Data from Android to transfer data from an Android device.
Tap Move Data from Android to transfer data from an Android device.
Set Up Your iPad as New Using iCloud
If you want to set up and use your iPad without syncing it to your computer, you can set it up using Apple’s iCloud online service. With this approach, you sync your data to your account on iCloud, from which you can access it using other iOS devices, a Mac or a Windows PC, or a web browser on any computer.
To set up a new iPad to use iCloud, follow the instructions in the previous section to begin setup, and then continue with the instructions in this section. If you have backed up your iPad to iCloud and want to restore it from that backup, turn to the next section instead.
Set Up Your iPad as New Using iCloud

![]() Begin setup as explained in the previous section, “Begin Setup and Activate Your iPad.”
Begin setup as explained in the previous section, “Begin Setup and Activate Your iPad.”
![]() On the Apps & Data screen, tap Set Up as New iPad.
On the Apps & Data screen, tap Set Up as New iPad.

The Apple ID screen appears.
![]() If you do not yet have an Apple ID, tap Don’t have an Apple ID or forgot it? and follow the screens that appear.
If you do not yet have an Apple ID, tap Don’t have an Apple ID or forgot it? and follow the screens that appear.
![]() Type your Apple ID.
Type your Apple ID.
![]() Type your password.
Type your password.
Note: If the Apple ID Security screen appears, prompting you to create new security questions, tap Add Security Questions, tap Next, and then create the questions.
![]() Tap Next.
Tap Next.

If you have enabled two-factor verification on your account, as Apple and security experts recommend, the Apple ID Verification Code dialog opens.
![]() Type the six-digit verification code sent to the iPhone, other iOS device, or Mac specified as the verification device in your account.
Type the six-digit verification code sent to the iPhone, other iOS device, or Mac specified as the verification device in your account.

![]() You can tap Didn’t Get a Code? if you did not receive a code or if you dismissed it by accident.
You can tap Didn’t Get a Code? if you did not receive a code or if you dismissed it by accident.
The Terms and Conditions screen appears.
![]() Tap Agree in the lower-right corner of the screen if you want to proceed.
Tap Agree in the lower-right corner of the screen if you want to proceed.
When you set up your iPad using iCloud, use an e-mail address that you intend to keep for the long term. This is especially important if you use the same e-mail address for the Apple ID that you use for the App Store; each app you buy is tied to that e-mail address, so if you change the address, you will need to authenticate again for each app update.

The Express Settings screen appears.
![]() Tap Continue if you want to proceed with the default values or your current values for the items listed on the screen, such as Siri and Location Services.
Tap Continue if you want to proceed with the default values or your current values for the items listed on the screen, such as Siri and Location Services.
![]() You can tap Customize Settings if you want to customize all the settings.
You can tap Customize Settings if you want to customize all the settings.
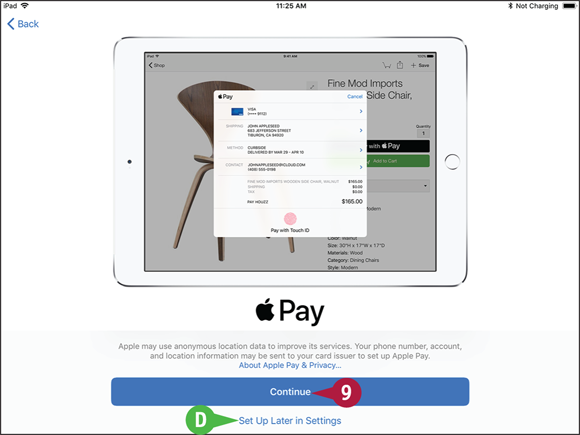
The Apple Pay screen appears.
![]() Tap Continue, and then follow the prompts on the Add Card screen to add your card. You can either point the iPad’s rear camera lens at your card and have iOS recognize the details, or tap Enter Card Details Manually and type in the details on the Card Details screen.
Tap Continue, and then follow the prompts on the Add Card screen to add your card. You can either point the iPad’s rear camera lens at your card and have iOS recognize the details, or tap Enter Card Details Manually and type in the details on the Card Details screen.

![]() You can tap Set Up Later in Settings if you do not want to set up Apple Pay now.
You can tap Set Up Later in Settings if you do not want to set up Apple Pay now.
Several information screens appear, such as the Access the Dock from Anywhere screen.
![]() On each information screen, read the details and tap Continue to proceed.
On each information screen, read the details and tap Continue to proceed.

The App Analytics screen appears.
![]() Tap Share with App Developers if you want to share usage statistics and crash data with the developers of the apps you use. Otherwise, tap Don’t Share.
Tap Share with App Developers if you want to share usage statistics and crash data with the developers of the apps you use. Otherwise, tap Don’t Share.
The Welcome to iPad screen appears.
![]() Tap Get Started.
Tap Get Started.
The Home screen appears, and you can begin using your iPad.
Set Up Your iPad from an iCloud Backup
Instead of setting up your iPad as new using iCloud, you can set it up by restoring it from an iCloud backup of either another iPad or iOS device or the same iPad. For example, if you are upgrading to a new iPad, you can restore the backup of your previous iPad.
When you restore your iPad from an iCloud backup, you choose which backup to use. iOS automatically restores your settings, downloads your apps from the App Store, and then installs them on the iPad.
Set Up Your iPad from an iCloud Backup

![]() Begin setup as explained in the section “Begin Setup and Activate Your iPad,” earlier in this chapter.
Begin setup as explained in the section “Begin Setup and Activate Your iPad,” earlier in this chapter.
![]() On the Apps & Data screen, tap Restore from iCloud Backup.
On the Apps & Data screen, tap Restore from iCloud Backup.
Note: On a cellular iPad, use a Wi-Fi network rather than the cellular network to restore your iPad from backup so as not to run through your data plan.

The iCloud Sign In screen appears.
![]() Type your Apple ID.
Type your Apple ID.
![]() Type your password.
Type your password.
![]() Tap Next.
Tap Next.
The Terms and Conditions screen appears.
![]() Tap Agree in the lower-right corner of the screen.
Tap Agree in the lower-right corner of the screen.
iOS verifies your Apple ID.

The Choose Backup screen appears.
![]() Tap the backup you want to use.
Tap the backup you want to use.

![]() If the backup you want to use does not appear, tap Show All Backups to display other backups, and then tap the appropriate backup.
If the backup you want to use does not appear, tap Show All Backups to display other backups, and then tap the appropriate backup.
The Settings from Your Backup screen appears.
![]() Tap Continue to restore the backup and include the settings shown in the list.
Tap Continue to restore the backup and include the settings shown in the list.
![]() You can tap Customize Settings if you want to customize the settings shown in the list.
You can tap Customize Settings if you want to customize the settings shown in the list.
The Restore from iCloud screen appears while iOS restores the backup to your iPad.
After iOS completes the restoration, your iPad restarts.
The lock screen appears.
![]() Press Home to unlock your iPad, and follow any security prompts that appear. You can then start using the iPad.
Press Home to unlock your iPad, and follow any security prompts that appear. You can then start using the iPad.
Set Up Your iPad Using iTunes
Instead of setting up your iPad using iCloud, as described in the previous two sections, you can set it up using iTunes. You can either restore an iTunes backup to the device or set up the iPad from scratch using iTunes.
When setting up your iPad for the first time, you can restore it from an iTunes backup of another iPad — for example, your previous iPad — or another iOS device. If you have already set up this iPad, you can restore it from its own backup.
Set Up Your iPad Using iTunes

![]() Begin setup as explained in the section “Begin Setup and Activate Your iPad,” earlier in this chapter.
Begin setup as explained in the section “Begin Setup and Activate Your iPad,” earlier in this chapter.
![]() On the Apps & Data screen, tap Restore from iTunes Backup.
On the Apps & Data screen, tap Restore from iTunes Backup.
The Connect to iTunes screen appears.
![]() Connect your iPad to your computer via the USB cable.
Connect your iPad to your computer via the USB cable.

On your computer, iTunes opens or becomes active.
The Welcome to Your New iPad screen appears.
![]() Make sure the Restore from this backup radio button is selected (
Make sure the Restore from this backup radio button is selected (![]() ).
).
![]() Click the pop-up menu (
Click the pop-up menu (![]() ), and select the appropriate iPad.
), and select the appropriate iPad.
![]() Click Continue.
Click Continue.

iTunes restores your iPad from the backup.
When the restore is complete, your iPad restarts.

The control screens for your iPad appear in the iTunes window.
You can now choose sync settings for the iPad as explained in the next section, “Choose Which Items to Sync from Your Computer.”
Choose Which Items to Sync from Your Computer
After setting up your iPad, you can use the iPad control screens in iTunes to choose which items to sync from your computer. When setting your sync preferences, start on the Summary tab. Here, you can change the iPad’s name, choose whether to back up the iPad to iCloud or to your computer, decide whether to encrypt the backup, and set general options for controlling syncing.
Choose Which Items to Sync from Your Computer

Connect Your iPad and Choose Options on the Summary Tab
![]() Connect your iPad to your computer via the USB cable.
Connect your iPad to your computer via the USB cable.
The iTunes window appears.
![]() If the iPad control screens do not automatically appear, click the iPad button (
If the iPad control screens do not automatically appear, click the iPad button (![]() ) on the navigation bar at the top of the screen.
) on the navigation bar at the top of the screen.
Note: Your iPad appears in iTunes with either a default name or the name you have given it.

The iPad control screens appear.
![]() Click Summary.
Click Summary.
The Summary screen appears.
![]() To change the name of your iPad, click the existing name, type the new name, and press
To change the name of your iPad, click the existing name, type the new name, and press ![]() or
or ![]() .
.
![]() In the Automatically Back Up area, click iCloud (
In the Automatically Back Up area, click iCloud (![]() changes to
changes to ![]() ) or This computer (
) or This computer (![]() changes to
changes to ![]() ) to specify where to back up your iPad.
) to specify where to back up your iPad.
![]() If you choose to back up to this computer, click Encrypt local backup (
If you choose to back up to this computer, click Encrypt local backup (![]() changes to
changes to ![]() ).
).

![]() In the Set Password dialog, type a password twice.
In the Set Password dialog, type a password twice.
![]() On a Mac, click Remember this password in my keychain (
On a Mac, click Remember this password in my keychain (![]() changes to
changes to ![]() ) if you want to save the password in your keychain.
) if you want to save the password in your keychain.
![]() Click Set Password.
Click Set Password.

The Set Password dialog closes.
![]() Click Open iTunes when this iPad is connected (
Click Open iTunes when this iPad is connected (![]() changes to
changes to ![]() ) if you want iTunes to open automatically when you connect the iPad.
) if you want iTunes to open automatically when you connect the iPad.
![]() Click Sync only checked songs and videos (
Click Sync only checked songs and videos (![]() changes to
changes to ![]() ) if you want syncing to omit any song or video whose check box you have deselected (
) if you want syncing to omit any song or video whose check box you have deselected (![]() ).
).
![]() Select Convert higher bit rate songs to AAC (
Select Convert higher bit rate songs to AAC (![]() changes to
changes to ![]() ) if you want to compress high-quality song files to fit more on your iPad. In the pop-up menu, choose the bit rate.
) if you want to compress high-quality song files to fit more on your iPad. In the pop-up menu, choose the bit rate.
iTunes makes it easy to choose which items to sync to your iPad. By selecting the iPad in the navigation bar in iTunes and then clicking the appropriate item in the Settings area of the Source list, you can quickly choose which apps, music, movies, and other items to sync from your computer.
After choosing the items to sync, you click the Apply button to apply your changes or the Sync button to run the sync.

Choose Which Apps to Sync
![]() Click Apps.
Click Apps.
![]() You can click the pop-up menu (
You can click the pop-up menu (![]() ) and choose how to sort the apps: Click Sort by Name, Sort by Kind, Sort by Category, Sort by Date Added, or Sort by Size, as needed.
) and choose how to sort the apps: Click Sort by Name, Sort by Kind, Sort by Category, Sort by Date Added, or Sort by Size, as needed.
![]() Click Install for each app you want to sync to the iPad (Install changes to Will Install).
Click Install for each app you want to sync to the iPad (Install changes to Will Install).
![]() Further down the screen, click Automatically install new apps (
Further down the screen, click Automatically install new apps (![]() changes to
changes to ![]() ) if you want to sync new apps automatically. Click the pop-up menu (
) if you want to sync new apps automatically. Click the pop-up menu (![]() ) and click iPad or iPad and iPhone, as needed.
) and click iPad or iPad and iPhone, as needed.

Choose Which Music to Sync
![]() Click Music.
Click Music.
![]() Click Sync Music (
Click Sync Music (![]() changes to
changes to ![]() ).
).
![]() To load a selection of music, click Selected playlists, artists, albums, and genres (
To load a selection of music, click Selected playlists, artists, albums, and genres (![]() changes to
changes to ![]() ) instead of Entire music library.
) instead of Entire music library.
![]() Click Automatically fill free space with songs (
Click Automatically fill free space with songs (![]() changes to
changes to ![]() ) if you want to put as much music as possible on your iPad.
) if you want to put as much music as possible on your iPad.
![]() Click the check box (
Click the check box (![]() changes to
changes to ![]() ) for each playlist, artist, genre, or album to include.
) for each playlist, artist, genre, or album to include.

Sync Books
![]() Click Books.
Click Books.
The Books controls appear.
![]() Click Sync Books (
Click Sync Books (![]() changes to
changes to ![]() ).
).
![]() Click All books (
Click All books (![]() changes to
changes to ![]() ) or Selected books (
) or Selected books (![]() changes to
changes to ![]() ).
).
![]() If you click Selected books, use the controls in the Books box to choose which books to sync.
If you click Selected books, use the controls in the Books box to choose which books to sync.
Note: You can sync photos from your computer only if you are not using the iCloud Photos feature. If you have enabled iCloud Photos, your iPhone syncs your photos through iCloud instead.

Apply Your Changes and Sync
![]() Click Apply or Sync.
Click Apply or Sync.
Note: The Apply button appears when you have made changes to the times you will sync. Click Apply to apply the changes and sync them.
iTunes syncs the items to your iPad.
![]() The readout shows you the sync progress.
The readout shows you the sync progress.
![]() If you need to stop the sync, click Stop (
If you need to stop the sync, click Stop (![]() ).
).
![]() When the sync finishes, disconnect your iPad.
When the sync finishes, disconnect your iPad.
Sync Your iPad with Your Computer via Wi-Fi
Instead of syncing your iPad via the USB-to-Lightning cable, you can sync it wirelessly, or “over the air.” To do so, you must connect both your computer and your iPad to the same network and enable wireless sync in iTunes. You can then have the iPad sync automatically when it is connected to a power source and to the same wireless network as the computer, and when iTunes is also running on your Mac or PC. You can also start a sync manually from the iPad even if it is not connected to a power source.
Sync Your iPad with Your Computer via Wi-Fi

Set Your iPad to Sync with iTunes via Wi-Fi
![]() Connect your iPad to your computer with the USB cable.
Connect your iPad to your computer with the USB cable.
The iTunes window appears.
![]() Click iPad (
Click iPad (![]() ) on the navigation bar.
) on the navigation bar.
The iPad control screens appear.
![]() Click Summary.
Click Summary.
![]() Click Sync with this iPad over Wi-Fi (
Click Sync with this iPad over Wi-Fi (![]() changes to
changes to ![]() ).
).
![]() Click Apply.
Click Apply.
![]() Disconnect your iPad from your computer.
Disconnect your iPad from your computer.

Perform a Manual Sync via Wi-Fi
![]() Press Home.
Press Home.
The Home screen appears.
![]() Tap Settings (
Tap Settings (![]() ).
).

The Settings screen appears.
![]() Tap General (
Tap General (![]() ).
).
The General screen appears.
![]() Tap iTunes Wi-Fi Sync.
Tap iTunes Wi-Fi Sync.
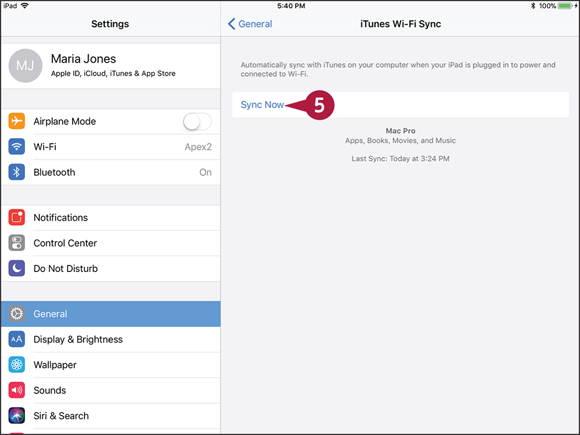
The iTunes Wi-Fi Sync screen appears.
![]() Tap Sync Now.
Tap Sync Now.
The sync runs.
The Sync symbol (![]() ) appears in the iPad status bar.
) appears in the iPad status bar.
The readout shows which part of the sync is currently running.
Explore the Interface and Launch Apps
After you sync the iPad with your computer or set it up with iCloud, you are ready to start using the iPad. When you press the Sleep/Wake button or open the Smart Cover — or the Smart Keyboard on an iPad Pro — the iPad displays the lock screen. You then unlock the iPad to reach the Home screen, which contains icons for running the apps installed on the iPad.
You can quickly launch an app by tapping its icon on the Home screen. From the app, you can return to the Home screen by pressing the Home button. You can then launch another app as needed.
Explore the Interface and Launch Apps

![]() Press Home with a finger or thumb you have registered for Touch ID fingerprint recognition.
Press Home with a finger or thumb you have registered for Touch ID fingerprint recognition.
The iPad wakes and reads your fingerprint.
The iPad unlocks, and the Home screen appears.
![]() The iPad has two or more Home screens, depending on how many apps are installed and how you arrange them. The gray dots at the bottom of the Home screen show how many Home screens you have. The white dot shows the current Home screen.
The iPad has two or more Home screens, depending on how many apps are installed and how you arrange them. The gray dots at the bottom of the Home screen show how many Home screens you have. The white dot shows the current Home screen.
![]() Tap Notes (
Tap Notes (![]() ).
).

The Notes app opens.
Note: If you chose to sync notes with your iPad, the synced notes appear in the Notes app. Otherwise, the list is empty until you create a note.
![]() Tap New (
Tap New (![]() ) to create a new note.
) to create a new note.
The on-screen keyboard appears automatically.

![]() Type a short note.
Type a short note.
![]() The note appears in the Notes list.
The note appears in the Notes list.
![]() If the suggestion bar shows the word or phrase you want, tap it to enter it.
If the suggestion bar shows the word or phrase you want, tap it to enter it.
Note: If the suggestion is in the center, you can enter it by tapping ![]() or another punctuation character.
or another punctuation character.
![]() If you need to hide the keyboard, tap Hide Keyboard (
If you need to hide the keyboard, tap Hide Keyboard (![]() ).
).
![]() To delete the note, tap Delete (
To delete the note, tap Delete (![]() ) and then tap Delete Note on the pop-up panel.
) and then tap Delete Note on the pop-up panel.
![]() Press Home.
Press Home.

The Home screen appears.
![]() Swipe left to display the second Home screen.
Swipe left to display the second Home screen.
You can now launch another app by tapping its icon.
![]() Press the Sleep/Wake button.
Press the Sleep/Wake button.
Note: If your iPad has a Smart Cover, you can also put it to sleep by closing the Smart Cover.
Your iPad goes to sleep.
Using Cover Sheet and Today View
Your iPad handles many different types of alerts, such as missed FaceTime calls, text messages, and invitations to events such as meetings. Your iPad integrates these alerts into Cover Sheet so that you can review them easily.
The iPad’s Today View enables you to view snippets of important and helpful information, such as weather, calendar appointments, and stock updates. You can access Today View either via Cover Sheet or directly from the Home screen.
Using Cover Sheet and Today View

![]() Swipe down from the top of the screen.
Swipe down from the top of the screen.

Cover Sheet appears.
![]() You can tap Clear (
You can tap Clear (![]() ) to clear all notifications in a category, such as Earlier Today.
) to clear all notifications in a category, such as Earlier Today.
![]() You can tap a notification to go to the app that raised it. For example, if you tap the notification for a message, the Messages app appears.
You can tap a notification to go to the app that raised it. For example, if you tap the notification for a message, the Messages app appears.
![]() Swipe a notification left.
Swipe a notification left.
The View button and the Clear button appear.
![]() Tap Clear.
Tap Clear.
The notification disappears from Cover Sheet.
![]() Swipe right.
Swipe right.
Note: You can also open Today View by swiping right on the first Home screen.

Today View appears, showing current information such as weather, calendar appointments, news, and reminders.
Other items appear.
![]() You can tap a widget to go straight to the related app.
You can tap a widget to go straight to the related app.
![]() You can tap Search (
You can tap Search (![]() ) and type a search term to search for items.
) and type a search term to search for items.
Note: You can tap an item such as a reminder to mark it as done.
![]() To edit Today View, tap Edit.
To edit Today View, tap Edit.

The Add Widgets screen appears, showing current widgets in the top section and available widgets in the More Widgets section.
![]() Drag a handle (
Drag a handle (![]() ) to move an item from one section to another or to a different position within its current section.
) to move an item from one section to another or to a different position within its current section.
![]() Tap Remove (
Tap Remove (![]() ) to remove a widget from the current widgets, moving it to the More Widgets section.
) to remove a widget from the current widgets, moving it to the More Widgets section.
![]() Tap Add (
Tap Add (![]() ) to move a widget from the More Widgets section to the current widgets.
) to move a widget from the More Widgets section to the current widgets.
![]() Tap Done.
Tap Done.
Today View appears again.
![]() Swipe up from the bottom of the screen.
Swipe up from the bottom of the screen.
Today View closes, and the screen appears that you were using before.
Using Control Center
Control Center enables you to turn on or off Airplane Mode, Wi-Fi, Bluetooth, Do Not Disturb Mode, Mute, Orientation Lock, and Night Shift; adjust the screen brightness; control music playback and volume, and direct the audio output to AirPlay devices; change the setting for the AirDrop sharing feature; and quickly access the Clock and Camera apps.
When the iPad is locked, Control Center appears on its own. When the iPad is unlocked, the Dock appears, as do thumbnails for your open apps.
Using Control Center

Open Control Center
![]() Swipe up from the bottom of the screen.
Swipe up from the bottom of the screen.
The Dock appears when the iPad is unlocked.
Control Center opens.
Note: You can open Control Center from most apps and screens.
![]() You can drag the Brightness slider (
You can drag the Brightness slider (![]() ) up or down to adjust the brightness.
) up or down to adjust the brightness.
![]() You can drag the Volume slider (
You can drag the Volume slider (![]() ) up or down to adjust the volume.
) up or down to adjust the volume.
![]() You can tap Timer (
You can tap Timer (![]() ) to display the Timer screen in the Clock app.
) to display the Timer screen in the Clock app.
![]() You can tap Camera (
You can tap Camera (![]() ) to display the Camera app.
) to display the Camera app.
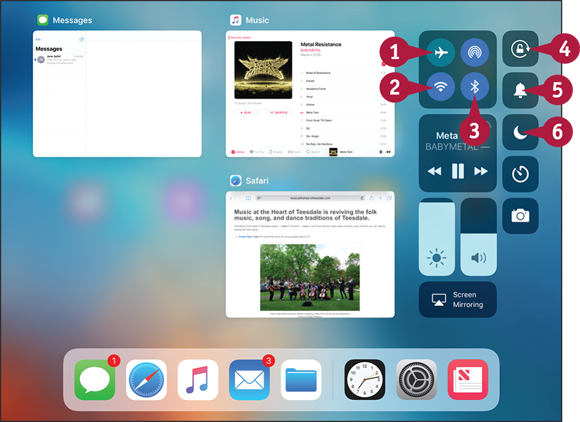
Control Essential Settings
![]() Tap Airplane Mode (
Tap Airplane Mode (![]() ) to turn Airplane Mode on or off.
) to turn Airplane Mode on or off.
![]() Tap Wi-Fi (
Tap Wi-Fi (![]() ) to turn Wi-Fi on or off.
) to turn Wi-Fi on or off.
![]() Tap Bluetooth (
Tap Bluetooth (![]() ) to turn Bluetooth on or off.
) to turn Bluetooth on or off.
![]() Tap Orientation Lock (
Tap Orientation Lock (![]() ) to turn Orientation Lock on or off.
) to turn Orientation Lock on or off.
![]() Tap Mute (
Tap Mute (![]() ) to turn muting on or off.
) to turn muting on or off.
![]() Tap Do Not Disturb (
Tap Do Not Disturb (![]() ) to turn Do Not Disturb Mode on or off.
) to turn Do Not Disturb Mode on or off.

Use AirPlay Devices and Control Music Playback
![]() You can use the playback controls to control playback.
You can use the playback controls to control playback.
![]() Press and hold the Music box.
Press and hold the Music box.
The Music box expands, showing additional controls.
![]() You can drag the Playhead to move through the song.
You can drag the Playhead to move through the song.
![]() You can tap the song art or the song details to go to the Music app.
You can tap the song art or the song details to go to the Music app.
![]() Tap AirPlay (
Tap AirPlay (![]() ).
).

The AirPlay dialog opens.
![]() Tap the AirPlay device you want to use.
Tap the AirPlay device you want to use.
The music starts playing on the AirPlay device.
![]() You can drag the Volume slider to adjust the playback volume on the current device.
You can drag the Volume slider to adjust the playback volume on the current device.
![]() Tap outside the AirPlay dialog.
Tap outside the AirPlay dialog.
The AirPlay dialog closes.
![]() Tap open space on the screen or press Home.
Tap open space on the screen or press Home.
Control Center closes.
Note: Instead of closing Control Center, you can tap an app’s thumbnail to go straight to that app.
Using the Dock
The Dock enables you to launch apps and switch quickly among them. The Dock appears on the Home screen, but you can also open it from other screens with a short swipe up from the bottom of the screen. A longer swipe up opens Control Center as well.
The Dock is divided into two sections by a vertical line. The left section contains apps fixed to the Dock, which you can customize as needed. The right section contains recent apps and suggested apps, which change as you work.
Using the Dock

Open the Dock and Launch an App
![]() With an app displayed on the screen, swipe up from the bottom of the screen.
With an app displayed on the screen, swipe up from the bottom of the screen.
Note: If you have a keyboard connected to your iPad, you can press ![]() +
+ ![]() +
+ ![]() to display or hide the Dock.
to display or hide the Dock.

The Dock appears.
![]() Icons on the left side of the Dock are fixed to the Dock. You can add, remove, and rearrange the fixed icons as needed.
Icons on the left side of the Dock are fixed to the Dock. You can add, remove, and rearrange the fixed icons as needed.
![]() This faint line divides the left side from the right side.
This faint line divides the left side from the right side.
![]() Icons on the right side of the Dock are for recent apps and suggested apps.
Icons on the right side of the Dock are for recent apps and suggested apps.
![]() Tap the icon for the app you want to launch.
Tap the icon for the app you want to launch.
The app opens.

Open a Recent File
![]() Tap and hold the icon for the appropriate app on the Dock. This example uses Pages (
Tap and hold the icon for the appropriate app on the Dock. This example uses Pages (![]() ).
).
Note: This technique works for only some apps.
A list of recent files appears.
Note: If you tap and hold for too long with the Home screen displayed, the icons start jiggling so that you can customize the layout. Press Home to stop the icons from jiggling.
![]() Tap the icon for the file you want to open.
Tap the icon for the file you want to open.
The file opens.

Open an App in Slide-Over View
![]() With an app displayed, open the Dock and drag the app’s icon up off it.
With an app displayed, open the Dock and drag the app’s icon up off it.
![]() When the icon becomes a button, release it.
When the icon becomes a button, release it.
The app appears in Slide-Over view on the right side of the screen.
Note: See the section “Multitask with Split-Screen Views and Spaces” in Chapter 6 for more coverage of multitasking.