Chapter 4
Setting Up Communications

In this chapter, you learn how to add your e-mail accounts to the Mail app, choose how and when your iPad gets your mail, and control how the messages appear. You also learn how to make your contacts appear the way you prefer, choose alert options for calendar events, and set your default account for notes.
Set Up an Exchange Server Account
Set Your Default Account and Create Signatures
Choose How Your iPad Gets Your E-Mail
Control How Your iPad Displays Your E-Mail
Organize Your E-Mail Messages by Threads
Choose How Your iPad Displays Your Contacts
Choose Alert Options for Calendar Events
Set Up Your Mail Accounts
You can set up your iCloud Mail account simply by setting up your iCloud account on your iPad. Beyond that, you can set up other e-mail accounts manually by working directly on the iPad, as explained in this section. To set up an e-mail account, you need to know the e-mail address and password, as well as the e-mail provider. You may also need to know the addresses of the mail servers the account uses. For Microsoft Exchange, you must know the domain name as well; see the next section, “Set Up an Exchange Server Account.”
Set Up Your Mail Accounts

![]() Press Home.
Press Home.
The Home screen appears.
![]() Tap Settings (
Tap Settings (![]() ).
).
The Settings screen appears.
Note: If you have not yet set up an e-mail account on the iPad, you can also open the Add Account screen by tapping Mail (![]() ) on the Home screen.
) on the Home screen.
![]() Tap Accounts & Passwords (
Tap Accounts & Passwords (![]() ).
).
The Accounts & Passwords screen appears.
![]() Tap Add Account.
Tap Add Account.

Note: This example uses a Google account. Different account types require you to enter different information. For example, for some account types, you must type a description for the e-mail account and your name the way you want it to appear in outgoing messages.
The Add Account screen appears.
![]() Tap the kind of account you want to set up.
Tap the kind of account you want to set up.

The screen for setting up that type of account appears.
![]() Type the e-mail address.
Type the e-mail address.
![]() Tap Next.
Tap Next.
![]() When prompted, type your password and tap Next.
When prompted, type your password and tap Next.
![]() If another security screen appears, such as the 2-Step Verification screen for a Google account, enter the required information and tap Next.
If another security screen appears, such as the 2-Step Verification screen for a Google account, enter the required information and tap Next.
Note: For some e-mail account types, you tap a different button than Next, such as Sign In.

The configuration screen for the account appears. The options vary depending on the account type.
![]() Make sure the Mail switch is set to On (
Make sure the Mail switch is set to On (![]() ).
).
![]() Set the Contacts switch to On (
Set the Contacts switch to On (![]() ) or Off (
) or Off (![]() ).
).
![]() Set the Calendars switch to On (
Set the Calendars switch to On (![]() ) or Off (
) or Off (![]() ).
).
![]() Set the Notes switch to On (
Set the Notes switch to On (![]() ) or Off (
) or Off (![]() ).
).
Note: If the Reminders switch appears, set it to On (![]() ) or Off (
) or Off (![]() ), as needed.
), as needed.
![]() Tap Save.
Tap Save.
The account appears on the Accounts screen.
Set Up an Exchange Server Account
You can set up your iPad to connect to Microsoft Exchange Server or Office 365 for e-mail, contacts, calendaring, reminders, and notes.
Before setting up your Exchange account, ask an administrator for the details you need. They include your e-mail address, your password, the server name, and the domain name, if required. You may be able to set up the account using only the e-mail address and password, but often you need the server name and domain as well.
Set Up an Exchange Server Account

![]() Press Home.
Press Home.
The Home screen appears.
![]() Tap Settings (
Tap Settings (![]() ).
).
The Settings screen appears.
![]() Tap Accounts & Passwords (
Tap Accounts & Passwords (![]() ).
).
The Accounts & Passwords screen appears.
![]() Tap Add Account.
Tap Add Account.
The Add Account screen appears.
![]() Tap Exchange.
Tap Exchange.

The first Exchange dialog opens.
![]() Tap Email and type your e-mail address.
Tap Email and type your e-mail address.
![]() Tap Description and type a descriptive name for the account.
Tap Description and type a descriptive name for the account.
Note: The description is to help you identify the account easily.
![]() Tap Next.
Tap Next.
The Sign in to Your Exchange Account Using Microsoft? dialog opens.
![]() Tap Sign In.
Tap Sign In.

An untitled configuration dialog opens.
Note: If the second Exchange dialog opens at this point, go to step 14.
![]() Tap Server and type the server’s address.
Tap Server and type the server’s address.
![]() Tap Domain and type the domain, if it is needed.
Tap Domain and type the domain, if it is needed.
![]() Tap Username and type your username.
Tap Username and type your username.
![]() Tap Next.
Tap Next.

The second Exchange dialog opens.
![]() Set the Mail switch to On (
Set the Mail switch to On (![]() ) or Off (
) or Off (![]() ), as needed.
), as needed.
![]() Set the Contacts switch to On (
Set the Contacts switch to On (![]() ) or Off (
) or Off (![]() ), as needed.
), as needed.
![]() Set the Calendars switch to On (
Set the Calendars switch to On (![]() ) or Off (
) or Off (![]() ), as needed.
), as needed.
![]() Set the Reminders switch to On (
Set the Reminders switch to On (![]() ) or Off (
) or Off (![]() ), as needed.
), as needed.
![]() Set the Notes switch to On (
Set the Notes switch to On (![]() ) or Off (
) or Off (![]() ), as needed.
), as needed.
![]() Tap Save.
Tap Save.
Set Your Default Account and Create Signatures
If you set up multiple e-mail accounts on your iPad, you need to set your default account. This is the account from which the Mail app sends messages unless you choose to use another account for a particular message.
You can save time by using e-mail signatures. A signature is text that the Mail app automatically adds to each message you compose — for example, your name and contact information. The default iPad signature is “Sent from my iPad.”
Set Your Default Account and Create Signatures

![]() Press Home.
Press Home.
The Home screen appears.
![]() Tap Settings (
Tap Settings (![]() ).
).
The Settings screen appears.
![]() Tap Mail (
Tap Mail (![]() ).
).
The Mail screen appears.
![]() In the Composing section, tap Default Account.
In the Composing section, tap Default Account.

The Default Account screen appears.
![]() Tap the account you want to make the default.
Tap the account you want to make the default.
![]() Tap Mail (
Tap Mail (![]() ).
).

The Mail screen appears again.
![]() Tap Signature.
Tap Signature.

The Signature screen appears.
![]() Tap All Accounts if you want to use the same signature for each e-mail account. Tap Per Account to use different signatures.
Tap All Accounts if you want to use the same signature for each e-mail account. Tap Per Account to use different signatures.
Note: If you do not want to use a signature, simply delete the default signature.
If you tap Per Account in step 8, a separate area appears for each account.
![]() Type the text of the signature or signatures.
Type the text of the signature or signatures.
Note: To make your signatures easy to read, keep them to four lines or fewer and use plain text without formatting.
![]() Tap Mail (
Tap Mail (![]() ).
).
The Mail screen appears.
Choose How Your iPad Gets Your E-Mail
Your iPad can get your e-mail messages by using two different technologies, Push and Fetch. With Push, the e-mail server “pushes” your new messages to your iPad as soon as the server receives them. With Fetch, your iPad checks in periodically with the server and downloads any new messages.
Push is normally more convenient than Fetch, but if your e-mail provider does not support Push, use Fetch and set a suitable interval for checking for messages. You can also check manually for e-mail at any point.
Choose How Your iPad Gets Your E-Mail

![]() Press Home.
Press Home.
The Home screen appears.
![]() Tap Settings (
Tap Settings (![]() ).
).
Note: Push uses more battery power, especially if you receive many messages or large attachments.
The Settings screen appears.
![]() Tap Accounts & Passwords (
Tap Accounts & Passwords (![]() ).
).
The Accounts & Passwords screen appears.
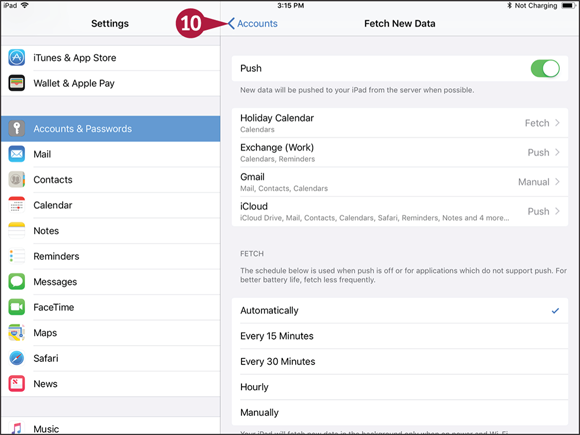
![]() The Fetch New Data button shows Push if Push is enabled or Off if Push is disabled.
The Fetch New Data button shows Push if Push is enabled or Off if Push is disabled.
![]() Tap Fetch New Data.
Tap Fetch New Data.

The Fetch New Data screen appears.
![]() To use Push for any of your e-mail accounts, set the Push switch to On (
To use Push for any of your e-mail accounts, set the Push switch to On (![]() ).
).
Note: The Fetch New Data screen shows only the options that are available for the accounts.
![]() To control how frequently Fetch runs, tap Automatically, Every 15 Minutes, Every 30 Minutes, Hourly, or Manually.
To control how frequently Fetch runs, tap Automatically, Every 15 Minutes, Every 30 Minutes, Hourly, or Manually.
![]() If you need to use different settings for an account, tap that account.
If you need to use different settings for an account, tap that account.

The account’s screen appears.
![]() Tap Push, Fetch, or Manual, as needed.
Tap Push, Fetch, or Manual, as needed.
Note: Push is not available for some types of accounts.
![]() If the account displays the Pushed Mailboxes list, as iCloud and Exchange do, tap to select each mailbox you want to push.
If the account displays the Pushed Mailboxes list, as iCloud and Exchange do, tap to select each mailbox you want to push.
![]() Tap Fetch New Data (
Tap Fetch New Data (![]() ).
).
The Fetch New Data screen appears.
![]() Tap Accounts (
Tap Accounts (![]() ).
).
The Accounts & Passwords screen appears again.
Control How Your iPad Displays Your E-Mail
You can configure the Mail app to suit the way you work. You can choose how many lines to include in the message preview, decide whether to display the To/CC label, and control whether Mail prompts you before deleting a message.
To make messages easy to read, you can change the minimum font size. You can also choose whether to load remote images in messages and whether to increase the indentation on messages you reply to or forward to others.
Control How Your iPad Displays Your E-Mail

![]() Press Home.
Press Home.
The Home screen appears.
![]() Tap Settings (
Tap Settings (![]() ).
).
The Settings screen appears.
![]() Tap Mail (
Tap Mail (![]() ).
).
The Mail screen appears.
![]() Set the Show To/Cc Labels switch to On (
Set the Show To/Cc Labels switch to On (![]() ) or Off (
) or Off (![]() ).
).
![]() Set the Load Remote Images switch to On (
Set the Load Remote Images switch to On (![]() ) or Off (
) or Off (![]() ).
).
![]() Tap Preview.
Tap Preview.
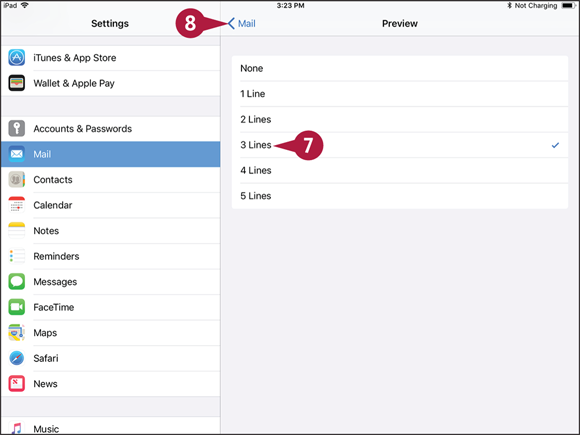
The Preview screen appears.
![]() Tap the number of lines you want to see in previews.
Tap the number of lines you want to see in previews.
![]() Tap Mail (
Tap Mail (![]() ).
).
The Mail screen appears again.
![]() Tap Flag Style.
Tap Flag Style.

The Flag Style screen appears.
![]() Tap Color or Shape to set the flag style.
Tap Color or Shape to set the flag style.
![]() Tap Mail (
Tap Mail (![]() ).
).
The Mail screen appears again.
![]() Tap Increase Quote Level.
Tap Increase Quote Level.

The Increase Quote Level screen appears.
![]() Set the Increase Quote Level switch to On (
Set the Increase Quote Level switch to On (![]() ) or Off (
) or Off (![]() ).
).
![]() Tap Mail (
Tap Mail (![]() ).
).
The Mail screen appears again.
Organize Your E-Mail Messages by Threads
The Mail app gives you two ways to view e-mail messages. You can view the messages as a simple list, or you can view them with related messages organized into threads, which are sometimes called conversations.
Having Mail display your messages as threads can help you navigate your inbox quickly and find related messages easily. You may find threading useful if you tend to have long e-mail conversations, because threading reduces the number of messages you see at once.
Organize Your E-Mail Messages by Threads

Set Mail to Organize Your Messages by Thread
![]() Press Home.
Press Home.
The Home screen appears.
![]() Tap Settings (
Tap Settings (![]() ).
).

The Settings screen appears.
![]() Tap Mail (
Tap Mail (![]() ).
).
The Mail screen appears.
![]() Set the Organize by Thread switch to On (
Set the Organize by Thread switch to On (![]() ).
).
![]() Set the Collapse Read Messages switch to On (
Set the Collapse Read Messages switch to On (![]() ) if you want Mail to collapse read messages in the thread.
) if you want Mail to collapse read messages in the thread.
![]() Set the Most Recent Message on Top switch to On (
Set the Most Recent Message on Top switch to On (![]() ) if you want the newest message in each thread to appear at the top of the screen. This option is often helpful for keeping up with your messages.
) if you want the newest message in each thread to appear at the top of the screen. This option is often helpful for keeping up with your messages.
![]() Set the Complete Threads switch to On (
Set the Complete Threads switch to On (![]() ) if you want each thread to show all its messages, even if you have moved some to other mailboxes. This option is usually helpful.
) if you want each thread to show all its messages, even if you have moved some to other mailboxes. This option is usually helpful.

Read Messages Organized into Threads
![]() Press Home.
Press Home.
The Home screen appears.
![]() Tap Mail (
Tap Mail (![]() ).
).
The Mailboxes screen appears.
![]() Tap the mailbox.
Tap the mailbox.
The inbox for the account appears.
![]() Two chevrons on the right (
Two chevrons on the right (![]() ) indicate a threaded message.
) indicate a threaded message.
![]() Tap the threaded message.
Tap the threaded message.

![]() The threaded messages appear in the right pane, with just the new part of each message displayed.
The threaded messages appear in the right pane, with just the new part of each message displayed.
![]() You can tap See More to display the entire message. Tap Done to return to the thread view.
You can tap See More to display the entire message. Tap Done to return to the thread view.
Add People to the VIP Inbox
The Mail app includes an inbox named VIP for collecting your most important messages so that you do not miss any. Mail automatically monitors your incoming messages and adds those from your designated VIPs to the VIP inbox.
To start using your VIP inbox, you must add people to the VIP list. You can add people either from your Contacts list or from e-mail messages you receive. You can configure VIP notifications in Settings to enable you to distinguish incoming VIP messages from other messages.
Add People to the VIP Inbox

![]() Press Home.
Press Home.
The Home screen appears.
![]() Tap Mail (
Tap Mail (![]() ).
).

The Mailboxes screen appears.
![]() Open the VIP list as follows:
Open the VIP list as follows:
![]() If Information (
If Information (![]() ) appears on the VIP button in the Mailboxes list, tap Information (
) appears on the VIP button in the Mailboxes list, tap Information (![]() ). Your VIP list already contains VIPs, so tapping the VIP button opens the mailbox rather than the VIP list.
). Your VIP list already contains VIPs, so tapping the VIP button opens the mailbox rather than the VIP list.
![]() If Information (
If Information (![]() ) does not appear, tap VIP.
) does not appear, tap VIP.
The VIP List pane appears.
![]() Tap Add VIP.
Tap Add VIP.

The Contacts list opens in the left pane. If All Contacts appears at the top, you are viewing all your contacts. If Contacts appears at the top, you are viewing only some groups.
![]() You can change the groups displayed by tapping Groups, making your choices on the Groups screen, and then tapping Done.
You can change the groups displayed by tapping Groups, making your choices on the Groups screen, and then tapping Done.
![]() Tap the contact you want to make a VIP.
Tap the contact you want to make a VIP.
![]() The VIP List pane appears again, with the contact now added.
The VIP List pane appears again, with the contact now added.
![]() You can tap Add VIP and repeat step 5 as needed to add all your VIPs to the VIP list.
You can tap Add VIP and repeat step 5 as needed to add all your VIPs to the VIP list.
![]() Tap VIP Alerts.
Tap VIP Alerts.

The VIP pane in Settings appears.
![]() Tap Sounds, tap the sound on the Sounds screen, and then tap VIP to return to the VIP screen.
Tap Sounds, tap the sound on the Sounds screen, and then tap VIP to return to the VIP screen.
![]() Set the Badge App Icon switch to On (
Set the Badge App Icon switch to On (![]() ) to display a badge on the Mail icon.
) to display a badge on the Mail icon.
![]() Set the Show on Cover Sheet switch to On (
Set the Show on Cover Sheet switch to On (![]() ) to display VIP messages on Cover Sheet.
) to display VIP messages on Cover Sheet.
![]() Set the Show in History switch to On (
Set the Show in History switch to On (![]() ) to include VIP messages in History.
) to include VIP messages in History.
![]() To display banners for VIP messages, set the Show as Banners switch to On (
To display banners for VIP messages, set the Show as Banners switch to On (![]() ) and then tap Temporary or Permanent, as needed.
) and then tap Temporary or Permanent, as needed.
![]() Tap Show Previews and choose which previews to display.
Tap Show Previews and choose which previews to display.
![]() Tap Mail.
Tap Mail.
The VIP List screen in the Mail app appears.
Choose How Your iPad Displays Your Contacts
You can set your iPad to sort and display the contacts in your preferred order for easy browsing. You can sort contacts either by first name or by last name; you can display contacts either by first name or last name; and you can choose whether and how to shorten last names — for example, by using the first initial and last name.
You can also control whether iOS displays suggested contacts it has found in other apps. See the tip for details.
Choose How Your iPad Displays Your Contacts

![]() Press Home.
Press Home.
The Home screen appears.
![]() Tap Settings (
Tap Settings (![]() ).
).
The Settings screen appears.
![]() Tap Contacts (
Tap Contacts (![]() ).
).
The Contacts screen appears.
![]() Tap Sort Order.
Tap Sort Order.

The Sort Order screen appears.
![]() Tap First, Last to sort by first name and then last name, or tap Last, First to sort by last name and then first name.
Tap First, Last to sort by first name and then last name, or tap Last, First to sort by last name and then first name.
![]() Tap Contacts (
Tap Contacts (![]() ).
).
![]() On the Contacts screen, tap Display Order.
On the Contacts screen, tap Display Order.
![]() On the Display Order screen, tap First, Last to display the first name and then the last name, or tap Last, First to display the last name and then the first name.
On the Display Order screen, tap First, Last to display the first name and then the last name, or tap Last, First to display the last name and then the first name.
![]() Tap Contacts (
Tap Contacts (![]() ).
).
![]() On the Contacts screen, tap Short Name.
On the Contacts screen, tap Short Name.

The Short Name screen appears.
![]() Set the Short Name switch to On (
Set the Short Name switch to On (![]() ) if you want to use name shortening.
) if you want to use name shortening.
![]() Tap your preferred means of shortening names: First Name & Last Initial, First Initial & Last Name, First Name Only, or Last Name Only.
Tap your preferred means of shortening names: First Name & Last Initial, First Initial & Last Name, First Name Only, or Last Name Only.
![]() Set the Prefer Nicknames switch to On (
Set the Prefer Nicknames switch to On (![]() ) if you want Contacts to display nicknames instead of proper names.
) if you want Contacts to display nicknames instead of proper names.
![]() Tap Contacts (
Tap Contacts (![]() ).
).
The Contacts screen appears again.
![]() Tap Default Account.
Tap Default Account.

The Default Account screen appears.
![]() Tap the account to use for new contacts by default.
Tap the account to use for new contacts by default.
![]() Tap Contacts (
Tap Contacts (![]() ).
).
The Contacts screen appears again.
Choose Alert Options for Calendar Events
Your iPad enables you to sync your calendars via iCloud and other online services. To help keep on schedule, you can set default alert times for calendar events. You can set a different alert time for each type of event — for example, 15 minutes’ notice for a regular event and a week’s notice for a birthday. You can also turn on the Time to Leave feature to make the Calendar app allow travel time based on your location, the event’s location, and current traffic.
Choose Alert Options for Calendar Events

![]() Press Home.
Press Home.
The Home screen appears.
![]() Tap Settings (
Tap Settings (![]() ).
).
The Settings screen appears.
![]() Tap Calendar (
Tap Calendar (![]() ).
).
The Calendar screen appears.
![]() Tap Sync.
Tap Sync.

The Sync screen appears.
![]() Tap the period of events you want to sync. For example, tap Events 1 Month Back.
Tap the period of events you want to sync. For example, tap Events 1 Month Back.
![]() Tap Calendar (
Tap Calendar (![]() ).
).
The Calendar screen appears again.
![]() Tap Default Alert Times.
Tap Default Alert Times.

The Default Alert Times screen appears.
![]() Set the Time to Leave switch to On (
Set the Time to Leave switch to On (![]() ) to have your iPad use your location to determine a suitable departure time for events.
) to have your iPad use your location to determine a suitable departure time for events.
![]() Tap the event type for which you want to set the default alert time. For example, tap Events.
Tap the event type for which you want to set the default alert time. For example, tap Events.

The corresponding screen appears — the Events screen, the Birthdays screen, or the All-Day Events screen.
![]() Tap the amount of time for the warning. For example, for an event, tap 15 minutes before.
Tap the amount of time for the warning. For example, for an event, tap 15 minutes before.
![]() Tap Default Alert Times (
Tap Default Alert Times (![]() ).
).
The Default Alert Times screen appears again, and you can choose default alert times for other event types if you wish.
![]() Tap Calendar (
Tap Calendar (![]() ).
).
The Calendar screen appears again.
Choose Your Default Calendar and Time Zone
When you use multiple calendars on your iPad, you should set your default calendar. This is the calendar that receives events you create outside any specific calendar. For example, if you have a Work calendar and a Home calendar, you can set the Home calendar as the default calendar.
If you travel to different time zones, you may need to specify which time zone to show event dates and times in. Otherwise, Calendar uses the time zone for your current location.
Choose Your Default Calendar and Time Zone

![]() Press Home.
Press Home.
The Home screen appears.
![]() Tap Settings (
Tap Settings (![]() ).
).
The Settings screen appears.
![]() Tap Calendar (
Tap Calendar (![]() ).
).
The Calendar screen appears.
![]() Tap Time Zone Override.
Tap Time Zone Override.

The Time Zone Override screen appears.
![]() Set the Time Zone Override switch to On (
Set the Time Zone Override switch to On (![]() ).
).
![]() Tap Time Zone.
Tap Time Zone.

The Time Zone screen appears.
![]() Type the first letters of a city in the time zone.
Type the first letters of a city in the time zone.
![]() Tap the search result you want.
Tap the search result you want.
The Time Zone Override screen appears again.
![]() Tap Calendar (
Tap Calendar (![]() ).
).
The Calendar screen appears again.
![]() Tap Default Calendar.
Tap Default Calendar.

The Default Calendar screen appears.
![]() Tap the calendar you want to make the default.
Tap the calendar you want to make the default.
![]() Tap Calendar (
Tap Calendar (![]() ).
).
The Calendar screen appears again.
Choose Settings for Notes
As described earlier in this chapter, you can set up multiple e-mail accounts on your iPad. Each e-mail account can synchronize notes if the e-mail service supports them.
You can choose whether to store notes directly on your iPad as well as — or instead of — in online accounts. You can set the default account for notes you create using Siri. You can also choose other settings, such as the default style for the first line of new notes and the grid or lines in the background of notes.
Choose Settings for Notes

![]() Press Home.
Press Home.
The Home screen appears.
![]() Tap Settings (
Tap Settings (![]() ).
).
The Settings screen appears.
![]() Tap Notes (
Tap Notes (![]() ).
).
The Notes screen appears.
![]() Set the “On My iPad” Account switch to On (
Set the “On My iPad” Account switch to On (![]() ) if you want to be able to store notes on your iPad instead of in online accounts. See the second tip.
) if you want to be able to store notes on your iPad instead of in online accounts. See the second tip.
![]() Set the Save to Photos switch to On (
Set the Save to Photos switch to On (![]() ) if you want photos and videos you take in Notes to appear in Photos.
) if you want photos and videos you take in Notes to appear in Photos.
![]() Tap Default Account.
Tap Default Account.

The Default Account screen appears.
![]() Tap the account in which you want to store new notes you create using Siri or the Notes widget in Today View.
Tap the account in which you want to store new notes you create using Siri or the Notes widget in Today View.
![]() Tap Notes (
Tap Notes (![]() ).
).
![]() Tap Sort Notes By to display the Sort Notes By screen; tap Date Edited, Date Created, or Title; and then tap Notes (
Tap Sort Notes By to display the Sort Notes By screen; tap Date Edited, Date Created, or Title; and then tap Notes (![]() ).
).
![]() Tap New Notes Start With.
Tap New Notes Start With.

The New Notes Start With screen appears.
![]() Tap Title, Heading, or Body to specify the style to use for the first paragraph of each note.
Tap Title, Heading, or Body to specify the style to use for the first paragraph of each note.
![]() Tap Notes (
Tap Notes (![]() ).
).
The Notes screen appears again.
![]() Tap Lines & Grids, tap your preferred line or grid format, and then tap Notes (
Tap Lines & Grids, tap your preferred line or grid format, and then tap Notes (![]() ).
).
![]() Tap Access Notes from Lock Screen.
Tap Access Notes from Lock Screen.

The Access Notes from Lock Screen screen appears.
![]() Tap Off, Always Create New Note, Resume Last Note Created on Lock Screen, or Resume Last Note Viewed in Notes App, as appropriate.
Tap Off, Always Create New Note, Resume Last Note Created on Lock Screen, or Resume Last Note Viewed in Notes App, as appropriate.
![]() Tap Notes (
Tap Notes (![]() ).
).
The Notes screen appears again.