Chapter 8
Keeping Your Life Organized

Your iPad comes with the Contacts app for managing your contacts, the Calendars app for organizing your schedule, the Reminders app for tracking tasks, the Maps app for directions, and the Clock app for timekeeping.
Share Contacts via E-Mail and Messages
Browse Existing Events in Your Calendars
Create New Events in Your Calendars
Work with Calendar Invitations
Track Your Commitments with Reminders
Find Your Location with the Maps App
Find Directions with the Maps App
Browse or Search for Contacts
The Contacts app displays the contacts you have synced to your iPad from an online service, such as iCloud, or created directly on the iPad. You can browse your contacts, viewing either the full list of contacts or only particular groups, or search for particular contacts.
Typically, each of your accounts that includes contacts appears as a group, but you can also create groups on your Mac in your iCloud account. You cannot create or edit groups on the iPad.
Browse or Search for Contacts

Browse Your Contacts
![]() Press Home.
Press Home.
The Home screen appears.
![]() Tap Contacts (
Tap Contacts (![]() ).
).

The Contacts list appears.
![]() If All Contacts appears, you are viewing all contacts. If Contacts appears, you are viewing only some groups of contacts.
If All Contacts appears, you are viewing all contacts. If Contacts appears, you are viewing only some groups of contacts.
![]() To navigate the screen of contacts quickly, tap the letter that you want to jump to. To navigate more slowly, scroll up or down.
To navigate the screen of contacts quickly, tap the letter that you want to jump to. To navigate more slowly, scroll up or down.
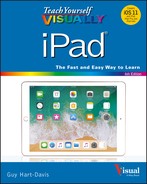
![]() Tap the contact whose information you want to view.
Tap the contact whose information you want to view.
The contact’s details appear.
![]() If necessary, tap and drag up to scroll down the screen to display more information.
If necessary, tap and drag up to scroll down the screen to display more information.

Choose Which Groups of Contacts to Display
![]() From the Contacts list, tap Groups.
From the Contacts list, tap Groups.
The Groups panel appears.
![]() Tap Show All Contacts.
Tap Show All Contacts.
Contacts displays a check mark next to each group.
Note: When you tap Show All Contacts, the Hide All Contacts button appears in place of the Show All Contacts button. You can tap Hide All Contacts to remove all the check marks.
![]() Tap a group to remove its existing check mark or apply a check mark.
Tap a group to remove its existing check mark or apply a check mark.
![]() Tap Done.
Tap Done.
The Contacts list appears, showing the contacts in the groups you selected.

Search for Contacts
![]() In the Contacts list, tap Search (
In the Contacts list, tap Search (![]() ).
).
The Search screen appears.
![]() In the Search box, type the name you want to search for.
In the Search box, type the name you want to search for.
![]() From the list of matches, tap the contact you want to view.
From the list of matches, tap the contact you want to view.
The contact’s information appears.
Create a New Contact
Normally, you put contacts on your iPad by syncing them from existing records on your computer or on an online service such as iCloud. But when necessary, you can create a new contact directly on your iPad — for example, when you meet someone you want to remember.
You can then sync the contact record back to your computer, adding the new contact to your existing contacts.
Create a New Contact
![]() Press Home.
Press Home.
The Home screen appears.
![]() Tap Contacts (
Tap Contacts (![]() ).
).
The Contacts list appears.
![]() Tap Add (
Tap Add (![]() ).
).

The New Contact screen appears, with the on-screen keyboard displayed.
![]() Type the first name.
Type the first name.
![]() Type the last name.
Type the last name.
![]() Add other information as needed by tapping each field and then typing the information.
Add other information as needed by tapping each field and then typing the information.
![]() To add a photo of the contact, tap add photo.
To add a photo of the contact, tap add photo.
The Photo dialog opens.
![]() To use an existing photo, tap Choose Photo and follow this example. To take a new photo, tap Take Photo and see the tip.
To use an existing photo, tap Choose Photo and follow this example. To take a new photo, tap Take Photo and see the tip.

The Photos dialog opens.
![]() Tap the album that contains the photo you want to use.
Tap the album that contains the photo you want to use.
The album’s contents appear.
![]() Tap the appropriate photo.
Tap the appropriate photo.

The Move and Scale screen appears.
![]() Position the part of the photo you want to use in the middle.
Position the part of the photo you want to use in the middle.
Note: Pinch in with two fingers to zoom the photo out. Pinch out with two fingers to zoom the photo in.
![]() Tap Choose.
Tap Choose.
The photo appears in the contact record.
![]() Tap Done when you finish editing the contact record.
Tap Done when you finish editing the contact record.
The contact appears in your Contacts list.
Share Contacts via E-Mail and Messages
Often in business or your personal life, you will need to share your contacts with other people. Your iPad makes it easy to share a contact record either via e-mail or via iMessage, the instant-messaging service offered by Apple.
The iPad shares the contact record as a virtual business card in the widely used vCard format. Most phones and personal-organizer software can easily import vCard files.
Share Contacts via E-Mail and Messages

Open the Contact You Want to Share
![]() Press Home.
Press Home.
The Home screen appears.
![]() Tap Contacts (
Tap Contacts (![]() ).
).

The Contacts list appears.
![]() Tap the contact you want to share.
Tap the contact you want to share.
The contact’s details appear.
![]() Tap Share Contact.
Tap Share Contact.
The Share sheet opens.

Share a Contact via E-Mail
![]() On the Share sheet, tap Mail (
On the Share sheet, tap Mail (![]() ).
).
![]() A new message with the contact’s name as the subject appears in the Mail app, with the contact record attached as a vCard file.
A new message with the contact’s name as the subject appears in the Mail app, with the contact record attached as a vCard file.
![]() Address the message by typing the address or by tapping Add Contact (
Address the message by typing the address or by tapping Add Contact (![]() ) and choosing a contact as the recipient.
) and choosing a contact as the recipient.
![]() Edit the default subject line if necessary.
Edit the default subject line if necessary.
![]() Type a message if necessary.
Type a message if necessary.
![]() Tap Send to send the message.
Tap Send to send the message.

Share a Contact via Messages
![]() On the Share sheet, tap Message (
On the Share sheet, tap Message (![]() ).
).
![]() The New iMessage screen appears, with the contact record attached to the message.
The New iMessage screen appears, with the contact record attached to the message.
![]() Address the message by typing the name or number or by tapping Add Contact (
Address the message by typing the name or number or by tapping Add Contact (![]() ) and choosing a contact as the recipient.
) and choosing a contact as the recipient.
![]() Type a message if necessary.
Type a message if necessary.
![]() Tap Send (
Tap Send (![]() ) to send the message.
) to send the message.
Browse Existing Events in Your Calendars
The Calendar app gives you a great way of managing your schedule and making sure you never miss an appointment.
After setting up your calendars to sync using iCloud, as described in Chapter 1, or another calendar service, you can take your calendars with you everywhere and consult them whenever you need to. You can view all your calendars or only the ones you choose.
Browse Existing Events in Your Calendars

![]() Press Home.
Press Home.
The Home screen appears.
![]() Tap Calendar (
Tap Calendar (![]() ).
).
The Calendar screen appears.
![]() Tap Month to see Month view, in which each day appears in a box on a calendar chart.
Tap Month to see Month view, in which each day appears in a box on a calendar chart.
![]() Month view shows a one-line entry with the time of each event that will fit in the box.
Month view shows a one-line entry with the time of each event that will fit in the box.
![]() Tap an event.
Tap an event.

A dialog opens, showing the event’s details.
![]() You can tap Edit to open the event so you can change its details.
You can tap Edit to open the event so you can change its details.
Note: You can drag up and down to change the month that appears.
![]() Tap outside the dialog to close it.
Tap outside the dialog to close it.
![]() Tap Week.
Tap Week.

The Calendar switches to Week view.
![]() Your events appear on a grid that shows the days as columns and the hours as rows.
Your events appear on a grid that shows the days as columns and the hours as rows.
Note: In Week view, you can scroll left, right, up, or down to change the days and hours shown.
Note: In Week view and Day view, you can move an event by tapping and holding it until its color darkens, and then dragging it to where you want it.
![]() Tap Day.
Tap Day.

The Calendar switches to Day view.
![]() You can tap another day to display that day.
You can tap another day to display that day.
![]() The left pane shows a vertical timeline for the day.
The left pane shows a vertical timeline for the day.
![]() The right pane shows the details of the selected event.
The right pane shows the details of the selected event.
![]() You can tap Edit to edit the event.
You can tap Edit to edit the event.
![]() Tap Today.
Tap Today.
Calendar displays the events for the current day.
Create New Events in Your Calendars
The Calendar app enables you to both sync events that you have created on other devices to your iPad and to create new events directly on the iPad. You can create either a straightforward, one-time event or an event that repeats on a schedule. You can also choose which calendar the event belongs to.
You can create a new event from any view, but Week view is usually the easiest view to use.
Create New Events in Your Calendars

![]() Press Home.
Press Home.
The Home screen appears.
![]() Tap Calendar (
Tap Calendar (![]() ).
).
The Calendar app opens.
![]() Tap Week to switch to Week view.
Tap Week to switch to Week view.
![]() Tap and hold the appropriate time slot.
Tap and hold the appropriate time slot.
The New Event dialog opens.
![]() Type the title of the event.
Type the title of the event.
![]() Tap Location.
Tap Location.
The Location dialog opens.
![]() Type or tap the location of the event.
Type or tap the location of the event.
The location appears.
![]() For an all-day event, set the All-day switch to On (
For an all-day event, set the All-day switch to On (![]() ).
).
![]() Tap Alert.
Tap Alert.

The Alert dialog opens.
![]() Tap the timing for the alert — for example, 30 minutes before.
Tap the timing for the alert — for example, 30 minutes before.
![]() You can tap None to remove the alert that is currently set.
You can tap None to remove the alert that is currently set.

The New Event dialog appears again.
Note: You can assign a second alert to the event by tapping Second Alert after choosing the first alert. A second alert can be a useful safety net for events you must not miss.
![]() Tap Starts.
Tap Starts.
The time controls appear.
![]() Drag the date and time controls to set the start time.
Drag the date and time controls to set the start time.
![]() Tap Ends.
Tap Ends.
![]() Set the end time.
Set the end time.
![]() If you need to change the time zone, tap Time Zone, type the city name, and then tap the time zone.
If you need to change the time zone, tap Time Zone, type the city name, and then tap the time zone.
![]() Tap Calendar.
Tap Calendar.

The Calendar dialog opens.
![]() Tap the calendar to which you want to assign the event.
Tap the calendar to which you want to assign the event.
The New Event dialog appears again.
![]() Tap Add.
Tap Add.
The event appears on your calendar.
Work with Calendar Invitations
Most likely, you will receive invitations to events that others create. When you receive an event invitation attached to an e-mail message, you can choose whether to accept the invitation or decline it. If you accept the invitation, you can add the event automatically to a calendar of your choice and set an alert for it.
Work with Calendar Invitations

Deal with an Invitation from an Alert
![]() When an invitation alert appears, tap the alert.
When an invitation alert appears, tap the alert.
Note: To control whether you receive alerts for invitations, press Home, and then tap Settings (![]() ). In the Settings app, tap Notifications (
). In the Settings app, tap Notifications (![]() ), and then tap Calendar (
), and then tap Calendar (![]() ). Tap Invitations to display the Invitations screen. Set the Show on Cover Sheet switch to On (
). Tap Invitations to display the Invitations screen. Set the Show on Cover Sheet switch to On (![]() ) if you want to receive invitation alerts on Cover Sheet. If you want to receive invitation alerts as banners, set the Show as Banners switch to On (
) if you want to receive invitation alerts on Cover Sheet. If you want to receive invitation alerts as banners, set the Show as Banners switch to On (![]() ), and then tap Temporary or Permanent to specify the banner type.
), and then tap Temporary or Permanent to specify the banner type.

The Calendar app appears.
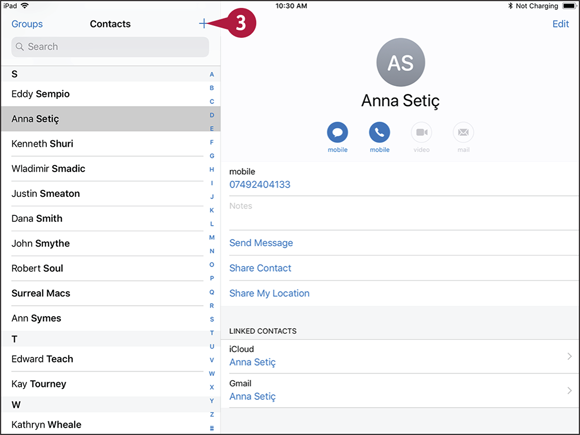
![]() The invitation’s event appears in gray.
The invitation’s event appears in gray.
![]() Tap the invitation’s event.
Tap the invitation’s event.
A pop-up panel appears showing the details of the invitation.
![]() Depending on the account type, you may be able to tap Propose New Time to propose a different time.
Depending on the account type, you may be able to tap Propose New Time to propose a different time.
![]() Tap Calendar and choose which calendar to assign the invitation to.
Tap Calendar and choose which calendar to assign the invitation to.
![]() You can tap Alert and set alert timing.
You can tap Alert and set alert timing.
![]() Tap Accept, Maybe, or Decline to give your response.
Tap Accept, Maybe, or Decline to give your response.
The pop-up panel closes.
The event takes on the color of the calendar you chose.

Deal with Invitations from the Inbox
![]() The number in parentheses on the right of the Inbox button shows the number of invitations.
The number in parentheses on the right of the Inbox button shows the number of invitations.
![]() Tap Inbox.
Tap Inbox.
The Inbox panel opens.
![]() You can tap the invitation to display all its details.
You can tap the invitation to display all its details.
![]() Tap Accept, Maybe, or Decline to give your response.
Tap Accept, Maybe, or Decline to give your response.
The invitation disappears from the New tab.
![]() You can tap Replied to display the Replied tab, which contains a list of the invitations you have received, including your responses.
You can tap Replied to display the Replied tab, which contains a list of the invitations you have received, including your responses.
![]() Tap outside the Inbox panel.
Tap outside the Inbox panel.
The Inbox panel closes.
Track Your Commitments with Reminders
The Reminders app gives you an easy way to note and track your commitments. Reminders comes with a built-in list called Reminders, but you can create as many other lists as you need — for example, Errands, Shopping, or Household. You can create a reminder with no due time. Alternatively, you can tie each reminder to a due time, arriving at or leaving a location, or both, and have your iPad remind you of each reminder at the appropriate time or place.
Track Your Commitments with Reminders

Open the Reminders App
![]() Press Home.
Press Home.
The Home screen appears.
![]() Tap Reminders (
Tap Reminders (![]() ).
).
The Reminders screen appears.
Note: When you complete a task, tap the circle (![]() ) to the left of the reminder (
) to the left of the reminder (![]() changes to
changes to ![]() ). If you need to reinstate the task, tap the circle again (
). If you need to reinstate the task, tap the circle again (![]() changes to
changes to ![]() ).
).

Create a New Reminder
![]() In the Reminders app, tap Add (
In the Reminders app, tap Add (![]() ) on the first blank line below the last reminder in the list. You can also simply tap the blank line.
) on the first blank line below the last reminder in the list. You can also simply tap the blank line.
Reminders starts a new reminder and displays the on-screen keyboard.
![]() Type the text of the reminder.
Type the text of the reminder.
![]() If you do not want to set any further details for the reminder, tap Done.
If you do not want to set any further details for the reminder, tap Done.
![]() Tap Information (
Tap Information (![]() ).
).
Note: To create a reminder using Siri, press Home for a couple of seconds until Siri beeps, and then say the reminder aloud. For example, say “Remind me at 8AM tomorrow to take the project files to the office.”

The Details dialog opens.
![]() Set the Remind me on a day switch to On (
Set the Remind me on a day switch to On (![]() ).
).
The Alarm button appears.
![]() Tap Alarm.
Tap Alarm.

Date and time controls appear.
![]() Select the date and time for the reminder.
Select the date and time for the reminder.
![]() If you need to create a repeating reminder, tap Repeat and choose the repeat schedule in the Repeat dialog. For example, touch Every Day or Every Week.
If you need to create a repeating reminder, tap Repeat and choose the repeat schedule in the Repeat dialog. For example, touch Every Day or Every Week.
![]() To assign a priority, tap !, !!, or !!!. To remove the priority, tap None.
To assign a priority, tap !, !!, or !!!. To remove the priority, tap None.
![]() To add notes, tap Notes and type the text.
To add notes, tap Notes and type the text.
![]() Tap Done.
Tap Done.
The Details dialog closes.
You can organize your reminders into different lists so that you can look at a single category of reminders at a time. For example, you may find it useful to create a Work list that enables you to focus on your work-related reminders.
After creating lists, you can easily switch among them. You can also move a reminder from one list to another as needed. And when you no longer need a particular reminder, you can delete it.

Create Different Lists of Reminders
![]() On the Reminders screen, tap Add List.
On the Reminders screen, tap Add List.
Note: If you have set up multiple Reminders accounts, the Select Account dialog opens. Tap the account in which to create the list.
![]() Type the name for the new list.
Type the name for the new list.
![]() Tap the color button for the list.
Tap the color button for the list.
![]() Tap Done.
Tap Done.
Reminders adds the new list.
Note: To delete a Reminders list quickly, tap it in the lists pane and swipe left; then tap Delete and tap Delete again in the confirmation dialog. Alternatively, tap Edit at the bottom of the lists pane, tap Delete, and then tap Delete again.
Note: Deleting a Reminders list also deletes all the reminders it contains.

Switch Among Your Reminders Lists
![]() On the Reminders screen, tap the list you want to display.
On the Reminders screen, tap the list you want to display.
![]() The list appears.
The list appears.

Change the List to Which a Reminder Is Assigned
![]() In a Reminders list, tap the reminder.
In a Reminders list, tap the reminder.
The Information button (![]() ) appears.
) appears.
![]() Tap Information (
Tap Information (![]() ).
).
The Details dialog opens.
![]() Tap List.
Tap List.

The Change List dialog opens.
![]() Tap the list to which you want to assign the reminder.
Tap the list to which you want to assign the reminder.
The Details dialog opens.
![]() Tap Done.
Tap Done.
The Details dialog closes.
The reminder moves to the list you chose.
Note: You can delete a reminder by tapping Edit on its list page, tapping next to the reminder, and then tapping Delete. Alternatively, tap the reminder in its list, swipe left, and then tap Delete.
Take Notes
Your iPad is a great device for taking notes wherever you go. The Notes app enables you to create notes stored in an online account, such as your iCloud account, and sync them across your devices. Alternatively, you can store notes on your iPad itself, which is useful for private notes you do not want to sync with other devices.
Take Notes

Open the Notes App, Choose the Account, and Create a Note
![]() Press Home.
Press Home.
The Home screen appears.
![]() Tap Notes (
Tap Notes (![]() ).
).
Note: If you want to be able to continue work on your latest note quickly, add the Notes widget to Today View. You can then tap the widget to go straight to the latest note in the Notes app.
Note: On an iPad Pro, you can start a note quickly from the lock screen by tapping the screen with the Apple Pencil.

The Notes app opens.
![]() The Notes pane shows the notes in the account you are currently using.
The Notes pane shows the notes in the account you are currently using.
![]() The note on which you were last working appears.
The note on which you were last working appears.
![]() You can tap Full Screen (
You can tap Full Screen (![]() ) to expand the current note to full-screen, hiding the Notes pane. Tap Back (
) to expand the current note to full-screen, hiding the Notes pane. Tap Back (![]() ) or Notes to display the Notes pane again.
) or Notes to display the Notes pane again.
![]() Tap Back (
Tap Back (![]() ).
).

The Folders pane appears.
![]() The Recently Deleted folder contains notes you have recently deleted. Notes remain here for 30 days and then are deleted.
The Recently Deleted folder contains notes you have recently deleted. Notes remain here for 30 days and then are deleted.
![]() You can create a new folder in your iCloud account by tapping New Folder.
You can create a new folder in your iCloud account by tapping New Folder.
![]() Tap the account or folder in which you want to create the new note.
Tap the account or folder in which you want to create the new note.

The Notes pane appears, showing the notes in that account or folder.
![]() Tap New (
Tap New (![]() ).
).
A new note opens.
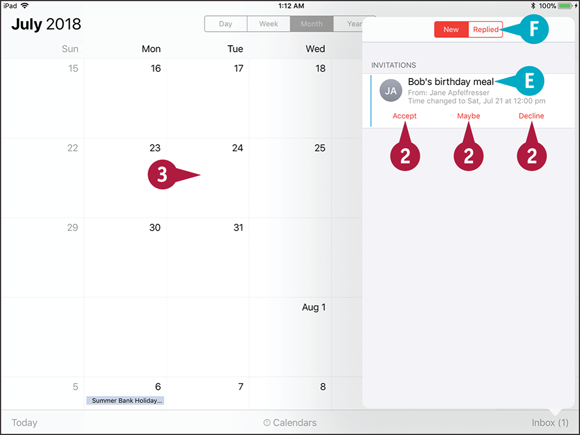
The Notes app includes built-in styles that enable you to format your notes with a title, headings, body text, bulleted lists, dashed lists, and numbered lists. By using these styles to format notes, you can create structured notes that you can easily use in a word processing app. You can also apply direct formatting, such as bold, italic, underline, and strikethrough.
You can also insert round check boxes to create lists from which you can check off completed items.

Enter Text and Apply Formatting
![]() After starting a note, type the title or first paragraph of the note.
After starting a note, type the title or first paragraph of the note.
Note: The first paragraph of the new note receives the style specified by the New Notes Start With setting. To change this setting, press Home, tap Settings (![]() ), and then tap Notes (
), and then tap Notes (![]() ).
).
![]() Tap return and continue typing the note.
Tap return and continue typing the note.
![]() The note’s entry in the Notes pane shows the first line and part of the next line.
The note’s entry in the Notes pane shows the first line and part of the next line.
![]() To apply a style to the current paragraph, tap Formatting (
To apply a style to the current paragraph, tap Formatting (![]() ).
).
The Formatting panel opens.
![]() Tap the style or formatting you want to apply.
Tap the style or formatting you want to apply.

The Formatting panel closes.
![]() The paragraph takes on the style or formatting.
The paragraph takes on the style or formatting.
![]() Tap Check Box (
Tap Check Box (![]() ).
).
![]() A round check box appears in the text.
A round check box appears in the text.
![]() Type the text to accompany the check box.
Type the text to accompany the check box.
![]() Tap return.
Tap return.

Another round check box appears at the beginning of the next paragraph, continuing the list.
![]() When you want to stop using check boxes, tap return twice in succession.
When you want to stop using check boxes, tap return twice in succession.
Note: You can also stop using check boxes by tapping Check Box (![]() ) on a paragraph that contains a check box.
) on a paragraph that contains a check box.
The Notes app enables you to add tables for laying out data regularly in rows and columns. You can customize each table with the number of rows and columns needed.
You can also add graphical objects to notes. You can use the iPad’s camera to scan a hardcopy document into a note, capture a new photo or video with the camera or insert an existing photo or video, or draw a sketch with your finger or with the Apple Pencil.

Insert a Table
![]() Position the insertion point where you want the table to appear.
Position the insertion point where you want the table to appear.
![]() Tap Table (
Tap Table (![]() ).
).
Notes inserts a table with two columns and two rows.
The insertion point appears in the first cell.
![]() Type the content for the first cell.
Type the content for the first cell.
![]() Tap Next on the keyboard.
Tap Next on the keyboard.
The focus moves to the next cell.
![]() Type the content for the next cell.
Type the content for the next cell.
![]() Tap Column Commands (
Tap Column Commands (![]() ).
).

The command bar appears.
![]() Tap Add Column.
Tap Add Column.
![]() You can tap Delete Column to delete the current column.
You can tap Delete Column to delete the current column.
Notes adds a new column.
![]() Continue typing the cell entries, tapping Next on the keyboard to move to the next cell.
Continue typing the cell entries, tapping Next on the keyboard to move to the next cell.
Note: If the current cell is the last cell in the table, tapping Next automatically adds a row to the table.
![]() You can add a new row below the current row by tapping Row Commands (
You can add a new row below the current row by tapping Row Commands (![]() ) and then tapping Add Row on the command bar that appears.
) and then tapping Add Row on the command bar that appears.

Add a Document, Photo, Video, or Sketch
![]() Place the insertion point where you want the item to appear.
Place the insertion point where you want the item to appear.
![]() Tap Add (
Tap Add (![]() ).
).
The Add pop-up panel opens.
![]() Tap Scan Documents, Take Photo or Video, Photo Library, or Add Sketch to specify what you want to add. This example uses Scan Documents.
Tap Scan Documents, Take Photo or Video, Photo Library, or Add Sketch to specify what you want to add. This example uses Scan Documents.

The appropriate screen appears, such as the screen for scanning documents.
![]() Aim the camera at the relevant part of the document.
Aim the camera at the relevant part of the document.
![]() Tap Take Photo (
Tap Take Photo (![]() ).
).
A crop area appears.
![]() Drag the corner handles to select the area you want to keep.
Drag the corner handles to select the area you want to keep.
![]() Tap Keep Scan.
Tap Keep Scan.
The item appears in the note.
Find Your Location with the Maps App
The Maps app can pinpoint your location by using known Wi-Fi networks or — on cellular iPads — by using GPS (Global Positioning System) satellites or cellular towers. You can view your location on a road map or a satellite picture, either with or without place names. You can switch among map types to find the most useful one. To help you get your bearings, the Tracking feature in the Maps app can show you which direction you are facing.
Find Your Location with the Maps App

![]() Press Home.
Press Home.
The Home screen appears.
![]() Tap Maps (
Tap Maps (![]() ).
).
The Maps screen appears.
![]() A blue dot shows your current location. The expanding circle around the blue dot shows that Maps is determining your location.
A blue dot shows your current location. The expanding circle around the blue dot shows that Maps is determining your location.
Note: It may take a minute for Maps to work out your location accurately. While Maps determines the location, the blue dot moves, even though the iPad remains stationary.
![]() Tap and pinch in with two fingers.
Tap and pinch in with two fingers.
Note: You can tap and pinch out with two fingers to zoom in.
The map zooms out, showing a larger area.
![]() Tap Information (
Tap Information (![]() ).
).

The Maps Settings dialog opens.
![]() Tap Satellite.
Tap Satellite.

The Satellite view appears.
The Maps Settings dialog changes to a darker theme.
![]() You can set the Labels switch to Off (
You can set the Labels switch to Off (![]() ) to hide the place names.
) to hide the place names.
![]() Set the Traffic switch to On (
Set the Traffic switch to On (![]() ).
).
![]() Tap Close (
Tap Close (![]() ).
).

The Maps Settings dialog closes.
![]() Traffic information appears where it is available.
Traffic information appears where it is available.
![]() Tap Location (
Tap Location (![]() changes to
changes to![]() ) to turn on the Location service.
) to turn on the Location service.
![]() Tap Location (
Tap Location (![]() changes to
changes to ![]() ).
).
![]() The Compass arrow appears (
The Compass arrow appears (![]() ). The red arrow indicates north.
). The red arrow indicates north.
![]() The map turns to show the direction the iPad is facing, so that you can orient yourself.
The map turns to show the direction the iPad is facing, so that you can orient yourself.
![]() You can tap 3D to switch to a three-dimensional view.
You can tap 3D to switch to a three-dimensional view.
Find Directions with the Maps App
The Maps app on your iPad can give you directions to where you want to go. Maps can also show you current traffic congestion to help you identify the most viable route for a journey. Maps displays driving directions by default, but you can also display walking and, in some cities, mass transit directions.
Following map directions requires an Internet connection. If your iPad is not a cellular model and you have an iPhone, share the directions to your iPhone before you leave so that you can follow the route.
Find Directions with the Maps App

![]() Press Home.
Press Home.
The Home screen appears.
![]() Tap Maps (
Tap Maps (![]() ).
).
The Maps app opens.
![]() Tap Search for a place or address (
Tap Search for a place or address (![]() ).
).
![]() Type your search term.
Type your search term.
The Search panel expands and displays search results.
![]() Tap the appropriate search result.
Tap the appropriate search result.

A map of the place appears.
A panel containing information about the place appears.
![]() Tap Directions.
Tap Directions.

The Directions panel appears, showing possible routes.
![]() You can change the starting point by tapping the current location, typing the new location in the Change Route dialog, and then tapping Route.
You can change the starting point by tapping the current location, typing the new location in the Change Route dialog, and then tapping Route.
Note: In the Change Route dialog, you can tap Switch Places (![]() ) to switch the start location and end location.
) to switch the start location and end location.
![]() Red pins mark the start and end points.
Red pins mark the start and end points.
![]() You can tap a time button to view a different route. The time button changes to blue to indicate it is active.
You can tap a time button to view a different route. The time button changes to blue to indicate it is active.
![]() You can tap Go to start following that route.
You can tap Go to start following that route.
![]() Tap Details for the route you want to view.
Tap Details for the route you want to view.

Maps displays the details for the route.
![]() You can tap a direction to view that stage of the journey.
You can tap a direction to view that stage of the journey.
![]() The map shows the detail of that stage.
The map shows the detail of that stage.
![]() Tap Done to return to the overview of the route.
Tap Done to return to the overview of the route.
Using the Maps App’s Favorites and Contacts
When you want to return to a location easily in the Maps app, you can create a favorite for the location. Similarly, you can add a location to your contacts, so that you can access it either from the Contacts app or from the Maps app. You can either create a new contact or add the location to an existing contact. You can also return quickly to locations you have visited recently but not marked with a favorite or a contact.
Using the Maps App’s Favorites and Contacts

![]() Press Home.
Press Home.
The Home screen appears.
![]() Tap Maps (
Tap Maps (![]() ).
).
The Maps screen appears.
![]() Find the place for which you want to create a favorite. For example, tap and drag the map, or search for the location you want.
Find the place for which you want to create a favorite. For example, tap and drag the map, or search for the location you want.
![]() Tap and hold the place.
Tap and hold the place.

The Information panel opens, showing details for the place. If the place has a name in Apple Maps, the name appears at the top of the Information panel. Otherwise, the Information panel shows Marked Location.
![]() You can quickly get directions to or from this place by tapping Directions.
You can quickly get directions to or from this place by tapping Directions.
![]() Tap Favorite (
Tap Favorite (![]() ).
).

The Add to Favorites dialog opens.
![]() Type the name for the favorite. Alternatively, you can accept the default name, if there is one.
Type the name for the favorite. Alternatively, you can accept the default name, if there is one.
![]() Tap Save.
Tap Save.

The Add to Favorites dialog closes.
The Information panel remains open.
![]() Favorite (
Favorite (![]() ) changes to Favorited (
) changes to Favorited (![]() ).
).
![]() To create a new contact record for this location, tap Create New Contact (
To create a new contact record for this location, tap Create New Contact (![]() ). In the New Contact dialog that opens, type the details for the contact, and then tap Done.
). In the New Contact dialog that opens, type the details for the contact, and then tap Done.
![]() To add this location to an existing contact record, tap Add to Existing Contact (
To add this location to an existing contact record, tap Add to Existing Contact (![]() ). On the Contacts screen that appears, tap the contact to which you want to add the location.
). On the Contacts screen that appears, tap the contact to which you want to add the location.
Using the Clock App
The Clock app on your iPad provides five helpful time-keeping features. The World Clock feature enables you to easily keep track of the time in different cities. The Alarm feature lets you set as many alarms as you need, each with its own schedule and your choice of sound. The Bedtime feature encourages you to follow consistent times for going to bed and waking; it also provides sleep analysis. The Stopwatch feature allows you to time events to the hundredth of a second. The Timer feature counts down a set amount of time and plays a sound when the timer ends.
Open the Clock App and Set Up the World Clock

To open the Clock app, press Home and then tap Clock (![]() ) on the Home screen. The app displays the screen for the feature you last used. You can switch among the five features by tapping World Clock, Alarm, Bedtime, Stopwatch, or Timer at the bottom of the screen.
) on the Home screen. The app displays the screen for the feature you last used. You can switch among the five features by tapping World Clock, Alarm, Bedtime, Stopwatch, or Timer at the bottom of the screen.
Tap World Clock (![]() changes to
changes to ![]() ) at the bottom of the screen to display the World Clock screen. The World Clock shows a dark face for a clock where the local time is between 6:00PM and 5:59AM and a white face for a clock where the local time is between 6:00AM and 5:59PM.
) at the bottom of the screen to display the World Clock screen. The World Clock shows a dark face for a clock where the local time is between 6:00PM and 5:59AM and a white face for a clock where the local time is between 6:00AM and 5:59PM.
To add cities, tap Add (![]() ) and then either type the start of the city name or simply browse the list. Tap the city you want to add, and it appears at the bottom of the list on the World Clock screen.
) and then either type the start of the city name or simply browse the list. Tap the city you want to add, and it appears at the bottom of the list on the World Clock screen.
To rearrange the cities, tap and hold a clock, and then drag it to its new position. To remove a city, tap Edit, tap Delete (![]() ), and then tap Delete; tap Done when you finish.
), and then tap Delete; tap Done when you finish.
Set Alarms

Tap Alarm (![]() changes to
changes to ![]() ) at the bottom of the screen to display the Alarm screen, which shows the current alarms with switches for enabling and disabling them.
) at the bottom of the screen to display the Alarm screen, which shows the current alarms with switches for enabling and disabling them.
Tap Add (![]() ) to start creating a new alarm. In the Add Alarm dialog, spin the dials to set the time. To create a repeating alarm, tap Repeat and then tap the days in the Repeat dialog. Tap Back (
) to start creating a new alarm. In the Add Alarm dialog, spin the dials to set the time. To create a repeating alarm, tap Repeat and then tap the days in the Repeat dialog. Tap Back (![]() ) to return to the Add Alarm dialog, tap Label, type a descriptive name for the alarm, and then tap Done. Tap Sound and choose the sound to play, and set the Snooze switch to On (
) to return to the Add Alarm dialog, tap Label, type a descriptive name for the alarm, and then tap Done. Tap Sound and choose the sound to play, and set the Snooze switch to On (![]() ) or Off (
) or Off (![]() ), as needed. Tap Save to save the new alarm.
), as needed. Tap Save to save the new alarm.
Use the Bedtime Feature

Tap Bedtime (![]() changes to
changes to ![]() ) at the bottom of the screen to display the Bedtime screen. To set up the Bedtime feature, tap Get Started to open the first Bedtime dialog, in which you specify the time you want to wake up. Tap Next to move through the subsequent Bedtime dialogs, in which you choose the days on which the Bedtime alarm should run, specify how many hours of sleep you need each night, choose the timing of your bedtime reminder, and decide what to hear as the alarm. Tap Save on the final screen. The Bedtime screen then shows your selections. You can enable or disable Bedtime by setting the Bedtime switch to On (
) at the bottom of the screen to display the Bedtime screen. To set up the Bedtime feature, tap Get Started to open the first Bedtime dialog, in which you specify the time you want to wake up. Tap Next to move through the subsequent Bedtime dialogs, in which you choose the days on which the Bedtime alarm should run, specify how many hours of sleep you need each night, choose the timing of your bedtime reminder, and decide what to hear as the alarm. Tap Save on the final screen. The Bedtime screen then shows your selections. You can enable or disable Bedtime by setting the Bedtime switch to On (![]() ) or Off (
) or Off (![]() ). Tap Options to change your Bedtime settings.
). Tap Options to change your Bedtime settings.
Time Events with the Stopwatch

Tap Stopwatch (![]() changes to
changes to ![]() ) at the bottom of the screen to display the Stopwatch screen. You can then tap Start to start the stopwatch running.
) at the bottom of the screen to display the Stopwatch screen. You can then tap Start to start the stopwatch running.
If you need to mark lap times, tap Lap at the appropriate points. The elapsed lap times appear at the bottom of the screen. The current lap time appears below the main time readout.
Tap Stop to stop the stopwatch. You can then tap Start to restart the stopwatch or tap Reset to reset it so it is ready for its next use.
Use the Timer

Tap Timer (![]() changes to
changes to ![]() ) at the bottom of the screen to display the Timer screen. Spin the Hours dial, the Minutes dial, and the Seconds dial to set the amount of time you want to count down. Tap the current sound name below the dials to display the When Timer Ends dialog, tap the sound you want to play or the Stop Playing action, and then tap Set. You can then tap Start to start the timer.
) at the bottom of the screen to display the Timer screen. Spin the Hours dial, the Minutes dial, and the Seconds dial to set the amount of time you want to count down. Tap the current sound name below the dials to display the When Timer Ends dialog, tap the sound you want to play or the Stop Playing action, and then tap Set. You can then tap Start to start the timer.
If you need to interrupt the timer, tap Cancel or Pause. Otherwise, when the timer sound plays, tap the prompt to stop it.
The Stop Playing action enables you to play music for a period of time and have it stop automatically — for example, to lull you to sleep.
Using Apple Pay
If your iPad has the Touch ID feature for unlocking the screen with a fingerprint, you can use Apple’s payment service to make payments online using your iPad. All current iPad models and those from the last several years have Touch ID, but older models do not.
Apple’s payment service is called Apple Pay. You can use it at a wide variety of online stores for convenience and security. If you have an iPhone 6 or a later model, such as an iPhone 8 or iPhone X, you can also use Apple Pay to make contactless payments at payment terminals.
Understand How Apple Pay Works

The Apple Pay service links with the four major payment networks — Visa, MasterCard, American Express, and Discover — and enables you to use debit cards and credit cards issued on these networks by a wide variety of banks.
The iPhone 6 and later iPhone models can use Apple Pay to make contactless payments at physical sales terminals in retail locations, thanks to the built-in Near Field Communications, or NFC, chip. At this writing, no iPad has an NFC chip, but iPads that have Touch ID can still use Apple Pay to make payments in compatible apps and websites.
Set Up Your Means of Payment

Before you can make a payment with Apple Pay, you must set up your means of payment. To do so, you add the details of your debit card or credit card to Apple Pay.
When you first set up your iPad, iOS prompts you to add a credit card or debit card to Apple Pay. You can add other cards by using the Settings app. Press Home to display the Home screen, and then tap Settings (![]() ) to display the Settings screen. Tap Wallet & Apple Pay (
) to display the Settings screen. Tap Wallet & Apple Pay (![]() ) to display the Wallet & Apple Pay screen, tap Add Credit or Debit Card, and then follow the prompts. You can either use the iPad’s rear camera to recognize the card’s details or tap Enter Card Details Manually and type in the details.
) to display the Wallet & Apple Pay screen, tap Add Credit or Debit Card, and then follow the prompts. You can either use the iPad’s rear camera to recognize the card’s details or tap Enter Card Details Manually and type in the details.
The iPad may also prompt you to add the credit card or debit card associated with your iTunes account to Apple Pay.
Make a Payment Online with Your iPad

After setting up Apple Pay, you can use it to make payments online using your iPad. You can make payments in various apps, including the Safari web browser. You can make payments to any retailer that accepts Apple Pay.
When an app displays a button with the Apple Pay logo on a payment screen, you can tap that button to use Apple Pay. On the subsequent screen, you use one of the fingers you have registered for Touch ID on Home to confirm the purchase and authenticate your identity.
Make a Payment at a Payment Terminal with an iPhone or Apple Watch

If you have an iPhone 6 or a later model, such as an iPhone 8 or iPhone X, you can use Apple Pay to make payments easily at payment terminals located in retailers, cafés and restaurants, and places such as stations or airports.
Before you can make a payment, you must set up your means of payment on the iPhone. Apple Pay does not sync credit and debit cards from one iOS device to another, so you must add to Apple Pay on the iPhone each card you want to use for Apple Pay. Press Home to display the Home screen, and then tap Settings (![]() ) to display the Settings screen. Tap Wallet & Apple Pay (
) to display the Settings screen. Tap Wallet & Apple Pay (![]() ) to display the Wallet & Apple Pay screen, tap Add Credit or Debit Card, and then follow the prompts.
) to display the Wallet & Apple Pay screen, tap Add Credit or Debit Card, and then follow the prompts.
To make a payment, you simply bring your iPhone up to the payment terminal, verify the amount displayed on-screen, and place one of the fingers you have registered with Touch ID on Home to approve the transaction and authenticate your identity.
If you have an Apple Watch, you can use it to make payments at payment terminals. Because your Apple Watch is an accessory to your iPhone, Apple Watch picks up the cards you have added to your iPhone; you do not need to add them to Apple Watch separately.