
9 NN-XT: Close-Up
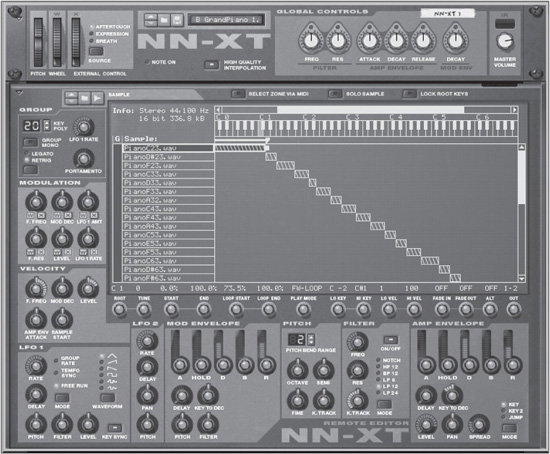
THE NN-XT IS THE SAMPLER THAT PICKS UP WHERE THE NN-19 LEAVES OFF. For people who have created Reason song files with versions of Reason prior to the addition of the NN-XT, it is a good thing that the NN-19 remains in the program for the sake of compatibility. However, after using the NN-19 as a learning tool, you will probably want to move up to the NN-XT. It’s a big step toward more functionality, compatibility, and, of course, creativity (see Figure 9.1).
© Propellerhead Software AB.
What Makes the NN-XT Different?
Aside from the extreme graphic facelift, there are many other differences between the NN-XT and NN-19:
![]() Multilayered sampling: The NN-XT can trigger samples according to their assigned velocity.
Multilayered sampling: The NN-XT can trigger samples according to their assigned velocity.
![]() More outputs: The NN-XT has eight stereo outputs, or up to 16 mono outputs, with the use of the panning assignments.
More outputs: The NN-XT has eight stereo outputs, or up to 16 mono outputs, with the use of the panning assignments.
![]() More control: The NN-XT allows individual control over each sample in a patch.
More control: The NN-XT allows individual control over each sample in a patch.
Sample format is the same for both NN-XT and NN-19 as well as Redrum and Kong. The audio file format support differs depending on which computer OS you are using. The NN-19 can read audio files in the following formats:
![]() In Windows 7: WAV, AIF, MP3, AAC, M4A, and WMA.
In Windows 7: WAV, AIF, MP3, AAC, M4A, and WMA.
![]() In Mac OSX 10.7: WAV, AIFF, 3G2, 3GP, MP1, MP2, MP3, MPEG, MPA, SND, AU, SD2, AC3, AAC, ADTS, AMR, CAF, M4A M4R and MP4.
In Mac OSX 10.7: WAV, AIFF, 3G2, 3GP, MP1, MP2, MP3, MPEG, MPA, SND, AU, SD2, AC3, AAC, ADTS, AMR, CAF, M4A M4R and MP4.
![]() SoundFonts (.SF2): SoundFonts are an open standard for wavetable-synthesized audio, developed by E-mu systems and Creative Technologies.
SoundFonts (.SF2): SoundFonts are an open standard for wavetable-synthesized audio, developed by E-mu systems and Creative Technologies.
![]() REX file slices (RX2, REX, RCY): REX files are music loops created in the ReCycle! program or when editing audio clips inline in Reason. The NN-19 lets you load REX files as patches or separate slices from REX files as individual samples.
REX file slices (RX2, REX, RCY): REX files are music loops created in the ReCycle! program or when editing audio clips inline in Reason. The NN-19 lets you load REX files as patches or separate slices from REX files as individual samples.
A Guided Tour of the NN-XT
It’s time to begin your guided in-depth tour of the NN-XT.
The NN-XT Main Display Panel
When you create an instance of the NN-XT, Reason does not automatically expand the device’s entire interface; the reason is that it takes up a lot of room and might seem a little intimidating to the novice sampling artist (see Figure 9.2). Rather, the NN-XT main display panel is the first part of the device you will see. The main display includes all the global controls of the NN-XT.

© Propellerhead Software AB.
Loading Patches
As with all Reason devices, the Patch Browser is available to locate and load patches, scroll through them, and save them. Because you already know how to browse for patches, you’re ready to consider the various formats the NN-XT can import.
![]() SXT: This is the standard NN-XT patch format extension name.
SXT: This is the standard NN-XT patch format extension name.
![]() SMP: This is the standard NN-19 patch format extension name.
SMP: This is the standard NN-19 patch format extension name.
![]() SF2: This is the common file extension name for SoundFonts. Unlike the NN-19, the NN-XT can import an entire SoundFont patch instead of just single SoundFont files.
SF2: This is the common file extension name for SoundFonts. Unlike the NN-19, the NN-XT can import an entire SoundFont patch instead of just single SoundFont files.
![]() RCY, REX, and RX2: These are the commonly known file extensions for REX files. As with the NN-19, when the NN-XT imports a REX file, it chromatically maps the individual REX slices, starting from the C1 note.
RCY, REX, and RX2: These are the commonly known file extensions for REX files. As with the NN-19, when the NN-XT imports a REX file, it chromatically maps the individual REX slices, starting from the C1 note.
Additionally, the NN-XT can sample audio just like Redrum, Kong, and the NN-19, and can be accessed from the Remote Editor, which you’ll read about soon.
Just below the Patch Browser is the High Quality Interpolation button and the Note On indicator, which lights up whenever a MIDI message is received.
Global Controls
To the right of the Patch Browser are the global controls for your loaded patches:
![]() Filter controls: These knobs are used to control the Freq (Frequency) and Res (Resolution) parameters of the filter found on the NN-XT Remote Editor. Note that the filter must be turned on before you can use these knobs.
Filter controls: These knobs are used to control the Freq (Frequency) and Res (Resolution) parameters of the filter found on the NN-XT Remote Editor. Note that the filter must be turned on before you can use these knobs.
![]() Amp Envelope controls: These knobs are used to control the attack, decay, and release of the amp envelope on the Remote Editor.
Amp Envelope controls: These knobs are used to control the attack, decay, and release of the amp envelope on the Remote Editor.
![]() Mod Env control: This knob is used to control the Decay parameter of the modulation envelope in the Remote Editor.
Mod Env control: This knob is used to control the Decay parameter of the modulation envelope in the Remote Editor.
![]() Master Volume: This knob controls the amplitude level for the NN-XT.
Master Volume: This knob controls the amplitude level for the NN-XT.
Pitch and Modulation
Located to the far left of the main display, the Pitch and Modulation controls are common to just about every Reason synth:
![]() Pitch Bend wheel: This wheel is used to bend the pitch of the sample up and down. The potential range of the pitch bend effect is determined by its corresponding controls found in the Remote Editor.
Pitch Bend wheel: This wheel is used to bend the pitch of the sample up and down. The potential range of the pitch bend effect is determined by its corresponding controls found in the Remote Editor.
![]() Modulation wheel: This wheel is used to control and modify a number of parameters, such as Filter Frequency, Resonance, and
Modulation wheel: This wheel is used to control and modify a number of parameters, such as Filter Frequency, Resonance, and
Level. When used effectively, modulation is a key tool for adding expression to your sampled instruments. Note that the modulation wheel is called the wheel or simply “W.”
External Control
To the right of the modulation wheel is the External Control wheel. The External Control wheel can receive three MIDI controller messages and then send that data to any of its assigned parameters in the NN-XT Remote Editor:
![]() Aftertouch
Aftertouch
![]() Expression
Expression
![]() Breath
Breath
Additionally, the External Control wheel can be used to send these three MIDI controller messages to the Reason sequencer if your MIDI keyboard does not support these parameters.
Also note that the External Control wheel is labeled “X” in the main display, just as the modulation wheel is labeled “W.” These controls will be discussed in greater detail later in this chapter.
The NN-XT Remote Editor
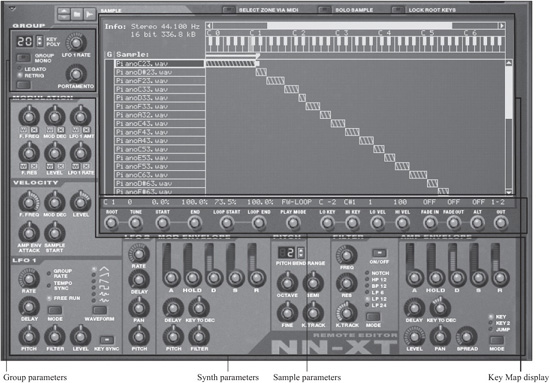
As stated, when an NN-XT is created in the Reason Rack screen, its main display is the only visible element. Just below the main display is the collapsed Remote Editor. Click on the arrow icon located in the lower-left corner of the NN-XT to expand the Remote Editor (see Figure 9.3).
© Propellerhead Software AB.
At first sight, the Remote Editor looks very complex. But as you read through the guided tour of this beauty, you will soon see that the Remote Editor is quite possibly one of the most well-thought-out and versatile devices in Reason.
There are several sections to the Remote Editor. Here’s a rundown of what this section covers:
![]() Synth parameters: The parameters in this section are used to edit and manipulate your sample patches using filters, envelopes, and two LFOs.
Synth parameters: The parameters in this section are used to edit and manipulate your sample patches using filters, envelopes, and two LFOs.
![]() Group parameters: These parameters are used to enhance the performance or playing style of the NN-XT. They are similar to the Play parameters of the NN-19.
Group parameters: These parameters are used to enhance the performance or playing style of the NN-XT. They are similar to the Play parameters of the NN-19.
![]() Key Map display: This area is used to map samples across the NN-XT. Any sample information you need can be found in this section.
Key Map display: This area is used to map samples across the NN-XT. Any sample information you need can be found in this section.
![]() Sample parameters: These parameters are used to set the key zones, root keys, play modes, and more for each sample loaded into the Key Map display.
Sample parameters: These parameters are used to set the key zones, root keys, play modes, and more for each sample loaded into the Key Map display.
These Parameters Are Not Global: While you’re touring the Remote Editor, it’s important to remember that, with the exception of the Group parameters, all the remaining parameters you will be using are not global. When you select a single sample from the Key Map display and make any change to the pitch, filter, or modulation, you are affecting just that single sample zone, not the rest of the sample patch. However, if you want to make global changes to the entire sample patch, you can do so in several ways. Here’s one:
1. Use the Patch Browser to load a sample patch into the NN-XT. Then open the Edit menu and choose Select All Zones.
2. Click on one of the samples in the Key Map display. Then Shift-click on the additional samples.
3. Click the group of samples you want to make changes to in the Group column. This selects all the samples in that particular group. If there are additional groups, you need to hold down the Shift key and select the next groups as well.
The Synth Parameters
The NN-XT Synth parameters are used to edit and manipulate the characteristics of your samples with ease and precision. To make them easier to understand, I break these parameters into the following groups:
![]() Modulation
Modulation
![]() Velocity
Velocity
![]() Pitch
Pitch
![]() Filter
Filter
![]() Envelopes
Envelopes
![]() LFOs
LFOs
THE MODULATION SECTION
The Modulation section of the NN-XT is one of the most versatile of its kind (see Figure 9.4). Six parameters can be used on an individual basis or grouped together. Additionally, you can assign these parameters to either the modulation wheel (by selecting the W button under each knob) or the External Control wheel (by selecting the X button under each knob). Better yet, you can assign the parameters to both wheels simultaneously by selecting both the W and X buttons.

© Propellerhead Software AB.
Take a look at what each of these parameters does:
![]() F. Freq: This parameter assigns the Filter Frequency parameters to the Modulation section. When it is assigned a positive value, the filter opens as the modulation wheel’s value is increased. Assigning a negative value has the opposite effect.
F. Freq: This parameter assigns the Filter Frequency parameters to the Modulation section. When it is assigned a positive value, the filter opens as the modulation wheel’s value is increased. Assigning a negative value has the opposite effect.
![]() Mod Dec: This parameter assigns the Decay parameter of the modulation envelope to either the modulation or External Control wheel.
Mod Dec: This parameter assigns the Decay parameter of the modulation envelope to either the modulation or External Control wheel.
![]() LFO 1 Amt: This parameter determines the amount of modulation of LFO 1 that is affected by the modulation wheel.
LFO 1 Amt: This parameter determines the amount of modulation of LFO 1 that is affected by the modulation wheel.
![]() F. Res: This parameter assigns the Filter Resonance parameter to the Modulation section.
F. Res: This parameter assigns the Filter Resonance parameter to the Modulation section.
![]() Level: This parameter assigns the level or amplitude of a single zone or several zones to the Modulation section.
Level: This parameter assigns the level or amplitude of a single zone or several zones to the Modulation section.
![]() LFO 1 Rate: This parameter assigns the rate of LFO 1 to the Modulation section.
LFO 1 Rate: This parameter assigns the rate of LFO 1 to the Modulation section.
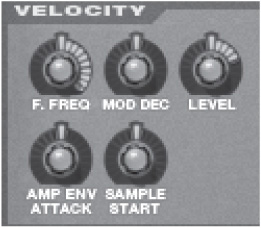
THE VELOCITY SECTION
The Velocity section enables you to modify a combination of five parameters according to the velocity of notes played by a MIDI keyboard (see Figure 9.5).
© Propellerhead Software AB.
![]() Filter Frequency: When this parameter is set to a positive value, different velocities control the Amount knob of the filter cutoff frequency. A negative value has the opposite effect.
Filter Frequency: When this parameter is set to a positive value, different velocities control the Amount knob of the filter cutoff frequency. A negative value has the opposite effect.
![]() Modulation Envelope Decay: When this parameter is set to a positive value, different velocities control the Decay parameter of the modulation envelope. A negative value has the opposite effect.
Modulation Envelope Decay: When this parameter is set to a positive value, different velocities control the Decay parameter of the modulation envelope. A negative value has the opposite effect.
![]() Level: When this parameter is set to a positive value, the velocity controls the amount of volume. A negative value has the opposite effect.
Level: When this parameter is set to a positive value, the velocity controls the amount of volume. A negative value has the opposite effect.
![]() Amp Env Attack: When this parameter is set to a positive value, the velocity controls the Attack parameter of the amplitude envelope. A negative value has the opposite effect.
Amp Env Attack: When this parameter is set to a positive value, the velocity controls the Attack parameter of the amplitude envelope. A negative value has the opposite effect.
![]() Sample Start: When this parameter is set to a positive value, the velocity modifies the starting time for the sample patch. A negative value has the opposite effect.
Sample Start: When this parameter is set to a positive value, the velocity modifies the starting time for the sample patch. A negative value has the opposite effect.
THE PITCH SECTION
The Pitch Bend Range setting is used to assign a bend range to the Pitch Bend wheel of the main display (see Figure 9.6). However, the Pitch Bend Range setting has a potential range of 24 semitones, or two octaves. To increase or decrease the bend value, you can click on its scroll buttons or simply click and drag on the display itself.

© Propellerhead Software AB.
Below the Pitch Bend Range setting are three parameters used to modify the pitch of individual samples in a patch. Take a look at what each of these parameters does:
![]() Octave: This parameter shifts the pitch of a selected sample in octave increments. The range of the Octave knob is +/−5 octaves.
Octave: This parameter shifts the pitch of a selected sample in octave increments. The range of the Octave knob is +/−5 octaves.
![]() Semi: This parameter shifts the pitch of a selected sample by semitone increments. The range of the Semi knob is +/−13 semitones, or two octaves.
Semi: This parameter shifts the pitch of a selected sample by semitone increments. The range of the Semi knob is +/−13 semitones, or two octaves.
![]() Fine: This parameter is used to make minimal adjustments to selected samples by cent increments. The range of the Fine knob is +/−50 cents, or half a semitone.
Fine: This parameter is used to make minimal adjustments to selected samples by cent increments. The range of the Fine knob is +/−50 cents, or half a semitone.
The Keyboard Track knob, labeled “K. Track,” is a parameter you use to control the keyboard tracking of the NN-XT pitch. It’s a fairly unusual parameter that is best explained when having a patch loaded, ready to listen to the resulting effect.
Load up a bass patch from the Reason Factory Sound Bank and try the following exercise:
1. Select all the samples in the patch by opening the Edit menu and choosing Select All Zones.
2. Navigate to the Keyboard Track knob and turn it all the way down by clicking and dragging with your mouse.
3. Arm the NN-XT sequencer track so you can play your MIDI keyboard to hear the effect. All the keys should now be the same pitch.
4. Now turn the Keyboard Track knob all the way up. Play the C3 note on your MIDI keyboard, followed by C#3 and D3. You should hear the same pitch played in different octaves. Experimenting with the Keyboard Track knob (especially with more subtle settings) can result in some interesting musical scales that you may find inspiring. This can work especially well with tuned ethnic percussion and metallic sounds. It can also allow you to play some ear-grabbing passages that would be very difficult with standard tuning.
THE FILTER SECTION
As with most other Reason devices, the filter uses a combination of resonance and cutoff frequencies to shape the sound and timbre of a sample (see Figure 9.7). Take a look at the available parameters.

© Propellerhead Software AB.
To activate the filter, just click the On/Off button located at the top-right corner of the Filter section. Once it is activated, you can also use the Filter controls in the NN-XT main display.
After activating the Filter section, you can then select one of six filter modes by clicking on the Mode button or by clicking on a filter’s name. Here’s a brief rundown of the available filter modes and the additional parameters:
![]() Notch: Rejects the mid frequencies while allowing the high frequencies and low frequencies to pass.
Notch: Rejects the mid frequencies while allowing the high frequencies and low frequencies to pass.
![]() HP 12: Filters out the low frequencies while allowing the high frequencies to pass through with a roll-off curve of 12 dB per octave.
HP 12: Filters out the low frequencies while allowing the high frequencies to pass through with a roll-off curve of 12 dB per octave.
![]() BP 12: Filters out both the high and low frequencies, while allowing the mid frequencies to pass with a roll-off curve of 12 dB per octave.
BP 12: Filters out both the high and low frequencies, while allowing the mid frequencies to pass with a roll-off curve of 12 dB per octave.
![]() LP 6: LP 6 is a low-pass filter that filters out the high frequencies while allowing the low frequencies to pass with a gentle roll-off curve of 6 dB per octave. The LP 6’s effect can be heard only when changing the value of the Frequency Filter knob because it has no resonance.
LP 6: LP 6 is a low-pass filter that filters out the high frequencies while allowing the low frequencies to pass with a gentle roll-off curve of 6 dB per octave. The LP 6’s effect can be heard only when changing the value of the Frequency Filter knob because it has no resonance.
![]() LP 12: Filters out the high frequencies while allowing the low frequencies to pass with a roll-off curve of 12 dB per octave.
LP 12: Filters out the high frequencies while allowing the low frequencies to pass with a roll-off curve of 12 dB per octave.
![]() LP 24: Filters out the high frequencies while allowing the low frequencies to pass with a steep roll-off curve of 24 dB per octave.
LP 24: Filters out the high frequencies while allowing the low frequencies to pass with a steep roll-off curve of 24 dB per octave.
The Filter Frequency (labeled “Freq”), or cutoff frequency as it is also called, is used to specify where the filter will function in the frequency spectrum. Once the Filter section is activated, just click on the Filter Frequency knob and drag your mouse up or down to increase or decrease the cutoff effect.
The Resonance knob (labeled “Res”) is used in combination with the Filter Frequency. It emphasizes the frequencies set by the Filter knob, which thins the sound out.
The Keyboard Track knob (labeled “K. Track”) is used to compensate for the loss of high frequencies as you play higher notes on the keyboard. It can be used to bring the higher played notes to the forefront in a mix.
THE ENVELOPES
An envelope generator is used to modify specific synth parameters, including pitch, volume, and filter frequencies. By using an envelope creatively, you can control how these parameters are to be modified over a specific amount of time. The NN-XT includes two envelope generators. One is assigned to modulation, and the other is assigned to amplitude (see Figure 9.8). Both envelope generators have common control settings, but they serve to control different parameters of the sample zones.

© Propellerhead Software AB.
Here are the control parameters in common with both the Mod and Amp Envelopes:
![]() Attack: When an enveloped is triggered, the Attack parameter, labeled “A,” determines how much time passes before the envelope reaches its maximum value.
Attack: When an enveloped is triggered, the Attack parameter, labeled “A,” determines how much time passes before the envelope reaches its maximum value.
![]() Hold: Unique to the NN-XT, this parameter is used to determine how long the envelope remains at its maximum potential.
Hold: Unique to the NN-XT, this parameter is used to determine how long the envelope remains at its maximum potential.
![]() Decay: Once the maximum value is reached and held for a determined hold time, the Decay parameter, labeled “D,” determines how much time passes before the value begins to drop.
Decay: Once the maximum value is reached and held for a determined hold time, the Decay parameter, labeled “D,” determines how much time passes before the value begins to drop.
![]() Sustain: After the value begins to drop, the Sustain parameter, labeled “S,” determines at which level the falling value should rest.
Sustain: After the value begins to drop, the Sustain parameter, labeled “S,” determines at which level the falling value should rest.
![]() Release: Once the value has been set at its rested value, the Release parameter, labeled “R,” determines how long it will take until the value will begin to drop to 0.
Release: Once the value has been set at its rested value, the Release parameter, labeled “R,” determines how long it will take until the value will begin to drop to 0.
![]() Delay: This parameter determines the amount of delay between playing the note and hearing the effect of the envelope. The Delay knob has a range of 0–10 seconds.
Delay: This parameter determines the amount of delay between playing the note and hearing the effect of the envelope. The Delay knob has a range of 0–10 seconds.
![]() Key to Decay: This parameter creates an offset of the Decay parameter, which is determined by where you play on your MIDI keyboard. If assigned a positive value, the Decay parameter will increase. The opposite effect occurs when assigned a negative value.
Key to Decay: This parameter creates an offset of the Decay parameter, which is determined by where you play on your MIDI keyboard. If assigned a positive value, the Decay parameter will increase. The opposite effect occurs when assigned a negative value.
The modulation envelope can be used to modify the pitch or filter parameters. Aside from the control settings that are found on both the mod and amp envelopes, the modulation envelope also has modulation amount controls that adjust the intensity of pitch and filter changes:
![]() Pitch: This parameter causes the envelope to control the pitch of the notes played. If assigned a positive value, the pitch bends up. The opposite effect occurs when assigned a negative value.
Pitch: This parameter causes the envelope to control the pitch of the notes played. If assigned a positive value, the pitch bends up. The opposite effect occurs when assigned a negative value.
![]() Filter: This parameter causes the envelope to modulate the Filter Frequency. When it is assigned a positive value, the value of the Filter Frequency increases. The opposite effect occurs when it is assigned a negative value.
Filter: This parameter causes the envelope to modulate the Filter Frequency. When it is assigned a positive value, the value of the Filter Frequency increases. The opposite effect occurs when it is assigned a negative value.
The amplitude envelope is used to alter the volume of a sample over time. Aside from the control parameters, the amplitude envelope also has a few additional knobs that control the following:
![]() Level: This parameter controls the volume level of a selected zone in the key zone map. It can also control the volume of an entire patch if you select all the zones.
Level: This parameter controls the volume level of a selected zone in the key zone map. It can also control the volume of an entire patch if you select all the zones.
![]() Pan: This parameter controls the panning of a selected zone in the key zone map. It can also control the panning assignment of an entire patch if you select all the zones.
Pan: This parameter controls the panning of a selected zone in the key zone map. It can also control the panning assignment of an entire patch if you select all the zones.
![]() Spread: This parameter creates a stereo effect by placing single notes played in various places in the stereo field. The knob determines the amount of spread, whereas the type of spread is determined by the Spread modes, which are located just to the right.
Spread: This parameter creates a stereo effect by placing single notes played in various places in the stereo field. The knob determines the amount of spread, whereas the type of spread is determined by the Spread modes, which are located just to the right.
![]() Mode: Also called Spread mode or Pan mode, this parameter has three settings: Key, Key2, and Jump. Key pans gradually from left to right across the entire range of the keyboard. Key2 pans from left to right and back again over a span of eight keys. Jump alternates the pan left or right each time a note is played.
Mode: Also called Spread mode or Pan mode, this parameter has three settings: Key, Key2, and Jump. Key pans gradually from left to right across the entire range of the keyboard. Key2 pans from left to right and back again over a span of eight keys. Jump alternates the pan left or right each time a note is played.
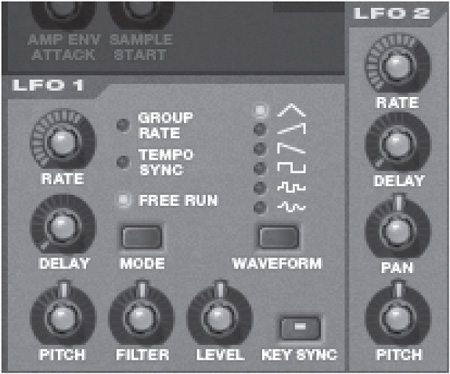
THE LFOS
The NN-XT includes two independent low-frequency oscillators, or LFOs (see Figure 9.9). As discussed in previous chapters, LFOs do not actually produce audible sound on their own. Rather, an LFO is used to modulate the main oscillators of a synthesizer. The NN-XT’s LFOs are designed to modulate the samples themselves.
© Propellerhead Software AB.
If you look at both of the LFOs, you’ll notice that they share common knobs, but there are some key differences between LFO 1 and LFO 2.
![]() Although LFO 1 supports a number of waveforms, LFO 2 supports only the triangle waveform.
Although LFO 1 supports a number of waveforms, LFO 2 supports only the triangle waveform.
![]() LFO 1 can modulate the NN-XT filter, whereas LFO 2 modulates the pan.
LFO 1 can modulate the NN-XT filter, whereas LFO 2 modulates the pan.
![]() LFO 2’s play mode is always set to Key Sync. That means the waveform of LFO 2 will always trigger whenever a note is pressed on your keyboard.
LFO 2’s play mode is always set to Key Sync. That means the waveform of LFO 2 will always trigger whenever a note is pressed on your keyboard.
The Rate knob determines the frequency of the LFO. To increase the modulation rate, turn the knob to the right. For a slower modulation, turn the knob to the left.
It is important to note that LFO 1 has three Rate modes, as follows:
![]() Group Rate: When this mode is selected, the rate of LFO 1 is controlled by the LFO 1 Rate knob in the Group parameters of the Remote Editor. This ensures that all the zones in the NN-XT modulate at the same rate.
Group Rate: When this mode is selected, the rate of LFO 1 is controlled by the LFO 1 Rate knob in the Group parameters of the Remote Editor. This ensures that all the zones in the NN-XT modulate at the same rate.
![]() Tempo Sync: When this mode is selected, the rate of the LFO is controlled by the tempo of the Reason sequencer. If you activate this mode and then begin to make changes to the Rate knob, a tooltip displays the different time divisions.
Tempo Sync: When this mode is selected, the rate of the LFO is controlled by the tempo of the Reason sequencer. If you activate this mode and then begin to make changes to the Rate knob, a tooltip displays the different time divisions.
![]() Free Run: When this mode is selected, the LFO runs continuously at the rate set by the Rate knob. If Key Sync is activated, the
Free Run: When this mode is selected, the LFO runs continuously at the rate set by the Rate knob. If Key Sync is activated, the
LFO triggers every time a note is played. Also note that LFO 2 always runs in Free Run mode.
The Delay knob is used to set a delay between playing the note on your keyboard and hearing it. Both LFO 1 and LFO 2 Delay knobs have the same capability and range of 0–10 seconds.
LFO 1 has six waveform choices for modulation. You can select these modes by clicking on the Waveform Mode button or by just clicking on the desired waveform.
![]() Triangle: This creates a smooth up-and-down vibrato.
Triangle: This creates a smooth up-and-down vibrato.
![]() Inverted Sawtooth: This creates a cycled ramp-up effect.
Inverted Sawtooth: This creates a cycled ramp-up effect.
![]() Sawtooth: This creates a cycled ramp-down effect.
Sawtooth: This creates a cycled ramp-down effect.
![]() Square: This makes abrupt changes between two values.
Square: This makes abrupt changes between two values.
![]() Random: This creates a random stepped modulation. Also known as sample and hold.
Random: This creates a random stepped modulation. Also known as sample and hold.
![]() Soft Random: This is exactly like the previous waveform but has a smoother modulation curve.
Soft Random: This is exactly like the previous waveform but has a smoother modulation curve.
After you select a rate, delay, and waveform mode, it’s time to choose a modulation destination. Although LFO 1 and LFO 2 contain different destinations, I have placed them all in a single list to discuss them:
![]() Pitch: This parameter modulates the pitch of the loaded sample patch. It is commonly used for trills and vibrato, but those are just a couple of the many sound design possibilities. The Pitch knob has a range of −2,400 to 2,400 cents (up to four octaves) and is available in both LFO 1 and LFO 2.
Pitch: This parameter modulates the pitch of the loaded sample patch. It is commonly used for trills and vibrato, but those are just a couple of the many sound design possibilities. The Pitch knob has a range of −2,400 to 2,400 cents (up to four octaves) and is available in both LFO 1 and LFO 2.
![]() Filter: This parameter modulates the Filter Frequency. It is a great tool for creating a filter sweep that can open upward (when set to positive) or downward (when set to negative). Note that this parameter is available only on LFO 1.
Filter: This parameter modulates the Filter Frequency. It is a great tool for creating a filter sweep that can open upward (when set to positive) or downward (when set to negative). Note that this parameter is available only on LFO 1.
![]() Level: This knob is used to modulate the output level of the NN-XT for creating a tremolo effect. Note that this is available only with LFO 1.
Level: This knob is used to modulate the output level of the NN-XT for creating a tremolo effect. Note that this is available only with LFO 1.
![]() Pan: This parameter is used to modulate the panning of a single or multiple zones. It is a great effect to use on orchestral percussion, such as xylophones or glockenspiels. When it is turned to the left, the panning effect moves from left to right in the stereo field. When the knob is turned to the right, the panning effect moves from right to left in the stereo field. Note that this parameter is available with LFO 2.
Pan: This parameter is used to modulate the panning of a single or multiple zones. It is a great effect to use on orchestral percussion, such as xylophones or glockenspiels. When it is turned to the left, the panning effect moves from left to right in the stereo field. When the knob is turned to the right, the panning effect moves from right to left in the stereo field. Note that this parameter is available with LFO 2.
The Group Parameters
Located in the upper-left corner of the NN-XT interface, the Group parameters apply to all the zones in a selected group (see Figure 9.10).
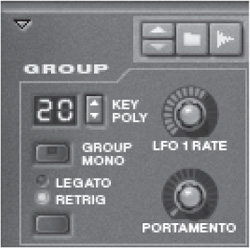
© Propellerhead Software AB.
POLYPHONY
Polyphony determines how many notes can be played simultaneously from the NN-XT. When it is set to a value of 1, the NN-XT becomes a monophonic instrument, which is perfect for playing lead synth lines or mimicking monophonic instruments, such as a flute or clarinet. When it is set to a greater polyphonic value, the NN-XT becomes the perfect device for mimicking instruments that are capable of producing many voices at one time, such as a piano, guitar, or choir. The NN-XT has a polyphony range of 1–99 voices, accessible from the Key Poly setting, so that should give you plenty of room to work with.
LEGATO AND RETRIG
Legato is the play mode of choice for monophonic sounds. While in Legato mode, play a note and hold it. Now play another note, and you will notice that the NN-XT will not retrigger the envelope but rather just change the pitch. If you combine this with a good portion of Portamento, you can create a fantastic sliding synth sound. Legato will also work with polyphonic patches. Set the Polyphony to 3 and play a three-note chord on your MIDI keyboard. Now press and hold another note, and you will hear that the new note is played legato style, but it steals one of the original notes of the chord.
Retrig is thought of as the “normal” preference for polyphonic patches. While in Retrig mode, NN-XT envelopes are triggered every time a note is played on your MIDI keyboard, which differs greatly from the legato effect. Retrig can also be used with monophonic patches. Press a note, hold it, and then play another note and release it. Notice that the NN-XT will now retrigger the sample of the first note, unlike in Legato mode.
GROUP MONO
The Group Mono setting is used in combination with notes that are grouped together in a patch. Once the notes are grouped and selected, activating the Group Mono function will bypass the Key Poly value and treat the grouped notes as monophonic. However, this function does not work with the Legato or Retrig play modes.
A real-world example of this would be the open hi-hat, closed hi-hat scenario. When you play an open hi-hat, you want the sound to be cut if you play the closed hi-hat sound. You can easily accomplish this effect with Group Mono by simply selecting both closed and open hi-hat samples, grouping them, and then activating Group Mono. Now play an open hi-hat, let it ring out, and then play a closed hi-hat sample. The open hat should immediately cut out.
LFO 1 RATE
The LFO 1 Rate knob is used to control the frequency of modulation in the LFO 1. This knob is active only when Group Rate mode is selected in the LFO section of the synth parameters.
PORTAMENTO
Portamento is used to create a sliding effect between played notes. The knob determines the amount of time it will take to slide from one note to another. It can be used with either monophonic or polyphonic patches and is a great tool for creating some interesting effects. Try loading a polyphonic patch, such as a string section or piano. Set the Portamento to 45 and play some chords. You will hear a slight sliding effect that makes the patch sound a little funny, but try adding some delay and reverb. After a while, you’ll have an ambient masterpiece on your hands.
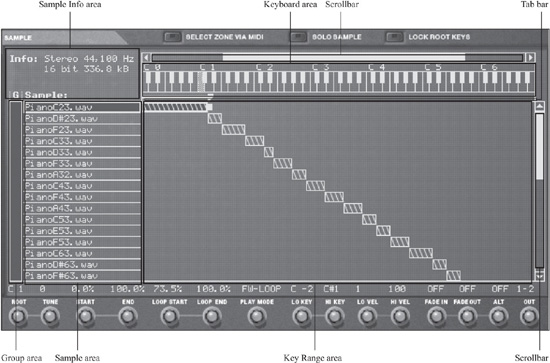
The Key Map Display
Occupying the majority of the Remote Editor, the Key Map display is where all the action happens when it comes to importing, grouping, and creating sample patches (see Figure 9.11). There are a few similarities to the NN-19 as you will see, but the NN-XT Key Map display is a much more diverse and mature interface that is intuitive and shouldn’t take too long to master.
© Propellerhead Software AB.
The Key Map display is split into seven areas:
![]() Sample Info: The Info area is used to display the sample rate, bit depth, and file size of a selected sample.
Sample Info: The Info area is used to display the sample rate, bit depth, and file size of a selected sample.
![]() Sample: The Sample area is used to list the filenames of the loaded samples in a patch.
Sample: The Sample area is used to list the filenames of the loaded samples in a patch.
![]() Group: The Group area does not display information. Rather, it is used to select a compilation of sample zones that are assigned to a group.
Group: The Group area does not display information. Rather, it is used to select a compilation of sample zones that are assigned to a group.
![]() Keyboard: The Keyboard area is used to display key ranges, audition loaded samples, and set root keys.
Keyboard: The Keyboard area is used to display key ranges, audition loaded samples, and set root keys.
![]() Tab bar: The Tab bar is located just below the Keyboard area and is used to display the key range of a selected sample zone. Here, you can resize a sample zone’s key range.
Tab bar: The Tab bar is located just below the Keyboard area and is used to display the key range of a selected sample zone. Here, you can resize a sample zone’s key range.
![]() Key Range: The Key Range area is used to display the sample zones in a patch. Zones can be moved and resized in this area.
Key Range: The Key Range area is used to display the sample zones in a patch. Zones can be moved and resized in this area.
![]() Scrollbars: Vertical and horizontal scrollbars allow you to view any key range (vertical) or position on the keyboard (horizontal).
Scrollbars: Vertical and horizontal scrollbars allow you to view any key range (vertical) or position on the keyboard (horizontal).
Aside from the Info area and scrollbars, which are pretty self-explanatory, let’s take an in-depth look at these areas.
THE SAMPLE AREA
All the files used to create a sample patch for the NN-XT are displayed in the Sample area as a list. The Sample area can also be used as a tool to load samples into a zone. To get better acquainted with the Sample area, try this quick exercise:
1. If you have a patch loaded into the NN-XT, clear it by opening the Edit menu and choosing Initialize Patch. This gives you a clean slate to work with.
2. Next, you need to add a zone to your key map so you can load a sample. Open the Edit menu and choose Add Zone to create an empty zone into which a sample can be loaded. Notice that in the Sample area, the newly created zone is labeled “No Sample.”
3. To load a sample into the zone, click on the Load Sample button in the upper-left corner of the Remote Editor or double-click on the No Sample label to open the Sample Browser. At this point, you can select a sample and load it into your new zone. Additionally, you can record a sample straight into the NN-XT by clicking on the Start Sample button.
THE GROUP AREA
After you create a number of zones and load samples into them, you can compile these zones into a group. Once you do this, a number of zones can be selected and modified at one time, making it a big time-saver. To create a group, try this quick exercise:
1. Using the previous exercise as an example, create several zones and load samples into them.
2. Once you have created a number of zones, select them all by either choosing Select All from the Edit menu or pressing Ctrl+A (Windows) or Command+A (Mac).
3. Choose Group Selected Zones from the Edit menu. This will place all the zones into one group.
THE KEYBOARD AREA
The Keyboard area is a graphical representation of the virtual keyboard in the NN-XT. It is here that key ranges can be viewed, root notes can be set, and loaded samples can be auditioned without the use of a MIDI keyboard.
Key range refers to the lowest and highest key that will trigger a loaded sample. For example, suppose you’ve imported a snare drum sample into a newly created zone in the key map. Because a snare drum is a sample that does not have a specific pitch, you will not need more than one or two keys on your keyboard to trigger the sample. By using a key range, you can specify that the snare sample will be heard only if the D1 or D#1 notes are pressed on a MIDI keyboard.
A root note specifies the original frequency at which a sample was recorded. If you record a piano played at middle C, C3 is its root note. It is very important to specify a sample’s root note because you want to make sure that the recorded sample retains its realism and natural timbre.
TIP: Later in this chapter, in the section called “The Sample Parameters,” you will read about root notes in more detail. You will also get an opportunity to work with root notes again.
It is very easy to audition loaded samples in the NN-XT by using your computer keyboard and mouse. If you are on a Windows PC, just Alt-click on a key in the virtual keyboard. Notice that the mouse icon becomes a speaker icon as you press the Alt key. You also can do this on the Mac by using the Option key.
THE TAB BAR
The Tab bar is one of several ways to adjust the key range of a zone. Start by selecting a sample zone in the key map. Once it is selected, the zone’s Tab bar will display the zone’s key range and supply boundary handles to make adjustments. Just drag the handles to the left or right to make adjustments to the key range. The Tab bar can also be used to adjust the key range of several zones at one time and shift the positions of several zones at once. For this to work, the zones must share at least one common key range value.
KEY RANGE AREA
The Key Range area is used to adjust the key range of a selected zone and to shift the position of a zone up and down the Keyboard area. The main difference between the key range and the Tab bar is that the key range will make adjustments on an individual basis. If two zones share the same key ranges, adjustments to the key range are still made individually. Zones can also be shifted in the Key Range area on a singular or multiple basis if they are both selected.
The Sample Parameters
Located in the bottom portion of the Key Map display, the Sample parameters enable you to edit any selected zone in the key map (see Figure 9.12). Whereas the synth parameters are used to alter the timbre and tone of a selected zone, the Sample parameters are used to set up loop points, root notes, and route outputs, and to generally help you do some pretty creative things with your samples.

© Propellerhead Software AB.
ROOT NOTES AND TUNE
The Root knob is used to adjust the original pitch of a loaded sample. When a sample is loaded into the NN-XT, you need to assign a root as the original frequency of the recorded sample. For example, if you record a piano’s C3 note and then import it into the NN-XT, you need to tell the NN-XT that the original pitch of the sample was C3. This is done with the Root knob.
After importing a sample into the key map, you can click and drag on the Root knob until you reach the desired root note. Another way to change the root note is to Ctrl-click (Windows) or Command-click (Mac) on the root note you want.
TIP: Once you have set a root note, activate the Lock Root Keys button at the top of the Key Map display. When it is active, you can still make adjustments to the root note with the Root knob, but if you want to shift the position of the sample zone, the root note will remain in place.
The Tune knob is used to make fine adjustments to your samples. It is used to make sure that the pitch of the samples matches the tunings of your other imported samples. For example, if you import a piano sample with a root note of C3 and then import another sample with a root note of E3, you might need to make fine-tuning adjustments to ensure that the piano samples will play in tune with each other as you make the transition from C3 to E3. The Tune knob has a range of +/− half a semitone.
If you are not sure what the root note of your sample is or which way to tune it, Reason has a solution to help you out. Reason can automatically detect the root note of any imported sample with a perceivable pitch. Here’s how it works:
1. Select the zone of the sample whose root note you want to detect.
2. Open the Edit menu and choose Set Root Notes from Pitch Detection. Reason will detect and assign a root note to your sample and will also make any fine-tuning adjustments.
START AND END
The Start knob is used to offset the start position of a loaded sample in the NN-XT. This function can be used for many purposes, such as the following:
![]() Removing unwanted noise at the beginning of a sample.
Removing unwanted noise at the beginning of a sample.
![]() Creating different versions of one sample. For example, if you have a sample of a person speaking the phrase “One, two, three, four,” you could use the Start and End knobs to isolate each word and map it on its own key without having to perform this task in an audio-editing program.
Creating different versions of one sample. For example, if you have a sample of a person speaking the phrase “One, two, three, four,” you could use the Start and End knobs to isolate each word and map it on its own key without having to perform this task in an audio-editing program.
![]() Creating very realistic and dynamic performances perfect for percussion and drums samples, using the Start knob along with the Sample Start Velocity Amount knob (labeled “S. Start”) in the Velocity section.
Creating very realistic and dynamic performances perfect for percussion and drums samples, using the Start knob along with the Sample Start Velocity Amount knob (labeled “S. Start”) in the Velocity section.
The End knob is used to offset the end position of a loaded sample in the NN-XT. It is useful for removing unwanted sample portions from the end of a sample, such as noise or hiss. To make changes to the Start and End knobs, you can click and drag up or down with your mouse to move the offsets by percentages. If you want to make very fine changes to these knobs, hold down the Shift key while making adjustments to the Start and End knobs.
LOOP START AND LOOP END
In sampling terms, a loop is used to prolong the sustain of a note that is held down on your MIDI keyboard. For example, if you play a piano sample and hold down the key, notice that like a real piano, the note sustains as long as you hold it (see Figure 9.13). This is accomplished by finding a portion of the sample that can be looped continuously to sound like a sustain.

© Propellerhead Software AB.
Figure 9.13 shows a loop point that will occur toward the end of the sample. This loop point was created for this guitar sample using the NN-XT Sample Editor. The loop that has been created occurs in an area where the loop start and end differ very slightly in amplitude. When a loop is created there, the loop is not noticeable and sounds very natural when used.
All the samples in the Reason Factory Sound Bank and Orkester Sound Bank have already been assigned loop points, and you will find that this is the case for any sample collection that is commercially available. The Loop Start knob shifts the offset of the loop starting point to the right in a sample. The Loop End knob shifts the offset of the loop end point to the left in a sample.
PLAY MODE
After a pair of loop points has been established, the Play Mode knob determines how the loop will be played. The Play Mode knob offers five choices:
![]() FW: The sample will play through once, without looping.
FW: The sample will play through once, without looping.
![]() FW-LOOP: The sample will play from the sample start to the loop end, and then it will jump back to the loop start and proceed to loop continuously between the loop points until the note is released.
FW-LOOP: The sample will play from the sample start to the loop end, and then it will jump back to the loop start and proceed to loop continuously between the loop points until the note is released.
![]() FW-BW: The sample will play from the sample start to the loop end. The sample will then play backward from the loop end to the loop start and finally play from the loop start to the loop end. This process will loop continuously until the note is released.
FW-BW: The sample will play from the sample start to the loop end. The sample will then play backward from the loop end to the loop start and finally play from the loop start to the loop end. This process will loop continuously until the note is released.
![]() FW-SUS: The sample will play from the sample start to the loop end, and then it will jump back to the loop start and proceed to loop continuously between the two loop points. After the note is released, the sample will play to the absolute end of the sample that reaches beyond the loop boundaries.
FW-SUS: The sample will play from the sample start to the loop end, and then it will jump back to the loop start and proceed to loop continuously between the two loop points. After the note is released, the sample will play to the absolute end of the sample that reaches beyond the loop boundaries.
![]() BW: The sample will play backward once, without looping.
BW: The sample will play backward once, without looping.
LO KEY AND HI KEY
The Lo Key and Hi Key knobs are used to assign boundaries to the loaded samples. The low key assigns the lowest note that a sample can be played at, whereas the high key does exactly the opposite. You’ll get a better idea of how this works later in the chapter when you build your own sample patch.
LOW VELOCITY AND HIGH VELOCITY
The Low Velocity and High Velocity knobs, labeled “Lo Vel” and “Hi Vel,” are used to assign velocity ranges to the loaded samples. Low velocity assigns the lowest velocity at which a sample can be played, whereas high velocity does the opposite.
Understanding these knobs and how they work is essential when creating a multilayered sample patch. For example, you can create sample zones and assign them all to the same key but give them different velocities. Here’s an example of how you would velocity-map four snare drum samples to the D1 note. (Note that this will include all the other sample parameters that you have read about up to this point.)
![]() Snare 1.aif: Root D1, Tune 0, Start 0%, End 100%, Play Mode FW, Lo Key D1, Hi Key D1, Lo Vel 1, Hi Vel 32
Snare 1.aif: Root D1, Tune 0, Start 0%, End 100%, Play Mode FW, Lo Key D1, Hi Key D1, Lo Vel 1, Hi Vel 32
![]() Snare 2.aif: Root D1, Tune 0, Start 0%, End 100%, Play Mode FW, Lo Key D1, Hi Key D1, Lo Vel 33, Hi Vel 64
Snare 2.aif: Root D1, Tune 0, Start 0%, End 100%, Play Mode FW, Lo Key D1, Hi Key D1, Lo Vel 33, Hi Vel 64
![]() Snare 3.aif: Root D1, Tune 0, Start 0%, End 100%, Play Mode FW, Lo Key D1, Hi Key D1, Lo Vel 65, Hi Vel 99
Snare 3.aif: Root D1, Tune 0, Start 0%, End 100%, Play Mode FW, Lo Key D1, Hi Key D1, Lo Vel 65, Hi Vel 99
![]() Snare 1.aif: Root D1, Tune 0, Start 0%, End 100%, Play Mode FW, Lo Key D1, Hi Key D1, Lo Vel 100, Hi Vel 127
Snare 1.aif: Root D1, Tune 0, Start 0%, End 100%, Play Mode FW, Lo Key D1, Hi Key D1, Lo Vel 100, Hi Vel 127
FADE IN AND FADE OUT
The Fade In and Fade Out knobs are used to assign velocity crossfades to overlapping zones. As discussed earlier in the section “The Key Map Display,” it is possible to have two zones that share the same range, root note, and velocity. The Fade In and Fade Out knobs can be used to smooth the transition between these two samples, making for an interesting dynamic effect.
The Fade In knob is used to create a velocity threshold that will trigger a sample when that threshold is reached via velocity. Once the threshold is reached, the sample will fade in rather than abruptly trigger. The Fade Out knob performs the same function, except that when the threshold is reached, the sample will fade out.
Here’s an example of how to use these knobs:
1. Create two zones and load a sample into each one. Set the Lo Vel setting for both zones to 1 and their Hi Vel settings to 127.
2. Set the Fade Out knob on the first zone to 40. This will tell the NN-XT to play that zone at its full level when the velocity is played under 40. Once the velocity has reached 40 and over, the sample will fade out.
3. Set the Fade In knob on the second zone to 80. This will tell the NN-XT to play that zone with a fade-in effect when the velocity equals 80. After the played velocity surpasses 80, the sample will then play at its full level.
ALTERNATE
To give your sample performance a realistic sound, you can use the Alternate knob, labeled “Alt,” to semi-randomly trigger different sample zones during playback. For example, if you have a sample of a guitar chord playing with a down stroke and a sample of that same chord playing with an up stroke, you can use the Alternate knob to create a pattern where the NN-XT will determine when to alternate between the two samples. Here’s how you set up the Alternate function:
1. Create two zones and load a sample into each.
2. Select both zones.
3. Set the Alt knob to the On position. The NN-XT will determine when to alternate between the two samples.
OUTPUT
The Output knob, labeled “Out,” is used to assign your sample zones to one of eight stereo pairs of outputs. This capability comes in handy when you work with a sample patch that has many samples loaded in it. You can route each of these samples to any of these outputs by selecting the zone on which the sample is loaded and using the Output knob.
Moving On
Whew! That’s a lot of sampling information. If you’ve made it through this chapter in one piece, it would be fair to say that you probably know more about sampling now than many seasoned professionals! But don’t let that stop you from continuing your sampling education. Try your hand at sampling drums, pianos, basses, voices, or a few unique noises from a creaky bedroom door to see how you can twist and turn those samples into music with the NN-XT!