
3 Recording and Effects
IN CHAPTER 2, “RECORDING,” YOU GOT YOUR FIRST TASTE OF RECORDING NOT ONLY AUDIO TRACKS, but also MIDI tracks. In this chapter, we’re going to expand on recording... and recording with effects. But before we do anything, let’s get into something that’s really important for recording and editing virtual instruments: quantization!
Quantization
I hope you saved your recorded material from Chapter 2. Remember that I had you play some stuff for four measures? What I’d like for you to do now is listen to what you played along with the click track. Does it sound like it’s in perfect time with the click track or does it sound sluggish? Could it be better? Worse? Regardless, I’d like to show you a trick that can save you a lot of editing time.
Remember when I had you move around and then delete notes in Chapter 2? This exercise was obviously helpful, but what if you could speed up your workflow even more and have Reason do some of the work for you?
Well, it can! The Quantize function is simple in the sense that you tell Reason what kind of notes you were playing (1/16, 1/8, 1/32, and so on), and based on what you tell it, it tries to take all those played notes and align them in the timing of the notes that you suggest.
TIP: If you’re new to music and don’t know the difference between the timing of a 1/16 note and an 1/8 note, let me fill you in on a secret: It’s almost always 1/16! It’s true—if you listen to most pop songs, you’ll notice that there are never more than 16 notes played between each kick and snare beat. In fact, Reason is always set to quantize at 1/16 notes by default. So, odds are, quantizing anything you play will most likely set it up in perfect timing.
Here’s an example of using Quantize: Suppose you play some drums off a MIDI keyboard. While you’re playing, everything sounds great. But when you click the Stop button and play back your recording, you notice that the timing, while close, is erratic. Maybe your hi-hat is a little lazy or your snare is a little fast. Also, you want this to sound good...and quickly! In this case, you’d do the following:
1. Drag to select around the played drums. Notice how the notes played appear to be slightly off the grid lines (see Figure 3.1).
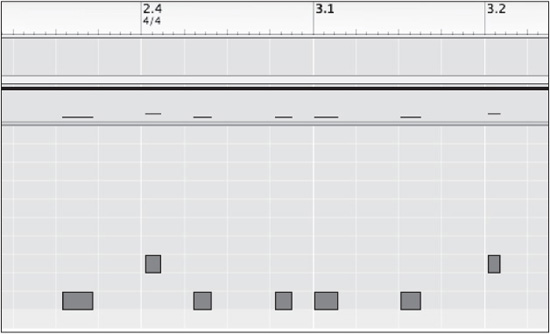
© Propellerhead Software AB.
2. Select the drum notes in need of help.
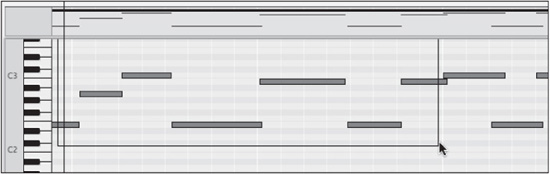
3. Open the Edit menu and select Quantize. Alternatively, press Command+K (Mac) or Ctrl+K (Windows). Now, the notes played are perfectly lined up with the grid lines (see Figure 3.2).

© Propellerhead Software AB.
Try applying quantization to what you played in the last section of Chapter 2:
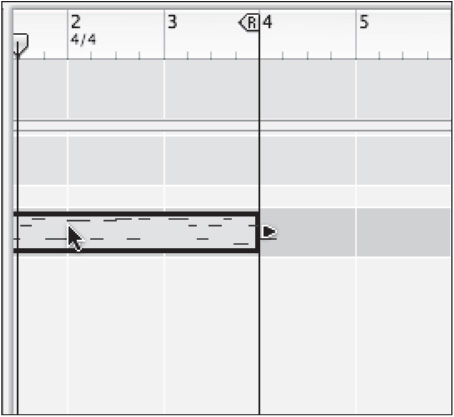
1. Double click on the MIDI clip to enter Edit mode, and then hold down your mouse button and drag a selection box around the notes you played (see Figure 3.3). If you’d like to do this in the regular Arrangement mode of the Sequencer screen, simply select the clip(s) you’d like to quantize (see Figure 3.4) and move on to the next step.
© Propellerhead Software AB.
© Propellerhead Software AB.
2. Open the Edit menu and select Quantize (see Figure 3.5). Alternatively, press Command+K (Mac) or Ctrl+K (Windows).
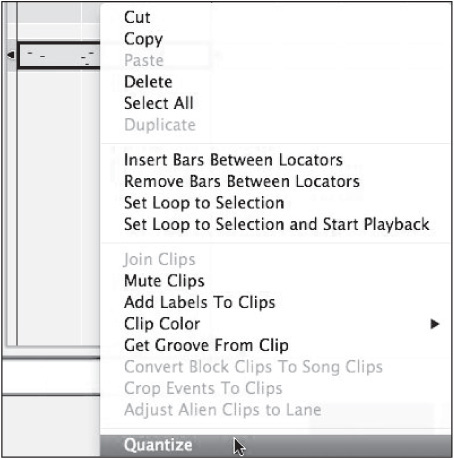
© Propellerhead Software AB.
3. Play back your part and listen to the difference. If you decide that you like the recording better without quantization, you can always choose Undo Record Track from the Edit menu.
If you’d like to try different quantization settings, press the F8 button to open the Tool Window (see Figure 3.6). To switch to the Sequencer Tools screen, click the Wrench/Screwdriver button at the top.

© Propellerhead Software AB.
You can also reduce quantization in the Tool Window. This capability can be handy when you want to retain some of the humanity of what you played but still need it to be a little “tighter.”
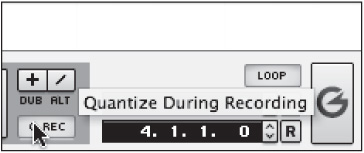
TIP: Having to remember to activate the Quantize function on each part you record can get annoying. To solve this problem, you can enable Auto-Quantize (Q Rec) on the transport bar (see Figure 3.7). This will automatically quantize everything you record!
© Propellerhead Software AB.
Quantization is just one of the many handy functions that Reason has to make your production experience fun, exciting, and simple!
Because we’re talking about functions that simplify the writing, recording, and production process, I’d like to show you another function of Reason that really speeds up song structure and makes song writing fun. Make sure that you hold on to what you did in the preceding exercise; you’ll be using it in the next!
Blocks
Great songs always have a few things in common, regardless of genre. Let’s break them down:
![]() There is always an opening to the song.
There is always an opening to the song.
![]() There is always an in-between part of the song that tells the story.
There is always an in-between part of the song that tells the story.
![]() There is always a crescendo, or climax, of some sort.
There is always a crescendo, or climax, of some sort.
![]() There is some sort of musical solo or breakdown.
There is some sort of musical solo or breakdown.
![]() Each song has an end! Everything comes to an end, right?
Each song has an end! Everything comes to an end, right?
These song parts actually have names:
![]() Intro (song opening)
Intro (song opening)
![]() Verse (storytelling portion of the song)
Verse (storytelling portion of the song)
![]() Chorus (climax)
Chorus (climax)
![]() Bridge (musical solo/breakdown)
Bridge (musical solo/breakdown)
![]() Outro (song end)
Outro (song end)
A while back, Propellerhead realized that people were spending a lot of time on simple loops that they had recorded in Loop mode (see Chapter 2) but weren’t actually completing songs! In fact, this is quite common with computer music: You get so much virtual gear that you don’t know what to do with all of it!
To combat this growing problem of song stagnation, Propellerhead created a system known as blocks. Blocks allow you to compose separate parts in a loop-recording style of sorts. Then, once you have all your parts recorded and ready to go, you can piece them together to form a full song. The idea is like baby blocks that have big letters on them. You take one big letter block and stick it with a few other letter blocks to form a full word.
Let’s look at how this system works!
In this exercise, I show you how to convert the last part you played and recorded into a block. Then I show you how to create another block and chain the two blocks together. Let’s get started!
NOTE: If it looks like something in the Reason 7 sequencer is missing, it’s probably the Edit Mode button. If you need to enter Edit mode, simply double-click on a clip or press Ctrl+E (Windows) or Command+E (Mac). Exiting Edit mode is also easy; either click the Close button, as illustrated in step 1 below, or just press Ctrl+E (Windows) or Command+E (Mac) again.
1. Click the close button in the upper-left corner of the Sequencer screen. The button should be white, not blue. You should now be in Arrangement mode (see Figure 3.8).
© Propellerhead Software AB.
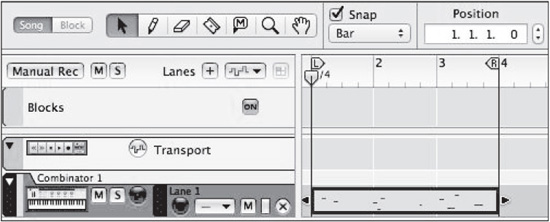
2. Select the recorded clips in your Sequencer screen from the preceding exercise. Then press Command+C (Mac) or Ctrl+C (Windows). Alternatively, open the Edit menu (see Figure 3.9) and choose Copy.

© Propellerhead Software AB.
3. Click the Block button, next to the sequencer toolbar. (See Figure 3.10.)

© Propellerhead Software AB.
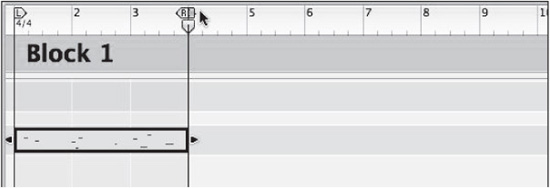
4. Welcome to Block mode. You’ll notice in the upper-left corner that the screen already says “Block 1.” When you enter Block mode, Block 1 is ready and waiting for your use. Press Command+V (Mac) or Ctrl+V (Windows) to paste your work into Block 1. Alternatively, choose Paste from the Edit menu (see Figure 3.11).
5. Congratulations! You’ve just created your first block. You’ll notice that there are loop locators inside the block as well. Place the left and right loop locators at the beginning and end of your recorded part (see Figure 3.12). This will mark where, when the block loops, your part will play.
6. Drag the E icon, for “end of block,” to the end of your recorded part (see Figure 3.13). The farther out this marker is placed from the end of your part, the longer the gap after the end of your part when you use this block later in Arrangement mode.
7. Open the Blocks menu (see Figure 3.14). and choose Block 2.
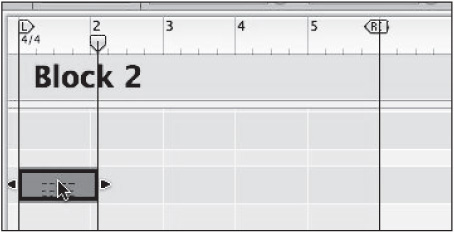
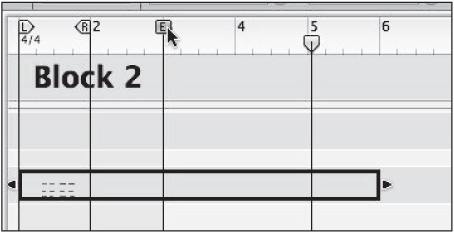
8. In Block 2, record a new part via Loop mode or by just clicking Record (see Figure 3.15). The loop locators still work the same way, so don’t let the fact that you’re in Block mode intimidate you. If you forgot how to loop record, refer to Chapter 2.
9. When your recording is finished, place the loop locators at the beginning and end of your recorded part and place the end marker at the very end of the part (see Figure 3.16).
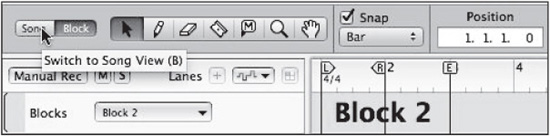
10. Click the Song button to switch back to Arrangement mode (see Figure 3.17).
11. Enable the Pencil tool (see Figure 3.18).
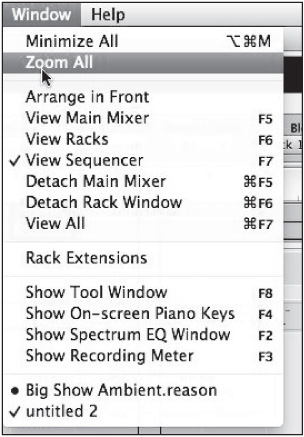
12. Now we’re going to have a little fun. With the Pencil tool, draw in the Blocks lane of your Sequencer. Draw a block for at least nine measures (see Figure 3.19). You may need to use the Zoom All function from the Window menu (see Figure 3.20).
13. Draw another block next to your first block (see Figure 3.21).

© Propellerhead Software AB.

© Propellerhead Software AB.
© Propellerhead Software AB.

© Propellerhead Software AB.
© Propellerhead Software AB.
© Propellerhead Software AB.
© Propellerhead Software AB.

© Propellerhead Software AB.

© Propellerhead Software AB.
14. Switch back to the Selection tool (arrow). Select the second block region, click on the Block 1 label to access the drop-down menu, and choose Block 2 (see Figure 3.22).
15. You’ll notice that you now have two chained blocks in the Sequencer (see Figure 3.23). If you move the song position pointer to the beginning of the song and click the Play button, you’ll hear both blocks play back to back.
Notice that your original recorded clip from the previous exercise is still in the Sequencer screen. Clips sitting on the timeline in Song mode will shadow clips in blocks, and so for both blocks to play, you will need to select and delete this clip. You don’t need it anymore because you have it contained in a block!
© Propellerhead Software AB.

© Propellerhead Software AB.

© Propellerhead Software AB.

© Propellerhead Software AB.
I hope that, through this simple exercise, you can see the implied power of blocks. With blocks, you can draw in pieces of music instead having to copy, paste, and so on. Making a change in a block will apply globally to regions drawn in Song mode. It’s important to note that multiple instrument tracks are contained in each block, so you’ll definitely want to use it as an arrangement tool.
Okay, now that you’ve had some time with blocks and recording, let’s have a little fun with effects.
Effects
While instruments and audio are definitely the building blocks of any song, if you don’t have effects, they are really, really boring. Let’s take a guitar, for example. If you just play a guitar by itself, it’s this twangy, almost bell-like thing. Don’t get me wrong; an acoustic on its own can be quite beautiful. But if it’s an electric guitar by itself, you could almost play a rubber band and get a more interesting sound. It’s not until an amplifier is hooked up that it begins to sound even remotely interesting.
However, even amps are rather limited. They generally only give you distortion, and that’s it. That’s why you pick up reverb pedals that make the guitar sound as if it’s in a long, cavernous hallway. That’s why you pick up echo pedals that make the guitar sound as if it’s got a distant cousin in the background or that you’re simply amazing at finger-picking, and so on.
These examples of effects are just the tip of the iceberg—especially when it comes to Reason.
Reason’s effects include the following:
![]() Amp modeling: Line 6 Guitar and Bass Amp
Amp modeling: Line 6 Guitar and Bass Amp
![]() Distortion: Scream 4, D-11 Foldback Distortion
Distortion: Scream 4, D-11 Foldback Distortion
![]() Reverb/delay/echo: RV7000, DDL-1 Delay, RV-7 Reverb
Reverb/delay/echo: RV7000, DDL-1 Delay, RV-7 Reverb
![]() Chorus/flange, phaser: CF-101 Chorus/Flanger, PH-90 Phaser, UN-16 Unison
Chorus/flange, phaser: CF-101 Chorus/Flanger, PH-90 Phaser, UN-16 Unison
![]() Filters: ECF-42 Filter
Filters: ECF-42 Filter
![]() Corrective effects (such as equalizers, compressors, and limiters): MClass EQ, Compressor, Comp-01, PEQ-2 Compressor, MClass Stereo Imager, Maximizer
Corrective effects (such as equalizers, compressors, and limiters): MClass EQ, Compressor, Comp-01, PEQ-2 Compressor, MClass Stereo Imager, Maximizer
![]() Pitch correction: Neptune, BV512 Vocoder
Pitch correction: Neptune, BV512 Vocoder
These effects are all amazing. They take Reason from being a quaint bundle of instruments to being a powerhouse virtual studio without rival.
Three effects that I really like are as follows:
![]() Echo: A delay unit designed to make feedback loops fun and exciting
Echo: A delay unit designed to make feedback loops fun and exciting
![]() Alligator: A filter gate that can be MIDI controlled like an instrument
Alligator: A filter gate that can be MIDI controlled like an instrument
![]() Pulveriser: A filtered compressor that can make anything sound hard and dirty (literally, there is a Dirt knob)
Pulveriser: A filtered compressor that can make anything sound hard and dirty (literally, there is a Dirt knob)
I like them so much because they do far more than what they are described as doing. For example, The Echo can double as a chorus type effect, and can give your music rhythmic stutters.
These descriptions may not raise your eyebrows much, but don’t be too quick to judge. As we begin exploring them, you may have your musical life changed.
First, how do you set up an effects device? In the last couple of exercises, you were using a Piano device to create sounds. Let’s try adding an effects device to this unit so you can hear and play simultaneously. Follow these steps:
1. On the Piano device you’ve been using for the last several exercises, position the cursor over a non-control area such as the rack ear and right-click to access the context menu. From the menu, choose Creative FX, and select The Echo (see Figure 3.24).

© Propellerhead Software AB.
2. The Echo effect pops into the Reason Rack. Press the Tab key to turn the Rack around (see Figure 3.25).

© Propellerhead Software AB.
You’ll notice that the cabling is already taken care of. The Piano device is going into The Echo, and The Echo is routed to the Mix Channel device. But wait a minute! Remember when I said that you can store effects inside the Mix Channel device? Well, you can, and this will be very important to you if you really want most of your control coming from the mixer, as many producers do. The reason you would create The Echo inside the Mix Channel device is so that you can map knobs on the Mix Channel device to the Insert device—in this case, The Echo.
3. Delete The Echo by selecting the unit and then pressing the Delete key. Alternatively, right-click on the rack ear of The Echo and choose Delete Devices and Tracks from the menu that appears (see Figure 3.26).

© Propellerhead Software AB.
4. Position the cursor on a region that is not a control on the Mix Channel device, right-click to access the context menu, choose Creative FX, and select The Echo (see Figure 3.27).
5. Notice that The Echo now resides inside the Mix Channel device (see Figure 3.28). Also notice that the cabling goes into the Insert FX inputs as opposed to the input sockets. Instead, the Piano device goes there directly. Press Tab.
Okay, now that you’ve seen a couple of the ways to route effects into your Reason Rack, let’s spend a little time getting to know The Echo since we’ve got it running.
The Echo
Many musical acts of the past and present have used delay as more of an instrument in itself as opposed to just a basic effect. For example, U2’s the Edge has created the illusion that he plays extremely fast and complicated guitar parts, when in reality he times his strums between echo repetitions. The Edge is an extremely talented guitarist, and I’m not bashing his play style; he’s amazing. That’s just a trick of his that he has used throughout his career.

© Propellerhead Software AB.

© Propellerhead Software AB.
Also, many electronic acts (myself included) will use echo or delay to make extremely intricate bass and drum loops. Delay/echo makes it easy because it doubles, triples, and in some cases, quadruples what is being played. Figure 3.29 shows Reason’s tool for this, The Echo.
Now try this exercise:
1. Play your original sequence from the earlier exercise. Place the Sequencer in Loop mode, with your loop points at a place where you can seamlessly loop your work for a while (see Figure 3.30).
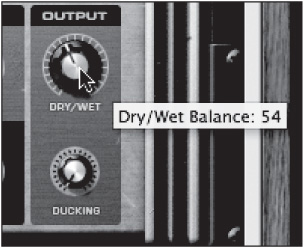
2. Adjust the Dry/Wet knob and the Time knob while your part plays (see Figure 3.31). Notice how this completely changes the feel of the original piano part.

© Propellerhead Software AB.

© Propellerhead Software AB.
© Propellerhead Software AB.
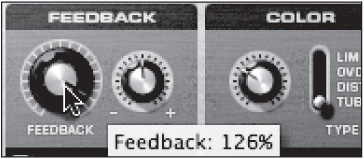
3. Pretty cool, eh? Let’s make things even more interesting! Turn the Feedback knob gradually until you get it quite far, around 5o’clock (see Figure 3.32). Notice how the piano now gets very, very psychedelic. It almost becomes a wall of sound. This is very reminiscent of old reggae, dub, ska, and so on, but can be used for any kind of music you want. When you want that wall, just raise the feedback.
4. If you want to really trick out the feedback loop, start toying with the Filter, LFO (low-frequency oscillator), Modulation, Color, and Diffusion sections (see Figure 3.33).
© Propellerhead Software AB.

© Propellerhead Software AB.
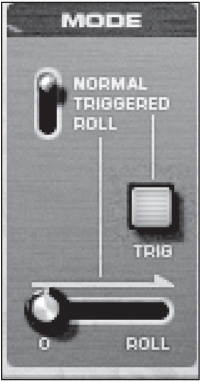
TIP: You can also use The Echo as a triggered device by changing its mode. The modes are as follows (see Figure 3.34):
![]() Normal: What you used in the preceding exercise.
Normal: What you used in the preceding exercise.
![]() Triggered: The Delay effect is bypassed until you click the Trig button. You can trigger this rhythmically in very cool ways. Try tapping!
Triggered: The Delay effect is bypassed until you click the Trig button. You can trigger this rhythmically in very cool ways. Try tapping!
![]() Roll: The Delay effect and feedback are bypassed but can be gradually increased by using the Roll crossfader. This mode is great for triggering feedback loops and so on.
Roll: The Delay effect and feedback are bypassed but can be gradually increased by using the Roll crossfader. This mode is great for triggering feedback loops and so on.
© Propellerhead Software AB.
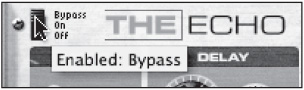
5. All right, now you can put The Echo in Bypass mode, as shown in Figure 3.35.
© Propellerhead Software AB.
Alligator
Gating is a tool that has been used in electronica of all sorts, but the methodology has been kept relatively hidden. This is mainly because the means for creating the gating effect haven’t been exactly easy to set up.
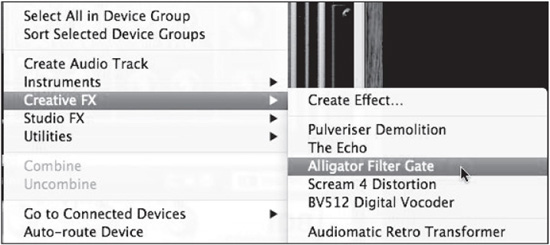
The Alligator changes this. As soon as you plug it in, you will instantly hear the gating effect, but with added dimension. You see, the Alligator, doesn’t just gate; it gates between filters—thus, the Alligator Filter Gate menu command shown in Figure 3.36, which you use to launch the Alligator. (Right-click on the Mix Channel device, choose Creative FX, and choose Alligator Filter Gate.)
© Propellerhead Software AB.
The Alligator features a rhythm generator that activates the gates. The lamps in the Gate section blink on and off according to the pattern settings and also indicate how the signal is being rhythmically directed through the Filter section (see Figure 3.37). You can override the pattern by clicking the Manual buttons to hold a gate open. (More on this later.)

© Propellerhead Software AB.
You’ll notice that each filter—the high pass, band pass, and low pass—can be modified in big, crazy ways with Delay, Drive, LFO, Phaser, and more (see Figure 3.38). That means each triggered filter can sound very, very different from another.

© Propellerhead Software AB.
The Pattern section gives you synced, premade patterns for bouncing between different filters (see Figure 3.39). Try running your piano sequence while the pattern (always enabled by default) is playing. Use the resolution to change the timing and the number arrows to choose the pattern.

© Propellerhead Software AB.
You can even set up the Alligator as a playable effect. Right-click on the Alligator and select Create Track for Alligator. You’ll now be able to trigger filters from MIDI keys F#1, G#1, and A#1. Neat, eh? For now, put the Alligator in Bypass mode.
Pulveriser
Compression is the friend of the knowledgeable producer for two reasons:
![]() It takes the dynamics out of very dynamic parts (vocals, guitar, drums, and so on) and makes them sit pretty in a mix.
It takes the dynamics out of very dynamic parts (vocals, guitar, drums, and so on) and makes them sit pretty in a mix.
![]() It can make things much bigger, meaner, and phatter.
It can make things much bigger, meaner, and phatter.
The latter is what the Pulveriser (see Figure 3.40) excels at. To open the Pulveriser, right-click the Mix Channel device, choose Creative FX, and select Pulveriser Demolition.

© Propellerhead Software AB.
But the Pulveriser is far more than just a compressor! It’s basically a compressor and distortion unit with a filter with an LFO. (If you don’t get what any of that means, you’ll know by the end of this book.)
Okay, so let’s try it out:
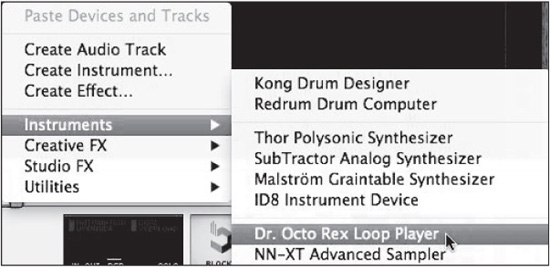
1. Create a Dr. Octo Rex. To do so, position the cursor on an empty area of the Rack screen and right-click to open a context menu. Then choose Instruments and select Dr. Octo Rex Loop Player (see Figure 3.41). Leave it loaded with its default patch, which is Acoustic Drums | College 130-1.drex (see Figure 3.42).
2. Click the Run button on the Dr. Octo Rex to hear the drum loop. When you have an idea what these drums sounds like, click the Run button again. Then right-click on the Dr. Octo Rex, choose Creative FX, and select Pulveriser Demolition to create another Pulveriser (see Figure 3.43). Make sure to right-click on an empty part of Dr. Octo Rex. Right-clicking on a knob will open a different menu.
3. Click the Run button on the Dr. Octo Rex and listen to the difference made just by adding a Pulveriser. Nasty, eh?
© Propellerhead Software AB.

© Propellerhead Software AB.

© Propellerhead Software AB.
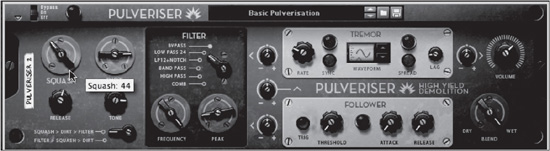
4. Turn the Squash knob to 11 o’clock and the Dirt knob to 3 o’clock (see Figure 3.44). Then click the Run button on the Dr. Octo Rex again. There’s a major difference with a subtle setting like this. Try experimenting with the Squash now. Notice how much more aggressive the drums get as you raise it.
© Propellerhead Software AB.
5. Let’s make it even more interesting! Try moving the Tremor to Volume knob to 3 o’clock (see Figure 3.45).
6. Increase the Tremor Rate to 4 o’clock (see Figure 3.46). Hear the ringing? Try adjusting the Tremor Waveform with the arrow buttons. Using these effects, you can create all sorts of crazy textures!

© Propellerhead Software AB.

© Propellerhead Software AB.
Not Enough? Try the Prop Shop!
Once upon a time, you were limited to the instruments and effects that Propellerhead included with Reason. This is no longer the case. Reason can now be expanded and customized with additional instruments, known as rack extensions, that can be purchased from the Propellerhead shop. That’s right: You can customize your Reason rack with additional pieces of gear.
Purchasing rack extensions is easy. Head to http://shop.propellerheads.se. Instantly you’ll be transported to the Rack Extensions online store (see Figure 3.47), which contains synthesizers, effects, utilities, and more.
© Propellerhead Software AB.
It’s important to note that while there are some additional devices created by Propellerhead, the creators of Reason, most Rack Extensions are from outside companies. And these third-party developers are not slouches by any stretch. In fact, they include major developers like Korg, Rob Papen, FXpansion, even Cakewalk!
Oh, and check this out: You can demo anything in the Prop Shop for up to 30 days. This little nugget of information should have you scurrying to the website right now! In fact, let me suggest some rack extensions for you to check out:
![]() Korg MonoPoly: This is a killer subtractive synth that has that vintage sound that will spruce up any track you bring it into. It also features a killer arpeggiator. (See Figure 3.48.)
Korg MonoPoly: This is a killer subtractive synth that has that vintage sound that will spruce up any track you bring it into. It also features a killer arpeggiator. (See Figure 3.48.)
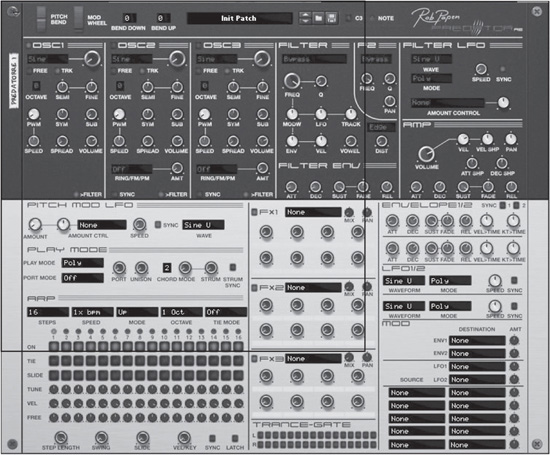
![]() Rob Papen Predator RE: This is another amazing synth that features three oscillators, tons of effects, and an arpeggiator that will almost write the song for you. (See Figure 3.49.) Rob Papen is a renowned sound designer with a roster of users who span several years of the Billboard charts. Keep an eye on anything from this developer.
Rob Papen Predator RE: This is another amazing synth that features three oscillators, tons of effects, and an arpeggiator that will almost write the song for you. (See Figure 3.49.) Rob Papen is a renowned sound designer with a roster of users who span several years of the Billboard charts. Keep an eye on anything from this developer.
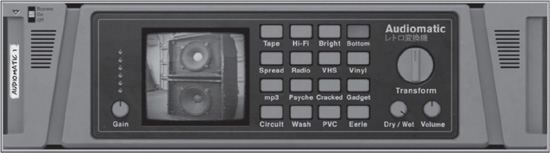
![]() Audiomatic Retro Transformer: Audiomatic is an incredible device from Propellerhead itself. It can be used to add vintage-style coloration to your audio. Seriously, run your mix through it and choose the Tape setting. Suddenly, your song will sound like it was recorded on an old reel to reel. Have a taste for vinyl? Well, there’s a setting for that, too. This rack extension is free for Reason 7 users. (See Figure 3.50.)
Audiomatic Retro Transformer: Audiomatic is an incredible device from Propellerhead itself. It can be used to add vintage-style coloration to your audio. Seriously, run your mix through it and choose the Tape setting. Suddenly, your song will sound like it was recorded on an old reel to reel. Have a taste for vinyl? Well, there’s a setting for that, too. This rack extension is free for Reason 7 users. (See Figure 3.50.)

© Propellerhead Software AB.
© Propellerhead Software AB.
© Propellerhead Software AB.
![]() BitSpeek LPC Vocoder from Sonic Charge: Have a taste for Speak & Spells? If so, you’ll love this device. With BitSpeek, shown in Figure 3.51, you can process your voice through the very same algorithm used to make the Speak & Spell voice. In other words, you can instantly sound like an old 8-bit computer. But there’s more: It’s also possible to use your MIDI keyboard to control the pitch of the recorded audio once it’s running through BitSpeek. It’s like having a Speak & Spell with auto-tune!
BitSpeek LPC Vocoder from Sonic Charge: Have a taste for Speak & Spells? If so, you’ll love this device. With BitSpeek, shown in Figure 3.51, you can process your voice through the very same algorithm used to make the Speak & Spell voice. In other words, you can instantly sound like an old 8-bit computer. But there’s more: It’s also possible to use your MIDI keyboard to control the pitch of the recorded audio once it’s running through BitSpeek. It’s like having a Speak & Spell with auto-tune!

© Propellerhead Software AB.
![]() Buffre Beat Repeater from Peff: Do you DJ? Do you dabble in electronica? Do you like sick, glitched-out breaks that change things up a bit? If you answered “Yes” to any of these questions, then you should definitely check out Buffre (see Figure 3.52). Aside from having one of the coolest-looking front and back panels of any of the third-party rack extensions, Buffre delivers precision stutters that can be triggered from your MIDI controller. If you get higher up in the octaves while stuttering, looping audio can even become melodic.
Buffre Beat Repeater from Peff: Do you DJ? Do you dabble in electronica? Do you like sick, glitched-out breaks that change things up a bit? If you answered “Yes” to any of these questions, then you should definitely check out Buffre (see Figure 3.52). Aside from having one of the coolest-looking front and back panels of any of the third-party rack extensions, Buffre delivers precision stutters that can be triggered from your MIDI controller. If you get higher up in the octaves while stuttering, looping audio can even become melodic.

© Propellerhead Software AB.
Prices on each of the rack extensions vary from developer to developer. And of course, the price listed may not always be the price you’re willing to pay. But keep in mind that developers are always having sales. And, if something looks appealing, try it! See if it’s even worth your hard-earned cash.
Moving On
As you can see, Reason is packed with some powerful pieces of gear...and it can be expanded with even more powerful pieces of gear!
Okay, now we can start spending some time with some of the individual instruments in Reason. Let’s move on!