
2 Recording
IN CHAPTER 1, “GETTING STARTED,” you learned about two of the main screens in Reason: the Mix screen and the Rack screen. This was a major step forward! Now that you understand these two main screens, you’re ready to move on to the main functions and to the rest of the main screens. But you can’t finish up with the Rack screen before creating instruments first.
The Devices
If you were to ask Reason users, they’d say the greatest fun in Reason would have to be the devices or gear—or whatever you want to call them. But before you get to know each and every one of them individually (this book goes into great depth with each device in later chapters), let’s talk about the three main types of devices and how to create them.
The three main types of devices are as follows:
![]() Instruments: These are the drum machines, synthesizers, and samplers—the devices you use to produce sound and make music.
Instruments: These are the drum machines, synthesizers, and samplers—the devices you use to produce sound and make music.
![]() Creative FX: These effects tend to be a little more on the experimental and non-traditional side. For example, The Echo isn’t just any old digital delay. It also incorporates subtle pitch-modulation functions and can be used to create spacious audio landscapes through feedback. If you’re looking for something different, try Creative FX out. Trust me!
Creative FX: These effects tend to be a little more on the experimental and non-traditional side. For example, The Echo isn’t just any old digital delay. It also incorporates subtle pitch-modulation functions and can be used to create spacious audio landscapes through feedback. If you’re looking for something different, try Creative FX out. Trust me!
![]() Studio FX: These devices add that extra sparkle to both instruments and audio tracks. These effects include echo (delay), reverb (hallway-type effects), chorus (fattening effects), and more.
Studio FX: These devices add that extra sparkle to both instruments and audio tracks. These effects include echo (delay), reverb (hallway-type effects), chorus (fattening effects), and more.
![]() Utilities: These devices require a little more understanding. They essentially perform very specific tasks that aren’t necessarily normal music functions. For example, splitters, in the form of Spiders, enable you to do very interesting things with cables and signal flow. There are also step-sequencing-type devices, such as the Matrix and RPG-8 (which produces arpeggios). You even get extra mixers.
Utilities: These devices require a little more understanding. They essentially perform very specific tasks that aren’t necessarily normal music functions. For example, splitters, in the form of Spiders, enable you to do very interesting things with cables and signal flow. There are also step-sequencing-type devices, such as the Matrix and RPG-8 (which produces arpeggios). You even get extra mixers.
The reason I’ve broken down the device types into these four groups is simply that Propellerhead (the manufacturer of Reason) has done the same thing.
In an empty Rack screen (or in a current song of your own), try right-clicking (Windows) or Control-clicking (Mac) on the black area (see Figure 2.1).
At the bottom of the context menu that appears, you’ll see four submenus: Instruments, Creative FX, Studio FX, and Utilities. If you open the Create menu, you’ll see the same categories (see Figure 2.2).
Create a Reason Device
Now we can put all this together in a quick, ordered list of instructions and actually create an instrument:
1. Right-click in the black area of Reason or open the Create menu.
2. Choose Instruments. Then choose Redrum Drum Computer. (See Figure 2.3.)
The Redrum Drum Computer appears in the Rack screen (see Figure 2.4).
You also can choose Reason-specific instruments that you’d like to use. For now, select the Redrum device in the Rack and press Delete.
Create an Instrument
Sometimes you need instruments that are more well known than a Malström, Thor, or SubTractor. Sometimes you want something along the lines of a piano, guitar, bass guitar, or lead synth. When you run into this situation, it can be tedious to load up each device and then try going through all the presets of each device. This is where the Create Instrument command becomes very handy. It’s also located in the Create menu.

© Propellerhead Software AB.

© Propellerhead Software AB.
Try it out now:
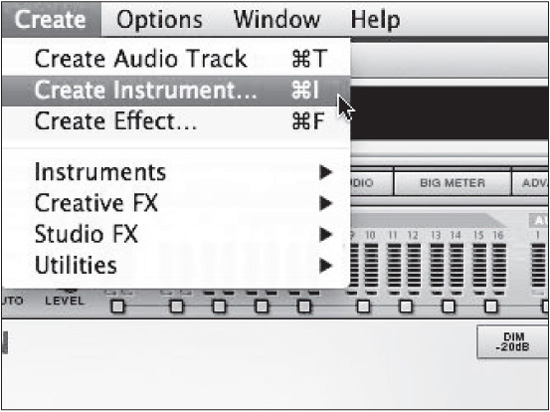
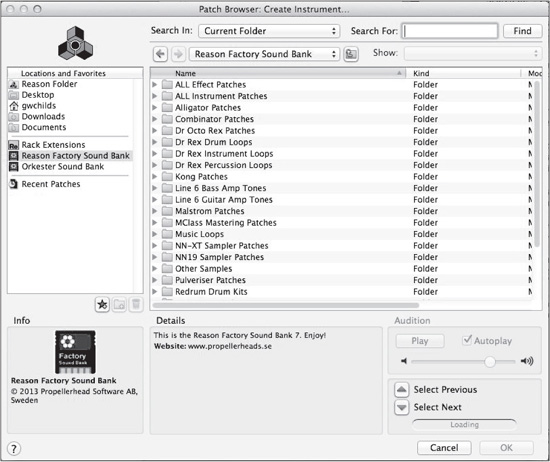
1. Open the Create menu and select Create Instrument (see Figure 2.5). Alternatively, can press Ctrl+I (Windows) or Command+I (Mac). The Patch Browser will appear. (See Figure 2.6.)
2. In the Patch Browser, choose Reason Factory Sound Bank if it isn’t already selected (see Figure 2.7).
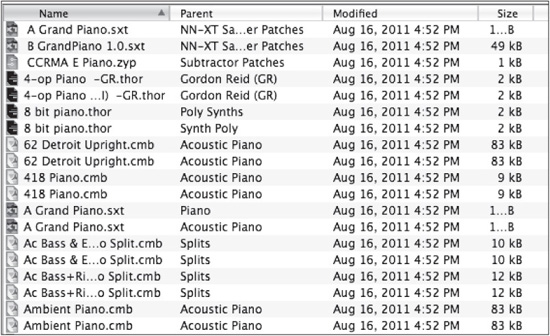
3. Type Piano in the Search For field, located in the upper-right corner of the Patch Browser (see Figure 2.8) and press Enter (Windows) or Return (Mac). Reason will display all the pianos in the middle of the Patch Browser (see Figure 2.9).
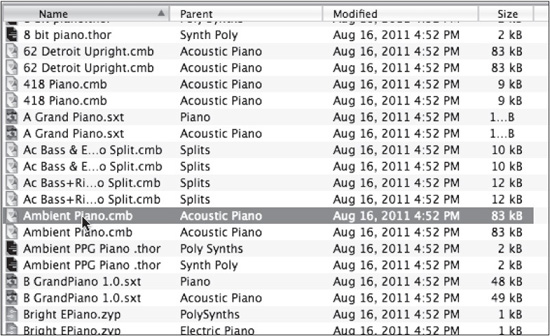
4. If your audio and controller are set up right, you’ll be able to select and play any piano in the list. Select a piano (see Figure 2.10) and try playing your MIDI Controller (if it’s available and set up).
5. If you find a piano you like, press Enter (Windows) or Return (Mac), and you’ll see the device planted nicely in your rack.

© Propellerhead Software AB.

© Propellerhead Software AB.
© Propellerhead Software AB.
© Propellerhead Software AB.

© Propellerhead Software AB.

© Propellerhead Software AB.
© Propellerhead Software AB.
© Propellerhead Software AB.
Creating an instrument is actually one of my favorite tricks in Reason. It speeds up the workflow in a big way because you can always find the instrument you’re looking for easily.
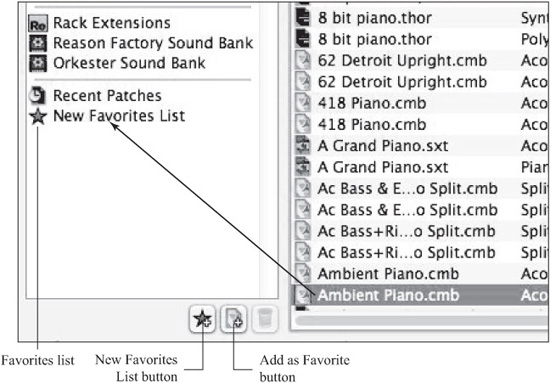
If you like the piano you found, or any other device, click the New Favorites List button in the browser and drag that patch from the browser into the Favorites list (see Figure 2.11). Or, click the Add As Favorite button. This will enable you to find this patch in your Favorites list.
© Propellerhead Software AB.
When you create the piano device, notice the additional device called Mix directly above the Redrum device (see Figure 2.12). Let’s talk about the Mix Channel device as well as the Audio Track device.

© Propellerhead Software AB.
The Mix Channel Device and Audio Track Device
The Mix Channel device is what connects the piano patch—or any other device you create—to the Mix screen. If you delete this device, you will no longer hear the drum machine.
Now let’s take it a step further. Click the small arrow next to the Combinator 1 label (see Figure 2.13).

© Propellerhead Software AB.
This expands the Mix Channel device so that you can see more of what it has to offer. In Chapter 1, we talked about what the Mute and Solo buttons do in both the Mix screen and the Audio Track device. Also mentioned in Chapter 1 was the fact that the Audio Track and Mix Channel devices are almost identical, aside from the Input Selection. Very important: The Mix Channel device has inputs (L and R) on it for Reason instruments and devices, where the Audio Track device does not. Everything else is exactly the same. So, let’s talk about the buttons that the Mix Channel and Audio Track devices have in common.
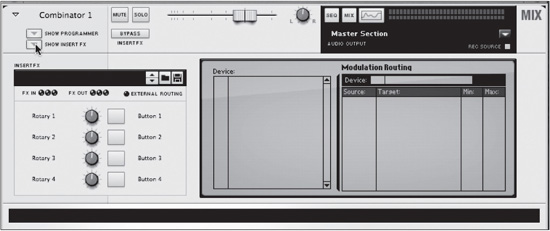
Click the Show Programmer button (see Figure 2.14). The Programmer lets you assign specific parameters of insert devices contained in your Mix Channel or Audio Track device. Contained in? Yep, you read that right! The Mix Channel and Audio Track devices are a form of the Combinator, which is fully explored in later chapters of this book. A Combinator is a Reason device that lets you combine many other devices, creating a much more specific and powerful device.
With regard to the Mix Channel and Audio Track devices, they merely let you contain effects devices in them to keep the Rack screen a little less cluttered and a little more organized. Plus, with the Programmer, you can assign specific functions of certain effects to the knobs or buttons of the Audio Track device, which will also be available also in the Mix screen. For example, I assign the Dry/Wet knob of the RV7000 to the first knob on my audio track so that I can adjust how much reverb my vocals have during a song. After assigning this in the Rack screen, I now have access to this same knob in the Mix screen.
Now, if you click the Show Insert FX button (see Figure 2.15), the Mix Channel or Audio Track device will display a black sub-rack area inside which you can stick effects.
With the effects condensed inside another device this way, you can keep a more tidy Rack screen, as well as know what devices are connected to what. (See the empty Rack screen in Figure 2.16 and filled Rack screen in Figure 2.17). This is far easier than having to root around behind the rack!
All right, before we move on to the sequencer, there’s another type of track we need to discuss: MIDI tracks for outboard gear!

© Propellerhead Software AB.
© Propellerhead Software AB.

© Propellerhead Software AB.

© Propellerhead Software AB.
Creating MIDI Tracks for External Devices
Okay, bear with me here. This is where things can get a little confusing. But, don’t worry! If you read this section carefully, you should be just fine!
The confusion comes from MIDI, and the way it works with all software applications when outboard hardware, like keyboards, are concerned. You see, MIDI does not transmit audio. When you hook a MIDI cable up to an external keyboard that actually has onboard sounds, sending a cable from MIDI OUT on your computer’s audio/MIDI interface to the MIDI IN on your keyboard (or drum machine) does not ensure audio will be heard. The MIDI cable, shown in Figure 2.18, simply gives your computer control over the keyboard. A separate audio cable has to be run from the keyboard back into your computer’s audio interface. If all this seems confusing, don’t worry. I’m going to walk you through it.

© G.W. Childs IV.
Before we begin, there are a couple of things you’ll need/want in order to complete this exercise. If you don’t have them, don’t worry; just move on to the “What Is a Sequencer?” section later in this chapter. When you do finally have everything, just come back to this section later.
Here’s what you’ll need:
![]() A free audio input that works with Reason, on your computer: If you have an audio interface, even better. If you’re lacking an interface, the built-in line in on a Mac computer will work. PC built-in line ins can be a little tricky to set up. If you have any trouble, consult your computer’s owner’s manual. Regardless of what type of computer you have, an audio interface will serve you best for audio latency, sound quality, and so on.
A free audio input that works with Reason, on your computer: If you have an audio interface, even better. If you’re lacking an interface, the built-in line in on a Mac computer will work. PC built-in line ins can be a little tricky to set up. If you have any trouble, consult your computer’s owner’s manual. Regardless of what type of computer you have, an audio interface will serve you best for audio latency, sound quality, and so on.
![]() A MIDI interface: Another reason to get an audio interface (if you don’t have one) is that they tend to have MIDI inputs as well. Even if your audio interface does not have a MIDI input, you can purchase MIDI interfaces relatively cheaply. Also, some USB controllers have MIDI interfaces as well, where external MIDI devices can be hooked up and controlled by your computer.
A MIDI interface: Another reason to get an audio interface (if you don’t have one) is that they tend to have MIDI inputs as well. Even if your audio interface does not have a MIDI input, you can purchase MIDI interfaces relatively cheaply. Also, some USB controllers have MIDI interfaces as well, where external MIDI devices can be hooked up and controlled by your computer.
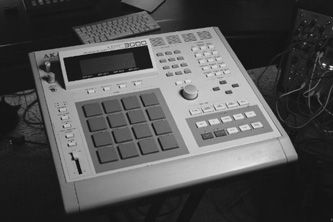
![]() A MIDI-compatible device: When I say MIDI-compatible device, I’m referring to keyboard synthesizers that generate sounds on their own. I’m not referring to typical USB controllers that just have keyboards and knobs. I’m also referring to drum machines that have built-in sounds, pattern sequencer, and voice parameters that can be controlled separately. If you’re unsure of your external devices, refer to their respective manuals. An example, My Roland XP-50, is shown in Figure 2.19. Another, a Boss DR-550 drum machine, is shown in Figure 2.20. Please verify that the device does have a MIDI IN port on it. (You may need to consult the device’s manual for additional setup that can only be done in the device.)
A MIDI-compatible device: When I say MIDI-compatible device, I’m referring to keyboard synthesizers that generate sounds on their own. I’m not referring to typical USB controllers that just have keyboards and knobs. I’m also referring to drum machines that have built-in sounds, pattern sequencer, and voice parameters that can be controlled separately. If you’re unsure of your external devices, refer to their respective manuals. An example, My Roland XP-50, is shown in Figure 2.19. Another, a Boss DR-550 drum machine, is shown in Figure 2.20. Please verify that the device does have a MIDI IN port on it. (You may need to consult the device’s manual for additional setup that can only be done in the device.)

© Moog Music.
© Akai Music Company.
Once you’ve assembled these requirements, continue on with the following steps. You’re going to love this!
NOTE: As I mentioned, you may have a USB controller that has built-in MIDI ports as well. If this is the case, you can use the MIDI OUT port. Just hook this port to the MIDI IN port of your external device.
1. Verify that the MIDI OUT port of your MIDI interface is connected to the MIDI IN port of your external MIDI device. (See Figure 2.21.)

© Moog Music.
2. Connect an audio cable from your external MIDI device’s audio output to an audio input on your computer or your computer’s audio interface (see Figure 2.22). If you have multiple audio inputs, make sure you remember the audio port’s designated number. For example, if you hook the audio cable to input 3, remember this number!

© G.W. Childs.
3. Now for the fun part! In Reason, open the Create menu, choose Instruments, and select External MIDI Instrument (see Figure 2.23). This device is known as the EMI, and it is a virtual MIDI interface that specifically controls external hardware. On this device, you’ll notice that you can send MIDI program changes, which means that you can program your hardware device to switch to different sounds. You can also choose particular control parameters that exist in your hardware device that can be controlled with the EMI’s encoder knob (with the CC toggle on) and numerical scroll. And, you can choose which MIDI channel you want to control on your external device. (The MIDI channel should be paid attention to, as some devices work only on certain channels, and other devices can have a different sound on each of the 16 channels. If you find your device is not working at the end of this section, you may try changing this number.)

© Propellerhead Software AB.
4. Now you need to set up audio coming from your MIDI device. Press Ctrl+T (Windows) or Command+T (Mac) to create an audio track. Then expand the device so that you can select the proper audio input on your audio interface. (Hopefully, you remembered the input number!) Finally, open the Audio Input and select the audio port to which your device is connected. (See Figure 2.24.)
5. Press F7 on your computer keyboard to open the Sequencer screen. Then click the EMI track. A small keyboard icon appears under the small device shown in the track list. This causes Reason to focus on this device for MIDI control. This is a function that you’ll use with external and internal devices. If you want to control a Reason synth, click the icon in the track list, so that the keyboard icon appears. Click on the EMI icon in the track list to direct control to your external hardware. (See Figure 2.25.)
6. While in the Sequencer screen, click the Enable Monitoring for Track button on the audio track (see Figure 2.26). This monitors incoming audio so that you can audition what the external hardware is emitting.

© Propellerhead Software AB.

© Propellerhead Software AB.

© Propellerhead Software AB.
7. Press a key on the your MIDI controller or use the onscreen piano keys, which you can access by pressing F4 key on your computer keyboard. If you press a key and you hear sound, you’ve done it! If not, go back and make sure you’re sending audio to the right audio input, verify that the MIDI device is functional, etc.
What If You’re Using an External MIDI Keyboard as a Controller?
One other scenario is one in which someone has an external MIDI device that they are using as a master MIDI controller for Reason. If this is your situation, you have it extremely easy! Your MIDI OUT port will be going into Reason already and set up via the Control Surfaces as a MIDI <Other> Device tab in the Reason Preferences dialog box. To use the sounds in your external MIDI controller, just send a MIDI cable from the MIDI OUT on your computer’s MIDI interface to the MIDI IN on your device. Then select the proper MIDI port on the EMI, as instructed on step 3 in the preceding section. As you go forward with your song creation, when you want to use your controller’sbuilt-insounds, select EMI in the sequencer. Note, however, that you’ll need to set this up every time you start a new song unless you code it into a template.
If You Can’t Get It to Work...
If your external MIDI device is not behaving, try pressing a key on the external device or a button that normally causes a sound to emit. If sound is coming into Reason, there is a MIDI setup problem. Either you’re using the wrong MIDI port or MIDI is disabled in the device. You may need to consult the device’s manual. There’s usually a section in the manual on using the device with a computer.
Next, let’s take a look at actually recording MIDI with the sequencer!
What Is a Sequencer?
In my opinion, terms like sequencing and sequencer tend to intimidate and confuse those interested in computer-based music. There was a point when computer-based music and MIDI were predominantly used by people like myself, who were comfortable with such terms, silly as they were.
So, what is a sequencer? It’s a recorder!
The sequencer allows you to create audio tracks and MIDI tracks, record on each individual track, and have them play together at the same time. It’s very similar to the multitrack recording devices used during the 1970s, 1980s, and 1990s. The main difference is that the sequencer enables you to arrange the parts you record in a visual manner. In fact, the sequencer is actually fully visual. Here’s a small feature list of what you can do with a sequencer:
![]() See each note you’ve played.
See each note you’ve played.
![]() Erase individual and multiple notes. (This applies more to virtual instruments than audio.)
Erase individual and multiple notes. (This applies more to virtual instruments than audio.)
![]() Copy sections of recordings in your project and paste them into multiple locations.
Copy sections of recordings in your project and paste them into multiple locations.
![]() Have the computer tighten up MIDI parts (virtual instrument parts) you recorded using a feature known as quantization.
Have the computer tighten up MIDI parts (virtual instrument parts) you recorded using a feature known as quantization.
Now that you have a better idea of what a sequencer does, let’s actually use Reason’s Sequencer screen to record some regular audio!
Recording an Audio Track
This exercise for recording an audio track assumes that you are still working in an empty Reason project. If not, please create one. Also, make sure you’ve set up your audio device properly in your Reason preferences. If you are unsure how to do this, consult your manual. If you are carrying over from the previous exercise, delete the piano and Mix device by selecting them and pressing Delete.
To record the track, follow these steps:
1. Press Ctrl+T (Windows) or Command+T (Mac). Your project should look like the one shown in Figure 2.27.

© Propellerhead Software AB.
2. Click the small arrow near Audio Track 1 (or 2 or 3 if you already have more audio tracks in your project). See Figure 2.28.

© Propellerhead Software AB.
3. Select your Audio Input (see Figure 2.29).
4. Press F7 to open the Reason Sequencer (if it’s not already open). See Figure 2.30.
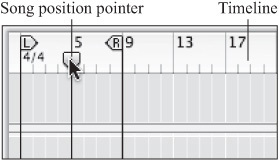
5. Click in the timeline where you’d like the recording to start (see Figure 2.31). This moves the song position pointer to the appropriate starting location.
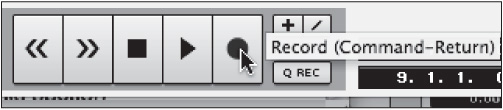
6. Click Record (see Figure 2.32).

© Propellerhead Software AB.

© Propellerhead Software AB.
© Propellerhead Software AB.
© Propellerhead Software AB.
Now you can sing, play, strum, whistle, clap, or chortle (what’s a chortle?) to your heart’s content! When you finish your recording, you’ll see your recorded part in the Sequencer screen. Click to move the song position pointer to the beginning of the recording to hear it again. If you don’t like your work, you can always choose Undo Record Track from the Edit menu (see Figure 2.33).

© Propellerhead Software AB.
Keep in mind that this is recording at its most basic level. There are way more tricks and methods to record audio parts in Reason. Another great way of doing this is through loop recording. Let’s check out this process next!
Loop Recording
When I’m engineering a recording session, one method of recording I’ve come to rely on quite a bit is loop recording. What’s so great about it is that you can set up a portion of the song that you want to focus on and record, say, a verse in the song. Next, you can set up Reason to record in this section of the song, over and over again. When you get to the end of the section you want to record, Reason restarts this section seamlessly. You can keep recording the parts with multiple takes and then later go back and choose the parts you like the most.
Let’s try this out now! Keep the track that you created in the previous exercise; just delete the recorded part. Next, do the following:
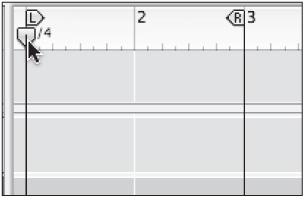
1. In the Sequencer screen (F7), Ctrl-click (Windows) or Option-click (Mac) in the timeline where you’d like your loop to start. In this case, choose measure 1. This will move the left loop locator to this location (see Figure 2.34).

© Propellerhead Software AB.
TIP: Using loop locators is a simple way to tell Reason which area you would like to repeat during either recording or playback. You can use loop recording in audio to perfect a certain part, to easily build harmonies, and so on. You can also use loop recordings with virtual instruments such as drums to easily build amazing drum loops and complex instrument parts.
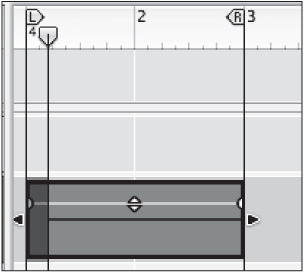
2. Alt-click (Windows) or Command-click (Mac) measure 3. This moves the right loop locator to measure 3 (see Figure 2.35). The right loop locator marks the end of the loop, whereas the left loop locator shows the beginning. If you cannot see measure 3, feel free to use the Magnifying Glass tool to zoom in, found in the tool bar (not shown).
3. Press L on your computer keyboard to trigger Loop mode. You can also click the Loop button in the transport bar (see Figure 2.36).
4. Now that your loop is established in the Sequencer screen, click on measure 1 to position the song position pointer (the line that moves over each part of your song as the song plays) at the beginning of the loop. You can also press 1 on your computer’s numeric keypad. To position the song position pointer at the left loop indicator, Option-click the left arrow button (Mac) or Alt-click the right arrow button (Windows). See Figure 2.37.

© Propellerhead Software AB.

© Propellerhead Software AB.
© Propellerhead Software AB.
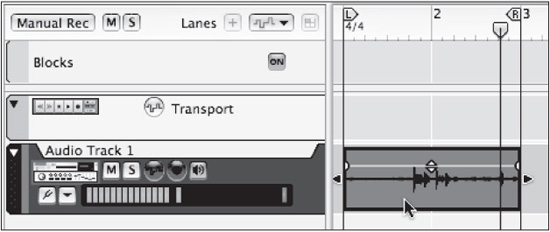
5. Click the Record button to start recording the same audio part over and over again (see Figure 2.38). Record for as long as you want. Don’t worry about what the sequencer is doing; just have fun. Once you’ve recorded yourself singing, drumming, whatever you do, click the Stop button (in the transport bar) or press the spacebar. Do not delete the audio part...until I tell you to.
© Propellerhead Software AB.
It’s nice to be able to record uninhibited like that, isn’t it? Just imagine how it’s going to be when you start incorporating drums, synths, and so on!
In the next section, I show you how to see all the different takes you recorded during your looped section. Moving on!
Working with Multiple Takes from Loop Recording
After doing all that recording, you may be wondering what happened to all the other audio you recorded while the sequencer was looping. The audio actually wasn’t deleted each time the song position pointer came around; instead, it was stuffed inside the small audio clips that were left after you clicked Stop.
In this exercise, I show you how to see the recorded audio parts and select the parts you want to use. Follow these steps:
1. Double-click the recorded clips from the previous exercise. Alternatively, press Ctrl+E (Windows) or Command+E (Mac). This will take you into Edit mode (see Figure 2.39). If there are no comp layers on the audio track, then you will go in to the Slice Editor (covered in Chapter 6, “Dr. Octo Rex: Close-Up”). If this happens to be the case, click the Open in Comp Edit button.
© Propellerhead Software AB.
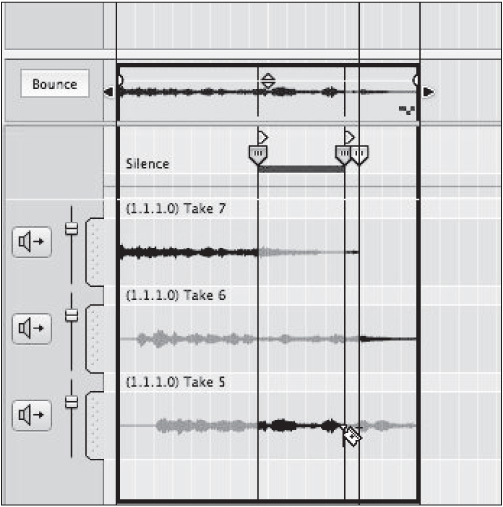
2. You are now seeing all your previous takes, but one of them is grayed out (or dimmed) and another is in color (see Figure 2.40). What’s happening here is that Reason is assuming the last take—the colored one—is your preferred take. To tell Reason that you think differently, double-click on a dimmed take to select it as your preferred take. If you want, press the spacebar and double-click through different takes till you hear one you like.

© Propellerhead Software AB.
3. You may discover that there are two takes you like a lot, but not necessarily the whole part of each take. For example, you may discover that you like how you sang the first part of a verse, but you don’t care for how you ended it. But there is another version of you singing this same part that has a brilliant ending but a bad beginning. To put them both together, press R to open the Razor tool (see Figure 2.41).

© Propellerhead Software AB.
4. With the Razor tool selected, click after the beginning of the verse recording that you like. Then press Q to switch to the Pointer tool and click on the ending part that you like. The beginning part of the first recording and the ending part of the second recording will appear in color (see Figure 2.42). If you play your looped section now, you’ll hear the audio accordingly. Neat, eh?
© Propellerhead Software AB.
This act of using the Razor tool is what’s known as comping. You combine two or more takes and use a bunch of individual pieces to make one perfect recording. It’s been done in pro studios for years. In fact, during the 1970s and 1980s, recording engineers actually used razor blades to cut pieces of audio tape and then pieced them together, much like what you’re doing here!
Now that you’re knee deep in Reason’s audio capabilities, you could run into a situation that commonly occurs in which you have access to an almost unlimited number of audio tracks. Even if this isn’t the case, it soon will be. So let’s start talking about a way to keep things organized and sounding good at the same time. Let’s talk about submixing.
Output Buses and Submixing
As your song ramps up in production, something always happens: More and more tracks appear. After all, you’re going to want to double vocals, add some harmonies, and record multiple drum takes, guitar takes, and on, and on, and on, right? As these additional tracks start to appear, it can get harder and harder to manage everything going on. One way that professional engineers handle tons of audio tracks is through the use of submixing.
When you submix, you direct the output of certain Mix Channel and Audio Track devices to a very special type of mixer channel. In Reason’s case, this type of channel is known as an Output Bus. The beauty of routing audio to an output bus is simple: You can create a special, smaller mix in your overall mix. Once your submix is done, you only have to deal with one fader—the one that controls the output bus.
Let me give you an example. Suppose you have, over the course of your production of a song, wound up with 13 vocal tracks. Your current vocal mix sounds wonderful, but you’ve decided that you’d like to be able to fade out all of the vocals at once. This can be tedious when you have 13 different faders to deal with! So, what you’d do is create an output bus and assign all of your vocal track outputs to this particular bus. Once you’ve done this, all you need to do is lower the fader of the ouput bus, and voilà! All your vocal tracks are lowered at once!
Let’s try setting this up right now. In the last exercise, you recorded some audio files. Let’s create a submix through an Output Bus.
1. Select an audio track in the Mix screen of your most recent Reason project. Make sure this project has more than a couple of audio tracks, preferably several similar tracks. For example, select one of your several drum tracks. If you don’t have a Reason project like this available, feel free to create four audio tracks and then just follow along. (See Figure 2.43.)

© Propellerhead Software AB.
2. Shift-click every other track that pertains to this type of group of audio tracks. For example, select all the drum tracks while pressing the Shift button. If you just created four empty audio tracks, go ahead and select all of these tracks while pressing the Shift button in the Reason Mix screen. (See Figure 2.44.)
3. Here’s where the magic takes place. Once you’ve selected all your tracks (they’ll all have a light blue field around each track/channel), press Ctrl+G (Windows) or Command+G (Mac). Alternatively, open the Edit menu, choose Route To, and select New Output Bus (see Figure 2.45). This will cause an output bus to appear and for all of the previously selected tracks to be output to this bus.
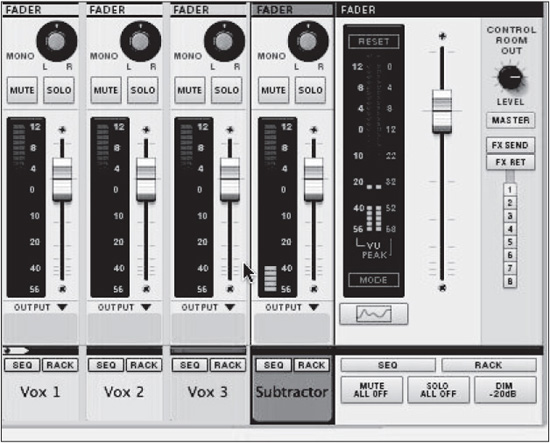
4. Now try lowering the fader of the output bus with the song running. Notice how all these channels that are routed to this bus lower in volume when this fader level is decreased. (See Figure 2.46.) What’s even better is that effects can also be assigned to this one bus. All insert effects created for this bus will affect all of the tracks being input into this bus. This is a wonderful way to save valuable processing power and build a very powerful submix in one shot. Not bad!
Submixing with output buses is a wonderful way to keep your mixes organized, processor-efficient, and sounding good. As you move forward, keep this technique in mind. This can save you a lot of headaches, especially if you are collaborating with someone else. By labeling your tracks and output buses, it’s easy to know what’s going on and ultimately, refine that master mix.
Keep in mind that output buses work on audio tracks as well as instrument tracks—in fact, on any track that appears in the Mix screen that isn’t already being routed to another bus. That being said, let’s start taking a look at something else Reason does very well: instruments and MIDI.
© Propellerhead Software AB.

© Propellerhead Software AB.
Recording with Reason Instruments
Before we get started, you should understand that recording Reason instruments is different from recording audio from live instruments. For Reason instruments, such as Thor or SubTractor, the actual audio is not recorded; instead, the performance is captured as a MIDI sequence of events. Another way of looking at this is that the sequencer records how you play the Reason instrument. For example, the sequencer records not only the note, but how hard you hit the key and how long you hold the key down.
For example, say I record a synthesizer part in Reason using SubTractor. When Reason is recording what I’m playing, it’s not actually recording the sound of the SubTractor; it’s recording what my hands are doing as I play. When I play back the recording, it’s playing back what my hands did, and then it cues the SubTractor in the same fashion. If I decide I don’t like one of the notes I played, I can go into the track and individually delete a note, and then it’s fixed. This type of recording is known as sequencing.
Recording a MIDI sequence is different from recording actual audio. For example, if I were to play a bad note while recording an actual guitar with a microphone, depending on where the note was placed in the recording, I may or may not be able to edit it out.

© Propellerhead Software AB.
In this exercise, I’d like for you to create another blank Reason project. That way, you don’t have some nasty looping audio playing over and over again while you try to record the synth part! Once you’ve got everything set up, follow these steps:
1. Create an instrument using the Create Instrument key command (or open the Create menu and choose Create Instrument). In the Reason Factory Sound Bank, type Piano in the Search For field, select a piano from the list (see Figure 2.47), and press Enter (Windows) or Return (Mac).
2. Set up your loop points the same way you did in steps 1 and 2 in the section “Loop Recording” earlier in this chapter. Your left loop locator should be on measure 1 and your right loop locator on measure 4 (see Figure 2.48). Don’t forget to put Reason in Loop Record mode by pressing L.
3. Enable the click track by pressing the C button on your keyboard. This enables the metronome. You can also select the Click button on the transport bar (see Figure 2.49).
TIP: The metronome audibly indicates how fast (tempo) your current Reason project is playing. It’s important, especially when using instruments, to record with the metronome so that you know whether you’re in or out of time. This is especially important when you get into quantizing. More on this later!
4. Start recording the sequence (see Figure 2.50). When you get to the R loop locator, don’t stop! Keep recording. When you feel as though you have enough material, press the spacebar to stop recording.
5. Play back your track, letting it loop a couple of times. Notice anything you like? Don’t like? Regardless, double-click on your recorded clip in the Sequencer screen (see Figure 2.51).
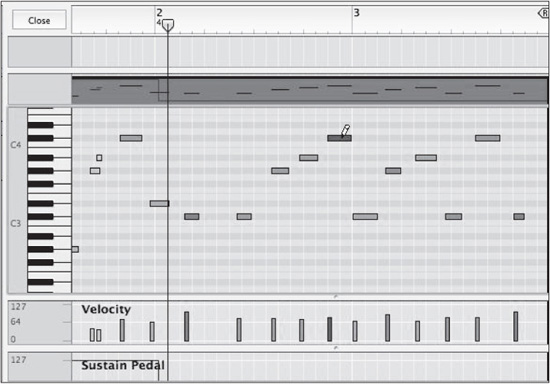
6. Now you should be in Edit mode (see Figure 2.52). It will look different than it did when you edited audio. You’ll see segments that represent all the notes that you played. Try selecting a note segment with your cursor.
7. With a note selected, try moving it around while the loop plays (see Figure 2.53). Notice how easily you can change things around after you’ve recorded.
8. Now, with a note or two selected (you can select several by clicking and dragging around many notes), press the Delete button. You just deleted notes that you recorded (see Figure 2.54)!

© Propellerhead Software AB.

© Propellerhead Software AB.

© Propellerhead Software AB.

© Propellerhead Software AB.

© Propellerhead Software AB.

© Propellerhead Software AB.
© Propellerhead Software AB.

© Propellerhead Software AB.
Moving On
Congratulations, you just did your first MIDI edit! Be aware that this is only the tip of the iceberg with MIDI, and there will be more. Make sure you save what you recorded here; you’ll be using it in the next chapter.
In the next chapter, we expand on instrument recording. Also, we get into some really cool effects that Reason includes, specifically Reason 7! See you in the next chapter!