
1 Getting Started
Introduction to Reason 7.0
Reason has been and always will be the quintessential software studio in the sense that all the gear you would ever need—and it does look like gear—is there at your fingertips. And, where other digital audio workstations (DAWs) have provided similar capabilities, none of them have gone as far as lovingly creating the mannerisms, look, and performance of the instruments that Reason emulates.
For example, Reason gives you cables to creatively route all your different virtual devices, as shown in Figure 1.1. You simply press the Tab button and turn the virtual “rack” around.

© Propellerhead Software AB.
Additionally, Reason gives you knobs, faders, buttons, and every other type of activator you would regularly see in any professional studio, as you can see in Figures 1.2 through 1.5.
© Propellerhead Software AB.
© Propellerhead Software AB.

© Propellerhead Software AB.
© Propellerhead Software AB.
The craziest thing about Reason, though—and this is mostly taken for granted these days—is that you can create an unlimited number of each device within Reason. The end result? You feel as though you’re in a multimillion dollar studio, similar to the types used by iconic artists like the Beatles, Snoop Dogg, Van Morrison, and the Cars. But you’re on your laptop or desktop computer!
In this first chapter, we go over what Reason is, what it isn’t, how to create instruments and audio tracks, and more.
What Is Reason?
If you haven’t figured it out by now, Reason is a piece of software that provides not only a studio, but also unlimited (unless you’re using Reason Essentials) instruments and devices within a virtual rack that all work and act like the real hardware instruments.
As mentioned in the introduction, you also have cables that let you creatively route the way each device is connected to mixers, effects, and more. But if you’re not into playing with cables, don’t worry about it! Reason also has an invisible engineer that you never see or hear from that handles all the cabling for you. Bottom line: He’s shy.
Furthermore, Reason also has a professional-grade sequencer/multitrack audio-recording platform that will enable you to create whatever is in your head and more.
And, if you have some outboard gear, such as MIDI keyboards, well, you’ve picked a great time to begin using Reason. In the past, Reason was set up to be more like an all-inclusive virtual studio. It was as if the developers did not think you’d want to use any gear other than the instruments provided with Reason. In Reason 7, that’s changed. MIDI instruments (outboard drum machines, keyboards, keytar, etc.) can be set up very similarly to the virtual instruments that Reason is known for.
Let’s begin by looking at four buttons you should become very intimate with if you plan on using Reason a lot. Because you did buy this book on Reason, I’ll assume that’s a yes, so let’s move on. I hope you’re excited!
Four Buttons for Four Windows
Reason has a few different screens that are highly important to its regular use. These screens are as follows:
![]() The Mix screen (F5): This screen holds the main Reason mixer that enables you to control the levels of not only your song, but also each individual instrument or track within your song (see Figure 1.6).
The Mix screen (F5): This screen holds the main Reason mixer that enables you to control the levels of not only your song, but also each individual instrument or track within your song (see Figure 1.6).
© Propellerhead Software AB.
![]() The Rack (F6): This screen emulates a hardware device rack that holds all your instruments, effects, and so on (see Figure 1.7).
The Rack (F6): This screen emulates a hardware device rack that holds all your instruments, effects, and so on (see Figure 1.7).

© Propellerhead Software AB.
![]() The Sequencer (F7): This screen is Reason’s main recording/sequencing tool (see Figure 1.8). This is the place where you record your parts and audio and arrange them.
The Sequencer (F7): This screen is Reason’s main recording/sequencing tool (see Figure 1.8). This is the place where you record your parts and audio and arrange them.

© Propellerhead Software AB.
![]() The Tool window (F8): This very handy window holds tools for editing MIDI (Musical Instrument Digital Interface) sequence parts, sample organization, and instrument creation (see Figure 1.9).
The Tool window (F8): This very handy window holds tools for editing MIDI (Musical Instrument Digital Interface) sequence parts, sample organization, and instrument creation (see Figure 1.9).

© Propellerhead Software AB.
Each function key indicated in the preceding list toggles open or close the window to which it’s assigned. Also, you can press each button individually or simultaneously. For example, you can press F5 and F6 at the same time to open both the Mix screen and the Rack screen at the same time. If you press both buttons again, both the Mix screen and the Rack screen will disappear. I draw your attention to these particular buttons because they are the easiest form of navigation in Reason and will save you a lot of time if you use them!
NOTE: If your computer’s function keys are tied up for other uses, you’ll want to go into your System Preferences and disable their use by other system programs. For example, if you press F5 on a Windows machine, the Windows Media Player automatically appears. Apple computers also have their own default uses for function keys. Consult your operating system’s Help menu or your owner’s manual for more information. Failure to free up the function keys (F1–F11) may interfere with your use of Reason.
Now let’s look at the Mix and Rack screens!
The Mix Screen (F5)
In earlier versions of Reason, you had to create a mixer to monitor and mix the multiple devices that you’d create. This is no longer the case. Beginning with version 6.0, Reason incorporated a very large, very powerful mixing board, called the Mix screen, that grows larger with each device you create.
When you open an empty Reason project, it won’t look very significant. You’ll see only the master channel strip on the right side of the screen (see Figure 1.10).
© Propellerhead Software AB.
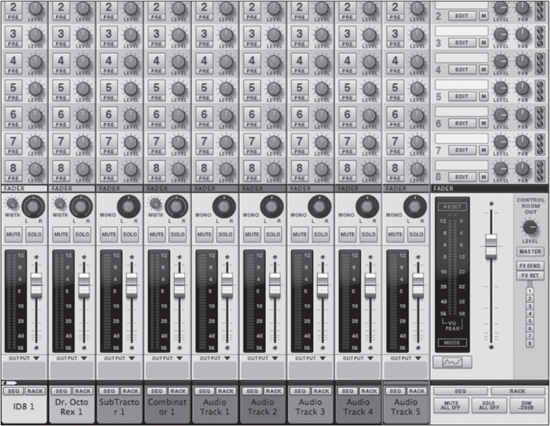
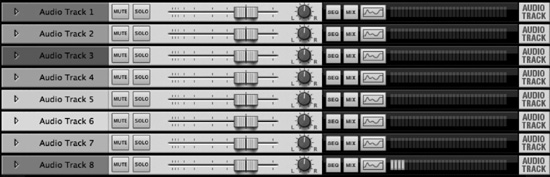
As you begin to add more devices or audio tracks, more channel strips will appear with each individual track or device created (see Figure 1.11).
© Propellerhead Software AB.
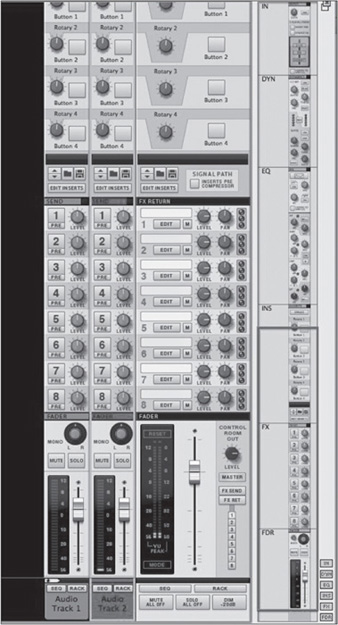
As the Mix screen begins to grow in size, it can become very intimidating to behold because it has so many features. How much you use these features is completely up to you. In fact, Reason has small Show/Hide buttons that enable you to show more or fewer of the sections of the Mix screen (see Figure 1.12). These buttons are abbreviated with the names of each part of the Mix screen, and they are used to hide and reveal parts of the Mix screen that you do and do not need.

© Propellerhead Software AB.
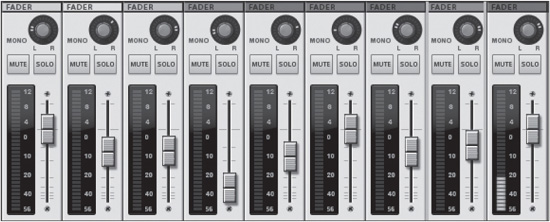
I advise that you hide all but the Fader section at first to avoid being overwhelmed by all the different parts of the Mix screen (see Figure 1.13).

© Propellerhead Software AB.
Fader Section
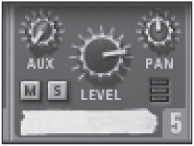
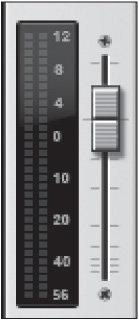
The Fader section of the Mix screen enables you to control the volume of each audio track and device within your Reason song/project, as well as adjust how much of one track or instrument is within each speaker (see Figure 1.14).
© Propellerhead Software AB.
For example, turning up the fader determines how loud an instrument/audio track is within a song (see Figure 1.15).
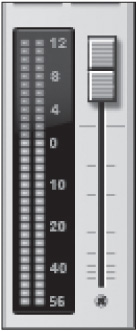
© Propellerhead Software AB.
Adjusting the Pan knob determines whether you hear more of an instrument/audio track in your left or right speaker (see Figure 1.16).

© Propellerhead Software AB.
There are also Mute and Solo buttons within the Fader section (see Figure 1.17). Mute does what it says it does: It instantly makes an audio track inaudible until you click the Mute button again. You’ll always know when it’s active for any particular track because it lights up orange.

© Propellerhead Software AB.
The Solo button will mute every track but the one you’re soloing (see Figure 1.18). For example, if you click Solo on your bass track, you instantly hear only the bass track and nothing else in your project. You’ll know when it is active because it lights up green. Just click the button again to stop this function.

© Propellerhead Software AB.
The other sections of the Mix screen are definitely relevant but are not necessary in terms of finishing a song. They’re described next.
Input Section
The Input section enables you to fine-tune the amount of signal coming into the audio track, as well as determine the order in which the signal will pass through different devices of the mixer (see Figure 1.19). For example, will it pass through the EQ section first or the Dynamics section?

© Propellerhead Software AB.
Dynamics Section
The Dynamics section of the Mix screen (see Figure 1.20) enables you to moderate how dynamic your audio track or instrument will be within your song. It’s broken up into the following two sections:
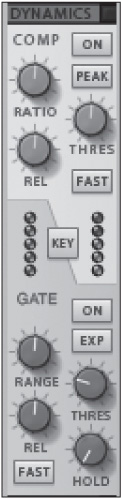
© Propellerhead Software AB.
![]() Compressor: A compressor smoothes out an audio signal (see Figure 1.21). For example, suppose you have recorded a singer, and she whispers through one section of the song and then starts screaming. The compressor will adjust the signal so that the whisper and the scream are both at the same perceived level of volume. Basically, you’re not raising the volume one minute and then cupping your hands over your ears the next!
Compressor: A compressor smoothes out an audio signal (see Figure 1.21). For example, suppose you have recorded a singer, and she whispers through one section of the song and then starts screaming. The compressor will adjust the signal so that the whisper and the scream are both at the same perceived level of volume. Basically, you’re not raising the volume one minute and then cupping your hands over your ears the next!

© Propellerhead Software AB.
![]() Gate: This tells the mixer to turn off all signals of a track when nothing is being played or between words (see Figure 1.22). For example, suppose you have recorded a very noisy guitar track. When the guitar is not playing, you hear a very loud hum that is not needed or wanted during the rest of the song. By adjusting the gate threshold, you can adjust at what volume the guitar will be cut off. If it plays above a certain level, it will be heard; if it’s only a hum, the signal will be killed. This frees up a lot of space within your mix so that other instruments can shine!
Gate: This tells the mixer to turn off all signals of a track when nothing is being played or between words (see Figure 1.22). For example, suppose you have recorded a very noisy guitar track. When the guitar is not playing, you hear a very loud hum that is not needed or wanted during the rest of the song. By adjusting the gate threshold, you can adjust at what volume the guitar will be cut off. If it plays above a certain level, it will be heard; if it’s only a hum, the signal will be killed. This frees up a lot of space within your mix so that other instruments can shine!

© Propellerhead Software AB.
EQ Section
The EQ section enables you to adjust the frequency range of an individual track or instrument (see Figure 1.23). If you have a really thick guitar track, it can take up the frequency range of an entire song, keeping you from hearing the vocals, drums, and so on. You can use the EQ section to moderate this range.

© Propellerhead Software AB.
NOTE: You don’t have to use the EQ section if you don’t want to. Some people may prefer to bypass the Mix screen entirely and work only within the Reason Rack and Sequencer screens. Reason does have two separate EQ devices: the Master Class EQ (see Figure 1.24) and the smaller PEQ-2 Two-Band Parametric EQ.

© Propellerhead Software AB.
The EQ section is broken up into the following sections:
![]() Filters: As shown in Figure 1.25, this contains one low pass filter (LPF) and one high pass filter (HPF). Use the high pass filter to instantly kill low frequencies in one fell swoop. Use the low pass filter to kill all high frequencies in one fell swoop. Yes, it looks as though this is a mistake on my part, but that’s how filters work. Low pass kills high frequencies, allowing only the “lows” to pass; high pass kills all low frequencies, allowing only the “highs” to pass.
Filters: As shown in Figure 1.25, this contains one low pass filter (LPF) and one high pass filter (HPF). Use the high pass filter to instantly kill low frequencies in one fell swoop. Use the low pass filter to kill all high frequencies in one fell swoop. Yes, it looks as though this is a mistake on my part, but that’s how filters work. Low pass kills high frequencies, allowing only the “lows” to pass; high pass kills all low frequencies, allowing only the “highs” to pass.

© Propellerhead Software AB.
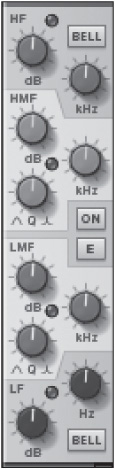
![]() HF (High Frequency), HMF (High Mid Frequency), LMF (Low Mid Frequency), LF (Low Frequency): Each subsection of the mixer, in this case, centers on certain areas within a frequency (see Figure 1.26). Use the HF, for example, to kill all the upper frequencies on a kick drum, while using the LF to boost the lower range of a kick drum to give it more bass.
HF (High Frequency), HMF (High Mid Frequency), LMF (Low Mid Frequency), LF (Low Frequency): Each subsection of the mixer, in this case, centers on certain areas within a frequency (see Figure 1.26). Use the HF, for example, to kill all the upper frequencies on a kick drum, while using the LF to boost the lower range of a kick drum to give it more bass.
© Propellerhead Software AB.
Inserts Section
The Inserts section enables you to control, from the Mix screen, effects that you’ve assigned specifically to individual tracks (see Figure 1.27).

© Propellerhead Software AB.
For example, suppose you create an RV7000 Reverb unit, a Line 6 unit, and a Master Class Compressor for your guitar track. After customizing all these effects devices, you decide that you’d like to have the ability to control specific knobs or buttons directly from the Mix screen as opposed to having to switch back and forth from the Rack screen to the Mix screen. Because the Inserts section is technically a Combinator, you can assign specific knobs or buttons from the effects directly to the Inserts section knobs and buttons. These assignments take place within the Rack screen’s representation of the mixer (described in the section “The Reason Rack [F6]” later in this chapter). Before moving on, though, I’d like to point out the four buttons at the bottom of the Inserts section. The Browse patch button enables you to open the Reason browser and search for your own or premade FX settings created by Propellerhead Software.
To access premade insert FX, follow these steps:
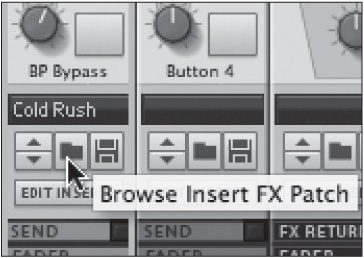
1. Click the Browse Insert FX Patch button in the Inserts section of the Mix screen (see Figure 1.28).
© Propellerhead Software AB.
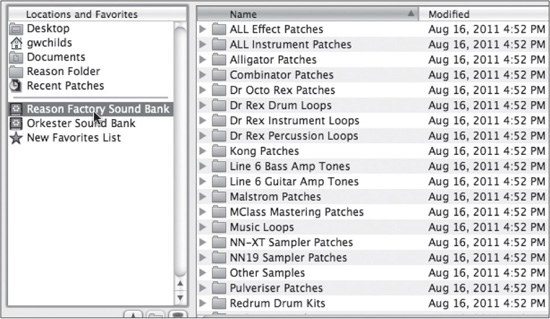
2. Select Reason Factory Sound Bank on the left side of the browser (see Figure 1.29).
© Propellerhead Software AB.
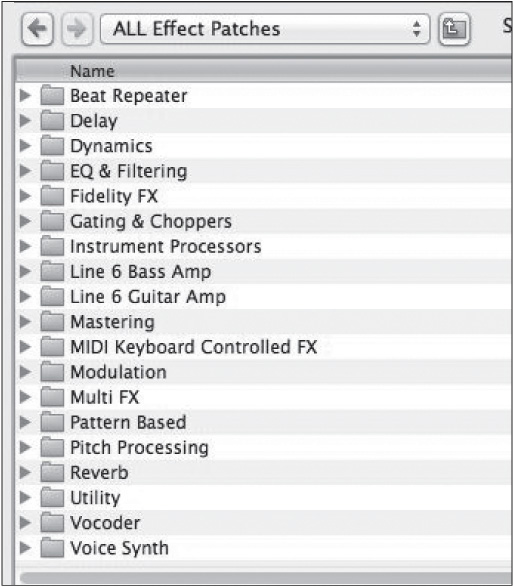
3. Double-click All Effect Patches to enter this directory (see Figure 1.30).

© Propellerhead Software AB.
4. Within the All Effect Patches directory, you’ll notice folders that describe several specific production tasks (see Figure 1.31). Open the folder that would best suit your purposes and select one of the patches inside by double-clicking.
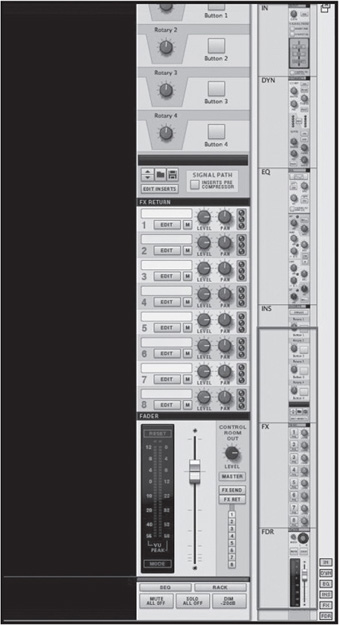
Master Section
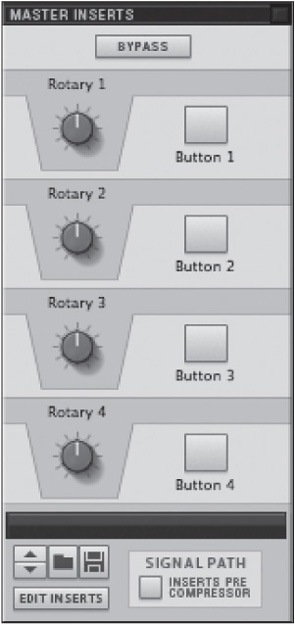
There is also an Inserts section for the entire mix. It is known as the Master Inserts section (see Figure 1.32). It is located in the Master section of the Mix screen, on the far right side of the Mix screen. The Master section not only controls your overall mix output using the Master Fader (refer to “Fader Section,” earlier in this chapter), but also controls the sound of the entire mix.
For example, using the Master Inserts section, you could assign a small chorus over the whole mix to give the mix a little extra thickness. Or you could simply use one of the premade patches from the Reason Factory Sound Bank to give your mix a whole new spin! The Master Section also has its own Dynamics section. Therein lies the Master Compressor, which you can use to tighten up your entire mix (see Figure 1.33).
And, finally there is the FX Send section, described in more detail in the next section.
© Propellerhead Software AB.
© Propellerhead Software AB.

© Propellerhead Software AB.
Send and Return Section
Sometimes you will want or need a few effects that can each be distributed to a variety of different tracks but stem from one source. The Send and Return section of the Reason Mix screen enables you to do just that (see Figure 1.34).

© Propellerhead Software AB.
As you can see, you get up to eight sends and returns within your project (see Figure 1.35). Once you’ve created a send effect, you can determine how much, if any, of the effect will be heard on the other tracks or channels by using the Send knobs.

© Propellerhead Software AB.
Here’s how you do it:
1. Right-click on the Return section of the Mix screen and select Create Send FX (see Figure 1.36).

© Propellerhead Software AB.
2. In this example, in the Studio FX submenu, choose RV7000 (see Figure 1.37).

© Propellerhead Software AB.
3. On the tracks on which you want to also have the RV7000 reverb, click the numbered buttons (in this case, 1) and turn up the Send knob that corresponds with the Return (see Figure 1.38). For example, the RV7000 is in Return 1, so you can turn up the Send 1 knob on the track that you want to have reverb.

© Propellerhead Software AB.
The advantages of doing it this way are as follows:
![]() You can adjust one effect and affect several instruments at once as opposed to having to adjust each individual instrument when you decide you don’t like something.
You can adjust one effect and affect several instruments at once as opposed to having to adjust each individual instrument when you decide you don’t like something.
![]() You can create an atmosphere through effects that will draw your listener in further.
You can create an atmosphere through effects that will draw your listener in further.
There are actually more uses for sends and returns, but I’ll leave those for you to discover on your own.
Creating Audio Tracks/Adding Channels to the Mix Screen
Before going on, I’d like to show you that you can create additional channels in the Mix screen that will also show up as gear within your Reason Rack screen (covered next), as well as tracks within the Reason Sequencer (covered in the next chapter).
To begin, let’s start by creating an audio track because, historically, it’s the most common form of track to a mixer.
1. Open the Create menu.
2. Select Create Audio Track (see Figure 1.39), or press and hold Ctrl+T (Windows) or Command+T (Mac).
Instantly, an additional channel will appear in your Mix screen (see Figure 1.40).
If you press the F6 button on your keyboard, you’ll notice a new track has appeared within the Rack screen, labeled as an audio track (see Figure 1.41).
On this audio track device, you can choose your recording input (from the Audio Input menu), mute, and solo, as explained earlier in this chapter, directly from the Mix screen.

© Propellerhead Software AB.

© Propellerhead Software AB.
Also, there are navigation buttons, such as Sequencer (labeled “Seq”) and Mixer (labeled “Mix”) buttons that take you to the labeled screens. There’s even a button to take you to the Spectrum EQ! You can also choose the audio track output from the Audio Output drop-down menu, as well as control the volume and panning of your audio track, all from Audio Track device.
Now that we’re here in the Rack screen, let’s talk about it a bit.
© Propellerhead Software AB.
The Reason Rack Screen (F6)
We’ve established now that Reason’s Mix screen is your main area for mixing your song. This entails adjusting levels and EQs, adding FX, and so on. Now, let’s talk about the screen that actually holds all the virtual devices that make up your virtual studio minus the mixer (see Figure 1.42).

© Propellerhead Software AB.
The Reason Rack screen—the most iconic portion of Reason, period—stores your virtual instruments, audio track devices, effects, line mixers, and more, but also takes it a step beyond this. These devices aren’t just visually represented here; they actually work! From within the mixer, you can modify settings on the devices. And by pressing the Tab button, you can even adjust the signal flow to and from the devices to the mixer, and so on. Press the Tab button now!
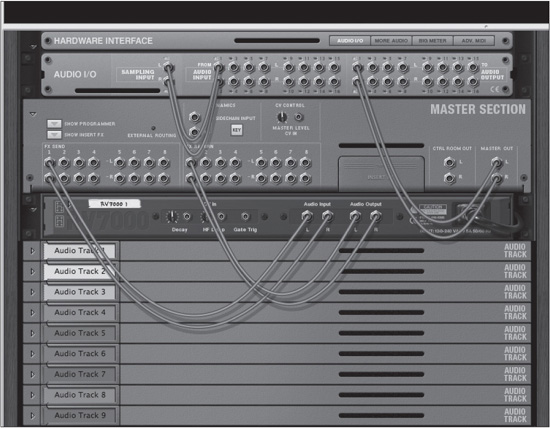
See all the dangling wires in Figure 1.43? These aren’t just for show! You can actually pull the wires and drag them to other inputs, outputs, or control voltage (CV) ports. If you aren’t comfortable with this yet, don’t worry; Reason doesn’t require you to do anything with the wires. Remember, you have a virtual engineer that will take care of all that for you if you want.
© Propellerhead Software AB.
Let’s take a moment to go over the anatomy of the Reason Rack screen in its most simple form, meaning before there are several devices attached (see Figure 1.44). To begin, let’s start with the hardware interface. You will always see this device in every Reason Rack screen, period. This is the virtual equivalent of the audio hardware you may physically have at your disposal, such as your audio interface or MIDI controller.
NOTE: Reason, like many DAWs, is compatible with ReWire, which is a protocol that allows two audio applications to work together. The ReWire protocol not only allows perfect synchronization between applications, but also enables you to send virtual audio cables between two applications to allow greater mixing potential. The audio inputs and outputs section of the hardware interface is your direct conduit to other applications. For more information on ReWire, see Using ReWire: Skill Pack by G.W. Childs (Course Technology PTR).
© Propellerhead Software AB.
The hardware interface consists of the following:
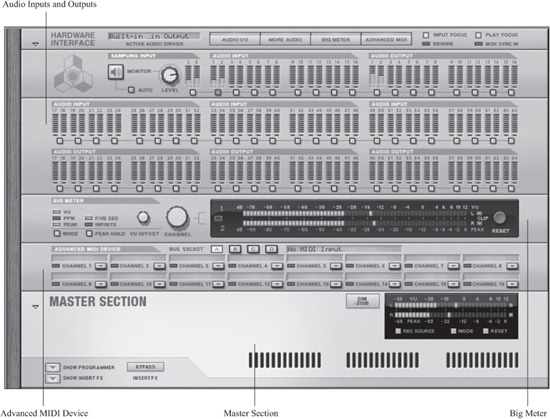
![]() Audio Inputs and Outputs: You use these audio inputs and outputs to enable the physical audio inputs and outputs on your audio interface. You also use them for rewiring to other audio applications. (See the preceding note on ReWire.)
Audio Inputs and Outputs: You use these audio inputs and outputs to enable the physical audio inputs and outputs on your audio interface. You also use them for rewiring to other audio applications. (See the preceding note on ReWire.)
![]() Big Meter: This device enables you to view the signal of either your main mix or another selected input or output. Additionally, it gives you options for how you’d like to view each signal.
Big Meter: This device enables you to view the signal of either your main mix or another selected input or output. Additionally, it gives you options for how you’d like to view each signal.
![]() Advanced MIDI Device: This is essentially a virtual MIDI interface. You use this device to connect multiple MIDI devices into one Reason Rack or to enable another computer sending MIDI to control Reason.
Advanced MIDI Device: This is essentially a virtual MIDI interface. You use this device to connect multiple MIDI devices into one Reason Rack or to enable another computer sending MIDI to control Reason.
![]() The Master Section: This interfaces with the Mix screen, covered earlier. Here, you connect your Master Section inserts within the Rack screen. This is also the place where your send and return FX are connected. Consider this the mixer’s avatar within the Rack screen.
The Master Section: This interfaces with the Mix screen, covered earlier. Here, you connect your Master Section inserts within the Rack screen. This is also the place where your send and return FX are connected. Consider this the mixer’s avatar within the Rack screen.
NOTE: When the Master Section is completely open, it looks and behaves very much like a Combinator (see Figure 1.45). Like the Combinator, it has assignable knobs and buttons that can be routed to specific functions. These functions are intended for the insert effects knobs, which are also present within the Mix screen.

© Propellerhead Software AB.
Moving On
We’ve covered two of the major screens within Reason. In the next chapter, we’ll get into the Reason screen that enables you to actually record and arrange your song: the Sequencer!