
4 The Reason Sequencer: Close-Up
THE REASON SEQUENCER IS BASICALLY THE BRAIN OF THE ENTIRE PROGRAM (see Figure 4.1). It is the compositional tool that enables you to record your performances, edit them, and then play them back with accuracy and precision. This chapter examines the individual parts of the Reason Sequencer screen and discusses how to use the Sequencer to its limits.

© Propellerhead Software AB.
A sequencer is responsible for performing three tasks:
![]() Recording MIDI/audio data
Recording MIDI/audio data
![]() Editing MIDI/audio data
Editing MIDI/audio data
![]() Playing back MIDI/audio data
Playing back MIDI/audio data
Importing and Exporting MIDI Files: The Reason sequencer can import and export MIDI files. This is a great feature for users who like to surf the Web and download MIDI files of their favorite songs. Additionally, you can export your songs in Reason as MIDI files for other users to download into their favorite MIDI sequencers.
To import a MIDI file, simply choose Import MIDI File from the File menu and then locate the MIDI file with your Windows or Mac file browser to import it. After you import the MIDI file, just keep these rules in mind:
![]() Imported sequencer tracks are automatically routed to an instance of the ID8 per MIDI track. Additionally, each instance of the ID8 will have a patch loaded that hopefully resembles the original sound if that data is contained within the MIDI file. Otherwise, the instance of the ID8 will load a Grand Piano patch as the default patch.
Imported sequencer tracks are automatically routed to an instance of the ID8 per MIDI track. Additionally, each instance of the ID8 will have a patch loaded that hopefully resembles the original sound if that data is contained within the MIDI file. Otherwise, the instance of the ID8 will load a Grand Piano patch as the default patch.
![]() All the controller data saved within a MIDI file, such as modulation wheel adjustments and pitch bend changes, is imported along with the rest of the data. In some cases, however, this controller data might not work as intended with Reason devices. You might have to remove the controller information, which is covered toward the end of this chapter.
All the controller data saved within a MIDI file, such as modulation wheel adjustments and pitch bend changes, is imported along with the rest of the data. In some cases, however, this controller data might not work as intended with Reason devices. You might have to remove the controller information, which is covered toward the end of this chapter.
To export a MIDI file, first set your end (E) marker to the right-most position of your song. Then choose Export MIDI File from the File menu, and Reason does the rest. Just remember the following:
![]() The tempo of the Reason song is stored in the MIDI file.
The tempo of the Reason song is stored in the MIDI file.
![]() All the exported sequencer tracks are set to MIDI Channel 1 by default. This is true because Reason is not a MIDI channel–dependent program, like Cubase and Logic.
All the exported sequencer tracks are set to MIDI Channel 1 by default. This is true because Reason is not a MIDI channel–dependent program, like Cubase and Logic.
![]() All the exported sequencer tracks retain their given names from Reason.
All the exported sequencer tracks retain their given names from Reason.
The rest of this chapter explores every inch of the Reason Sequencer screen, including the following topics:
![]() The basic layout
The basic layout
![]() The Track List
The Track List
![]() The Sequencer screen toolbar
The Sequencer screen toolbar
![]() The Tool Window
The Tool Window
![]() The Transport panel
The Transport panel
![]() How to sequence a live performance
How to sequence a live performance
![]() How to sequence written data
How to sequence written data
![]() How to record a live performance
How to record a live performance
![]() How to edit a live performance
How to edit a live performance
![]() The ReGroove Mixer
The ReGroove Mixer
The Basic Layout and Tools
Before you begin your exploration of the Reason Sequencer screen, it’s important to have a general understanding of the basic layout of its common and unique views and functions.
The Song View and Edit Mode
When you first look at the Sequencer screen, the Song view is probably the first point of interest you will notice. This is the place where all the MIDI and audio data for your Reason song is stored, arranged, and displayed.
NOTE: All the data displayed in the Reason Sequencer screen is also referred to as clips. Clips are groups of data that can be easily moved around, selected, deleted, cut into smaller clips, and more.
Typically, a sequencer displays its MIDI/audio data in a linear fashion, meaning that the information is read from left to right. A song begins on the far left and progresses to the right as the song plays. The timeline of these events in the Reason Sequencer screen is governed by the ruler, which is located at the top of the Song view and runs parallel to it. Looking at Figure 4.2, you can see that the ruler displays bars, or measure counts for every other bar. When you read through the next part of this section and use the Zoom tools, you’ll find that the ruler can display much smaller and finer increments.

© Propellerhead Software AB.
Several kinds of data are displayed in the Song view:
![]() Note/audio information
Note/audio information
![]() Controller information
Controller information
![]() Automation information
Automation information
![]() Pattern change information
Pattern change information
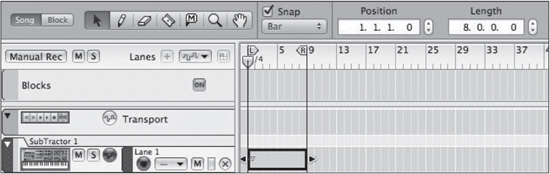
NOTE: If you’re familiar with other DAWs, you’re probably used to seeing track lanes that feature a lot of data, which can be viewed through various drop-down menus and so on. Reason works similarly, but through a feature called “lanes,” which are multiple tracks of data contained within a single sequencer track. Looking at Figure 4.3, you can see a track that includes two lanes of data. The first lane is the note data and the second lane is automation data for the Filter Frequency parameter of the Reason synth where this track is routed, which is the SubTractor. Also note that the second lane has an On/Off switch, which disables the automation data from playing back. This is also the same for pattern lanes, which you’ll read about shortly. Additionally, every lane has a Delete Lane button marked ×, which deletes just the lane and not the entire sequencer track.

© Propellerhead Software AB.
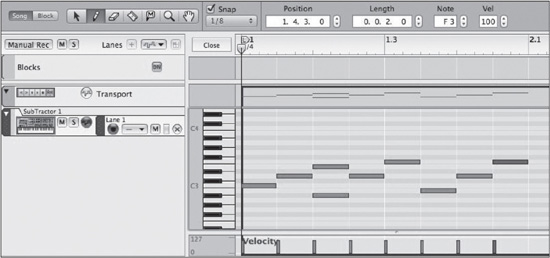
The Sequencer screen also has an alternate viewing mode, called Edit mode. In this view, all the data in a song can be edited and new data can be created (see Figure 4.4). As you read further in this chapter, you will find that there are many creative possibilities and different faces to the Edit mode.

© Propellerhead Software AB.
The Zoom Tools
The Reason Sequencer screen includes Zoom tools that can help you get a close-up look at any data in a particular track. They also give you a better view of an overall song.
![]() The first pair of Zoom tools is located in the lower-left corner of the Sequencer screen. These tools enable you to zoom in and out horizontally on any event(s) in the Sequencer screen (see Figure 4.5).
The first pair of Zoom tools is located in the lower-left corner of the Sequencer screen. These tools enable you to zoom in and out horizontally on any event(s) in the Sequencer screen (see Figure 4.5).

© Propellerhead Software AB.
![]() The second pair of Zoom tools is located in the lower-right corner of the Navigator. These tools enable you to zoom in and out vertically on every sequencer track while in Song or Block view (see Figure 4.6).
The second pair of Zoom tools is located in the lower-right corner of the Navigator. These tools enable you to zoom in and out vertically on every sequencer track while in Song or Block view (see Figure 4.6).
© Propellerhead Software AB.
![]() Two additional pairs of Zoom tools become visible when you enter Edit mode. They are located in the upper-right corner of the Sequencer screen. You use the topmost pair to zoom in or out on the Clip Overview and use the lower pair to zoom in or out on the data being edited (see Figure 4.7).
Two additional pairs of Zoom tools become visible when you enter Edit mode. They are located in the upper-right corner of the Sequencer screen. You use the topmost pair to zoom in or out on the Clip Overview and use the lower pair to zoom in or out on the data being edited (see Figure 4.7).

© Propellerhead Software AB.
Sizing Up the Sequencer
The size of the Sequencer screen can be easily adjusted in two ways:
![]() Click on the Maximize button, located in the upper-right corner of the Sequencer screen. Note that after you maximize the Sequencer screen, the Maximize button becomes a Restore button, which you use to return the window to its default position. You can also use the F7 key to maximize the Sequencer screen.
Click on the Maximize button, located in the upper-right corner of the Sequencer screen. Note that after you maximize the Sequencer screen, the Maximize button becomes a Restore button, which you use to return the window to its default position. You can also use the F7 key to maximize the Sequencer screen.
![]() Click and drag on the divider between the Sequencer screen and the Reason Rack screen.
Click and drag on the divider between the Sequencer screen and the Reason Rack screen.
The Sequencer Screen Toolbar and Tool Window
Both the toolbar and the Tool Window are used to perform numerous tasks in the Sequencer screen. This section discusses each of these (see Figure 4.8).
Let’s first discuss the Sequencer screen toolbar, starting at the far-left corner.
Accessing Edit Mode
Like all DAWs, Reason features a main view that acts as your arrangement window. In Reason’s case, this is the Song view that we’ve been working in. There’s also another view known as Edit view. You can reach this mode a few different ways. One is to use the Options menu, shown in Figure 4.9. The quickest way is to press Ctrl+E (Windows) or Command+E (Mac). You can also double-click on a clip to enter Edit mode, but double-clicking on an audio clip with no comp layers opens the Inline Editor for timing adjustments.
© Propellerhead Software AB.

© Propellerhead Software AB.
TIP: Looking at Figure 4.9, you can also see another option, Switch to Block View, which switches the Reason Sequencer screen to Block view. In case you missed this feature, refer to Chapter 3, “Recording and Effects.”
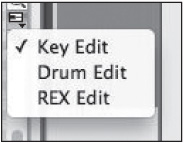
Changing Edit Modes: When you are in the Edit mode of the Reason Sequencer screen, you can view and edit your performances and sequences in a few ways. You use the Change Note Edit Mode pop-up menu, which is located to the upper-right area of the Sequencer screen, just below the Zoom tools (see Figure 4.10).
© Propellerhead Software AB.
Looking at the figure, you can see three options (Key Edit, Drum Edit, and REX Edit), each of which serves a unique purpose (see Figure 4.11).
![]() Key Edit: This editor is used to edit the MIDI data related to the SubTractor, Malström, Thor, NN-19, and NN-XT devices.
Key Edit: This editor is used to edit the MIDI data related to the SubTractor, Malström, Thor, NN-19, and NN-XT devices.
![]() Drum Edit: This editor is used to edit the MIDI data of Redrum.
Drum Edit: This editor is used to edit the MIDI data of Redrum.
![]() REX Edit: This editor is used to edit the MIDI data of the Dr. Octo Rex Loop Player.
REX Edit: This editor is used to edit the MIDI data of the Dr. Octo Rex Loop Player.

© Propellerhead Software AB.
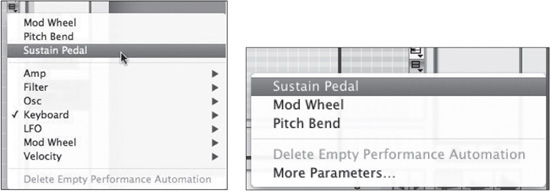
Just below the Change Note Edit Mode menu is the Note Lane Performance Parameter Automation menu (see Figure 4.12). This menu enables you to show and hide different controller parameters such as the Mod Wheel and Aftertouch and all the parameters that can be automated. You’ll learn more about this later in the chapter. For now, just be aware that these menus are available and you’ll be calling on them from time to time.
© Propellerhead Software AB.
The Toolbar
To the right of the Song/Block buttons is the toolbar, containing the Sequencer screen editing tools (see Figure 4.13). These seven buttons are used to view, write, or edit data in both the Song and Block views, as well as in Edit mode.
© Propellerhead Software AB.
![]() Selector tool: Also known as the pointer, this tool enables you to select an individual event or group. You also can use it to select a group of events and groups by clicking and dragging a marquee box around them.
Selector tool: Also known as the pointer, this tool enables you to select an individual event or group. You also can use it to select a group of events and groups by clicking and dragging a marquee box around them.
![]() Pencil tool: This tool enables you to draw MIDI events and groups. Additionally, you can use it to draw in controller and velocity information on an event-by-event basis. You can also hold down the Ctrl (Windows) or Option (Mac) key, and the Pencil becomes a crosshair tool that you can use to click and drag straight lines or smooth diagonal lines.
Pencil tool: This tool enables you to draw MIDI events and groups. Additionally, you can use it to draw in controller and velocity information on an event-by-event basis. You can also hold down the Ctrl (Windows) or Option (Mac) key, and the Pencil becomes a crosshair tool that you can use to click and drag straight lines or smooth diagonal lines.
![]() Eraser tool: This tool enables you to delete single events and groups. Additionally, you can delete a group of events by clicking and dragging a marquee box around them and then releasing the mouse button.
Eraser tool: This tool enables you to delete single events and groups. Additionally, you can delete a group of events by clicking and dragging a marquee box around them and then releasing the mouse button.
![]() Razor tool: This tool enables you to cut sequencer data by splitting clips.
Razor tool: This tool enables you to cut sequencer data by splitting clips.
![]() Mute tool: This tool enables you to mute selected clips of events in a song.
Mute tool: This tool enables you to mute selected clips of events in a song.
![]() Magnify tool: This tool enables you to get a close-up look at a group or event.
Magnify tool: This tool enables you to get a close-up look at a group or event.
![]() Hand tool: This tool enables you to scroll through a Reason song. Select it and then click and drag to the left or right while in the Song or Edit view. The song position pointer shifts along with you.
Hand tool: This tool enables you to scroll through a Reason song. Select it and then click and drag to the left or right while in the Song or Edit view. The song position pointer shifts along with you.
Keyboard Shortcuts: Each tool button has a keyboard shortcut assigned to it. This makes it easy to switch tools quickly without using the mouse. Here’s a list of the buttons and their shortcut keys:
![]() Selector: Q
Selector: Q
![]() Pencil: W
Pencil: W
![]() Eraser: E
Eraser: E
![]() Razor: R
Razor: R
![]() Mute: T
Mute: T
![]() Magnify: Y
Magnify: Y
![]() Hand: U
Hand: U
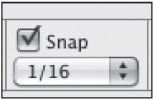
Snap Controls
To the right of the editing tools are the Snap (short for “Snap to Grid”) controls (see Figure 4.14). These perform two tasks:
![]() They assign a minimum note length value to the Pencil tool.
They assign a minimum note length value to the Pencil tool.
![]() They assign a minimum note length value for shifting MIDI events.
They assign a minimum note length value for shifting MIDI events.
© Propellerhead Software AB.
Snap supports a wide variety of note values, ranging from bar (whole notes) to 1/64 notes. After selecting a note value, you can then use the Pencil, Line, or Selector tool to draw, edit, or shift clips in the Song view or events in the Edit view.
It’s important to understand how Snap works, so let’s try a couple of exercises. Get yourself ready by starting a new Reason song, creating an instance of SubTractor, and creating a clip by using the Pencil tool to click and drag between the left and right locator points. When you’re finished, it should look something like Figure 4.15.
1. Use the Selector tool to double-click on the clip. This opens the Key Lane Editor for the SubTractor. The velocity lane should also be viewable by default.
2. Select a note value of 1/8 from the Snap menu.
3. Make sure the Snap button, located to the right of the Snap Value menu, is active.

© Propellerhead Software AB.
4. Select the Pencil tool and click to create a few events in the key lane. Notice that each note is a 1/8 note in length (see Figure 4.16).
© Propellerhead Software AB.
5. Click the Close button to switch to Song view.
In the next exercise, you’ll use the Selector tool in Song view. For the sake of simplicity, keep using the song you started in the preceding example and make sure that the Snap to Grid button is still active before you begin this exercise.
1. Switch to Song view and choose 1/2 from the Snap menu. This assigns a half note value.
2. Click the Selector tool. Now click and drag the SubTractor clip to the left or right, and you will notice it moving in half-note increments.
3. Choose a smaller note value from the Snap menu, such as 1/8.
4. Try moving the clip again, and you will see that it moves in much smaller increments than before.
NOTE: Located just to the right of the Snap menu is the Snap to Grid button (keyboard shortcut S). This button turns the Snap function on and off. You have just seen how the Snap works when activated. Try turning off the Snap to Grid button and using the Selector tool to move around a few clips. You will notice that the moving clips are not governed by the Snap note value. Rather, you can move clips around freely, which is typically referred to as free time. This enables you to make very fine adjustments to a performance.
Additional Toolbar Features
In addition to all the tools discussed in the preceding sections, the Sequencer screen toolbar provides other tools and features. Just to the right of the Snap tools, there may appear to be a lot of empty, unused space. I say “may appear to be” because some of these additional tools and features do not appear unless a clip has been selected (see Figure 4.17).
© Propellerhead Software AB.
The Track Parameter Automation button and menu operate in the same fashion as the Performance Parameter Automation menu that you looked at earlier in this chapter (review Figure 4.12). The purpose of this button and menu is to create an automation lane on the selected sequencer track. Looking at Figure 4.18, you can see that most of the automated parameters are listed, such as the parameters on the SubTractor.

© Propellerhead Software AB.
The Manual Record button performs a simple yet useful task. Whenever you select a track in the Reason Sequencer screen, the track is automatically set to Record Enabled. Although this feature is great when you’re first creating your Reason song, it can get a bit cumbersome when you are in the mixing stage because you don’t want to risk accidentally recording over your audio tracks. Activate the Manual Record button and select any track in your Reason song, and you’ll see that the track is not Record Enabled.
Moving along to the right, the Create Pattern Lane button enables you to create a lane for changing patterns with either the Matrix or Redrum, which are both pattern-based Reason devices. You also can use it to create a lane for changing loops with Dr. Octo Rex. Note that this button is grayed out until an instance of one of the aforementioned Reason devices has been created.
Now, select the Pencil tool and a couple of new drop-down menus appear just to the right of the Pattern Lane button.
![]() Time Signature: This drop-down menu is used to automate time signature changes for your Reason song. To use it, simply hold down the Alt (Windows) or Option (Mac) key on your keyboard and click on the Time Signature display in the Transport panel. A new time signature lane is created on the transport sequencer track. At this point, select your new time signature from the menu and use the Pencil tool to draw in the new time signature along the transport sequencer track.
Time Signature: This drop-down menu is used to automate time signature changes for your Reason song. To use it, simply hold down the Alt (Windows) or Option (Mac) key on your keyboard and click on the Time Signature display in the Transport panel. A new time signature lane is created on the transport sequencer track. At this point, select your new time signature from the menu and use the Pencil tool to draw in the new time signature along the transport sequencer track.
![]() Pattern/Loop: This is used to automate pattern changes for either the Matrix or Redrum. It also can be used for automating loop changes with Dr. Octo Rex. To use it, hold down the Alt (Windows) or Option (Mac) key on your keyboard and click on the Pattern section of either the Matrix or Redrum, or the Loop Slot section of Dr. Octo Rex. A pattern select lane is created on the sequencer track of the aforementioned Reason devices. At this point, select your new pattern from the menu and use the Pencil tool to draw the new pattern in the lane.
Pattern/Loop: This is used to automate pattern changes for either the Matrix or Redrum. It also can be used for automating loop changes with Dr. Octo Rex. To use it, hold down the Alt (Windows) or Option (Mac) key on your keyboard and click on the Pattern section of either the Matrix or Redrum, or the Loop Slot section of Dr. Octo Rex. A pattern select lane is created on the sequencer track of the aforementioned Reason devices. At this point, select your new pattern from the menu and use the Pencil tool to draw the new pattern in the lane.
![]() Block: This is used to assign any selected clip of song data in a song to a block, which is part of the Block view. This is a feature that enables you to create a dynamic arrangement of your song by assigning groups of MIDI data to blocks that can then be rearranged quickly. This feature is covered in the previous chapter.
Block: This is used to assign any selected clip of song data in a song to a block, which is part of the Block view. This is a feature that enables you to create a dynamic arrangement of your song by assigning groups of MIDI data to blocks that can then be rearranged quickly. This feature is covered in the previous chapter.
Lastly, some additional settings are displayed in the Inspector when dealing with MIDI clips in Edit mode. Open any Reason song that contains MIDI tracks, switch to Edit mode, and select a MIDI note. At this point, you see the newly displayed options at the top of the screen in an area called the Inspector (see Figure 4.19). They are as follows:

© Propellerhead Software AB.
![]() Position: This option displays the MIDI note’s position in bars, beats, 1/16 notes, and ticks.
Position: This option displays the MIDI note’s position in bars, beats, 1/16 notes, and ticks.
![]() Length: This option displays the MIDI note’s length in bars, beats, 1/16 notes, and ticks.
Length: This option displays the MIDI note’s length in bars, beats, 1/16 notes, and ticks.
![]() Note: This option displays the note’s pitch in numeric form. Note that this option is not actually labeled “Pitch” (or anything, for that matter).
Note: This option displays the note’s pitch in numeric form. Note that this option is not actually labeled “Pitch” (or anything, for that matter).
![]() Vel: This option displays the note’s velocity.
Vel: This option displays the note’s velocity.
Note that you also can view the Position and Length options in Song view when a clip is selected in the Sequencer screen.
The Tool Window
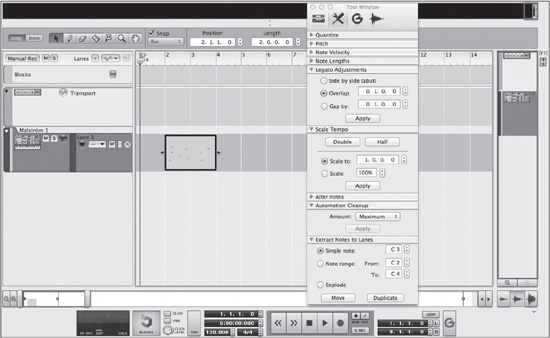
Reason 7’s Tool Window is probably one of the best workflow features I’ve ever used in a sequencing program (see Figure 4.20.) It can help create new instances of any Reason device, edit your MIDI performances, edit samples, and edit/alter your grooves via ReGroove, which you’ll learn about later in this chapter. It can even be used to transpose the pitch of audio and MIDI clips! In other words, it’s Reason’s creative hub.
The Tool Window is divided into four sections: the Device palette, the Sequencer tools, the Groove settings, and the Song Samples section. This discussion focuses only on the Sequencer tools and Song Samples section; you’ll learn about the Groove settings later in this chapter.
Sequencer Tools
To start, let’s meet the family of Sequencer tools (refer to Figure 4.20).
QUANTIZE
Quantization helps to correct timing problems. The easiest way to explain this concept is to think of quantizing as an invisible magnet that pulls and pushes MIDI events to a determined note value, which is assigned via the Quantize Notes section of the Sequencer tools (refer to Figure 4.20). It’s an indispensable tool for rhythmically challenged (or non-robotic) people who need rhythms that are tight and punchy.

© Propellerhead Software AB.
To use this tool, you must select a clip from any sequencer track that has MIDI note data or a group of MIDI notes in Edit mode. After you do this, the Apply button in the Quantize tool becomes active. Assuming that you’ve done this, let’s look at the individual parameters:
![]() Value: This menu determines the note value to use for quantization. Like the Snap menu, it has a range of bar to 1/64 and all points in between. However, unlike the Snap menu, it has an additional Shuffle option, which is used in combination with the ReGroove mixer. More on this later.
Value: This menu determines the note value to use for quantization. Like the Snap menu, it has a range of bar to 1/64 and all points in between. However, unlike the Snap menu, it has an additional Shuffle option, which is used in combination with the ReGroove mixer. More on this later.
![]() Amount: This menu determines the amount of quantization to apply to a clip or to a group of selected MIDI notes. It has a range of 5% to 100%.
Amount: This menu determines the amount of quantization to apply to a clip or to a group of selected MIDI notes. It has a range of 5% to 100%.
![]() Random: This option applies a randomized feeling to your MIDI notes in tick increments. It has a range of 0–120 ticks. The purpose of this function is to introduce a looser feeling to your music to prevent it from feeling too tight and rigid. Think of real drummers; as much as they might try, it’s difficult to hit every note right in time without some sort of variation. This introduces a randomization into their playing, which is what gives the performance its charm. The Random function can help make this possible.
Random: This option applies a randomized feeling to your MIDI notes in tick increments. It has a range of 0–120 ticks. The purpose of this function is to introduce a looser feeling to your music to prevent it from feeling too tight and rigid. Think of real drummers; as much as they might try, it’s difficult to hit every note right in time without some sort of variation. This introduces a randomization into their playing, which is what gives the performance its charm. The Random function can help make this possible.
![]() Quantize During Recording: When selected, this performs real-time quantization after the MIDI event has been recorded. The amount of applied quantization is determined by the selected note value and quantization strength.
Quantize During Recording: When selected, this performs real-time quantization after the MIDI event has been recorded. The amount of applied quantization is determined by the selected note value and quantization strength.
PITCH
The Pitch tool enables you to alter the pitch of an audio or MIDI performance in your song. This process can also be referred to as transposition because it can be used to introduce key changes to your song. As shown in Figure 4.20, you have two options from which to choose when using this tool:
![]() Transpose: This option enables you to transpose the pitch of your audio or selected MIDI notes in semitone increments. It has a range of +/–127 for MIDI clips. For audio, the combined transpose values in the Tool Window and Clip Inspector cannot exceed +/–12.50 semitones.
Transpose: This option enables you to transpose the pitch of your audio or selected MIDI notes in semitone increments. It has a range of +/–127 for MIDI clips. For audio, the combined transpose values in the Tool Window and Clip Inspector cannot exceed +/–12.50 semitones.
![]() Randomize: This option enables you to randomize the pitches of your selected MIDI notes based within a specifically selected note range. Simply assign a Low and High setting and then click the Apply button.
Randomize: This option enables you to randomize the pitches of your selected MIDI notes based within a specifically selected note range. Simply assign a Low and High setting and then click the Apply button.
NOTE VELOCITY
The Note Velocity tool is used to assign varying velocities to the MIDI performances in your song. It’s an important part of the creative process because it can help introduce dynamics to your music, making it much more interesting to listen to.
![]() Add: This setting allows you to add a specific amount of velocity to a selected clip or group of MIDI notes. Note that this adds velocity to what has already been recorded, which simply means that if you have a MIDI note with a velocity of 80 and then use this tool to add 20, the resulting value is 100.
Add: This setting allows you to add a specific amount of velocity to a selected clip or group of MIDI notes. Note that this adds velocity to what has already been recorded, which simply means that if you have a MIDI note with a velocity of 80 and then use this tool to add 20, the resulting value is 100.
![]() Fixed: This setting enables you to apply a fixed velocity value to your selected MIDI notes.
Fixed: This setting enables you to apply a fixed velocity value to your selected MIDI notes.
![]() Scale: This setting enables you to apply a scaled feeling to your selected MIDI notes. A good example of this is a drum clip that has a lot of dynamics. Using the Scale setting is a great way to make those variations in velocity more pronounced.
Scale: This setting enables you to apply a scaled feeling to your selected MIDI notes. A good example of this is a drum clip that has a lot of dynamics. Using the Scale setting is a great way to make those variations in velocity more pronounced.
![]() Random: This setting enables you to introduce randomization to the velocities of your selected MIDI notes. You should use this feature sparingly because it might create some velocities that are unpleasant to listen to.
Random: This setting enables you to introduce randomization to the velocities of your selected MIDI notes. You should use this feature sparingly because it might create some velocities that are unpleasant to listen to.
NOTE LENGTHS
The Note Lengths tool is used to add, subtract, or fix the length of the selected clip or group of selected MIDI notes in your song. Let’s say you would like to take a track of sustained chords played through the NN-XT and make the notes play longer or shorter than originally recorded. Note Lengths is the right tool for the job.
![]() Add: This option adds length to your selected MIDI notes by bars, beats, 1/16 notes, or ticks.
Add: This option adds length to your selected MIDI notes by bars, beats, 1/16 notes, or ticks.
![]() Sub: This option subtracts length from your selected MIDI notes by bars, beats, 1/16 notes, or ticks.
Sub: This option subtracts length from your selected MIDI notes by bars, beats, 1/16 notes, or ticks.
![]() Fixed: This option applies a fixed length to your selected MIDI notes by bars, beats, 1/16 notes, or ticks.
Fixed: This option applies a fixed length to your selected MIDI notes by bars, beats, 1/16 notes, or ticks.
LEGATO ADJUSTMENTS
The Legato Adjustments tool is used to adjust the amount of legato for the selected notes in your Reason song. It’s a handy and quick way to make a series of notes flow evenly without gaps between the notes. It’s also a tool that can be used to overlap notes, and it can be used to introduce a gap between notes. The options are as follows:
![]() Side-by-side: This option extends the length of a selected note to the beginning of the next selected note.
Side-by-side: This option extends the length of a selected note to the beginning of the next selected note.
![]() Overlap: This option overlaps the lengths of selected notes by bars, beats, 1/16 notes, or ticks.
Overlap: This option overlaps the lengths of selected notes by bars, beats, 1/16 notes, or ticks.
![]() Gap by: This option creates a gap between selected notes by bars, beats, 1/16 notes, or ticks.
Gap by: This option creates a gap between selected notes by bars, beats, 1/16 notes, or ticks.
SCALE TEMPO
The Scale Tempo tool is used to alter the perceived tempo of an audio or MIDI performance. With the Scale Tempo tool, you can make a bass line or lead sound as if it’s playing back at half or double the tempo at which it was originally recorded. Additionally, Scale Tempo alters any automation, controller, or pattern data to make sure everything sounds correct as it plays back. The options are as follows:
![]() Double/Half: These buttons double or cut in half the original tempo of the selected MIDI notes or audio data, speeding up or slowing down the tempo, respectively. You can also use the Scale setting to create the same effect by assigning a value of 200% to double the tempo or 50% to cut the tempo in half.
Double/Half: These buttons double or cut in half the original tempo of the selected MIDI notes or audio data, speeding up or slowing down the tempo, respectively. You can also use the Scale setting to create the same effect by assigning a value of 200% to double the tempo or 50% to cut the tempo in half.
![]() Scale: This option allows you to alter the tempo of your selected MIDI notes or audio by less common values than the Double and Half buttons. Simply set your desired value and click the Apply button.
Scale: This option allows you to alter the tempo of your selected MIDI notes or audio by less common values than the Double and Half buttons. Simply set your desired value and click the Apply button.
ALTER NOTES
The Alter Notes tool is a bit of an avant-garde feature because it alters the pitch, length, and velocity of your selected MIDI notes in a random fashion. However, this tool is not confined to a specific note or velocity range as you saw with the Note and Velocity tools. All you need to do is assign a percentage value and then click on the Apply button to see what Reason will randomly cook up for you. Just remember, there’s always an opportunity to undo what you’ve done by selecting Undo Alter Notes from the Edit menu.
AUTOMATION CLEANUP
The Automation Cleanup tool is used to optimize or clean your automation data in a Reason song. You may notice that as you begin to write in automation data, it tends to get a little messy due to all the automation points created along the timeline of the sequencer track. To use this tool, simply select a clip with automation written onto it, determine the amount of cleanup needed (options range from Minimum to Maximum), and click the Apply button. You’ll take a better look at this feature in Chapter 12, “Automation,” which discusses automation at length.
EXTRACT NOTES TO LANES
The Extract Notes to Lanes tool is used to move or duplicate a specific note or range of notes to a separate clip on a new note lane within a sequencer track. This is a useful tool to have when you are working with a device, such as a Redrum sequencer track. You can split the separate notes onto their own tracks for further editing. The tool includes the following parameters:
![]() Single Note: This parameter enables you to select a single note to extract.
Single Note: This parameter enables you to select a single note to extract.
![]() Note Range: This parameter enables you to select a range of notes to extract.
Note Range: This parameter enables you to select a range of notes to extract.
![]() Explode: This parameter places every note of a sequence onto its own note lane.
Explode: This parameter places every note of a sequence onto its own note lane.
Song Samples Section
The Song Samples section is used to list all of the audio samples loaded in a Reason song. This includes samples used within a device such as the NN-XT and recorded audio performances. This section can also be used to record, edit, duplicate, delete, and export a sample.
The Song Samples section includes the following options:
![]() Play: This will play any selected sample. Also note the Autoplay feature and the volume slider.
Play: This will play any selected sample. Also note the Autoplay feature and the volume slider.
![]() Start Sampling: This will record new audio samples to be used in your song.
Start Sampling: This will record new audio samples to be used in your song.
![]() Duplicate: This will create a duplicate file of any selected sample.
Duplicate: This will create a duplicate file of any selected sample.
![]() Delete: This will delete any selected sample.
Delete: This will delete any selected sample.
![]() Export: This will export any selected sample to an AIFF or WAV file.
Export: This will export any selected sample to an AIFF or WAV file.
The Transport Panel
Although some might consider the Transport panel a separate entity from the Reason Sequencer screen, I disagree, because the Sequencer screen is dependent on the Transport panel to function properly. With that in mind, the next part of the tour is dedicated to the features and functionality of the Transport panel (see Figure 4.21).
© Propellerhead Software AB.
In the center of the Transport panel are the Stop and Play controls of the Reason Sequencer screen. They look similar to the buttons on a tape machine or DVD player. There is really no mystery as to what each button does, but there are a few variations that make these buttons more adaptable to the Reason environment.
![]() Clicking the Stop button stops the sequencer wherever it is playing within a sequence. If you click the Stop button a second time, the song position pointer returns to the left locater. Clicking the Stop button a third time causes the song position pointer to return to the beginning of the sequence. This is called the return-to-zero function.
Clicking the Stop button stops the sequencer wherever it is playing within a sequence. If you click the Stop button a second time, the song position pointer returns to the left locater. Clicking the Stop button a third time causes the song position pointer to return to the beginning of the sequence. This is called the return-to-zero function.
![]() Clicking the Play button causes the Reason sequencer to begin playing. There are no additional features on this button.
Clicking the Play button causes the Reason sequencer to begin playing. There are no additional features on this button.
![]() Clicking the Rewind button shuttles the song position pointer backward to any point in a Reason song. The button can be used while the song is playing or when the sequencer is stopped. When it is clicked once, the song position pointer jumps back one bar. When you click and hold the button, the song position pointer scrolls back even faster.
Clicking the Rewind button shuttles the song position pointer backward to any point in a Reason song. The button can be used while the song is playing or when the sequencer is stopped. When it is clicked once, the song position pointer jumps back one bar. When you click and hold the button, the song position pointer scrolls back even faster.
![]() Clicking the Fast Forward button shuttles the song position pointer forward to any point in a Reason song. As with the Rewind button, it can be used while the song is playing or when the Reason sequencer has stopped. When you click the button once, the song position pointer jumps forward one bar. When you click and hold the button, the song position pointer scrolls forward even faster.
Clicking the Fast Forward button shuttles the song position pointer forward to any point in a Reason song. As with the Rewind button, it can be used while the song is playing or when the Reason sequencer has stopped. When you click the button once, the song position pointer jumps forward one bar. When you click and hold the button, the song position pointer scrolls forward even faster.
![]() Clicking the Record button triggers Reason’s sequencer to record audio or MIDI data. If the Record button is clicked while the sequence is stopped, playback begins and recording commences on any record-enabled tracks or lanes. If the sequence is already playing, you can click the Record button to input MIDI or audio data on the fly. This is also referred to as punching in.
Clicking the Record button triggers Reason’s sequencer to record audio or MIDI data. If the Record button is clicked while the sequence is stopped, playback begins and recording commences on any record-enabled tracks or lanes. If the sequence is already playing, you can click the Record button to input MIDI or audio data on the fly. This is also referred to as punching in.
Know Your Key Commands: The key to becoming a seasoned Reason user is to learn the keyboard shortcuts linked to the graphical user interface controls in the program. Because I just went over the basic transport controls, here is a quick list of their corresponding key commands:
![]() Stop button: The 0 (zero) key on your numeric keypad, press the spacebar, or Shift+Enter (Windows) or Shift+Return (Mac). Pressing 0 twice or Shift+Enter or Shift+Return twice returns to zero.
Stop button: The 0 (zero) key on your numeric keypad, press the spacebar, or Shift+Enter (Windows) or Shift+Return (Mac). Pressing 0 twice or Shift+Enter or Shift+Return twice returns to zero.
![]() Play button: The Enter key on your numeric keypad or the spacebar
Play button: The Enter key on your numeric keypad or the spacebar
![]() Rewind button: The 7 key on your numeric keypad
Rewind button: The 7 key on your numeric keypad
![]() Fast Forward button: The 8 key on your numeric keypad
Fast Forward button: The 8 key on your numeric keypad
![]() Record button: The * (asterisk) key on your numeric keypad
Record button: The * (asterisk) key on your numeric keypad
NOTE: Located just to the left of the Transport controls is the Song Position readout. This is a numeric readout indicating where you currently are located in your sequence in bars, beats, 1/16 notes, or ticks. Click Play, and notice that the indicator constantly calls out position readings. Just below this is another Song Position readout that is in hours, minutes, seconds, and milliseconds. If you want to jump to a specific point in your song, you can double-click in either Song Position readout, type a value, and then press Enter (Windows) or Return (Mac).
Alt or Dub?
Located just to the right of the Transport controls are a couple of buttons that determine how Reason records a new audio or MIDI performance. These buttons are as follows:
![]() Dub: Select this button, and Reason creates a new note lane in your selected MIDI track without muting the previous note lane. Or, in the case of audio, a new audio track is created with the same settings as the previous audio track, also without muting the previous audio track. This allows you to record additional material into your sequence while listening to what you have already recorded for that same part.
Dub: Select this button, and Reason creates a new note lane in your selected MIDI track without muting the previous note lane. Or, in the case of audio, a new audio track is created with the same settings as the previous audio track, also without muting the previous audio track. This allows you to record additional material into your sequence while listening to what you have already recorded for that same part.
![]() Alt: Select this button and Reason creates a new note lane in your selected MIDI track while muting the previous note lane. Or, in the case of audio, a new audio track is created with the same settings as the previous audio track (and the previous audio track is muted). This allows you to record a new take without having to listen to what was previously recorded.
Alt: Select this button and Reason creates a new note lane in your selected MIDI track while muting the previous note lane. Or, in the case of audio, a new audio track is created with the same settings as the previous audio track (and the previous audio track is muted). This allows you to record a new take without having to listen to what was previously recorded.
Quantize During Recording
Located just to the lower right of the main Transport controls is the Quantize During Recording function (labeled Q Rec). When activated, this button performs real-time quantization after the MIDI event has been recorded. The amount of applied quantization is determined by the note value and quantization strength selected in the Quantize Notes section of the Sequencer tools in the Tool Window.
Tempo and Time
Located below the Song Position readouts are the Tempo and Time Signature readouts, in which you can make adjustments to the song tempo and time signature.
![]() Tempo refers to the speed of the song played by the sequencer. Tempo is measured in beats per minute (BPM) and can be adjusted anywhere from 1 to 999.999. This gives you many possibilities when writing and recording songs within Reason. Note: You can adjust the tempo by using the + and – keys on your numeric keypad.
Tempo refers to the speed of the song played by the sequencer. Tempo is measured in beats per minute (BPM) and can be adjusted anywhere from 1 to 999.999. This gives you many possibilities when writing and recording songs within Reason. Note: You can adjust the tempo by using the + and – keys on your numeric keypad.
![]() Time signature specifies the beats per bar (such as 1, 2, 3, 4, and so on) and what counts as a beat (that is, 1/2 note, 1/4 note, 1/8 note, and so on).
Time signature specifies the beats per bar (such as 1, 2, 3, 4, and so on) and what counts as a beat (that is, 1/2 note, 1/4 note, 1/8 note, and so on).
TIP: Just to the left of the Tempo and Time Signature readouts is the Tap button. You use this button to set the tempo of your song by clicking in succession. This tool is handy if you want to determine the tempo of a favorite track of yours and write something similar in tempo. While listening to the song, use the Tap button and click along with the beat. Reason then sets the tempo of the song.
Locators: The Key to Looping
To the right of the main Transport controls are the locator points and looping controls. If you recall from Chapter 2, “Recording,” you learned a little bit about Reason’s locator points. Although there are many ways to describe them, the easiest way is to think of them as a pair of bookends. Just like on a shelf of books, locator points act as the virtual bookends of a sequence. You have a left locator, which is used as a starting position, and a right locator, which is used as an ending position. These locator points can be used together to create a loop for a specific number of measures. Here’s how:
1. Set your left locator to measure 1 by using the arrow keys next to the numeric values or by double-clicking on the numeric value and typing the desired value.
2. Using the same method, set your right locator to measure 9.
3. Just above the locators in the Transport panel is the Loop button. Click on it to activate the loop feature. This can also be done by pressing the / (forward slash) key or the L key on your keyboard.
4. Click Play and watch as the position indicator moves to the right. As soon as it reaches the right locator point, it jumps back to the left locator point.
After a looping point is created, you can listen to a specific part of your song over and over to edit the MIDI or audio data.
NOTE: The key to any electronic or dance music is the incorporation of loops and repetition. As you’ll learn in future chapters, a few virtual sound modules in Reason help to easily create these loops for you.
TIP: If you press the Alt button while the Loop function is turned on, Reason still creates a new note lane on your selected sequencer track, but it mutes only the note data between the left and right locators and not the entire note lane.
The Click Control and Blocks
To the left of the Tempo and Time Signature fields of the Transport panel is the Click control. When activated, this function provides a metronome sound that is accented on the first beat of every measure. Just clicking on the Click button turns it on; you adjust the volume of the click by using the Click Level knob below. Note that the click sound itself is quite loud, so exercise caution when adjusting the volume.
Additionally, there is a Pre button, which, by default, gives you one measure of clicks before recording. This is more commonly known as a precount. The number of precount bars can be adjusted in the Options menu. You can choose to have up to four precount bars.
Just to the left of the Click controls is the Blocks button. This button is simply used to turn the Blocks function on and off. Try clicking on it, and you’ll notice that the Block button next to the Song button is hidden and the Blocks sequencer track is hidden.
The In/Out, DSP, and Calc Indicators
To the far left of the Transport panel are the In/Out, DSP, and Calc indicators. The In/Out (I/O) indicators represent Reason’s audio input and output signals. Note that when the inputs or outputs are overloaded, Reason indicates this by displaying the word “Clip” in bright red just above either the input or output. It is important to keep an eye on the audio I/Os because you really don’t want to clip in the digital domain. Trust me—it sounds terrible! Figure 4.22 shows a graphical example of digital clipping.
The DSP meter is a real-time indicator of how much of the computer’s CPU is being used in a given Reason song. As you begin to accumulate more and more virtual synths, real-time effects, and equalizers in a song, this meter tells you how much more CPU you have left until your audio “drops out.” The Calc indicator is used to display Reason’s progress when stretching or transposing audio. We’ll dig into this later in the chapter.
Creating and Managing Tracks
Now that you’ve covered the basics of the Transport panel, you’re ready to move to the left side of Reason’s Sequencer screen, called the Track List. This is the place where all the tracks in a song are created and maintained. If you are not new to the concept of sequencing and recording, this section should look similar to other programs you have used. If you are new to this whole game, you’ll be happy to know that understanding this portion of the Sequencer screen is a snap.

© Propellerhead Software AB.
Creating and Deleting Sequencer Tracks in Reason
There are a few ways to create a sequencer track in Reason:
![]() A sequencer track is automatically created whenever a Reason device is created. This includes audio and synth tracks.
A sequencer track is automatically created whenever a Reason device is created. This includes audio and synth tracks.
![]() You can right-click (Windows) or Ctrl-click (Mac) on any Reason device without a sequencer track and select Create Track for [name of device]. A good example of this is reMix, which doesn’t automatically get a sequencer track when an instance is created. Conversely, you can select any Reason device with a sequencer track, right-click on it, and select Delete Track.
You can right-click (Windows) or Ctrl-click (Mac) on any Reason device without a sequencer track and select Create Track for [name of device]. A good example of this is reMix, which doesn’t automatically get a sequencer track when an instance is created. Conversely, you can select any Reason device with a sequencer track, right-click on it, and select Delete Track.
After creating a sequencer track, you can name it anything you want by double-clicking on the name of the sequencer track and typing (up to 36 characters).
If you want to delete a sequencer track from Reason, you also have a few choices:
![]() Highlight the sequencer track and press the Delete or Backspace key on your keyboard. Note that this deletes the sequencer track and the Reason device to which it’s routed. And in case you forget, a window pops up to remind you.
Highlight the sequencer track and press the Delete or Backspace key on your keyboard. Note that this deletes the sequencer track and the Reason device to which it’s routed. And in case you forget, a window pops up to remind you.
![]() Highlight the sequencer track and choose Cut Track and Device from the Edit menu or press Ctrl+X (Windows) or Command+X (Mac). Again, this removes both the sequencer track and the Reason device to which it’s routed.
Highlight the sequencer track and choose Cut Track and Device from the Edit menu or press Ctrl+X (Windows) or Command+X (Mac). Again, this removes both the sequencer track and the Reason device to which it’s routed.
![]() Right-click on the Reason device and select Delete Track. This just removes the sequencer track and not the Reason device.
Right-click on the Reason device and select Delete Track. This just removes the sequencer track and not the Reason device.
The Track Parameters
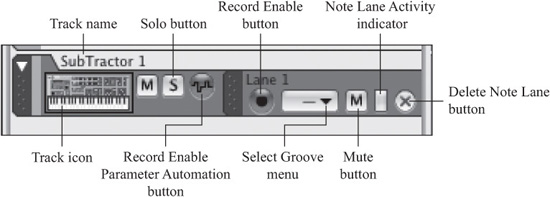
After you create a sequencer track, it’s time to look at its parameters (see Figure 4.23).
![]() Track name: This is the where the name of the sequencer track is displayed.
Track name: This is the where the name of the sequencer track is displayed.
![]() Track icon: This icon represents the Reason device to which the sequencer track is routed. This icon also displays incoming MIDI messages by making use of a green LED.
Track icon: This icon represents the Reason device to which the sequencer track is routed. This icon also displays incoming MIDI messages by making use of a green LED.
![]() Mute/Solo: Marked simply with an M and an S, the Mute and Solo buttons are used to mute or solo individual tracks from within the Track List. Also note the M and S buttons at the top of the Track List. These are the All Mute Off and All Solo Off buttons, which unmute/solo any sequencer tracks below that are muted or soloed.
Mute/Solo: Marked simply with an M and an S, the Mute and Solo buttons are used to mute or solo individual tracks from within the Track List. Also note the M and S buttons at the top of the Track List. These are the All Mute Off and All Solo Off buttons, which unmute/solo any sequencer tracks below that are muted or soloed.
![]() Record Enable Parameter Automation: This button is used to place the sequencer track in a Record Ready mode to record automation data. Note that it is automatically activated when a sequencer track is created.
Record Enable Parameter Automation: This button is used to place the sequencer track in a Record Ready mode to record automation data. Note that it is automatically activated when a sequencer track is created.
![]() Record Enable: This button is used to put the sequencer track into Record Ready mode to record your performance. Note that like the previous parameter, it is also automatically activated when you create a sequencer track.
Record Enable: This button is used to put the sequencer track into Record Ready mode to record your performance. Note that like the previous parameter, it is also automatically activated when you create a sequencer track.
© Propellerhead Software AB.
![]() Select Groove: This menu is used to assign a sequencer track to a ReGroove channel. You’ll learn more about this later in this chapter.
Select Groove: This menu is used to assign a sequencer track to a ReGroove channel. You’ll learn more about this later in this chapter.
![]() Note Lane Activity: This LED represents data as it plays back a sequence. You don’t see it in action while you record—just when a sequence is playing back.
Note Lane Activity: This LED represents data as it plays back a sequence. You don’t see it in action while you record—just when a sequence is playing back.
![]() Delete Note Lane: This button is used to delete a lane of data from a sequencer track.
Delete Note Lane: This button is used to delete a lane of data from a sequencer track.
Moving Tracks
After you begin to accumulate a few tracks, you might want to organize the tracks by moving them up and down in the Track List. For example, you might prefer to have the Redrum and Dr. Octo Rex tracks at the top of the Track List, followed by the bass track, and then the chord and lead tracks. This is very easy to do. Here’s how:
1. Click in the far-left section on the sequencer track that you want to move.
2. Click and drag with your mouse until you reach the desired position.
3. Release the mouse button. The track will drop into place.
TIP: Looking at the top-left corner of every sequencer track, you can see an arrow pointing down, which means that the sequencer track is being displayed in its “expanded” mode. Click on this arrow to minimize, or collapse, the track. This is a great way to save space in your Track List, especially when you have 20 or 30 tracks of sequences playing back.
Sequencing a Live MIDI Performance
Now that you have taken your first detailed look at the Sequencer screen, it’s time to press forward and record your first live sequencer track. In this section, you’ll do the following:
![]() Create an instance of Redrum
Create an instance of Redrum
![]() Record a drum pattern live
Record a drum pattern live
![]() Edit that pattern with quantization and dynamics
Edit that pattern with quantization and dynamics
TIP: Before you start this exercise, make sure your MIDI keyboard is turned on and connected to your computer. Additionally, make sure Reason has selected the keyboard as the Master Keyboard. You can do this by selecting it from the Control Surfaces tab of the Preferences dialog box. (Of course, if you don’t have a MIDI controller handy, you can press F4 and play with your mouse or your computer keyboard!)
To record a drum pattern with Redrum:
1. Start a new Reason song.
2. Create an instance of Redrum by opening the Create menu, choosing Instruments, and selecting Redrum. A Redrum sequencer track is created and is armed to receive MIDI from your keyboard.
3. Take a second to turn off the Enable Pattern Section setting in the Redrum interface. This enables you to trigger and record live MIDI data from Redrum without using its pattern sequencer.
4. Because Redrum is already armed to receive MIDI data, you can press the C1 key on your MIDI keyboard. This key should trigger the kick drum sample. Also note that C#1 is typically the snare drum sample in any Redrum kit. The 10 channels on Redrum are mapped to keys C1 through A1 on your MIDI keyboard. Take a moment now to familiarize yourself with which key triggers which sound in your Redrum kit before you start recording.
5. In the Transport panel, make sure that the Loop section is activated. Set the right locator to bar 5. This provides you with four empty measures to record a four-bar loop. Also make sure that both the Click and Pre settings are turned on so that you have a full measure count in and a metronome to play against. Finally, make sure that you set the tempo to one you’re comfortable playing. If this is your first time, I suggest 90 BPM.
6. Click the Stop button twice to send the position indicator back to measure 1. Now click on the Record button to start recording. The position indicator should begin moving to the right and start recording MIDI data.
7. When the sequencer starts recording data, play the kick drum sample on beats one and three until the position indicator reaches measure 5, at which time it will jump back to measure 1 and begin recording more MIDI data.
8. When the position indicator jumps back to measure 1 and begins recording again, play the snare sample on beats two and four until it reaches measure 5, at which point it will jump back to measure 1 again.
9. When the position indicator jumps back to measure 1 and begins recording again, play the hi-hat sample (typically found on the G#1 key) on beats one, two, three, and four until it reaches measure 5, at which point it will jump back to measure 1 again.
10. Click Stop in the Transport panel or press the spacebar on your computer keyboard to stop the recording. Notice that there is now MIDI data displayed in the Song view of the Sequencer screen (see Figure 4.24).

© Propellerhead Software AB.
Editing Your Performance
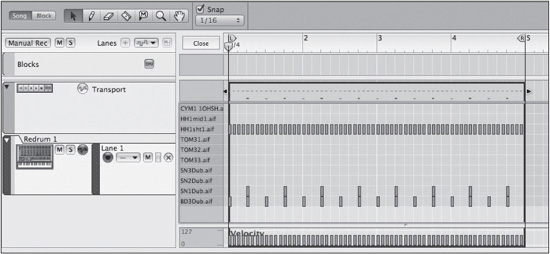
At this point, you have recorded the performance. If this was your first time recording a live MIDI performance using a sequencer, the timing might not have been as tight as you wanted. In this section, you learn how to fix any timing problems and move events around by using the Editing tools. Before you begin, switch to Edit mode by double-clicking on a MIDI clip. Because you are working with Redrum, the Redrum Lane Editor is displayed by default (see Figure 4.25). Use the Zoom tools to close in on the Redrum group that you are going to work on.
© Propellerhead Software AB.
Quantize: Timing Corrections
The first thing you are going to do is correct any timing problems by using the quantization function:
1. Look closely at the Redrum performance. You can see many timing inconsistencies because the events don’t quite match up with the vertical lines (see Figure 4.26).
© Propellerhead Software AB.
2. Use the Pointer tool to click and drag a box around the Redrum events to select them all. You also can press Ctrl+A (Windows) or Command+A (Mac).
3. Select the note value used to quantize. Start by selecting the Quantize tool in the Tool Window. Next, select a 1/4-note value. This means that Reason will nudge each note to its nearest quarter note.
4. Just below the Quantize menu is the Amount menu. This option determines the amount of quantization that will occur when the process is performed. By default, it is set to 100%, which means that the events will be moved completely to the nearest quarter note. This setting is fine for this demonstration, but you can try different values to achieve a different effect. This feature can help to prevent your music from feeling too robotic or unnatural.
5. Click on the Apply button to quantize your performance. Alternatively, press Ctrl+K (Windows) or Command+K (Mac).
6. Look at the performance again. You can see the events have been nudged left and right toward their closest quarter note (see Figure 4.27). Click Play and listen to the corrected timing.

© Propellerhead Software AB.
TIP: You can also quantize while you are recording a performance. Just to the right of the main transport buttons is the Q Rec button, which, when activated, automatically quantizes your events while recording your performances. To dig into this function a little more, try activating it and recording a new Redrum pattern like the one you created at the beginning of this section.
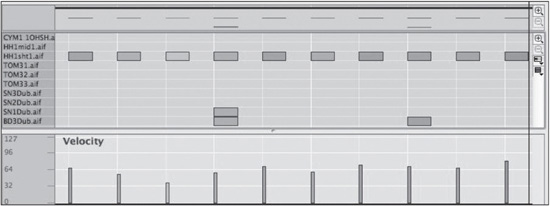
Adding Velocity
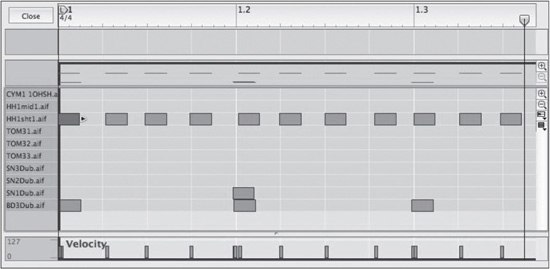
Now that the timing has been corrected, you can add some dynamics to the performance by using the velocity edit lane, which appears below the drum edit lane (see Figure 4.28.) This editor can increase or decrease the amount of velocity assigned to a recorded MIDI note. It is a great tool to use if you find that you didn’t press the keys hard enough when recording your performance. In this exercise, you edit the velocity of your Redrum pattern with the Pencil tool:

© Propellerhead Software AB.
1. With the velocity edit lane open, select the Pencil tool.
2. Click and drag downward on the velocity of the first MIDI event. Notice that as you drag down, decreasing the velocity, the color of the MIDI event changes from a dark red to a light pink (a darker color for higher velocities, a lighter color for lower velocities).
3. Use the Pencil tool on a couple of other MIDI events to alter their velocities. Try alternating between MIDI events to create a more interesting sequence (see Figure 4.29).
© Propellerhead Software AB.
Universal Edits: Edits made in the velocity edit lane are universal. That means a velocity edit you make to a MIDI event affects all the other MIDI events that occur at that same time location within a clip. The significance of this is illustrated in the following example.
Looking back at Figure 4.28, you can see all the MIDI events used to create the drum pattern. Notice how two separate MIDI events occur at the same time on each beat. For example, on the downbeat of bar 1, you see a kick drum MIDI event and a hi-hat MIDI event lined up vertically, which means that they trigger at the same time.
Now use the Pencil tool again to edit the velocity of the downbeat of bar 1. As you make a change to the velocity, notice that both of the MIDI events change in color. That means the velocities of the hi-hat and the kick drum are being altered simultaneously.
This situation can become a problem because each drum sample’s velocity should be independent of the other. So how do you combat this problem? Well, there are a few things you can do:
![]() You can record on separate note lanes for each drum sound. For example, you can create one note lane dedicated to the kick drum and another for the snare, and so on.
You can record on separate note lanes for each drum sound. For example, you can create one note lane dedicated to the kick drum and another for the snare, and so on.
![]() You can use the Velocity knobs on the Redrum interface to decrease each channel’s sensitivity to different velocities.
You can use the Velocity knobs on the Redrum interface to decrease each channel’s sensitivity to different velocities.
![]() You can use the Explode option of the Extract Notes to Lanes tool.
You can use the Explode option of the Extract Notes to Lanes tool.
However, there is another way to accomplish this goal: Simply select the note that you want to edit with the Selector tool, switch to the Pencil tool, hold down the Shift key, and set a new velocity for the single note.
In addition to the Pencil tool, the Line tool can also be used to edit the velocities of a performance. You access the Line tool by first selecting the Pencil tool and then holding down the Ctrl (Windows) or Option (Mac) key. Try the following:
1. Select the Line tool.
2. Click and drag horizontally across the velocities of a few events.
3. Release the mouse, and the velocities should change accordingly (see Figure 4.30).

© Propellerhead Software AB.
4. Start at the beginning of the Redrum pattern, and then click and drag from left to right in an upward motion diagonally across the velocity edit lane until you reach the end of the pattern. Release the mouse, and you have now created a fantastic crescendo (see Figure 4.31).

© Propellerhead Software AB.
Sequencing Written Data
The Reason Sequencer screen can also be used to draw in events and MIDI data quite easily. This section shows you the following:
![]() How to draw and erase events with the Key and REX Lane Editors
How to draw and erase events with the Key and REX Lane Editors
![]() How to draw in controller information
How to draw in controller information
Drawing and Erasing Events
Drawing in events in the Sequencer screen is quite easy. Often, you might find it most efficient to write complicated performances that would otherwise be difficult to learn and execute perfectly in a live keyboard performance. It’s also a handy way to write in performances when you do not have a MIDI keyboard available, which is the case for many traveling musicians. When inspiration hits, drawing in sequences is a real lifesaver.
Let’s begin by drawing in a SubTractor sequence with the Key Lane Editor. Get yourself ready by starting a new Reason song and creating an instance of SubTractor. Also, make sure you set your right locator to bar 2. Then do the following:
1. Using the Pencil tool, click and drag a clip between bars 1 and 2.
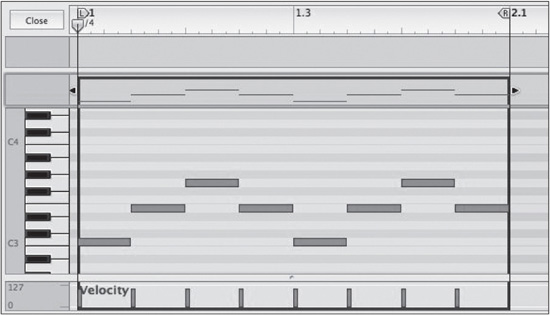
2. Double-click on the clip to switch to Edit mode. The Key Lane Editor should open by default (see Figure 4.32).

© Propellerhead Software AB.
3. Use the horizontal zoom tools (found at the lower-left corner of the Sequencer screen) to zoom in on the individual beats of bar 1.
4. You are going to write in an 1/8 note sequence, so select 1/8 from the Snap menu (see Figure 4.33). Also make sure that Snap to Grid is activated.
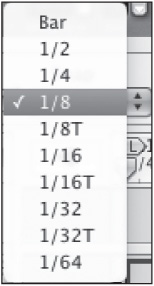
© Propellerhead Software AB.
5. Select the Pencil tool and draw in an 1/8-note sequence. For the sake of simplicity, you might want to try something as simple as a C major arpeggio (C-E-G), as shown in Figure 4.34.
6. Click Play. You’ll hear the sequence play back in perfect time. At this point, you can try drawing in some different velocities for effect.
7. Press Ctrl+E (Windows) or Command+E (Mac) to switch to Song view.
TIP: After writing your sequence, you can easily shift the events around by using the Selection tool. Try selecting the sequence and then clicking and dragging on individual events to change their event and time locations. When you’re doing this, notice that you can move the events left and right only by 1/8-note increments. The reason is that the Snap value is set to 1/8. If you want to make finer adjustments, try changing the Snap value to 1/16 for 1/16 notes.
© Propellerhead Software AB.
Duplicating MIDI Events
After performing or drawing in MIDI events, you can very easily duplicate those MIDI events to create a repetition. While there are a few ways to do this you can use the mouse and a key command to duplicate the events and place them anywhere you want.
Let’s look at the first method by using the current song, selecting the SubTractor track, and following along:
1. Use the Selector tool to click and select the SubTractor clip.
2. Open the Edit menu and choose Copy. Alternatively, press Ctrl+C (Windows) or Command+C (Mac).
3. Open the Edit menu and choose Paste. Alternatively, press Ctrl+V (Windows) or Command+V (Mac). This pastes the copied events immediately after the original selected events (see Figure 4.35).

© Propellerhead Software AB.
Now let’s look at the other way of doing this:
1. Use the Selector tool to select your clip.
2. Hold down the Ctrl (Windows) or Option (Mac) key as you click and drag the events to the right.
3. Release the mouse button. The events should now be duplicated and placed where you released the button.
For the next example, you’ll use Dr. Octo Rex and the REX Lane Editor. Prepare for this example by clicking on the SubTractor in the Reason Rack screen and selecting Dr. Octo Rex Loop Player from the Create menu. This places the Dr. Octo Rex just below the SubTractor, with its default patch already loaded. Then do the following:
1. Expand the Dr. Octo Rex Programmer by clicking the triangle in the lower-left corner of Dr. Octo Rex.
2. Click on the Copy Loop to Track button to send the loop to its sequencer track.
3. Disable Loop Playback mode in the Dr. Octo Rex by clicking the Enable Loop Playback button in the upper right (the red light should turn off).
4. Double-click on the clip in the Dr. Octo Rex sequencer track to switch to Edit mode. You will see the REX Lane Editor. Notice that the velocity edit lane is also open.
5. Select the Eraser tool and erase a few REX slices by clicking on them.
6. Time to draw in a few events. Set your Snap value to 1/16 so that you can draw 1/16 notes.
7. Select your Pencil tool and draw in a few REX slices in the same area that you erased earlier (see Figure 4.36).

© Propellerhead Software AB.
8. Click Play. The REX loop should now sound rhythmically different.
Resizing Events
As you edit your MIDI data in either of the lanes, you might want to resize the events that you have either drawn in or performed live. This is very easy to do. Try the following:
1. Switch back to the SubTractor track.
2. Double-click on the clip to switch to Edit mode.
3. Use the Selector tool to draw a marquee around a few of the events to select them.
4. With the Selector tool still active, navigate to the end of the selected MIDI events. Notice that the Selector tool changes to an icon with two arrows pointing in opposite directions. This icon is used to resize the events.
5. Click and drag to the right. The MIDI events start growing in length (see Figure 4.37).

© Propellerhead Software AB.
6. Release the mouse. The events should now be resized (see Figure 4.38).
NOTE: Individual MIDI events as well as groups of events can be resized.

© Propellerhead Software AB.
Drawing Controller Data
Reason’s Sequencer screen is also a great way to draw in data that controls the various parameters of each Reason device, which is done via the Note Lane Performance Parameter Editor. Although it’s covered briefly in this chapter, you will find oodles of info on controller data and automation in Chapter 12.
This section continues to use the setup from the preceding section and shows you how to draw in controller data for the Dr. Octo Rex modulation wheel. Before beginning the exercise, locate the Filter Freq to Mod Wheel Amount knob (labeled F. Freq) on Dr. Octo Rex’s programmer. Use your mouse to turn down this control to about nine o’clock. Now the modulation wheel will control the filter frequency in a useful way. Then follow these steps:
1. Select the Dr. Octo Rex sequencer track and double-click its clip to switch to Edit mode.
2. Click on the Note Lane Performance Parameter button and select Mod Wheel. This opens the editor you’re going to work with (see Figure 4.39).

© Propellerhead Software AB.
3. At this point, you are almost ready to write in your controller data. Before you begin, select 1/64 from the Snap menu. This allows you to make very fine changes to the controller data.
4. Select your Pencil tool and begin to draw in some controller data for the modulation wheel (see Figure 4.40).

© Propellerhead Software AB.
The ReGroove Mixer
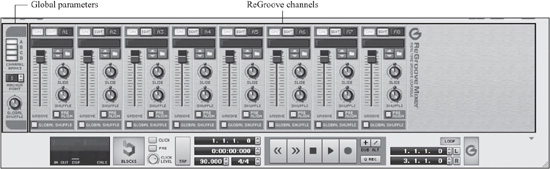
Even with all the sequencing tips and tricks you’ve learned throughout this chapter, you may end up finding that your sequences lack the feeling or vibe you’re trying for. As a result, your first few songs in Reason might end up sounding a little stale and robotic. Never fear. Propellerhead has brought forth a great feature that will get your songs and sequences grooving in no time. I give you the ReGroove Mixer (see Figure 4.41).
© Propellerhead Software AB.
The ReGroove Mixer functions in a fashion similar to an audio mixer, except in this case the ReGroove Mixer is mixing the “feeling” or grooves between 32 accessible channels. There are several templates and tools to help you achieve the kind of feeling that you want for your Reason songs, so stop dreaming and start driving. To begin, click on the ReGroove Mixer button in the Transport panel to launch it.
Let’s examine the basic layout of the ReGroove Mixer. Looking back at Figure 4.41, you can see that the ReGroove Mixer is divided into two sections:
![]() Global parameters: These appear on the far-left side of the ReGroove interface.
Global parameters: These appear on the far-left side of the ReGroove interface.
![]() ReGroove channels: These sliders, knobs, and buttons occupy the rest of the interface.
ReGroove channels: These sliders, knobs, and buttons occupy the rest of the interface.
The global parameters affect the entire ReGroove interface and include the following:
![]() Channel Banks: These buttons enable you to access the four available banks of eight ReGroove channels each, giving you a total of 32 possible grooves within a Reason song.
Channel Banks: These buttons enable you to access the four available banks of eight ReGroove channels each, giving you a total of 32 possible grooves within a Reason song.
![]() Anchor Point: This tool enables you to set when ReGroove should begin to play back your programmed grooves. A good use for this tool is a song that has a one-bar pickup, with the song beginning at bar 2. In this case, you would want to set the Anchor Point to 2.
Anchor Point: This tool enables you to set when ReGroove should begin to play back your programmed grooves. A good use for this tool is a song that has a one-bar pickup, with the song beginning at bar 2. In this case, you would want to set the Anchor Point to 2.
![]() Global Shuffle: This knob enables you to introduce a shuffle or swing feel to all the ReGroove channels. Additionally, it is used in combination with the Shuffle button found on the Matrix, RPG-8, and Redrum interfaces. Simply activate them and use the Global Shuffle knob to swing the patterns that are playing back from any of these Reason devices.
Global Shuffle: This knob enables you to introduce a shuffle or swing feel to all the ReGroove channels. Additionally, it is used in combination with the Shuffle button found on the Matrix, RPG-8, and Redrum interfaces. Simply activate them and use the Global Shuffle knob to swing the patterns that are playing back from any of these Reason devices.
The ReGroove channels enable you to affect the individual channels of the ReGroove Mixer. They include the following options:
![]() On: This turns the ReGroove Channel on and off.
On: This turns the ReGroove Channel on and off.
![]() Edit: This opens the Groove settings in the Tool Window. You’ll revisit this feature later.
Edit: This opens the Groove settings in the Tool Window. You’ll revisit this feature later.
![]() Channel number: This displays the bank and channel number of the ReGroove channel.
Channel number: This displays the bank and channel number of the ReGroove channel.
![]() Patch name: This displays the name of the patch used in a ReGroove channel.
Patch name: This displays the name of the patch used in a ReGroove channel.
![]() Groove Patch Browser: These buttons are used to find grooves by making use of the Patch Browser.
Groove Patch Browser: These buttons are used to find grooves by making use of the Patch Browser.
![]() Slide: This knob is used to slide notes back and forth in ticks.
Slide: This knob is used to slide notes back and forth in ticks.
![]() Shuffle: This knob introduces a swing feeling, much like Global Shuffle, except this time it applies to an individual channel.
Shuffle: This knob introduces a swing feeling, much like Global Shuffle, except this time it applies to an individual channel.
![]() Pre Align: This button activates the Pre Align feature, which applies a rigid quantization to any incoming notes before they are grooved. Note that this is a nondestructive function.
Pre Align: This button activates the Pre Align feature, which applies a rigid quantization to any incoming notes before they are grooved. Note that this is a nondestructive function.
![]() Groove Amount: This slider determines how strongly the selected groove patch will be applied to the MIDI sequence. It works in combination with the Groove settings in the Tool Window.
Groove Amount: This slider determines how strongly the selected groove patch will be applied to the MIDI sequence. It works in combination with the Groove settings in the Tool Window.
![]() Global Shuffle: This button links a ReGroove channel to the Global Shuffle knob.
Global Shuffle: This button links a ReGroove channel to the Global Shuffle knob.
And finally, before getting into using ReGroove, let’s go over the parameters of the Groove settings of the Tool Window (see Figure 4.42).

© Propellerhead Software AB.
![]() Groove Channel: This menu enables you to navigate between the different channels of the ReGroove Mixer.
Groove Channel: This menu enables you to navigate between the different channels of the ReGroove Mixer.
![]() Groove Patch: This displays the name of the selected groove. To the right are the Browse and Save buttons, which are used to locate and import or save grooves to use in ReGroove.
Groove Patch: This displays the name of the selected groove. To the right are the Browse and Save buttons, which are used to locate and import or save grooves to use in ReGroove.
![]() Length/Time Signature: These parameters are used to display the length and time signature of a loaded groove.
Length/Time Signature: These parameters are used to display the length and time signature of a loaded groove.
![]() Timing Impact: This slider determines how much the timing of a loaded groove will affect your sequences. The greater the value, the closer the sequence will be to the original timing of a loaded groove. Also note that this works in combination with the Groove Amount slider in the ReGroove Mixer, which serves as a means to scale back the timing impact as the sequence plays back.
Timing Impact: This slider determines how much the timing of a loaded groove will affect your sequences. The greater the value, the closer the sequence will be to the original timing of a loaded groove. Also note that this works in combination with the Groove Amount slider in the ReGroove Mixer, which serves as a means to scale back the timing impact as the sequence plays back.
![]() Velocity Impact: This slider determines how much the velocity of a loaded groove will affect your sequences.
Velocity Impact: This slider determines how much the velocity of a loaded groove will affect your sequences.
![]() Note Length Impact: This slider determines how much the note length of a loaded groove will affect your sequences. Note that this works only with grooves that have note lengths embedded within, which does not include drum grooves.
Note Length Impact: This slider determines how much the note length of a loaded groove will affect your sequences. Note that this works only with grooves that have note lengths embedded within, which does not include drum grooves.
![]() Random Timing: This slider randomizes the timing of your groove in tick measurements.
Random Timing: This slider randomizes the timing of your groove in tick measurements.
![]() Get From Clip: This neat feature extracts the groove from a selected MIDI clip and places its parameters into the Groove settings. Let’s say you come up with a killer groove on your own and you’d like to use it in another song. You can use this button to extract the groove and then save it using the Save button.
Get From Clip: This neat feature extracts the groove from a selected MIDI clip and places its parameters into the Groove settings. Let’s say you come up with a killer groove on your own and you’d like to use it in another song. You can use this button to extract the groove and then save it using the Save button.
Now that you’re familiar with the parameters of ReGroove, let’s dive in and see how it works.
Getting Started with ReGroove
Let’s start off with something simple, like assigning sequencer tracks to the ReGroove Mixer. To really feel the impact of ReGroove, I suggest using a basic drum sequence. Assuming that you have this ready to go, let’s begin.
First, you have to assign a sequencer track to a ReGroove channel, which is easily accomplished by navigating to the note lane of a sequencer track, clicking on the Select Groove menu, and selecting a ReGroove channel to assign to this track to (see Figure 4.43.)
Pretty easy, huh? As you will find throughout the rest of this book, Propellerhead has really made a great effort to make this program easy and intuitive to understand and use.

© Propellerhead Software AB.
CAUTION: Looking at Figure 4.43, you can see the Commit to Groove option. Selecting this option applies whatever adjustments you’ve made with the ReGroove Mixer to your sequence. I don’t suggest using this option unless you’re absolutely sure that this is what you want to do with your sequence.
Now that your sequencer track has been assigned to a ReGroove channel, you’re ready to explore the limitless possibilities of ReGroove.
Applying Groove to Your Sequence
At first listen, you won’t hear any difference in your sequence because you haven’t made any adjustments to your ReGroove channel. So let’s try a couple of quick parameter adjustments to demonstrate how this works. You might want to turn on the Click function to really feel the impact of the adjustments.
Adjust the Slide knob to the left or right to hear the difference in the sequence. Remember that this parameter has a range of +/–120 ticks, which is really not that much; however, the results will be heard. On the left side of Figure 4.44 is the sequence without any adjustments. The center image is the sequence with the Slide knob adjusted to –120, and the right side is the sequence with the Slide knob adjusted to +120.

© Propellerhead Software AB.
Now let’s look at the Shuffle knob. Try adjusting this to the left or right to hear the difference in the groove. This effect is much more pronounced; you’ll certainly hear it as soon as you make some adjustments. The left side of Figure 4.45 displays the original sequence; the center displays the sequence with the Shuffle knob set to 35%, and the right side displays the sequence with the Shuffle knob at 70%. As you can see, there’s quite a difference.

© Propellerhead Software AB.
NOTE: If you activate the Global Shuffle button, the LED above the Shuffle knob on the ReGroove channel will turn off, indicating that it is no longer changing the swing of the sequence. However, the Slide knob will still work even with the Global Shuffle button active.
TIP: At any time you can click the On button on any ReGroove channel to bypass the ReGroove effect to hear how your sequence sounds without it.
Working with ReGroove Patches
After you’ve done some experimenting with the parameters in the preceding section, I’m willing to bet you’ve come up with some pretty nasty little grooves with shuffle and slide galore. Well, strap yourself in because it’s time to show you how to use the provided ReGroove patches. As with nearly all the Reason devices, you’ll find that Propellerhead has included a feast of ReGroove patches that you can be sure will give your sequences something original. Before you begin, it would be a good time to set the Slide and Shuffle knobs to their default values and set the Groove Amount slider to 50%. You can also start playing your sequence back in a loop because you’re going to preview these grooves in real time.
Navigate over to the Groove settings in the Tool Window and click on the Folder icon to launch the Patch Browser window. Then click on the Reason Factory Sound Bank icon in the upper-left corner and double-click on the ReGroove Patches folder. When you’re done, you should see a window that looks like Figure 4.46.

© Propellerhead Software AB.
As you can see, Reason supplies a healthy dose of groove patches to play with, including the following:
![]() Bass-Comp/Drummer/Percussion: These grooves were recorded live by studio musicians, analyzed, and then extracted into individual groove patches. Don’t be confused, though; they don’t contain audio, simply the timings and velocities of what they originally played.
Bass-Comp/Drummer/Percussion: These grooves were recorded live by studio musicians, analyzed, and then extracted into individual groove patches. Don’t be confused, though; they don’t contain audio, simply the timings and velocities of what they originally played.
![]() Programmed: These grooves were programmed by studio musicians to emulate well-known drum programming grooves for use in hip-hop or pop music.
Programmed: These grooves were programmed by studio musicians to emulate well-known drum programming grooves for use in hip-hop or pop music.
![]() MPC-60: These grooves were extracted from an Akai MPC-60, which is probably the most important drum machine ever, because it had a timing and feel that have never really been duplicated.
MPC-60: These grooves were extracted from an Akai MPC-60, which is probably the most important drum machine ever, because it had a timing and feel that have never really been duplicated.
![]() Vinyl: These grooves were captured from vinyl groove record samples. The samples were then analyzed and extracted into individual groove patches. You had better believe there’s some funk to be had here.
Vinyl: These grooves were captured from vinyl groove record samples. The samples were then analyzed and extracted into individual groove patches. You had better believe there’s some funk to be had here.
Assuming your sequence is playing now, use the Patch Browser to preview patches by simply clicking on them one time. When you do, the sequence will play with the patch applied to it. Pretty cool, huh? So when you’re thoroughly versed in what the patches feel like and you find one you like, go ahead and click OK. For this demonstration, my money’s on the Bobby B patch, located in the Vinyl folder.
After the patch is imported, you can use the Groove Amount slider to adjust the amount of groove you’d like to hear while the sequence is playing back. A setting of 50% works fine for me, but you might find that you need that extra little kick, so use whatever’s comfortable.
At this point, I’m going to show you what the sliders do in the Groove settings of the Tool Window, starting with the Timing Impact slider. Looking at Figure 4.47, on the left is my sequence without any groove, the center is the sequence with the Timing Impact set to 100%, and the right is the sequence with the Timing Impact slider set to 200%. As stated, you can use the Groove Amount slider to scale back this effect.

© Propellerhead Software AB.
I’m going to leave the Timing Impact slider at 100%, so you can see the Velocity Impact slider. Looking at Figure 4.48, you can see the sequence with 100% Timing Impact and 100% Velocity Impact on the left and 100% Timing Impact and 200% Velocity Impact on the right.

© Propellerhead Software AB.
Next up is the Note Length Impact slider, but because I’m not using a synth-based sequence, like a lead or bass line, this slider will have little or no impact on this drum sequence. So let’s move down to the Random Timing slider and introduce some randomization to the timing of this groove. Looking at Figure 4.49, you can see the sequence with 100% Timing Impact and 100% Velocity Impact and no Random Timing on the left, whereas on the right, you can see the sequence with Random Timing set to 36 ticks. Because this has a range of only 120 ticks, it does not create a huge difference, but you can still see and hear the results.
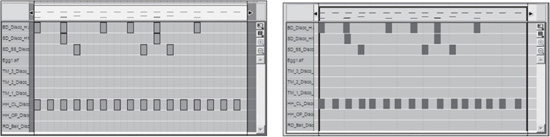
© Propellerhead Software AB.
Additional ReGroove Tips
Wow, there’s a lot under the hood when you really start to look at the ReGroove Mixer in Reason. And believe it or not, there are some additional features that you should be aware of:
![]() Initialize Channel: Let’s say you want to wipe the slate clean. Just right-click on any ReGroove channel and select Initialize Channel.
Initialize Channel: Let’s say you want to wipe the slate clean. Just right-click on any ReGroove channel and select Initialize Channel.
![]() Copy/Paste: These options are handy if you want to lock in the same groove between two instruments, such as drums and bass. Simply right-click on the ReGroove channel with the groove you want and select Copy Channel. Then go to the channel where you want to paste the groove to and select Paste Channel.
Copy/Paste: These options are handy if you want to lock in the same groove between two instruments, such as drums and bass. Simply right-click on the ReGroove channel with the groove you want and select Copy Channel. Then go to the channel where you want to paste the groove to and select Paste Channel.
![]() Commit to Groove: As mentioned earlier in this chapter, this option is a destructive edit that applies your ReGroove settings to the selected sequencer track. This option can be found in the Select Groove menu on your sequencer track. Although this is a neat shortcut, remember that it actually alters the placement of the MIDI notes in the sequence, so be sure that you are happy with it.
Commit to Groove: As mentioned earlier in this chapter, this option is a destructive edit that applies your ReGroove settings to the selected sequencer track. This option can be found in the Select Groove menu on your sequencer track. Although this is a neat shortcut, remember that it actually alters the placement of the MIDI notes in the sequence, so be sure that you are happy with it.
Recording an Audio Performance
Now that you have taken a close look at the MIDI features of Reason 7, it’s time to change direction a bit and look at the audio side of the Sequencer screen. This is a newer feature that’s quite exciting because previously, Reason users had to use other digital audio workstation (DAW) applications to record their guitars, drums, and vocals. As of Reason 6, however, you can do all your recording in one application. This section of the chapter covers the following topics:
![]() Creating an audio track
Creating an audio track
![]() Recording a simple audio performance
Recording a simple audio performance
![]() Editing the performance
Editing the performance
Let’s begin by creating an audio track in Reason. Start a new song and select Create Audio Track from the Create menu. When you’re done, you should have a setup similar to that shown in Figure 4.50.
As you can see, an audio track looks quite a bit different from the tracks you’ve used throughout this chapter. Obviously, there are a few commonalities, such as the Mute/Solo buttons and the Record Enable buttons, but there are a few new buttons that you may not be very familiar with. Let’s quickly review the layout.
The first button to take note of is the Monitoring button, which is the button with a speaker icon on it. When activated, this button enables you to listen to the incoming signal on your audio track. This button is active by default whenever an audio track is created and will automatically turn itself off whenever you’re playing back your audio performance. If you want to alter the behaviors of the monitoring functions, you can do so within the Audio tab of the Preferences window.
The next button is Select Audio Input, which is located just to the left of the meter. This button enables you determine if your audio track will be a stereo or a mono track and which inputs on your audio interface will be used to record your performance. Looking at Figure 4.51, you can see that I have selected to record a mono track and I will be using Input 1 on my audio interface.
The final new button to take note of is the Tuner button. It is a real helper for guitarists and bassists because it provides a means to keep your instruments in tune before you begin to record your audio performance. Simply plug in your guitar or bass, activate the tuner, and play a string. Reason will detect the pitch and tell you whether or not you’re in tune (see Figure 4.52).

© Propellerhead Software AB.
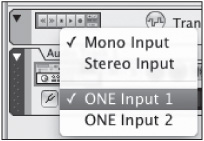
© Propellerhead Software AB.
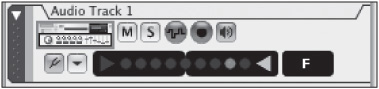
© Propellerhead Software AB.
You’re now ready to record your first audio track in Reason. Assuming that you have a strong signal from your audio interface to Reason, do the following:
1. In the Transport panel, make sure that the Loop section is deactivated. Set the right locator to bar 9. This will provide you with eight empty measures to record a quick loop. Also make sure that both Click and Pre are turned on so that you will have a full measure count in and a metronome to play against. Finally, make sure that you set the tempo to one you’re comfortable playing. If this is your first time, I suggest 90 BPM.
2. Click the Stop button twice to send the position indicator back to measure 1. Now click on the Record button to start recording. The position indicator should begin moving to the right and will start recording audio data.
3. When the sequencer starts recording data, either sing or play a very simple melody or chord progression until the position indicator reaches measure 9. Click Stop on the Transport panel or press the spacebar on your computer keyboard to stop the recording. Notice that there is now audio data displayed as a waveform on the Song view of the Sequencer screen (see Figure 4.53).
Editing Your Audio Performance
At this point, you have recorded your audio performance. Now it’s time to push forward into the editing capabilities of Reason, which offers a variety of interesting options that are both easy to use and execute.

© Propellerhead Software AB.
Normalization and Reverse
The first edit you can make on your audio performance is a function known as Normalization. This is a very handy editing feature for boosting the volume of a recording that sounds a little too quiet for your song. Normalization is a function that examines the entire waveform and locates the loudest point within the performance as a point of reference. The volume of that point is then increased to 0 dB (full scale), and the rest of the waveform is adjusted accordingly.
To normalize your audio performance, do the following.
1. Select the audio clip by clicking on it.
2. Select Normalize Clips from the Edit menu.
In Figure 4.54, notice the original clip on the left, followed by the processed clip on the right.

© Propellerhead Software AB.
CAUTION: Although normalizing your audio has its advantages, just be aware that while normalizing increases the volume of your recorded performance, it also increases the volume of the noise within your performance. If you have a particularly noisy recording, you might want to skip normalizing it.
Reversing your audio performance is a surefire attention-getting element within a song. Does it contain a subliminal message? Does it tell you where John buried Paul? Does it contain a recipe for an awesome batch of cookies? Who knows? But some of the best-known rock recordings have a reverse audio element in them. A great example is “Are You Experienced” by Jimi Hendrix. The whole rhythmic element of that song is based on a reverse strum of the guitar. Back then, it was a rather complicated task to create this texture. In Reason, it’sa snap.
To reverse your audio performance, do the following:
1. Select the audio clip by clicking on it.
2. Select Reverse Clips from the Edit menu.
In Figure 4.55, notice the original clip on the left, followed by the reversed clip on the right.

© Propellerhead Software AB.
Transpose, Level, and Fades
When you select an audio clip in the Reason Sequencer screen, you’ll see some additional displays appear in the Inspector: Fade In, Fade Out, Level (dB), and Transpose (see Figure 4.56).
© Propellerhead Software AB.
The Fade In and Fade Out displays are very useful. They are used to create fade-ins and fade-outs with ease. Let’s take a quick tour through these tools:
![]() Fade In: This display is used to create a fade for the beginning of an audio clip in your song. It allows you to make adjustments in increments of 1/16 notes and ticks. Simply use the spin controls or double-click in the setting to make your adjustments. Try making some adjustment, and you’ll see that the audio clip updates its appearance in real time.
Fade In: This display is used to create a fade for the beginning of an audio clip in your song. It allows you to make adjustments in increments of 1/16 notes and ticks. Simply use the spin controls or double-click in the setting to make your adjustments. Try making some adjustment, and you’ll see that the audio clip updates its appearance in real time.
![]() Fade Out: This display does exactly the opposite, creating a fade-out for the end of any selected audio clip in your Reason song.
Fade Out: This display does exactly the opposite, creating a fade-out for the end of any selected audio clip in your Reason song.
![]() Level (dB): This display enables you to adjust the overall volume of your selected audio clip.
Level (dB): This display enables you to adjust the overall volume of your selected audio clip.
![]() Transpose: This display enables you to alter the tuning of a selected audio clip in increments of semitones and cents. It has a range of +/–12 semitones. Try selecting a clip of audio, such as a vocal or guitar line, and use the Transpose display to raise and lower the pitch to hear the result. Just as a point of interest, you should also see the Calc indicator in the Transport Panel working to recalculate the audio clip as it’s being transposed.
Transpose: This display enables you to alter the tuning of a selected audio clip in increments of semitones and cents. It has a range of +/–12 semitones. Try selecting a clip of audio, such as a vocal or guitar line, and use the Transpose display to raise and lower the pitch to hear the result. Just as a point of interest, you should also see the Calc indicator in the Transport Panel working to recalculate the audio clip as it’s being transposed.
TIP: Another way to make fade and level edits to your clips is to use the set of handles located at the start (fade in), middle (level), and end (fade out) of any selected clip of audio in your Reason song. Simply click and drag the handles to create your fade and level adjustments graphically.
Comp Editing
Aside from some of the editing features you might normally find on other DAWs, one of Reason 7’s secret weapons is the ability to comp tracks. Say you’ve recorded a couple of takes of the same vocal or guitar part for your song. Listening to both takes, you find that although you don’t like either of the entire takes, you like elements of both. A perfect solution to this dilemma is comping, which makes it possible for you to extract elements of different takes and combine them into a single complete audio performance. Comping is a fairly common practice in modern recordings because it allows the musician/producer to quickly create tracks and keep the creativity flowing.
Let’s push forward and explore some basic comping to give you an idea of what can be accomplished. Figure 4.57 shows a simple audio track that we’re going to comp. I have recorded two takes of the same guitar riff and switched to Edit mode in the Reason Sequencer screen. You can see that one take is grayed out, whereas the other is active. This is a perfect starting point.
1. Press Ctrl+E (Windows) or Command+E (Mac) to switch to Comp mode.
2. Click on the Single Take button (it looks like a speaker, with an arrow pointing away from it) to audition one of the comp layers.
3. You’re now ready to make the first cut. Take it really easy here because this is your first comp edit. With Snap set to Bar, select the Razor tool, navigate to bar 2 of the grayed-out take, and click, hold, and drag from bar 2 to bar 3 to create two cut markers. When you’re done, you should have an edit similar to the one in Figure 4.58.
4. At this point, you could create some more cut markers by clicking on either take with the Razor tool. If you switch to a finer Snap value, you can create cuts up to a 1/64 note resolution. Looking at Figure 4.59, you can see that I’ve made 1/8 note cuts to create a unique guitar part.
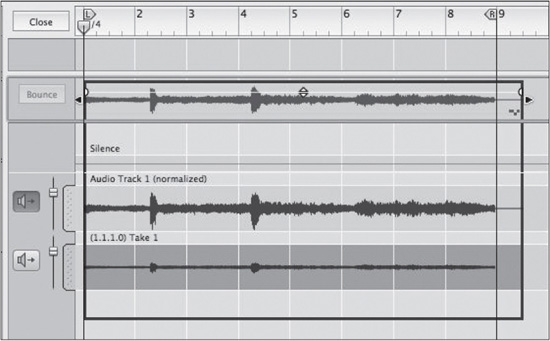
© Propellerhead Software AB.

© Propellerhead Software AB.
Another possibility is to click and drag the cut markers even more to fine-tune the comped audio performance. Just make sure to switch to the Selector tool before you begin.

© Propellerhead Software AB.
TIP: While creating a comped audio performance, you may find that you need to smooth out the transitions between different cut markers. This is easily done by creating a crossfade. To do this, simply click on any cut marker to select it; a handle appears just above the marker. Click and drag to the right, and Reason creates a crossfade between the different takes, similar to Figure 4.60.

© Propellerhead Software AB.
Spectrum EQ
Of course, after a bit of audio editing, it’s pretty fair to say that you’re going to want to EQ your audio track a little as well. Although you could go to the Mix screen to start EQing your work, you could also use the EQ button, shown in Figure 4.61 to access the Spectrum EQ. Or, even better, press the F2 button. This visual EQ system controls the mixer EQ in a fun, versatile way, and also lets you see the spectrum image of the incoming signal in real time. Keep in mind that the Spectrum EQ is the exact same EQ on the actual Reason mixer. The Spectrum EQ window, however, gives you a much more intuitive way of tweaking the EQs on the mixer. And it provides a very powerful spectrum analyzer to boot!
One thing that is extremely cool about the Spectrum EQ is that once its window is activated and visible, it will continue to jump with you from track to track, displaying the spectral analysis of each track. An easy way to see this in action is to press F2 and then select a few different lanes in the Sequencer screen, as shown in Figure 4.62. By moving between tracks and viewing which track frequencies are strong or soft, you can see and hear which frequencies on one track are competing with frequencies on another track. An example would be removing some lower frequencies on a bass drum so that you can feel the lowest frequencies of a kick drum.

© Propellerhead Software AB.

© Propellerhead Software AB.
While displaying a track, you can use the Spectrum EQ to dial in the frequencies of your audio track by using either the dedicated low-pass filter (LPF) and high-pass filter (HPF), which are also available on the Reason mixing board. You may also enable the dedicated EQ, as shown in Figure 4.63 for your audio or instrument track. Go ahead and try enabling the HP filter now!
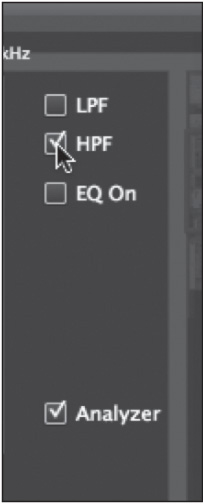
© Propellerhead Software AB.
The HPF cuts low frequencies so that only the high frequencies can pass through. A lot of the time, I’ll start with the HPF when I begin EQing a vocal track, as lower vocal frequencies are often unwanted and tend to have frequencies that clash with bass and drums. If you drag the small orange circle toward the right, you will begin to see and hear, if your audio track is playing, how the HPF kills those low signals (see Figure 4.64).
When I’m working with male vocals or electric guitar, I’ll often use the LPF to cut the high frequencies as well. Electric guitar harmonics, when higher frequencies are activated, can be extremely uncomfortable for a listener. And male vocals never tend to have too many high frequencies, anyway. Cutting these frequencies can end up killing additional, unwanted room noise that the vocal mic picked up, and even get rid of smacks and mouth noises. Enable the LPF now and try it on your own stuff. (See Figure 4.65.)
Of course, there may be some frequencies that seriously don’t work. For example, maybe there’s some sibilance you want to get rid of. Why not enable the EQ? With the EQ enabled, you get additional frequency bands that can be used to shelve, peak, or just about any other EQ possibility you can think of. Try this: Hold down the Alt (Windows) or Option (Mac) key while dragging the blue circle/band up or down. Notice how this changes the shape of the curve you’re working with? It adjusts the EQ (see Figure 4.66). Using this method, you can boost very specific frequencies or cut them. It’s up to you.
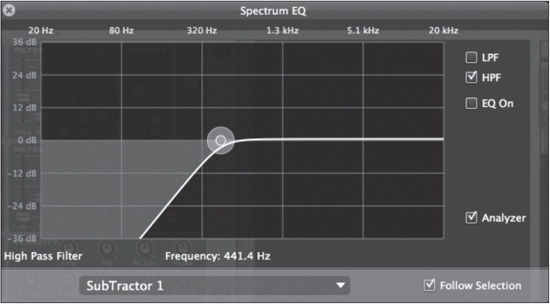
© Propellerhead Software AB.

© Propellerhead Software AB.

© Propellerhead Software AB.
Finally, the gray and red circles, by default, act as low and high shelves. But, when you place them in the high-frequency bell (HF Bell) or low-frequency bell (LF Bell) graph, you can use these bands to boost specific frequencies as well (see Figure 4.67).

© Propellerhead Software AB.
Using Spectrum EQ really can make the production cycle much quicker and more efficient, and yield better-sounding results. It’s much smoother than having to jump back and forth to the mixer, and it keeps you in the loop visually and aurally.
Moving On
Throughout this chapter, you have witnessed the ins and outs of the Reason Sequencer screen. I’m betting you’ll agree that there is a lot under the hood of this baby. Be sure to read Chapter 12, which takes an in-depth look at automation and revisits the Sequencer screen.