
5 Kong: Close-Up
WHEN IT COMES TO PROVIDING CREATIVE AVENUES FOR BEAT CREATION, Propellerhead Software has not been known to rest on its laurels. Way back when, with Reason 5, the company decided to push the creative envelope and introduce Kong (see Figure 5.1). Kong is an electronic musician’s dream machine because it includes a desirable feature set of sampling, physical modeling, and effects, all wrapped up in an interface that looks and feels similar to the popular Akai MPC series of drum machines.
© Propellerhead Software AB.
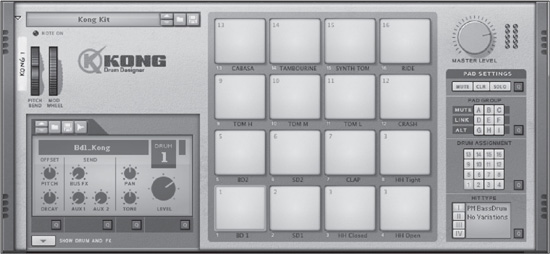
When you first create an instance of Kong, the first parts of the interface you see are the Pad section and the dedicated drum control (see Figure 5.2). Additionally, you see the Patch Browser buttons, the pitch and modulation wheels, and the master level. As you will learn later in this chapter, this is just the first half of the interface. For now, let’s concentrate on the basics and work our way out from there.
© Propellerhead Software AB.
Browsing and Loading Patches
When you first create an instance of Kong, a default drum kit is loaded. After a while, you’ll certainly want to try different drum kits, so navigate to the upper-left corner of the interface, where you can browse the drum patches (see Figure 5.3).

© Propellerhead Software AB.
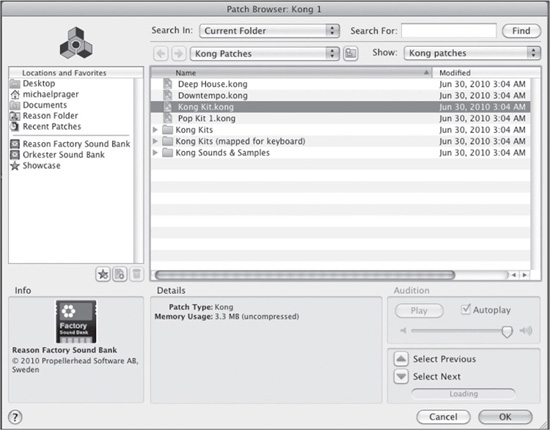
Click on the browser window or on the folder button located directly below it to open the Patch Browser window (see Figure 5.4).
When the Patch Browser window is open, you can locate and load any of the available Kong patches by opening the Kong Patches folder, found in the Reason Factory Sound Bank. When you do this, you can select between standard Kong kits and the same Kong kits mapped out specifically for keyboards. Try a simple kit now to familiarize yourself with the Kong interface. Open the Club Kits folder and select the Downtempo kit. Click on the OK button in the Patch Browser, and the kit loads itself into the Kong interface.
The Pad Section
In the Pad section of the Kong interface, you graphically trigger the individual sounds in a loaded Kong kit. Looking back at Figure 5.2, you can see that there are 16 individual pads arranged in groups of four. You can trigger these sounds by using any of the following methods:
![]() Clicking on them with your mouse
Clicking on them with your mouse
![]() Using a controller keyboard
Using a controller keyboard
![]() Using the onscreen piano keys (press F4 on your computer keyboard)
Using the onscreen piano keys (press F4 on your computer keyboard)
TIP: The individual Kong pads are mapped in a similar fashion to Redrum, which starts at C1 and ends at D#2 on your keyboard.
© Propellerhead Software AB.
All of Kong’s pads are velocity sensitive, which means that they respond and sound differently depending on how hard or soft you trigger them from your keyboard. Additionally, you can use your mouse to achieve the same effect by clicking from the bottom (softest) to the top (hardest) on each pad.
To the right of the Pad section is the Pad Settings panel, which houses various parameters that allow you to assign the pads, edit them, and remap them (see Figure 5.5).

© Propellerhead Software AB.
Let’s look at each of these, starting with the Mute, Clear, and Solo buttons:
![]() The Mute button mutes any selected Kong pad. When you click the Mute button, it and the selected Kong pad turn bright red.
The Mute button mutes any selected Kong pad. When you click the Mute button, it and the selected Kong pad turn bright red.
![]() The Clear button deactivates all assigned solos and mutes to the Pad section. For example, if you had both of the kick drum pads muted, you could click the Clear button to unmute both with one click.
The Clear button deactivates all assigned solos and mutes to the Pad section. For example, if you had both of the kick drum pads muted, you could click the Clear button to unmute both with one click.
![]() The Solo button works in the opposite way of the Mute button, isolating the drum sample that you want to hear on its own. Select a pad, click the Solo button, and all the other pads turn bright red, whereas the selected pad shows as a bright green hue.
The Solo button works in the opposite way of the Mute button, isolating the drum sample that you want to hear on its own. Select a pad, click the Solo button, and all the other pads turn bright red, whereas the selected pad shows as a bright green hue.
Just to the right of the Mute, Clear, and Solo buttons is the Pad Mute/Solo Quick Edit Mode button. If you click this button, the area of the Pad section you are editing launches into Quick Edit mode, which enables you to perform several edits quickly for all 16 pads instead of one pad at a time (see Figure 5.6).

© Propellerhead Software AB.
Next down from the Mute, Clear, and Solo buttons are the pad groups (see Figure 5.7). You use these to assign different play parameters to your selected Kong pads. Using these buttons effectively can give a much more realistic effect to your drum samples, and they also allow you to be a lot more creative with your sequencing.

© Propellerhead Software AB.
You can use mute groups to have one pad mute the sound of another pad assigned to the same group. For example, say you have an open hi-hat sample on pad 7 and a closed hi-hat sample on pad 8. You can assign both of them to a mute group so that when you play the open hi-hat sample, you can use the closed hi-hat sample to mute it, which is exactly how it would sound on an acoustic drum kit.
Try the following exercise. Make sure you’re still using the Downtempo Kong kit before you begin.
1. Select pad 12, which is a crash cymbal.
2. Click on mute group A to assign pad 12 to it.
3. Select pad 4, which is a closed hi-hat.
4. Click on mute group A to assign pad 4 to it.
5. Play pad 12 and then pad 4. You should hear the crash cymbal abruptly end.
Link groups enable you to combine or link several pads together so they are triggered simultaneously. To get a better idea of how this feature works, try the following exercise:
1. Select pad 13, which is a shaker type sound.
2. Click on link group D to assign pad 13 to it.
3. Select pad 6, which is a snare drum.
4. Click on link group D to assign pad 6 to it.
5. Play either pad 13 or pad 6, and you’ll hear both of them played back at once.
Alt groups enable you to create a randomization effect between grouped pads. This is certainly one of the more creative groups that Kong offers. Try the following exercise to see how they work:
1. Select pad 1, which is a kick drum, and assign it to alt group G.
2. Select pad 5, which is another kick drum, and assign it to alt group G.
3. Select pad 9, which is a high tom, and assign it to alt group G.
4. Select pad 13, which is a shaker sound, and assign it to alt group G.
5. Play any of the four assigned pads, and Kong randomly plays any of the four sounds.
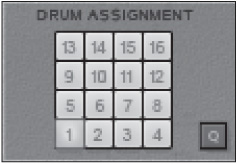
The Drum Assignment buttons enable you to assign the drum sounds of Kong to any of the 16 individual pads (see Figure 5.8). I’ll get into this topic later in this chapter when I show you how to build your own drum kit with Kong.
© Propellerhead Software AB.
The Hit Type section enables you to assign one of four hit types to a single Kong pad (see Figure 5.9). This is another feature that probably won’t make a whole lot of sense this early in the chapter, but it will shortly.

© Propellerhead Software AB.
The Drum Control Panel
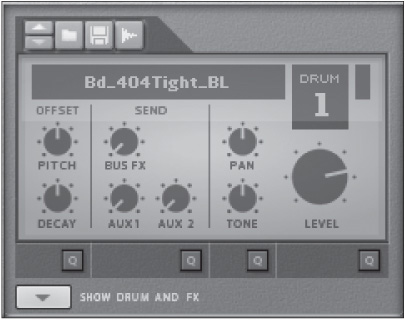
Kong’s Drum Control Panel enables you to assign specific sounds to each selected Kong pad, as well as mix the loaded sound with send effects, panning, tone, and volume (see Figure 5.10). Additionally, you can sample your own sounds into Kong from these controls, making for a very powerful drum-sampling machine.
© Propellerhead Software AB.
In this section, you can select new sounds for any selected pad, edit it, and save it using the available Browse and Save buttons. Although each Kong pad has its own series of controls, you cannot view them until you select one of the pads by clicking on it with your mouse. Click on the BD1 pad and look at the available parameters:
![]() Select Previous Drum Patch/Select Next Drum Patch: These buttons enable you to select new samples one by one from within a selected directory. For example, if you have selected the kick drum Kong pad, the Select Previous Drum Patch and Select Next Drum Patch buttons allow you to select a new kick drum patch. Also note that you can click on the naming parameter in the Drum Control Panel and select a new drum patch from a pop-up list.
Select Previous Drum Patch/Select Next Drum Patch: These buttons enable you to select new samples one by one from within a selected directory. For example, if you have selected the kick drum Kong pad, the Select Previous Drum Patch and Select Next Drum Patch buttons allow you to select a new kick drum patch. Also note that you can click on the naming parameter in the Drum Control Panel and select a new drum patch from a pop-up list.
![]() Browse Drum Patch: This button enables you to launch the Kong Drum File Browser, which makes it possible to search for, preview, and import new samples into your Kong kit.
Browse Drum Patch: This button enables you to launch the Kong Drum File Browser, which makes it possible to search for, preview, and import new samples into your Kong kit.
![]() Save: This button enables you to save your sample.
Save: This button enables you to save your sample.
![]() Sample: This button launches the sampling function so you can record your own sounds into a Kong kit.
Sample: This button launches the sampling function so you can record your own sounds into a Kong kit.
![]() Pitch: This knob enables you to change the pitch of the selected Kong pad.
Pitch: This knob enables you to change the pitch of the selected Kong pad.
![]() Decay: This knob is used to change the decay of a selected Kong pad. This feature is especially useful if you have a cymbal sound with a very long decay or sustain.
Decay: This knob is used to change the decay of a selected Kong pad. This feature is especially useful if you have a cymbal sound with a very long decay or sustain.
![]() Bus FX: This knob is used to send a signal from a selected Kong pad to one of several provided bus effects. I will discuss this feature further later in this chapter.
Bus FX: This knob is used to send a signal from a selected Kong pad to one of several provided bus effects. I will discuss this feature further later in this chapter.
![]() Aux1/Aux2: These knobs are used to send signals from a selected Kong pad to Kong’s auxiliary outputs (labeled Aux Send Out on
Aux1/Aux2: These knobs are used to send signals from a selected Kong pad to Kong’s auxiliary outputs (labeled Aux Send Out on
Kong’s rear panel).
![]() Pan: This knob is used to set the placement of the selected Kong pad in the stereo field.
Pan: This knob is used to set the placement of the selected Kong pad in the stereo field.
![]() Tone: This knob is used to alter the tone, or equalization, of the selected Kong pad.
Tone: This knob is used to alter the tone, or equalization, of the selected Kong pad.
![]() Level: This knob sets the level of the selected Kong pad.
Level: This knob sets the level of the selected Kong pad.
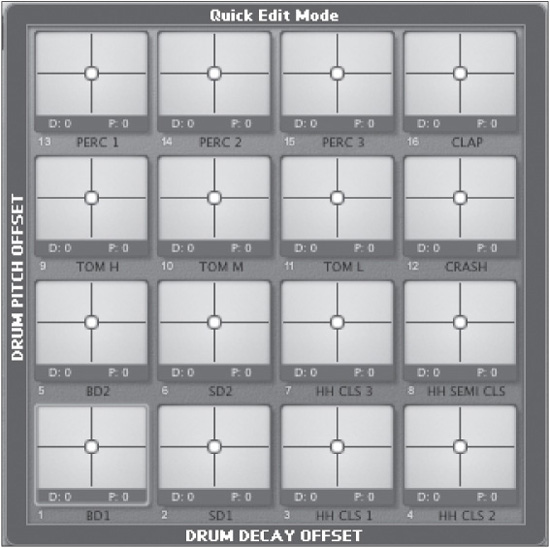
Just below each of these controls is a series of Quick Edit buttons that allow you to see and edit various parameters for all 16 pads simultaneously instead of one pad at a time (see Figure 5.11). Clicking one of the buttons marked with a Q calls up the Quick Editor. The Quick Editor is an X-Y Cartesian plot that overlays on each pad, and the parameters change depending on the selected Quick Edit mode. Clicking a different Quick Edit Mode button changes the parameter options, and clicking the active Quick Edit Mode button again switches off the Quick Editor and returns the pads to their normal operation.
![]() Drum Pitch/Decay Offset Quick Edit Mode: This Quick Edit button makes changes to pitch and decay offset using an X-Y controller on each pad.
Drum Pitch/Decay Offset Quick Edit Mode: This Quick Edit button makes changes to pitch and decay offset using an X-Y controller on each pad.
![]() Drum Sends Quick Edit Mode: This Quick Edit button makes changes to the Bus FX send and Aux Send knobs. However, unlike Quick Edit 1, this Quick Edit button makes its changes with individual adjustments for each knob instead of an X-Y controller.
Drum Sends Quick Edit Mode: This Quick Edit button makes changes to the Bus FX send and Aux Send knobs. However, unlike Quick Edit 1, this Quick Edit button makes its changes with individual adjustments for each knob instead of an X-Y controller.
![]() Drum Pan/Level Quick Edit Mode: This Quick Edit button makes changes to the pan and level using an X-Y controller on each pad.
Drum Pan/Level Quick Edit Mode: This Quick Edit button makes changes to the pan and level using an X-Y controller on each pad.
![]() Drum Tone/Level Quick Edit Mode: This Quick Edit button makes changes to the tone and level using an X-Y controller on each pad.
Drum Tone/Level Quick Edit Mode: This Quick Edit button makes changes to the tone and level using an X-Y controller on each pad.
© Propellerhead Software AB.
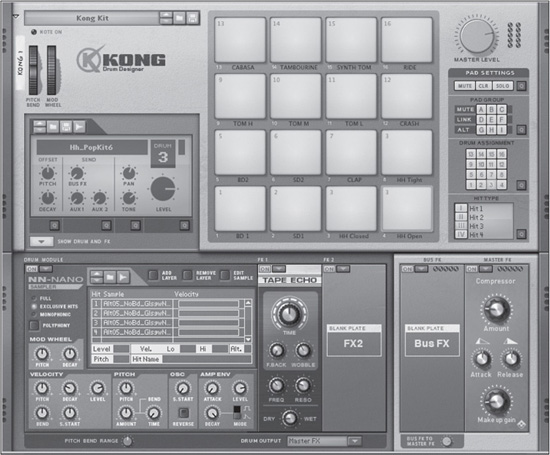
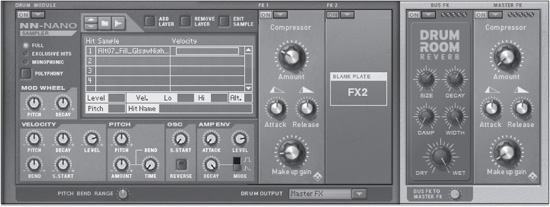
The Drum Module and FX
There’s a whole other layer to the complexity of Kong, which is the included Drum Module and FX section (see Figure 5.12). In this section, you select the type of synthesis that will generate your drum sounds and the real-time effects to enhance them further.
© Propellerhead Software AB.
Click on the Show Drum and FX button to display this section and let’s start exploring.
The Drum Module
At the far left is the Drum Module, where the sound of Kong is generated. Kong provides three types of synthesis to produce sounds:
![]() Samples: Kong supports several digital audio formats, including WAV, AIFF, SoundFonts, and REX files.
Samples: Kong supports several digital audio formats, including WAV, AIFF, SoundFonts, and REX files.
![]() Physical modeling: This type of synthesis is used to generate sounds by mathematically simulating or emulating an acoustic kick drum, snare drum, and toms.
Physical modeling: This type of synthesis is used to generate sounds by mathematically simulating or emulating an acoustic kick drum, snare drum, and toms.
![]() Analog modeling: This type of synthesis is used to generate sounds by mathematically simulating or emulating classic analog kicks, snares, hi-hats, and toms.
Analog modeling: This type of synthesis is used to generate sounds by mathematically simulating or emulating classic analog kicks, snares, hi-hats, and toms.
Let’s look at these and discuss each drum module in depth, starting with the NN-Nano.
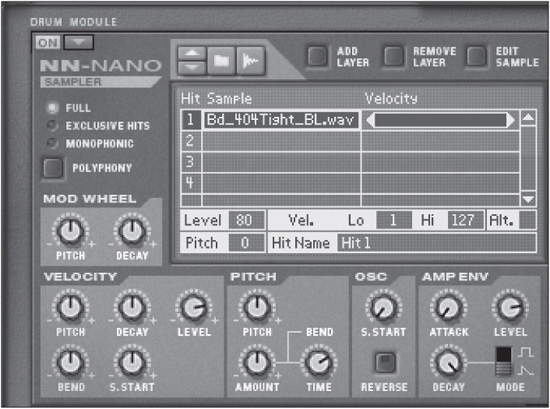
The NN-Nano Drum Module
The NN-Nano is a drum sampler based off the NN-XT sampler (see Figure 5.13). This module is used to import or record samples and provides several creative editing options that can make your drums sound as realistic or synthetic as you would like. Note that when you’re using the Downtempo kit, every pad uses the NN-Nano.
© Propellerhead Software AB.
Let’s explore the various parameters of the NN-Nano, starting with the Sample Map display.
The Sample Map
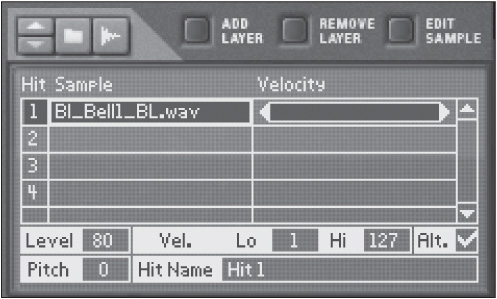
Using the Sample Map display, you can select or edit samples and map their hit type to a selected Kong pad (see Figure 5.14). The NN-Nano supports multiple hit samples, which enables you to create either realistic or synthetic samples for your Kong kit because each sample is assigned to one of four different hit types. All the nuances and sonic characteristics of the sampled instrument can be accurately mapped in the NN-Nano.
Let’s discuss the individual parameters:
![]() Sample scroll controls: These buttons are used to select new samples one by one from within a selected directory.
Sample scroll controls: These buttons are used to select new samples one by one from within a selected directory.
![]() Browser: This button is used to launch the Sample Browser, which makes it possible to search for, preview, and import new samples.
Browser: This button is used to launch the Sample Browser, which makes it possible to search for, preview, and import new samples.
![]() Sample: This button launches the sampling function so you can record your own sounds.
Sample: This button launches the sampling function so you can record your own sounds.
![]() Add Layer: This button is used to add a layer to a selected sample hit. For example, you could have a kick drum on hit 1 and then use the Add Layer button to add a layer with a cowbell sample onto it.
Add Layer: This button is used to add a layer to a selected sample hit. For example, you could have a kick drum on hit 1 and then use the Add Layer button to add a layer with a cowbell sample onto it.
![]() Remove Layer: This button removes any selected layer.
Remove Layer: This button removes any selected layer.
![]() Edit Sample: This control is used to launch the Sample Editor for any selected sample.
Edit Sample: This control is used to launch the Sample Editor for any selected sample.
![]() Hit: This control is used to select one of four available hit types.
Hit: This control is used to select one of four available hit types.
© Propellerhead Software AB.
![]() Sample: This control displays the name of the loaded sample. You can select a new sample by double-clicking here, and you can preview the loaded sample by Alt-clicking (Windows) or Option-clicking (Mac) on the sample.
Sample: This control displays the name of the loaded sample. You can select a new sample by double-clicking here, and you can preview the loaded sample by Alt-clicking (Windows) or Option-clicking (Mac) on the sample.
![]() Velocity (Graphical): This control is used to display and edit the mapped velocity of a loaded sample in a graphical way. Simply click and drag from either the left or right corner of a selected sample to assign its low- or high-velocity value.
Velocity (Graphical): This control is used to display and edit the mapped velocity of a loaded sample in a graphical way. Simply click and drag from either the left or right corner of a selected sample to assign its low- or high-velocity value.
![]() Level: This displays the amplitude of a selected sample.
Level: This displays the amplitude of a selected sample.
![]() Velocity (Numeric): This is used to display and edit the mapped velocity of a loaded sample in a numeric way. Simply click and drag up or down to assign its low- or high-velocity value.
Velocity (Numeric): This is used to display and edit the mapped velocity of a loaded sample in a numeric way. Simply click and drag up or down to assign its low- or high-velocity value.
![]() Alt: This control is used to alternate between different layers in the same hit. For example, if you have three snare samples loaded onto one hit, you can assign them to the Alt function to create the alternate effect. It helps to introduce some randomization to your loaded sample.
Alt: This control is used to alternate between different layers in the same hit. For example, if you have three snare samples loaded onto one hit, you can assign them to the Alt function to create the alternate effect. It helps to introduce some randomization to your loaded sample.
![]() Pitch: This control is used to assign a pitch to a selected sample.
Pitch: This control is used to assign a pitch to a selected sample.
![]() Hit Name: This control is used to assign a new name to a selected hit.
Hit Name: This control is used to assign a new name to a selected hit.
The Global Parameters
The NN-Nano also includes a wide assortment of synth parameters that you can assign to your selected sample (see Figure 5.15). These parameters are global, which simply means that they affect all the hits in a selected Kong pad equally.

© Propellerhead Software AB.
The Polyphony controls determine how many voices can be heard simultaneously from a selected hit. NN-Nano offers three choices:
![]() Full: This is the full polyphony setting, which means that all hits can be heard with full polyphony.
Full: This is the full polyphony setting, which means that all hits can be heard with full polyphony.
![]() Exclusive Hits: When this control is selected, any played hit abruptly cuts off any other audible hits, while maintaining full polyphony in the currently played hit.
Exclusive Hits: When this control is selected, any played hit abruptly cuts off any other audible hits, while maintaining full polyphony in the currently played hit.
![]() Monophonic: When this control is selected, only one hit is heard at a time, with only one voice of polyphony.
Monophonic: When this control is selected, only one hit is heard at a time, with only one voice of polyphony.
The Mod Wheel parameters enable you to assign both pitch and decay to Kong’s modulation wheel. They can offer some creative textures because the mod wheel is a lively sounding effect best served in a live environment.
The Velocity parameters allow you to edit the following parameters of your hits based on the amount of velocity used:
![]() Pitch: The velocity modifies the pitch for a sample hit.
Pitch: The velocity modifies the pitch for a sample hit.
![]() Decay: The velocity modifies the decay time for a sample hit.
Decay: The velocity modifies the decay time for a sample hit.
![]() Level: The velocity modifies the level for a sample hit.
Level: The velocity modifies the level for a sample hit.
![]() Bend: The velocity modifies the pitch bend effect. This is similar to the Bend parameter featured in Redrum.
Bend: The velocity modifies the pitch bend effect. This is similar to the Bend parameter featured in Redrum.
![]() Sample Start: The velocity modifies the starting time for the sample hit.
Sample Start: The velocity modifies the starting time for the sample hit.
You can use the Pitch parameters to set the global pitch and create a pitch bend effect for your hits. For example, you could load a crash cymbal and have it pitch bend up or down over a specific amount of time. The parameters are as follows:
![]() Pitch: This knob sets the global pitch for your hits.
Pitch: This knob sets the global pitch for your hits.
![]() Amount: This knob sets the amount of pitch bend. A positive value causes the pitch to bend down, whereas a negative value has the opposite effect.
Amount: This knob sets the amount of pitch bend. A positive value causes the pitch to bend down, whereas a negative value has the opposite effect.
![]() Time: This knob determines the amount of time given to the pitch bend effect.
Time: This knob determines the amount of time given to the pitch bend effect.
The Oscillator (OSC) parameters enable you to determine the sample start time. Additionally, you can use NN-Nano to reverse the playback of your samples by clicking the Reverse button. Reversing playback creates a fantastic backward sound to your loaded samples.
The Amp Envelope (AMP ENV) parameters assign global envelope parameters to the amplitude of your hits. The parameters are as follows:
![]() Attack: This parameter sets the attack to your hits.
Attack: This parameter sets the attack to your hits.
![]() Level: This knob sets the amplitude of your hits.
Level: This knob sets the amplitude of your hits.
![]() Decay: This knob is used to determine the decay of your hits after they’ve been triggered. The Decay parameter includes two additional parameters, Gate and Trig. When Gate is selected, the Decay knob assigns the minimum decay to your hit, with the decay stage starting when the Kong pad is released. When Trig is selected, the decay stage begins as soon as you strike the pad, even if you continue holding the pad.
Decay: This knob is used to determine the decay of your hits after they’ve been triggered. The Decay parameter includes two additional parameters, Gate and Trig. When Gate is selected, the Decay knob assigns the minimum decay to your hit, with the decay stage starting when the Kong pad is released. When Trig is selected, the decay stage begins as soon as you strike the pad, even if you continue holding the pad.
Nurse Rex
Now that you’re done touring NN-Nano, let’s change the drum module by selecting pad 1 and clicking the down-facing arrow located at the upper-left corner. A pop-up menu allows you to select from a list of nine drum modules (see Figure 5.16). Select the Nurse Rex Loop Player module, and you’re ready to begin.
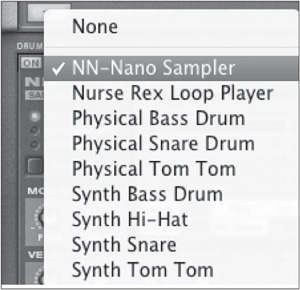
© Propellerhead Software AB.
Nurse Rex (see Figure 5.17) is a light version of the Dr. Octo Rex loop player device, which is covered in Chapter 6, “Dr. Octo Rex: Close-Up.” This drum module loads REX files and enables you to assign the slices to any Kong pad.

© Propellerhead Software AB.
Loading REX Files
After you create an instance of Nurse Rex, the first thing you should do is load a REX file. You do this by clicking on the Browse Loop button, located in the upper-left corner of the module. This launches the REX File Browser, where you can navigate, browse, and select your REX file. The best way to do this is as follows:
1. Click on the Reason Factory Sound Bank icon in the REX File Browser.
2. Double-click on the Dr Rex Drum Loops folder to display its contents.
3. You can browse through this entire folder, which contains subfolders with loops of various styles. For the sake of simplicity and time, select the file Acs01_StrghtAhead_130.rx2, located in the root Dr Rex Drum Loops folder.
4. Click OK, and the loop is loaded into Nurse Rex.
Now that you have loaded a REX file, play the associated Kong pad to hear the loop play back. By default, the REX file plays back in its entirety without stopping until it reaches the end of the file. This is known as Loop Trig mode, which is one of the four available hit types for Nurse Rex (see Figure 5.18).
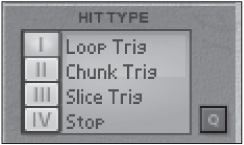
© Propellerhead Software AB.
Loop Trig mode is governed by a pair of start and end points in the Waveform display. You can alter the range of these points by clicking or dragging up or down in the display or simply clicking and dragging the start and end points to the left or right on the ruler along the Waveform display. For example, you could set the start point to 3 and the end point to 3, which would cause Nurse Rex to simply play the third slice of the REX file when triggered.
Chunk Trig mode is a hit type that makes it possible to assign individual slices of a loaded REX file to multiple Kong pads. This is a really great feature because you can use a single drum module to feed several Kong pads at one time, which saves CPU and memory resources. Here’s how to do it:
1. Select Chunk Trig as the hit type on pad 1.
2. Click the Quick Edit mode or Q button under the Drum Assignments section.
3. Set pad 2 to drum 1 by clicking on the 1. Then set its hit type to Chunk Trig.
4. Set pad 3 to drum 1 by clicking on the 1. Then set its hit type to Chunk Trig.
5. Set pad 4 to drum 1 by clicking on the 1. Then set its hit type to Chunk Trig.
After you’ve made your edits, your Kong setup with Nurse Rex should look like Figure 5.19. Play the pads now, and each pad will play a specific chunk of the REX file. At this point, you can set the size of the chunks by clicking and dragging between them to the left or right and come up with some wild combinations.

© Propellerhead Software AB.
Slice Trig mode is made to assign a single slice or multiple slices of a REX file to a single Kong pad. Select pad 1, select Slice Trig as the hit type, and then play the pad. You should now hear only a single slice playback, which is the first slice by default. If you want to select a different slice, you must deselect the first slice by clicking on the Trig parameter to deactivate it (see Figure 5.20).

© Propellerhead Software AB.
At this point, you can select another slice by clicking on it with your mouse and then selecting the Trig parameter to set it as the slice that the Kong pad will trigger (see Figure 5.21).

© Propellerhead Software AB.
In addition to triggering a single slice, you can also choose multiple slices. Select the Trig parameter, and the Kong pad will alternate between each of the slices (see Figure 5.22). Here’s how to do it using pad 1:
1. Hold down Ctrl (Windows) or Command (Mac) key and use your mouse to select multiple slices.
2. Select the Trig parameter.
3. Play the Kong pad. Nurse Rex alternates between the various slices (see Figure 5.22).
© Propellerhead Software AB.
Stop mode enables you to abruptly stop a REX file while playing back in either Loop Trig or Chunk Trig mode. If you want to do this, just assign one of the other available Kong pads to drum 1 and set its hit type to Stop. Now play the REX file with the first Kong pad and use the other assigned pad to stop it.
The Waveform Display Parameters
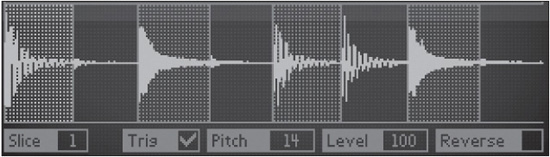
The Nurse Rex Waveform display offers a variety of parameters that can be assigned to each slice of a loaded REX file (see Figure 5.23):
© Propellerhead Software AB.
![]() Slice: This enables you to select any slice of a REX file by clicking and dragging up or down.
Slice: This enables you to select any slice of a REX file by clicking and dragging up or down.
![]() Trig: This is used to assign a slice to be triggered when the Slice Trig hit type is selected.
Trig: This is used to assign a slice to be triggered when the Slice Trig hit type is selected.
![]() Pitch: This alters the pitch of a single REX slice.
Pitch: This alters the pitch of a single REX slice.
![]() Level: This alters the amplitude of a single REX slice.
Level: This alters the amplitude of a single REX slice.
![]() Reverse: This assigns a reverse playback effect to a single REX slice.
Reverse: This assigns a reverse playback effect to a single REX slice.
The Panel Parameters
Nurse Rex offers a wide assortment of real-time parameters to twist up and turn your REX file around, which can produce some very eclectic and creative results (see Figure 5.24). Note that these parameters are global, meaning they affect the entire REX file.

© Propellerhead Software AB.
![]() Envelope Type: This toggles between Gate mode, which is set by the Decay parameters, and ADSR (Attack/Decay/Sustain/Release) mode.
Envelope Type: This toggles between Gate mode, which is set by the Decay parameters, and ADSR (Attack/Decay/Sustain/Release) mode.
![]() Attack: This is used to set the attack when ADSR mode is selected. The attack sensitivity can be modulated by using the included Velocity parameter.
Attack: This is used to set the attack when ADSR mode is selected. The attack sensitivity can be modulated by using the included Velocity parameter.
![]() Decay: This is used to set the decay when the ADSR mode is selected. The decay sensitivity can be modulated by using the included Velocity parameter or the Mod parameter, which is linked to the modulation wheel.
Decay: This is used to set the decay when the ADSR mode is selected. The decay sensitivity can be modulated by using the included Velocity parameter or the Mod parameter, which is linked to the modulation wheel.
![]() Sustain: This is used to set the sustain when the ADSR mode is selected.
Sustain: This is used to set the sustain when the ADSR mode is selected.
![]() Release: This is used to set the release when the ADSR mode is selected. The release sensitivity can be modulated by using the included Velocity parameter or the Mod parameter, which is linked to the modulation wheel.
Release: This is used to set the release when the ADSR mode is selected. The release sensitivity can be modulated by using the included Velocity parameter or the Mod parameter, which is linked to the modulation wheel.
![]() Pitch: This is used to alter the pitch of the REX file and can be modulated by using the included Velocity parameter.
Pitch: This is used to alter the pitch of the REX file and can be modulated by using the included Velocity parameter.
![]() Level: This is used to alter the level of the REX file and can be modulated by using the included Velocity parameter.
Level: This is used to alter the level of the REX file and can be modulated by using the included Velocity parameter.
TIP: You can assign each Kong pad to a different hit type when you’re using Nurse Rex. For example, pad 1 can be set to a Loop Trig hit type, while pads 2 and 3 can be set to Slice Trig, and finally pad 4 can be set as a Stop. Don’t be afraid to jump in and try different combinations of hit types with Nurse Rex. You may find just what your music needs to give it that creative edge you’ve been looking for.
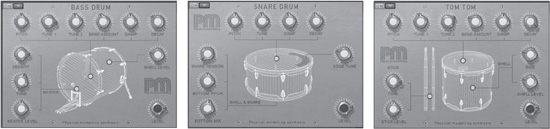
Physical Bass, Snare, and Tom Tom Modules
The physical Bass, Snare, and Tom Tom modules are drum sounds based on the principles of physical modeling, which is a form of sound synthesis that mathematically emulates the inner workings of an instrument. In the case of these drum modules, physical modeling is used to emulate the characteristics of the acoustic kick, snare, and tom tom drums (see Figure 5.25). Before you begin this section, select pad 1 and then change the drum module to either the Bass, Snare, or Tom Tom module.
© Propellerhead Software AB.
Several parameters are shared between these modules, which you’ll explore throughout the next couple of sections. For example, there is a Level parameter on each of the drum modules, and it performs the same task on each: adjusting the level of the audio signal sent from the module to the FX section, which you’ll read about later in this chapter.
The Drum Head and Shell Parameters
Each of the drum modules shares similar parameters, such as the drum head and shell parameters, which affect the overall tone characteristics of the drums. These parameters include the following:
![]() Pitch: This knob sets the pitch for all the drum modules.
Pitch: This knob sets the pitch for all the drum modules.
![]() Tune 1 and Tune 2: Available on the Bass and Tom Tom modules, these knobs alter the harmonics of the drum, which is similar to adjusting the screws on the sides of an acoustic drum.
Tune 1 and Tune 2: Available on the Bass and Tom Tom modules, these knobs alter the harmonics of the drum, which is similar to adjusting the screws on the sides of an acoustic drum.
![]() Tune: Available on the Snare module, this knob adjusts the tension of the snare head.
Tune: Available on the Snare module, this knob adjusts the tension of the snare head.
![]() Bend: Available on the Bass and Tom Tom modules, this knob creates the natural pitch bend of an acoustic drum when struck hard.
Bend: Available on the Bass and Tom Tom modules, this knob creates the natural pitch bend of an acoustic drum when struck hard.
![]() Damp: This knob sets the damping for all the drum modules.
Damp: This knob sets the damping for all the drum modules.
![]() Decay: This knob sets the decay for all the drum modules.
Decay: This knob sets the decay for all the drum modules.
![]() Shell Level: Available on the Bass and Tom Tom modules, this knob enables you to introduce the sound of the shell into the mix.
Shell Level: Available on the Bass and Tom Tom modules, this knob enables you to introduce the sound of the shell into the mix.
![]() Shell Size: Available on the Tom Tom module, this parameter adjusts the length of the shell. Think of it like those drum kits you’ve seen with very long, deep toms.
Shell Size: Available on the Tom Tom module, this parameter adjusts the length of the shell. Think of it like those drum kits you’ve seen with very long, deep toms.
![]() Edge Tune: Available on the Snare module, this parameter sets the tuning of the head. Note that this works only when hit type 4 is selected.
Edge Tune: Available on the Snare module, this parameter sets the tuning of the head. Note that this works only when hit type 4 is selected.
![]() Snare Tension: Available on the Snare module, this parameter adjusts the tension of the snare, which is located on the bottom of an actual snare drum.
Snare Tension: Available on the Snare module, this parameter adjusts the tension of the snare, which is located on the bottom of an actual snare drum.
![]() Bottom Pitch: Available on the Snare module, this parameter adjusts the bottom head of the snare drum.
Bottom Pitch: Available on the Snare module, this parameter adjusts the bottom head of the snare drum.
![]() Bottom Mix: Available on the Snare module, this parameter adjusts the amount of the bottom head you’ll hear in the mix.
Bottom Mix: Available on the Snare module, this parameter adjusts the amount of the bottom head you’ll hear in the mix.
The Beater and Stick Parameters
The Beater and Stick Parameters are used to emulate the beater sound of the kick drum and the stick sound of the snare and toms. These parameters have a very pronounced effect, and there are several variations.
![]() Density: Available on the Bass module, this parameter adjusts the “make” of the beater. For example, a rubber beater produces a much different sound than a traditional fabric-style beater.
Density: Available on the Bass module, this parameter adjusts the “make” of the beater. For example, a rubber beater produces a much different sound than a traditional fabric-style beater.
![]() Tone: Available on the Bass and Tom Tom modules, this knob adjusts the tone.
Tone: Available on the Bass and Tom Tom modules, this knob adjusts the tone.
![]() Beater Level: Available on the Bass module, this knob adjusts the level of the beater hit in the mix.
Beater Level: Available on the Bass module, this knob adjusts the level of the beater hit in the mix.
![]() Stick Level: Available on the Snare and Tom Tom modules, this knob adjusts the level of the stick hit in the mix.
Stick Level: Available on the Snare and Tom Tom modules, this knob adjusts the level of the stick hit in the mix.
The Synth Bass, Snare, Tom Tom, and Hi-Hat
The synth Bass, Snare, Tom Tom, and Hi-Hat modules are the complete opposite of their physical counterparts (see Figure 5.26). These modules are used to emulate the electronic characteristics of the analog drums of the 1980s, such as the Roland TR-808 and Simmons electronic drum kits.

© Propellerhead Software AB.
Drum Parameters
As with the physical modules, the synth drum modules share many common parameters, such as the Level parameter. Let’s explore them further:
![]() Pitch: This parameter adjusts the pitch of the drum.
Pitch: This parameter adjusts the pitch of the drum.
![]() Tone: Available on the Bass module, this parameter adjusts the tone of the drum.
Tone: Available on the Bass module, this parameter adjusts the tone of the drum.
![]() Attack: Available on the Bass module, this parameter adjusts the attack of the kick sound.
Attack: Available on the Bass module, this parameter adjusts the attack of the kick sound.
![]() Decay: This parameter adjusts the decay time of all the drum modules. In addition, the parameter also offsets the Noise Decay setting on the Bass, Snare, and Tom Tom modules, as well as the Harmonic Decay setting on the Snare module.
Decay: This parameter adjusts the decay time of all the drum modules. In addition, the parameter also offsets the Noise Decay setting on the Bass, Snare, and Tom Tom modules, as well as the Harmonic Decay setting on the Snare module.
![]() Harmonic Balance: Available on the Snare module, this parameter adjusts the mix between the base tone and the harmonic tone.
Harmonic Balance: Available on the Snare module, this parameter adjusts the mix between the base tone and the harmonic tone.
![]() Harmonic Frequency: Available on the Snare module, this parameter adjusts the harmonic frequency.
Harmonic Frequency: Available on the Snare module, this parameter adjusts the harmonic frequency.
![]() Harmonic Decay: Available on the Snare module, this parameter adjusts the decay of the harmonic tone.
Harmonic Decay: Available on the Snare module, this parameter adjusts the decay of the harmonic tone.
![]() Click Frequency: Available on the Bass module, this parameter adjusts the click frequency.
Click Frequency: Available on the Bass module, this parameter adjusts the click frequency.
![]() Click Resonance: Available on the Bass module, this parameter adjusts the resonance of the click sound.
Click Resonance: Available on the Bass module, this parameter adjusts the resonance of the click sound.
![]() Click Level: Available on the Bass module, this parameter adjusts the click volume.
Click Level: Available on the Bass module, this parameter adjusts the click volume.
![]() Bend Amount: Available on the Bass and Tom Tom modules, this parameter sets the amount of pitch bend by assigning an upper pitch.
Bend Amount: Available on the Bass and Tom Tom modules, this parameter sets the amount of pitch bend by assigning an upper pitch.
![]() Bend Time: Available on the Bass and Tom Tom modules, this parameter adjusts the time it takes from the pitch set by the Bend Amount setting to reach the original pitch.
Bend Time: Available on the Bass and Tom Tom modules, this parameter adjusts the time it takes from the pitch set by the Bend Amount setting to reach the original pitch.
![]() Noise Tone: Available on the Snare and Tom Tom modules, this parameter sets the tone of the noise element in the sound.
Noise Tone: Available on the Snare and Tom Tom modules, this parameter sets the tone of the noise element in the sound.
![]() Noise Decay: Available on the Snare and Tom Tom modules, this parameter sets the decay of the noise element in the sound.
Noise Decay: Available on the Snare and Tom Tom modules, this parameter sets the decay of the noise element in the sound.
![]() Noise Mix: Available on the Snare and Tom Tom modules, this parameter sets the level of the noise element in the sound.
Noise Mix: Available on the Snare and Tom Tom modules, this parameter sets the level of the noise element in the sound.
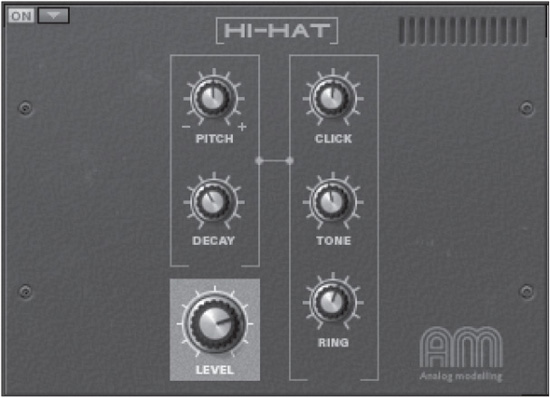
The Synth Hi-Hat
The final drum module discussed here is the synth Hi-Hat module (see Figure 5.27). This module emulates the classic sounds and textures of the 808 and 909 hi-hats.
![]() Pitch: This knob sets the pitch of the hat sound.
Pitch: This knob sets the pitch of the hat sound.
![]() Decay: This knob sets the decay of the hat.
Decay: This knob sets the decay of the hat.
![]() Level: This knob adjusts the level of the hat.
Level: This knob adjusts the level of the hat.
![]() Click: This knob adjusts the level of the click in the hat sound.
Click: This knob adjusts the level of the click in the hat sound.
![]() Tone: This knob adjusts the overall tone of the hat.
Tone: This knob adjusts the overall tone of the hat.
![]() Ring: This knob is used to introduce a resonance into the hat sound to create a metallic ring tone.
Ring: This knob is used to introduce a resonance into the hat sound to create a metallic ring tone.
© Propellerhead Software AB.
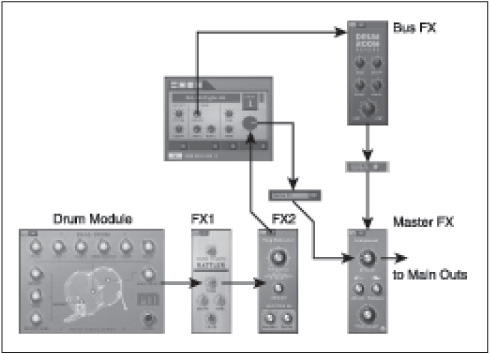
Kong Routing and FX
In addition to all the groovy sounds and editing parameters, Kong also sports a complex yet versatile array of routing parameters to help make your drums sound their best. From here, you can specify how to route your drum module through the insert effects, bus effects, and master effects.
In Figure 5.28, you can see that, by default, the Kong drum modules are routed to two separate insert effects. Just as a reminder, an insert effect processes the entire dry signal that’s fed to it. That processed signal is fed to the Master FX/Output. Additionally, Kong supports a single Bus FX slot that is fed a dry signal by using the Bus FX knob on the Drum Control panel. This gives you a very solid mix of drums and effects.
© Propellerhead Software AB.
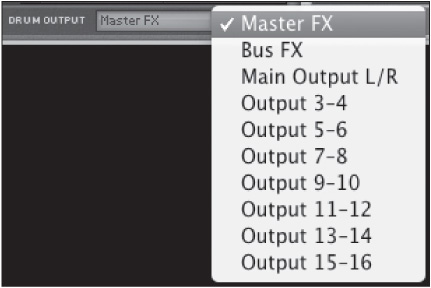
Kong also offers bonus routing possibilities by making use of the Drum Output menu at the bottom of the FX1/2 Slots (see Figure 5.29).
The last point of interest here is that you can specify how much processed signal is sent from the Bus FX slot to the Master FX slot by using the Bus FX To Master FX knob at the bottom right of the Kong interface.
© Propellerhead Software AB.
Kong Effects
Now that you have a better understanding of the routing potential of Kong, let’s look at the real-time effects that come with it. As stated, there are two insert slots and a bus slot. Additionally, there’s a master effect slot, which is used as an insert to process the entire signal when routed to the master outputs.
The effects I want to discuss here are the generator effects, which include the Noise effect and the Tone effect. These effects enable you to enhance the Kong pads by introducing additional tones and textures to the samples and synth percussion sounds generated by Kong. They can be used as insert effects on both insert slots.
Noise Effect
Using the Noise effect, you can introduce a digital noise tone into your Kong pads (see Figure 5.30). This is a fantastic effect for adding more crispness to your hi-hat or snare sounds.

© Propellerhead Software AB.
The Noise effect has the following parameters:
![]() Hit Type: The Noise effect can be assigned to any or all hit types on a Kong pad. For example, if you were to load up a physical Snare module, you could use this parameter to assign a noise to any of the four hit types associated with that module.
Hit Type: The Noise effect can be assigned to any or all hit types on a Kong pad. For example, if you were to load up a physical Snare module, you could use this parameter to assign a noise to any of the four hit types associated with that module.
![]() Pitch: This sets the pitch of the noise.
Pitch: This sets the pitch of the noise.
![]() Attack: This alters the attack time of the noise.
Attack: This alters the attack time of the noise.
![]() Decay: This alters the decay of the noise.
Decay: This alters the decay of the noise.
![]() Reso: This assigns the resonance to the noise.
Reso: This assigns the resonance to the noise.
![]() Sweep: This assigns the start pitch of the noise sweep.
Sweep: This assigns the start pitch of the noise sweep.
![]() Click: This sets the noise’s click level.
Click: This sets the noise’s click level.
![]() Level: This sets the level of the generator.
Level: This sets the level of the generator.
Tone Effect
The Tone effect generates a synth tone via an oscillator, which is then mixed with the sound generated by a Kong pad (see Figure 5.31).

© Propellerhead Software AB.
The Tone effect has the following parameters:
![]() Hit Type: The Tone effect can be assigned to any or all hit types on a Kong pad.
Hit Type: The Tone effect can be assigned to any or all hit types on a Kong pad.
![]() Pitch: This sets the pitch of the tone.
Pitch: This sets the pitch of the tone.
![]() Attack: This alters the attack of the tone.
Attack: This alters the attack of the tone.
![]() Decay: This alters the decay of the tone.
Decay: This alters the decay of the tone.
![]() Bend Decay: This alters the decay of the pitch bend effect.
Bend Decay: This alters the decay of the pitch bend effect.
![]() Bend: This parameter assigns the pitch of the generated tone.
Bend: This parameter assigns the pitch of the generated tone.
![]() Shape: This parameter alters the shape or tone of the generator.
Shape: This parameter alters the shape or tone of the generator.
![]() Level: This parameter sets the level of the generator.
Level: This parameter sets the level of the generator.
The next effects covered are the FX modules, which are similar to the standard real-time themed effects you’ll find all over the Reason interface.
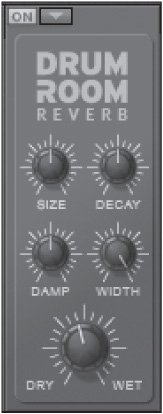
Drum Room Reverb Effect
The Drum Room Reverb effect creates a reverberation, or echo, to any audio that’s fed through it (see Figure 5.32). Think of it as the ambience effect that works great with just about any drum sound, especially snares and tom toms.
The Drum Room Reverb effect includes the following parameters:
![]() Size: This adjusts the size of the room.
Size: This adjusts the size of the room.
![]() Decay: This adjusts the decay of the reverb effect, which is also known as the tail.
Decay: This adjusts the decay of the reverb effect, which is also known as the tail.
![]() Damp: This adjusts the dampening of the high frequencies in the reverb.
Damp: This adjusts the dampening of the high frequencies in the reverb.
![]() Width: This adjusts the width of the reverb’s stereo field.
Width: This adjusts the width of the reverb’s stereo field.
![]() Dry/Wet: This adjusts the ratio between the dry unprocessed sound and wet processed sound.
Dry/Wet: This adjusts the ratio between the dry unprocessed sound and wet processed sound.
© Propellerhead Software AB.
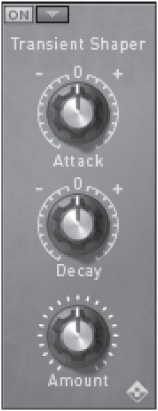
Transient Shaper Effect
The Transient Shaper effect bears a lot of similarities to a compressor effect (see Figure 5.33). However, unlike a traditional compressor, this effect just alters the loudness of the beginning section of the audio that it’s processing, which is called the transient.
© Propellerhead Software AB.
The Transient Shaper effect includes the following parameters:
![]() Attack: This parameter alters the amplitude of the attack on the transient.
Attack: This parameter alters the amplitude of the attack on the transient.
![]() Decay: This parameter alters the decay time of the effect.
Decay: This parameter alters the decay time of the effect.
![]() Amount: This parameter determines the level of the effect.
Amount: This parameter determines the level of the effect.
Compressor Effect
The Compressor effect is typically used to level out audio signals that are too loud in the mix and are in danger of digitally clipping (see Figure 5.34). You also can use this effect to make your drum sounds stand out in the mix by increasing the perceived loudness without actually increasing the amplitude of the sound.

© Propellerhead Software AB.
The Compressor effect has the following parameters:
![]() Amount: This sets the sensitivity of the compressor.
Amount: This sets the sensitivity of the compressor.
![]() Attack: This is used to alter the attack of the compression effect.
Attack: This is used to alter the attack of the compression effect.
![]() Release: This sets the release of the compression effect.
Release: This sets the release of the compression effect.
![]() Make Up Gain: This compensates for any volume lost by the compression effect.
Make Up Gain: This compensates for any volume lost by the compression effect.
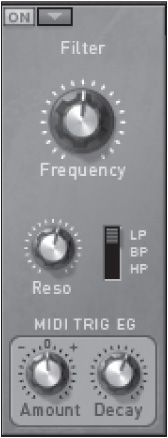
Filter Effect
The Filter effect enables you to create a tonal sweeping effect on your Kong pads (see Figure 5.35). It’s a commonly heard yet effective sound in electronic music.
© Propellerhead Software AB.
The Filter effect has the following parameters:
![]() Frequency: This assigns the cutoff frequency.
Frequency: This assigns the cutoff frequency.
![]() Resonance: This assigns the volume applied to the frequencies around the cutoff.
Resonance: This assigns the volume applied to the frequencies around the cutoff.
![]() Filter Type: This changes the filter type. You can choose between Low Pass (low frequencies pass through the filter), Band Pass (mid frequencies pass through the filter), or High Pass (high frequencies pass through the filter).
Filter Type: This changes the filter type. You can choose between Low Pass (low frequencies pass through the filter), Band Pass (mid frequencies pass through the filter), or High Pass (high frequencies pass through the filter).
![]() MIDI Trig Amount: This determines the amount that a MIDI note will trigger the filter effect.
MIDI Trig Amount: This determines the amount that a MIDI note will trigger the filter effect.
![]() MIDI Trig Decay: This sets the decay time of the MIDI controlled envelope.
MIDI Trig Decay: This sets the decay time of the MIDI controlled envelope.
Parametric EQ Effect
The Parametric EQ effect is used to alter the equalization, or tonal qualities, of the signal fed through it (see Figure 5.36).

© Propellerhead Software AB.
The Parametric EQ effect has the following parameters:
![]() Frequency: This assigns the center frequency to alter.
Frequency: This assigns the center frequency to alter.
![]() Gain: This determines the gain of the center frequency.
Gain: This determines the gain of the center frequency.
![]() Q: This sets the bandwidth around the frequency. From here, you can create a nice, round EQ curve, or a curve for surgical boosting or cutting of frequencies.
Q: This sets the bandwidth around the frequency. From here, you can create a nice, round EQ curve, or a curve for surgical boosting or cutting of frequencies.
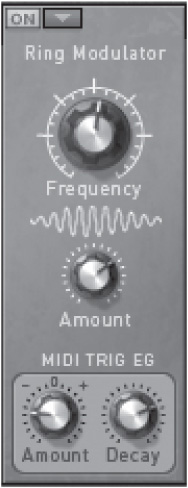
Ring Modulator Effect
The Ring Modulator is a unique effect. It produces a pronounced and distinctive sound that makes the hairs on the back of your neck stand up. Basically, the Ring Modulator effect (see Figure 5.37) takes the input of your audio and multiplies it with another signal called a sine wave. This produces a very metallic tone that’s perfect for special percussion effects.
The Ring Modulator effect has the following parameters:
![]() Frequency: This assigns the frequency of the sine wave.
Frequency: This assigns the frequency of the sine wave.
![]() Amount: This assigns the amount of sine wave applied to the original signal.
Amount: This assigns the amount of sine wave applied to the original signal.
![]() MIDI Trig Amount: This determines the amount that a MIDI note will trigger the Ring Modulator effect.
MIDI Trig Amount: This determines the amount that a MIDI note will trigger the Ring Modulator effect.
![]() MIDI Trig Decay: This sets the decay time of the MIDI-controlled envelope.
MIDI Trig Decay: This sets the decay time of the MIDI-controlled envelope.
Rattler Effect
The Rattler effect (see Figure 5.38) is another unique effect in that it emulates the character of the snare strand assembly and applies it to other drum sounds. Imagine having a snare on your tom toms or kick drum. The Rattler effect will get the job done.
The Rattler effect includes the following parameters:
![]() Snare Tension: This assigns the tension of the snare.
Snare Tension: This assigns the tension of the snare.
![]() Tone: This alters the tone of the snare effect.
Tone: This alters the tone of the snare effect.
![]() Decay: This is used to set the decay of the ring of the snare.
Decay: This is used to set the decay of the ring of the snare.
© Propellerhead Software AB.

© Propellerhead Software AB.
![]() Tune: This tunes the snare.
Tune: This tunes the snare.
![]() Level: This assigns the volume of the overall effect.
Level: This assigns the volume of the overall effect.
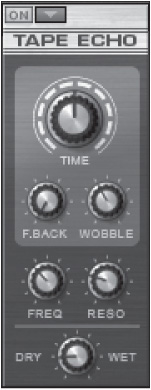
Tape Echo Effect
The Tape Echo effect emulates the characteristics of a classic type of delay that was generated via infinite loops of tape (see Figure 5.39). This created a very distinct sound, and that sound is now a part of Kong.
The Tape Echo effect includes the following parameters:
![]() Time: This sets the amount of time between echoes.
Time: This sets the amount of time between echoes.
![]() Feedback: This assigns the number of echoes.
Feedback: This assigns the number of echoes.
![]() Wobble: This emulates the wobbling of the tape speed. That means the frequency of each echo will be tonally unique.
Wobble: This emulates the wobbling of the tape speed. That means the frequency of each echo will be tonally unique.
© Propellerhead Software AB.
![]() Frequency/Resonance: These set the cutoff frequency and resonance of the tape echoes. Think of these knobs as a filter for the delay.
Frequency/Resonance: These set the cutoff frequency and resonance of the tape echoes. Think of these knobs as a filter for the delay.
![]() Dry/Wet: This adjusts the ratio between the dry unprocessed sound and wet processed sound.
Dry/Wet: This adjusts the ratio between the dry unprocessed sound and wet processed sound.
Overdrive/Resonator Effect
The Overdrive/Resonator effect is a dual effect of sorts (see Figure 5.40) because it includes an overdrive/digital distortion effect and a resonator. Put these effects together, and you’ve got a mean, growling snare or kick.

© Propellerhead Software AB.
The Overdrive/Resonator effect includes the following parameters:
![]() Drive: This assigns the amount of distortion.
Drive: This assigns the amount of distortion.
![]() Resonance: This assigns the amount of resonance.
Resonance: This assigns the amount of resonance.
![]() Size: This determines the size of the resonance chamber.
Size: This determines the size of the resonance chamber.
![]() Model: This toggles between the different resonance bodies.
Model: This toggles between the different resonance bodies.
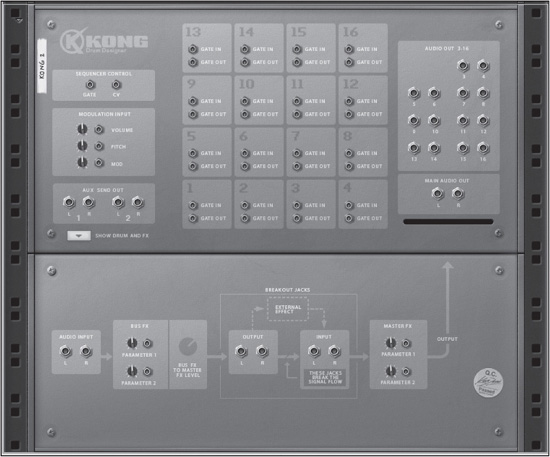
Kong Connections
Press the Tab key to swing the Rack screen around and you’ll see all the Kong control voltage (CV) and audio connections available (see Figure 5.41).
© Propellerhead Software AB.
Audio Outputs
Kong includes three different kinds of audio outputs:
![]() Main outputs: Located to the far right of the interface are the main outputs. Kong supplies a pair of master outputs as well as an individual output for every Kong pad. That means you have a virtually endless supply of routing possibilities.
Main outputs: Located to the far right of the interface are the main outputs. Kong supplies a pair of master outputs as well as an individual output for every Kong pad. That means you have a virtually endless supply of routing possibilities.
![]() Aux outputs: Located to the far left of the interface are a pair of stereo aux outputs. These are used to send the signal of any or all of Kong’s pads to an external audio effect device. For example, you could route the snare pad of a Kong kit to an instance of the RV7000 by making use of the first or second pair of aux outputs. Once this is done, simply use the Aux 1 or Aux 2 knob in the Drum Control panel of any selected Kong pad.
Aux outputs: Located to the far left of the interface are a pair of stereo aux outputs. These are used to send the signal of any or all of Kong’s pads to an external audio effect device. For example, you could route the snare pad of a Kong kit to an instance of the RV7000 by making use of the first or second pair of aux outputs. Once this is done, simply use the Aux 1 or Aux 2 knob in the Drum Control panel of any selected Kong pad.
![]() External outputs: This pair of outputs is used to send audio from Kong (including audio that’s routed into Kong to an external
External outputs: This pair of outputs is used to send audio from Kong (including audio that’s routed into Kong to an external
Reason device) to an external effect. These outputs are used in combination with the external inputs to create an insert effect loop with other Creative or Studio effect devices.
Audio Inputs
In addition to a variety of audio outputs, Kong also supplies a couple pairs of audio inputs. Both pairs are located at the bottom left and center on the rear panel of the Kong interface:
![]() Audio inputs: These are the standard audio inputs for Kong. From here, you can route the outputs of other Reason devices and send them through the Bus FX and Master FX.
Audio inputs: These are the standard audio inputs for Kong. From here, you can route the outputs of other Reason devices and send them through the Bus FX and Master FX.
![]() External inputs: These inputs are used in combination with the external outputs to insert an external effects device into the Kong audio signal chain.
External inputs: These inputs are used in combination with the external outputs to insert an external effects device into the Kong audio signal chain.
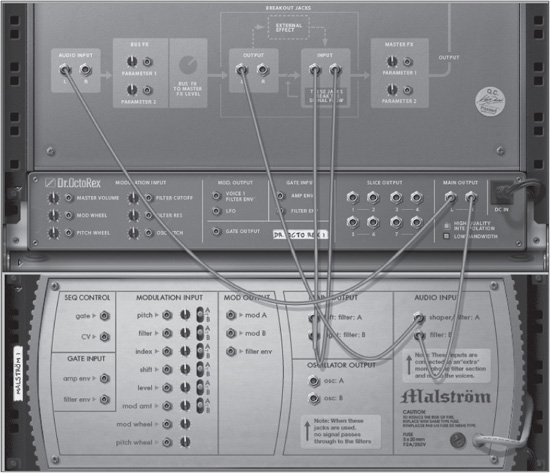
Here’s a quick example showing how to use Kong’s inputs and outputs. Looking at Figure 5.42), you can see that there is an instance of Kong, Dr. Octo Rex, and the Malström. You can also see the following connections:
![]() The left output of Dr. Octo Rex is connected to the left audio input of Kong, which routes to Kong’s Bus FX and Master FX.
The left output of Dr. Octo Rex is connected to the left audio input of Kong, which routes to Kong’s Bus FX and Master FX.
![]() The left external output of Kong is routed to the Shaper/Filter A input of the Malström. Activate these sections on the Malström interface, and you can achieve some sonically wild results.
The left external output of Kong is routed to the Shaper/Filter A input of the Malström. Activate these sections on the Malström interface, and you can achieve some sonically wild results.
![]() The right output of Dr. Octo Rex is routed to the Filter B input of Malström.
The right output of Dr. Octo Rex is routed to the Filter B input of Malström.
![]() The main outputs of Malström are routed to the external inputs on Kong, which routes to Kong’s Master FX.
The main outputs of Malström are routed to the external inputs on Kong, which routes to Kong’s Master FX.
© Propellerhead Software AB.
CV Inputs/Outputs
Kong sports a wide variety of CV inputs and outputs, which are used to route control voltage information to and from Kong to any other Reason device. Let’s begin with the gate inputs and outputs.
Gate Inputs/Outputs
The gate inputs and outputs are found on every Kong pad and are used to trigger other Reason devices with the outputs and/or have other Reason devices trigger the individual pads. Try this quick exercise to see how they work:
1. Create an instance of Redrum.
2. Write in a quick bass drum sequence.
3. Press the Tab key to view the back of the Reason Rack screen.
4. Connect the Gate Out of Redrum’s channel 1 and route it to the Gate In on any Kong pad.
5. Play the Redrum sequencer, and you should now hear both Redrum and Kong play the same sequence.
Modulation Inputs
Kong includes a number of CV inputs that are used to modulate its various parameters by routing the modulation output of any Reason device to it. For example, you could route from the modulator outputs of Malström to Kong’s Volume modulation input.
Here are the available Kong modulation inputs:
![]() Volume: Routing a CV connection to this input modulates Kong’s volume.
Volume: Routing a CV connection to this input modulates Kong’s volume.
![]() Pitch: Routing a CV connection to this input modulates Kong’s pitch wheel.
Pitch: Routing a CV connection to this input modulates Kong’s pitch wheel.
![]() Mod Wheel: Routing a CV connection to this input modulates the modulation wheel.
Mod Wheel: Routing a CV connection to this input modulates the modulation wheel.
![]() Bus Effects: These CV inputs are used to modulate two specific parameters of loaded effects in Kong’s Bus FX slot, called Parameter 1 and Parameter 2. For example, if you have a Compressor effect loaded into the Bus FX slot, the Parameter 1 input is used to control the Attack parameter of the Compressor effect and Parameter 2 input is used to control the Release parameter.
Bus Effects: These CV inputs are used to modulate two specific parameters of loaded effects in Kong’s Bus FX slot, called Parameter 1 and Parameter 2. For example, if you have a Compressor effect loaded into the Bus FX slot, the Parameter 1 input is used to control the Attack parameter of the Compressor effect and Parameter 2 input is used to control the Release parameter.
![]() Master Effects: These effects operate just like the bus effects, except they are routed to the Master FX slot on the Kong interface.
Master Effects: These effects operate just like the bus effects, except they are routed to the Master FX slot on the Kong interface.
Sequencer Control
The final set of CV inputs is the sequencer control inputs. These inputs are used to route sequencer information from another Reason device with a sequencer, such as Matrix and Thor, to Kong. That way, you can run both devices together with the same rhythm. Just remember that the CV input of the sequencer control is used to dictate which Kong pad will be triggered (which note), whereas the gate input of the sequencer control is used to trigger the note on/off and velocity of Kong.
Moving On
As you have seen throughout this chapter, Kong is an amazing drum machine capable of much sonic goodness, yet with an incredibly easy-to-understand interface. Be sure to really dig into this Reason device and create your own Kong kits.