
6 Dr. Octo Rex: Close-Up
ONE OF THE MORE UNUSUAL DEVICES IN THE REASON RACK SCREEN IS THE DR. OCTO REX LOOP PLAYER (see Figure 6.1). Dr. Octo Rex is a RAM-based sample playback device based on the ReCycle! technology created by Propellerhead Software. Dr. Octo Rex can import specially prepared digital audio loops, called REX files, and play them back at just about any tempo.

© Propellerhead Software AB.
Dr. Octo Rex can import the following file formats:
![]() REX. A mono file format supported by the Mac platform
REX. A mono file format supported by the Mac platform
![]() RCY. A mono file format supported by the PC platform
RCY. A mono file format supported by the PC platform
![]() RX2. A stereo file format supported by both Mac and PC platforms
RX2. A stereo file format supported by both Mac and PC platforms
![]() DREX. A patch format that stores Dr. Octo Rex settings, including references to ReCycle! loops
DREX. A patch format that stores Dr. Octo Rex settings, including references to ReCycle! loops
TIP: If you’re a long-time Reason user, you might have noticed that Dr:rex is no longer listed as one of the Reason devices. That’s because Dr. Octo Rex has replaced Dr:rex. Thankfully, you’ll find throughout this chapter that all the Dr:rex features are found in Dr. Octo Rex. I’m sure that Dr:rex had a nice retirement party, though. And don’t worry: If you have any songs created with previous versions of Reason that contain Dr:rex, they will open just fine in Reason 7, with Dr. Octo Rex substituted for Dr:rex.
A New Reason to ReCycle!
Propellerhead Software began to make its mark in the audio industry in 1994 by releasing a sample-editing software product called ReCycle! (see Figure 6.2). This program enabled musicians to edit digital audio loops on their computers and export them to hardware samplers in a format that would allow the tempo to be varied while not affecting the pitch. It was a real breakthrough because musicians could now use the same loops in different songs and styles and keep everything in the original pitch and matching tempo.

© Propellerhead Software AB.
The ReCycle! file export format is the REX file (short for ReCycle! Export). A REX file is a single audio file that contains a number of smaller separate audio files, or slices. The audio file is automatically sliced on the transients, or attacks, of the waveform. The REX file can then be imported into a digital audio/MIDI sequencing program, and the audio loop will instantly work at any tempo. Not only that, but if you were to change the tempo of your song, the REX files would instantly speed up or slow down to match that new tempo.
REX files became an adopted format for many digital audio programs, such as Cubase and Logic. Since the introduction of the REX format, many companies have begun releasing new REX format titles and also reissuing older audio loop titles. At the time of this writing, there are literally thousands of audio loops available in the REX format.
NOTE: Yep, in this chapter, we’ll also be covering how to create your own loop files...in Reason. ReCycle! is now a part of Reason, and that means lots of loop making for us all.
In 2000, when the release of Reason 1.0 was announced, it seemed only right that Propellerhead would incorporate its REX technology into this program because it’s all about remixing and loops. With that, I give you the subject of this chapter, Dr. Octo Rex!
A Guided Tour of Dr. Octo Rex
Now that you have a basic idea of what Dr. Octo Rex is and the technology behind it, you can begin your tour of the Dr. Octo Rex interface. Create an instance of it and then expand the Programmer so you can view the entire interface.
Getting Sound into Dr. Octo Rex
By default, Dr. Octo Rex automatically loads eight loops into its interface across eight different triggers, or “slots,” which are incredibly useful when you are trying to get to know this fantastic loop machine. If you’d like to hear the preloaded loop, click the Run button. Dr. Octo Rex will play and repeat the loop until you either click the Run button again or click the Stop button in the Transport panel. Additionally, you can preview any of the loaded loops by clicking on their corresponding slot numbers (1 through 8). However, you’ll soon want to start trying new sounds and textures, so let’s discuss how to load sounds into Dr. Octo Rex by loading a DREX patch file.
© Propellerhead Software AB.
In the middle of the Dr. Octo Rex interface is its file browser (see Figure 6.3). Start by clicking on the folder icon. This brings up the Patch Browser so you can begin to audition and load sounds (see Figure 6.4).
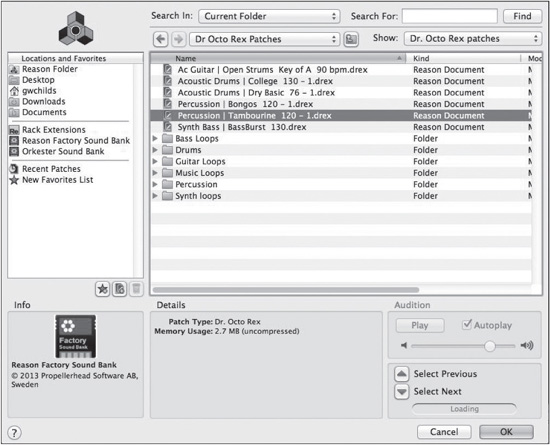
© Propellerhead Software AB.
When the Patch Browser opens, you might not see any sound files to audition. If this is the case, click on the Reason Factory Sound Bank (on the left, under Locations). Now you’ll see four different folders:
![]() Dr. Octo Rex Patches
Dr. Octo Rex Patches
![]() Dr. Rex Drum Loops
Dr. Rex Drum Loops
![]() Dr. Rex Percussion Loops
Dr. Rex Percussion Loops
For this example, double-click on the Dr. Octo Rex Patches folder. From any of these folders, you can select a DREX patch to import into your Dr. Octo Rex device. For example, you could open the Drums, Acoustic Drums, and Pop folders, and then select a DREX patch you want to import into a Dr. Octo Rex style drum loop.
NOTE: The auditioning feature plays loops at the tempo at which your Reason song is set.
After selecting your patch, click the Patch Browser’s OK button or just double-click the patch file to load it into Dr. Octo Rex. Notice also that the name of the REX file in the patch is now displayed in the Dr. Octo Rex Waveform display (see Figure 6.5).

© Propellerhead Software AB.
After a patch file is imported into Dr. Octo Rex, the slices that make up the REX file are mapped out over the C1 octave of your keyboard. This enables you to preview each slice of a loaded REX file by arming the sequencer track and playing any keys in the C1 octave of your keyboard (C1, C#1, D1, D#1, E, and so on).
You can also preview the slices of any of the other REX files in the DREX file by clicking on its Notes to Slot button, which is the red LED located just to the left of each slot in the Dr. Octo Rex interface.
If you’d rather listen to the entire REX file play back, just click on the Run button, located at the top-right corner of the Dr. Octo Rex interface. This will play back the selected REX file indefinitely until you click the Run button again, click another Loop Slot button, or click Stop in the Reason Sequencer screen.
While the Loop Playback section of Dr. Octo Rex is playing, you can switch between different slots in real time. If you want to specify how quickly Dr. Octo Rex changes between different selected slots, you can select one of three options on the far-left side of the interface:
![]() Bar. The REX file will change slots at the end of the nearest completed bar.
Bar. The REX file will change slots at the end of the nearest completed bar.
![]() Beat. The REX file will change slots at the end of the nearest completed beat.
Beat. The REX file will change slots at the end of the nearest completed beat.
![]() 1/16. The REX file will change slots at the end of the nearest completed 1/16 note.
1/16. The REX file will change slots at the end of the nearest completed 1/16 note.
Selecting Different REX Files in a Patch
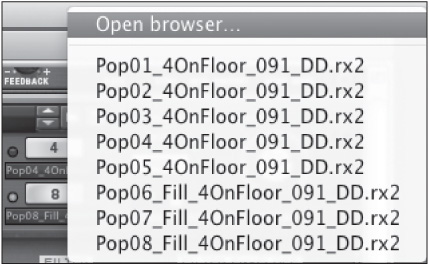
As you’ll come to find throughout this book, there’s very little that Reason can’t do when it comes to creative thinking and sound design. For example, let’s say you load a DREX patch and you like the REX files loaded onto all the slots except for slot 8. It’s easy to select another REX file by simply clicking on the name of the REX file in slot 8 and selecting Open Browser from the pop-up menu (see Figure 6.6).
© Propellerhead Software AB.
At this point, the Patch Browser will open, and you can use it to locate, preview, and import a new REX file into slot 8.
Polyphony
Toward the bottom of the Dr. Octo Rex Programmer is the Polyphony parameter (see Figure 6.7), which determines the number of REX slices your MIDI keyboard can play simultaneously. Dr. Octo Rex contains a large polyphony potential that ranges from 1 to 99. You can change the polyphony by clicking on the increase/decrease controls to the right of the display or by clicking and dragging in the display itself.

© Propellerhead Software AB.
The Polyphony control assigns the number of voices that can be played simultaneously. Because each slice in a REX file is assigned to a key on your MIDI keyboard, you can resequence loops using the REX Lane Editor in the Reason sequencer. This will give you a chance to reinterpret the loop by introducing a new groove and feel that includes playing multiple slices simultaneously.
The Synth Parameters
The Dr. Octo Rex Programmer is the main section, where you can edit REX loops with ease. Here, you can accomplish everything from transposition to pitching and panning each slice in a loaded REX file. Just to review, a REX file contains a number of different slices of audio, which are compiled and seen as one file. The sliced nature of the REX files makes them ideal for editing.
The Waveform Display
In the Dr. Octo Rex Waveform display (see Figure 6.8), you can see the REX file split in a slice-by-slice view along with the original tempo of the loop. Above the waveform and to the right, Dr. Octo Rex displays the default pitch of the REX file. The default pitch for any REX file loaded into Dr. Octo Rex is C. Every aspect of the REX file can be edited, with the help of the parameter knobs above and below the Waveform display. Let’s take a look at them.
Located just above the Waveform display are a few of Dr. Octo Rex’s play parameters (see Figure 6.9).
![]() Select Slice by MIDI. This checkbox allows you to select each REX slice with a MIDI controller, such as a keyboard or drum machine. If you select this checkbox and click Play, you’ll see the slice selector move across the loop from left to right in accordance with the MIDI note that is being played. Above this is the Note On indicator light, which lets you know when Dr. Octo Rex receives any kind of MIDI signal, whether from a controller or a keyboard.
Select Slice by MIDI. This checkbox allows you to select each REX slice with a MIDI controller, such as a keyboard or drum machine. If you select this checkbox and click Play, you’ll see the slice selector move across the loop from left to right in accordance with the MIDI note that is being played. Above this is the Note On indicator light, which lets you know when Dr. Octo Rex receives any kind of MIDI signal, whether from a controller or a keyboard.
![]() Follow Loop Playback. When this checkbox is selected, Dr. Octo Rex will display the currently triggered REX file in the
Follow Loop Playback. When this checkbox is selected, Dr. Octo Rex will display the currently triggered REX file in the
![]() aveform display. This will change as a new REX file from a different slot is selected.
aveform display. This will change as a new REX file from a different slot is selected.
![]() Copy Loop to Track. This button sends the MIDI notes that are assigned to each slice of a selected REX file to Dr. Octo Rex’s sequencer track. If you select the Dr. Octo Rex sequencer track and click on the Switch to Edit Mode button, you will see each of these MIDI notes displayed in the REX Lane Editor.
Copy Loop to Track. This button sends the MIDI notes that are assigned to each slice of a selected REX file to Dr. Octo Rex’s sequencer track. If you select the Dr. Octo Rex sequencer track and click on the Switch to Edit Mode button, you will see each of these MIDI notes displayed in the REX Lane Editor.
![]() Loop Transpose. This knob alters the pitch of the entire REX file. The range of this parameter is +/–12 semitones.
Loop Transpose. This knob alters the pitch of the entire REX file. The range of this parameter is +/–12 semitones.

© Propellerhead Software AB.

© Propellerhead Software AB.
TIP: After you click the Copy Loop to Track button to send the REX slices to the Reason sequencer, you might hear a strange flange or phaser sound as you play back your song. This is due to the fact that while the Reason sequencer is playing back your REX file from the sequencer track, it is also playing back the REX file from the Dr. Octo Rex interface. This happens because the Enable Loop Playback parameter is activated. This parameter is located just above the Run button. Deactivate this parameter, and your REX file should sound just fine.
Below the Waveform display, you’ll find the following parameters to edit the REX file (see Figure 6.10).

© Propellerhead Software AB.
![]() Slice. This knob allows you to select each slice in the Waveform view by clicking and dragging the mouse up or down.
Slice. This knob allows you to select each slice in the Waveform view by clicking and dragging the mouse up or down.
![]() Pitch. The Pitch knob transposes each slice in a REX file. Each slice can be adjusted up or down, giving you a possible pitch range of eight octaves. This effect is great for creating some interesting rhythmic ideas or mapping the pitches in a chromatic effect.
Pitch. The Pitch knob transposes each slice in a REX file. Each slice can be adjusted up or down, giving you a possible pitch range of eight octaves. This effect is great for creating some interesting rhythmic ideas or mapping the pitches in a chromatic effect.
![]() Pan. The Pan knob adjusts the stereo position for any slice in the REX file. For example, you can set slice 1 to –64, or hard left while setting slice 3 to 63, or hard right. This setting can create a very cool stereophonic effect, especially when you combine it with the Pitch knob.
Pan. The Pan knob adjusts the stereo position for any slice in the REX file. For example, you can set slice 1 to –64, or hard left while setting slice 3 to 63, or hard right. This setting can create a very cool stereophonic effect, especially when you combine it with the Pitch knob.
![]() Level. This knob changes the volume of an individual slice in a REX file. By default, each slice is set to 100, which is moderately loud. This allows for some interesting dynamic changes that can affect the overall feel of the REX file when used creatively.
Level. This knob changes the volume of an individual slice in a REX file. By default, each slice is set to 100, which is moderately loud. This allows for some interesting dynamic changes that can affect the overall feel of the REX file when used creatively.
![]() Decay. The Decay knob adjusts the length of each slice in a REX file. By default, each slice is set to 127, which is the maximum length. When adjusted, each slice can be shortened to create a gate effect of sorts.
Decay. The Decay knob adjusts the length of each slice in a REX file. By default, each slice is set to 127, which is the maximum length. When adjusted, each slice can be shortened to create a gate effect of sorts.
![]() Reverse. Using this knob, labeled “Rev,” creates a reverse effect on an individual slice in a REX file. This is really cool for drum samples in particular.
Reverse. Using this knob, labeled “Rev,” creates a reverse effect on an individual slice in a REX file. This is really cool for drum samples in particular.
![]() Filter Frequency. This knob, labeled “F.Freq,” is used to offset the cutoff frequency of the Filter section the selected slice. The Filter section is covered later in this chapter.
Filter Frequency. This knob, labeled “F.Freq,” is used to offset the cutoff frequency of the Filter section the selected slice. The Filter section is covered later in this chapter.
![]() Alt. This knob is used to create a natural feel for your loaded REX files. You accomplish this by assigning individual slices of a REX file to one of four groups. These groups then randomize each time the REX loop plays. For example, say you have a REX file with four different snare slices. You can use the Alt knob to assign all the snare slices to Alt Group 1. Each time the loop plays (using the Loop Playback function), the snare slices will be shuffled with each other, making the loop sound just a bit different each time it plays. Slices assigned to Alt groups will also be randomized when using the Copy Loop to Track function.
Alt. This knob is used to create a natural feel for your loaded REX files. You accomplish this by assigning individual slices of a REX file to one of four groups. These groups then randomize each time the REX loop plays. For example, say you have a REX file with four different snare slices. You can use the Alt knob to assign all the snare slices to Alt Group 1. Each time the loop plays (using the Loop Playback function), the snare slices will be shuffled with each other, making the loop sound just a bit different each time it plays. Slices assigned to Alt groups will also be randomized when using the Copy Loop to Track function.
![]() Output. This knob allows you to assign the individual slices of a REX file to one of five pairs of outputs on the back of the Dr. Octo Rex interface.
Output. This knob allows you to assign the individual slices of a REX file to one of five pairs of outputs on the back of the Dr. Octo Rex interface.
TIP: One of my favorite features in Dr. Octo Rex is Slice Edit mode, which you access from the Dr. Octo Rex Programmer (see Figure 6.11, button shown in the lower-right corner). When it is selected, you can edit the slices of a loaded REX file by using the Pencil tool directly on the Waveform display. Select any of the slice editing parameters by clicking on its name in the Waveform display, and you can edit the individual slices. This powerful feature makes it possible to simply draw in your edits rather than use the knobs of the individual slice parameters, which can be a little cumbersome at times.

© Propellerhead Software AB.
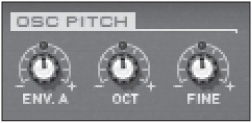
The Oscillator Pitch Section
The Oscillator Pitch section can adjust the overall pitch of the REX loop statically with knobs to adjust the octave and fine tuning. You can even assign the Dr. Octo Rex Filter Envelope to dynamically affect the pitch of your REX loop (see Figure 6.12).
© Propellerhead Software AB.
![]() Env. A. The Envelope Amount (Env. A.) knob is used to assign a determined amount of the Dr. Octo Rex Filter Envelope to modulate the pitch of the REX loop. This creates a dynamic pitch-shifting effect based on the amount of Filter Envelope applied to the oscillator.
Env. A. The Envelope Amount (Env. A.) knob is used to assign a determined amount of the Dr. Octo Rex Filter Envelope to modulate the pitch of the REX loop. This creates a dynamic pitch-shifting effect based on the amount of Filter Envelope applied to the oscillator.
![]() Oct. The Oct knob enables you to transpose the entire REX file up or down an octave at a time and has an eight-octave range.
Oct. The Oct knob enables you to transpose the entire REX file up or down an octave at a time and has an eight-octave range.
![]() Fine. The Fine knob adjusts the overall pitch of the REX file in cents, which are hundredths of a semitone. With a range of +/–50 cents, this is for making extremely minor adjustments to the overall pitch.
Fine. The Fine knob adjusts the overall pitch of the REX file in cents, which are hundredths of a semitone. With a range of +/–50 cents, this is for making extremely minor adjustments to the overall pitch.
TIP: In the lower-right section of the main panel of the Dr. Octo Rex interface is the Global Transpose parameter. It affects the overall pitch of all the REX files loaded in an instance of Dr. Octo Rex. It has a range of +/–1 full octave.
The Filter Section
To the right of the Waveform display lies Dr. Octo Rex’s Filter section (see Figure 6.13). By shaping the overall tone of the REX file, you can generate incredible filter sweeps that hurt the ears and shatter speakers. The filter can then be modified with an envelope and finally be assigned to the modulation wheel for dynamic control. Now let’s look at the filter.

© Propellerhead Software AB.
Whenever Dr. Octo Rex is loaded into the Reason Rack screen, the filter is already activated. It can be turned off and on by simply clicking on the Filter button located at the top of the Filter section. Once the filter is activated, you can select one of five filter modes by clicking on the individual names or by clicking on the Mode button:
![]() Notch. This filter can be thought of as the opposite of a band pass filter. It rejects the mid frequencies while allowing the high frequencies and low frequencies to pass through. Although not the most dramatic filter effect, it still has a place in the mix for making minor changes to a sample.
Notch. This filter can be thought of as the opposite of a band pass filter. It rejects the mid frequencies while allowing the high frequencies and low frequencies to pass through. Although not the most dramatic filter effect, it still has a place in the mix for making minor changes to a sample.
![]() HP 12. This mode filters out the low frequencies while letting the high frequencies pass through. It has a roll-off curve of 12 dB per octave.
HP 12. This mode filters out the low frequencies while letting the high frequencies pass through. It has a roll-off curve of 12 dB per octave.
![]() BP 12. This mode filters out both the high and low frequencies, leaving the mid frequencies alone to be toyed with. With a roll-off curve of 12 dB per octave, the BP 12 can be used effectively on instrument loops, such as a guitar loop or possibly hi-hat-heavy percussion loops.
BP 12. This mode filters out both the high and low frequencies, leaving the mid frequencies alone to be toyed with. With a roll-off curve of 12 dB per octave, the BP 12 can be used effectively on instrument loops, such as a guitar loop or possibly hi-hat-heavy percussion loops.
![]() LP 12. This filter allows low frequencies to pass through, whereas high frequencies are filtered out. It is similar to the 24 dB low pass (introduced next), but the roll-off curve is not as strong because it has a range of only 12 dB per octave. This makes the LP 12 a perfect solution for creating a filter sweep that is low but not low enough to blow up your speakers.
LP 12. This filter allows low frequencies to pass through, whereas high frequencies are filtered out. It is similar to the 24 dB low pass (introduced next), but the roll-off curve is not as strong because it has a range of only 12 dB per octave. This makes the LP 12 a perfect solution for creating a filter sweep that is low but not low enough to blow up your speakers.
![]() LP 24. Like the LP 12, this filter allows low frequencies to pass through while filtering out high frequencies. To top it off, this low-pass filter has an intense roll-off curve (approximately 24 dB per octave), which produces a greater emphasis on the low frequencies.
LP 24. Like the LP 12, this filter allows low frequencies to pass through while filtering out high frequencies. To top it off, this low-pass filter has an intense roll-off curve (approximately 24 dB per octave), which produces a greater emphasis on the low frequencies.
A filter typically has two controls:
![]() Cutoff frequency. The cutoff frequency (or filter frequency or cutoff filter, as it is also called) specifies where the filter will function in the frequency spectrum. It is a popular parameter used to create the “sweeping” effect that you hear so often in electronic music. When the frequency is used to alter a filter, it opens and closes the filter in a specific frequency range. For example, if the cutoff frequency is set to the highest position possible and is in LP 12 mode, the entire frequency spectrum will pass through. Likewise, if the cutoff is set to a lower position and the cutoff frequency is set in the LP 12 mode—say, between the middle and bottom—the resulting sound will contain a majority of low-end signal because only the lower end of the frequency spectrum can pass through.
Cutoff frequency. The cutoff frequency (or filter frequency or cutoff filter, as it is also called) specifies where the filter will function in the frequency spectrum. It is a popular parameter used to create the “sweeping” effect that you hear so often in electronic music. When the frequency is used to alter a filter, it opens and closes the filter in a specific frequency range. For example, if the cutoff frequency is set to the highest position possible and is in LP 12 mode, the entire frequency spectrum will pass through. Likewise, if the cutoff is set to a lower position and the cutoff frequency is set in the LP 12 mode—say, between the middle and bottom—the resulting sound will contain a majority of low-end signal because only the lower end of the frequency spectrum can pass through.
![]() Resonance. Resonance, on the other hand, is a parameter that modifies the filter’s sound. It is used to emphasize the frequencies around the Filter Frequency slider. When used in different positions, the Resonance slider can filter out different frequencies or create fantastic bell tones. For example, in High Pass mode, if the cutoff slider is set to the maximum potential and the resonance is set to the minimum potential, the resulting sound will be extremely treble heavy with minimal bass. However, if the Resonance slider is in the middle position, the very high frequencies around the cutoff frequency will be boosted even more. If the resonance is set to its highest potential while the Filter Frequency slider is set to its lowest potential and the filter is in LP 12 mode, the resulting signal will be extremely bass heavy (or inaudible, depending on your monitoring setup). As the cutoff filter moves up, the bass frequencies will be dynamically enhanced by the resonance, and the resulting sound will have the neighbors pounding at your door immediately afterward.
Resonance. Resonance, on the other hand, is a parameter that modifies the filter’s sound. It is used to emphasize the frequencies around the Filter Frequency slider. When used in different positions, the Resonance slider can filter out different frequencies or create fantastic bell tones. For example, in High Pass mode, if the cutoff slider is set to the maximum potential and the resonance is set to the minimum potential, the resulting sound will be extremely treble heavy with minimal bass. However, if the Resonance slider is in the middle position, the very high frequencies around the cutoff frequency will be boosted even more. If the resonance is set to its highest potential while the Filter Frequency slider is set to its lowest potential and the filter is in LP 12 mode, the resulting signal will be extremely bass heavy (or inaudible, depending on your monitoring setup). As the cutoff filter moves up, the bass frequencies will be dynamically enhanced by the resonance, and the resulting sound will have the neighbors pounding at your door immediately afterward.
TIP: As stated, make sure to keep an eye on the Audio Out Clip indicator, which is at the bottom left of the Transport panel, especially when you start fiddling with the filters found on just about every synth and sound module in Reason. You not only can distort your signal, but also run the risk of damaging your speakers and, more importantly, your ears.
To the right of the Filter modes is the Filter Envelope (see Figure 6.14). An envelope is used to modify specific synth parameters, including pitch, volume, and filter frequencies. By using an envelope creatively, you can control how these parameters are modified over a specific amount of time. But before you get ahead of yourself, take a look at the essential controls of the Filter Envelope.

© Propellerhead Software AB.
![]() Amount. This slider is used to determine the extent to which the Filter Envelope will affect the Filter Frequency. By default, the Amount slider is set to 0.
Amount. This slider is used to determine the extent to which the Filter Envelope will affect the Filter Frequency. By default, the Amount slider is set to 0.
![]() Attack. When a sound’s envelope is triggered, the Attack parameter, labeled “A,” determines the length of time before the envelope reaches its maximum value.
Attack. When a sound’s envelope is triggered, the Attack parameter, labeled “A,” determines the length of time before the envelope reaches its maximum value.
![]() Decay. Once the maximum value is reached, the Decay parameter, labeled “D,” determines the length of time it takes for the value to drop to the level determined by the Sustain value.
Decay. Once the maximum value is reached, the Decay parameter, labeled “D,” determines the length of time it takes for the value to drop to the level determined by the Sustain value.
![]() Sustain. The Sustain setting, labeled “S,” determines the level at which the falling value rests at the end of the decay stage.
Sustain. The Sustain setting, labeled “S,” determines the level at which the falling value rests at the end of the decay stage.
![]() Release. The Release parameter, labeled “R,” determines how long it will take for the value to fall to 0 after a Note Off message has been received (such as when a key is released or at the end of the playback of a REX slice).
Release. The Release parameter, labeled “R,” determines how long it will take for the value to fall to 0 after a Note Off message has been received (such as when a key is released or at the end of the playback of a REX slice).
A Filter Exercise: The following is a filter exercise that should help you start brewing a few ideas. Before you begin, start a new Reason song and create an instance of Dr. Octo Rex.
1. Load a REX loop with a lot of kick drum in it. For example, choose something from the House folder in Dr. Rex Drum Loops. After loading the REX loop into Dr. Octo Rex, click the Run button so you can listen and edit at the same time.
2. Select the LP 12 Filter mode and adjust the Frequency Filter slider to a 25 and the Resonance to about 75. This should produce a very low-end, bass-heavy sound.
3. Raise the Filter Envelope’s Amount slider to about 50. This should start to change the timbre of the sound immediately.
4. Now try working with a different combination of Filter Envelope parameters. For example, to create a percussive loop, set the Attack, Decay, and Release to 0. Then move the Sustain slider up and down until you reach a desired effect. Click on the Run button to stop playing the loop.
5. To make this loop appear in the Reason sequencer, click on the Copy Loop to Track button. The corresponding MIDI notes should appear in the Dr. Octo Rex track. Turn off Enable Loop Playback and click Play in the Reason sequencer to hear your loop.
The LFO (Low-Frequency Oscillator)
Directly beneath Dr. Octo Rex’s filter, you will find the low-frequency oscillator (LFO), shown in Figure 6.15. An LFO is capable of generating waveforms with a low frequency (well below the range of human hearing), hence the name LFO. An LFO’s purpose is to modulate a parameter, such as a filter or another oscillator. That means the LFO itself is never actually heard, just its effect on other synth parameters.
© Propellerhead Software AB.
To hear the effect of the LFO, you must first adjust the Amount knob, located to the right of the Rate knob. Once this parameter is turned up, you can start to explore the functions of the LFO.
KEEPING IT IN SYNC
No “boy band” jokes, please. The LFO can run in either free time or synchronized time that is determined by the master tempo of the Transport panel. To activate the synchronization, click on the Sync button, located directly above the Waveform selector (see Figure 6.16). This will sync the Dr. Octo Rex LFO with the Reason master tempo. At this point, you can follow it up by assigning both a waveform shape and a destination for the LFO.

© Propellerhead Software AB.
WAVEFORMS: TAKE YOUR PICK
Six types of waveforms can be applied to your LFO. You can select them by clicking on them with the mouse or by using the Wavef. button at the bottom of the waveform list.
Let’s discuss the differences between these individual waveforms:
![]() Triangle. This creates a smooth up and down vibrato.
Triangle. This creates a smooth up and down vibrato.
![]() Inverted Sawtooth. This creates a cycled ramp-up effect.
Inverted Sawtooth. This creates a cycled ramp-up effect.
![]() Sawtooth. This creates a cycled ramp-down effect.
Sawtooth. This creates a cycled ramp-down effect.
![]() Square. This makes abrupt changes between two values.
Square. This makes abrupt changes between two values.
![]() Random. This creates a random stepped modulation. Also known as sample and hold.
Random. This creates a random stepped modulation. Also known as sample and hold.
![]() Soft Random. This is exactly the same as the previous waveform, but with a smoother modulation curve.
Soft Random. This is exactly the same as the previous waveform, but with a smoother modulation curve.
DESTINATION: ANYWHERE
After selecting an LFO waveform and rate/amount, you’re ready to choose which parameter will be modulated by the LFO. LFO modulation can be applied to three destinations. Again, you can click directly on each one or cycle through them by clicking the Dest button.
![]() Osc. This sends the LFO modulation effect to the overall pitch of the REX loop. Depending on which waveform is selected and how much LFO is assigned to the oscillator, it can produce a very neat up-and-down effect.
Osc. This sends the LFO modulation effect to the overall pitch of the REX loop. Depending on which waveform is selected and how much LFO is assigned to the oscillator, it can produce a very neat up-and-down effect.
![]() Filter. This sends the LFO modulation to the Filter section of Dr. Octo Rex. This can produce a tempo-based filter sweep effect if the Sync button is activated.
Filter. This sends the LFO modulation to the Filter section of Dr. Octo Rex. This can produce a tempo-based filter sweep effect if the Sync button is activated.
![]() Pan. This sends the LFO modulation to the Stereo Pan setting of Dr. Octo Rex. When synced, this will create a tempo-based stereophonic effect.
Pan. This sends the LFO modulation to the Stereo Pan setting of Dr. Octo Rex. When synced, this will create a tempo-based stereophonic effect.
The Amp Envelope
Creating an audible sound takes two basic actions: the generation of the sound and its amplification. So far, this chapter has focused on the generation of sound in Dr. Octo Rex. Modulation of the amplification aspect is covered by Dr. Rex’s Amp Envelope feature (see Figure 6.17).

© Propellerhead Software AB.
![]() Level. This slider controls the volume of Dr. Octo Rex.
Level. This slider controls the volume of Dr. Octo Rex.
![]() Attack. When a sound’s envelope is triggered, the Attack parameter, labeled “A,” determines the length of time before the envelope reaches its maximum value.
Attack. When a sound’s envelope is triggered, the Attack parameter, labeled “A,” determines the length of time before the envelope reaches its maximum value.
![]() Decay. Once the maximum value is reached, the Decay parameter, labeled “D,” determines the length of time it takes for the value to drop to the level determined by the Sustain value.
Decay. Once the maximum value is reached, the Decay parameter, labeled “D,” determines the length of time it takes for the value to drop to the level determined by the Sustain value.
![]() Sustain. After the value begins to drop, the Sustain parameter, labeled “S,” determines the level where the falling value rests.
Sustain. After the value begins to drop, the Sustain parameter, labeled “S,” determines the level where the falling value rests.
![]() Release. The Release parameter, labeled “R,” determines how long it will take for the value to fall to 0 after a Note Off message has been received (such as when a key is released or at the end of the playback of a REX slice).
Release. The Release parameter, labeled “R,” determines how long it will take for the value to fall to 0 after a Note Off message has been received (such as when a key is released or at the end of the playback of a REX slice).
The Velocity Section
The Velocity section (see Figure 6.18) allows you to assign certain filter and amplification parameters to be modified according to the velocity at which each note (or slice) is played. Remember, velocity refers to how hard the note is played on your keyboard. Whether you play it hard or soft, these assignable parameters will respond according to their settings. If you are not using a controller keyboard, you can draw the velocity data in via the Reason sequencer.

© Propellerhead Software AB.
![]() F. Env. When this parameter is set to a positive value, different velocities control the Amount knob of the Filter Envelope. A negative value has the opposite effect.
F. Env. When this parameter is set to a positive value, different velocities control the Amount knob of the Filter Envelope. A negative value has the opposite effect.
![]() F. Decay. When this parameter is set to a positive value, different velocities control the Decay parameter of the Filter Envelope. A negative value has the opposite effect.
F. Decay. When this parameter is set to a positive value, different velocities control the Decay parameter of the Filter Envelope. A negative value has the opposite effect.
![]() Amp. When this parameter is set to a positive value, the velocity controls the amount of volume. A negative value has the opposite effect.
Amp. When this parameter is set to a positive value, the velocity controls the amount of volume. A negative value has the opposite effect.
Pitch Bend and Modulation
The Pitch Bend Range and Modulation controls are located below and above the Velocity section, respectively (see Figure 6.19).

© Propellerhead Software AB.
GET IT IN PITCH
The Dr. Octo Rex Pitch Bend Range is similar to Pitch controls on hardware synths; it bends the pitch of the whole loop up or down. You can click on the up and down buttons or just click and drag in the field itself to change the range. For kicks, try selecting 24, which is equivalent to 24 semitones, or two octaves. Then click the Preview button. While the file is playing, use a keyboard controller with a pitch-shifting wheel or just click and drag up or down on the Bend wheel to hear the pitch shifting at work.
MODULATION
Modulation is the “secret sauce,” or essential ingredient, in any form of artistic electronic music. It can be used to effectively change the timbre of a signal. The common modulation wheel found on most typical synthesizers can be assigned to a number of different synth parameters. When assigned, the modulation wheel then makes modifications in real time to the played note according to the selected parameter and its assigned value.
The modulation wheel has three parameters that can be assigned to it (see Figure 6.20):

© Propellerhead Software AB.
![]() F. Freq. This is assigned to the cutoff filter (labeled “Freq”) of the Dr. Octo Rex Filter section. When a value is assigned to this knob, the cutoff filter’s value decreases or increases as the modulation wheel is used.
F. Freq. This is assigned to the cutoff filter (labeled “Freq”) of the Dr. Octo Rex Filter section. When a value is assigned to this knob, the cutoff filter’s value decreases or increases as the modulation wheel is used.
![]() F. Res. This is assigned to the Resonance control of the Filter section. Depending on where it is set, the Resonance control increases or decreases while the modulation wheel is in use.
F. Res. This is assigned to the Resonance control of the Filter section. Depending on where it is set, the Resonance control increases or decreases while the modulation wheel is in use.
![]() F. Decay. This is assigned to the Decay slider of the Filter Envelope. Depending on where it is set, the envelope decay increases or decreases.
F. Decay. This is assigned to the Decay slider of the Filter Envelope. Depending on where it is set, the envelope decay increases or decreases.
The whole point of electronic music is to experiment and deviate from the norm. The modulation wheel is a useful tool for accomplishing that goal.
Make It Punchy! Here’s a quick DIY tutorial on using the modulation wheel with its three parameters. Before beginning this exercise, start a new Reason song and create an instance of Dr. Octo Rex.
1. In the Filter section, by default, the Filter mode should be set to LP 12 mode, which is fine for this exercise. Now set the Filter Frequency slider to about 25 and set the Resonance slider to 75.
2. Click the Run button to hear your REX file in action with the active filter.
3. In the Filter Envelope, set the Amount slider to 100%. Then set the Attack, Decay, Sustain, and Release parameters to 0.
4. In the Modulation Wheel section, set the F. Freq knob to 32, the F. Res knob to –32, and the F. Decay knob to –64.
5. Use the modulation wheel with your mouse or MIDI keyboard. Notice how the filter opens up as it is activated. Also notice how the Decay amount increases.
Dr. Octo Rex Connections
Press the Tab key to swing the Rack screen around, and you’ll see all the Dr. Octo Rex control voltage (CV) and audio connections available (see Figure 6.21).

© Propellerhead Software AB.
Audio Quality in Dr.Octo Rex
In the lower-right corner of the back panel are two parameters that affect the quality of your loops (see Figure 6.22):

© Propellerhead Software AB.
![]() High Quality Interpolation. When this parameter is activated, Dr. Octo Rex plays back the REX file with a more advanced interpolation algorithm, resulting in a higher-quality audio signal. The difference is most noticeable in loops containing a lot of high-frequency data, such as a hi-hat track. This enhanced audio quality does come at the price of a bit of extra work for your processor.
High Quality Interpolation. When this parameter is activated, Dr. Octo Rex plays back the REX file with a more advanced interpolation algorithm, resulting in a higher-quality audio signal. The difference is most noticeable in loops containing a lot of high-frequency data, such as a hi-hat track. This enhanced audio quality does come at the price of a bit of extra work for your processor.
![]() Low Bandwidth. This parameter removes some of the high end from the playback of a REX file to relieve the burden on your CPU. The difference is especially evident in loops with a lot of hi-hat or Latin percussion. If, on the other hand, your loops are mostly low-frequency data, or if they’ve been put through a low-pass filter, you’ll be less likely to hear the difference.
Low Bandwidth. This parameter removes some of the high end from the playback of a REX file to relieve the burden on your CPU. The difference is especially evident in loops with a lot of hi-hat or Latin percussion. If, on the other hand, your loops are mostly low-frequency data, or if they’ve been put through a low-pass filter, you’ll be less likely to hear the difference.
Audio Outputs
The rear panel of Dr. Octo Rex offers two types of audio outputs.
![]() Main outputs. These are used as the main outputs of Dr. Octo Rex. All the loaded REX files are automatically routed to these outputs.
Main outputs. These are used as the main outputs of Dr. Octo Rex. All the loaded REX files are automatically routed to these outputs.
![]() Slice outputs. These outputs are available for routing individual slices of loaded REX files in an instance of Dr. Octo Rex. This is done by making use of the Output parameter on the Waveform display editor on the front panel of the interface. Simply select the slice you want and assign it to one of four pairs of stereo outputs.
Slice outputs. These outputs are available for routing individual slices of loaded REX files in an instance of Dr. Octo Rex. This is done by making use of the Output parameter on the Waveform display editor on the front panel of the interface. Simply select the slice you want and assign it to one of four pairs of stereo outputs.
CV Outputs
Three CV outputs are available to you on the rear panel of the Dr. Octo Rex interface:
![]() Filter Envelope. This is a modulation output that sends modulation information from the first voice of polyphony of a REX file played through the Filter Envelope to any modulation input on another Reason device. For example, you could route this output to the Gate CV input of the ECF-42 filter. Every time the REX file plays back, the first voice of polyphony will trigger the Gate parameter of the ECF-42.
Filter Envelope. This is a modulation output that sends modulation information from the first voice of polyphony of a REX file played through the Filter Envelope to any modulation input on another Reason device. For example, you could route this output to the Gate CV input of the ECF-42 filter. Every time the REX file plays back, the first voice of polyphony will trigger the Gate parameter of the ECF-42.
![]() LFO. This is another modulation output that sends modulation information from the LFO of Dr. Octo Rex to the CV inputs of any other Reason device.
LFO. This is another modulation output that sends modulation information from the LFO of Dr. Octo Rex to the CV inputs of any other Reason device.
![]() Gate Output. This is an output that sends out a gate signal for every slice of a REX file.
Gate Output. This is an output that sends out a gate signal for every slice of a REX file.
Gate Inputs
Two CV inputs receive gate information from another Reason device and can be used to trigger two different envelopes: the Filter Envelope and the Gate Envelope. In this case, you could have the Gate Output of a Redrum channel trigger the Filter Envelope or Gate Envelope as a sequence plays back. Or, you could use the Curve CV output of an instance of the Matrix to trigger either of these two envelopes.
Modulation Inputs
To the far left of the rear panel are all the modulation inputs of Dr. Octo Rex. In this case, however, you’ll see that there are not only inputs, but also input knobs to the left that specify how intense or subtle the modulation effect will be.
![]() Master Volume. Routing a CV connection to this input modulates the master volume of Dr. Octo Rex.
Master Volume. Routing a CV connection to this input modulates the master volume of Dr. Octo Rex.
![]() Mod Wheel. Routing a CV connection to this input modulates the modulation wheel. You can edit this even further by assigning any or all three of the modulation destinations on the front panel.
Mod Wheel. Routing a CV connection to this input modulates the modulation wheel. You can edit this even further by assigning any or all three of the modulation destinations on the front panel.
![]() Pitch Wheel. Routing a CV connection to this input modulates the pitch wheel.
Pitch Wheel. Routing a CV connection to this input modulates the pitch wheel.
![]() Filter Cutoff. Routing a CV connection to this input modulates the Filter Frequency parameter of the Filter section.
Filter Cutoff. Routing a CV connection to this input modulates the Filter Frequency parameter of the Filter section.
![]() Filter Resonance. Routing a CV connection to this input modulates the Resonance parameter of the Filter section.
Filter Resonance. Routing a CV connection to this input modulates the Resonance parameter of the Filter section.
![]() OSC Pitch. Routing a CV connection to this input modulates the pitch of the loaded REX file.
OSC Pitch. Routing a CV connection to this input modulates the pitch of the loaded REX file.
Creative Uses for Dr. Octo Rex with the Reason Sequencer
The key to enjoying a long, creative, and fruitful future with Dr. Octo Rex and Reason is to try different combinations and ideas. Remember, anything can be routed into anything in Reason. This section provides a few tips and tricks to fire up the synapses and get the creative juices flowing.
Before you begin these exercises, make sure you start a new Reason song and create an instance of Dr. Octo Rex. Finish preparing yourself by locating a new REX file or a DREX patch from the Reason Factory Sound Bank and loading it into Dr. Octo Rex.
Cut It Out!
Although many folks like a good, predictable, four-on-the-floor beat in dance music, it is a good idea to introduce some variations from time to time. One of those variations includes the deletion of different slices from a REX file to give it an entirely different feel.
Recall that a REX file contains two types of information to do its magic. The first type is digital audio information, which you see in the Waveform view of Dr. Octo Rex as a series of slices. The other type of information is the corresponding MIDI notes that accompany each digital audio slice. When you click the Copy Loop to Track button on the Dr. Octo Rex interface, it copies the MIDI notes to its track on the sequencer. After recording the MIDI tracks, you can simply open the appropriate editor in the sequencer and remove a few of the MIDI notes so that the corresponding audio slices will not play back.
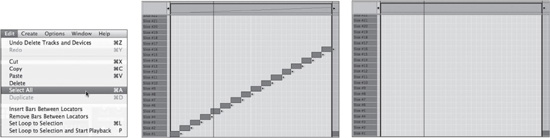
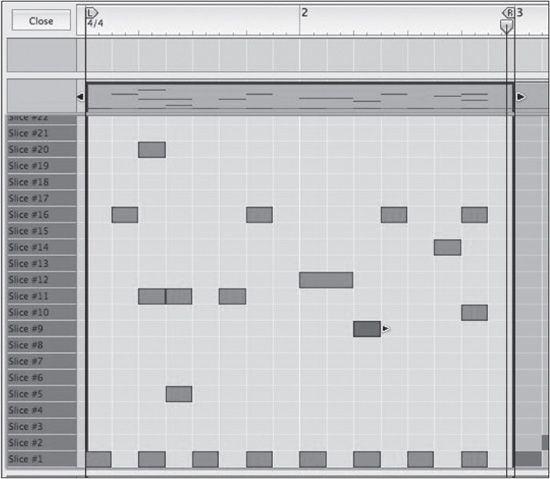
Start by clicking on the Switch to Edit Mode button on the Reason sequencer. Because this is a Dr. Octo Rex track, the sequencer will automatically know which editor to open—in this case, the REX Lane Editor. At this point, you should see all the MIDI notes lined up in zipper fashion (see Figure 6.23) as they move upward diagonally from left to right. To the far left of the notes is a list of numeric names for each slice. Depending on the length of the loop, up to 92 slices can be displayed here. Navigate your mouse to Slice 1 in the Slice list and notice that the Selector tool becomes a Speaker tool, which enables you to preview a slice by clicking on the slice name. You can also click and hold on the name of any slice in the list and drag your mouse up or down to preview the slices one by one.

© Propellerhead Software AB.
At this point, listen to each slice and decide which sound you want to remove from your loop. For example, you will probably want to keep the kick drum to keep a steady beat, but you can remove the snare or hi-hat sounds. Locate each of the sounds that you want to remove and then select them. Click Delete to get rid of them or use the Eraser tool.
When you’re finished, play the loop and see how you like the results. Getting a sound you like might take a lot of experimenting. Remember, you can always go back to the original loop by using the Copy Loop to Track button in Dr. Octo Rex or the Undo edit function.
Write Your Own Grooves
Aside from erasing MIDI notes, you also can rewrite your REX file groove in a couple of ways.
![]() Draw in a new sequence using the slices.
Draw in a new sequence using the slices.
![]() Use a MIDI controller to record a new sequence.
Use a MIDI controller to record a new sequence.
Using the Pencil tool, you can redraw the MIDI notes that are connected to the different slices in your Dr. Octo Rex module. This task is easier than it sounds, but it will take a little practice.
1. Start a new Reason song and load an instance of Dr. Octo Rex.
2. Load a new REX file into Dr. Octo Rex and click on the Copy Loop to Track button to send the MIDI notes of the REX file to the Reason sequencer.
3. Click on the Switch to Edit Mode button. You should now see the REX Lane Editor.
4. Find the sounds for which you want to draw notes by clicking on the slices of the REX file.
5. Open the Edit menu and choose Select All to highlight each MIDI note in the editor. Then press the Delete key to erase all the notes. As you can see in Figure 6.24, you have a clean palette to work with.
6. Create a two-bar loop so that you can work quickly. In the Transport panel, set your left locator to bar 1 and the right locator to bar 3. Make sure that the loop function is on by clicking on the Loop On/Off button in the Transport panel. Click the Stop button twice in the Transport panel to send the position indicator back to the beginning of the sequence. Click Play. You should now have a two-bar template to work with.
7. Choose the note value that you want to draw in. Because this is probably your first time doing this, I suggest using something simple like an 1/8 note. To do this, just select 1/8 from the Snap pull-down menu of the Sequencer toolbar (see Figure 6.25). Select the Pencil tool, and you can begin to draw in your MIDI notes.
8. Start with Slice 1 and draw in an 1/8 note at the beginning of each 1/4 note in bar one (1, 2, 3, and 4). (See Figure 6.26.) Click Play. You should now hear the first slice play four times.
© Propellerhead Software AB.

© Propellerhead Software AB.

© Propellerhead Software AB.
9. Choose a few more slices and draw them in. As you can see in Figure 6.27, you can make a simple yet effective rhythm with just a few slices. Try it on your own with different note values, and you’ll be on your way to a groove.
© Propellerhead Software AB.
TIP: If you’ve sequenced in other programs, you might be accustomed to seeing a Key Edit window that looks more like Figure 6.28. As you learned in Chapter 4, “The Reason Sequencer: Close-Up,” Reason also has a Key Edit window called the Key Lane. You can draw in your new REX grooves using either the REX Lane Editor or the Key Lane Editor by selecting them in the upper-right corner of the sequencer (see Figure 6.29).
You can also input data into the Reason sequencer live (covered in Chapter 4). Just make sure that your Dr. Octo Rex track is activated and ready to accept live MIDI data. You do so by making sure the Record Enable button is turned on for Dr. Octo Rex in the Track List (see Figure 6.30). Using your MIDI keyboard, you can now play Dr. Octo Rex in much the same way that you would play a drum machine with a MIDI keyboard. Any REX file loaded into Dr. Octo Rex is mapped across a MIDI keyboard, starting with C1 on your keyboard corresponding to Slice 1 in Dr. Octo Rex.
Just click Record. You can record a new performance of the REX file.
Creating Your Own REX Files
As of Reason 7, it is no longer necessary to own ReCycle!. The ability to create REX files now resides directly in Reason. This saves several steps toward REX file creation and it is very easy to create a loop library of your own. In this section, let’s take a look at how to make your own REX Files.
Just so we can make a REX file that is truly your own, let’s go ahead and start from a new Reason project with nothing in it. (If you have something that you’d like to keep from what we’ve been working on so far, make sure to save it before you proceed.)
1. In a new Reason session, create a Redrum drum machine. Then click the Patch Browse button, shown in Figure 6.31. This will open the Patch Browser, of course.

© Propellerhead Software AB.

© Propellerhead Software AB.
© Propellerhead Software AB.
2. In the Reason Patch Browser, you should already be in the Redrum Drum Kits folder of the Reason Factory Sound Bank. Double-click on the Chemical Kits directory, and then double-click on the Chemical Kit 01.drp, as shown in Figure 6.32. This will load a drum patch in to Redrum.
3. Use Redrum to make a drum beat. To do this, simply select a drum channel—let’s say channel 1 (kick drum), as shown in Figure 6.33. Then press the space bar to start the Reason sequencer, which in turn will start the Redrum drum sequencer. Use the buttons 1–16 to draw in drum beats. Once your channel 1 drum sounds good, select another channel and draw in beats. Keep doing this until you have a drum beat that is enjoyable to your ears!

© Propellerhead Software AB.

© Propellerhead Software AB.
4. Press F7 to switch to the Sequencer screen. In this screen, set your left loop point at measure 1 and your right loop point at measure 2. This will tell Reason how long you want your loop to be. See Figure 6.34.
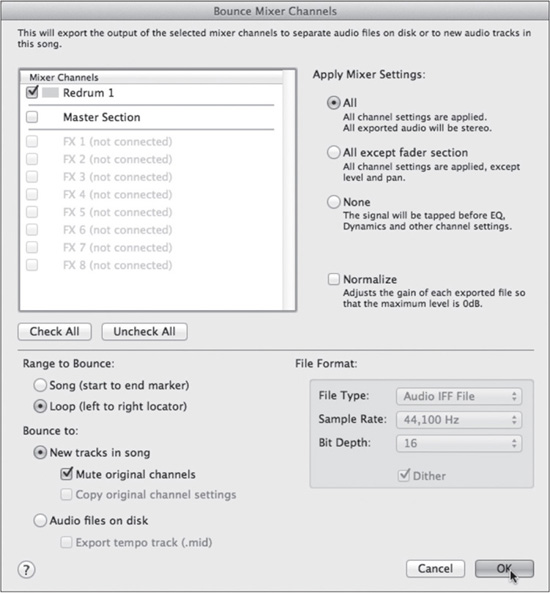
5. Stop the sequencer with the space bar and select Bounce Mixer Channels from the File menu. In the browser that appears, select the Redrum mixer channel. Also select Loop as the Range to Bounce To value. This tells Reason to render only what’s between your loop points. Finally, select Bounce to New Tracks in Song. (See Figure 6.35.) You may also want to select the Mute Original Channels option. This will mean that the Redrum track will be muted once the audio loop is rendered and will not play on top of the copy of the loop that you’ll be adding to the arrangement.
6. After the rendering takes place, you’ll notice a new audio clip in the sequencer. Double-click this audio clip to go into Inline Edit mode. In this mode, you’ll see several, small arrows all over the audio, as shown in Figure 6.36. These arrows designate slices. Slices are what REX files are based on. By cutting up several transients, or hits, in the audio file, Dr. Octo Rex will eventually be able to play a loop back at any speed, as will Reason. In fact, if you try changing the project tempo now, you’ll notice that the audio loop will speed up or slow down based on your chosen tempo. The pitch, however, will not change.
7. Before you create your REX loop, you may want to change the name of the track that you’re going to convert to a REX loop. This will cause the REX loop, once rendered, to be labeled with the name of your choosing for the loop. Names like “Nasty Beat (132)” are fine because they let you know the original tempo of the loop, while also letting you know the original tempo of the loop. You can change the label of the track label by clicking the track in the sequencer and then typing over the existing name, as shown in Figure 6.37.
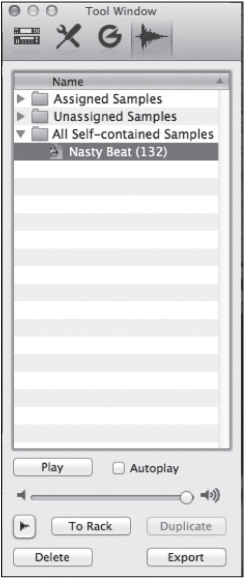
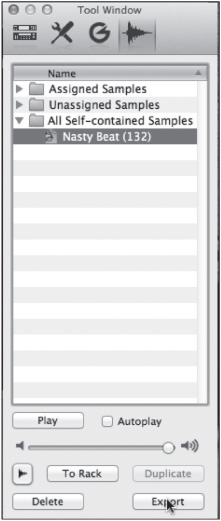
8. Now, to make a REX loop. Right-click on the audio clip and choose Bounce > Bounce Clip to REX Loop from the menu that appears. The Tool Window opens and displays your REX file in the Song Samples screen, as shown in Figure 6.38.

© Propellerhead Software AB.

© Propellerhead Software AB.
9. With the REX file selected, you’ll notice that there are options at the bottom of the Song Samples screen for things you can do with it. The first, and funnest option is the To Rack button, shown in Figure 6.39. This places the REX file in a Dr. Octo Rex automatically for you. Try this now!
© Propellerhead Software AB.
10. If you decide you’d like to add this loop to a personal REX/Loop collection, click the Export button, shown in Figure 6.40. By exporting to a file on your computer, you can make this loop available to any songs you currently have or create later. I highly recommend this route. As you’ve seen throughout this chapter, REX files in Dr. Octo Rex can be manipulated in many strange ways. So many, in fact, that you can completely disguise the original recording. Try exporting now. Make sure and create a file in a directory that you’ll visit a lot. Take mental note of it!
There you go! REX files are really easy to create in Reason. What’s also wonderful is that REX files can be used in more than just Reason. Pro Tools, Ableton Live, and even Logic Pro all support REX files. So, if you’re using more than one DAW, you can bring some stuff over and have some fun.

© Propellerhead Software AB.

© Propellerhead Software AB.
© Propellerhead Software AB.

© Propellerhead Software AB.
© Propellerhead Software AB.
Moving On
As you have seen in this chapter, Dr. Octo Rex is a Reason device that takes looping to a whole new level. Next, you are going to delve into the first of Reason’s three virtual synths: the Malström!