

Still from the animated short The Fantastic Flying Books of Mr. Morris Lessmore. Property of Moonbot Studios.
Lighting in CG is done by positioning virtual lights around an environment with either an interactive Graphic User Interface (GUI) or through code. Although there are many differences between these CG lights and real world lights, it is easiest to think about lighting for animation as one would stage lighting. Both start with a dark set filled with characters and props. It is then the lighting artist’s job to add lights of varying quality to illuminate the stage. Both have the goal of illuminating the necessary parts of the scene while setting the mood for the audience.
CG lights and the renderers are generally constructed to mimic how light reacts in the real world. They can often simulate elements like rays of light bouncing off one surface onto another and light refracting through glass objects and liquids. The main difference is that CG lights have the ability to detach from the laws of physics, granting the artist complete control over their attributes. For example, CG lights generally have the option to turn shadow casting off. This would be impossible to do for a real light source and can give the artist more flexibility to do what is necessary to create aesthetically pleasing images.
Before lighting in a CG world, artists must know what virtual lights are available to them. These lights are tools at artists’ disposal designed to give them everything necessary to craft a well-lit image. The lights listed in this section are not software specific but are commonly found in almost all renderers. They may go by different names but, regardless of whether it is the simplest software package on the market or the most robust proprietary renderer in a massive studio, the characteristics and uses remain the same. This section will not only work to describe how these lights function and their attributes but will also aim to show specific situations when each type of light is appropriate.
Point Lights
A point light is the simplest CG light to understand. Point lights are placed in a scene at a given X, Y, and Z coordinate and they radiate light in all directions. In other words, the artist places a point light in a given spot and light rays shoot out from that point in every direction. If shadows are enabled on the light they will also be cast radially from the position of the point light.
Point lights are best used when simulating something like a candle or a bare light bulb. They are lights that are small in size and illuminate in all directions and are especially useful when the light source is actually on screen. In this situation, the point light can be seen shooting light in all directions and the resulting shadows will replicate what would happen in the natural world.
Since point lights are so conceptually straightforward, new artists commonly overuse them. A new artist sees a part of the image in need of light and will place a point light in that area. The problem is that not only can a point light look incorrect, it can be inefficient and cause unnecessary render calculations. When a point light is positioned off camera, only a small segment of the rays being emitted are actually used. Therefore, the rays being cast away from the scene can still calculate light and shadow values which will slow down render times immensely.

Figure 3.1 Point lights are placed in a scene at a given X, Y, and Z coordinate and they radiate light in all directions.
Directional Lights
Directional or distant lights cast light rays in one designated direction. They emanate light across the entire CG scene following the angle determined by the lighting artist. Therefore, the only positional attribute that matters in regard to a directional light is the rotation. The X, Y, Z position and the size of the directional light in the scene do not matter. By design, directional lights simulate any light that is very far away from the scene and illuminates across the entire shot. Because of this, some artists prefer to use directional lights when simulating sun or moonlight. Directional lights can be quite useful as gentle fill lights as well.
The major holdup for using a directional light is the fact that it illuminates everything uniformly. As discussed previously, any time uniform lighting exists in a scene the image runs the risk of losing visual shaping and overall interest. It is often important when using directional lights to implement gobos (discussed later) or other methods to vary the intensity of the light to avoid this issue.

Figure 3.2 Directional or distant lights cast light rays in one designated direction.
Directional lights also have issues with regards to shadows. They can have very limited control over the softness and look of the shadows when compared with spotlights. Also, they can be inefficient since many of the light rays being cast will never be seen on camera and therefore could add to render calculations with no visual improvements.
Spotlights
Spotlights are very common in many renderers. They are similar to a point light in that they have no physical dimensions but are different because they illuminate in a specific direction inside a conical area. Spotlights are popular because an artist can use a spotlight to specifically sculpt light into an area of the scene. The cone can be centered on one specific object leaving the audience focusing on what the lighter wants. They also have the benefit of additional controls not found in other lights, like the ability to project a mapped image onto the scene and the ability to make their beam of light visible as if passing through dust or fog. Spotlights also wield the most control over the shadow settings and allow the artist the ability to simulate almost any shadow type. Unlike point lights or directional lights, spotlights produce fewer light rays that are wasted by being fired off screen. Ultimately, spotlights give the artist the most control over the look of the light and will increase the render efficiency of the scene and minimize render times.

Figure 3.3 Spotlights are similar to a point light in that they have no physical dimensions but are different because they illuminate in a specific direction inside a conical area.
Spotlights have a wide array of uses. They can be used as flashlights, streetlights, stage spotlights, or in other scenarios where light starts off at one point and emits in a conical shape. In practice their range reaches far beyond that. A spotlight can often be placed far away from the scene to simulate the sun or moon. Their cone can be focused on the scene and be much more efficient than a directional light. Spotlights can be used to represent an off camera lamp or fireplace since the artist can focus their influence back into the scene. They are also often used to simulate indirect light and color spill because of their ability to isolate light to specific regions.
Ultimately, the spotlight is one of the most versatile weapons in the lighting artist’s arsenal. It can be controlled and manipulated to simulate almost all lighting situations. If using it well, the artist can utilize the benefits of the spotlight to craft a fine looking image.
Area Lights
An area light is a light source that emits light from a geometric shape and is, in many cases, the best representation of a real world light source. The shape is generally a 2D plane, but some software packages allow for light to be emitted from a variety of shapes. Some software packages automatically calculate area lights with decay, which is very different from other lights discussed thus far. This decay causes lights to decrease in intensity as they travel over a distance. It is also common for the amount of light emitted from an area light to increase as the size of the light grows.
Area lights are soft by nature since they are usually larger light sources than point lights or spotlights. They cast soft shadows and large specular highlights to create this soft overall look. Area lights are often used to replicate monitors, television screens, or large, flat fluorescent lights. Another common use for area lights is to be used to generate highlight specs or reflections in eyes or reflective surfaces.

Figure 3.4 Area lights emit light from a geometric shape onto their surroundings.
When creating an area light, it is important to ensure that it is only casting light in the one direction needed. Some software packages default to area lights emitting in both directions, but limiting it to only one side often cuts render calculations in half.
One main downside to area lights’ soft shadows is that they are difficult to process and can be taxing on the renderer. Because of this, the addition of an area light can increase a scene’s render time dramatically. As hardware and renderers become more powerful this is becoming less of an issue and area lights’ usage is on the rise.
Ambient Lights
Ambient lights do not exist in the natural world. By default, ambient lights illuminate all objects in the scene evenly and do not cast shadow or show any directionality. The closest real world example of an ambient light is on an overcast day where the clouds completely block the sun and everything is more uniformly lit throughout the environment. Even in this situation, there is still more directionality and shadow casting than exists in a true CG ambient light. Artists have often advised against using ambient lights as they will result in the scene looking flat and unrealistic. If applied subtly and with a soft touch, ambient lights can be used to lift the darkest of values in a scene and help the final image.

Figure 3.5 Ambient lights do not exist in the natural world. By default, ambient lights illuminate all objects in the scene evenly and do not cast shadow or show any directionality.
Some software packages offer increased controls for an ambient light that allow the artist to give some shaping qualities. The artist can create ambient shade which will give the light directionality based on its position in the scene and the ability to cast ambient shadows. With these controls in place, ambient light can be used to simulate large areas of bounce light or overhead illumination from the sky.
All the lights in the scene need to be meticulously crafted to fit their role within the shot. To obtain this level of sophisticated adjustments the software package gives the artist a series of controls to modify the properties of a particular light source and its shadow. This section aims to define many of the light properties and give a sense of how each one can be used.
Color
All light in the real world has color. Whether it is natural or man-made, light will always cast some shade of warm or cool light. The sun projects warm light, fluorescent light has a green tint, and a television emits an animated array of light colors. Even though light in the real world almost always has color, the default color of light in almost all renderers is white. Therefore it is absolutely essential for CG lights to adjust the light color in order to create a successful final image.
The color of a CG light can be represented in different ways. The first and most prominent is RGB values. RGB values refer to the additive method of color which uses a mixture of red (R), green (G), and blue (B) to create any color in the spectrum. If all three colors are turned up to full capacity, the resulting color is white. If all three are set to 0, the result is black. If all values were the same, then the color would be a range of gray values. When the numbers differ, that is when visual color values begin to emerge.

Figure 3.6 Depending on the light source, light color can change dramatically from the orange glow of a sunny day to the green cast of a fluorescent light.
These numbers can be represented on a scale of either 0 to 1 or 0 to 255. The 0 to 1 scale is simply the percentage of that color’s contribution. If the color desired is red, the number would be 1 0 0 since the contribution of red would be 100 percent and green and blue would be 0 percent. The 0 to 255 scale works the same way except the numbers are not percentages but whole values that represent the entire range of colors in an eight-bit image.
Additionally, colors can be represented in the HSV (hue, saturation, value) or HSL (hue, saturation, lightness) method. These methods describe color as it appears on the color spectrum by identifying the color’s hue, how robust it is, and how bright it is. The hue is a numeric value from 0 to 1 (or sometimes 0 to 360) that defines where a hue exists on the color wheel. Numbers 0 and 1 are normally red and all numbers in between represent a different hue. The saturation indicates how dull or pure the color is and the value is how light or how dark.

Figure 3.7 An additive color chart with examples of colors and their values.

Figure 3.8 A chart showing the how changing the hue, saturation, or value can affect the color.

Figure 3.9 Light intensity is a multiplier of the color and is one of the most influential light settings.

Figure 3.10 Isolating diffuse and specular illumination and showing how they work together in the final image.
Intensity
Dialing in the intensity so the values are just right is a huge part of the lighter’s responsibilities. It is not only about illuminating areas of the scene, but crafting areas of light and darkness to direct the viewer’s eye and create visual interest throughout the shot.
Technically speaking, intensity is simply a multiplier of color. When a light has an intensity of 1 and a color of white (1 1 1), that means the color being emanated from the light is pure white. When intensity is set to 0.5, the RGB values of the light color are cut in half (0.5 0.5 0.5). When the intensity is 2, they are doubled (2 2 2).
Diffuse Illumination vs. Specular Illumination
CG lights influence two different types of illumination on the surface material of objects: specular illumination and diffuse illumination. Diffuse illumination is the matte lighting across the surface of the object. The diffuse illumination generally makes up a larger, broader area of light on the object. Specular illumination is the highlights, or the small, bright, shiny area, of an object with a reflective surface. Together, they combine to create the overall lighting on an object.
Most software packages allow the artist the ability to control the specular and diffuse contributions individually in order to craft the look. As will be seen in future chapters, there may be times when the artist creates a light to emit only specular or diffuse values to achieve the look he or she is striving for.
Light Decay
As mentioned in Chapter 2, all real world light sources only illuminate for a certain distance. They naturally decay and lose intensity as they travel and eventually reduce down to nothing. CG lights, in most renderers, do not function this way. In many render software packages they illuminate indefinitely. Software packages offer controls to allow the artist to let a light decay in a way that is much more natural. These controls may be called drop-off, falloff, decay, or light decay depending on the rendering software. For the purposes of this book, this phenomenon will be referred to as decay. CG lights turn decay off by default because it greatly increases the render times and, in most situations, the audience will never perceive that decay in space.
The rate of decay can vary to allow for different types of mathematical calculations. As the decay rate is increased, the light rays will reduce and eliminate more quickly. Therefore, a linear decay rate will last longer than a greater decay rate like cubic or quadratic. Take note that as decay is added to the light, the light’s intensity may have to increase dramatically in order to compensate.

Figure 3.11 By enabling decay the artist can make a light appear more realistic as its value will decrease as objects get further away from it.

Figure 3.12 Volumetric lights can make it appear as if the light is passing through dust, mist, or other material that makes the light rays visible.

Figure 3.13 Demonstrating the difference between ambient shadows and cast shadows.
Volumetric Light
Software packages will also give the artist the ability to make light visible to the viewer. In nature this can happen if light is passing through dust or fog and the rays can become visible. In CG, this phenomenon can be called visible lights, volume lights, or, in some instances, God rays or crepuscular rays. For the purpose of this book, it will be called volumetric light. Volumetric light is most generally applied to spotlights as they can best harness and implement the volumetric light most effectively. When used properly, light fog can add drama or a “wow” factor to a shot.
Shadows are simply areas of blocked light. Shadows can be poetically described as dark, ominous shapes that follow people around but they are not objects unto themselves. So they are more the absence of light versus the addition of darkness. The aesthetic roles of shadows will be discussed in later chapters, but this section will discuss the technical ins and outs of shadows.
Types of Shadows
There are two main types of shadows that exist in computer graphics: cast shadow and ambient shadow. Cast shadows are the elongated shadows that mimic the shape of the object. Their source normally can be pinpointed to one light and they fall in the direction opposite the light.
What is Shadows’ Visual Contribution?
Shadows contribute greatly to the overall final look of a shot. Primarily, shadows help define spatial relationships. Without shadows, it can often be difficult to determine whether one object is in front of or behind another. Also, it makes it is impossible to determine if an object is touching another surface or floating above.
A well-crafted shadow can also supply a much-needed dark section to a shot. Oftentimes lighting artists need to create a dark section behind a character in order to get that character to visually pop off the screen and that can be done with a well-placed shadow. In other words, shadows and their placement can be constructed within the scene to allow for the best visual storytelling.
Shadows are also beneficial in helping the audience understand the environment the characters exist in and the time of day. This is not something that the audience is necessarily aware of but instead it is certainly something that is sensed. A long shadow with parallel lines will clue the audience that the shot is taking place outside, either late in the day or in the early morning when the sun is closer to the ground. A very large shadow behind a character will indicate the light source is much closer to the subject and therefore being lit by something other than the sun or moon.
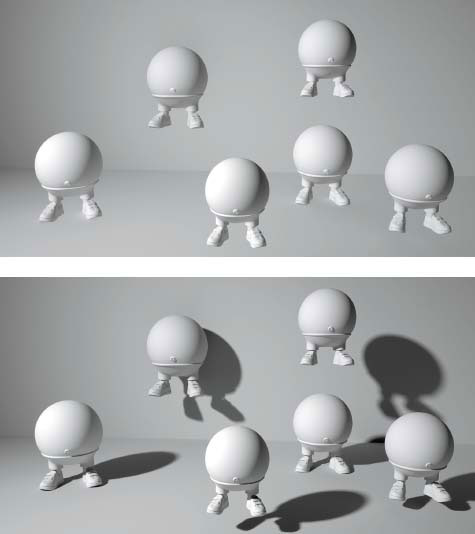
Figure 3.14 Shadows can help define spatial relationships between objects.

Figure 3.15 The length of the cast shadow can also help the audience identify the time of day or the overall lighting scenario.
Shadow Qualities
Shadow Size
Shadow size is based on a few determining factors. First is the angle of the light. The lower the light is relative to the object, the longer the shadow. The more overhead or perpendicular the light is relative to the subject, the shorter the shadow. In other words, the subject’s shadow will be much longer at sunrise or sunset than it is at high noon.
The distance between the light and the subject influences the resulting size of the shadow. Generally speaking, the further the light source is away from the subject, the smaller the shadow will appear. A light source that is very close to an object, like a candle or a flashlight, will create a very large shadow. A very distant light source, like the sun, will create a relatively much smaller shadow.

Figure 3.16 As the sun is high in the sky during the afternoon hours, the shadow length is relatively short. During morning or evening, as the sun is closer to the horizon, the shadow length will be much longer.

Figure 3.17 The closer an object is to a light source the larger that object’s shadow will appear to be. As the object moves further from that light source, the shadow will shrink in size.
Shadow Color
Shadows are often thought of as being black but that is rarely the case. They will almost always have at least some color value in them. Remember, in the real world shadows are nothing but an object blocking one or more light sources. That means the remaining light sources that are not completely blocked will hit the shadowed region and contribute to the color of that shadowed area.
Take a sunny day, for example (Figure 3.18). The sun would come down and hit the subject, casting a shadow onto the ground. The shadow would be the absence of the sunlight’s value and therefore contain none of that warm light contribution. The shadow would, however, still be lit from all of the blue sky surrounding the scene. Therefore, shadows on bright sunny days definitely have a distinct blue cast.
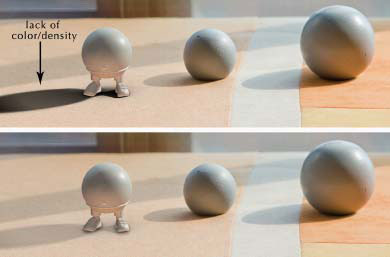
Figure 3.18 In this sunny day example, the shadow has a cooler cast that is being determined by the sky color.
Shadow Softness
Similar to shadow size, shadow softness is determined by the relative size of the light source in comparison to the object. The larger the relative size of the light source, the softer the light. This is true because the larger the light source, the greater the number of angles at which the light rays can reach the subject. This widely varying incoming light gets scattered over a greater area and therefore is perceived to be softer. If the light source is very small and far away, the shadow will not have this softness and be much harder around the edges. Think of shadow puppets. If the hands are closer to the light source the shadow is softer than when the hands are further away.
Light Properties for Shadows
Gobos
Shadow casting can be expensive to render. There are a couple of methods lighters use to simulate additional shadows in the scene without increasing render times. Creating a gobo or cookie cutter for a light is one of these methods. Gobos or cookies are based on the photographic principle of placing an object in front of the light source to cast a shadow onto the scene. The term “gobo” is derived from either the phrase “Go Between” or the acronym for “Goes Before Optics.” In most software packages, gobos can be accomplished by mapping an image file onto the color channel of the particular light. The image map will be projected through the light and the resulting dark shapes will appear in frame, creating the simulated shadow. Both still frames and an animated sequence of frames could be used.

Figure 3.19 The larger the light source is relative to the object, the softer the shadow that is cast.

Figure 3.20 Gobos or cookies are based on the photographic principle of placing an object in front of the light source to cast a shadow onto the scene.
Gobos are also a quick way of implying what is happening off screen without actually building geometry. The artist can project the shadow of a building, some trees, or even other characters through gobos. In that way gobos allow an artist to expand the CG world without costly additional geometry.
It must be remembered that gobos are 2D solutions to a 3D issue. They can look flat, unrealistic, and pasted onto a scene if not painted correctly. It is best to not rely on gobos too heavily, but when added with restraint and crafted with care they can be a powerful tool.
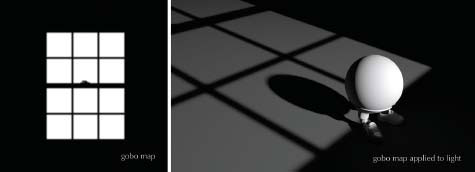
Figure 3.21 Gobo maps can be painted textures that are applied to a light’s color and projected onto the scene.
These are the main tools that every lighter has at his or her disposal. Professional lighters at animation studios do not have a secret vault filled with different lights or settings or “make it pretty” buttons. They work with spotlights, gobos, and raytraced renderers just like a student. The key is to learn how to utilize all of the attributes of these lights in such a way as to make successful final images.
|

Q. What is your current job/role at your company?
A. I’m the Technical Supervisor of Imaging at Blue Sky Studios. I work with the back end TD departments to ensure that our imagery meets a visual standard of excellence while simultaneously assessing cost and value to ensure we don’t spend extra on something our audience won’t see.
Q. What inspired you to become an artist on CG films?
A. During my last semester of my industrial design degree, I found myself slightly disillusioned with my job prospects. I really enjoyed design, but my portfolio at the time demonstrated a significant aptitude for an industry demand for photorealistic product renderings. The only job offers I was receiving were for positions where I’d be shackled to a computer to simply draft and make pretty pictures of someone else’s designs. Certainly not the end of the world, but I knew I would have very limited opportunities to express my creativity. A concerned professor of mine suggested that I get in touch with a former colleague of his who was then a CG supervisor at ILM. Within a few minutes of him looking at my portfolio, this gentlemen had me convinced my talents would be going to waste in the ID design world, and would be put to much better use in the VFX world. After that significant moment of inspiration, I created a self-taught graduate curriculum, chained myself to the university supercomputer for almost two years, and then landed my first job in the industry.
Q. What non-CG artwork inspires you?
A. I still gravitate towards design and architecture for inspiration. Architectural drawings by Hugh Ferriss and shape studies by Lebbeus Woods still blow me away. A friend of mine introduced me to Walton Ford recently, and I found his Audubon-style paintings with all of their subtle irony and humor to be pretty inspiring.
Q. What do you think is lighting’s largest contribution to an animated film?
A. Hands down, setting the “mood.” While an audience member will consciously connect with the animation performance and dialogue of a film, it’s lighting’s job to subconsciously influence that same audience member to register the mood of the scene via lighting techniques.
Q. Where do you think the future of lighting is headed?
A. On a shot level, full real time global illumination. We are getting pretty close to that, and we will owe the success of it to the new breed of renderers that will be able to take advantage of the bleeding edge 100+ core CPUs and co-processors just entering the market place. From a more overarching pipeline perspective, simultaneous real time multi-shot lighting for animated features. With the expected gains in per shot rendering, I see a day soon where one artist can light an entire sequence of shots simultaneously, relying heavily on intelligent automated management of the individual shot assets and scripts. Sort of a shot management “auto-pilot” where it allows the lighter more time to be an artist, and not a technician.
Q. Can you tell us why it is so important to be mindful of render times?
A. Well, it depends on the project, but in a feature-length animated film, establishing an acceptable range for render times is critical to the financial success of a film. Lighting decisions have a directly correlated impact on the shared machine resources throughout the whole studio. If a lighter fails to create an efficient lighting setup, not only will it affect their iterative and final rendering times for the affected shots, but it also takes away rendering resources from other artists that need them. That imbalance can lead to unanticipated purchases of more hardware, longer schedules, and a need for temp artists, which all could make or break a film.
Q. What are some techniques you would recommend to someone optimizing their lighting/render workflow?
A. Well,
• Don’t try to perfect everything within the render; if your output is mono then you can solve a huge number of issues by easily addressing the problem in post/comp.
• Don’t try to make everything perfect. Perfection is unattainable, so focus on what your audience will be looking at.
• Focus your time and attention on the eyes of a character. The audience connects to the character via the eyes, so don’t let your workflow skimp on them.
• If you’re working on multiple shots, learn how to script. Manipulating files via an automated/semi-automated script will save you time.
Q. If you could tell yourself one piece of advice when you were first starting out in this industry, what would it be?
A. Use your youth and lack of dependants to be as mobile as possible in the infancy of your career. Working at multiple studios will not only expose you to a plethora of techniques and workflows, it will also increase your salary much faster than it would if you stayed in one place.
Q. In your opinion, what makes a good lighting artist?
A. From my eighteen years in the industry, I can say the most successful lighting artists have had a limitless ability to visually and technically problem-solve without guidance from a superior. The old adage “he/she just gets it” really rings true. Lighting supervisors and leads are thrilled when you can complete shots with minimal intervention from them. If you can’t figure out what’s wrong with a shot from either a visual or technical perspective without hand holding, you’re gonna have problems.