
Chapter 1. Raspberry Pi
We recommend you start with the Raspberry Pi Model B, which includes wired Ethernet and enough USB ports for a mouse and keyboard. This makes it much easier to get started.

Unless you buy your Raspberry Pi as part of a kit, it probably didn’t come with an enclosure, but you can just put the bare board on your table for extra geek credibility. Or, if you have access to a 3D printer, CNC, or laser cutter, you can find many enclosures to fabricate on http://www.thingiverse.com.
A 4 GB SD memory card is big enough to fit the operating system. A bigger card may be less susceptible to wearing out over time (more storage to allocate to wear-leveling), so if you have an 8 GB or bigger card, even better.
The Raspberry Pi can drive a full high-def display, and can even send sound over HDMI. Most likely, an HD television will work nicely as a display for your Pi.
Having a keyboard and a mouse will make it easy to get started. Raspberry Pi Model B has exactly two USB ports, just enough for the mouse and the keyboard.
If you want to add a USB WLAN adapter, you need a powered USB hub. See http://elinux.org/RPi_USB_Wi-Fi_Adapters for a list of WiFi adapters that are known to work with the Raspberry Pi. You’ll be able to configure WiFi on your Pi by double-clicking the WiFi Config icon on the desktop after you install the operating system and boot to the graphical desktop environment.
Raspberry Pi from Zero to First Boot
This chapter will get you up and running with the Raspberry Pi quickly. The first thing you need to do is to install Linux on the Raspberry Pi. It involves the following steps:
- Download and extract the installer to a formatted SD card.
- Insert the card into the Raspberry Pi and connect it to a keyboard, mouse, and monitor.
- Turn it on, choose what to install, and wait.
Once that’s done, you are ready to boot the Pi into a graphical Linux desktop.
You’ll need the following parts:
- Raspberry Pi Model B
- Micro USB cable and USB charger (or computer)
- 4 GB SD card
- Display with HDMI port
- HDMI cable
- USB mouse
- USB keyboard
Extract NOOBS*.zip
Download NOOBS_vX_Y_Z.zip (as of this writing, it was NOOBS_v1_3_4.zip but the filename may be different by the time you read this) from http://raspberrypi.org/downloads.
You can also find all the important links mentioned in this book on http://botbook.com, along with mirrored copies of some files.
Insert the SD card into your computer. Most SD cards are FAT32 formatted at the factory, so unless you’re using an SD card that you’ve formatted yourself, extracting the NOOBS zip to the SD card is enough. After you unzip the file, make sure that the bootcode.bin file is in the root (top-level) directory of the SD card.
If you need to format the SD card, use the formatting tool from the SD Card Association.
In modern versions of Linux, Windows, and Mac you can just double-click or right-click the NOOBS zip file to extract it. For older versions of Windows, you can install 7zip to let you extract zip files.
Connect Cables
Connecting the cables is easy, because each cable will fit only its correct socket. Plug the mouse and the keyboard into the Raspberry Pi’s USB ports. If you’re using an HDMI monitor, connect an HDMI cable between the monitor and Raspberry Pi. If you’re using an NTSC or PAL monitor, use a composite video cable to connect the yellow plug on the Raspberry Pi to the monitor.
Next, connect the micro USB cable to Raspberry to supply power. Plug that cable into either a computer’s USB port or a 5 volt USB charger that provides at least 700 mA.
Boot and Install Raspbian
As soon as you connect power to the Raspberry Pi, it boots. No power switch is needed.
If nothing appears on the screen, you may need to select the right output mode for the Raspberry Pi. The default output mode is HDMI, but if you are connected via HDMI and see nothing, try pressing 2 on the keyboard connected to your Raspberry Pi to select HDMI Safe Mode. If you are connected via the composite (yellow) connector, press 3 for a PAL monitor or television, or 4 for an NTSC monitor or television.
You are greeted with a graphical menu of different operating systems as well as language and keyboard type. Choose “Raspbian [RECOMMENDED]” (Figure 1-2) and select your language and type of keyboard you’ll be using.

If you know any Debian, Mint or Ubuntu, you will feel at home with this choice; if you don’t, read on and you’ll still feel at home! Raspbian takes a few minutes to finish installing (Figure 1-3). After the installer completes, it will indicate that it installed the operating system successfully. Press Enter or click OK to reboot.

The Raspberry Pi configuration utility opens. Use arrow keys and Tab to navigate, and press Enter/Return to select an option, as shown in Figure 1-4.
You’ll want to enable the Boot to Desktop option. When you have finished changing settings, use Tab to select Finish and reboot when asked.
After the Raspberry Pi reboots, it will start up in a graphical desktop and will log you in automatically.
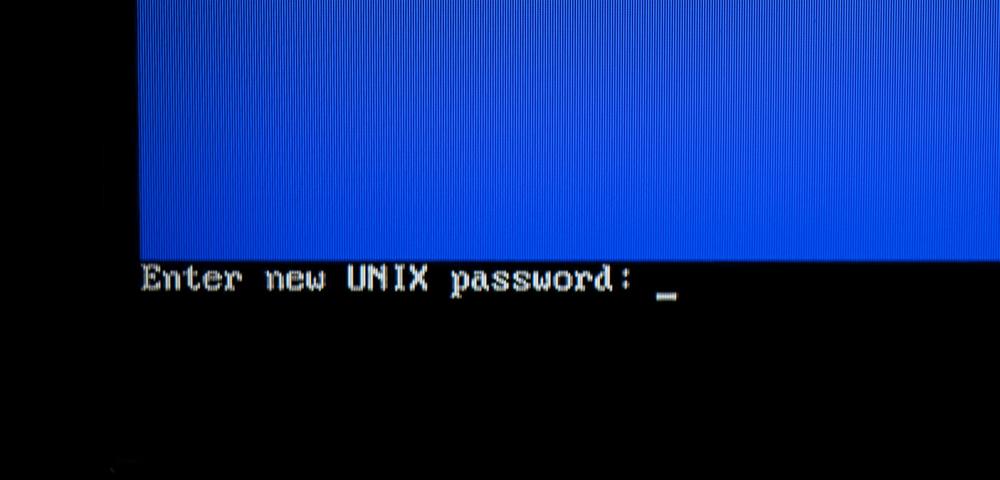
If you have chosen not to enable Boot to Desktop, you’ll always start in the command-line interface. Log in as “raspberry” with password “pi” (unless you changed the password). After you log in, type startx to start the X Window System, which is the graphical desktop.
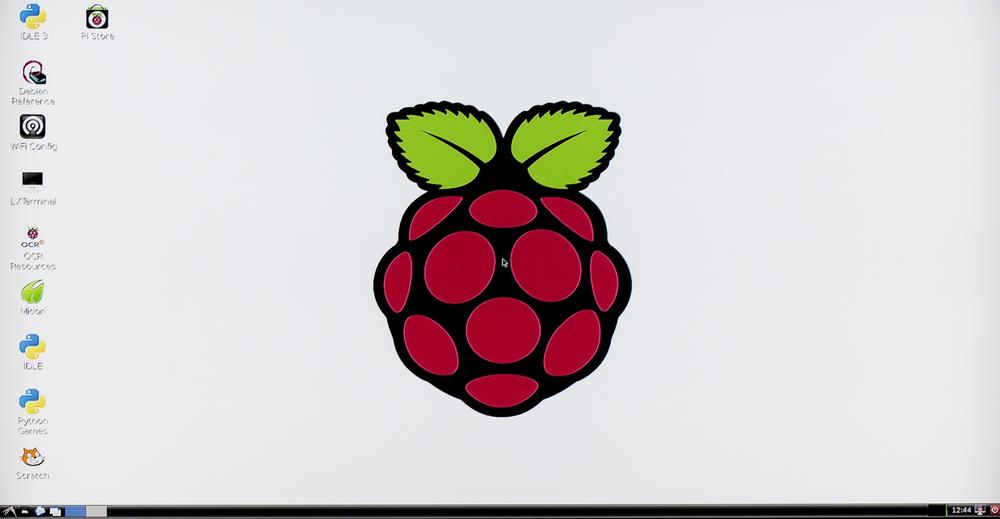
Welcome to Linux! You have now installed Raspbian on Raspberry Pi (Figure 1-5).
To turn off your Raspberry Pi, double-click the Shutdown icon on the desktop. After it finishes the power down process, you should unplug the power.
Troubleshooting Your Raspberry Pi Installation
Here are some solutions to common problems.
- Is your card FAT32 formatted?
-
If you’re having trouble booting from the SD card, it might not be formatted correctly. On Linux, use the built-in graphical partition editor (type
sudo gpartedto run it). Format the entire disk to FAT. You can run another tool with the commandsudo palimpsest(orsudo gnome-disks) and for advanced users,sudo partedwill get you into a classic command-line partitioning tool. On Windows and Mac, use the SD Association formatter (https://www.sdcard.org/downloads/formatter_4/). On Windows, choose the “format size adjustment” option in the formatter. On Mac, use “Overwrite Format.”
- Red power LED (PWR) not lit?
- Power LED dim or blinking? Power LED briefly on but then goes off? Raspberry Pi is not getting enough power. Connect a USB power supply that can provide 5 volts and 1 amp or more. If you’re powering the Pi via a laptop USB, switch to a desktop computer’s USB or use a powerful mobile phone or tablet charger.
- Black screen (but red PWR LED lit)?
- It’s possible that the Raspberry Pi can’t read the bootloader from the SD card. Power down, remove the SD card, and reinsert it firmly. Verify that the first file used in the boot sequence, bootcode.bin, is on the top level of the SD card. If the problem persists, format the SD card and extract the NOOBS zip on it again. If that doesn’t help, try a different SD card.
- Four colored boxes on the screen?
- The bootloader was read from the SD card, but the operating system kernel.img failed to boot. Format the SD card and extract the NOOBS zip again, or try another SD card.
- Boot fails with some error messages?
- Try disconnecting all USB devices, such as keyboard, mouse, and WiFi adapter (if you connected one). Leave only the SD card, display, and power. Remove and insert the SD card to ensure that it makes proper contact. If the problem persists, reformat the SD card and extract the NOOBS zip on it again.
- Messed up your operating system?
- If normal commands don’t work, your screen is full of garbage, or Raspberry Pi stops working suddenly, don’t worry. Hold down the Shift key on boot, and choose the option to reinstall Raspbian. This is quite fast and easy, but it deletes all data on the memory card. If it doesn’t help, reformat the card, extract the NOOBS zip to it, and go through the installation process again.
- No Internet?
-
If you have connected an Ethernet cable before boot, it should work like a charm in a typical network. Check that the link present (LNK) light is lit on the Raspberry Pi. If LNK is not lit, this means the Raspberry Pi thinks that one end of the Ethernet cable is not connected. Typically, you should see 100 (indicating a 100 Mbit/s or faster connection), and FDX (full duplex) should be lit. If LNK is lit and you still have problems, you may need some more advanced troubleshooting commands like the following:
ifconfig(displays network adapter configuration),route -n(displays the routing table for the network connection),cat /etc/resolv.conf(shows the nameserver in use), andping -c 1 google.com(tells you whether you can reach Google over the network).
If you get any error messages not mentioned here, try typing the exact error message into a Google search. Be sure to use the exact error message shown. If the message appears as the system is booting, take a photo of the screen with your camera or cell phone and transcribe it.
Feeling at Home in Linux
Raspberry Pi is Linux. Well, it’s built on Linux. The name “Linux” is used to describe the operating system kernel and the operating system itself. The Linux operating system is composed of the kernel as well as thousands of utilities and applications from various sources.
Raspberry Pi is not a workstation-class device. In terms of computing power, it’s more comparable to an entry-level portable tablet or a mobile phone. So even if you boot to its graphical desktop, don’t expect to dump your laptop or desktop computer just yet. Extremely low computing power combined with little memory means that applications like LibreOffice and Mozilla Firefox won’t be usable.
Command-Line Interface is Everywhere, Forever
Are you ready to feel the power of the $ prompt?
The command line has stood the test of time, and it might be something you’ll teach your grandchildren. The commands you use all the time, like pwd, ls, or cat, existed long before Linux was invented. (Linux was written by a Finnish student in Helsinki, just five kilometers from the botanical garden where I’m writing this.) Power users on both OS X and Windows dive down into the command line when they need to do something they can’t do with a mouse alone.
Most of the commands you’ll use with Raspberry Pi are the same you’d use on a Mac or Linux computer, and are similar even to the command-line tools on Windows.
As you may know, most of the world’s servers run Linux. Google, Facebook, Amazon, and most supercomputers run Linux. Web servers don’t run a graphical user interface, so that’s why most programmers and system administrators must know how to use the command-line interface (CLI). You can use these commands on a Linux desktop or laptop, too.
The CLI is easy to automate. Whatever commands you can type on the command prompt (also known as the shell), you can also turn into a program. You just put each command into a text file, one command per line (we show you how to do this in the next section). Then you can run that program with dash (on Raspberry Pi, the shell is named dash). Whenever you realize you’re typing the same 10 commands over and over, it’s time to turn them into a script.filename
Even though CLI scripts are so easy to write that they are good for quick-and-dirty one-off scripts, they are also suitable for serious, mission-critical applications. For example, Linux uses scripts for booting and controlling daemons (server applications that run in the background).
Looking Around
After you boot your Raspberry Pi into the graphical user interface, you can start up the command-line interface by double-clicking the LXTerminal icon on your desktop.
Besides being great for browsing the Web, the Midori web browser is useful if you want to copy and paste some sample code from http://botbook.com.
The prompt $ means Linux is waiting for your command. Type pwd to print your current working directory (where you are in the file system). Linux answers with a path, such as /home/pi/.
To list the files in the working directory, type ls and press Return or Enter. These are the files you can readily manipulate. Whenever you get an error like No such file or directory, just use pwd to see where you are and ls to see what files are in the working directory.
You will always need to type Return or Enter after you type a shell command such as ls. Before you press Return/Enter, you can use the Backspace and arrow keys to edit the command.
To edit (or create) a file called foo.txt, use nano foo.txt. Type some text, then press Control-X to save it (when prompted whether to save, type y. When asked for the filename, just press Enter or Return). To edit the file some more, type the command nano foo.txt again.
Text Files for Configuration
In Linux, most things are text files. With just the commands listed in the previous section, along with the sudo command, a skillful hacker can change many system settings. All configuration in Linux is stored in text files. System-wide configuration files are in the /etc/ directory and per user configuration is in the user’s home directory, /home/pi/.
Even the Pi’s input and output pins can be manipulated by editing text files under the /sys/ directory. Later in this book, you will learn to connect sensors and LEDs to Raspberry using GPIO pins.
If you connected the Pi to the network with an Ethernet cable before booting, your Raspberry Pi should already be connected to the Internet. Test this by typing ping www.google.com. You’ll see a result every second. Kill the command after a while by typing Control-C. If the network is working well, it should report a packet loss of 0%. You can also download whole web pages with commands like curl botbook.com and wget botbook.com.
sudo Make Me a Sandwich
Linux is well known for its robust security model. The separation of user privileges is one of its key features. Normal users can make changes only to files that affect their working environment. This means that they can modify files only in their home directory (/home/pi/) and in temporary working directories such as /tmp/.
The super user, or root user, is all-powerful and can change any file on the system. To use root’s privileges, put sudo in front of a command. Putting sudo in front of the command runs that commands under the privileges of the root user.
For example, Raspbian’s package manager makes it very easy to install additional software, but you need to use root’s privileges to install anything. Before you install new software, you need to update the list of what’s available with sudo apt-get update. This requires a network connection because all the software packages are on a file server.
Many Linux and Unix systems (such as OS X) are configured such that you need to type your user password when you use sudo. This is an extra safety step. By default, Raspberry Pi’s Raspbian operating system does not ask for this. Be careful using sudo, because you can easily make mistakes that would render the operating system unbootable.
You can install any program from a repository by specifying its package name. To install ipython (an interactive tool for experimenting with the Python language and data visualization), use sudo apt-get -y install ipython. The -y parameter tells the package manager to assume a “yes” answer to any questions it asks. The package manager (apt) does everything for you.
After a moment, you can run the newly installed package by typing ipython. Any python command will work here, but exit() will get you back to the command prompt (“$”), where you can type shell commands.
Different prompts are one way of indicating which program you’re talking to. When you see the shell, or command prompt ($), you can type the name of built-in shell commands as well as programs installed on your Raspberry Pi. When you see another prompt, such as the ipython prompt (In [1]:), you can type Python commands.
Installing daemons (also known as servers) is just as easy. Try installing the most popular web server in the planet, Apache, with this command: sudo apt-get -y install apache2. When it finishes, you can pull down your web server’s raw home page with curl localhost. To browse your Apache web server from another computer, determine your IP address with the output of the ifconfig command and type that address into a web browser on another computer connected to your network.
You will see at least two adapters listed in the output of ifconfig. Use the Ethernet adapter’s (eth0) address, or if you’re using WiFi, use that adapter’s address.
Phew! That was a lot of command line if you are (were) a beginner. To give yourself a well-earned break, power off the Raspberry Pi by typing the command sudo shutdown -P now. Just like you do on your workstation, you must shut down properly so that data gets actually written to disk before you power off. Once it shuts down, you can unplug it from the USB power source. When you’re ready to use it again, plug it back in.
Still wondering what we’re talking about with the sudo sandwich? Try searching the Web for “xkcd sudo sandwich.” You can use the rest of your break to read some of the other comics there.
See Appendix A for a cheat sheet of Linux commands.
Connecting Electronics to Raspberry Pi Pins
The Pi’s GPIO (general-purpose input and output) pins let you connect electronic components directly to the Raspberry Pi. These pins are called general purpose because you can decide what purpose they serve, and you can even configure the same pin to be an input or an output at different times. Throughout this book, you will learn the following:
- Digital output (turn an LED on and off)
- Digital resistance (detect whether a button is pressed or a sensor is active)
- Digital input for very short pulses (used by sensors such as a distance sensor)
- Analog resistance (analog resistance sensors for pressure, light, temperature)
- Industry standard protocols, such as I2C and SPI (used by the Wii Nunchuk and analog-to-digital converters)
Unlike most other tutorials available at the time of writing, we’ll teach you how to use digital input and output without having to invoke root privileges all the time. This provides security and stability benefits.
For digital input, you’ll learn to use the Pi’s internal pull-up resistor, so that your circuit uses a minimum number of components.
For measuring analog resistance, you’ll use an external analog-digital converter chip.
Many components in everyday products communicate over industry standard protocols, such as I2C and SPI. You will see examples of both protocols later in the book.
But first, let’s show you how to use the most basic form of digital output.
Hello GPIO, Blink an LED
In this “Hello GPIO World” example, you’ll attach a new LED to Raspberry Pi and blink it.
We start all of our projects with a “Hello World” on any platform, on any language. So whenever you are about to build something more complicated, it’s a good idea to build this “Hello GPIO World” first. This lets you confirm that the hardware and software are functioning at the most basic level. If your “Hello World” example doesn’t work, you need to fix it before trying something more complicated.
Parts needed:
- Raspberry Pi
- Female-to-male jumper wires, black and green or yellow color
- Solderless breadboard
- 470 Ohm resistor (yellow-violet-brown stripes)
- An LED
If you don’t have all the parts at hand, see Troubleshooting for suggestions. For wires, a female connector is one that has a receptacle and a male connector is one that has an extending pin. You will often see female abbreviated as F and male abbreviated as M, along with other characteristics of the connector, such as its length. The type of female-to-male jumper wires you need are typically sold as “male to female breadboard jumper wires.”
GPIO pins are not protected against overcurrent (Figure 1-6). Unlike Arduino, Raspberry Pi is not forgiving on user mistakes. Data pins can take only 3.3 V. Connecting a +5 V pin to a data pin can easily break your Raspberry Pi, or at a minimum, render that pin unusable. Double-check anything that you build on a breadboard, and be very careful where you place any test probes if you use a multimeter with the GPIO pins.

Building the Circuit
The circuit is simply an LED with a current limiting resistor, connected in series between GPIO pin 27 and ground (Figure 1-7). Connect the short (negative) lead of the LED to the black wire, and the long (positive) lead to the resistor. You should make these connections while the Raspberry Pi is shut down and unplugged.
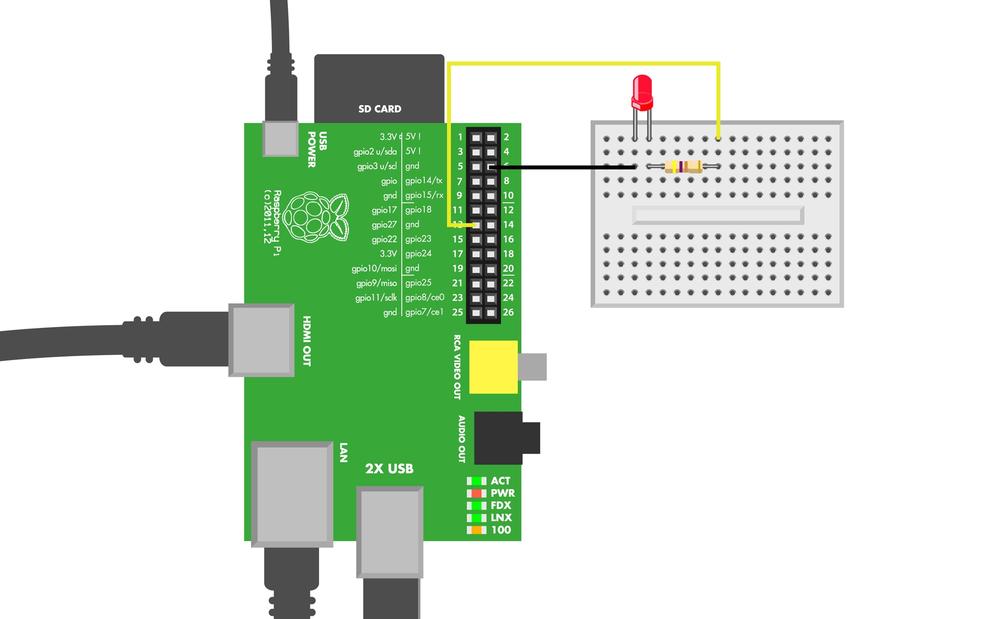
Build the circuit on the breadboard (Figure 1-8). Double-check all connections to avoid breaking your Raspberry Pi. After you’re sure you’ve connected the wires correctly, you can power up your Pi.
To learn about how the Raspberry Pi’s pins are numbered, read on.

Two Numbering Systems: Purpose and Location
Each GPIO pin has two numbers: purpose and physical location. To find the correct pin in the GPIO header, you should learn to convert between the two numbering systems.
Locate the GPIO pin header on Raspberry Pi (Figure 1-6). When converting between purpose and physical location numbers, use the numbering diagram (Figure 1-9).
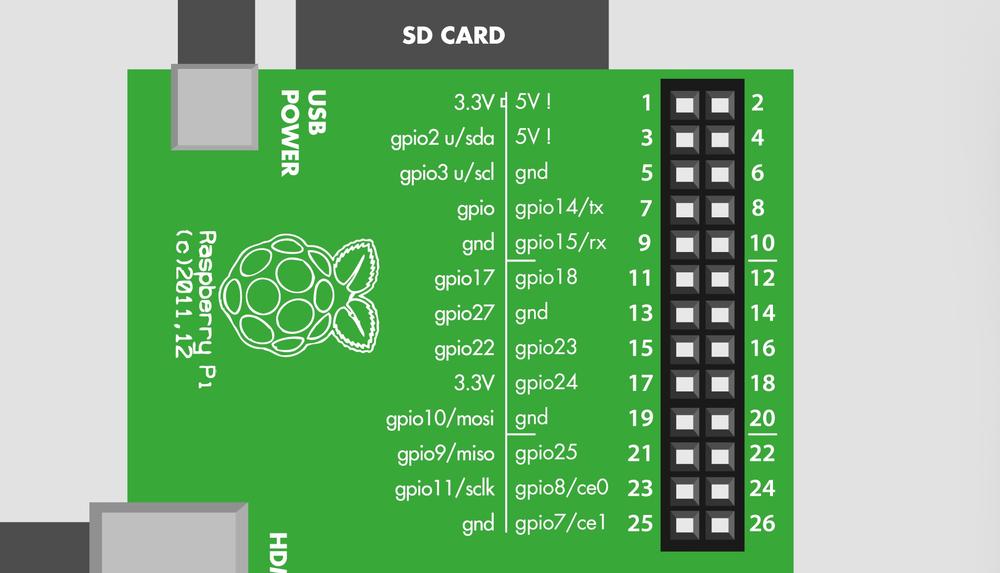
The left side of the numbering diagram shows the purpose of the pins (GND, GPIO 27). The right side of the numbering diagram shows the physical location (1 to 26).
The physical pin header has a running number, from 1 to 26. There is a tiny white box drawn near pin one, and it is also labeled P1. This physical pin header number tells you where to insert the jumper wire. These physical numbers are also known as board numbers.
There is also another, purpose-based numbering. The code you’ll be writing uses GPIO numbers, such as GPIO 27, which corresponds to physical pin 13 (which is the pin you connected to the resistor with a wire). Circuit diagrams are likely to refer to ground (GND), +5 V, and +3.3 V, and Figure 1-9 will help you find them. Some pins can have multiple purposes. For example, GPIO 10 can be used for the SPI bus. These purpose-based numbers are also known as BCM numbers.
To help you get started, the two pins used here are listed in Table 1-1. For future projects, learn to find these numbers in the numbering diagram (Figure 1-9).
Controlling GPIO Pins from the CLI
Let’s see how to use the command-line interface to control the GPIO pins we just connected. First you’ll try it out as root, then advance to using it without needing to invoke sudo privileges each time.
Text files control everything in Linux. The kernel GPIO driver (a piece of software that controls how Linux talks to GPIO pins) makes the GPIO pins available to you through the virtual /sys/ file system. To control GPIO, you simply edit or otherwise make changes to these text files.
You don’t need a graphical user interface at this point, so we can do everything from the LXTerminal command-line interface. Double-click its icon to launch it.
If you configured your Raspberry Pi to not start in the graphical interface, or if you’ve used SSH to connect to it remotely from another computer, you don’t need to start up the graphical desktop system to try this out.
To turn on the pin, you first export it, configure it for “out” mode, and write the number “1” to it. All this is done by editing text files.
Writing to Files Without an Editor
Earlier, you saw how to modify the contents of a file with the nano text editor. Here’s how you can modify files without needing the editor.
First, let’s look at how to display text. You can print text to the terminal using this command (don’t type the $; it indicates the shell prompt):
$echo"Hello BotBook"
Any text you display this way can also be redirected to overwrite a file (be careful using this, and don’t overwrite anything important):
$echo"Hello BotBook"> foo.txt
If the file foo.txt, did not exist, it will be created. If it existed, it was overwritten without warning. You can use the > (redirection) operator to send the output of almost any command to a text file. You can see what’s inside that file with the cat command:
$ cat foo.txt

Hello BotBook
Couldn’t you just use nano foo.txt? Yes, of course you could. But it requires more typing, and it’s not as easy to automate.
Light Up the LED
We’ll use sudo the first time through lighting an LED. Does it feel wrong to use root for non-administrative tasks? If not, it should; if you mistype a command with sudo, you can potentially render your operating system unusable and will need to reinstall it.
Don’t worry, you’ll use sudo just to initially try it. Later, you’ll fix Linux’s file permissions and interact with the files that control GPIOs as a normal user.
Type sudo -i to get a root shell. Use root shell only as long as required by this task, and type exit when you’re done. You’ll notice that your prompt changes to a hash mark, #. Be careful what you type as root, as mistakes can break your operating system.
After you start the root shell, export GPIO pin 27 to be able to manipulate it (remember, just type the text to the right of the # shell prompt):
# echo "27">/sys/class/gpio/export
This creates the new virtual file you’ll use to blink the LED. Next, set pin 27 to out mode, so that you can turn it on and off.
# echo "out" > /sys/class/gpio/gpio27/direction
Now turn on the pin:
# echo "1" > /sys/class/gpio/gpio27/value
Your LED should light up now. Once you have enjoyed the light for a while, turn it off:
# echo "0" > /sys/class/gpio/gpio27/value
Did your LED light up? Hello, GPIO world!
Once you are done with playing root, remember to type exit. Your prompt should return to the dollar sign symbol $, indicating that you are working with the shell as a normal user.
Troubleshooting
If you had trouble setting things up, check out the following:
- Lacking a 470 Ohm resistor?
- Use any resistor in the hundreds of ohms range to take only a minor risk with your board. The resistor is just used for limiting current through the LED, to avoid frying the LED or the pins on the Raspberry Pi. If you don’t mind the LED being a bit too dim or slightly overworked, you can use any resistor value between 100 Ohm and just under 1 kOhm. (Such resistors will have a brown third stripe; see The Third Stripe Rule.)
- Can’t find female-male jumper wires?
- You can use an old 40-wire IDE hard drive cable (not 80-wire). Put the female side of the cable into GPIO header. Cut the other end. Pay attention to wire numbers. If you don’t need all the wires, don’t strip them. If you strip them all, at least use tape to cover +5 V wire ends. See http://bit.ly/1f0GWfV for a tutorial on using an old IDE cable. There are also many ready-made connectors available such as this one from Adafruit. MAKE’s Raspberry Pi Starter Kit, which includes a Raspberry Pi, includes the cable and a breadboard-ready breakout board.
- My LED does not light
- Did you insert it the right way? LEDs have polarity, and if you insert them backward, they won’t light up. The long positive leg of the LED goes to GPIO 27 (through the resistor). The negative side of the LED has a flattened area in the plastic body of the lamp, and a shorter lead than the positive lead. The negative side of the LED goes to ground. The arrow in Figure 1-10 is pointing to the cathode. You may need to look closely to see the flattened part at the base of the LED package. If you have trouble seeing it, grab an LED and check it out yourself.

- Nothing happens when I type root commands
-
Don’t type the prompt (
#); that is shown in the previous examples to show you what you’ll see on your Raspberry Pi screen. The shell shows that prompt when it is waiting for you to type a command while in a root shell. You wouldn’t type the normal user prompt “$” either, would you? The hash symbol has special meaning to the shell: it means that the rest of the line is a comment (a human-readable remark you leave in a program), and is ignored by the shell. - I can’t access the shell
- Review the instructions in Looking Around.
- I get an error message
- Copy and paste the exact error message into a search engine like Google. Also try putting quotes around your error message. You can try “Raspbian” or “Raspberry Pi” as additional search terms. When you solve your problem, it’s a good idea to blog about it and include the exact error message in your blog post so other people searching can find it.
GPIO Without Root
Avoiding root privileges will make the system more secure and more stable. For example, think about a program that serves sensor data to web. Would you run a program that strangers can connect to as root?
Before you begin, make sure that you can turn the LED on and off (Light Up the LED).
In modern versions of Linux, devices attached to your system are controlled by udev. Udev is a rule-based system that can run scripts when devices are plugged in. If you have developed apps for Android under Linux, you may have created a udev rule to modify permissions when your cell phone is plugged into the computer. If you have developed with Arduino on Linux, you have probably added yourself to the dialout group to get access to serial over USB.
Normally, the GPIO files in /sys/class/gpio/ are owned by the user “root” and the group “root.” You’ll see how to write a udev rule to change the group to “dialout.” You’ll then allow that group to read and write the files under /sys/class/gpio/. Finally, you’ll make the folders’ group sticky, so that any newly created files and folders under it will also be owned by the “dialout” group.
All system-wide configuration in Linux is under /etc/. Not surprisingly, udev configuration is in /etc/udev/. First, open an editor with sudoedit so you can create a new rule file:
$ sudoedit /etc/udev/rules.d/88-gpio-without-root.rulesAdd the text shown in Example 1-1 to the file. Be sure to type each line as shown (don’t type the numeric symbols; those are there to explain to you what is going on in this file). Udev rules are very sensitive to typos.
# /etc/udev/rules.d/88-gpio-without-root.rules - GPIO without root on Raspberry Pi ## Copyright 2013 http://BotBook.com#SUBSYSTEM=="gpio",RUN+="/bin/chown -R root.dialout /sys/class/gpio/"SUBSYSTEM=="gpio",RUN+="/bin/chown -R root.dialout /sys/devices/virtual/gpio/"#SUBSYSTEM=="gpio",RUN+="/bin/chmod g+s /sys/class/gpio/"SUBSYSTEM=="gpio",RUN+="/bin/chmod g+s /sys/devices/virtual/gpio/"#SUBSYSTEM=="gpio",RUN+="/bin/chmod -R ug+rw /sys/class/gpio/"SUBSYSTEM=="gpio",RUN+="/bin/chmod -R ug+rw /sys/devices/virtual/gpio/"

This comment explains the purpose of the file.

Sets the owner of the two directories to be root, and the group to be dialout.

Sets the sticky bit flag on these two directories.

Configures the permissions on the directories to give members of the dialout group read and write permission.
The rules are processed in numeric order, but this is probably the only rule affecting the GPIO directories, so the number does not matter. In Morse code (CW), 88 is short for hugs and kisses. We prefer it over the often-picked number 99, which means “get lost.”
To avoid typing and inevitable typos, you can download a copy of the 88-gpio-without-root.rules file from http://botbook.com.
Save the file (Control-X, press y, and then press Enter).
To use your new rules, restart the udev daemon and trigger your new rule with these commands:
$sudo service udev restart$sudo udevadm trigger --subsystem-match=gpio
In modern Linux, all daemons (“servers”) are controlled with scripts. So you could just as easily tell the Apache web server to reread its configuration with sudo service apache2 reload. Or you can make SSH server restart (stop and start) with sudo service ssh restart.
Next, check whether the ownership is correct:
$ ls -lR /sys/class/gpio/The listing should mention the “dialout” group many times. The parameter -l means to display a long listing (with owner, group, permissions), and -R means recursively list directory contents, too.
Let’s try GPIO without root now. Notice that our prompt is a dollar sign ($), indicating that we’re running as a normal user.
$echo"27"> /sys/class/gpio/unexport$echo"27"> /sys/class/gpio/export$echo"out"> /sys/class/gpio/gpio27/direction$echo"1"> /sys/class/gpio/gpio27/value
The first command unexports the GPIO so that the export command doesn’t get an error.
The LED should be lit now. You can turn it off with this:
$echo"0"> /sys/class/gpio/gpio27/value
Can you control the LED as a normal user? Well done!
This paves the way to use GPIO from almost any programming language.
Troubleshooting GPIO
- File permissions have not changed
-
If
ls -lR /sys/class/gpio/does not show “dialout,” the most likely cause is a typo in the rule file /etc/udev/rules.d/88-gpio-without-root.rules. Download the file from http://botbook.com and move it to the right place (for example,sudo mv 88-gpio-without-root.rules /etc/udev/rules.d/). To make Linux use the new rules, usesudo service udev restartor reboot withsudo shutdown -r now. - The LED is not lit
- Try it as root first (Light Up the LED) to make sure it works.
- I get an error message
- Write it down and search the Web for it.
GPIO in Python
You can use GPIO from Python by just writing and reading files in /sys/. This is the same method you used earlier with the shell.
Hello Python
As always, start with a “Hello World” to test your environment. Using a text editor, create the file:
$ nano hello.pyIf you can’t save the file, you might have used the cd command to navigate to part of the file system where you don’t have permissions. Type cd ~ to return to your home directory and try it again.
The file needs only one line:
"Hello world!"
Save the file (in nano, you save with Control-X, then type y and press Enter/Return).
Now run your program:
$ python hello.py

Hello world!
Running the python command without any parameters starts an interactive console. See also The Python Console.
Python GPIO
Let’s blink the LED connected to GPIO pin 27. Wire up the LED if you don’t still have it set up from the earlier experiment (Figure 1-7). Save the code in Example 1-2 to a file called led_hello.py on your Raspberry Pi and run it:
$python led_hello.py Blinking LED on GPIO27once...
Did your LED light up for two seconds? Hello, GPIO!
Any problems? Read on to code explanation and troubleshooting. “Hello World” is the right place to solve these problems. Whenever you have problems with more complicated code, make sure that you can still run this “Hello World.”
# led_hello.py - light a LED using Raspberry Pi GPIO# (c) BotBook.com - Karvinen, Karvinen, Valtokariimporttime#importosdefwriteFile(filename,contents):#withopen(filename,'w')asf:#f.write(contents)# main"Blinking LED on GPIO 27 once..."#ifnotos.path.isfile("/sys/class/gpio/gpio27/direction"):#writeFile("/sys/class/gpio/export","27")#time.sleep(0.1)writeFile("/sys/class/gpio/gpio27/direction","out")#writeFile("/sys/class/gpio/gpio27/value","1")#time.sleep(2)# seconds #writeFile("/sys/class/gpio/gpio27/value","0")#
-
Import the libraries you need. Each library has namespace with the same name as the library, so all commands you use from
timestart with that word, liketime.sleep(2).-
Define a new helper function for writing files. The function only runs later, when it’s called.
-
The modern way to access files in Python is the “with” syntax. That will automatically handle closing the file in case of any exceptions. In open(), filename could be /sys/class/gpio/gpio27/direction and
wmeans to open it for writing. This creates a new file handlefthat we use for the actual file operations.-
Even though you want to blink an LED, it’s a good idea to print something on the screen to confirm that the program runs. In Python this is not critical, as Python can print quite good traceback error messages that explain what went wrong.

Check that the pin is not already exported. Otherwise, the second run would result in “IOError: [Errno 16] Device or resource busy.” This style of checking the conditions first is sometimes called “asking for permission.” Another style, not used here, is to “ask for forgiveness” and use
try...except. We chose “asking for permission” here so that we can use an if-clause and keep the program simple.
Export the pin. This creates all the files for controlling the pin, like direction and value.

Because you want to write to the pin to set it on or off, you set the direction to “out.” If you want to read the value, you’d set the direction to “in.” If you are familiar with Arduino, you might remember a similar Arduino command
pinMode().
Set the value to “1” to light the LED. The value “1” means that the pin is set to 3.3 V, the HIGH level of a Raspberry Pi GPIO pin.

Wait for two seconds. It’s a good idea to put units in comments at least once for each function or variable so that others reading your code know what you were planning. During this time, the pins are left in their current state. In this case, GPIO 27 is “1” and lights the LED.

Set the value to “0” to turn off the LED.
Troubleshooting
- You receive a permission denied error
If you get an error like
IOError: [Errno 13] Permission deniedorIOError: [Errno 2] No such file, you can live dangerously and try running as root:$sudo python led_hello.py# for testing onlyIf it works correctly as root, good! You can now fix the permissions on the GPIO virtual files (GPIO Without Root). If you still have the same problem, reboot Raspberry Pi by shutting down, unplugging power, and plugging it back in. If all goes well, you can run it the correct way, as a normal user:
$python led_hello.py- LED does not light, but the program doesn’t give any errors
- Check the LED polarity and connections. Check that you have connected the jumper wires to the correct pins on the GPIO header (Figure 1-9). If that doesn’t help, you can use a multimeter to verify that you used the correct resistor (e.g., 470 Ohm). You can test the LED with a circuit that just has a battery, the resistor, and the LED in series. This will tell you whether the LED works.
What’s Next?
You have now set up your own $35 Linux environment. And you can even wire it directly to hardware. This means you have combined the power of Linux and electronics.
The system administration techniques you have been practicing are leading you in the right direction. It’s always good to use minimum (non-root) privileges whenever possible.
To keep playing with your Raspberry Pi, you can now move ahead to the sensor projects in this book. The individual sensor examples teach you how to use digital input, analog input, industry standard protocols, and to measure pulse length with an interrupt.
You can apply your new system administration and GPIO skills with all the sensors in this book. Raspberry Pi usually shines with sensors that use more advanced protocols. This advantage is clear with I2C sensors such as Wii Nunchuk, MPU 6050 accelerometer-gyro, and the GY65 atmospheric pressure sensor.
Welcome to embedded Linux!