
Up to this point, you’ve learned how to create networks using Cisco devices, but GNS3 can do so much more! It uses a robust set of network tools that allow you to integrate external applications into your GNS3 projects. In this chapter, you’ll explore some of these tools by learning how to integrate PC hosts into projects using Virtual PC Simulator and VirtualBox. The chapter will also cover basic packet sniffing using Wireshark.
One way to add hosts to your projects is with VPCS, a small application that simulates up to nine DOS-like PCs. VPCS hosts have a limited set of commands but are well suited for testing end-to-end connectivity across your GNS3 networks. VPCS uses very few PC resources, which allows you to add numerous hosts to projects without bogging down your PC.
If you’re running Windows or OS X, VPCS should have been included when you installed GNS3. If you’re using a Linux system, VPCS source code should have been included in your GNS3 for Linux download, but it will need to be compiled before you can use it. Compile and install it using the following commands, replacing x with the version number of your VPCS source file:
$ unzip vpcs-x.zip
$ cd vpcs-x/src
$ sh mk.sh
$ sudo cp vpcs /usr/local/bin/
To use VPCS, drag a VPCS host node from End Devices on the Devices toolbar to your workspace. Before you can start a VPCS host, it must be connected to another device in your project. After starting a VPCS host and opening a console, you’ll be presented with a window similar to Figure 5-1.
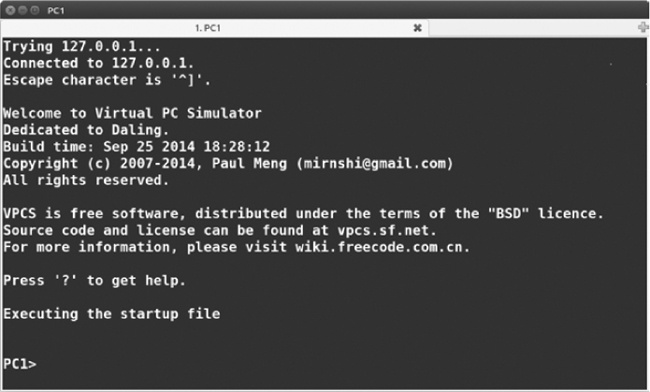
If you don’t see the VPCS console or if your application displays errors, verify that the program resides in /usr/local/bin/ (on Linux) and that the path has been set correctly in the GNS3 preferences. The developer provides very little in the way of support or documentation, so if you continue to have problems, you may want to visit the GNS3 forums (http://community.gns3.com/) for a possible solution.
The commands in VPCS are mostly self-explanatory, but I’ll cover a couple of them here to get you started. To see a full list of supported commands, you can enter a question mark, ?. To display the configuration of your hosts, you can enter the show command. To display the parameters for a specific command, enter the command name followed by a question mark. For example, entering ping ? would display all the options of the ping command.
After launching VPCS, you need to configure the host for use with GNS3. Typically, this only requires setting the IP address, subnet mask, and gateway address.
VPCS supports IPv4 and IPv6 addressing. You can manually configure an IP address or acquire one automatically if a Dynamic Host Configuration Protocol (DHCP) server is running in your GNS3 project. To manually configure an IPv4 address, you would enter ip-address mask gateway. The following example sets an IPv4 address to 192.168.1.50 using a subnet mask of 255.255.255.0 and sets the default gateway to 192.168.1.1:
PC1> ip 192.168.1.50 255.255.255.0 192.168.1.1You can enter the same IPv4 address using Classless Inter-Domain Routing (CIDR) notation in place of a standard subnet mask, as shown here:
PC1> ip 192.168.1.50 /24 192.168.1.1To manually configure an IPv6 address, enter the ip command followed by a valid IPv6 address and mask. The following example sets the IPv6 address to 2014:12:1a::50 using a 64-bit subnet mask:
PC1> ip 2014:12:1a::50 /64To configure a host automatically using DHCP, enter the dhcp command for each host that requires an address, as in this example:
PC1> dhcpUse the save command to save your VPCS settings with your GNS3 project.
PC1> save
.  done
The settings will be saved in the GNS3 projects folder under GNS3/projects/<project_name>/project-files/vpcs/<vpcs_uuid>. Later, when you load your GNS3 project, the configuration settings will automatically be applied to the host.
To test VPCS, create a project using a VPCS host node and link it to some other device, like a router. Assign an IP address to your VPCS host and the other device, and then use ping or trace to test connectivity. If all goes well, you should receive a reply like the one in this example:
PC1> ping 192.168.1.1
192.168.1.1 icmp_seq=1 ttl=255 time=35.821 ms
After successfully pinging devices, you can examine the ARP cache (MAC address to IP table) using the arp command, as in the following:
PC1> arp
cc:00:05:a9:00:00 192.168.1.1 expires in 114 seconds
If a ping is unsuccessful, VPCS displays a “host not reachable” message:
PC1> ping 192.168.1.1
host (192.168.1.1) not reachable
You can troubleshoot this by verifying that your router interfaces are up in GNS3 and checking that all the IP addresses and subnet masks have been correctly assigned.
Another cause may be your PC’s firewall settings, especially if you’re using a Windows PC. In general, disabling your firewall entirely while working with GNS3 is a good idea and might resolve this and other issues.
VPCS is a great tool for adding simple hosts to GNS3 and testing connectivity, but sometimes you need a host that’s running a real operating system rather than a simulated one. This is where VirtualBox comes in. VirtualBox can run most PC-based operating systems, including Windows, Linux, FreeBSD, and others. It’s also useful for running network operating systems such as Arista vEOS, Juniper Firefly, and NX-OSv.
The upside to using VirtualBox is that it provides you with hosts running actual operating systems; the downside is that those operating systems may need substantial resources from your PC. If all you need to do is test connectivity, then stick with VPCS, but if you need a host that provides a robust set of network utilities (to test the security of your GNS3 network, for example) or to run some other router or switch OS, then you might want to use VirtualBox.
To install VirtualBox on Windows, download the appropriate installer from the VirtualBox website (http://www.virtualbox.org/). Launch the installer and click Next when you see the Welcome screen to bring up a customization window. Make any desired customizations here and follow the onscreen instructions to complete the installation. I recommend accepting the default values to ensure that VirtualBox runs correctly with GNS3.
After the installation completes, you can launch the application by using the Windows Start menu or by clicking the VirtualBox icon.
To install VirtualBox on OS X, download the appropriate installer from the VirtualBox website (http://www.virtualbox.org/) and launch it. When the VirtualBox installation screen appears, double-click the VirtualBox.pkg icon and follow the onscreen instructions. The installation requires elevated privileges, so have your administrator password handy. Once the package is installed, you can launch it from your Applications folder by double-clicking the VirtualBox icon.
VirtualBox is supported on most Linux distributions, but check your Linux package manager to verify that it’s supported on your specific platform. On Ubuntu and most other Debian-based Linux systems, use the apt-get utility to update your package manager and install the latest version of VirtualBox. Be sure that you have Internet access and enter the following from a terminal window:
$ sudo apt-get update
$ sudo apt-get install virtualbox
Once the utility is installed, you can launch it either by opening a terminal window and entering virtualbox or by launching it from your Linux window manager.
A VirtualBox appliance is a preconfigured virtual machine, often running a custom Linux distribution, that you can use in your GNS3 projects. Using a real operating system gives you more commands and greater flexibility than using a simulator like VPCS. You can download preconfigured VirtualBox appliances from the GNS3 website under the Download section.
Appliances need to be imported into VirtualBox before you can use them. Appliance package names end in .ova, which stands for Open Virtual Appliance, and are often referred to as OVA files. To import an appliance, launch VirtualBox, and you’ll be presented with the VirtualBox Manager window. From the VirtualBox Manager, you can import or create new virtual machine guests and manage all of your installed guest operating systems. Importing an appliance is a fast and easy way to add a guest because the configuration and installation of the operating system has already been done for you.
The appliances found on the GNS3 website are often optimized to use fewer PC resources than a standard installation of the same operating system. Unfortunately, this means your appliance might not have all the commands or tools you need, but you should be able to update or install additional software through its software package manager.
In Figure 5-2, you can see that VirtualBox has been configured with one guest (Linux Microcore).

Selecting the guest OS displays basic information about the guest’s configuration, such as the base memory and how much disk space has been assigned to the virtual machine. To modify the settings of a virtual machine, highlight the guest and click Settings in the toolbar. Just like real PCs, virtual PC guests often run better when given more resources, such as memory or additional CPU cores.
To import a VirtualBox guest appliance, download an image file and copy it to a folder in your user directory. Launch VirtualBox and select File ▸ Import Appliance; then click Open Appliance and browse to the location where you saved the file. Select the image file and click Continue followed by Import to complete the process. To test your VirtualBox guest, click Start, and your OS should boot up and run like a normal PC.
After testing your newly imported OS, you’re ready to configure the GNS3 VirtualBox preferences.
To manage VirtualBox guests, GNS3 uses the VBoxManage application. This program is automatically installed when you install VirtualBox. Before adding a VirtualBox guest to GNS3, verify the path to VBoxManage. Launch GNS3, select GNS3 ▸ Preferences on OS X or Edit ▸ Preferences on Windows and Linux, and then click VirtualBox to reach the window shown in Figure 5-3.
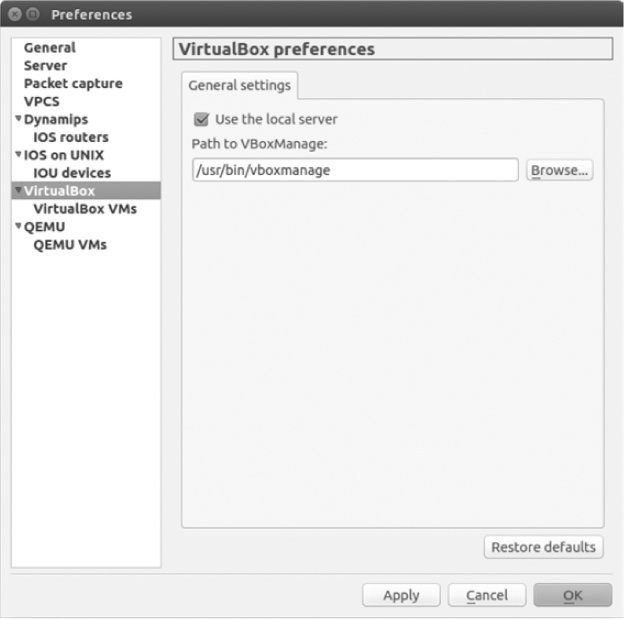
On Ubuntu Linux, the path on the General Settings tab should be set to /usr/bin/vboxmanage. Adjust the path as necessary and then click Apply and OK. On Windows and OS X, the VBoxManage path shouldn’t need to be changed.
Unchecking Use the local server will allow you to choose a local or remote GNS3 server when creating a VirtualBox host. Leaving the box checked ensures that VirtualBox guest will always run locally on your PC.
If you experience problems while starting a VirtualBox host or opening a console connection to a host, one or more of the default console port numbers may already be in use by another application running on your PC. To fix this, try closing the offending application or disabling your PC firewall. Another possible cause might be that the VirtualBox guest you’re using isn’t configured to accept console connections.
After configuring (or at least reviewing) the VirtualBox preferences in GNS3, you need to set up one or more VirtualBox hosts to use in your projects. Begin by selecting VirtualBox VM from the left pane. Click New and select your VirtualBox virtual machine from the VM list drop-down menu, as shown in Figure 5-4.

Click Finish to complete the installation. You should see the currently assigned settings for the virtual machine, as shown in Figure 5-5.

By default your virtual machine device can be found under End Devices in the Devices toolbar. By right-clicking the virtual machine icon in the Preferences window (Linux Microcore in this example), you can assign a different icon to the virtual machine and choose where it will reside in the Devices toolbar. This allows you to better organize all your GNS3 devices.
To modify the settings of a virtual machine, select the virtual machine and click Edit. In most cases you’ll want to go to the General settings tab and select the Enable remote console and Start VM in headless mode boxes, as shown in Figure 5-6. The first option allows you to access the console of a running virtual machine from GNS3’s assigned terminal application; the second option suppresses VirtualBox from opening a console window when you start a virtual machine in GNS3.
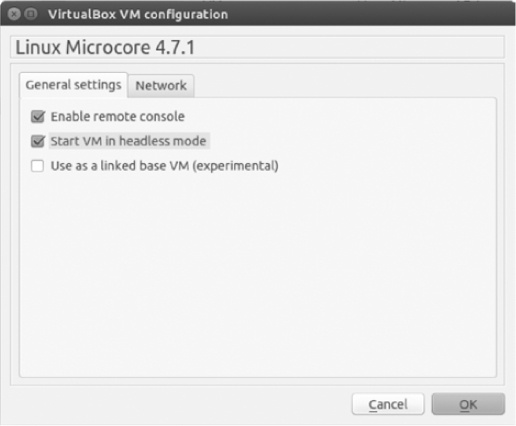
To modify network settings, click the Network tab. You can change the number of adapters installed in the virtual machine, the starting adapter number (usually 0 or 1), and the type of adapter installed in the virtual machine. When you’re finished, click Apply and OK to save the modifications.
After you have configured a virtual machine guest operating system, you can use it in your GNS3 projects.
To add a VirtualBox host to a project, drag a VirtualBox host node icon from the End Devices window to your GNS3 workspace.
A VirtualBox host can be used only one time per GNS3 project. If you want to use a particular VirtualBox host more than once, launch VirtualBox and use the Clone feature to create a cloned copy of the virtual machine.
Then, launch GNS3 and follow the same steps outlined earlier to configure the cloned host under VirtualBox Preferences. The next time you add a VirtualBox host node to your workspace, the cloned OS will be available.
After a VirtualBox host node has been added to your workspace, you’re ready to link it to other GNS3 devices.
To add a link between a VirtualBox host node and another device, click the Add a Link toolbar icon; then click your VirtualBox host node and choose an interface to use for the link. Select another device and choose an interface to complete the connection.
To boot the host, right-click the VirtualBox host node icon and select Start. Test the connection by configuring an IP address on your VirtualBox host and the device to which it’s linked; then use the ping command to verify connectivity.
On most Linux systems, like Microcore, you can manually configure an IP address and default gateway using the ifconfig and route commands. To see a list of available network interface cards (NICs) in Linux, use the ifconfig command without any configuration options.
$ ifconfig

eth0      Link encap:Ethernet HWaddr 08:00:27:7F:91:0A
          UP BROADCAST MULTICAST MTU:1500 Metric:1
          RX packets:0 errors:0 dropped:0 overruns:0 frame:0
          TX packets:0 errors:0 dropped:0 overruns:0 carrier:0
          collisions:0 txqueuelen:1000
          RX bytes:0 (0.0 B) TX bytes:0 (0.0 B)
          Interrupt:10 Base address:0xd020

eth1      Link encap:Ethernet HWaddr 08:00:27:C5:FC:66
          UP BROADCAST MULTICAST MTU:1500 Metric:1
          RX packets:0 errors:0 dropped:0 overruns:0 frame:0
          TX packets:0 errors:0 dropped:0 overruns:0 carrier:0
          collisions:0 txqueuelen:1000
          RX bytes:0 (0.0 B) TX bytes:0 (0.0 B)
          Interrupt:9 Base address:0xd060
Note
Not all Linux systems use the ifconfig or route command to configure TCP/IP, but most do. If these commands aren’t available with your distribution, check your Linux documentation to see how to configure an interface.
If you’re using a Windows PC virtual machine, you can manually configure an IP address by opening the Network and Sharing Center and clicking Change Adapter Settings. Right-click the adapter you want to configure and select Properties to modify the TCP/IP settings, as shown in Figure 5-7.

Enter your IP address information and click OK when finished. If you have a DHCP server configured in your GNS3 project, you can leave the fields blank and choose Obtain an IP address automatically instead.
Now that you’ve added a Linux VirtualBox virtual machine to GNS3, let’s create a simple project that networks the host to a Cisco IOS router. Begin by creating the project in Figure 5-8. Drag a VirtualBox Linux host and Dynamips router to your workspace and link them together using an Ethernet switch node.
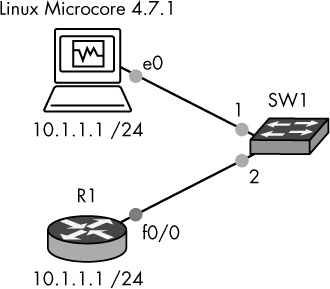
Start the devices and begin configuring your project by assigning an IP address to interface eth0 of the VirtualBox Linux host. Right-click the Linux Microcore node and select Console to open the terminal. From the Linux terminal shell, enter the following command to assign the IP address:
$ sudo ifconfig eth0 10.1.1.1 netmask 255.255.255.0 upNext, open a console to router R1, assign an IP address to interface f0/0, and bring up the interface.
R1# configure-terminal
R1(config)# interface f0/0
R1(config-if)# ip address 10.1.1.2 255.255.255.0
R1(config-if)# no shutdown
R1(config-if)# exit
R1(config)# exit
R1#
Finally, test connectivity by pinging your Linux host’s IP address from router R1.
R1# ping 10.1.1.1

Type escape sequence to abort.
Sending 5, 100-byte ICMP Echos to 10.1.1.1, timeout is 2 seconds:
!!!!!
Success rate is 100 percent (5/5), round-trip min/avg/max = 8/16/32 ms
Now let’s take a look at how you can use Wireshark to analyze packets on your GNS3 networks.
Wireshark is one of the most robust packet analysis tools available to network engineers, and it’s free! A packet analyzer, sometimes called a packet sniffer, is software that allows you to capture IP packets as they traverse your network. You can then open the packets to reveal and analyze their contents. Packet sniffers like Wireshark are used to troubleshoot networking protocols, thwart hackers, and even identify viruses, but they are often overlooked by beginners. If you’re an aspiring networking engineer, using GNS3 and Wireshark together is an excellent way to learn the ins and outs of networking and how network protocols work.
If you installed GNS3 using the Windows all-in-one installer, then Wireshark should already be installed. If you’re using OS X or Linux, then you need to download and install Wireshark manually.
Before installing Wireshark on OS X, you need to install XQuartz, an OS X version of the X Window System that’s similar to X.Org on Linux systems.
Download the appropriate version of XQuartz from the Mac OS Forge website (http://xquartz.macosforge.org/). Double-click the installer and then click the XQuartz.dmg installer package. Click Continue until you reach the welcome screen, and then click I Agree and Install to complete the installation.
Next, download and install Wireshark from the developer website (http://www.wireshark.org/). Double-click the downloaded file, followed by the wireshark.dmg installer package. At the welcome screen, click Continue, I Agree, and Install to complete the installation.
The first time you launch Wireshark, OS X will ask for the location of the X Window program. From the File window, click Browse, navigate to the Applications/Utilities folder, and then select XQuartz.
Note
The first time you launch Wireshark, XQuartz opens an Xterm window but not Wireshark. This strange quirk is easily corrected by closing XQuartz and relaunching Wireshark. It may take a moment to open, but this is normal. When the application starts, you should see the Wireshark welcome screen.
Now that Wireshark is installed, let’s look at how to capture packets from devices in your projects.
To install the latest version of Wireshark using the Advanced Package Tools on Ubuntu Linux, open a terminal program and enter the following commands:
$ sudo apt-get update
$ sudo apt-get install wireshark
Confirm the installation when prompted, and the package will be installed. After the process has completed, Wireshark should be ready to use.
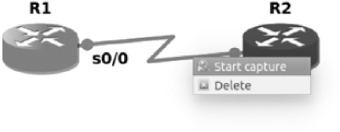
To begin capturing packets, right-click a link between two devices and select Start Capture, as shown in Figure 5-9. (To stop a capture, right-click the same link and select Stop Capture.)
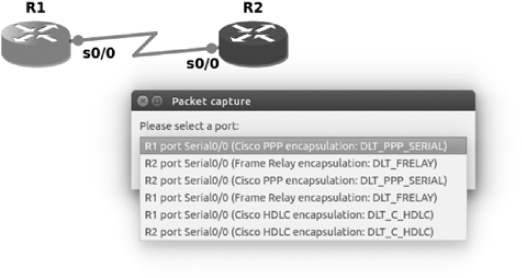
GNS3 prompts you for the source device, the interface name, and the encapsulation type to use for capturing data. You can capture data on Ethernet and serial interfaces. On Ethernet connections, you can choose only Ethernet encapsulation: DLT_EN10MB, but on serial connections, you can choose Cisco HDLC encapsulation: DLT_C_HDLC, Cisco PPP encapsulation: DLT PPP_SERIAL, or Frame Relay encapsulation: DLT_FRELAY.
To capture standard Cisco serial data (High-Level DataLink Control), choose HDLC; to capture serial Point-to-Point Protocol data, choose PPP; and to capture Frame-Relay data, select FRELAY. Use the drop-down menu to make your selection, as shown in Figure 5-10.
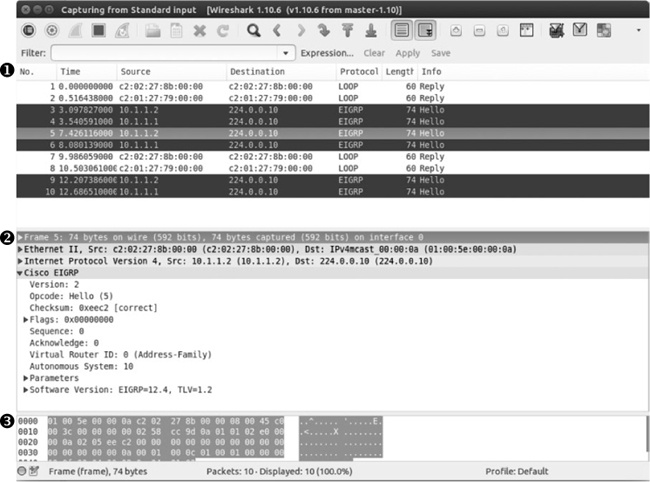
After making a selection and clicking OK, GNS3 will open Wireshark and begin capturing packets, as shown in Figure 5-11. Notice that the Wireshark window is divided into three distinct panes.
➊ Packet List pane The top pane of the window is dedicated to displaying individual packets as they’re being captured. Packet fields are displayed across the top and include the packet sequence number (No.), timestamp (Time), source IP address (Source), destination IP address (Destination), protocol name (Protocol), frame length size (Length), and information field (Info). Packets containing different protocol types are displayed in different colors to help identify them.
➋ Packet Details pane After a packet is selected from the packet list, details about the protocols and protocol fields of the packet are displayed in the middle pane. You can expand and collapse the fields to show or hide their details. The displayed field names are specific to the type of packet being captured and will change from one packet type to another.
➌ Packet Bytes pane The lower pane of the main window displays the raw data in hexadecimal format, with ASCII characters displayed to the right. This is what the data looks like natively as it crosses the network. Wireshark allows you to view this information in either hexadecimal or binary.
If you don’t see any packets displayed in the packet list, close Wireshark and stop the capture. Be sure your router interfaces are up and have been assigned IP addresses and then restart a capture and start Wireshark again.
Note
To learn more about using Wireshark, I highly recommend reading Practical Packet Analysis, 2nd Edition by Chris Sanders (No Starch Press, 2011). You could even become a Wireshark Certified Network Analyst (WCNA).
To change the default behavior of Wireshark in GNS3, go to Preferences and select Packet Capture. To prevent GNS3 from automatically starting Wireshark when you capture packets, uncheck Automatically start the packet capture application, as shown in Figure 5-12.
You have the option to save packet captures and analyze them later. To do so, select Wireshark Traditional Capture from the drop-down menu (under Preconfigured packet capture reader commands) and then click Set, Apply, and OK. Now when GNS3 captures data, it will automatically save the captured files in a directory named captures within your project folder, as in GNS3/projects/<project_name>/project-files/captures/.
To review saved packet captures, launch Wireshark on your PC, select File ▸ Open, browse to the captures folder, and select a capture file. The .pcap capture files will be named after the GNS3 devices involved in the capture, as in R1_FastEthernet0-0_to_R2_FastEthernet0-0.pcap.

To learn more about Wireshark, check out the online User’s Guide (http://www.wireshark.org/docs/wsug_html_chunked/). It’s well organized and provides a lot of information about using the software.
One key aspect of GNS3 is its modular design and ability to expand projects using other open source software. Using VPCS, you can add a large number of simple PC hosts, and with VirtualBox you can run hosts using full-blown operating systems such as Linux. This feature makes GNS3 very expandable because any network operating system that runs in VirtualBox can be added to your GNS3 projects.
Wireshark is one of the most underutilized tools around, but it’s also one of the most powerful. With Wireshark, you can dig deep and really see what’s happening on your networks. Whether you’re new to networking or already network certified, breaking out Wireshark and examining packets is a great way to hone your skills and increase your understanding of network protocols.
In Chapter 6, you’ll look at Quick Emulator, another open source PC emulator, and use it to create a special PC version of Juniper’s Junos OS known as Juniper Olive. Juniper Olive allows you to add fully functional Juniper routers to your GNS3 projects.