
Chapter 7. Exchanging data
- Publishing Collections without the autopublish package
- Using template-level subscriptions
- Limiting client data with parameterized subscriptions
- Creating a new aggregation data source
- Making a custom data source reactive
- Securing an application with server-side methods
In the early stages of development, it may often be helpful to have the contents of the server database available on the client as well. The increased convenience comes at the price of both performance and security, though. If the idea is to build low-latency and high-performance applications for the web, you must refrain from replicating the entire database on each client. Additionally, sharing all data probably includes sensitive information that should be viewed only by its owner. As a result, you must get rid of the automatic data publication and regain control over all database content.
This chapter introduces two key concepts to working with Meteor: publications and methods (see figure 7.1).
Figure 7.1. Publications and methods give developers full control when dealing with data.
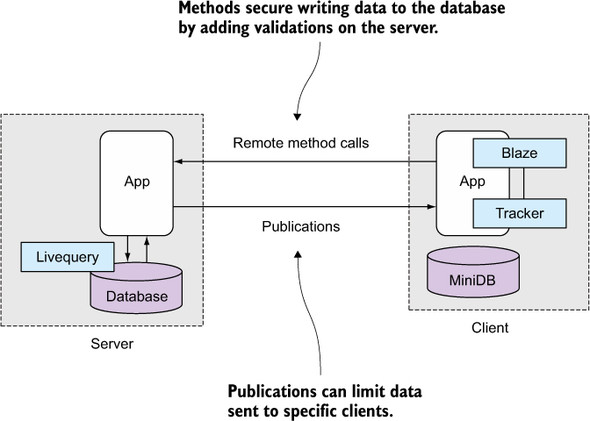
Using Meteor’s publications and subscriptions you can control not only how much data is sent to each client but also which fields are available to which user. In this chapter you’ll learn how to set up data publications on the server that’ll allow your application to easily hold thousands of database documents while sending only small subsets to the clients. That way, you can effectively address many performance issues that might arise.
In chapter 6 we discussed allow/deny rules for securing write operations to the database. Methods, Meteor’s remote procedure calls, are a powerful alternative to these simple rules. Methods may run on the server or the client. You’ll use them to secure all write operations to the database by properly validating all content received from the client. Their use isn’t limited to database operations, though—they can also be used for other actions like sending emails.
Throughout this chapter you’ll be enhancing an application so that it becomes robust enough to be deployed to the internet. The application you’ll use will store workout data to cover the following aspects:
- Manually defining publications and subscriptions
- Limiting data sent to a client by using parameterized subscriptions
- Aggregating data
- Restricting data only to a particular user
- Securing database writes with methods
The workout tracker is very simple; all code is put into five files. You’ll use a fixtures.js file to populate the collection with random workout data—look at the sample code for this chapter to see how it works:

7.1. Publications and subscriptions
Up to this point, Meteor has automatically published all collection data to all clients using the autopublish package. This package isn’t suitable for production environments because it doesn’t limit the amount of data sent to a client. What works well for a few database entries during development doesn’t scale well with hundreds or thousands of documents. Also, it doesn’t provide any access restrictions—every client may access all data. In this section, you’ll learn ways to send data to the client in an efficient and secure way.
You’re going to use an application that stores workouts such as running or biking and presents them to a user in a simple table. All workouts will be stored inside a single collection and contain the date when they happened and their distance as well. You’ll create a lot of sample workout documents at startup and show all of them in one table at first. Because you don’t want the client to load all the data at once, you’ll then limit the number of workouts loaded to the client and also add a button to fetch more data on each click. Eventually you’ll add an aggregated view of the whole data. For that, you’ll add up the distance of the workouts of each month. The aggregated data in the client will also be updated reactively. When a new document is added to the workouts collection, the count for the affected month will reactively show the updated sum.
7.1.1. publish() and subscribe()
Publications and subscriptions always come in pairs. Although Collections are typically declared on both the server and the client, publications exists only on the server. They can retrieve data from a database using the Collection.find() method just like a template helper. In figure 7.2 you can see an example where the publication retrieves three documents from the database. Those documents are then published under the same name as the collection: workouts.
Figure 7.2. An overview of publications and subscriptions
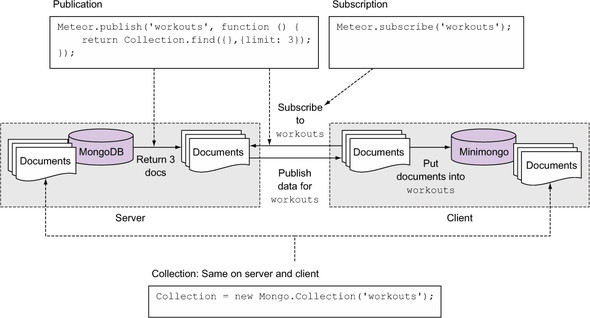
On the client a Meteor.subscribe() call initiates a request to the server to send data for the workouts collection. Notice that it doesn’t request the content from the database but from the server—more precisely, the result for Collection.find(). In this case the result is just three documents. The client receives these documents and puts them into a local collection of the same name. Although the Collection object has the same name on the server and client, it may hold different data, depending on context and publication settings.
Removing autopublish
Because you’ll manually decide what content to send to clients, you must remove the autopublish package. Adding and removing packages with Meteor is done via the CLI tool. Here’s how you get rid of the autopublish package:
$ meteor remove autopublish
Once the package is removed and the Meteor server is started, the client will have no data available anymore. Even though the client still knows about all available collections, no data is transferred from the server-side MongoDB to the browser’s Minimongo instance. If you were to query for documents with any collection, you wouldn’t get any results back.
Setting up a publication
In order to display the data you need from the workouts collection inside the MongoDB, you have to provide a pub/sub pair. First you’ll set up a simple publication that sends all workout documents to all clients that subscribe to that publication. Because all publications live in the server scope, you’ll put them in a new publications.js file within the server folder. The following listing shows how to set up the publication.
Listing 7.1. A simple server-side publication

Note
Publications are one-way streets that send data from the server to the client. To send data from the client back to the server, you must provide a secure method to insert and update data. We’ll look at this topic later in the chapter.
Setting up a publication won’t have any effect on the client at this point. It must specifically ask for the data via a subscription.
7.1.2. Global subscriptions
On the client you must add a subscription. Inside the workoutTracker.js file, add the following line at the top:
Meteor.subscribe("workouts");
Once you subscribe to the publication, you’ll see that all the data that’s available on the server-side MongoDB is also available through the Minimongo on the client. You can check inside a browser console by using the same code as inside the publication:
WorkoutsCollection.find({})
Calling Meteor.subscribe() returns an object with a stop() and a ready() method. stop() can be used to terminate a subscription, and ready() is true if the server has marked the publication as ready. It’s a reactive data source just like Collection or Session.
This is basically what the autopublish package gave you for free for all collections. Next you’ll start to control the data that’s published to the client by limiting the number of documents going to the client.
There are scenarios when two Meteor servers should exchange information. Technically, one server becomes the client of the other. The subscribe() method works only inside the client context, but there’s a way one server can subscribe to the data of another using a Distributed Data Protocol (DDP) connection.
You can connect to another server using DDP.connect(). It takes the URL of the remote server as the only argument. Once successfully connected, it’ll return an object that allows you to use subscribe() (to access published data), call() (to invoke methods), methods() (to define client-side methods), and a few more functions.
Connecting one server to another and acting as a client takes only three lines of code. First, the server-to-server connection is defined; a connection to http://192.168.2.201:3000 will be established. To receive the published data, you need to declare a collection. This time it’ll take not only a name as its argument but also how to connect to the master. Hence, server2 will be the second argument. Finally, the server may subscribe to remoteData. Again there’s a slight variation because you need to call the subscribe() method on the remote server rather than the local Meteor instance:
var server2 = DDP.connect('http://191.168.2.201:3000/'),
var RemoteCollection = new Mongo.Collection('remoteData', server2);
server2.subscribe('remoteData'),
7.1.3. Template-level subscriptions
Subscriptions using the Meteor.subscribe function are greedy. Regardless of whether a user views the subscription data, the function will register a subscription with the server and trigger data transfers. As soon as a user hits the front page of your application, all subscriptions will be made and data will be loaded, even if the user never looks at it. You can avoid such global subscriptions by binding them to templates, using Meteor’s template-level subscriptions.
When you use a template-level subscription, the subscription is initiated when the template is created. When the template is destroyed, the subscription is also terminated. That way, you can limit the actual data transfers between client and server. You also don’t need to worry about which route[1] requires which data; you can pass this relation directly to the template that requires that data. Each Template instance has its own subscribe function, which uses the same syntax as Meteor.subscribe. In the onCreated callback of a template, you can access the current template instance via this:
We’ll discuss route-based subscriptions in the next chapter.
Template.workoutList.onCreated(function () {
  this.subscribe("workouts");
});
Whenever the workoutList template is created, Meteor will automatically set up a subscription to the workouts publication. To determine whether the subscription is ready, you can use the Template.subscriptionsReady helper. It returns true if all subscriptions of a template are ready and can be used to show a loading indicator for the template itself, as shown in the following listing.
Listing 7.2. Using a template-level subscription with a loading indicator


Using template-level subscriptions gives you more control over when and where to load data. By avoiding global subscriptions, you also decrease the required traffic when initially loading a Meteor application. Especially when you’re rendering multiple templates on the same page, there’s no need to wait until all data is available—each template can use its own loading indicator.
In the rest of this chapter, we’ll use the global Meteor.subscribe because the examples are rather simple. For more complex applications, you can use the same syntax and place your subscriptions in the onCreated callback of a template. Their behavior is exactly the same, except they differ in lifespan:
- Meteor.subscribe is set up when the client loads your application and is terminated when the client closes the connection.
- Template.subscribe is set up when the associated template is created and is terminated when the template is destroyed.
7.1.4. Parameterizing subscriptions
For performance reasons, you never want the entire database content to be sent over the network. Besides taking a long time to transfer, too much information may be confusing to users. Therefore you’ll publish only the 10 newest documents of the workouts collection initially. Users can choose to request more documents if they want to see older records as well. Obviously you need to adjust the existing publication code. It must support both limits and take an argument to dynamically determine an offset to allow sending a second or third set of 10 documents. Let’s take it step by step.
The first thing you’ll do is tell the publication the limit you want to set for the workout query. You can add parameters to the subscription call that’ll be available as parameters inside the server-side publication function. This way, you can set options for the publication; the client tells the server what to do.
Warning
Whenever you’re dealing with data coming from the client, you must validate it before using it.
The publication takes an options argument that first needs to be checked. Instead of adding your own validation, you can use Meteor’s check() function.
Validating data via check()
With the check() function, you can match input values against known patterns. To limit the subscription, you expect the user to provide a number and nothing else. check() uses a simple syntax with two arguments—the value itself and the pattern it should be checked against:
check(value, pattern);
To ensure that the provided parameter contains only a number, you use check (options, Number); inside the publication. In our example, you’re dealing with an object, so you have to check a pattern for every parameter of the object:
check(options,
  {
    limit: Number
  }
);
You’ll use check() again when we discuss methods.
Dynamic subscriptions
Listing 7.3 shows the code from the server’s publications.js file.
Listing 7.3. Adding parameters to a publication

Every client can now subscribe to this publication and set a limit. The check() function expects an option object and will throw an error unless one is passed by the subscription. You have to create the subscription for the client that subscribes to the data provided by this publication. You’ll do this inside the client folder’s workoutTracker.js file because the subscription is available only in the browser. You’ll use Session to keep track of the currently used limit (see the following listing).
Listing 7.4. Subscribing to a publication with parameters
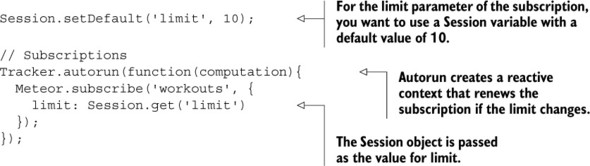
When the application first starts, the Session variable limit is set to 10 because it doesn’t have any other value. This is what setDefault does and it ensures that limit will always have a value.
The reason you need to put the subscription inside a Tracker.autorun is to create a reactive context. Once the Session variable limit changes, the subscription to workouts gets rerun with the updated limit value. This means whenever the limit value changes, triggered by an event or directly from the JavaScript console, the subscription is updated automatically. Then the new data from the publication is added to the client’s Minimongo and also rendered in the template.
To allow for a more convenient way to increase the number of documents to show, you can add a button with a click handler that adds 10 to the current limit value in the Session object (see following listing).
Listing 7.5. Adding an event handler to increase the limit by 10

As you can see, it’s not too difficult to remove the autopublish package and take control over the data that’s available on the client. With reactive variables, it’s also very easy to modify a subscription and the data that’s available. The same approach you used for limiting the amount of documents can easily be used for filtering and sorting. Before you proceed to the next section, try to add a second button that provides a value of -1 or 1 to sort all documents in ascending or descending order.
7.1.5. Publishing aggregated data to a client-only collection
Imagine you run three times a week, four weeks a month. Then you’re not only incredibly fit, but you also need to look at 12 different entries to understand how many miles you covered in a single month. That makes quickly comparing stats a pain. This is when data aggregation comes in. Instead of showing all the fine details, you sometimes need a summary of large amounts of data to make sense of it. Let’s extend the application so you can say for sure that you ran farther in June than in January.
If you had all workout documents available on the client, aggregating could be an easy task. By iterating over each document and adding the distance for each month, you’d be all set. Unfortunately, this approach has multiple downsides. One is you’d have to pass a lot of data over the wire. If you wanted to aggregate the data of the last 10 years, you’d end up sending thousands of documents over the network. Another downside is that the computation takes quite some time, and this would slow down the user’s UI, resulting in poor user experience. Therefore, you need to aggregate the data on the server and publish the aggregate as well. Figure 7.3 shows the client subscribing to both publications. Whereas workouts uses the find() method, distanceByMonth will use MongoDB’s aggregation framework.
Figure 7.3. Using two publications from a single database collection

If you’re familiar with SQL, you’re probably already thinking about doing a SELECT with a COUNT(*) and a GROUP BY, but that won’t work in the NoSQL world. MongoDB itself is built to handle large datasets and give analytical insight, so it also offers a way to aggregate data, just not using GROUP BY. You’re going to use the aggregation pipeline to compare the distances between all months of the year. Minimongo, the client implementation in the browser, doesn’t support using the aggregation pipeline, but this is okay as you’ll see.
The approach you’ll take involves creating a publication that doesn’t send data directly from a Collection but creates the aggregated data inside itself and returns this to all subscribers. This data is stored inside a collection that exists only on the client. It’s not persistent in the server-side MongoDB because it’d leave you with redundant data.
At first, you’ll create a new publication named distanceByMonth. It doesn’t have a corresponding collection inside the database. Where you previously put a find() operation on a database collection, the second argument to publish() will now hold the aggregation.
The aggregation framework for MongoDB isn’t supported out of the box. Several community packages are available that provide aggregation capabilities so you can easily add it yourself. You’ll fall back to the core MongoDB driver, then define the actual pipeline, run the aggregation so that it doesn’t block any other processes, and finally mark the subscription as ready.
Any publication can send status messages to its subscribers, indicating that content has changed or that it’s done with sending all available content. When publishing a database collection directly, these status messages are automatically managed by Meteor. When using a custom publication they must be called explicitly.
- added(collection, docId, fields)— When a new document is created, the first argument is the collection, followed by the document ID. The third argument contains all fields of the document (excluding the _id field).
- changed(collection, docId, fields)— For changed documents, again the collection name and ID are passed as the first argument, followed by an object that contains all updated fields (fields with a value of undefined have been deleted from the document).
- removed(collection, docId)— This takes two arguments: the collection name and the document ID that was removed.
- ready()— This takes no arguments and informs the client that all available data has been sent.
Listing 7.6 gives you the full code, which we’ll go through bit by bit. To use the MongoDB core driver you must use MongoInternals, which is defined as part of the mongo package included with each new Meteor project. A reference to the default database used by Meteor is stored inside db. Because you’re using the core MongoDB driver, you can use all functions, including aggregate(). The pipeline variable contains an array with details about the actual aggregation. The MongoDB aggregation pipeline consists of stages. Each stage transforms the documents as they pass through the pipeline. First, all matching documents are determined. In this scenario, all documents match because we haven’t defined any restrictions. Next, all resulting documents, or rather the specified field contents, are grouped together. All workouts are grouped by month and are given a new _id that represents the month (1 = January, 2 = February, etc.).
MongoDB isn’t reactive by itself and calling it would result in a synchronous call that would block all other server requests until the aggregation is finished. This is why you need a way to unblock the aggregation and receive a callback once it’s done while maintaining the full Meteor context. Asynchronous calls to external components should always be wrapped inside Meteor.bindEnvironment().
Note
This aggregation operates on the fly, meaning that every subscription will trigger the aggregation on database contents. If you notice that the processing takes a long time, it may be a better option to write the aggregated data to a dedicated collection.
Using the Underscore library, all months’ results are added to the subscription distanceByMonth. Finally, the publish() function signals the client that the subscription is ready.
Listing 7.6. Aggregation inside a publication


On the client side, you create a collection available only on the client that takes this data. Create this collection inside the client folder in the workoutTracker.js file:
DistanceByMonth = new Mongo.Collection('distanceByMonth'),
This looks and behaves exactly like any other collection, but the data comes from your custom publication and not the server-side MongoDB. You can use the data inside this collection as you normally would. You can create a new template and helper to display the data from the aggregation publication. Refer to the sample code for more details.
One downside of this approach is that this data isn’t reactive because the aggregation framework is just a dumb data source. That means if someone added a new workout for the month of April with an 8-mile distance, the aggregated data on the client for April wouldn’t be increased by 8 automatically. When the page is reloaded the subscription would be initialized again so that the screen would update correctly. This is definitely not how things are supposed to be inside a Meteor application where the client should be reactive. Next, you’ll see how to improve the publication to make this aggregated publication reactive again.
7.1.6. Turning an aggregation publication into a reactive data source
Unlike a normal Collection.find(), the aggregation publication isn’t reactive. Nevertheless, you want a client’s aggregated data to update reactively when data changes—just like adding a workout would update the limited list automatically. What’s missing to turn the aggregation into a reactive data source is an observer that monitors the workout collection and performs an action if a new workout is added.
Every collection cursor available—for example, the returned cursor from calling WorkoutsCollection.find()—has the ability to observe the documents that were added, deleted, or changed inside the collection. Which documents are observed depends on the query that’s used by the Collection.find() method.
By limiting the query for a find(), you can keep an eye only on workouts with a type of jogging and react if a new document is added, changed, or removed. At a later point, we could add a different action for workouts of type chess or aerobics. The function you’ll use for monitoring updates to a data source is observeChanges().
There are three cases that you can observe; each has an associated callback with one or more attributes. The associated callbacks are similar to those used for setting the publication status, but they don’t require that you pass a collection name as an argument:
- added(docId, fields)— When a new document is created, the first argument is the document ID, and the second contains all fields of the document (excluding the _id field).
- changed(docId, fields)— For changed documents, again the ID is passed as the first argument, and the second contains only the updated fields (fields with a value of undefined have been deleted from the document).
- removed(docId)— This takes a single argument: the ID of the document that was removed from the collection.
Note
Although they have the same names, the added, changed, and removed functions in a publication use a slightly different syntax.
The following listing shows the syntax of using all three callbacks on a watched WorkoutsCollection query.
Listing 7.7. Observing changes in a collection
WorkoutsCollection
  .find( query )
  .observeChanges({
    added: function(id, fields){
      // do something if a document was added matching the query
    },
    changed: function(id, fields){
      // do something if a document of the query changed
    },
    removed: function(id){
      // do something if a document of the query was removed
    }
  });
You know how to aggregate data in a publication as well as how to create a callback if a document is added to a collection. That’s all you need to make the aggregation publication reactive. The trick is to create an object within the publication that keeps track of all the aggregated data via observeChanges(). In this example workoutHandle is used to watch the collection and observe if a new document is added. If so, you can update the total distance of the month in the object that keeps track of the aggregated data. The newly updated data is then sent down to the client, telling it that the subscription has changed (see the following listing).
Listing 7.8. Using observeChanges to update aggregated data


Now whenever a new workout is added to Workouts, the object that tracks the aggregated data (workoutHandle) is updated and sends the change to the client. Go to your browser and add a new workout through the console. You’ll see that the aggregated data updates accordingly.
One last but very important thing to do is to clean up the publication accordingly. The observe methods will run endlessly if you don’t stop them. The right moment to stop the observation of the collection is when the client subscription stops:

Whenever the client stops the subscription, observing will be stopped as well.
Note
If you want to publish a single document, you still have to use collection.find({_id: options._id}) and not findOne(). This is because a publication must return a cursor whereas findOne() returns the actual result as an object.
7.1.7. Limiting data visibility by user ID
You can now control the data that’s sent to the client and make sure that not every workout is sent to it. Still, you need to find a way to decide how many documents a user can see and that he sees only his own workouts and not the ones from other users (see listing 7.9). For this, you’ll add the accounts packages we looked at earlier in this chapter. In a publication you can access the userId of the currently logged-in user by using this.userId, which is null if the user isn’t logged in.
Listing 7.9. Sending only the data a user is allowed to see

It’s important to store the reference to the user inside the workout document. If you do this, it’s as simple as adding { userId: this.userId } to the query in the WorkoutsCollection.find(qry...) function. Also note that if you log in or out, the data changes reactively.
The aggregated data is a little bit more complicated to adjust because you need to match the aggregation itself as well as the query that you want to observe (see the following listing).
Listing 7.10. Aggregation of a user’s documents


There’s not much to do to update the aggregation publication so that it depends on the user. Only the aggregated documents with the correct userId should be counted in. Lastly, the documents that should be observed have to be found by the query {userId: this.userId}.
7.2. Meteor methods
Meteor makes sending data from clients to the server very easy. But on the web you can never trust the data that comes from a client. You can never be certain that there isn’t a malicious hacker on the other end trying to access or modify sensitive data. Therefore, everything coming from a client must be validated before processing. Using the browser’s console, every validation could be bypassed. This applies to all web applications, regardless of whether they’re written in Java or JavaScript.
The solution is to implement a safeguard on the server side that deals with all write actions. Meteor uses a concept similar to remote procedure calls (RPCs) that can be called from the client and are executed on the client and afterward on the server, too. These are known as methods. Not only do they help secure applications but they’re also capable of making apps more user friendly using latency compensation.
Storing data inside a database takes a relatively long time, depending on network connections and write speeds. Figure 7.4 illustrates how methods are used to apply security and increase the perceived speed of write operations. First, a user submits a new workout. An event handler receives the data and passes it to a client method. This method will perform data validation to check whether the distance entered is valid. If all checks are passed, it simulates storing data to the database by adding it to the local Minimongo instance and updates the screen for the user. This happens in a fraction of a second, because all events take place in the memory of the local computer or mobile device. But now the data is sent to the server, where the same method will be executed. Some server-specific checks might be added as well, such as making sure the user ID is correct. If all validations pass, data is stored in the database and success is confirmed to the client.
Figure 7.4. User-generated content must always be validated on the server because it may be possible to bypass the code executed on the client.

Methods can be used not only for database operations but also for anything else that needs to take place on the server, such as sending emails or triggering processes.
In this section you’ll replace the default insecure package (which lets anybody access every database document) with methods that allow for a fine-grained level of security. Users will be able to add their own workouts to the collection. For this, you’ll use a method call to send the write actions instead of direct inserts and updates.
7.2.1. Removing the insecure package
Just as the autopublish functionality was provided in form of a package, there’s a package called insecure that allows a client to initiate writes to the server-side database. As the name suggests, it isn’t intended for production environments but rather to speed up the development process. To remove the package from your application, stop the Meteor server and issue the following command:
$ meteor remove insecure
Having the ability to update and insert data from the browser console is useful during development, so it’s up to you whether you prefer to remove the insecure package early on in a project or leverage its power for quicker development. Either way, a production application should never be deployed with insecure still active.
Once the insecure package is removed and the server is started again, any attempt to update, insert, or remove a document from the client will result in an error message in the console (see figure 7.5).
Figure 7.5. When the insecure package is removed, access is denied in the browser for any write operation.
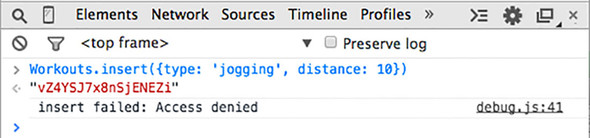
Note
Read access to data is defined using publications, so removing the insecure package doesn’t protect any sensitive data. It simply prohibits the client from writing to the server-side database directly.
7.2.2. Using methods to write data to collections
The place to put methods depends on what you want to do. If you put a method inside the server folder you can still call it from the client, but the method is processed only on the server and not on the client. If the method is shared between the server and the client, the process is similar to the Collection.insert() functionality. This means a method call is processed on the client immediately. Then if all goes well it’s also processed on the server, and if something goes wrong here, the function is reverted on the client. This way, you gain the latency compensation with methods too.
Tip
If a method is executed on the client, it’s running as a simulation. You can check by using this.isSimulation() inside a method context to determine whether the code is used to trigger a remote method or runs as a stub. It returns true if the method is running on the client, but simulations can also be used on the server.
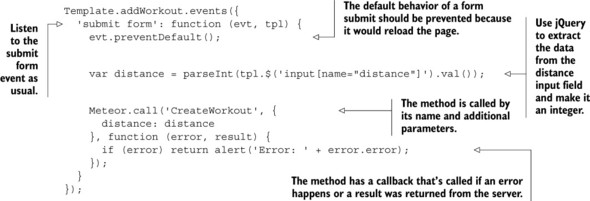
You now want users to be able to add workouts themselves by adding a simple form. If the form is submitted, you want to extract the data from the form and use it in a method call. In the method, you want to make sure that the data is allowed and valid and that it comes from a logged-in user—a guest shouldn’t be able to add workouts. Finally, you create a new workout in the method.
Meteor.call() takes one mandatory argument: the method name. Additionally, you can add as many arguments as you like and they’ll be available in the method. The last argument you provide is a callback function to deal with the results returned by the method (see listing 7.11). The callback itself takes two arguments: error and result. The value for error remains undefined as long as the method finishes as expected. result contains the return value of the method—in this case, the document ID for the newly inserted workout.
Listing 7.11. A method call from the client
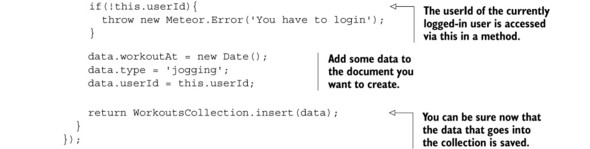
A method always has a name and can have as many parameters as you like. This way, you can use a method to send data from the client to the server. Next, you must define the method; its purpose is to create a workout. Let’s put it into a new file in a methods folder. It should be available on the client and the server as well, which allows you to take advantage of latency compensation (see the following listing).
Listing 7.12. Using a method to create a new document
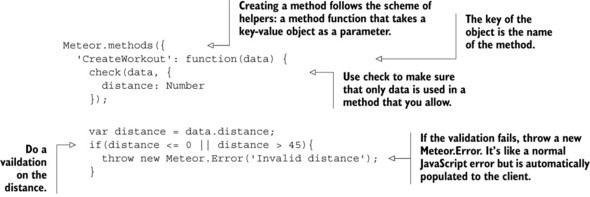
If you look at the method, you’ll see that the data parameter is what’s finally passed to the WorkoutsCollection.insert method. Because of this, it’s really important to make sure that you know exactly what’s inside the data object that’s coming from the client. If you didn’t make any security checks, a user could add any data inside your WorkoutsCollection collection. We’ll use the check() function again and look at it in a little more detail.
Using audit-argument-checks to validate all user input
Each argument sent to a method should be checked before processing it. The more form fields are used, the harder it is to keep track of whether every user input has been checked yet. Meteor ships with a package called audit-argument-checks, which checks that every argument was indeed checked before it was used. Add it to your project via this command:
$ meteor add audit-argument-checks
Every time the client sends an argument to the server for processing, audit-argument-checks will ensure that it’s checked first. You need to add checks to all methods. If there’s no check in place, a method will still execute but you’ll see an exception on the server, as shown in the following listing.
Listing 7.13. Console message for unchecked values in methods
Exception while invoking method 'CreateWorkout' Error: Did not check() all arguments during call to 'CreateWorkout'
    at _.extend.throwUnlessAllArgumentsHaveBeenChecked (packages/check/match.js:352)
    at Object.Match._failIfArgumentsAreNotAllChecked (packages/check/match.js:108)
    at maybeAuditArgumentChecks (packages/ddp/livedata_server.js:1596)
    at packages/ddp/livedata_server.js:648
    at _.extend.withValue (packages/meteor/dynamics_nodejs.js:56)
    at packages/ddp/livedata_server.js:647
    at _.extend.withValue (packages/meteor/dynamics_nodejs.js:56)
    at _.extend.protocol_handlers.method (packages/ddp/livedata_server.js:646)
    at packages/ddp/livedata_server.js:546
Depending on what you expect arguments to be, you need to use different checks. Although Match.Any will accept any value from the client, others are stricter. Table 7.1 lists the available pattern matches for checking variable content.
Table 7.1. Match patterns for checking variable content
|
Pattern |
Matches |
|---|---|
| Match.Any | Matches any value. |
| String, Number, Boolean, undefined, null | Matches a primitive of the given type. |
| Match.Integer | Matches a signed 32-bit integer. Doesn’t match Infinity, -Infinity, or NaN. |
| [pattern] | A one-element array matches an array of elements, each of which match pattern. For example, [Number] matches a (possibly empty) array of numbers; [Match.Any] matches any array. |
| {key1: pattern1, key2: pattern2, ...} | Matches an object with the given keys, with values matching the given patterns. If any pattern is a Match.Optional, that key doesn’t need to exist in the object. The value may not contain any keys not listed in the pattern. The value must be a plain object with no special prototype. |
| Match.ObjectIncluding({key1: pattern1, key2: pattern2, ...}) | Matches an object with the given keys; the value may also have other keys with arbitrary values. |
| Object | Matches any plain object with any keys; equivalent to Match.ObjectIncluding({}). |
| Match.Optional(pattern) | Matches either undefined or something that matches pattern. If used in an object this matches only if the key isn’t set as opposed to the value being set to undefined. |
| Any constructor function (e.g., Date) | Matches any element that’s an instance of that type. |
| Match.Where(condition) | Calls the function condition with the value as the argument. If condition returns true, this matches. If condition throws a Match.Error or returns false, this fails. If condition throws any other error, that error is thrown from the call to check. |
7.3. Summary
In this chapter, you’ve learned that
- Pub/sub is Meteor’s way to get data from the server to a client.
- To secure applications, autopublish and insecure must be removed; publications and methods should take their place.
- Publications may return data from a database or publish customized data.
- Publications can securely limit the published data by document fields such as a user/owner ID.
- Subscriptions can either be made globally for the entire application or scoped to individual templates.
- Writing to the database via server-side methods is secure and more flexible than using allow/deny patterns.
- The audit-argument-checks package helps to ensure all data provided by a client is validated before it’s used.