
Chapter 11. Building and debugging
- Customizing the Meteor build process
- Debugging using the server shell and node-inspector
- Creating browser applications
- Creating mobile applications
With the rise of the smartphone, web applications no longer require a web browser because they also come as mobile applications. Meteor wouldn’t be an appropriate tool for building modern applications if it didn’t offer support for mobile platforms as well. Platforms that are capable of running Meteor applications can be the server, browser, and even mobile devices like iOS and Android.
Although there is no need to create an EXE file or application binaries, even interpreted languages like JavaScript require some source code processing before they can be run. One of the most familiar steps in building a JavaScript project is minification, which reduces source files to a minimum so that network traffic is minimized at the cost of readability.
Turning source code into runnable applications is the job of a build tool, and in Meteor it’s called Isobuild. This tool works mostly behind the scenes and allows you to focus on coding rather than setting up build chains.
In this chapter, we take a close look of two main aspects of Isobuild:
- How the Meteor build process works
- How to build apps for various platforms
Additionally, this chapter introduces debugging techniques that will allow you to get a better understanding of what happens inside the application when it’s running.
When you complete this chapter, you’ll be able to customize your workflow and put your application on iOS and Android devices.
11.1. The Meteor build process
Whenever a Meteor project is run, Isobuild gets busy behind the scenes. It needs to combine all files that contain HTML and JavaScript source code, put together styling information, and merge the results intelligently with the content from all packages present within the project. The output is an application that can be run on development or production systems.
Let’s revisit the graphic introduced in chapter 1 that showed the various parts that make up the source of a Meteor application (see figure 11.1). Building an application means taking the contents from the box on the left side and processing them so they may run on any or all of the platforms shown on the right. Isobuild takes care of this transformation. It’s a complete tool chain for turning source code into programs that may run on various platforms.
Figure 11.1. Isobuild takes all parts that compose a Meteor application and turns them into applications for various platforms.

For a platform to be isomorphic, all functionality that’s added via packages must behave the same on multiple—or ideally all—components of the stack. Certainly there are exceptions—for example, accessing the phonebook of a mobile phone on a server platform is hardly possible. But most other functions, like fetching contents from a web service, must be called in exactly the same way, regardless of where they take place. Instead of you having to use jQuery.get() in a browser and http.request() on the server, Meteor provides an abstract API that allows you to use HTTP.get() anywhere and achieve the same results. It’s not just the same language that’s used across the entire stack—it’s the same API so that the same code can run anywhere.
The JavaScript world knows a large number of build tools—npm, jake, bower, grunt, and gulp. Why doesn’t Meteor use one of these instead of Isobuild?
Building Meteor applications requires a build tool that works equally well for server and client code. Most tools focus on only one of these environments, so they’re a poor fit for a full-stack platform, especially when they must cater to the isomorphic nature of the code.
Packages for Meteor aren’t limited to using JavaScript, Spacebars, and CSS but also use CoffeeScript, Jade, or LESS. These require an additional build step to translate the contents into the former languages. Furthermore, Isopacks may contain not only code but also assets such as font files or images. That means injecting resources into the client bundle becomes necessary.
Another shortcoming of package managers is the paradox of choice. With many packages offering similar functionality, it becomes hard to tell which is the best (and still maintained) option to choose. The Meteor Development Group addresses this issue by using a two-level namespace for packages. Every package that prefixes a curator in the curator:packagename style is considered a community package. Once these become widely tested and commonly accepted, they drop the curator prefix and are considered safe bets, thereby making it much easier for developers to pick the most reliable package from a list of alternatives.
Because none of the existing solutions were capable of satisfying all the requirements for a full-stack build and package manager, Meteor 0.9 introduced the Isobuild system.
All the code we’ve written in the previous chapters and all assets that were added (remember the images we used for the fridge in chapter 2?) are considered business logic. For some Meteor functionality we use packages (Isopacks) and—if needed—also npm packages. The default target platforms for all Meteor applications are server and browser, and neither supports Cordova packages. These are needed to access mobile hardware such as the camera or contacts from the phone’s address book when you build an application for mobile platforms. Therefore, we’ll look at Apache Cordova/PhoneGap in more detail later in this chapter.
Note
Apache Cordova is an open source project that turns HTML5-based applications into mobile apps and provides a JavaScript API to access device functionality available to native apps but not from inside a web browser. Adobe PhoneGap is a fork of this project and offers additional, for-pay features. In the context of this book and for using Google search, both names are used interchangeably.
11.1.1. Build stages
Whenever you run a Meteor application using the meteor run command, the build process is triggered. While the Meteor server is running, any changes to the application code will trigger a rebuilding of the application code. Up until this point we haven’t paid close attention to what actually happens with our code during the build process, so now we’ll look under the hood.
Meteor goes through the following build stages:
1. Read project metadata.
2. Initialize the catalog.
3. Resolve constraints.
4. Download missing packages.
5. Build local packages.
6. Save changed metadata.
Let’s have a look at each of these stages.
Stage 1: Reading project metadata
Before the build process performs any actions, it reads the current project configuration. Every Meteor project has certain metadata that’s stored in the .meteor directory. There are four files that hold all relevant information for the build process. You can edit them manually, but the standard way to modify them is by using Meteor’s CLI tool (see table below).
Table 11.1. Files used to store project metadata and their corresponding CLI commands
|
Filename |
Modified by command |
Contains information on... |
|---|---|---|
| .meteor/packages | meteor list meteor add meteor remove | Meteor packages used by this project, one per line |
| .meteor/platforms | meteor list-platforms meteor add-platform meteor remove-platform | Target platforms to build the project for |
| .meteor/release | meteor create meteor update | Meteor release version to be used for this project |
| .meteor/versions | meteor update | Package requirements and versions determined by the Version Solver component of Isobuild |
Every project has a base version of the Meteor framework,[1] which is stored inside the release file. It gets updated when you first create a new project and every time you perform an update command in the project root folder. This is the starting point for the Version Solver component that determines which package versions are known to work well together (refer back to chapter 9 for more details on Version Solver).
Instead of the word platform we’ll use framework here to avoid confusing target platforms with the Meteor platform.
Whenever you add or remove a package with the meteor command, it’ll trigger an edit of the packages file. By default new projects start with the three packages meteor-platform, autopublish, and insecure. Packages can depend on other packages. For example, the meteor-platform package consists of multiple others, but they aren’t listed inside the packages file. They are managed implicitly by Isobuild.
Adding a new package will add a new line at the end of the file, so the contents of this file are ordered chronologically, not alphabetically.
In the versions file, Meteor keeps track of all packages that are needed to build the current project, regardless whether they were added explicitly or came in as a dependency. Therefore, a package such as tracker isn’t listed inside the packages file but only inside versions. If you wish to update all packages used in your project to the latest version, you use meteor update. You shouldn’t edit this file manually—it’ll be managed by Isobuild.[2] Packages in the versions file are ordered alphabetically; they’re the result of processing the packages file that takes place in stage 3.
When you add a package with a specific version constraint using meteor add, the contents of the versions file will be updated. Because it doesn’t affect the build process, we won’t go into the specifics of this case.
Note
In case you only need to update packages to their latest version but not the Meteor release, add the --packages-only option to the update command.
When you issue a meteor run command, the first thing that happens is that those four files are read.
Stage 2: Initializing the catalog
In the build context, the catalog is basically the versions file. Here all the Isopacks required to build the project are listed. When a new package is added to or removed from the packages file and meteor run is called, the appropriate package needs to also be added or removed from the versions file. In case a package brings in additional dependencies, then those need to be brought in as well, which happens in the next stage.
Stage 3: Resolving constraints
The purpose of the resolving constraints stage is to determine dependencies in regard to both packages and versions. All locally available packages are stored inside the Meteor installation folder and not the current project folder. To resolve constraints, each package configuration is read. If a package configuration references another package or a version that’s not available locally, additional packages are marked as required and will be retrieved in the next stage.
Stage 4: Downloading missing packages
In case packages aren’t present on disk yet, Meteor will attempt to download them automatically from the internet. All packages will be stored in the Meteor installation folder rather than the current project folder. That way, all Meteor projects on the same machine can share packages.
Eventually the full set of required Isopacks is available so that the build process can begin.
Stage 5: Building local packages
When all packages are available on the build system, they’re built for the current project. Code and assets (fonts, images, and so forth) will be added to the project in the .meteor/local folder. Also, source maps are created for each JavaScript file. Source maps allow you to view the original sources in the browser, even if the files used are minified.
Stage 6: Saving changed metadata
Once all build steps have been executed, the current state is persisted inside the versions and packages files.
Rinse and repeat: Watching for changes
Although technically not a build stage, the run command will continue to monitor any changes to application files and reexecute the build process if needed. Meteor handles client and server changes differently. Client changes are processed and get sent directly to the browser using hot code push. All changes that affect the server cause an actual relaunch of the application. Note that this also executes all Meteor.startup() functions in the server context.
Meteor uses an advanced method to detect file modifications that’s similar to the way it uses the MongoDB oplog to monitor changes to the database. On Mac OS X, a kernel extension named kqueue is used; on Linux inotify informs Meteor of all file operations that took place. On Windows there is no such mechanism available.
When Meteor can use either kqueue or inotify, it falls back to a 5000 ms interval to check for possible changes it may have missed, which is much easier on CPU and disk operations than the default setting of 500 ms. On remote filesystems that are mounted via NFS or shared with a virtual (such as a Vagrant[3]) machine, the kernel extensions may miss changes. If it takes up to 5 seconds for the Meteor process to pick up on any changes, it’s likely that the watcher doesn’t work properly. In these rare cases you can use two environment variables to define polling behavior (that is, regularly checking for changes). In the same terminal session where you’ll start the meteor process, issue the following commands to force polling regardless of whether kqueue or inotify is found, and set the interval to 10 seconds:
See appendix A for more details on how to use Vagrant.
$ export METEOR_WATCH_FORCE_POLLING=t
$ export METEOR_WATCH_POLLING_INTERVAL_MS=10000
Note
The environment variable METEOR_WATCH_FORCE_POLLING expects a single t, which sets it to true; otherwise it defaults to false. The polling interval is defined in milliseconds, and when not set, it defaults to 5000 ms (500 ms if polling is forced).
11.1.2. Running with the --production flag
If you’re using a more complex file structure for your project, you can see that using meteor run will hardly change the number or structure of your files at all. They’ll simply be copied over to the .meteor/local/build directory structure.
This behavior is convenient for development purposes on a local system because a simple copy operation doesn’t add a lot of overhead for each file change. In production environments, though, the fewer files you need to serve, the better the initial page loads are. Therefore, in a web environment all files of the same type are usually merged so that only three files must be sent to the browser:
- One JavaScript file
- One CSS file
- One HTML file
Also, the contents of these files are minified, which again decreases transfer times. Unfortunately, merging and minifying source files can lead to some unexpected behaviors such as messed-up styles or crashing applications. To avoid surprises when supposedly finished code is deployed, run a local project with the --production flag:
$ meteor run --production
Using this flag triggers additional build steps. All code that’s sent to the client will be merged into a single file for each type (JS, CSS, HTML) and given a random, 41-character name. Server code isn’t merged because these files aren’t sent over the network and combining them wouldn’t yield noticeable performance benefits.
The additional build steps make restarting the server and performing hot-code pushes slower, so use --production for testing purposes rather than during development.
Some packages add functionality that’s useful only in a development context. In case they expose easy access to internal data or execute tests, they can even be dangerous to deploy to production. For this purpose packages can set a debugOnly flag that advises Meteor to exclude those packages from the build process when running with the --production option.
11.1.3. Load order
With the freedom of creating files and folders using any directory hierarchy, it’s important to understand precedence in Meteor’s loading process. Especially when client files are merged using the --production flag, having the wrong load order can lead to crashes and bugs.
Meteor’s load order is based on both naming conventions and folder hierarchy. This load order is applicable only the business logic of an application. The load order in packages is defined manually inside the package definition (refer to chapter 9 for more details).
As a rule of thumb, Meteor loads files in subdirectories before files in parent directories. The deeper a file is inside a project hierarchy, the sooner it gets loaded. Consequently, files in the root directory are loaded last. Within the same hierarchy level or directory, files are loaded in alphabetical order by filename.
There are some exceptions to this general rule:
- All files in folders named lib/ are loaded before all other folder contents. If multiple lib folders exist, they’re ordered by level (deepest first) as well as alphabetically. As such, client/lib/file1.js gets loaded before client/scripts/views/file2.js, even though the general rule suggests that file2 should be loaded first due to the position in the hierarchy.
- The client/compatibility/ directory is reserved for libraries that rely on variables declared with var at the top level being exported as globals. Files in this directory are executed without being wrapped in a new variable scope. These files are executed before other client-side JavaScript files but after the contents from lib/.
- All files that start with main.* are loaded after everything else: client/lib/validations.js comes before client/lib/main.helper.js.
- Any content inside the private/, test/, and public/ directories isn’t automatically loaded and won’t be processed by the build process.
Depending on whether Meteor is running in the server or client context, some files may not be loaded at all. Meteor ignores certain folder contents to prevent sending all code to the browser, even if it’s never executed there. Table 11.2 lists all folders that are either ignored on the server or not even sent to the client.
Table 11.2. Directories ignored in server and client contexts
|
Excluded in server context |
Excluded in client context |
|---|---|
| client/ | server/ |
| public/ | public/ |
| private/ | private/ |
| tests/ | tests/ |
Figures 11.2 and 11.3 show the load order in action. Each file is logging its name to the console once it’s loaded. As you can see, only two files are loaded on the server (common.js and server.js), whereas the client loads a total of eight JavaScript files. All directories with the same hierarchical level are sorted alphabetically and loaded in order. The special directories private, public, and test are excluded from loading any JavaScript code.
Figure 11.2. Visualizing the load order for JavaScript files on the server using console messages

Figure 11.3. Visualizing the load order for JavaScript files on the client using console messages

The client uses a more sophisticated file structure. Regardless of their position inside the hierarchy, all contents from directories named lib come first, which is why its files come before everything else. Then all files from the deepest hierarchy level to the highest are loaded; on the same level directories and files are sorted alphabetically. That means client/views/edit/edit.js comes before client/views/client.js. All files with a main.* prefix are moved to the very end of the loading cycle. So even if main.helper.js is stored inside lib/ it will only be loaded after all other files. All these rules apply to the server environment as well.
11.1.4. Adding build stages via packages
The easiest way to extend the build process with additional stages is to add one of the core packages to your project that add language support.
The following core packages can be used to add stages to the build process:
- The package coffeescript adds transpiling[4] of *.coffee files to JS.
The term transpiling is used to describe source-to-source compilation. Generally, when compiling a file the level of abstraction is reduced—for example, when turning C code into Assembly. When transpiling the level of abstraction stays the same—that is, when going from CoffeeScript to JavaScript.
- The package less or stylus adds processing of *.less or *.sty files to CSS.
For additional language support, a variety of community packages are also available. Check the official package repository to see whether your preferred language is available already.
As a third option, you can choose to write your own package that enhances the build process.
CoffeeScript
Many JavaScript developers prefer using CoffeeScript instead of plain JavaScript. Coffee uses a different syntax with fewer brackets and semicolons and requires transpiling into plain JavaScript so it can be executed in the browser and inside Node.js.
Using CoffeeScript with a Meteor project is as simple as adding the coffeescript package:
$ meteor add coffeescript
Once the package is available in a Meteor project, all files with a .coffee extension are automatically transpiled (translated) into JavaScript whenever they’re modified. That way, regular JavaScript files can be used along with code written in CoffeeScript—for example, when adding external libraries to a lib/ folder.
Except for the fact that Meteor supports another file extension and adds a translation stage, the rest of the build process stays exactly the same, including the load order of files.
LESS or Stylus
Static style files using CSS are supported by Meteor out of the box. If you add the corresponding packages, the dynamic styling languages LESS and Stylus can also be used. These languages are called preprocessors, and they’re used to enhance style sheets with variables and mixins. Mixins allow you to use style snippets that can be easily reused, thus shortening the overall code that you have to write. In combination with using variables, this makes customizing designs much easier, which is why many developers prefer dynamic preprocessors over plain CSS.
LESS and Stylus need to be translated into plain CSS for a browser to be able to interpret them. Let’s start by adding either of the packages using the CLI:
$ meteor add less
$ meteor add stylus
As a result of adding either of the packages, files with a .less or .sty extension are properly identified and processed by Meteor. Both preprocessors behave exactly the same in regard to the build process.
Meteor concatenates all style files into one, following the aforementioned load order. To gain more control over the load order, you can import individual files from a style file. If a file has the extension *.import.less or *.import.sty, then Meteor won’t process it during the build unless these files are directly referenced from a style file.
In practice you’ll end up with a single styles.less file that may look similar to listing 11.1. Obviously the referenced files must exist in order to import them.
Listing 11.1. Sample style file using the LESS preprocessor

11.1.5. Adding a custom build stage
In version 1.1, the possible ways to extend Meteor’s build stages are limited to watching for changes to files with a specific extension. Changes to a file may trigger an action associated with the watcher configured for the specific file extension, such as transpiling one language to another.
Essentially adding a custom build stage requires using a package. Build steps are added during stage 5, the building of local packages. In the package.js file Package .registerBuildPlugin() is used to identify that a package extends the build process. Listing 11.2 shows the code used by the coffeescript package as an example.
- name is the identifier for this build stage. A package may contain multiple build plug-ins as long as they have unique names.
- use references Meteor Isopacks that this build stage may depend on as a string or array of strings.
- sources contains an array of strings that defines which files are part of the plug-in.
- npmDependencies is an object that holds npm package names and versions that the plug-in may depend on.
In case you need to write your own build plug-in—say, for transpiling TypeScript (another shorthand notation for JavaScript) to plain JavaScript—you need to replace the coffee-script npm dependency with the ts-compiler module. Additionally, you need to adjust the name and source file accordingly.
Listing 11.2. Registering a build plug-in with CoffeeScript support in package.json

In the source files of a build plug-in, you can use Plugin.registerSourceHandler() to define what actions to execute if files with a particular extension are changed. If the plug-in is supposed to monitor files with a .ts extension, then it must be specified as a source handler. Listing 11.3 outlines the essentials parts of a build plug-in. Using compileStep, it’s possible to either read or write to the currently processed files.[5]
The official documentation for using compileStep can be found at https://github.com/meteor/meteor/wiki/CompileStep-API-for-Build-Plugin-Source-Handlers.
Listing 11.3. Skeleton for transpiling TypeScript to JavaScript during the build

Note
As of version 1.1 there’s a limitation on the source handler that only one build plug-in per file extension can be used. There can’t be multiple plug-ins that add a build step for JavaScript files, for example.
If you add a package to a project that turns TypeScript or CoffeeScript into JavaScript, the build and run process will look like this:
1. Isobuild determines which file has changed.
2. It looks at the filename extension and checks if a compileStep is associated with it. There may only be one step per file extension.
3. If an associated compileStep is found, Isobuild executes it and saves the output as defined by the build plug-in.
4. If you use the build command or run Meteor with the --production flag, merging and minification run independently and after completing all steps of the build plug-in.
11.2. Accessing running applications
In previous chapters you’ve used the browser console to send commands to a running application, such as to check the values of a Session variable. In this section, we’ll explore possible options to access the server side of a running application as well to allow better debugging capabilities.
11.2.1. Using the interactive server shell
Whenever you issue meteor run in a terminal session, you can view all server output in the same terminal window. All console logging that takes place on the server side is shown, but it doesn’t allow you to send any commands. Instead, whenever you need to check the current state of variables you can add a console.log() to the JavaScript files, which triggers a server restart.
For locally running applications, the Meteor CLI tool can open an interactive shell session, where you can send commands to the server just like inside the browser console.
Invoking the interactive shell
Open a terminal session and navigate to the Meteor project folder. Run the server using the following:
$ meteor run
You can now see all server messages scroll by as the project starts up. Open a second terminal session and navigate to the same project folder. Now issue this command:
$ meteor shell
This command opens up an interactive shell, as shown in figure 11.4.
Figure 11.4. Invoking the interactive server shell using the meteor command

Using the interactive shell
All shell commands start with a leading dot. They can be used to execute any code that you would otherwise put inside a file. For example, during development you can query external APIs, call helper functions, or easily remove content from the database using Collection.remove(). That way, you can also use the Meteor syntax instead of the slightly different MongoDB syntax and you don’t need an additional MongoDB connection using RoboMongo or meteor mongo.
The shell supports autocompletion of all Meteor globals when you use the Tab key. You can also access a complete history of all commands by using the up and down arrow keys. The shell history is stored in the project folder in the .meteor/local/shell-history file. Using the .save and .load commands, you can store a sequence of commands for reuse. All commands from the current session will be saved. This can be useful for saving scenarios like filling in fixtures or resetting the application state to a certain point. Saving and loading requires a unique name. To store a sequence of commands under the bootstrap identifier, you could use the following:
> PostsCollection.insert({title: 'first test article'})
'i4xZb8WM8Lr63KwA4'
> PostsCollection.insert({title: 'second test article'})
'PvRkekuDuBn6Wx5kY'
> .save bootstrap
Whenever you want to re-execute these commands, you can do so by issuing .load bootstrap inside the shell. The saved REPL[6] files can be found in the project/.meteor/local/build/programs/server/ folder. Multiple shells may be opened for the same project.
REPL stands for Read-Eval-Print-Loop and refers to the fact that it isn’t a fully interactive shell where, for example, your commands could query additional user input during execution. They’re simply read and executed, and the result is printed to the screen.
Note
Both the shell-history file and the REPL files are ignored by Git by default. If you want to add them to your source code repository, you must adjust the .gitignore file accordingly.
11.2.2. Debugging using node-inspector
If you need to perform more sophisticated server-side debugging of an application, node-inspector is a handy utility. It’s a browser-based debugger interface for Node.js that you can use to set breakpoints, inspect source files, step through program execution, and inspect values and variables.
Passing the debug command to the meteor CLI tool provides a simple way to use node-inspector. Make sure you are in a project’s root directory and that it’s currently not running. Then issue this command:
$ meteor debug
Any WebKit-based browser is capable of running node-inspector, which means both Chrome and Safari can be used to access the debugging URL. You can’t use Firefox or Internet Explorer.
Note
Accessing the application using http://localhost:3000 is still possible in debug mode. Additionally, you can open the debugger interface using http://localhost:8080/debug?port=5858.
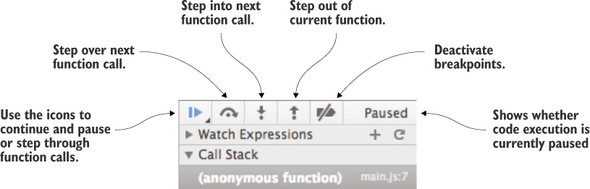
Once the server starts up, you can access both the app and the debugging interface. If you don’t see your application starting up, go to the debugging URL and check the current execution status. If code execution is paused, you’ll see a message icon at the top of the right sidebar, just like in figure 11.5. Click the pause arrow at the left of the icon bar to continue program execution.
Figure 11.5. The icons on the top of the right sidebar enable stepping through functions and pausing execution.
The application will run as usual, but you’ll now be able to use the debugging console to inspect what happens during code execution on the server. Two of the most important tools are setting breakpoints and inspecting and modifying variable content.
Breakpoints are markers that define where code execution should be paused so that each step can be executed individually to identify the actual behavior of a function or code section. You can set them either in the browser window by clicking an individual line number of a file or by using the debugger; statement. Listing 11.4 shows a simple example where the variable status is assigned the value initialized, and immediately after code execution is paused. Using node-inspector, you can then inspect the content of the status variable.
Listing 11.4. Setting breakpoints using debugger;

Hover the mouse cursor over the variable name, and its contents will be displayed in a yellow pop-up as well as on the right side under Scope Variables (where you can change the value to something else). For setting breakpoints or inspecting variable content from other files, open the file navigator using the top-left icon (see figure 11.6).
Figure 11.6. Inspecting and changing the contents of a variable with node-inspector

Tip
If node-inspector doesn’t seem to behave like it should, try refreshing the browser. If that doesn’t work, restart Meteor with the debug command again.
node-inspector is a powerful tool that enables you to gain valuable insight into your application’s behavior. To understand all its features, take a look at the documentation at the project’s GitHub page: https://github.com/node-inspector/node-inspector.
11.3. Creating browser applications
Applications may support one or more platforms. By default, all new projects have the server and browser platforms enabled. As mentioned earlier, you can view a list of all supported platforms for a project by issuing this command:
$ meteor list-platforms
Unless you’ve added additional platforms already, the output will show browser and server. To deploy an application to a server, you have to bundle it first. The output is similar to that of meteor run --production, but there’s no need to run continuously and watch for file changes.
Note
In version 1.0 Meteor projects must always contain the server platform. It’s not possible to build for the browser platform only.
11.3.1. Application configuration using Meteor.settings
Earlier we talked about storing configuration data like API keys and secrets only on the server side. But there are scenarios where multiple server environments exist—dedicated development, testing, and production environments. Each may require different settings, which is why it’s not efficient to store configuration data in the code files but rather in a configuration file. Meteor can take a JSON file and expose its contents via the Meteor.settings object. That means you can use code like Meteor .settings.oauth.twitter.apikey instead of a string. The following listing shows the structure of a configuration file for Meteor settings.
Listing 11.5. Setting configuration options for applications via settings.json
{
  "oauth": {
    "twitter": {
      "apikey": "123abc",
      "secret": "abc123"
    }
  },
  "public": {
    "version": "v1"
  }
}
Meteor doesn’t use a settings file by default. The settings file must be specified on the command line using the --settings parameter.
To use a file named settings.json, start the project with this:
$ meteor run --settings settings.json
Alternatively, you can store the JSON configuration object in an environment variable called Meteor.settings. Either way, you can access properties of the settings object, as shown in listing 11.6.
Note
When you’re using Meteor.settings always provide the settings object upon start of the Meteor server or you’ll run into errors.
Listing 11.6. Using Meteor.settings with values from a JSON configuration file
if (Meteor.isServer) {
  console.log("Using the following API Key for Twitter");
  console.log(Meteor.settings.oauth.twitter.apikey);
}
The configuration file isn’t available on the client, but you can access all configuration settings stored inside a public field by using Meteor.settings.public. Any content that is stored outside the public field won’t be accessible on the client and can be safely be used for sensitive configuration settings.
Using different settings files, you can easily run applications in staging and production environments with different databases and API connections.
11.3.2. Building Meteor projects
Meteor can create bundles of an application using the meteor build command. The output is a fully contained Node.js application in the form of a tarball. If needed, the build command can be changed to create a directory with the same contents as the tarball.
Creating the bundle is as simple as navigating to the application root directory and calling the command with an argument specifying you want to create the output file.
Tip
When you’re creating a tarball, it’s usually fine to place the output in the current project folder, but for various reasons it might be better to put it elsewhere. First, you could accidentally add it to the source code repository unless you explicitly add a rule to ignore this file. Second, if you decide to create a directory instead of a file or build for another platform, the resulting files will be interpreted as additional source files when you use meteor run and produce error messages.
To place the archived bundle file for your Meteor application at the parent folder of the current project in a directory called builds, use the following commands:
$ cd myMeteorProject
$ meteor build ../builds
The tar.gz file contains the compiled Meteor application, which you can put on a server, extract, and run (see chapter 12 for more details).
You’ll notice that the entire directory structure has changed significantly from the original project organization (see figure 11.7). Instead of client, server, and public folders, you’ll now see two main folders: programs and server. All relevant code is located in the programs folder, organized by platforms. In the server folder, all modules, packages, and assets are stored. The contents from the assets and private folders are treated differently because they’re moved into an assets directory inside the bundle. All other contents are moved to the app directory; the tests folder is an exception because it isn’t put into production bundles.
Figure 11.7. The output of meteor build

All resources that are sent to the browser are stored in the web.browser folder. Running meteor build implies using the --production option, so there are three important files: one each for HTML, CSS, and JavaScript. Also, the static resources from the public directory are copied for the client platform and can be found in the app directory.
You’ll notice several other files are available that weren’t present before, such as main.js. These files are generated automatically and include the main components needed to run the project as a regular Node.js application.
Although meteor build is simple to use, it does have some limitations in regard to portability. As long as you don’t rely on platform-specific, binary npm modules, you shouldn’t experience any problems moving an app from a Mac OS X development system to an Ubuntu Linux server. In some advanced cases that require truly portable Node.js applications, demeteorizer is the more flexible tool. Take a look at chapter 12 for further information on how to use it.
11.4. Creating mobile applications
Apps running on smartphones and tablets are often similar to web applications. Instead of using a browser, they embed the application in an app container. That way, they combine aspects of server/client-oriented websites based on HTML5 and native apps, which is why they’re called hybrid apps. Meteor leverages the power of Cordova to add mobile platform support.
11.4.1. Hybrid apps with Cordova
Cordova[7] is a framework that converts HTML, JavaScript, and CSS into a native application that can run on mobile platforms such as iOS or Android. It provides a native wrapper around a web view (think of it as an embedded browser) and offers access to hardware features like the camera or GPS. To a user, apps built on Cordova look and behave exactly like native apps. They’re distributed via app stores, so in order to sell mobile Meteor apps you must be part of Apple’s or Google’s developer program.
If you want to learn more about Cordova, refer to Raymond K. Camden’s Apache Cordova in Action (Manning, 2015).
Because it’s an Apache project, Cordova is open source and free to use. There’s also PhoneGap, which is often used to describe the same tool. Technically PhoneGap is a distribution of Cordova that’s maintained by Adobe and offers some paid features. For the purpose of putting Meteor applications on mobile devices, we’ll refer only to Cordova from here on, but on Google and Stack Overflow most of the time you can use both terms interchangeably.
Cordova features
The most important advantage Cordova can add to a Meteor app is the web browser shell that’ll make it look and behave like an app. This shell allows apps to be bought in the app stores and started without you having to know which server URL to navigate to.
By using plug-ins, Cordova can access a device’s hardware or exchange data with other apps on a device. These plug-ins provide APIs to use the camera, access contacts, or even enable in-app purchases.
A full list of all available plug-ins for Cordova can be found at http://plugins.cordova.io/. Some of the plug-ins are available as Meteor packages as well. The Meteor Development Group provides the following:
- mdg:camera— Allows an app to access the device’s camera
- mdg:geolocation— Provides a reactive interface to the device’s GPS location
- mdg:reload-on-resume— Delays hot-code pushes until the app is closed and reopened
Cordova limitations
Although Cordova makes it easy to turn HTML5 applications into mobile apps, it’s still the same as browsing a website. Don’t expect the same performance from the DOM rendering as from a graphic-intensive action game written in Java. That said, many apps will certainly do fine with modern devices.
Because Cordova only shells web applications, it doesn’t provide a UI framework or enforce design guidelines.
11.4.2. Adding mobile platforms
Meteor supports two mobile platforms: Android and iOS. When either of them is added to a project, the build command will take care of creating not only a tarball but also a valid Android Studio or Xcode project. During development, there’s no need to open either of those tools because Meteor is capable of running an application inside simulators as well.
Prerequisites
Before you can add mobile platforms to a project, you must install the SDKs for each platform on your development machine. The iOS SDK is available only on Mac OS X and requires you to also install Apple’s Xcode. It’s not possible to build iOS applications on Linux or Windows. You install the SDKs by using these meteor commands:
$ meteor install-sdk ios
$ meteor install-sdk android
You have to accept the license agreement for the iOS SDK. If you get an error message, try opening Xcode and click on the agreement. The Android SDK has a dedicated configuration interface, which can be invoked by the meteor CLI tool as well. You can use this interface to download updates or manage devices that can be used with the simulator. It’s not necessary to perform any configuration before you can start bringing an application to Android, so we won’t look into the details of this tool. Should you ever need the Android SDK Manager, you can start it with this command:
$ meteor configure-android
Adding platforms
Making a Meteor application run on mobile devices requires adding the corresponding platform to the project. To do so, use one or both of these commands:
$ meteor add-platform ios
$ meteor add-platform android
The Meteor build process will automatically be configured to include the required steps to produce mobile apps for either platform. But meteor run won’t automatically run your application for a mobile platform; you need to add the platform name as an argument to the run command like this:
$ meteor run ios
$ meteor run android
This command will compile the application and open it in a simulated iPhone or Android device. Although the application itself won’t make use of any UI guidelines for the platform, all input fields like drop-down lists and text boxes will rely on the devices’ default interfaces (see figure 11.8).
Figure 11.8. Cordova apps use device-specific input UIs by default, such as when using drop-down lists.

If you prefer to run the Meteor app on an actual device, you’ll need to use Xcode (https://developer.apple.com/library/mac/documentation/IDEs/Conceptual/AppDistributionGuide/LaunchingYourApponDevices/LaunchingYourApponDevices.html) or follow the instructions for setting up an Android device for testing (http://developer.android.com/tools/device.html#setting-up). The run command must include a device as a parameter to tell Meteor to use actual hardware instead of a simulator:
$ meteor run ios-device
$ meteor run android-device
Meteor won’t create a finished mobile application that can be submitted to the app stores. For both Android and iOS, you’ll still need to complete the necessary steps for publishing the applications just as you would for any other mobile app. But you won’t have to write any code in Xcode or Android Studio. You can only make the finishing touches to distribute your app using these tools.
The first prerequisite to get your mobile Meteor application on a smartphone or tablet is to join the developer program. For both platforms, doing so involves registration and paying a fee; you’ll then be able to submit applications to the Google Play Store or the Apple iTunes Store.
The specifics may change, so you should consult the official process of creating an application, but these are the basic steps you need to follow. Once you have a developer account, you’ll obtain a certificate that you can use to sign your application code. This certificate verifies that your application is your app and that someone else isn’t distributing it under your name. The certificate usually accompanies a distribution profile that lists company information and, most important, a unique identifier for your application.
When it’s time to release your project to mobile devices, issue the meteor build command to create the required Xcode (when publishing for iOS) or Android Studio project files. In fact, all available platforms are built by this command. Because mobile devices don’t allow users to enter URLs like browsers do, the build command requires an additional parameter to specify the server during build time:
$ meteor build ../builds --server=http://mobile.meteorinaction.com
Be sure that a Meteor app is available at the server URL or the app may run perfectly fine inside the simulator but not once it’s deployed to an actual hardware device. Also, before submitting your app to the stores check that the server URL is correct.
11.4.3. Configuring mobile applications
You can customize mobile applications by changing the default configuration. App icons, launch screens, application meta information, and plug-in settings may be managed using a mobile-config.js file at the root level of a project.
Application meta information using App.info()
App.info() holds an object that contains further information regarding an app. It uses the following properties:
- id— Unique reverse-domain identifier
- version— Full version number using x.y.z notation
- name— Displayed on the device’s home screen and used in app stores
- description— Used in app stores
- author— Used in app stores
- email— Used to further specify the author information in app stores
- website— Used to further specify the author information in app stores
All keys take a string value, as shown in the following listing.
Listing 11.7. Sample App.info() for a mobile app
App.info({
  id:          'com.meteorinaction.mobile.app',
  version:     '1.0.0',
  name:        'Meteor in Action Mobile App',
  description: 'This is a mobile app for Meteor in Action',
  author:      'Stephan Hochhaus',
  email:       '[email protected]',
  website:     'http://meteorinaction.com'
});
Icons and launch screens
To customize both the logo that’s shown on the home screen of a device and the screen shown during the startup of an application, use the API commands App.icons() and App.launchScreens(). When those blocks are not filled, the default Meteor icons and launch screens are used. Different devices use different resolutions, which is why both commands take a variety of properties. For distribution in app stores, all screen sizes must have a dedicated icon and launch screen configured. Check the mobileApp project from this chapter’s code samples for a full list of all currently supported device types. The following listing shows how they’re used in the mobile-config.js file.
Listing 11.8. Setting up icons and launch screens in mobile.config.js
App.icons({
  'iphone':                'icons/iphone.png',
  'android_ldpi':          'icons/android-launcher.png',
  });

App.launchScreens({
  'iphone':                'icons/splash-iphone.png',
  'android_ldpi_portrait': 'icons/splash-ldpi_portrait.png',
});
Whitelisting URLs
In web browsers your application may request additional information from various URLs without you noticing it. For security reasons Cordova applications are not allowed to access arbitrary URLs. Only URLs that are whitelisted in the mobile-config.js file can be accessed. Each allowed URL is defined using App.accessRule using the syntax
App.accessRule(domainRule, {launchExternal: false})
The domainRule can be any URL, using placeholders for subdomains. Setting options is not required. The only possible option is launchExternal, which allows the Cordova apps to launch a URL in an external application on the mobile device. Listing 11.9 gives an example of typical access rules.
Note
Whenever your mobile application relies on content from external APIs, you must declare access rules in order to allow your app to access the remote URL.
Listing 11.9. Declaring URL access rules in mobile.config.js

Configuring Cordova plug-ins
Besides Isopacks and npm modules, Meteor supports Cordova plug-ins. The mobile-config.js file can also be used to configure these plug-ins. You can set the configuration of the WebKit container via App.setPreference(). Technically it allows you to set values for the preference tag inside Cordova’s config.xml file.
Cordova plug-ins can be configured using App.configurePlugin(). They also use a rather simple key-value style for configuration, so the command takes two arguments: the name of a plug-in and a config object providing key-value pairs.
The following listing shows how to configure both global preferences as well as a plug-in called facebookconnect.
Listing 11.10. Configuring app behavior and Cordova plug-ins
App.setPreference('BackgroundColor', '0xff0000ff'),
App.setPreference('HideKeyboardFormAccessoryBar', true);

App.configurePlugin('com.phonegap.plugins.facebookconnect', {
  APP_ID: '1234567890',
  API_KEY: 'apikey'
});
11.4.4. Adding mobile functionality
Although turning an existing browser application into a mobile app isn’t difficult, so far we haven’t shown you how to add any mobile-specific functionality. Similar to the isServer() and isClient() methods, you can use a Meteor.isCordova() function to run code exclusively on mobile platforms:
if (Meteor.isCordova) {
  console.log('Printed only in mobile cordova apps'),
}
Using this conditional is the simplest way to add mobile-only functionality, but it doesn’t enable access to a device’s features. To do so, you have to enhance the existing application.
Cordova is similar to Meteor because it uses a small core set of functionality that’s extended by plug-ins. If a feature can be added by using an Isopack such as mdg:geolocation, its usage is like most other packages.
Any functionality that relies on a Cordova/PhoneGap plug-in should wrap code in a Meteor.startup() block. In case of mdg:geolocation, you’d need code like this:
Meteor.startup(function () {
  Geolocation.currentLocation();
});
Without going into the details of using specific packages, we’ll look at another way to extend the application’s functionality by integrating Cordova plug-ins into an app. There are two types of plug-ins: those that are bundled with the core (which can be identified by their name prefix, org.apache.cordova) and third-party plug-ins, which can be found in the official plug-in registry at http://plugins.cordova.io/ and on GitHub.
Note
Don’t wrap mobile code inside an isServer() block or put it in the server folder because eventually it must run on the mobile client device.
Let’s look at an example of how to use plain Cordova plug-ins with Meteor. We’ll use the dialogs plug-in, which provides native UI dialog elements to an application. First, add it via meteor add. Because it’s a Cordova plug-in, it uses the cordova: prefix by definition. Meteor doesn’t perform the same consistency and compatibility checks as it does with Isopacks, so you must specify a specific version instead of relying on Version Solver to determine the correct one:
$ meteor add cordova:[email protected]
The dialogs plug-in will now be listed along with all other packages when issuing meteor list. Listing 11.11 shows how to create a native dialog based on Meteor’s default project. In the event map you add an additional dialog to the change event on a select box and wrap it in an isCordova() block to prevent it from being executed in the browser. Meteor can use the plug-in as is; there’s no need to wrap it in API calls. The same navigator.notification.alert that can be used in regular Cordova apps can be used here. It takes four arguments: the dialog message in the form of a string, a callback function when the alert is dismissed (here, null), a dialog title (which defaults to Alert), and the button name (which defaults to OK).
Listing 11.11. Adding the Cordova dialogs plug-in to a change event

11.5. Summary
In this chapter, you’ve learned that
- Although JavaScript isn’t a compiled language, Meteor apps need to be built before running them.
- When you use the --production flag with the run command, all files will be minified.
- The file load order is based on hierarchical position and filenames.
- The build process can be extended by using packages such as coffeescript or less.
- By default, all projects are built for a server-browser scenario.
- Adding mobile platforms extends the build process to create hybrid apps for iOS or Android using Cordova.
- Cordova plug-ins can be used directly with Meteor; they don’t have to be wrapped inside Isopacks.