
Chapter 5. Fully reactive editing
This chapter covers
- Building reactive forms
- Using reactive data bindings to update views
- Working with unsynchronized, or local, collections
- Displaying collection data within forms and performing updates reactively
- Implementing a simple notifications system
In chapter 4 you created a fully functional yet basic application that allows users to select, view, add, and delete houses. Because you used reactive data sources, you didn’t have to manipulate the DOM tree—for example, adding a new option element to the drop-down list when you created a new house—Meteor’s reactivity took care of it for you.
The most common approach to front-end development is manual DOM manipulation, but it’s tedious and error-prone. In most frameworks, data is retrieved from a back end and needs to be inserted into the DOM somehow. If a new database entry is sent to the client, a library like jQuery is used to add a new li element or table row. Although this approach is straightforward, it tends to make code overly complex and forces you to explicitly add changes for all occurrences inside a page. Many people associate front-end coding with DOM manipulations, but Meteor allows you to focus on data only and let it perform any changes to views and templates. In this chapter you’ll be taking advantage of reactive data bindings that limit the amount of code required and make the application more robust.
This chapter shows you how to enhance the existing application to allow working with more complex data structures. You’ll keep all interactions with the DOM at a minimum. In order to do so, you’ll take advantage of Meteor’s database everywhere principle and use a local collection that exists only on the client. That way, you can add and remove any number of plants to a house. Additionally, you’ll ensure that unsaved changes won’t be discarded by accident by implementing a rudimentary notifications system. By the end of this chapter, you’ll be able to create fully reactive front ends powered by reactive data sources.
5.1. The reactive editing workflow
Before you apply some of the advanced Meteor concepts to the houseSitter application, let’s revisit the overall flow of information between users and databases (figure 5.1).
Figure 5.1. The reactive editing workflow

When a house is selected, users may change its contents, for example, by adding or removing plants (step 1). Especially when dealing with sensitive data, the application will validate the incoming data in the browser already (step 2). If all data is valid, it’s stored inside the local mini-database (step 3). Because the data is still volatile and present only inside the user’s browser, it’s merely a simulation of the actual saving process. If the user closes her browser at this point, no data is stored on the server although the browser view is already updated (step 4).
After the successful simulation, data is sent to the server with a request to persist it (step 5). Again, validations should occur (step 6) and the actual storing procedure takes place (step 7). Finally, the result of the operation, either an error or a success message, is sent back to the client (step 8). All other users who can currently view the updated document get an instant update of their screen. The Livequery component constantly monitors the database for changes and keeps track of all currently subscribed clients.[1]
We’ll discuss subscriptions and publications in more detail in chapter 7.
So far the houseSitter business you built in chapter 4 allows you to take on new clients with only a single plant. You need to be able to serve not only customers with multiple plants but also those with varying numbers of plants. The first improvement for the existing application must be to allow editing of existing documents while also enabling an arbitrary number of plants in each household. The combination of Blaze templates and reactive data sources allows you to implement reactive form editing with just a few lines of code.
Once you introduce reactive editing, you’ll have to take into account that the instant updates triggered by Livequery may not always be desirable. There may be times when two people edit the same document, so you need a way to communicate that someone else has changed a document that’s currently being edited. You shouldn’t discard all unsaved changes because the server holds newer data. All local changes should first be stored in a staging environment, which gives you performance benefits as well as a safety net. You’ll also implement a notifications system to highlight changes to the user.
5.2. Reactive front ends vs. DOM manipulation
Most front-end engineers typically think about the DOM first. They consider how and where to put elements or how to serialize data and send it to REST interfaces. jQuery is a handy tool for these tasks, and it’s synonymous for many people with front-end development and DOM manipulation.
When you’re using different languages and frameworks on the server and the client, you often find yourself faced with the problem of how to map data received from the server to an actual view. If no easy integration is available, there’s always jQuery and adding and removing nodes from the DOM. Unfortunately, changing the DOM manually becomes quite messy, even for small tasks, which is why we see a shift toward functional reactive paradigms. Meteor is no exception to this development.
Let’s compare the two scenarios side by side. Consider a simple form for adding and removing plants in each of our houses. One button is used to remove an existing plant; another will add another form fieldset to allow entering plant details. Scenario A in figure 5.2 shows the associated code when removing a DOM node. A click on a button removes a form’s fieldset (the parent of the clicked button). It doesn’t affect any other occurrences where the plant may be displayed, so in more complex views additional remove() operations might be required—for example, when a preview of the house document appears on the same page. Adding a new plant involves a lot more complexity—you need to inject the entire HTML necessary to define a plant form field. Not only is this line very long; it’s also very fragile should you ever decide to adjust the form code by using different classes or adding more fields.
Figure 5.2. Comparing DOM manipulation with reactive data updates
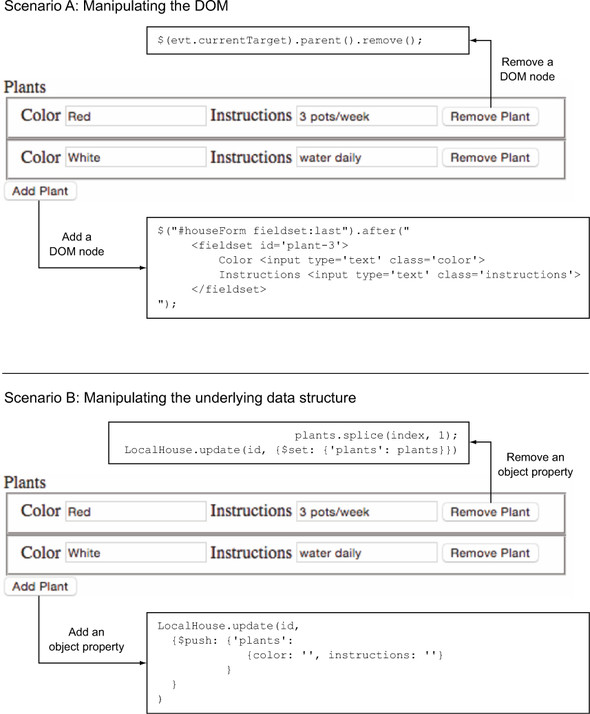
DOM manipulation may be suitable for small front-end hacks, but when writing larger applications it’ll be a challenge to maintain that kind of code. Here’s where Meteor’s seamless integration between front end and back end comes in handy. With Meteor you can directly work with data and let the framework do all the DOM mapping for you. Changing the data structure will automatically trigger the necessary DOM updates.
Each house is already stored as a document or object inside the database. Why not leave it at that and work with the object rather than worry about the HTML tags? With Meteor you can do this easily so that not only you do not have to worry about mapping content with jQuery, but you also get reactive data binding for free (see the sidebar “Two-way data binding vs. reactivity” for more information on data binding). The HTML form is just a different representational view of the house object. Clicking buttons won’t trigger DOM operations but will change an object, as shown in Scenario B in figure 5.2.
As you can see, not only is less code involved, but it also does a much better job at separating data from presentation. As a JavaScript developer you’re already familiar with manipulating objects. All that’s left is to walk through how Meteor can pass data as an object to the front end.
In this extended example of the houseSitter app, you’ll rely on four data sources only:
- HouseCollection— A MongoDB collection on the server side used to persist houses
- Session.get('selectedHouseId')— Used to keep track of which house is currently selected
- Session.get('notification')— Used to store and display notification messages
- LocalHouse— A local Minimongo collection that exists only inside the browser and acts as the staging database before changes are sent to the server
The first two were already present in the previous chapter, and you’ll add the other two in this chapter. You can also get rid of the button used to track whether flowers have been watered already because you’ll focus solely on the management of client or house records. While you’re at it, you’ll enhance the layout so you use two columns. The contents of the house document will appear on the left and the editing form on the right. Again, you can find the styles used in the code sample accompanying this chapter.
Popular frameworks such as Angular or Ember promote a concept called two-way data binding, where changes in the UI can affect the underlying data model, and vice versa. Meteor doesn’t rely on such bindings but uses reactivity instead. But what are the actual differences?
Using a traditional server-side language such as PHP or Java, the application retrieves data from a database, renders it into HTML, and sends it to the browser for display. It’s possible for the server code to poll the database for changes, re-render, and send an updated view to the browser, using Ajax, for example. If the data is displayed as a form, users can perform as many changes as they like and it won’t affect the database content. In fact, form data must be posted first to the server to process and update the data. The server will then store the data in the database, retrieve it, and send an updated view to the browser. Because data flows from a data provider to a consumer, this is sometimes referred to as one-way data binding.

With two-way data binding, the flow is continuous. Every change in a view flows back into the actual data, and vice versa. That means if a form field is updated by a user, the underlying data provider is changed as well. This behavior can be observed if form data is also displayed elsewhere on the site because it would update instantly.

In practice, these two-way data bindings can have unpredictable consequences, especially when there are multiple instances and each may trigger updates to others.
Although reactivity isn’t necessarily related to any data bindings, it can easily be used to monitor events and use computations to automatically perform updates when data is changed. In fact, using a reactive data source is an easy way to implement behavior similar to two-way data binding by using template helpers to show data and using events to update data sources. No code is required to update any views if data changes because it’s taken care of by the Blaze engine. If done cleverly, you don’t even need to provide any code to send the data back to the server, as you must when using a client-only framework.
If you need more advanced front-end functionality or specifically two-way data bindings, it’s possible to combine Meteor with other front-end frameworks such as Angular or Ember by using packages.
5.3. Staging changes in a local collection
In chapter 4 you used two different types of reactive data sources: Session and Collection. Before you implement any reactive editing, you must decide which to use for holding house data. You could easily use the Collection object because all houses are already stored inside it. That way, you could get rid of much of the code and always have the latest editing state inside the database. There are two disadvantages of using a server-side Collection:
- Each change—that is, keystroke—must initiate a database write operation, which puts stress on both the network as well as the server. A single client will do quite well, but if you expect thousands of houseSitters to be updating their client’s houses you can foresee a lot of load that’s best avoided.
- There’s no rollback if changes were made accidentally. You still want the user to press a button to persist data to avoid adding complex undo routines.
You could use Session to hold the database object, but that would mean you’d have to use a different way to work with data and affect your ability to reuse existing code.
You need an intermediary data storage that holds house data only for the duration of the editing process and hands it over to a Collection once the Save button is clicked. To comply with the first point, there’s no reason you should send the contents of the staging Collection back to the server after each editing step (although you could, if you wanted to build an autosaving variant akin to Google Docs). To avoid any intermediary formats, you can use a special variant of Collection as a staging instance: a local or unsynchronized collection. You can see the data flow in figure 5.3.
Figure 5.3. The local collection LocalHouse is used as a staging environment for house documents.

Local collections have the advantage that they exist only inside the browser’s memory. That means they’re fast and write operations are cheap. No network latency or disk I/O is involved that could slow down these operations. As a bonus, all data is already in exactly the same format as in the persisted MongoDB collection on the server.
Note
Using a local staging collection requires you to deal with potential data inconsistencies when server content changes. We’ll address this by implementing a notifications system later on.
As a starting point let’s use the code for the houseSitter application from the previous chapter and set up a new houseSitter2 app. The only files you’re going to change are the client files client.js and templates.html.
When you instantiate a new Mongo.Collection without a name or explicitly set the name to null, an unsynchronized, or local, collection is created. This can be done in either the server or client environment:
LocalHouse = new Mongo.Collection(null);
To use the LocalHouse collection on the client exclusively, you must add the code to the client.js file. Each client has its own instance of LocalHouse, and pushing changes to the server (which in turn will update all clients) will be triggered by clicking the Save button.
You’ll also add a default value for selectedHouseId to make our code more understandable and a newHouse object that defines the structure of a database entry. With the two fields lastsave and status, you have a better chance of comparing the data available in the staging and server environments. That ability will come in handy later. Listing 5.1 shows the first lines of the updated client.js file.
Listing 5.1. Setting up a local collection
LocalHouse = new Mongo.Collection(null);
var newHouse = {
  name: '',
  plants: [],
  lastsave: 'never',
  status: 'unsaved'
  };
Session.setDefault('selectedHouseId', ''),
Once the collection is set up, selecting a house performs a lookup in the server database and inserts the document for the currently selected ID into the LocalHouse collection. That means we need to revisit the events for the selectHouse template.
So far the only thing the change event on the drop-down list does is set the value for Session, so let’s enhance the existing code. Listing 5.2 shows the changes you need to make. When assigning a value to newId things get a little more complex, so we’ll look at the code from the inside out. The findOne() operation on the HousesCollection will return a document based on the currently selected ID. If the empty drop-down option was selected, it can’t find a document. In that case, you’ll use the newHouse object instead. Either way, after changing the drop-down option you’ll have a document.
Because you deal with either an existing doc (which would require using update()) or a new document (which must use insert()), you can use the flexible upsert() method. If it finds an existing document based on its _id, it’ll perform an update; otherwise, it’ll insert a whole new document. When performing an update upsert() returns how many documents were affected; when inserting a new document it returns an object with two attributes: numberAffected and insertedId. Either way the returned value for insertedId is assigned to newId, which will become the new value for selectedHouseId. If upsert() doesn’t need to insert any new documents into the local collection, it means a document with the selected ID is already present and should be used as newId.
Listing 5.2. Adding a house to the local staging collection using the change event

Now that you’re going to add editing functionality to the form, you need the full house details in two places: the showHouse template and the houseForm. It’s more efficient to use a single global helper that can be used in any template instead of creating another helper that returns the house content for the editing template.
Template.registerHelper() allows you to create global helpers, so you’ll use it to make {{selectedHouse}} available from all templates in the application (listing 5.3). Note that the helper doesn’t perform a database lookup on the server as before; it returns the contents from LocalHouse.
Listing 5.3. Global helper that returns the edit object
Template.registerHelper('selectedHouse', function () {
  return LocalHouse.findOne(Session.get('selectedHouseId'));
});
Next you can update the showHouse template to use the global helper instead of the template-specific house. Find the {{#with house}} tag and change it as shown in the following listing.
Listing 5.4. Setting the data context to the global selectedHouse helper using {{#with}}
<template name="showHouse">
    {{#with selectedHouse}}
        <h2>Taking care of {{name}}'s house</h2>
        ...
    {{/with}}
</template>
To conclude the showHouse refactoring, you can remove the code for Template.showHouse.helpers completely.
If you use the drop-down list to select a house, its name and plant details should now be shown just like before, only this time they’re coming from the local collection, not the server. The houseForm, though, doesn’t yet show any data for a selected house because it doesn’t yet have a data context. You can either use the same approach as before (adding {{#with selectedHouse}} to the template) or provide the data context directly when including the template in the body. The latter requires adding a single word and not two more lines to the code:
{{> houseForm selectedHouse }}
For consistency let’s stick with the {{#with}} syntax. Also, if you decide later to put templates into separate files, it’ll be easier to understand the given data context because it’s contained inside the template itself and not inherited from the parent.
5.4. Displaying collection data within a form
Still, no data shows in the input fields, so you must add value attributes to each. Also, you still need to allow for any number of plants to be displayed. Listing 5.5 shows the updated code.
For better visual organization, you’ll introduce fieldsets around each group of inputs. That way, you can easily keep track of which instructions belong to which plant. In addition, you’ll split the templates in the same way you did for the showHouse template. A new plantFieldset template will be used for each plant. For removing plants, you’ll add buttons to each plant’s fieldset and place another button for adding new plants just before the Save button of the form (figure 5.4).
Figure 5.4. Updated form using fieldsets and buttons to add/remove plants

Finally, in order to show the existing data inside the input fields, each input gets a new attribute value with an associated expression. As a finishing touch, change the generic “Add a house” heading to mention the current name instead (see following listing).
Listing 5.5. Template code for displaying multiple plants in the HTML form


Let’s revisit the code. You’re aiming for reactive data binding, so there must be a way for the application code to map each attribute in the current house object to a unique HTML element. You can verify that this is the case because each data attribute (such as the name and all plant details) are correctly shown. There must also be a way to uniquely tie HTML elements back to the data object, which is missing so far. Apart from the input values each plant fieldset looks exactly the same, so you need to enrich it with a unique identifier. You could define color as a unique field and add validation code to ensure you never have two plants of the same color, but that wouldn’t be a very robust approach. You could even have houses with two plants of the same color, so requiring the color attribute to be unique would severely limit future developments. Instead, you can already identify each plant uniquely by its position inside the array. In the next section, we’ll introduce a new index value that represents a plant’s position inside the plants array, which enables you to perform reverse mapping.
5.4.1. Adding array index information to an #each loop
At the time this book was written the {{@index}} helper did not yet exist[2]. As soon as it’s available you can easily access the position of a plant inside an array like that:
The functionality is already available in the development branch, so it should probably be available in Meteor 1.2 and later.
<template name="plants">
  {{#each plant in plants}}
    Index: {{@index}}
    Plant Color: {{color}}
</template>
Until the new helper is available you need to manually implement a solution to get the index of an array element inside an each block.
You’ll use a global helper called withIndex, which will return the plants array with each plant as an object and enhance it with a new index attribute using the map function provided by Underscore.js.[3] Using Underscore.js helps you keep the required code to a minimum. Underscore.js ships with Meteor and you don’t have to add it manually. Listing 5.6 shows withIndex, which takes list as an argument. This will be the plants array. First, you check if the plant object (v) equals null. If not, you add a new property to the object named index with the value of the current array position (i). Your new helper takes a list and gives you a new list with exactly the same elements in the same order, with an additional index property attached to each object.
Underscore.js is a highly useful library that provides commonly used functions in a simple way. See http://underscorejs.org/.
Listing 5.6. Using Underscore.js to add an index attribute to arrays of objects

You can pass any array of objects to the withIndex function and use {{index}} in a template to return the array position of an object inside a loop. That way, you can uniquely identify each cycle and element created by an #each block. In the houseForm template, adjust the #each block tag to pass plants to the withIndex function as shown in the following listing.
Listing 5.7. Adding an index to plants using template helpers

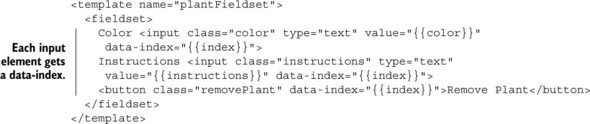
You also need to enhance the plantFieldset template to add an index for each field (see listing 5.7). You’re going to use an attribute, data-index, to store it for each input; the fieldset itself will use id instead.
There’s no more need for a compound ID mashed up of house ID and plant color as you did previously, because you can uniquely identify each plant by its position in the plants array of the current document by enhancing the template as shown in listing 5.8. You can now have dozens of red plants that share the same name but have different instructions.[4]
If you have limited botanical knowledge, it might indeed be useful to require plant colors to remain unique or at least add a location attribute. Otherwise, you shouldn’t pursue a career as a professional house-sitter.
Listing 5.8. Adding index information to the plantFieldset template
At this point both the showHouse and the houseForm templates will show all plants inside each house. Now let’s step it up a notch and implement editing houses with an arbitrary number of plants.
5.5. Reactive updates using a local collection
You can edit the document using a safety net so that all your changes remain locally in the browser. Unlike other frameworks, Meteor doesn’t differentiate between using the database on a server or locally, so you can reuse everything you learned about CRUD operations in the previous chapter. This time, though, you won’t use it to store data back to a server but to edit the contents of a document until you’re ready to persist in the central database.
For editing houses, you’ll focus on two templates and six events, three in each template. This covers all actions involving only the staging collection. Figure 5.5 gives an overview of which events occur in which templates.
Figure 5.5. Editing a house involves two templates and six events.

Let’s look at the code. You begin with the event map for the houseForm template. Editing the document name, adding a new plant, and saving to the remote database are the main functions.
Because all editing events will trigger an update() operation, you can reduce the lines of code by introducing a general function to perform updates to LocalHouse. As you know, every update() of a collection takes two arguments: which objects to update (the document _id argument) and how to update it (the modifier argument). Let’s keep the code lean by using listing 5.9; put that code at the end of your client.js file, and you won’t have to touch it again.
Although the _id can easily be retrieved from Session.get("selectedHouseId") you still need to come up with the code required to assemble the modifier for each event.
Listing 5.9. Wrapper function for performing updates to the LocalHouse collection
updateLocalHouse = function (id, modifier) {
  LocalHouse.update(
    {
      '_id': id
    },
    modifier
  );
};
5.5.1. Event map for the houseForm template
In the previous version of the app, you relied on jQuery to retrieve form values and manually put them into an object to be stored in the collection. This time you can reduce the amount of jQuery involved. Listing 5.10 shows how you can achieve the same goal in a much simpler fashion.
The evt object gives you access to the contents of the input field with an ID of house-name. Whenever a keystroke occurs, you set the name value to the value of the currentTarget property for the caught event and wrap it in the correct $set syntax for updating MongoDB collections. You then call the update() function with both the current document ID and the modifier. To avoid the default browser behavior of reloading the page, you must keep the evt.preventDefault() directive.
Listing 5.10. Event map for updating the house name
Template.houseForm.events({
  'keyup input#house-name': function (evt) {
    evt.preventDefault();
    var modifier = {$set: {'name': evt.currentTarget.value}};
    updateLocalHouse(Session.get('selectedHouseId'), modifier);
  },
  //...
});
With the code from listing 5.10 in place, each change to the value of the input element for house-name will automatically update all occurrences of the name attribute on the page. Every keystroke will trigger all templates to be partly re-rendered with the new value for name. The rest of the templates, such as the color or instructions fields, won’t be rendered again.
Even though the event relates to a button, similar code can be applied to the addPlant event. This time, though, you don’t need the $set syntax but, because you’re dealing with an array of objects, you need the $push syntax shown in listing 5.11. You can simply insert a new empty plant object with color and instructions as its attributes.
Listing 5.11. Event map for adding a new plant
Template.houseForm.events({
  'click button.addPlant': function (evt) {
    evt.preventDefault();
    var newPlant = {color: '', instructions: ''};
    var modifier = {$push: {'plants': newPlant}};
    updateLocalHouse(Session.get('selectedHouseId'), modifier);
  },
  //...
});
There’s no need to manipulate the DOM in any way—simply changing the underlying data will update your templates. Both editing the name attribute and clicking the button to add a new plant will automatically update the screen. This is reactive data binding in action.
Before we move on to the plantFieldset, let’s look at the third event: saving to the remote database (see listing 5.12). To keep track of the last save, each house has a field called lastsave, which you populate with a timestamp.
Note
Because different clients can have different clock settings, it’s not good practice to trust the client to provide an accurate timestamp. Ideally, a timestamp used for database entries should be created by the server. In chapter 7 we’ll introduce you to server-side methods that allow you to implement this functionality quite easily.
Again, you’re providing a modifier. First you update the local house document and then send it to the remote database. But now you run into a limitation of running code from a client: what happens if you successfully update the local document but persisting the changes in the MongoDB fails? You could (and probably should) work around this by checking return values and catching exceptions. Again, this is something you can accomplish much more easily by using server-side methods, so just keep this limitation in mind. Chapter 7 will give you the necessary tools to deal with these situations more efficiently.
Listing 5.12. Saving the staging document to the database with a timestamp

Three events implemented, three to go. Next up is the plantFieldset template.
5.5.2. Event map for the plantFieldset template
Laziness is a virtue for programmers, so let’s use only a single event for changes to either the color or instructions attribute of a plant. That way, you’ll get updates to all available plant attributes for free, should you ever decide to add, say, a location field. That means you have to determine not only the value of what to insert into the document but also the field name or where to insert it. To uniquely identify a property, you need three pieces of information:
- Current plant index (the position of a plant inside the plants array, such as 0)
- Current plant attribute (the field name inside a document, such as color)
- Updated attribute value (the value for a field, such as blue)
Let’s take the following document as an example:
{
  name: 'Manuel',
  plants: [
    {color: 'Red', instructions: '3 pots/week'},
    {color: 'Yellow', instructions: 'keep humid'}
  ]
}
To change the first color attribute for the first plant from Red to Blue, use the following dot notation:
LocalHouse.update(id, {$set: {"plants.0.color": "Blue"}});
As you can see in listing 5.13, you first combine the necessary identifiers to access the right element inside the collection. You can obtain the index from the data-index attribute of the HTML element, which you defined earlier in this chapter. The field name is the same as the class attribute of an input element. These pieces are concatenated into the dot notation for the currently edited plant and property. Dynamically concatenating field names inside an object or using variables as keys is only possible when using the bracket notation, which is why you must first assign plantProperty with the field identifier and then use brackets to assign the new value, which is accessible via evt.currentTarget.value.
Listing 5.13. Event map for updating plant properties

MongoDB allows you to manipulate data inside a collection in various ways, but unfortunately there’s no easy way of removing a single plant object from the plants array.[5] But this is exactly what you need the removePlant button to do. You’ll work around this limitation by first putting all plants in a regular array, splicing it, and then storing the modified plants array back into the document.
This limitation in MongoDB is tracked as “A modifier to delete a single value from an array” (https://jira.mongodb.org/browse/SERVER-1014) and dates back to 2010.
Because you’re in the plantFieldset template, the current data context is limited to a single plant object. To read the entire plants array, you can perform another lookup in the local collection. The collection is available inside the browser and no network latency would affect the lookup, so you could use the following to get all plants for the currently selected house:
LocalHouse.findOne(Session.get('selectedHouseId')).plants
Alternatively, you could access the parent data context using the global Template object:
Template.parentData(1).plants;
If you don’t put an argument inside the brackets, it defaults to 1, which means the data context one level up is referenced. You can go up as many levels as required and access the data you need by adding its name to the statement. The previous code is equivalent to using {{../plants}} within a template.
Once you have all plants from the house document in a regular JavaScript array, you’ll use splice to extract the element at the position determined by the index associated with the HTML button. The resulting array has one less element and is used inside modifier. The following listing shows the event map for removing a plant.
Listing 5.14. Removing plants

These are all the events needed to provide full editing of existing houses. Together with the code provided in the selectHouse event, this approach is also flexible enough to address the use case of creating new houses; you simply select the empty option from the drop-down.
Note
We haven’t discussed it in detail, but make sure that when removing a house you remove it from both HousesCollection as well as LocalHouse. Make this simple fix before moving on to the next section.
The application still lacks something in terms of usability. How can you tell whether you’ve made any changes to the document currently opened in your browser when you return from a lengthy phone call? Or even worse, what happens if a colleague works on the same house as you do simultaneously and saves it without you knowing? You can greatly improve this app with a basic notifications[6] system that provides and save reminders and warnings if there’s newer database content.
You’ll see more efficient ways to implement notifications when we talk about packages in chapter 9.
5.6. Implementing a simple notifications system
Any application that allows multiple users to edit the same data simultaneously has to deal with concurrent saves. What happens if you start editing a house and someone saves while you’re still editing? Let’s assume Manuel and Stephan are both editing the same house document, as shown in figure 5.6. Stephan updates the plants in his home so that the document contains three entries: red, orange, and white. When he’s finished, he stores the changes back to the server. Meanwhile, Manuel has started editing Stephan’s house as well. He views a local copy with only two plants: red and blue. What should happen with Manuel’s view now that the database content has changed? One possibility would be to discard all local changes and reactively update the view with the latest state of the document. Doing so automatically wouldn’t be an ideal solution and results in poor user experience; it may frustrate Manuel because it’ll feel as if he lost important data. Perhaps his data was even newer than Stephan’s.
Figure 5.6. Dealing with concurrent edits to the same house

There are many scenarios where you want to avoid instant updates—for example, when thinking about a simple way to provide fallbacks to cancel an edit, or when documents can only be changed entirely to maintain a certain level of consistency.
Either way, as long as you don’t have a means to collaboratively update a document simultaneously and merge updates directly into a document, a better approach is to use notifications to signal that the local copy Manuel is looking at is outdated.
Besides having an area to display notifications, you need a trigger to determine when to show messages and which messages to show, so you’ll extend the update() operations on the local document to indicate that a document has been changed by including a status field. Also, you want to avoid overwriting someone else’s changes. To do so, you’ll implement a notification that appears when remote data is changed by someone else. There are many ways to achieve this—in this chapter, you’ll rely on the lastsave attribute to determine whether a document was changed by someone else while editing is still in progress.
A second use case for providing notifications is to prevent a user from accidentally discarding an edited document. So you’ll also build in a safety net for the drop-down list so that users won’t accidentally switch houses while unsaved changes are present on the page.
5.6.1. Adding a notifications template
All notifications will be displayed at the top of the page. If there are no messages or warnings to show, the notifications area remains invisible. Both the showHouse and the formHouse templates already use a similar approach—if there’s no data context, they won’t be rendered.
You’ll use an additional template called notificationArea that checks whether there’s a notification object. If so, it’ll use its style and text properties and display a message to the user. The following listing shows the template’s code.
Listing 5.15. Using a template for displaying notifications
<template name="notificationArea">
  {{#if notification}}
    <p class="{{notification.type}}">{{notification.text}}</p>
  {{/if}}
</template>
You can embed this template anywhere you like, in the form template or at the top of the page, by using {{> notificationArea}}.
5.6.2. Adding a status property
Keeping track of the status of a house document is best done by introducing a new status property. There can be three states:
- The contents of a document in HouseCollection and LocalHouse are the same— This requires no notifications. As long as users only look at content and don’t use the form to make any updates, there’s no need to display any notifications besides the actual document contents.
- LocalHouse has local or unsaved changes but the remote document hasn’t changed— If there are only local edits, a warning must be displayed that unsaved changes are present on the page and navigating away will discard them.
- While you were editing the current document, the remote document was changed— In this scenario the remote database contains newer content than what the user currently sees inside the browser. A warning must tell the user that saving now will overwrite a newer version on the server.
The first state is the initial state when a new house is selected by the user. It doesn’t require any additional code, so let’s look at the second case: identifying unsaved changes.
To add state, you’ll extend the existing modifiers you’ve used for the LocalHouse.update() operation. In most cases it’s sufficient to add a new key-value pair to the $set statement. Adding plants makes use of the $push operator, so you must add a dedicated $set statement to the modifier. For the color and instructions events, you’ll also use bracket notation to add the status to the update modifier. The Save button will set the status to saved, so make sure you set the correct status. The following listing shows which lines must be present inside the event map code.
Listing 5.16. Adding status to the update modifiers

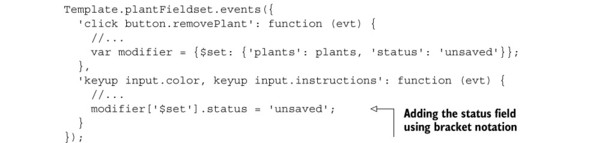
Not only will every change to the form contents trigger an update to LocalHouse, but it will also set a status field to unsaved. Only clicking the Save button or selecting another house should reset the current status.
5.6.3. Using a Session variable to trigger notifications
You could easily use a helper to determine different states and return the actual display text and style, but in this chapter you’ll use a dedicated Session variable to trigger messages. Keeping the code separated makes it much simpler to extend the code in the future and only perform updates to a single location. The code presented in listing 5.17 should look familiar by now—it’s a simple helper that returns the contents of the Session variable named notification.
Listing 5.17. Helper that displays notifications from a Session variable
Template.notificationArea.helpers({
  notification: function () {
    return Session.get('notification'),
  }
});
The contents for the Session variable must be set based on simple conditions. Instead of hooking into the update modifiers, you’ll use a computation that checks for certain conditions. If those are met, it’ll reactively set the correct notifications content.
You used Tracker.autorun earlier to set up a reactive computation. This time you can limit it to the houseForm template because this is the only place where status updates may be triggered. The advantage of using autorun inside a template context is that once the template is destroyed the autorun function is destroyed as well. We discussed hooking into the created callback in chapter 4:
Template.houseForm.onCreated(function () {
  this.autorun(function () {
    // do stuff
  })
});
Inside the autorun you’ll check for two conditions to be met:
- Is a house document selected and does its status equal unsaved? Then let the notification be a save reminder.
- Is the lastsave timestamp of the remote doc newer than that of the local staging document? Then let the notification be a warning.
If neither of these conditions is met, you can safely proceed without any notifications. Listing 5.18 shows how to perform the checks in the client.js code. Because the Session object can hold entire objects, you store both the type as well as the text property for the notification via Session.set().
Listing 5.18. Setting the notifications inside an autorun

Open up two browsers and check if the code works as expected (see figure 5.7 for an example). If you open the same house in both and start editing, you’ll see a green[7] message text saying that you must remember to save your changes. As soon as you save in one of the browsers, the other will tell you that the document has been changed inside the database on a red background.
Of course the message will only be green if you took the CSS classes from the chapter’s code and put them into your styles.css file.
Figure 5.7. Remote changes trigger a warning message about changed content.

You can now build on this rather simple solution. Possible improvements include showing the remote and local documents side by side so that a user can easily see the differences. All that’s required is to display the contents from HousesCollection in the showHouse template and keep the houseForm populated with data from LocalHouse. You can even go as far as highlighting the differing fields to give even more guidance. We’ve covered enough ground now that you should be capable of enhancing the application on your own.
If you want to include information on who changed the document, you must first understand the concept of users and how Meteor handles them. Head over to the next chapter to find out how to deal with users and authentications, and learn how to restrict users to editing only certain fields or documents.
5.7. Summary
In this chapter, you learned that
- Local collections are unsynchronized and may be used just like regular databases, even if they exist only inside the browser’s memory. That means they aren’t affected by network latency or slow disk performance.
- Using reactive data binding between collections and templates removes the need to perform DOM updates manually; simply updating data sources will trigger view updates.
- Reactive data binding can have similar effects as two-way data binding in other frameworks.
- Blaze templates can’t return array index positions; a helper function is required.
- Session can be used to implement a simple notifications system.