
Chapter 8. Routing using Iron.Router
- Adding routing capabilities to Meteor applications
- Creating layouts
- Improving code structure using Iron.Router
- Extending Iron.Router with controllers, hooks, and plug-ins
- Creating server-side routes and APIs
As your application grows in size and complexity, you’ll have to deal with lots of subscriptions, publications, collections, and templates. You need a way to organize all these things as well as specify what to render and what data context should be available in the rendered templates.
One good approach to handling this complexity is to use routes. This means you decide what to subscribe to and what to render and you specify the data context, depending on unique URLs. The router handles all those tasks. The most commonly used package with Meteor is Iron.Router.
Iron.Router is a community package maintained by Chris Mather and Tom Coleman. Tom wrote one of the first routers for Meteor, called meteor-router, and Chris also started a routing project called meteor-mini-pages. Luckily for the Meteor community, they combined their efforts and developed a single router, which eventually became the Iron.Router package.
The Meteor Development Group (MDG) had a router on its own roadmap once but decided that it wasn’t necessary for them to build one, even though routing is a crucial aspect of every web framework. The reason was that the community efforts in building a router were so good that a router developed by MDG wasn’t needed.
8.1. Routing in web applications
If you click a link on a normal website, the URL changes in the browser. The browser then requests the resource from the server that belongs to the new URL. The first thing the web server does after it receives a request with a given route is go through a dictionary of all the routes it knows. If the route of the request matches a known route in the dictionary, the defined action is performed. At the end of each action, the response is created and sent back to the browser, which renders the HTML it received for the new route. The router typically handles all of this functionality (figure 8.1).
Figure 8.1. The client’s HTTP request is handled by a server-side router that responds with HTML.

Let’s say you’re on a community website and see a list of profiles. One of them is from Manuel. If you click the Manuel link, the URL of the browser changes and a request is sent to the server. The server performs the actions defined for the route to generate the HTML needed for Manuel’s profile. At the end, the response is sent back.
With Meteor, you create client-side web applications. This means if you click a link, there’s no request back to the server for a different HTML document. In a web application, if you click a link the view is changed directly in the browser, without the need for a new HTTP request to the server. This means that technically you don’t need any routes because you can link the functions that change the DOM directly on the event handler of a click event on specific anchor elements (figure 8.2).
Figure 8.2. A client-side web application can handle the DOM manipulation in an event handler.

When links to profiles are listed on a website, the process is quite different from the one on a static website. If you click the link for Manuel’s profile, the URL doesn’t change at all, but instead the event is handled by a JavaScript function directly in the browser. The DOM could be changed directly on the click and show a loading indicator—for example, a simple string like Loading.... At the same time, the application fetches some data from the server that’s needed in order to render the profile. In Meteor, you do this by updating or creating a new subscription. If the new data is available on the client, the DOM is changed again and the new profile is rendered.
If you change the current HTML based on click events like this without changing the browser’s URL, it affects the maintainability of your application. The URL combined with a dictionary of routes that your application understands is a very good starting point if you want to figure out where to look in your code. Suppose you want to join a project that’s creating a complex application that’s completely new to you. If you click a profile of the community website and the URL changes to /profiles/manuel, you can start looking at the defined routes and see what action is performed. You can use the URL as a first hint where to look for relevant code, which is very important.
The main reason why you should always use URLs even for a client-side application is the architecture of the web itself. Its URLs define every resource you can reach in the web. URLs enable you to share content with your friends. If your community application will consist of only one URL, you can never share an interesting profile with anyone. But if you perform actions like filtering or sorting of tables, it would be good to reflect this in the URL as well. Consider a special and very important filter and sorting combination of a large data set that you need to access very often. If you can access this exact data set with a URL, you can easily bookmark it and reach it much faster than you would if you had to set up the configuration every time you wanted to access it.
URLs are important not only for humans browsing through the web but for applications as well. If a search engine crawls a website, it always tries to understand the content of the given document that relates to a specific URL. If a user then types search phrases into the search bar, the search engine will try to present the best matching URL as a response. If your application has only one URL for all the content it contains, a search engine can’t properly redirect visitors to the exact view that would be relevant to the search phrase of the user.
Because routes are so important for Meteor applications, Iron.Router implements a router. The router is available on both the client and the server sides. On the client side, the router helps you set up new subscriptions but also end old ones based on a given URL. In addition, it takes care of rendering the specified template based on the current URL (figure 8.3). As you’ll see in this chapter, Iron.Router has even more capabilities.
Figure 8.3. Iron.Router listens for URL changes and performs actions defined for a route.

You can also use Iron.Router to react as a normal server-side router. This means you can create REST interfaces with a Meteor application. The main use case of Iron.Router is client-side routing, and this is what we’ll focus on in this chapter. But we’ll take a look at server-side routing at the end of this chapter, too.
8.2. Client-side routing
In this section we’ll show you how to use Iron.Router to implement client-side routing. The router component will run exclusively on the client and let you navigate around without having to contact the server.
You’ll be building a community application where you can see users’ profiles and comment on their profile pages. An important aspect of an application like this (and for nearly any web application) is to have URLs that are sharable. Think of your profile page on our new community website. Without your unique URL, you couldn’t share it with anyone or even access it yourself.
At the end of this chapter you’ll have built an application that can contain an unlimited number of profile pages, each with a unique and sharable URL. Each profile will have a dedicated URL that shows the contents, as shown in figure 8.4. Our application will have multiple routes not only for static pages but also for dynamic pages that require data in order to render the templates.
Figure 8.4. A simple profile page of a single-page community application

8.2.1. Adding Iron.Router
Meteor doesn’t come with a router as a core feature, but as mentioned earlier, Iron.Router is a high-quality package developed by the Meteor community that’s well maintained. For your Meteor project, you have to add Iron.Router as a package first:
$ meteor add iron:router
Once you’ve added Iron.Router you get access to the Router object in your application in both the client and server environments. Therefore, you can use it to perform server-side routing as well. We’ll get back to using Router on the server in a bit.
Create a router folder just at the root of your application folder. Inside this folder you’ll put all router-related files, beginning with the routes.js file that contains all route definitions (figure 8.5).
Figure 8.5. Iron.Router works on both the client and the server, so putting a routes.js file somewhere outside the client or server folder makes it accessible in all environments.
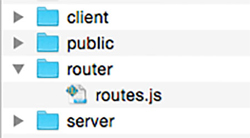
You’ll use the routes.js file to define all the routes the application should contain. It’s a good practice to have every route of your application in a single file to allow for a quicker overview.
8.2.2. Creating your first routes
Our next goal is to set up two basic routes. One is the standard home route, which should be rendered at the root of your application. This route relates to the path /. The second route is a simple about page that should be rendered when users access the /about URL (see figure 8.6).
Figure 8.6. Clicking the About link in the top navigation changes the URL to /about.

Note
To reduce the complexity of the code we won’t show any of the bootstrap markup. The code download for this chapter contains all the relevant bootstrap code in order to achieve a more polished look. To add the Bootstrap CSS-Framework, you have to add the twbs:bootstrap package.
The file structure you’ll use for the first step is shown in figure 8.7.
Figure 8.7. To create two simple routes, you must define the routes and the templates that should be rendered for each route.

The home.html file (see listing 8.1) contains the template that should be rendered if a user is on the root path, /. Navigating to the /about page should bring up a static site with further information about the application. For this you’ll use an about template that’s stored in the static folder. The index.html file contains some general templates as well as the <head> element for the application.
Listing 8.1. Initial templates for the community application
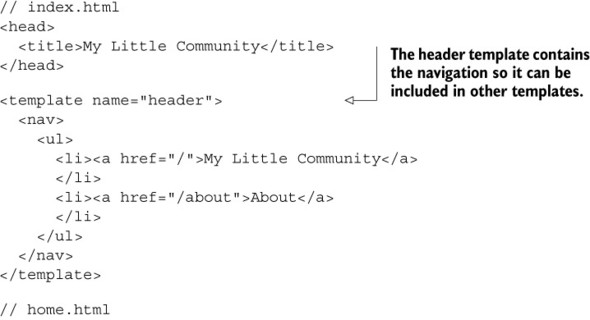

There’s nothing too fancy about the templates yet. The navigation inside the header template contains two anchor elements. One links to the root path <a href="/">My Little Community</a> and the other links to the about page <a href="/about">About</a>. Next you want to add those routes to the Iron.Router and render the appropriate template using the code from the following listing.
Listing 8.2. Setting up different routes

The Router object has a route function that takes two parameters—the path and the associated function. The function is called if the URL changes and the path matches the specified one. Inside the scope of the function that’s called, you have access to the current instance of the so-called RouteController object via this. With the help of the RouteController you can, for example, render a template to a specific location into the DOM. In this case, because you have nothing else defined, the template specified with the string parameter of the this.render('templateName') function will be rendered simply inside the <body> element.
8.2.3. Defining a layout depending on a route
For the entire application you want to maintain a consistent layout—for example, by keeping the main navigation on top. Therefore, you can set a default layout for all routes. Alternatively, some routes may require different layouts. The front page shows multiple images side by side whereas a profile page uses a single, bigger profile image instead.
Single layout
In our previous example, we included the navigation at the top of the application in every rendered template (see figure 8.8).
Figure 8.8. Reusing templates for each route without using a layout
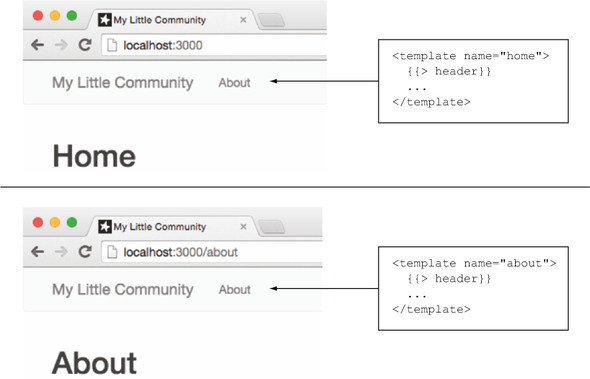
A more effective way to reuse the header template is to use a layout template for each route and alter only a part of the layout based on the current route. This is especially useful if layouts grow more complex or multiple layouts must be used within a single application.
As you can see in figure 8.9, for both routes the masterLayout template should be rendered so that it always has the header template on top. The dynamic part is changed depending on the current route. If the current path is /, the dynamic part of the layout should be replaced with the template called home, and if the path changes to /about, the dynamic part of the layout has to be exchanged with the template called about.
Figure 8.9. {{> yield}} is a dynamic area that’s replaced with the template that should be rendered for the current route.

In the layout template you use the {{> yield}} template helper that’s defined by the Iron.Router package. With {{> yield}}, you can specify exactly where the template for the route should be rendered; it’s a placeholder for content. This is what’s called a region.
Remember to consolidate the code from your view templates to the masterLayout template, as shown in the following listing.
Listing 8.3. Moving layout-specific markup into a common layout template
// masterLayout.html
<template name="masterLayout">
  {{> header}}

  <div class="container">
    {{> yield}}
  </div>
</template>

// home.html
<template name="home">
  <h1>Home</h1>
</template>
To specify which layout should be used for each route, you must set it inside the Router object via the configure() function. To keep the configuration separate from route definitions, put the following content inside a new file router/config.js:
Router.configure({
  layoutTemplate: 'masterLayout'
});
Using multiple layouts
Instead of a single layout template for all routes, you need two layouts to differentiate the profile page from the front page. First let’s look at the old masterLayout and the new profileLayout (figure 8.10).
Figure 8.10. The second layout for the profile pages should be used on routes for profiles.
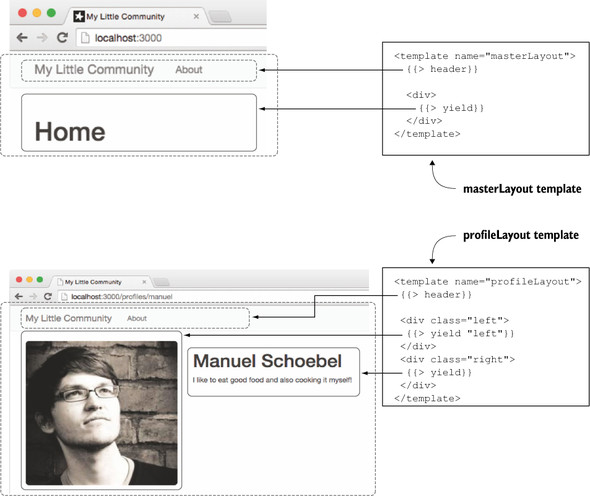
As you can see, the profile layout has two columns. The column on the left renders the profile picture and the right column contains profile information. You still have one main content region that’s specified with the {{> yield}} template helper. The second region on the left needs a name so it can be referenced later in the route function. For that, you can use a named yield like this: {{> yield "name"}}.
In the route function you can specify which layout should be used. If you don’t specify a layout, the one set by the configure function is used. If it hasn’t been configured, the template is directly rendered into the <body> (see the following listing).
Listing 8.4. Setting a layout inside the route function

Defining the content template for named regions
If you have named regions like the previous example—{{> yield "left"}}—you want to define which template should be rendered there. You can do so in one of several ways.
The easiest approach is inside the template itself. Iron.Router uses a template helper named contentFor that lets you define content for specific regions (see listing 8.5). Anything outside this block is rendered to the main region.
Listing 8.5. Rendering a template inside a named yield with template helpers

You can also use contentFor as a partial and specify which template to render:
{{> contentFor region='left' template="profileImage"}}
The most flexible way to define contents for a region is inside the route definition. The render() function has a to option that can be used to specify the region in which you want to render templates and data (see the following listing).
Listing 8.6. Rendering a template inside a named yield using JavaScript

You defined the route for a specific profile in a static way because you used the route /profiles/manuel. Of course, you want to have only one route for profile detail pages, as you’ll see next.
8.2.4. Setting the data context depending on a route
On the home route of our application, you want to have multiple profiles with links to their details page. The profile detail page should have a template that renders the data of the individual profile that’s specified through the URL. That means the route /profiles/stephan should render the profile detail template with Stephan’s profile data. The route /profiles/manuel should render the profile detail template as well, only with Manuel’s profile data (figure 8.11).
Figure 8.11. With Iron.Router you can define the rendered template, the layout, and the data context.

Figure 8.11 shows the core functionality you’ll implement in this chapter. You’ll need a list of profiles on the home route, a more... link that redirects to the profile URL, and a dynamic route that displays detailed profiles.
The data context of the home route has to be a set of profiles that should be rendered. On the profile’s detail page you only require a single user’s data as the context for the profileDetail template. Because the URL defines the data context, you’ll use Iron.Router to set it.
To make things easier, let’s assume that the autopublish package is still active so that all profile data is available on the client. You also need all profile data to be available inside ProfilesCollection. Refer back to chapter 7 to learn how to set up publications and subscriptions that limit the data on the client.
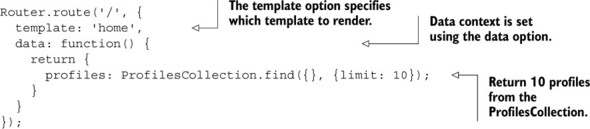
The relevant logic is located in the routes.js file (see listing 8.7). You now have three routes: home or /, /about, and a dynamic /profiles route that accepts a user ID as a URL parameter to determine which profile to display. The /about route stays the same, but the other two require updating.
The home route now sets the data context of the home template. It returns an object that contains all profiles available on the client and makes them accessible via profiles. This makes it possible to access all profiles inside {{#each profiles}}...{{/each}} within the home template. There’s no need to define a template helper that returns data; Iron.Router can take care of it entirely.
Listing 8.7. Setting the data context with Iron.Router


In case of the profile’s detail page, you expect the path to be /profiles/:_id. The leading : (colon) signifies that _id is a variable, which is read from the URL. Its content is accessible through the params attribute of the current route controller instance. You access the current value from the URL with this.params._id. This way, you can identify which document to retrieve from the database. Let’s take a closer look at the data option.
8.2.5. Data subscriptions with Iron.Router
You’ve seen that multiple aspects depend on the current route: the layout that should be used, the templates that should be rendered, and the data that you want to look at. Typically the autopublish package won’t be available within a package, so you must be able to dynamically subscribe to data depending on the current route.
On the home path of the social community, say you’d like to show some random profiles, limited to a maximum of 10. This involves subscribing to the data. But instead of being subscribed to this data all the time, you want to be subscribed to it only for the home route. If you navigate to a profile’s detail page, you don’t need to have all the data of the 10 profiles available anymore.
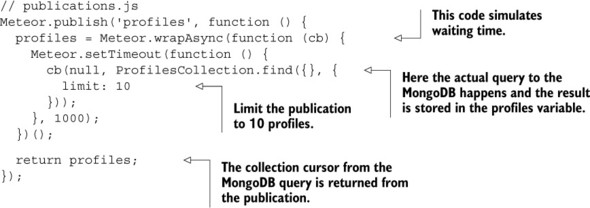
At first you’ll remove the autopublish package from the application. On the server you’ll create a publication that includes a slight delay to simulate network latency. The following listing shows the publication code for the server.
Listing 8.8. Publishing the profiles collection with a one-second delay
Next you need the client to subscribe to this publication. Let’s start with the home route. Instead of using a simple this.render() call, you’ll pass an object as the second route argument. The result will be the same, but the syntax is different (see following listing).
Listing 8.9. Defining a route’s behavior by options only
As you can see, by using options instead of a route function you save some lines of code and it works perfectly fine for this simple use case.
While you wait for data you want the application to render a loading indicator. Iron.Router comes with a waitOn option that you can use to define all required subscriptions (listing 8.10). A loading template is automatically shown when you use the waitOn option. It’s possible to change the default loading template via the loadingTemplate option. You can do so either in the route’s options or globally for the entire application in the global router configuration.
Listing 8.10. Subscribing based on a route

When the home route is requested, you’ll see a loading indicator, as shown in figure 8.12. Once the subscription is ready, the home template will be rendered with the correct data.
Figure 8.12. Iron.Router automatically renders a loading indicator when using waitOn.

The same technique is used to display individual profiles. To tell the application which profile to display you must also include the requested profile ID. As mentioned earlier, you can pass it to the subscription using this.params._id. Without using the render() function, the route looks like the following listing.
Listing 8.11. Waiting on individual profile subscriptions
Router.route('/profiles/:_id', {
  layoutTemplate: 'profileLayout',
  waitOn: function() {
    return Meteor.subscribe('profile', this.params._id);
  },
  template: 'profileDetail',
  yieldTemplates: {
    'profileDetailLeft': {
      to: 'left'
    }
  },
  data: function() {
    return ProfilesCollection.findOne({
      _id: this.params._id
    });
  }
});
These are the fundamental building blocks you need to create single-page applications. Iron.Router not only helps you organize your code but also lets you accurately define which templates should be rendered, which subscriptions are required, and what data should be available in the templates’ data context.
Ready to step it up a bit? Let’s look at some more advanced use cases.
8.3. Advanced routing methods
For the rest of this chapter, we’ll look at advanced techniques that are useful and commonly used in applications. They’re related to
- Maintainability— Using named routes for easier reference and organizing code in controllers and plug-ins
- Appearance— Highlighting active links with different classes
- Performance— Loading external libraries for specific routes only
- Functionality— Using hooks to add view counters and prevent anonymous users from accessing routes
8.3.1. Using named routes and link helpers
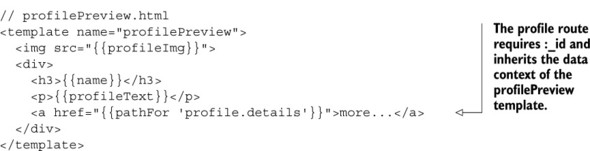
It’s good practice not to hard-code any links in an application, such as the href attribute of an anchor element. If a route changes, you’d have to edit all hard-coded occurrences manually, so it’s much better to rely on route names and use a helper to generate the link path. As with templates you can give a name to a route and use it to reference the router. The name of a route is one of its options in the route definition. To link to a named route, you’ll use the pathFor template helper.
Listing 8.12 shows how to link to named routes. A profile page requires a profile’s ID to properly display its contents. In that case the route named profile must fill a variable called _id and the {{pathFor}} template helper must have access to it. It’s possible to set the data context through Iron.Router or use the {{#with}} block helper to pass a value for _id. Listing 8.12 uses Iron.Router to set the context.
Listing 8.12. Using named routes

When {{pathFor}} is used, it returns a relative URL, making it work equally well in different deployment environments. If you need an absolute URL, you should use {{urlFor}} instead. A third option is {{#linkTo}}, which you’ve used earlier in this chapter as well. It renders the anchor element and allows for content to be included between its tags—for example, when providing a link text (see following listing).
Listing 8.13. Using the linkTo block helper to render anchor elements
{{#linkTo route='about'}}About{{/linkTo}}

// renders to
<a href=""/about">About</a>

{{#linkTo route='home' class='navbar-brand'}}
   My Little Community
{{/linkTo}}

// renders to
<a class="navbar-brand" href="/">
   My Little Community
</a>
Any attribute you add to a {{#linkTo}} block helper will be rendered to the anchor element, too. That way, you can add attributes such as class, data-*, or id.
8.3.2. Working with active routes for better navigation links
To let users know which part of an application they’re currently dealing with, you should highlight the link associated with the current route. This way, users can directly see where they are on the application (figure 8.13).
Figure 8.13. An active navigation item has a CSS class active and a highlighted UI.

For this functionality, you need a global template helper that can be used in any template and for any navigational link. The purpose of the global helper is to check whether or not the currently active route matches the route of the link. To be able to tell which route is currently active, you’ll take advantage of Iron.Router’s named routes feature:
Router.route("/about", {name: "about"});
Every route can have an optional name, which makes it easier to reference it. Listing 8.14 defines a template helper that determines the name for the current route and returns it to the template. In the HTML file it’s then possible to implement a simple check and set the CSS class for the li element to active for the current route.
Listing 8.14. A global template helper that highlights an active link

You can use this template helper on every navigational link where you want to set the active class depending on the current route name. You can also use this helper for anything else that needs to check the name of the currently active route.
8.3.3. Waiting for external libraries to load
Meteor loads every JavaScript to the client with the initial page request. If your application contains a lot of external JavaScript libraries, it’s a good idea to not put everything into the main application folder because doing so will increase the amount of data to be transferred when first accessing the page. The resulting load time will be longer than for a statically rendered page. If you use external libraries that aren’t required by the initial page, it’s better to split them from the initial loading request.
Iron.Router makes it possible to load an external library based on a route. When adding a map or date picker, the library must be loaded before rendering, which can also be achieved with Router.
A package called wait-on-lib provides the necessary functionality:
$ meteor add manuelschoebel:wait-on-lib
This package enables you to use an object called IRLibloader, which can be used in a waitOn function named Iron.Router just like you do with a Meteor.subscription. Let’s say you want to load the jquery.fittext.js library only for the /profiles/:_id URL. Once loaded, it’ll make text sizes flexible. The library itself is located in the public folder as public/jquery.fittext.js.[1]
Everything inside the public folder is served as is. This means even if a JavaScript file is located in public, it won’t be minified by Meteor, even when running with the --production flag.
With the wait-on-lib package, the waitOn function is used as shown in listing 8.15. You define a full URL or a filename; wait-on-lib will look for the file inside the public folder.
Listing 8.15. Waiting for external libraries to load

Even though Meteor is loaded as one complete application, it’s still possible to load libraries you don’t need for every visit of the application separately in order to reduce the data that has to be transferred on an initial page load.
8.3.4. Organizing routes as controllers
Until now you’ve added all of a route’s functionality directly in the route() method. If you did this in a large application, the routes.js file would quickly become too large to comfortably manage, and you’d lose the ability to get a quick overview of an application’s route at a glance. As a means to better organize your code, Iron.Router introduces the concept of controllers (see the accompanying sidebar).
Many web frameworks build on the MVC principle, which consists of models, views, and controllers. Therefore the term controller comes with a lot of associations. Meteor doesn’t rely on the MVC pattern, which means that some of these assumptions may not be accurate. So what is a controller in the Iron.Router context?
A routing controller is the blueprint for commonly shared routing instructions. Each route can build on these default settings and extend them as required. Technically the routing controller is an object that stores state information when changing URLs. Controllers offer two main benefits when applications grow larger:
- Inheritance—Routing controllers may build on each other to model an application’s behavior, enforcing the Don’t repeat yourself principle (DRY).
- Organization—Separating route logic into different files helps maintain a better overview of the actual routing and business logic.
By default, all of the routing functions like route() and render() rely on the default RouteController object.
You can specify a controller for each route and put it into its own file. That way, you can remove all logic from the routes.js file and split it across multiple files, similar to how you deal with templates.
Let’s say that you want to use a controller for the home route. It should wait for a subscription to the profiles collection and set the data context so that all available profiles are shown inside the home template.
To specify a controller for this route, you can set it explicitly as a string or a controller object. The controller itself typically has the same name as the route, suffixed by the word Controller. To organize your code, place each controller in a dedicated file. For the HomeController you need to define the waitOn, template, and data attributes as shown in listing 8.16.
Listing 8.16. Using an Iron.Router controller

RouteController can have the same attributes as route(). This means you can also create your own custom action function or specify a layoutTemplate. Splitting your routes into separate controllers leaves a clean and short routes.js file (see following listing).
Listing 8.17. Routes declaration using controllers

If you’re using named routes, you don’t even have to specify a controller anymore. If you have a route named home, then Iron.Router automatically looks for a controller called homeController or HomeController: The following works just like the code in listing 8.17:

8.3.5. Extending the route process using hooks
A hook is basically a function that can be added to the routing process. One of the most common requirements for using route hooks is to prevent anonymous users from accessing internal routes. Another use case is tracking some statistics or count views, like the number of times a certain profile has been viewed. To track each view, you can use an onRun hook. This hook runs exactly once regardless of whether a computation invalidates and a rerun takes place. Therefore, onRun is the perfect hook to use to increase the view count.
For every hook you can create one function or an array of multiple functions that will all be called.
onRun—Called when the route runs for the first time. It runs only once!
onRerun—Called every time a computation is invalidated.
onBeforeAction—Called before an action or route function runs. If there are multiple functions, you have to make sure that next is called because this doesn’t happen automatically with onBeforeActions. If you want the next onBeforeAction to be called, you have to call this.next.
onAfterAction—Called after the action or route function runs.
onStop—If a route stops—for example, a new route is run—this hook is called.
In listing 8.18, you add an onRun hook to the ProfileController. Now whenever the route is accessed, an update to the ProfilesCollection is made, increasing the views field by 1 for the current profile _id.
Listing 8.18. Adding a hook to a RouteController

Now every view of a profile is counted, and you can add it within the data context of a profile via {{views}}.
In our community application, there are several routes only members should be able to access. This can be implemented with the onBeforeHook just as easily. See listing 8.19 for the code. Within the onBeforeAction hook, you perform a check for the current user ID. If there’s no user ID available, you redirect the request to show a membersOnly template. In combination with a data publication that checks for a user ID, this will be enough to prevent users from seeing content they aren’t authorized for.
Listing 8.19. Requiring a logged-in user for a specific route
// profileController.js
ProfileController = RouteController.extend({
  // ...
  onBeforeAction: function() {
    if (!Meteor.userId()) {
      this.render('membersonly'),
    } else {
      this.next();
    }
  },
//...
});
You can make these hooks reusable by putting them into controllers or wrapping them into plug-ins.
8.3.6. Creating an Iron.Router plug-in
If you create hooks that you want to use for multiple applications or share with the community, creating Iron.Router plug-ins is the way to go. These plug-ins enable portable functionality that’s easy to share and use in applications or packages. Let’s turn the hook that requires users to be logged in into a plug-in.
Each Iron.Router plug-in can be added as part of the configuration. You can include it for all or just for specific routes. Because you already have an onBefore-Action hook in the /profiles route, you can remove the code from here and place it inside a new router/plugins/membersOnly.js file. Creating a plug-in is similar to the way you define template helpers. Plug-ins take two parameters: router and options. Instead of simply reading the parameters passed to a plug-in, use a lookupOption function to access all configuration options available to Iron.Router. You could use the function to access layoutTemplate the same way you use it here to access the setting for membersOnlyTpl. As you can see in listing 8.20, most of the code for a plug-in is fairly similar to an actual route.
To use a plug-in, you don’t call it from a specific route or controller but instead set it in the router configuration file router/config.js (see listing 8.20). A plug-in is loaded via Router.plugin('name', options). The options object contains two settings: membersOnlyTpl defines which template to render when an anonymous user tries to access a route that requires a user ID, and only contains an array of the routes affected. You have a single route, /profile, that should be protected. If most of your routes require a plug-in, then you can use except rather than only to define all routes that don’t require a logged-in user.
Listing 8.20. Creating a reusable Iron.Router plug-in

Keep in mind that this plug-in checks for a user ID only on the client side. Any malicious user can fake a user ID, so it isn’t sufficient to rely on routing functionality as the only security measure. A combination of a router with a publication that checks for a user ID on the server side should be used to secure your application for production. Even if users could get to the layout and templates of a single profile, they still couldn’t access any data if it’s not published to the client in the first place.
8.4. Server-side routing with a REST API
If you need an API for non-Meteor clients, you can’t take advantage of DDP, so you may need a traditional HTTP interface. For an automated process, you might want to allow scripts to look up usernames based on their ID. Then all routing takes place on the server because you’re dealing with a dumb client that knows only a single URL. There’s no point in first sending all JavaScript over the wire if all the client needs is a single name string.
Implementing server-side routing requires passing the where option to the route() function. You use this option to limit the route to the server only. Providing an HTTP interface effectively bypasses most of Meteor’s functionality, so you’ll rely on the basic Node.js functionality with both request and response objects (see listing 8.21). Instead of defining all headers and using response.write(), you shorten the code to use only response.end(). In the response.end() function, you perform a database lookup with the given ID and return the name attribute (figure 8.14).
Figure 8.14. When provided with a valid ID, the API responds with the name of a member.

Listing 8.21. Simple server-side route

If you make a request with a query string and message as the key, the server will respond with the value.
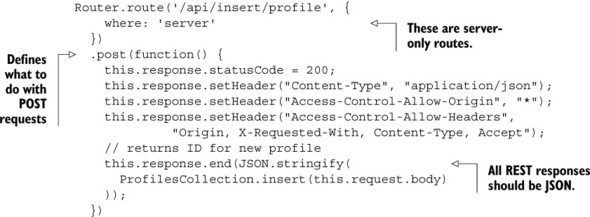
For more advanced APIs, it’s even possible to use the route() function to determine whether a GET, POST, or PUT request was received. For more RESTful routes, take a look at listing 8.22. It defines a GET method for /api/find/profiles that returns all database entries from the profiles collection and a POST method for /api/insert/profile to create new profiles via an API. Remember when using this for your own API to secure the API endpoints—for example, by requiring a login system.
Listing 8.22. RESTful routes

Tip
If you need to build a REST interface, instead of using Iron.Router directly you should also look into using either the nimble:restivus or simple:rest package, which both offer a simpler approach for creating routes and endpoints.
Iron.Router is an extremely versatile and highly configurable router that’s tailored to the Meteor platform. It enables applications to react on specific route requests and can also be used to greatly improve your code structures.
8.5. Summary
In this chapter, you’ve learned that
- URLs enable applications to be accessible and shareable.
- Iron.Router is the de facto standard for routing in Meteor.
- Templates, subscriptions, and the data context can be defined using routes.
- Routing functionality can be structured and grouped by using named routes, controllers, hooks, and plug-ins.
- Routes can be created for the client and the server.