Appendix B. The anatomy of MongoDB
This appendix covers
- Scalable MongoDB architectures
- How to set up MongoDB with oplog tailing
Out of the box, Meteor works hand in hand with MongoDB. If you consider hosting your own database server, you should first know the basic components of a MongoDB installation, how it scales, and how it integrates with Meteor.
This appendix introduces you to more advanced topics. They assume you have a basic understanding of system architecture and administration. By the end of this appendix, you’ll be familiar with the most important aspects of setting up and running your own MongoDB instance.
B.1. The MongoDB components
A MongoDB database is fairly simple. You access it via an endpoint, authenticate with a user and password, and query for what looks like JSON objects. The simplest way to deploy MongoDB is to use a single instance (see figure B.1).
Figure B.1. The simplest way to use MongoDB with Meteor

In a production environment, where you want to make sure the database is always available, you need to look behind the scenes to identify the requirements for high availability. Although the database itself is often referred to in singular, there are in fact multiple processes running. With MongoDB we differentiate between the following components:
- mongod
- mongos
- mongoc
B.1.1. mongod: databases and shards
The mongod process is the database process and takes care of data replication. In the simplest setup, it’s the only process required for running MongoDB. Once a database becomes too big for a single instance, it needs to be scaled out. MongoDB does that by splitting the data between multiple servers, the so-called shards. Shards typically contain only a part of the overall database, a subset of all available documents.
Imagine you’re going to store a worldwide phonebook in your database. Because there are a lot of entries, you’ll partition the data to be stored across three servers. The entries for names starting with A–J will be placed on shard 1, K–S on shard 2, and T–Z on shard 3. Each of the shards contains roughly the same amount of data to evenly balance the load.
B.1.2. mongos: query routing
Because there are now multiple database processes, a routing component will be needed to direct requests to the appropriate mongod instance. The Meteor application should have only a single connection and be unaware of any internal database. In a sharded cluster, the way an application can access the database is through a process called MongoDB Shard, or simply mongos. From an application point of view, it behaves just like the mongod process and takes care of distributing data to the correct shard. The application won’t know whether it was redirected to any other mongod instance.
If you decide to add a new entry in the phonebook, your application will need to access the database through mongos and write a new entry. But how does mongos know where to redirect the request and store the data?
B.1.3. mongoc: configuration servers
A sharded cluster also needs an instance that knows which data resides in which shard. This is where mongoc comes in. This process is referred to as the config server and technically it’s a special kind of mongod instance. It’s crucial that the config servers be available at all times, although they don’t handle a lot of load because the routing instances cache all relevant data for performance purposes. When the routing servers are started, they contact the config servers to retrieve cluster metadata. Sometimes a MongoDB database will use balancing techniques to split or migrate some data to another shard, which is when data gets written to the configuration servers. The creators of MongoDB recommend using three mongoc instances in a production environment. If you decide you don’t want to use sharding, you don’t have to use any configuration servers.
In the phonebook example, the mongoc process ensures that all documents starting with R are stored on shard 2, so the mongos instance knows to redirect the application’s write request to the corresponding machine.
B.1.4. Replica sets
When designing for high availability, you can’t risk losing a single shard. To prevent the unavailability of data when any single process dies, you can use replica sets. Replica sets can have members of three types:
- Primary— All write operations are performed on the primary member only. The primary member also maintains the oplog, which is the foundation of all replication action and is used by Meteor as a better alternative to the poll-and-diff approach.
- Secondary— Secondary members maintain an identical dataset from the primary. In case the primary member becomes unavailable, they can take over as a new primary. Failover requires the remaining members to vote on the new primary.
- Arbiter— Although technically not a real member of a replica set, the arbiter has a vote when electing a new primary member. It doesn’t maintain a copy and can’t become a new primary member. An arbiter is a special mongod process.
Each replica set requires a dedicated mongod process. Multiple processes can run on the same physical or virtual machine, but they must use different ports.
In the phonebook example, you have three mongod instances running on each of the shards. The primary replica set is the one that’s writable, and depending on the exact configuration of the cluster all others will be used as backups for automatic failovers or even as read-only instances for optimum load balancing.
When a primary replica set becomes unavailable, it can automatically be replaced by a secondary member. The remaining nodes will vote on which secondary member will be the new primary. Because a member can’t vote for itself, an uneven number of members is required in a replica set. When you have three replica sets and one goes down, the remaining two will elect the new primary. If for whatever reasons you need to use an even number of replica sets—for example, when two are sufficient and you don’t want the additional network and disk I/O overhead of another instance—then using an arbiter will help reach an uneven number. Otherwise, if there’s an uneven number of sets already, you most likely don’t need an arbiter. Consequently, there should never be more than one arbiter associated with one replica set. Arbiters vote, but they don’t put additional load for replication processes on either of the machines. There’s no need for an arbiter in figure B.2 because an uneven number of replica set members (three) exists.
Figure B.2. A production-ready setup for MongoDB

Oplog
Replica sets aren’t limited to sharded deployments. Even in single shard deployments—such as when you’re running the meteor CLI tool—replica sets are useful because they enable the oplog (operations log), which is an important way to enhance the performance of a Meteor application running on multiple servers.
In the phonebook example, an administrator might want to import a whole batch of names and other data directly into the database without going through the web application. Also, two instances of the application could be running in parallel, so both can change data at the same time. In both cases, the application will only know about any changes if and when it makes a dedicated request (such as “find all entries”). The standard behavior for Meteor is to poll the database every 10 seconds.
Performing such an operation regularly puts unnecessary load on the database as well as on the Meteor server and adds noticeable lag, which is why Meteor is capable of using a much cleverer approach: hooking directly into the replication stream by subscribing to the oplog. The oplog is a special collection that keeps a rolling record of all operations that modify the data stored in your databases.
Component distribution
A production-grade MongoDB consists of multiple servers, physical or virtual. A minimum of three servers is required to run the config servers. The mongod instances could also run on the same servers, although typically you should use a dedicated machine. For the query routing mongos, you can decide between two best practices:
- Dedicated routing servers, at least two on different servers
- One mongos instance deployed on each Meteor server
When running on dedicated routing servers, all instances must listen to the same address, because each Meteor server should use only one dedicated connection string. Therefore, a load balancer such as HAProxy or nginx should be used in front of the mongos. Doing so introduces another single point of failure, which means the load balancer must also be highly available.
To avoid an overly complex scenario, you can simply decide to install mongos on every Meteor server you’re going to use. Using system tools, you can configure the mongos process to restart if it ever crashes, which makes this approach much simpler to manage.
B.2. Setting up MongoDB
Although we can’t cover all the details for deploying a fully production-ready cluster for MongoDB with sharding and query routers, this section covers the specifics for Meteor. We’ll focus on setting up a single instance with a replica set so that you can take advantage of tailing the oplog. You’ll find further instructions on how to set up MongoDB in the official documentation or by checking out MongoDB in Action (Manning, 2011), by Kyle Banker.
Setting up oplog tailing
The oplog is stored in a system database called local. If you haven’t defined any replica sets, you won’t have a collection called oplog.rs (see figure B.3). To initialize the collection you must define a replica set, but you don’t need to add multiple members—you can use a single primary member only.
Figure B.3. Accessing the oplog with Robomongo

Each mongod instance has its own configuration.[1] First open the mongodb configuration file /etc/mongodb.conf. At the very end of the file add two lines:
If you’re running multiple mongod processes on the same machine, make sure you’re editing the correct config file.
replSet=rs0
oplogSize=100
The first parameter defines the name of the replica set (replSet) to be used by this mongod instance. oplogSize defines the amount of disk space to be used for the collection, 100 MB in this example. If you don’t specify oplogSize it defaults to 5 percent of your free disk space.
Next, restart the mongod process and open a mongo shell. You can use either a tool such as Robomongo or the command line. Once you’re connected, switch to using the local database:
> use local
The next step is to initialize the replica set and thereby enable the oplog:
> rs.initiate({
  _id: "rs0",
  members: [{
    _id: 0,
    host: "localhost:27017"
  }]
})
You can always check the status of the current replica set by using rs.status() and view the full configuration and member list using rs.config(). After a successful initialization, these commands should show a replica set with a single member, similar to figure B.4.
Figure B.4. Initializing a replica set from the mongo shell
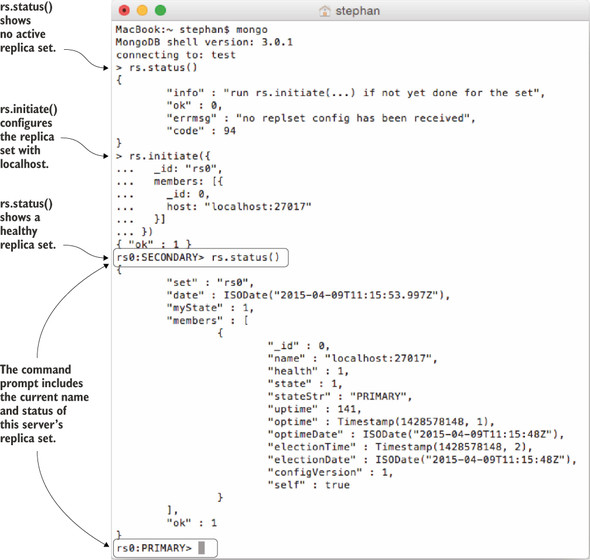
As you can see in figure B.4, two additional collections will be created: oplog.rs and system.replset. Also, the shell prompt will change to reflect the replica set name and its member status (rs0:PRIMARY).
MongoDB now automatically tracks all write operations in the oplog.rs collection. Once the specified size is reached, it’ll purge old entries.
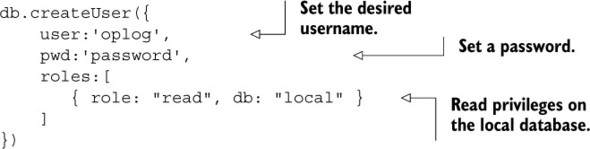
Setting up an oplog user
By default, MongoDB doesn’t require a user to authenticate. In such an environment you can also access the oplog without credentials, so you could skip this step. But in production environments you should add users to provide a means of access control.
For the purpose of tailing the oplog, you need a dedicated user that’s allowed to access the local database, which is where the oplog.rs collection is.
Note
Even though the oplog user has access to the local database, it’s technically created inside the admin database. This is because the local database doesn’t allow any users to be created inside it.
Create an oplog user with the following command: