
Appendix C. Setting up nginx
- Setting up nginx as a load balancer
- Serving static content from nginx
- Enabling SSL for Meteor applications
Although Node.js—Meteor’s underlying server technology—is great for handling events, it’s not optimized to handle static content such as images well. Even though it’s possible to use SSL with a Node.js application, it’s not yet possible with Meteor. The fact that Node.js is a single-threaded application that won’t take advantage of the full power of multicore processors might be enough to convince you that scaling Meteor will be complicated.
Thankfully it doesn’t require much to build a production environment for running a Meteor application that takes care of all these shortcomings. In this appendix, you’ll learn how to use the lightweight web server nginx to accomplish all you need to run a rock-solid Meteor project.
C.1. Load balancing with nginx
Some of the most popular choices for running software load balancers are nginx and HAProxy. Both are available as free open source packages, but because HAProxy is built as a load balancer and nginx is a web server that’s also capable of load balancing, HAProxy provides more advanced features should you need them.[1]
Note that the commercial variant nginx plus offers more advanced functionality, but it’s not available as open source. More details on the differences between the free and the paid versions of nginx can be found at http://nginx.com/products/feature-matrix/.
Our example uses nginx because it’s more versatile and it can do everything you need to ensure your Meteor application is always available. You can reduce the complexity of your setup by just adding a single application to address all your production challenges.
C.1.1. Installing nginx on Ubuntu
On all major Linux distributions, nginx can be installed using a package manager. On Ubuntu and Debian the command is as follows:
$ sudo apt-get install nginx
Meteor uses WebSockets, and nginx only supports WebSockets starting with version 1.3, so ensure that you’re using a recent version (see figure C.1).
Figure C.1. Installing nginx

C.1.2. Installing on Debian 7 (Wheezy)
On Debian 7 (Wheezy), the default nginx version is too old to support WebSockets, so you should install it from the Dotdeb repository instead. Simply add these two lines to the end of the /etc/apt/sources.list file:
deb http://packages.dotdeb.org wheezy all deb-src http://packages.dotdeb.org wheezy all
Then issue these two commands to fetch and install the Dotdeb GPG key:
$ wget http://www.dotdeb.org/dotdeb.gpg
$ sudo apt-key add dotdeb.gpg
Once you run apt-get update you’ll be able to install the most recent stable version of nginx with this:
apt-get install nginx
Next, you’ll configure nginx to listen to requests for the meteorinaction.com site, define back-end servers running Meteor, and forward requests to them. Also, nginx mustn’t send any requests to a back-end server that’s not available.
Note
Debian 8 (Jessie) ships with nginx 1.6. There’s no need to add additional repositories; you can use apt-get install nginx without the preparatory steps.
C.2. Configuring as a load balancer
Similar to Apache, nginx uses a general server configuration file and ideally every virtual host should be configured inside an individual file. You don’t have to touch the general main config file—you’ll create an additional configuration file for your Meteor application.
C.2.1. Creating a site configuration file
First, you create a new file in the /etc/nginx/sites-available directory named meteor-inaction.com. To listen to any requests, you define the server name and port at which nginx should listen.
Also, you want to redirect all incoming requests to have a www prefix.[2] The corresponding file is shown in the following listing.
Although it’s convenient for users to drop the www from an address, any site running on a “naked” top-level domain can create scalability issues. If you don’t use a subdomain, the DNS system will lock you into assigning a single IP address to your domain, which is why we rewrite all traffic to use a subdomain. Users can still access your site without it; they’ll be automatically redirected. Find out more at www.yes-www.org/why-use-www/.
Listing C.1. nginx site configuration

C.2.2. Defining Meteor servers
To let nginx know which servers to forward requests to, you use a module called upstream. Because any server configuration can use any upstream group, it must not be inside a server {} block. At the very beginning of the configuration file, place the following block:

You can think of upstream as an array of servers. Each line starting with server defines a new instance. The first parameter is the actual address of the server. The machine running nginx must be able to access it, but it’s not required that the upstream server can be accessed from the internet. Therefore, you can also use a local Meteor instance at 127.0.0.1 as an upstream. In this example, both instances are accessible only from a private network in the 192.168.2.0/24 range.
All incoming requests will now be distributed equally between both back-end servers. You can further specify parameters such as weight to fine-tune the settings for your environment. Across all requests you need to keep in mind that they’re stateful and that moving between servers may break a user session. The easiest way to make sure users aren’t moving back and forth between servers from one request to another is to use the ip_hash directive. By adding it to your configuration block, you tell nginx to always send requests from the same IP to the same upstream server.
Note
If you expect many requests from the same IP, using the ip_hash directive may result in uneven distribution of users across your servers. In that case you should include the sticky module in your nginx configuration in combination with the least_conn directive instead. You can find out more at https://bitbucket.org/nginx-goodies/nginx-sticky-module-ng/overview. Alternatively, HAProxy might be the better solution for you.
C.2.3. Forwarding requests to the back-end servers
Once nginx listens to requests and knows about the upstream servers, you can define how you want to forward requests. In the configuration block for www.meteorinaction.com, you add a new location for root (/) (see the following listing).
Listing C.2. Location for request forwarding in nginx
server {
...
location / {
    proxy_pass http://meteor_server;
    proxy_redirect off;
    proxy_http_version 1.1;
    proxy_set_header X-Forwarded-For $proxy_add_x_forwarded_for;
    proxy_set_header Host $http_host;
    proxy_set_header Upgrade $http_upgrade;
    proxy_set_header Connection "upgrade";
  }
}
Let’s go through this configuration line by line:
- proxy_pass is used to tell nginx that it should forward requests to this location. It uses the name of the upstream group (meteor_server) and not a real URL.
- proxy_redirect can be used to rewrite the URL request in more complex scenarios. It’s not needed in your setup so you switch it off.
- proxy_http_version sets the HTTP version to 1.1 (the default is 1.0), which is required for WebSockets functionality.
- proxy_set_header allows you to add or modify some headers that’ll be sent to the Meteor server. X-Forwarded-For contains the IP address of the user making the request. Especially when nginx is on the same host as your Meteor server, you need to set this. Host passes the hostname for the actual request to the Meteor server. Both Upgrade and Connection are used to allow forwarding of WebSocket connections.
C.2.4. Activating the nginx site
The final step in configuring the load balancer is to activate the site. First you’ll create a symbolic link of the configuration that’ll be placed in the /etc/nginx/sites-enabled/ directory:
$ sudo ln -s /etc/nginx/sites-available/meteorinaction.com
 /etc/nginx/sites-enabled/meteorinaction.com
Next you test if the configuration is good to go by calling nginx with the –t parameter:
$ sudo nginx –t
If there are no errors, you can reload the configuration without having to restart nginx:
$ sudo nginx –s reload
C.3. Serving static content with nginx
Even if you only expect a small number of users, serving content from a content delivery network or using a reverse proxy to serve static files can greatly decrease wait times for the users of your application. If your application is already using an nginx load balancer, it requires just some lines of configuration to enable it as a reverse proxy.
Meteor shouldn’t have to serve any static files, so you’ll configure nginx to process all requests for media files and images as well as CSS and JavaScript files. Additionally you’ll enable gzip compression.
C.3.1. Serving CSS and JavaScript
The meteor build command automatically minifies and compiles all CSS and JavaScript files and places them in the folder bundle/programs/web.browser. If nginx is to serve these files, they must be accessible from the nginx server. If Meteor is deployed to a different server, you can either copy the files to the nginx machine or configure a folder share using Network File System (NFS). If you copy the files, remember that you need to repeat this every time you deploy the application. Because each build command will create new random filenames, there’s no need to delete the old files; this allows for a smoother transition between deployments.
To configure serving static application files and styles, you must define a new location block in your nginx configuration file:
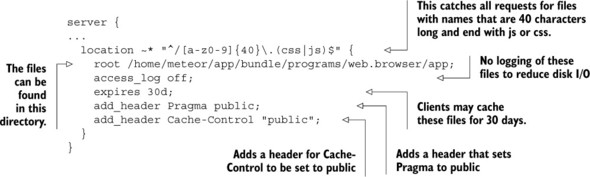
During the bundling process, all CSS and JavaScript files get a new and unique name consisting of 40 characters (letters and digits), and only they will be served from the proxy. Adjust the value for root to the directory where nginx can find these files. Logging will be deactivated for these static files and clients may cache these files for 30 days (expires in combination with the added headers for Pragma and Cache-Control are responsible for this). The next bundling process will result in new filenames, so you won’t run into clients having stale cached files even if you deploy a new version of your app before the 30 days of caching are over.
Note
Nginx must have direct access to the files created by Meteor in order to be able to serve them as a proxy. If nginx can’t access these files locally, you need to leave out this configuration block.
C.3.2. Serving media files and images
The contents of the public folder should also be served from nginx. Because the public folder is accessible at the root of your application, you’ll use file extensions to determine whether a request will be served statically or from Meteor. The configuration is similar to the block you saw earlier:
  location ~ .(jpg|jpeg|png|gif|mp3|ico|pdf) {
     root /home/meteor/app/bundle/programs/web.browser/app;
     access_log off;
     expires 30d;
     add_header Pragma public;
     add_header Cache-Control "public";
  }
You may add all file extensions to the regular expression in the location line. During the bundling process, all contents from the public folder go into bundle/programs/web.browser/app so you must use this as the root path for the location.
Again, if nginx has no access to these files locally, you should copy them over manually, use a shared storage such as an NFS export, or leave out this configuration part.
C.3.3. Enabling gzip compression
The last optimization for serving static files from an nginx reverse proxy is enabling gzip compression. Even when minified, text files can be compressed efficiently; in particular, users with less bandwidth (such as mobile users) benefit greatly from using compression. Configuration is done outside any location blocks but inside a server block:
server{
  ...
  gzip on;
  gzip_disable "msie6";
  gzip_vary on;
  gzip_proxied any;
  gzip_comp_level 6;
  gzip_types text/plain text/css application/json application/x-javascript text/xml application/xml application/xml+rss text/javascript;
 }
The first line activates gzip compression and the second disables it for Internet Explorer 6. Enabling vary and proxied ensures that even requests going through proxy servers that may be used along the way to the client will be handled correctly. In this example, you set the compression level to 6 (on a scale from 1 to 9). Finally, you define the MIME types that should be compressed.
C.4. Setting up SSL with nginx
Because Meteor doesn’t support SSL, you’ll configure nginx for SSL offloading, which means the SSL connection will terminate at the load-balancing proxy server. It doesn’t matter whether you use a self-signed certificate or one that was issued by Thawte, StartSSL, or any other certificate authority (CA). You must copy both the certificate file (with the .crt extension) and the key file (with the .key extension) to your nginx server.
Your Meteor application and server will run exactly the same as before—no changes required. The only configuration you’ll need to make is in the nginx site file.
In the server configuration block you’ll switch the port to 443, turn SSL on, and configure the certificate files to be used (see the following listing).
Listing C.3. SSL setup for nginx
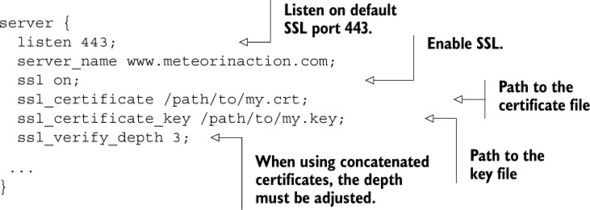
Just like in the non-SSL configuration, you have to define both the port and server name. When ssl is set to on, you must also provide a certificate and a key file. Sometimes the instructions issued by a CA ask you to combine multiple files into one. In order for nginx to accept and verify this combined file, you should adjust the ssl_verify_depth parameter. This parameter defines the maximum number of intermediate certificate issuers—that is, the depth of how many CA certificates may be looked up while verifying the client certificate. When combining your own with a primary and a secondary intermediate certificate, the depth should be 3; self-signed certificates have a depth of 0.
Additionally, you should add a server that listens on port 80 and forwards all non-SSL traffic to the SSL port:

Now your configuration file should have two server blocks: one that listens on port 443 and the other that listens on port 80 and forwards all requests to the SSL server. Test and reload the configuration and you’re good to go.
Note
This SSL configuration is very limited—there are ways to make connections even more secure. Take a look at the code accompanying this book for a full example that’ll provide maximum security while being compatible with most browsers.