
For any Enterprise-level software, administration of your system is critical. Alfresco provides a simple and user-friendly interface to administrate and configure various important services. Users and groups can be very efficiently managed by admin users.
This chapter provides you with an introduction on ways to administer Alfresco.
By the end of this chapter, you will have learned about:
- Understanding Alfresco Explorer and the Share admin console
- Groups and user creation
- Administration of workflow
- How to use Node Browser
Alfresco provide three types of administration console:
This is a standalone administration console in Alfresco, which allows you to configure and manage the Alfresco repository. This console is available only in the Enterprise version and is restricted to admin users. This interface is external to Alfresco Explorer and Share.
Use the following URL to access the admin console. It will prompt for user credentials. Provide admin user credentials to access it:
http://<IP>:<Port>/alfresco/service/enterprise/admin
The landing page is the summary of all the configurations. There are various configurations available in this console. Let's go through each of them in detail.
This is the landing page for the admin console. It provides details about all the configurations of the repository such as JDK version, Alfresco path, file server, e-mail configuration, auditing, content-store location, indexes, and users and groups in the system.
The following snapshot shows the configuration details in the summary section. System Information shows details about the server. The Indexing Subsystem section shows which type of subsystem is enabled for searches. The Content Stores section shows the path and size of contentstore.


The console section provides an interface to execute the commands to load the message bundle, model files, and perform an operation on workflows. This section is divided into three categories:
- Model and messages console
- Tenant console
- Workflow console
This console allows you to manage the models and message bundles. Alfresco allows you to define custom content type and its schema in .xml configuration files, which are called model files. Place the file in the extension directory and you can load the changes into Alfresco. You can activate or deactivate the content model via command execution:
- Type
helpto get a list of all the commands.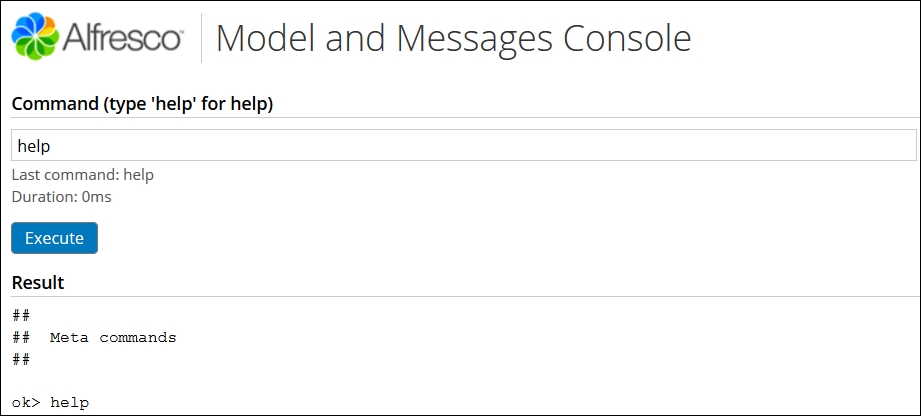
- For example, let's say the marketing team is your Alfresco repository, and you need to categorize a brochures type of content so it can be filtered out easily and you also require additional metadata such as published date and who authorized the content. Here, we need to define a new custom content type in the custom model file and deploy it in Alfresco. The following steps are required to create a new content type named
brochure. - Create
customModel.xml. Here is a snippet of the code. A new content type namedbrochureis created:... <types> <type name="custom:brochure"> <title>Brochures</title> <parent>cm:content</parent> <properties> <property name="custom:publishedDate"> <type>d:datetime</type> </property> <property name="custom:authorisedBy"> <type>d:text</type> </property> </properties> </type> </types> .. - Place this file in the Alfresco installation directory (
<Alfresco_Home>/tomcat/shared/classes/alfresco/extension). - Execute the following command in the model and messages console, this would deploy the model and activate it:
deploy model alfresco/extension/customModel.xml
- By default, the deployment model gets activated, if you want to deactivate the model execute the following command:
deactivate model customModel.xml
In a similar way you can deploy and undeploy the message bundle.
The tenant console allows you to administrate and manage the different tenants in Alfresco. Alfresco supports multitenancy where a single instance of Alfresco can be divided into different tenants. Each tenant is a logical partition representing an independent instance of Alfresco. For end users it appears they are accessing separate instances of Alfresco. Each tenant will have its own set of users, folders, and content. Using this tenant console you can create, delete, enable, and disable tenants. It also allows you to import and export content from tenants.
For example, if each department in your organization needs their content and users completely separated, creating a different tenant for each department is one of the ways to achieve this with a single instance of Alfresco.
To create a new tenant, execute the following command. This will create a tenant named digitalmarketing.com and the admin user for this tenant will be joe1234. Each tenant can have a different admin user:
create digitalmarketing.com joe1234
Execute the help command to see a list of all the available commands.

In the version prior to Alfresco 5.0 this feature is available by using the following URL:
http://<IP>:<Port>/alfresco/faces/jsp/admin/tenantadmin-console.jsp
This console allows you to manage and administer workflows using various commands. You can deploy and undeploy workflows from the repository. Using this console you can query the task details of any process in the workflow, start a workflow, and other tasks.
Important commands from an administrator standpoint:
- To get a list of all the workflows that are completed or are in an in-flight state, they can be retrieved using the following command. This command takes time to execute when there are a large number of workflows:
show workflows all
- If you want to get a list of workflows of specific definitions, you can use the following list of commands. For example, let's say we want to find the list of all Review Approve workflows:
- First, fetch the workflow definition list using the following command:
show definitions all
- Set the definition ID in the console to execute a further command. Here, we are taking an example of the Review Approve workflow, which has an ID as
activiti$activitiReview:1:8use definition activiti$activitiReview:1:8
- Now, execute the following command to fetch all the workflows for this definition. The result of this command will provide the workflow ID, description, start date, and definition name. The structure of any workflow ID is
activiti$<Numeric ID>.show workflows. id: activiti$101 , desc: review the details and provide comments , start date: Sun Jan 11 18:41:07 PST 2015 , def: activiti$activitiReview
- You can also get into more granular details such as task details of any workflow instance, as each workflow would have different stages. For example, for the workflow
activiti$101,we want to get the task details, so we need to execute the following set of commands:use workflow activiti$101 show tasks
The output obtained is shown here:
task id: activiti$145 , name: wf:activitiReviewTask , properties: 19
- First, fetch the workflow definition list using the following command:
- This console is also useful to delete any specific in-flight workflows, all workflows from the repository, and specific tasks of the workflow. For example, we want to delete the workflow with the ID
activiti$101, so we need to execute the following command:delete workflow activiti$101
- To delete all workflows from the repository, execute the following command. Be very cautious when using this command:
delete all workflows
In the version prior to Alfresco 5.0, this feature is available using the following URL: http://<IP>:<port>/alfresco/faces/jsp/admin/workflow-console.jsp.
Alfresco provides two kinds of e-mail services: inbound and outbound e-mails.
Inbound e-mail services allows users to store their e-mails in Alfresco as content along with attachments. Alfresco becomes a repository for e-mail storage. This Inbound Email admin page allows you to enable or disable services and configure them as per requirements. The following screenshot shows details about the configuration:

Outbound e-mails control all e-mails sent to users from the Alfresco repository. This page allows you to configure and manage the SMTP server details. It also has a Test Email section, which you can use to confirm whether the configurations are correct and e-mails are being sent. The following screenshot shows details about the configuration available:
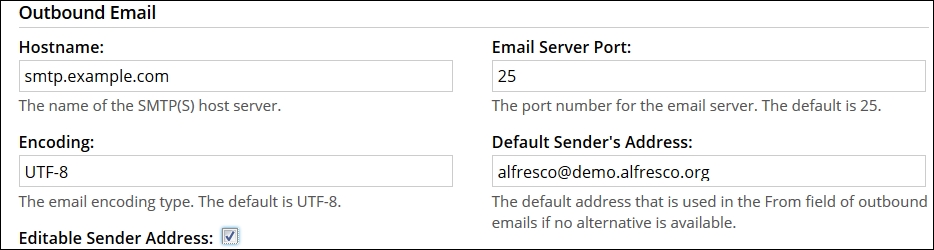
As shown in the following screenshot, you can also send a test message to confirm the configurations are working properly:

The configurations are the same as we learnt in Chapter 3, Alfresco Configuration. With the admin console you can configure the service at runtime without restarting Alfresco.
In this section, we will discuss the following topics:
The Enterprise Edition of Alfresco needs a license for installation. This admin page allows you to manage the license file. The license is not bound to the server, but it restricts the number of users, amount of content, and type of support from Alfresco.
This page provides details such as valid date of license, usage information, clustering support, content-store encryption, and cloud sync. By default, Alfresco provides a 30-day trial license as shown in the following screenshot:

The license file received from Alfresco has the extension .lic. You can upload the license file to the Alfresco repository or copy it in the Alfresco installation path and apply the license file as shown in the following screenshot. Once the license file is installed successfully, the file extension will be changed to <license-name>.lic.installed.

This section provides details about the repository such as unique ID, which is important when communicating with the server using the CMIS protocol. It also provides the version and build details of Alfresco. These details are required when you need support from Alfresco or you are upgrading the repository.

These settings are for the repository and Share application configurations. There are three sections: Alfresco Repository Settings, Server Settings, and Share Application Settings:
- Alfresco Repository Settings shows the details about the repository port, IP address, and protocol that can be used to communicate with the server. This page does not allow you to change values, you can configure these values in the
alfresco-global.propertiesfile. - Server Settings allows you to configure the maximum number of users who can use the system. You can also control the users who can only log in to the system by configuring the user list in Allowed Users. If the admin user who is setting this allowed users list does not enter their name in the list, the system will automatically take that username in allowed users, and this current user would not be locked out of the system. The username list in the allowed users configuration should match with the username in the Alfresco repository.

- Share Application Settings section allows you to configure the IP address, port, and protocol to access the Share application. As the Share application can be installed independent to Alfresco, we can change the configuration of the repository to point to a different Share instance. You can also configure the group details who have access to all the public sites in Share.

This section of the admin page allows you to configure various core services of the Alfresco repository such as search, activity feed, replication, and so on.
Let's see details about each of the service configurations:
- Activities Feed: When enabled, this service allows all users in the Alfresco repository to receive e-mails about their activities and the activity of the people they are following. These feeds are the same as the My Activity dashlet in Share. If enabled, you can configure the frequency of the feed to be sent to users. The time duration of activities, such as only activities of the past 10 days, should be sent in feeds and also control the number of activities. Enable this service only when required and remember to time the feed scheduler for when there is much less usage of the repository. By default, this service should always be kept disabled as it will create an unnecessary load on the system.
- Repository Server Clustering: This page just shows the details about the clustering enabled/disabled and Cluster ID. More information about clustering will be covered in Chapter 7, High Availability in Alfresco.
- Process Engines: Alfresco supports two workflow engines: Activiti and jBPM. In this section you can enable/disable the workflow engine you need. By default, Activiti is enabled and it is recommended to use this engine only. This page also shows you the count of total workflow in-flight and total tasks.
- Replication Service: One of the nice features in Alfresco is that it allows you to replicate the content from one repository to another by defining replication jobs. These jobs contain details about the target server, folders to be copied, and timing of when this should be triggered. These jobs are controlled by the Replication Service. You have to enable the Replication Service using the setting Replication Enabled, before you can define your jobs to replicate content. This section also allows you to define the permission of the replicated content on the target repository, if Read Only Replication is enabled, all content in the target repository would be Read Only.
- Search Service: Search Service is the backbone of the search in Alfresco. Search Service talks to search engines such as Solr and Lucene. By default, the Solr4 search engine is used since Alfresco v 5.0. This section allows administrators to configure and manage search servers by configuring the IP address, port, HTTP, and so on. You can also configure the backup location and timings for Solr indexes. If Solr is embedded in Alfresco there is no change required in default configurations. More details about search engines and their monitoring will be covered in Chapter 5, Search.
- Subscription Service: In Alfresco Share, there is a functionality where a user can follow other users in the repository and they can view activities about other users. This is controlled by the Subscription Service. You have to enable the Subscription Service if you want to allow users to follow each other and view other users' activities. By default, this feature is enabled.
- Transformation Service: Alfresco supports transformation of content in various file formats such as Word documents to PDF, image
.jpegto.png,.pdfto.swf,and so on. These transformations are controlled by various transformation services, which internally use various tools such as Openoffice, ImageMagick, and SWF tools. This page allows you to control and manage these transformation tools. It is recommended not to change the default settings unless it is required.
These are some additional tools that help administrators get details about the repository and help them in troubleshooting:
- Node Browser: This browser allows the administrator user to navigate through the complete repository and view details about all nodes such as folders, rules, users, system folders, and so on. Node Browser is a very useful and important tool from an administration standpoint. More details are covered in a later part of this chapter.
- Download JMX Dump: You can download the complete configuration and system details of the Alfresco repository in a
.zipfile as shown in the following screenshot. This file is very useful to the person troubleshooting the system.
Alfresco users and groups can be managed internally or we can integrate it with external directory servers such as LDAP, Active Directory, Kerberos, and so on. You can synchronize all the users and groups from this external directory in Alfresco. Note, no password information is stored in Alfresco if these external directories are used for authentication.
You can configure the chain of these external directories for authentication and synchronization. They would follow the same order as defined. This page allows you to configure and synchronize these external directories with Alfresco.
We would see more details about this configuration in Chapter 6, Permissions and Security.
The content of Alfresco can be accessed as a virtual filesystem using CIFS/FTP. The Alfresco server can also be used as an IMAP server, you can just drag and drop e-mail content using this protocol. This page allows the administrator to configure and control these virtual filesystems.
All the configuration properties for CIFS, FTP, and IMAP, which we learned in Chapter 3, Alfresco Configuration, can have certain properties configured dynamically using this page. You can enable or disable the filesystems without a server restart.
Share was designed as a collaboration platform in Alfresco. But since Alfresco version 5, on deprecation of Alfresco Explorer, Share is now the main interface for accessing the Alfresco repository. Some of the repository and Share administration operations are available using this admin console page.
To access the admin page in Share, follow these steps:
- Log in to Alfresco Share
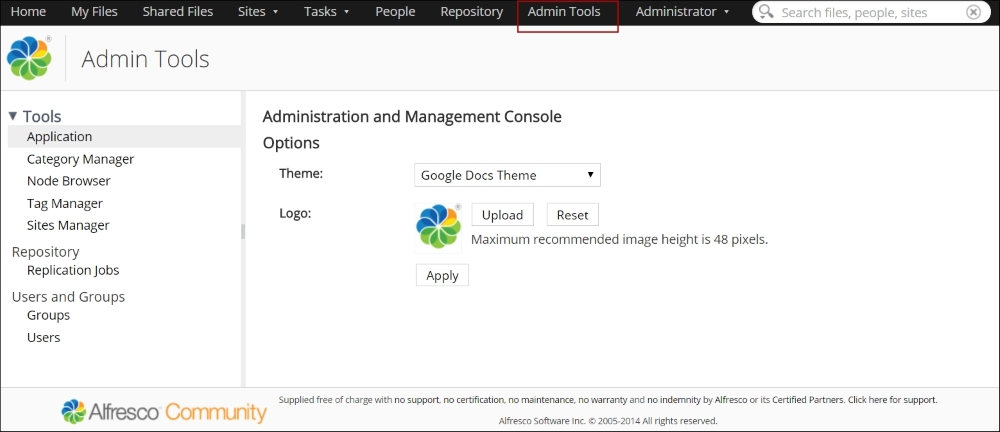
http://<IP>:<port>/shareusing admin user credentials or via a user who is part of theAlfresco_Administratorgroup. - Click on Admin Tools in the right-most action in the top panel, as shown in the following screenshot. You will find various options to administer and control the Share GUI and repository.
Let's see in detail each of the administrative operations available.
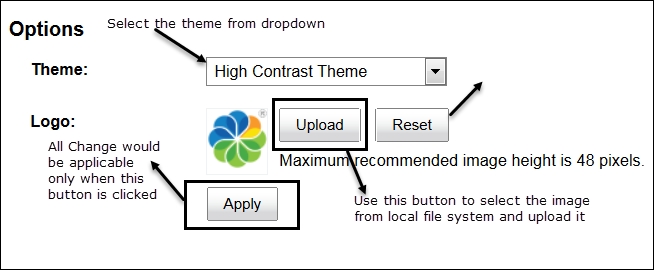
This section provides control to modify the theme of the Share user interface. There are various default themes available in the drop-down menu, you can select any of them and apply. Also, the logo on the page can be changed.
Select the theme and upload a logo, as shown in the following screenshot, and hit Apply. Immediately the theme and logo will be changed.
Any content in Alfresco can be associated with a category. This page allows you to define new categories and manage existing ones. When you delete a category, it removes all the subcategories and also removes the link to any content that these categories were associated with.
Refer to the following screenshot, which shows details about how to manage these categories:

Node Browser is a very important tool for administrators for monitoring and troubleshooting purposes. This browser allows you to navigate through the complete repository and view details about every single individual node in the repository, either its folders, content, system folders, users, or groups. You can search content using Solr by using search queries. It also allows the interface to do a full text search.
For an administrator, this would be the first page to look for content if you want to troubleshoot a data issue in the repository.
Refer to the following screenshot for details about the Node Browser interface:
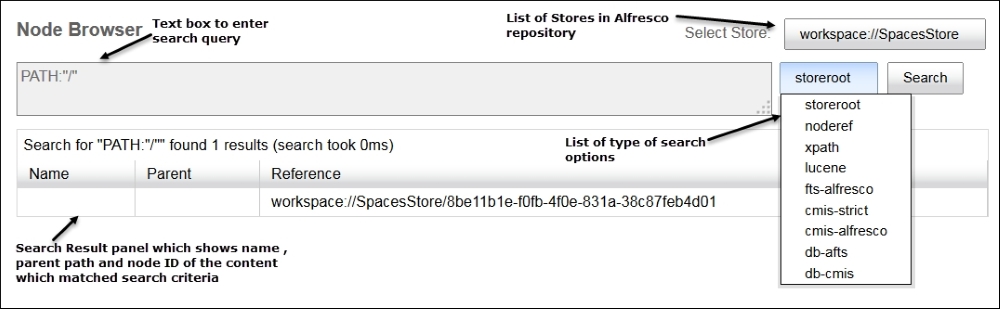
Select Store drop-down list provides a list of stores available in Alfresco. In the Alfresco repository, the content is divided among different states based on type and state. Refer to the following screenshot for a full list of stores available.
Important ones are workspace://SpacesStore, as all the live content, folders, and system folders are under this store. All the archived content is under archive://SpacesStore.
user://alfrescoUserStore as the name suggests contains details about the users in the repository.

Let's see a different way to search content in Alfresco using this Node Browser:
- If you know the node ID and store information of any asset in Alfresco, you can easily find the node and its details using the noderef search option. Refer to the following screenshot:

- Sometimes you don't know the node ID of the content and you want to navigate to the store, so you can use the storeroot option. This would give you the root node ID for the selected store and then you can navigate to that complete store. Refer to the following screenshot, which shows the root node ID for
workspace://SpacesStore:
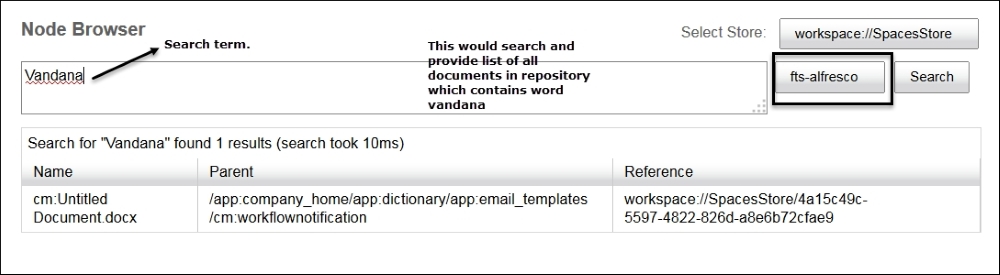
- Alfresco also supports a full text search. Use the fts-alfresco option and provide the search text you are looking for. This would search for all the content in the selected store within the repository that contains the search term. Refer to the following screenshot:
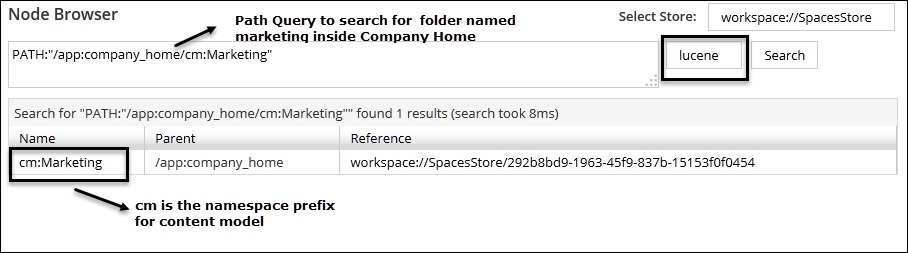
- Using the lucene option you can search for content using the standard search queries. Alfresco provides some additional queries such as PATH and TYPE. Refer to the following screenshot to view details about the PATH query. Various search query details are covered in Chapter 5, Search.
- The following are some of the useful search queries that come in handy:
- Search name of the content with a query such as,
@cm:name:"Name of the content. - Similarly you can search on any metadata of the content in the repository.
- Search on type of content using a query such as,
TYPE:"cm:folder".
- Search name of the content with a query such as,
- The CMIS query can also be executed in Node Browser to fetch the asset from the repository using the cmis-alfresco option.
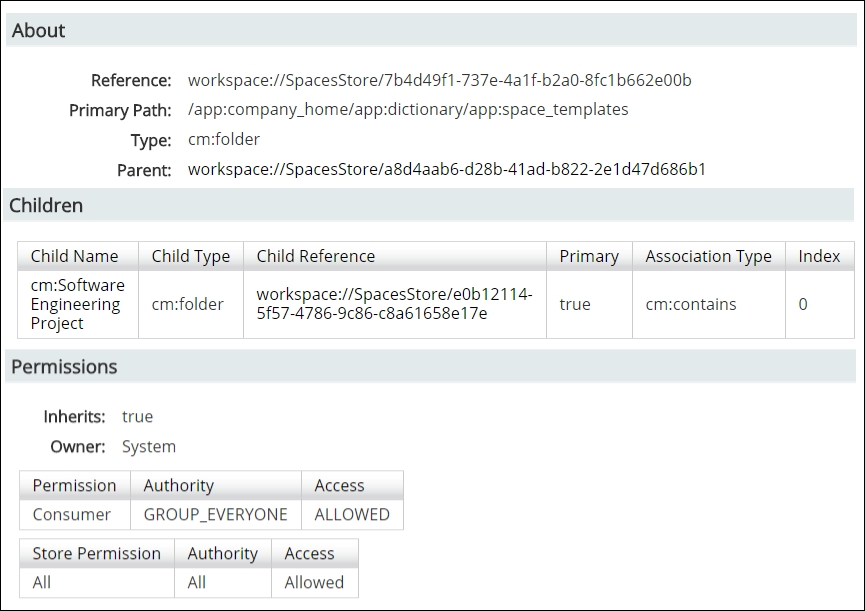
- Once you get the search result, click on the node reference to view the details of the node. This page provides metadata, aspect, type details, children, permission, and a parent node reference. You can click on any children or parent node reference to navigate further. The following is a snapshot of the details page:
Content in Alfresco can be tagged by the user. All the tags in the repository can be managed using this admin page. This tool also helps you to edit and delete the tag name.
For example, imagine a user created a tag named marketing document and associated it with thousands of documents. If later on we needed to update the tag to marketing asset, instead of updating thousands of documents, we just need to update the tag name using this page. All documents would have the updated tag.
The tag name in the search result has hyper links that would redirect to the document library and list all the documents that are tagged with the selected tag. So, if you find there is an unused tag, you can remove it from tag manager. This would help in maintaining a clean system.
Refer to the following screenshot, which shows details about tag manager:

Users can create various public or private sites for collaboration. In earlier versions, there was no easy way to manage all these sites. Now, with the new version, the Site Manager tool helps administrators to keep full control and manage the sites effectively. The following screenshot show various types of sites, and the admin user is the Site Manager for all the sites:

This page is the user administration of the repository. You can create, edit, or delete users from Alfresco. Alfresco also provides a feature to import a list of users using the .csv file.
The following steps can be performed to create a new user in Alfresco:
- Select Users in the admin tool in Share and click the New User button.
- Fill in all the required details. You can also search for any group and add a user to any group at user creation time.
- Click Create User or Create and Create Another (if you want to create more users). Refer to the following screenshot:

Best practice would always be to bind the users to a group, if you know which group the user is going to be associated with.
The following steps can be performed to edit/delete a new user in Alfresco:
- Select Users in the Share admin tool.
- Search for the user you want to edit. For example, the Joe Smith user that we created lets us edit that user. The following screenshot shows details of the user search:
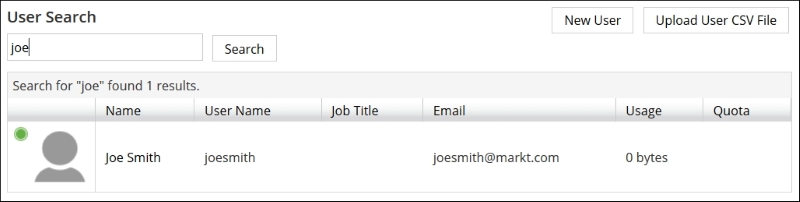
- Now click on user in the search result, this would redirect you to the details page of the user. Click on Edit User or Delete User based on the operation you want to perform.

- Be cautious when you do perform a delete operation on a user, since it cannot be restored. Delete User will remove the user from Alfresco completely. Edit User directs you to a details page where you can add or remove a user from a group, edit the password, and enable or disable the user account.

The following steps can be performed to create multiple users in Alfresco:
- Create a spreadsheet file with the
.csvextension. Add a header as mentioned in the following and in the same order. Place the values for each of them. All fields are not mandatory:User Name,First Name,Last Name,E-mail Address,,Password,Company,Job Title,Location,Telephone,Mobile,Skype,IM,Google User Name,Address,Address Line 2,Address Line 3,Post Code,Telephone,Fax,Email
- Open the Users page in Admin Tools.
- Click on Upload User CSV file and browse for the
.csvfile created in step 1. Click Upload File to upload the.csvfile. Once users are created you can see a list of users, and an e-mail will be sent to each individual user about their account details.
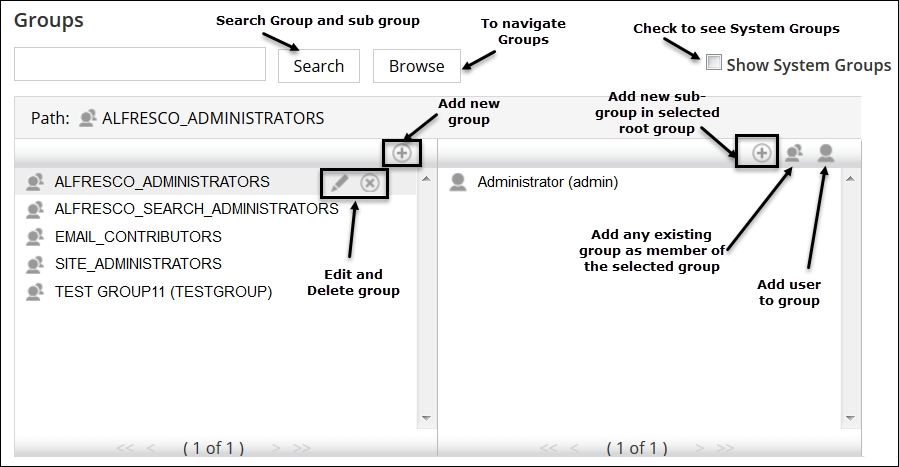
Groups are a logical way to group a set of users. Specific permissions on folders or asset can be given to a group. So all the user members of that group will automatically inherit the same permission. This provides a better way to manage the security in the repository. If any user needs to be removed, just remove it from the group and all permissions would be revoked. No need to remove the user from tons of folders.
Always have a good naming convention for groups, so you can identify them easily. For example, if you want to group all HR people who have admin rights on a set of folders, name the group HR_Admin.
Once groups are created you cannot edit the name of the group. Only display names can be modified.
In Alfresco, you can also create sub-groups beneath root groups. Parent group permissions are automatically inherited by sub-groups. More details on permissions will be discussed in Chapter 6, Permissions and Security.
Group management is a very easy process. There is a simple user interface to perform this operation. Refer to the following screenshot for details:
Alfresco Explorer is one of the web-client interfaces that provides document management and administration capabilities. It is being deprecated from Alfresco version 5.0.
Follow these steps to access the administrator console of Alfresco Explorer:
- Log in to Alfresco Explorer (
http://<ip>:<port>/alfresco) using your admin credentials. You need to log in with an administrator username. The default administrator username isadmin. Any user that is part of theAlfresco_Administratorgroup, will also have the same admin rights. We will see in a later section of this chapter how to add users to groups. -
Click on the Administration Console icon
 in the upper-right corner of the My Dashboard page. It opens the admin console options as shown in the following screenshot:

Alfresco Explorer provides the following options of administration:
- Manage System Users: As the name suggests, this option allows you to manage users of the repository. It allows you to create, modify, and delete users. It also allows you to change a password for any user in the repository. It is the same as what we covered in the Share user admin console. The only difference here is you cannot add a user to a group while creating or editing user information.
- Manage User Groups: As the name suggests, this is to manage groups in Alfresco. Groups are a logical grouping of users and sub-groups. You can create/delete groups, and add/remove users from groups.
- Category Management: In Alfresco you can categorize the content/folder by associating them with any category. This section allows you to create/delete different categories that can be associated with any space or content in Alfresco.
- Import: This administrative action allows you to import information from one repository to the same or another Alfresco repository. You can import space, content, and its associated metadata in the same format from another Alfresco instance.
- Export: This allows you to export the information from the Alfresco repository. You can export space, content, and metadata in a specific format, which can be easily imported in another, or the same, Alfresco instance.
- System Information: This section just provides details about the repository and system information such as Tomcat path, Java, and HTTP session details.
- Node Browser: This browser allows you to navigate through the complete repository. It also allows you to search any node based on the Node-ref or search query. It is the same as what we saw in an earlier part of this book in Share admin tools.
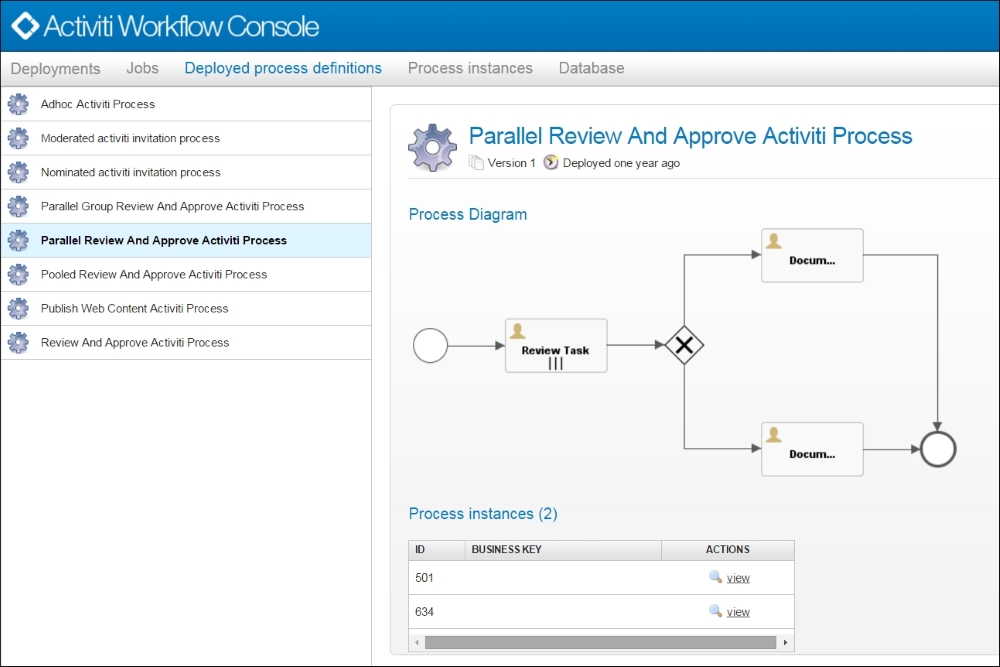
Workflows in Alfresco use the Activiti engine. Activiti workflow also provides its own workflow console to monitor and manage the workflows in Alfresco. This is a very user-friendly interface to show details about workflows. This console shows the list of workflows deployed and running process instance. It also shows all the database tables used by Activiti.
Log in with Alfresco admin credentials using the URL; http://<IP>:<port>/alfresco/activiti-admin to access the workflow console.
There are various pages to this workflow console. Let's go through each of them in detail:
- Deployments: This section shows the list of deployed workflows. It shows details of when the last deployment was done for each of the workflows. The link is provided to access the process definition XML and diagram. It also provides an option to upload a new process definition as a
.ziporbpmn20.xmlfile. - Deployed process definitions: This section shows details about the process definitions in the repository. Process definitions, as the name suggests, define the complete flow from start to end. Let's say for a simple Approve Reject workflow, this process definition will define the start point, how many steps are required in the process, and what the percentage of approval or rejection before marking a final status of completion of the workflow should be. Process instance is a running instance of process definitions. In simple terms, like having a Java class and different objects of the same class. There can be multiple process instances for the same definitions. The process instance will be in a state at any point of time. You can see a complete process diagram for each of the deployed process definitions in Alfresco, and if there are any active process instances for that workflow, you will see the list of IDs. As shown in the following diagram, there is a simple parallel review and approve process diagram. There is one active workflow, which you can see in the process instance section. Click on view to see the process instance details.
- Process instances: This page shows details about the active processes. You can see there was an active workflow instance in the preceding diagram for parallel review and process. When you click on view it takes you to the process instance page with more details about the workflow. It shows the current state in the process diagram. You can also delete the active process instance using the delete action provided in the upper-right corner of the page.

- Database: This section shows all the database tables of Alfresco, which are specifically for the Activiti workflow. It also shows the count and all the rows of the data. This count will be useful to get the workflow statistic in Alfresco during the upgrade process.
Note
For more details about business processes you can refer to https://en.wikipedia.org/wiki/Business_Process_Model_and_Notation.