
It is time for you to practice what you have learned until now. In the upcoming sections, you will see examples for you to practice along with the creation of packages, using nodes, using Parameter Server, and moving a simulated robot with Turtlesim.
We have command-line tools to navigate through the filesystem. We are going to explain the most used ones.
To get information and move to packages and stacks, we will use rospack, rosstack, roscd, and rosls.
We use rospack and rosstack to get information about packages and stacks, the path, the dependencies, and so on.
For example, if you want to find the path of the turtlesim package, you will use the following command:
$ rospack find turtlesim
You will then obtain the following output:
/opt/ros/hydro/share/turtlesim
The same thing happens with the metapackages that you have installed in the system. An example of this is as follows:
$ rosstack find ros_comm
You will obtain the path for the ros_comm metapackage as follows:
/opt/ros/hydro/share/ros_comm
To list the files inside the pack or stack, you will use the following command:
$ rosls turtlesim
The following is the output of the preceding command:
cmake images srv package.xml msg
If you want to go inside the folder, you will use roscd as follows:
$ roscd turtlesim
$ pwd
The new path will be as follows:
/opt/ros/hydro/share/turtlesim
Before we do anything, we are going to create our own workspace. In this workspace, we will have all the code that we will use in this book.
To see the workspace that ROS is using, use the following command:
$ echo $ROS_PACKAGE_PATH
You will see output similar to the following:
/opt/ros/hydro/share:/opt/ros/hydro/stacks
The folder that we are going to create is in ~/dev/catkin_ws/src/. To add this folder, we use the following commands:
$ mkdir –p ~/dev/catkin_ws/src
$ cd ~/dev/catkin_ws/src
$ catkin_init_workspace
Once we've created the workspace folder, there are no packages inside—only CMakeList.txt. The next step is building the workspace. To do this, we use the following commands:
$ cd ~/dev/catkin_ws
$ catkin_make
Now, if you type the ls
command in the directory, you can see new folders created with the previous command. These are the build and devel folders.
To finish the configuration, use the following command:
$ source devel/setup.bash
This step is only to reload the setup.bash file. You will obtain the same result if you close and open a new shell. You should have this command line in the end in your ~/.bashrc file because we used it in Chapter 1, Getting Started with ROS Hydro. If not, you can add it using the following command:
$ echo "source /opt/ros/hydro/setup.bash" >> ~/.bashrc
As said earlier, you can create a package manually. To avoid tedious work, we will use the catkin_create_pkg command-line tool.
We will create the new package in the workspace created previously using the following commands:
$ cd ~/dev/catkin_ws/src
$ catkin_create_pkg chapter2_tutorials std_msgs roscpp
The format of this command includes the name of the package and the dependencies that will have the package, in our case std_msgs and roscpp. This is shown in the following command:
Catkin_create_pkg [package_name] [depend1] [depend2] [depend3]
The following dependencies are included:
std_msgs: This contains common message types representing primitive data types and other basic message constructs, such as MultiArray.roscpp: This is a C++ implementation of ROS. It provides a client library that enables C++ programmers to quickly interface with ROS topics, services, and parameters.
If everything is right, you will see the following screenshot:

As we saw earlier, you can use the rospack, roscd, and rosls commands to retrieve information about the new package. The following are the dependencies used:
rospack profile: This command informs you about the newly added packages to the ROS system. It is useful after installing any new package.rospack find chapter2_tutorials: This command helps us find the path.rospack depends chapter2_tutorials: This command helps us see the dependencies.rosls chapter2_tutorials: This command helps us see the content.roscd chapter2_tutorials: This command changes the actual path.
Once you have your package created and you have some code, it is necessary to build the package. When you build the package, what happens really is that the code is compiled.
To build a package, we will use the catkin_make tool, as follows:
$ cd ~/dev/catkin_ws/

$ catkin_make
In a few seconds, you will see something similar to the following screenshot:
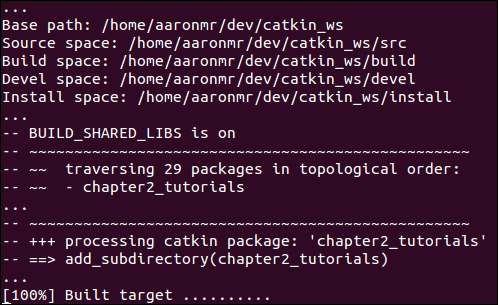
If you don't encounter any failures, the package is compiled.
Remember that you should run the catkin_make command line in the workspace folder. If you try to do it in any other folder, the command will fail. An example of this is provided in the following command lines:
$ roscd chapter2_tutorials/
$ catkin_make
When you are in the chapter2_tutorials folder and try to build the package using catkin_make, you will get the following error:
The specified base path "/home/your_user/dev/catkin_ws/src/chapter2_tutorials" contains a CMakeLists.txt but "catkin_make" must be invoked in the root of workspace
If you execute catkin_make in the catkin_ws folder, you will obtain a good compilation.
As we explained in the Nodes and nodelets section, nodes are executable programs, and these executables are in the devel space. To practice, and learn about, nodes, we are going to use a typical package called turtlesim.
If you have installed the desktop installation, you will have the turtlesim package preinstalled; if not, install it with the following command:
$ sudo apt-get install ros-hydro-ros-tutorials
Before starting with anything, you must start roscore using the following command:
$ roscore
To get information on nodes, we have the rosnode tool. To see what parameters are accepted, type the following command:
$ rosnode
You will obtain a list of accepted parameters, as shown in the following screenshot:
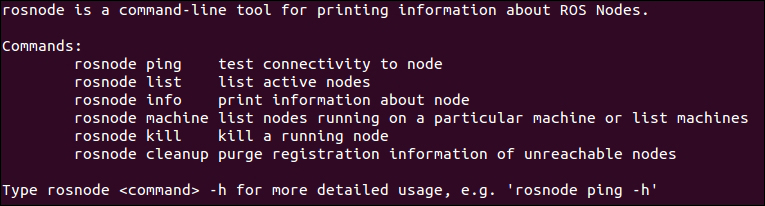
If you want a more detailed explanation of the use of these parameters, use the following command:
$ rosnode <param> -h
Now that roscore is running, we are going to get information about the nodes that are running, using the following command:
$ rosnode list
You see that the only node running is /rosout. It is normal because this node runs whenever roscore is run.
We can get all the information about this node using parameters. Try to use the following commands for more information:
$ rosnode info
$ rosnode ping
$ rosnode machine
$ rosnode kill
$ rosnode cleanup
Now, we are going to start a new node with rosrun using the following command:
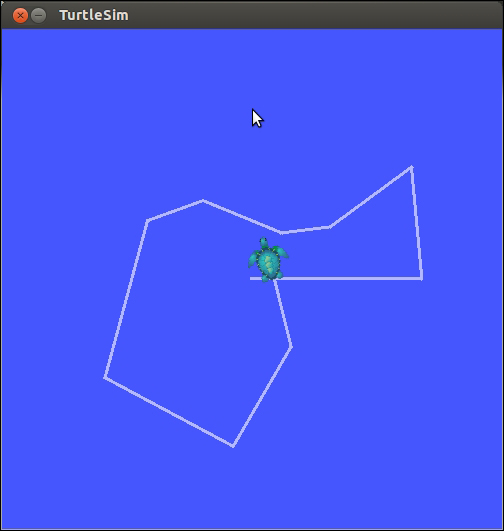
$ rosrun turtlesim turtlesim_node
We will then see a new window appear with a little turtle in the middle, as shown in the following screenshot:

If we see the node list now, we will see a new node with the name /turtlesim. You can see information about the node using rosnode info nameNode.
You can see a lot of information that can be used to debug your programs, using the following command:
$ rosnode info /turtlesim
The preceding command line prints the following information:
Node [/turtlesim]
Publications:
 * /turtle1/color_sensor [turtlesim/Color]
 * /rosout [rosgraph_msgs/Log]
 * /turtle1/pose [turtlesim/Pose]

Subscriptions:
 * /turtle1/cmd_vel [unknown type]

Services:
 * /turtle1/teleport_absolute
 * /turtlesim/get_loggers
 * /turtlesim/set_logger_level
 * /reset
 * /spawn
 * /clear
 * /turtle1/set_pen
 * /turtle1/teleport_relative
 * /kill

contacting node http://127.0.0.1:43753/ ...
Pid: 32298
Connections:
 * topic: /rosout
 * to: /rosout
 * direction: outbound
 * transport: TCPROS
In the information, we can see the Publications (topics), Subscriptions (topics), and Services (srv) that the node has and the unique name of each.
Now, let's see how you interact with the node using topics and services.
To interact and get information about topics, we have the rostopic tool. This tool accepts the following parameters:
rostopic bw TOPIC: This displays the bandwidth used by topicsrostopic echo TOPIC: This prints messages to the screenrostopic find TOPIC: This finds topics by their typerostopic hz TOPIC: This displays the publishing rate of topicsrostopic info TOPIC: This prints information about active topicsrostopic list: This lists the active topicsrostopic pubs TOPIC: This publishes data to the topicrostopic type TOPIC: This prints the topic type
If you want see more information on these parameters, use -h as follows:
$ rostopic bw –h
With the pub parameter, we can publish topics that can subscribe to any node. We only need to publish the topic with the correct name. We will do this test later; we are now going to use a node that will do this work for us:
$ rosrun turtlesim turtle_teleop_key
With this node, we can move the turtle using the arrow keys, as illustrated in the following screenshot:
Why does the turtle move when turtle_teleop_key is executed?
If you want to see information about the /teleop_turtle and /turtlesim nodes, we can see in the following code that there exists a topic called /turtle1/cmd_vel [geometry_msgs/Twist] in the Publications section of the node, and in the Subscriptions section of the second node, there is /turtle1/cmd_vel [geometry_msgs/Twist]:
$ rosnode info /teleop_turtle

Node [/teleop_turtle]
...
Publications:
 * /turtle1/cmd_vel [geometry_msgs/Twist]
 ...

$ rosnode info /turtlesim

Node [/turtlesim]
...
Subscriptions:
 * /turtle1/cmd_vel [geometry_msgs/Twist]
...
This means that the first node is publishing a topic that the second node can subscribe to. You can see the topic list using the following command line:
$ rostopic list
The output will be as follows:
/rosout
/rosout_agg
/turtle1/color_sensor
/turtle1/cmd_vel
/turtle1/pose
With the echo parameter, you can see the information sent by the node. Run the following command line and use the arrow keys to see the data that is being sent:
$ rostopic echo /turtle1/cmd_vel
You will see something similar to the following output:
---
linear:
  x: 0.0
  y: 0.0
  z: 0.0
angular:
  x: 0.0
  y: 0.0
  z: 2.0
---
You can see the type of message sent by the topic using the following command line:
$ rostopic type /turtle1/cmd_vel
You will see something similar to the following output:
Geometry_msgs/Twist
If you want to see the message fields, you can do it with the next command:
$ rosmsg show geometry_msgs/Twist
You will see something similar to the following output:
geometry_msgs/Vector3 linear
  float64 x
  float64 y
  float64 z
geometry_msgs/Vector3 angular
  float64 x
  float64 y
  float64 zfloat32 angular
These tools are useful because, with this information, we can publish topics using the rostopic pub [topic] [msg_type] [args] command:
$ rostopic pub /turtle1/cmd_vel  geometry_msgs/Twist -r 1 -- "linear:
  x: 1.0
  y: 0.0
  z: 0.0
angular:
  x: 0.0
  y: 0.0
  z: 1.0"
You will see the turtle doing a curve, as shown in the following screenshot:

Services are another way through which nodes can communicate with each other. Services allow nodes to send a request and receive a response.
The tool that we are going to use to interact with services is called rosservice. The accepted parameters for this command are as follows:
rosservice args /service: This prints the service argumentsrosservice call /service: This calls the service with the arguments providedrosservice find msg-type: This finds services by their service typerosservice info /service: This prints information about the servicerosservice list: This lists the active servicesrosservice type /service: This prints the service typerosservice uri /service: This prints the ROSRPC URI service
We are going to list the services available for the turtlesim node using the following command, so if it is not working, run roscore and run the turtlesim node:
$ rosservice list
You will obtain the following output:
/clear
/kill
/reset
/rosout/get_loggers
/rosout/set_logger_level
/spawn
/teleop_turtle/get_loggers
/teleop_turtle/set_logger_level
/turtle1/set_pen
/turtle1/teleport_absolute
/turtle1/teleport_relative
/turtlesim/get_loggers
/turtlesim/set_logger_level
If you want to see the type of any service, for example, the /clear service, use the following command:
$ rosservice type /clear
You will see something similar to the following output:
std_srvs/Empty
To invoke a service, you will use rosservice call [service] [args]. If you want to invoke the /clear service, use the following command:
$ rosservice call /clear
In the turtlesim window, you will now see that the lines created by the movements of the turtle will be deleted.
Now, we are going to try another service, for example, the /spawn service. This service will create another turtle in another location with a different orientation. To start with, we are going to see the following type of message:
$ rosservice type /spawn | rossrv show
You will see something similar to the following output:
float32 x
float32 y
float32 theta
string name
---
string name
The preceding command is the same as the following commands. If you want to know why these lines are the same, search in Google about piping Linux:
$ rosservice type /spawn
You will see something similar to the following output:
turtlesim/Spawn
Type in the following command:
$ rossrv show turtlesim/Spawn
You will see something similar to the following output:
float32 x
float32 y
float32 theta
string name
---
string name
With these fields, we know how to invoke the service. We need the position of x and y, the orientation (theta), and the name of the new turtle:
$ rosservice call /spawn 3 3 0.2 "new_turtle"
We then obtain the following result:

Parameter Server is used to store data that is accessible to all nodes. ROS has a tool called rosparam to manage Parameter Server. The accepted parameters are as follows:
rosparam set parameter value: This sets the parameterrosparam get parameter: This gets the parameterrosparam load file: This loads parameters from the filerosparam dump file: This dumps parameters to the filerosparam delete parameter: This deletes the parameterrosparam list: This lists the parameter names
For example, we can see the parameters in the server that are used by all nodes:
$ rosparam list
We obtain the following output:
/background_b
/background_g
/background_r
/rosdistro
/roslaunch/uris/host_aaronmr_laptop__60878
/rosversion
/run_id
The background parameters are of the turtlesim node. These parameters change the color of the windows that are initially blue. If you want to read a value, you will use the get parameter:
$ rosparam get /background_b
To set a new value, you will use the set parameter:
$ rosparam set /background_b 100
Another important feature of rosparam is the dump parameter. With this parameter, you can save or load the contents of Parameter Server.
To save Parameter Server, use rosparam dump [file_name] as follows:
$ rosparam dump save.yaml
To load a file with new data for Parameter Server, use rosparam load [file_name] [namespace] as follows:
$ rosparam load load.yaml namespace
In this section, we are going to learn how to create two nodes: one to publish data and the other to receive this data. This is the basic way of communicating between two nodes, that is, to handle data and do something with this data.
Navigate to the chapter2_tutorials/src/ folder using the following command:
$ roscd chapter2_tutorials/src/
Create two files with the names example1_a.cpp and example1_b.cpp. The example1_a.cpp file will send the data with the node name, and the example1_b.cpp file will show the data in the shell. Copy the following code inside the example1_a.cpp file or download it from the repository:
#include "ros/ros.h"
#include "std_msgs/String.h"
#include <sstream>

int main(int argc, char **argv)
{
  ros::init(argc, argv, "example1_a");
  ros::NodeHandle n;
  ros::Publisher chatter_pub = n.advertise<std_msgs::String>("message", 1000);
  ros::Rate loop_rate(10);
  while (ros::ok())
  {
    std_msgs::String msg;
    std::stringstream ss;
    ss << " I am the example1_a node ";
    msg.data = ss.str();
    //ROS_INFO("%s", msg.data.c_str());
    chatter_pub.publish(msg);
    ros::spinOnce();
    loop_rate.sleep();
  }
  return 0;
}
Here is a further explanation of the preceding code:
#include "ros/ros.h"
#include "std_msgs/String.h"
#include <sstream>
The headers to be included are ros/ros.h, std_msgs/String.h, and sstream. Here, ros/ros.h includes all the files necessary to use the node with ROS, and std_msgs/String.h includes the header that denotes the type of message we are going to use.
ros::init(argc, argv, "example1_a");
Initiate the node and set the name; remember that the name must be unique:
ros::NodeHandle n;
This is the handler of our process.
ros::Publisher chatter_pub = n.advertise<std_msgs::String>("message", 1000);Set a publisher and tell the master the name of the topic and the type. The name is message, and the second parameter is the buffer size. If the topic is publishing data quickly, the buffer will keep at 1,000.
ros::Rate loop_rate(10);
Set the frequency to send the data, which in this case is 10 Hz.
while (ros::ok())
{
The ros::ok() line stops the node if Ctrl + c is pressed or if ROS stops all the nodes:
std_msgs::String msg;
std::stringstream ss;
ss << " I am the example1_a node ";
msg.data = ss.str();
In this part, we create a variable for the message with the correct type to send the data:
chatter_pub.publish(msg);
Here, the message is published:
ros::spinOnce();
We have a subscriber in this part, where ROS updates and reads all the topics:
loop_rate.sleep();
Sleep for the necessary time to get a 10 Hz frequency.
Now, we will create the other node. Copy the following code inside the example1_b.cpp file or download it from the repository:
#include "ros/ros.h"
#include "std_msgs/String.h"

void chatterCallback(const std_msgs::String::ConstPtr& msg)
{
  ROS_INFO("I heard: [%s]", msg->data.c_str());
}

int main(int argc, char **argv)
{
  ros::init(argc, argv, "example1_b");
  ros::NodeHandle n;
  ros::Subscriber sub = n.subscribe("message", 1000, chatterCallback);
  ros::spin();
  return 0;
}
Let's explain the code:
#include "ros/ros.h"
#include "std_msgs/String.h"
Include the headers and the type of message to use for the topic:
void messageCallback(const std_msgs::String::ConstPtr& msg)
{
  ROS_INFO("I heard: [%s]", msg->data.c_str());
}
This function is called every time that the node receives a message. This is where we do something with the data; in this case, we show it in the shell:
ros::Subscriber sub = n.subscribe("message", 1000, messageCallback);Create a subscriber and start to listen to the topic with the name message. The buffer will be of 1,000, and the function to handle the message will be messageCallback:
ros::spin();
The ros::spin() line is a loop where the node starts to read the topic and when a message arrives, messageCallback is called. When the user presses Ctrl + c, the node exits the loop and ends.
As we are using the chapter2_tutorials package, we are going to edit the CMakeLists.txt file. You can use your favorite editor or the rosed tool. This will open the file with the Vim editor:
$ rosed chapter2_tutorials CMakeLists.txt
At the end of the file, we will copy the following lines:
include_directories(
  include
  ${catkin_INCLUDE_DIRS}
)

add_executable(chap2_example1_a src/example1_a.cpp)
add_executable(chap2_example1_b src/example1_b.cpp)

add_dependencies(chap2_example1_a chapter2_tutorials_generate_messages_cpp)
add_dependencies(chap2_example1_b chapter2_tutorials_generate_messages_cpp)

target_link_libraries(chap2_example1_a ${catkin_LIBRARIES})
target_link_libraries(chap2_example1_b ${catkin_LIBRARIES})
Now, to build the package and compile all the nodes, use the catkin_make tool as follows:
$ cd ~/dev/catkin_ws/
$ catkin_make chapter2_tutorials
If ROS is not running on your computer, you will have to use the following command:
$ roscore
You can check whether ROS is running using the rosnode list command as follows:
$ rosnode list
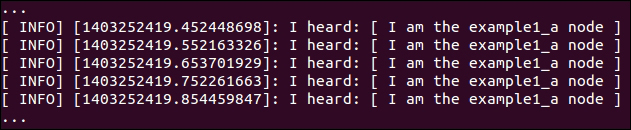
Now, run both nodes in different shells:
$ rosrun chapter2_tutorials example1_a

$ rosrun chapter2_tutorials example1_b
If you check the shell where the example1_b node is running, you will see something similar to the following screenshot:
Everything that is happening can be viewed in the following diagram. You can see that the example1_a node is publishing the message topic, and the example2_b node is subscribing to the topic.

You can use rosnode and rostopic to debug and see what the nodes are doing. Try the following commands:
$ rosnode list
$ rosnode info /example1_a
$ rosnode info /example1_b
$ rostopic list
$ rostopic info /message
$ rostopic type /message
$ rostopic bw /message
In this section, we are going to learn how to create msg and srv files for use in our nodes. They are files where we put a specification about the type of data to be transmitted and the values of this data. ROS will use these files to create the necessary code for us to implement the msg and srv files to be used in our nodes.
Let's start with the msg file first.
In the example used in the Building the node section, we created two nodes with a standard type message. Now, we are going to learn how to create custom messages with the tools that ROS has.
First, create a new msg folder in our chapter2_tutorials package, create a new chapter2_msg1.msg file and the following lines:
int32 A
int32 B
int32 C
Now, edit package.xml and remove <!-- --> from the <build_depend>message_generation</build_depend> and <run_depend>message_runtime</run_depend> lines.
Edit CMakeList.txt and add the message_generation line as follows:
find_package(catkin REQUIRED COMPONENTS
  roscpp
  std_msgs
  message_generation
)
Find the next lines, uncomment, and add the name of the new message as follows:
## Generate messages in the 'msg' folder
add_message_files(
        FILES
        chapter2_msg1.msg
)

## Generate added messages and services with any dependencies listed here
 generate_messages(
   DEPENDENCIES
   std_msgs
 )
And now, you can compile using the following lines:
$ cd ~/dev/catkin_ws/
$ catkin_make
To check whether all is OK, you can use the rosmsg command:
$ rosmsg show chapter2_tutorials/chapter2_msg1
If you see the same content as that of the chapter2_msg1.msg file, all is OK.
Now, we are going to create a srv file. Create a new folder in the chapter2_tutorials folder with the name srv, create a new chapter2_srv1.srv file, and add the following lines:
int32 A
int32 B
int32 C
---
int32 sum
To compile the new msg and srv files, you have to uncomment the following lines in the package.xml and CMakeLists.txt files. These lines permit the configuration of the messages and services and tell ROS how and what to build.
First of all, open the package.xml folder from your chapter2_tutorials package as follows:
$ rosed chapter2_tutorials package.xml
Search for the following lines and uncomment them:
<build_depend>message_generation</build_depend>
<run_depend>message_runtime</run_depend>
Open CMakeLists.txt using the following command:
$ rosed chapter2_tutorials CMakeLists.txt
Find the following lines, uncomment them, and complete them with the correct data:
catkin_package(
CATKIN_DEPENDS message_runtime
)
To generate messages, you need to add the message_generation line in the find_package section:
find_package(catkin REQUIRED COMPONENTS
  roscpp
  std_msgs
  message_generation
)
Add the names of the message and service files in the add_message_files section, as follows:
## Generate messages in the 'msg' folder
add_message_files(
    FILES
    chapter2_msg1.msg
)

## Generate services in the 'srv' folder
add_service_files(
    FILES
    chapter2_srv1.srv
)
Uncomment the generate_messages section to make sure that the generation of messages and services can be done:
## Generate added messages and services with any dependencies listed here
 generate_messages(
   DEPENDENCIES
   std_msgs
 )
You can test whether all is OK using the rossrv tool as follows:
$ rossrv show chapter2_tutorials/chapter2_srv1
If you see the same content as that of the chapter2_srv1.srv file, all is OK.
First, we are going to learn how to create a service and how to use it in ROS. Our service will calculate the sum of three numbers. We need two nodes: a server and a client.
In the chapter2_tutorials package, create two new nodes with the following names: example2_a.cpp and example2_b.cpp. Remember to put the files in the src folder.
In the first file, example2_a.cpp, add the following code:
#include "ros/ros.h"
#include "chapter2_tutorials/chapter2_srv1.h"

bool add(chapter2_tutorials::chapter2_srv1::Request  &req,
         chapter2_tutorials::chapter2_srv1::Response &res)
{
  res.sum = req.A + req.B + req.C;
  ROS_INFO("request: A=%ld, B=%ld C=%ld", (int)req.A, (int)req.B, (int)req.C);
  ROS_INFO("sending back response: [%ld]", (int)res.sum);
  return true;
}

int main(int argc, char **argv)
{
  ros::init(argc, argv, "add_3_ints_server");
  ros::NodeHandle n;

  ros::ServiceServer service = n.advertiseService("add_3_ints", add);
  ROS_INFO("Ready to add 3 ints.");
  ros::spin();

  return 0;
}#include "ros/ros.h" #include "chapter2_tutorials/chapter2_srv1.h"
These lines include the necessary headers and the srv file that we created:
bool add(chapter2_tutorials::chapter2_srv1::Request &req,
chapter2_tutorials::chapter2_srv1::Response &res)This function will add three variables and send the result to the other node:
ros::ServiceServer service = n.advertiseService("add_3_ints", add);Here, the service is created and advertised over ROS.
In the second file, example2_b.cpp, add this code:
#include "ros/ros.h"
#include "chapter2_tutorials/chapter2_srv1.h"
#include <cstdlib>
int main(int argc, char **argv)
{
ros::init(argc, argv, "add_3_ints_client");
if (argc != 4)
{
ROS_INFO("usage: add_3_ints_client A B C ");
return 1;
}
ros::NodeHandle n;
ros::ServiceClient client = n.serviceClient<chapter2_tutorials::chapter2_srv1>("add_3_ints");
chapter2_tutorials::chapter2_srv1 srv;
srv.request.A = atoll(argv[1]);
srv.request.B = atoll(argv[2]);
srv.request.C = atoll(argv[3]);
if (client.call(srv))
{
ROS_INFO("Sum: %ld", (long int)srv.response.sum);
}
else
{
ROS_ERROR("Failed to call service add_3_ints");
return 1;
}
return 0;
}ros::ServiceClient client = n.serviceClient<chapter2_tutorials::chapter2_srv1>("add_3_ints");Create a client for the service with the name add_3_ints.
chapter2_tutorials::chapter2_srv1 srv; srv.request.A = atoll(argv[1]); srv.request.B = atoll(argv[2]); srv.request.C = atoll(argv[3]);
Here, we create an instance of our srv file and fill all the values to be sent. If you remember, the message has three fields.
if (client.call(srv))
With this line, the service is called and the data is sent. If the call succeeds, call() will return true, and if not, call() will return false.
To build the new nodes, edit CMakeList.txt and add the following lines:
add_executable(chap2_example2_a src/example2_a.cpp)
add_executable(chap2_example2_b src/example2_b.cpp)

add_dependencies(chap2_example2_a chapter2_tutorials_generate_messages_cpp)
add_dependencies(chap2_example2_b chapter2_tutorials_generate_messages_cpp)

target_link_libraries(chap2_example2_a ${catkin_LIBRARIES})
target_link_libraries(chap2_example2_b ${catkin_LIBRARIES})
Now, execute the following command:
$ cd ~/dev/catkin_ws
$ catkin_make
To start the nodes, execute the following command lines:
$ rosrun chapter2_tutorials example2_a
$ rosrun chapter2_tutorials example2_b 1 2 3
You should see something similar to this output:
Node example2_a
[ INFO] [1355256113.014539262]: Ready to add 3 ints.
[ INFO] [1355256115.792442091]: request: A=1, B=2 C=3
[ INFO] [1355256115.792607196]: sending back response: [6]
Node example2_b
[ INFO] [1355256115.794134975]: Sum: 6
Now, we are going to create nodes with our custom msg file. The example is the same, that is, example1_a.cpp and example1_b.cpp, but with the new message, chapter2_msg1.msg.
The following code snippet is present in the example3_a.cpp file:
#include "ros/ros.h"
#include "chapter2_tutorials/chapter2_msg1.h"
#include <sstream>

int main(int argc, char **argv)
{
  ros::init(argc, argv, "example3_a");
  ros::NodeHandle n;
  ros::Publisher pub = n.advertise<chapter2_tutorials::chapter2_msg1>("message", 1000);
  ros::Rate loop_rate(10);
  while (ros::ok())
  {
    chapter2_tutorials::chapter2_msg1 msg;
    msg.A = 1;
    msg.B = 2;
    msg.C = 3;
    pub.publish(msg);
    ros::spinOnce();
    loop_rate.sleep();
  }
  return 0;
}
The following code snippet is present in the example3_b.cpp file:
#include "ros/ros.h"
#include "chapter2_tutorials/chapter2_msg1.h"

void messageCallback(const chapter2_tutorials::chapter2_msg1::ConstPtr& msg)
{
  ROS_INFO("I heard: [%d] [%d] [%d]", msg->A, msg->B, msg->C);
}

int main(int argc, char **argv)
{
  ros::init(argc, argv, "example3_b");
  ros::NodeHandle n;
  ros::Subscriber sub = n.subscribe("message", 1000, messageCallback);
  ros::spin();
  return 0;
}
If we run both nodes now, we will see something similar to the following output:
…
[ INFO] [1355270835.920368620]: I heard: [1] [2] [3]
[ INFO] [1355270836.020326372]: I heard: [1] [2] [3]
[ INFO] [1355270836.120367449]: I heard: [1] [2] [3]
[ INFO] [1355270836.220266466]: I heard: [1] [2] [3]
…
The launch file is a useful feature in ROS to launch more than one node. In these sections, we have created nodes, and we have been executing them in different shells. Imagine working with 20 nodes and the nightmare of executing each one in a shell!
With the launch file, we can do it in the same shell by launching a configuration file with the extension .launch.
To practice with this utility, we are going to create a new folder in our package as follows:
$ roscd chapter2_tutorials/
$ mkdir launch
$ cd launch
$ vim chapter2.launch
Now, put the following code inside the chapter2.launch file:
<?xml version="1.0"?>
<launch>
  <node name ="example1_a" pkg="chapter2_tutorials" type="example1_a"/>
  <node name ="example1_b" pkg="chapter2_tutorials" type="example1_b"/>
</launch>
This file is simple although you can write a very complex file if you want, for example, to control a complete robot, such as PR2 or Robonaut. Both are real robots and they are simulated in ROS.
The file has a launch tag; inside this tag, you can see the node tag. The node tag is used to launch a node from a package, for example, the example1_a node from the chapter2_tutorials package.
This launch file will execute two nodes—the first two examples of this chapter. If you remember, the example1_a node sends a message to the example1_b node. To launch the file, you can use the following command:
$ roslaunch chapter2_tutorials chapter2.launch
You will see something similar to the following screenshot on your screen:
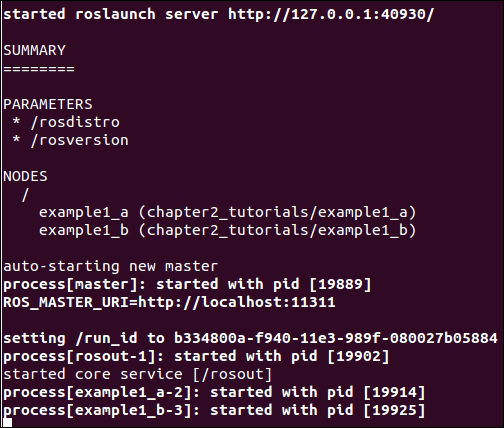
The running nodes are listed in the screenshot. You can also see the running nodes using the following command:
$ rosnode list
You will see the three nodes listed as follows:

When you launch a launch file, it is not necessary to execute it before the roscore command; roslaunch does it for us.
Remember that the example1_b node prints in the screen the message received from the other node. If you take a look, you won't see anything. This is because example1_b prints the message using ROS_INFO, and when you run only a node in a shell, you can see it, but when you run a launch file, you can't.
Now, to see the message printed in the screen, you can use the rqt_console utility. You will learn more about this utility in the following chapters. Now, run the following command:
$ rqt_console
You will see the message sent by example1_b, as shown in the following screenshot:

On the line, you can see the message, the node that has sent it, and the path of the source file.
Another utility in ROS is the Dynamic Reconfigure utility. Normally, when you are programming a new node, you initialize the variables with data that can only be changed within the node. If you want to change these values dynamically from outside the node, you can use Parameter Server, services, or topics. If you are working in a PID node to control a motor, for example, you should use the Dynamic Reconfigure utility.
In this section, you will learn how to configure a basic node with this feature. Add the necessary lines in the CMakeLists.txt and package.xml files.
To use Dynamic Reconfigure, you should write a configuration file and save it in the cfg folder in your package. Create the folder and a new file as follows:
$ roscd chapter2_tutorials
$ mkdir cfg
$ vim chapter2.cfg
Write the following code in the chapter2.cfg file:
#!/usr/bin/env python
PACKAGE = "chapter2_tutorials"

from dynamic_reconfigure.parameter_generator_catkin import *

gen = ParameterGenerator()

gen.add("double_param", double_t, 0, "A double parameter", .1, 0,   1)
gen.add("str_param", str_t, 0, "A string parameter", "Chapter2_dynamic_reconfigure")
gen.add("int_param", int_t, 0, "An Integer parameter", 1,  0, 100)
gen.add("bool_param",   bool_t, 0, "A Boolean parameter",  True)

size_enum = gen.enum([ gen.const("Low", int_t, 0, "Low is 0"),
                   gen.const("Medium", int_t, 1, "Medium is 1"),
                   gen.const("High", int_t, 2, "Hight is 2")],
                 "Select from the list")

gen.add("size", int_t, 0, "Select from the list", 1, 0, 3, edit_method=size_enum)

exit(gen.generate(PACKAGE, "chapter2_tutorials", "chapter2_"))
Let's explain the code:
#!/usr/bin/env python
PACKAGE = "chapter2_tutorials"

from dynamic_reconfigure.parameter_generator_catkin import *
These lines initialize ROS and import the parameter generator:
gen = ParameterGenerator()
This line initializes the parameter generator, and thanks to it, we can start to add parameters in the following lines:
gen.add("double_param", double_t, 0, "A double parameter", .1, 0,   1)
gen.add("str_param", str_t, 0, "A string parameter", "Chapter2_dynamic_reconfigure")
gen.add("int_param", int_t, 0, "An Integer parameter", 1,  0, 100)
gen.add("bool_param",   bool_t, 0, "A Boolean parameter",  True)
These lines add different parameter types and set the default values, description, range, and so on. The parameter has the following arguments:
gen.add(name, type, level, description, default, min, max)
name: This is the name of the parametertype: This is the type of the value storedlevel: This is a bitmask that is passed to the callbackdescription: This is a little description that describes the parameterdefault: This is the default value when the node startsmin: This is the minimum value for the parametermax: This is the maximum value for the parameter
The names of the parameters must be unique, and the values have to be in the range and have min and max values:
exit(gen.generate(PACKAGE, "chapter2_tutorials", "chapter2_"))
The last line generates the necessary files and exits the program. Notice that the .cfg file was written in Python. This book is for C++ snippets, but we will sometimes use Python snippets.
It is necessary to change the permissions for the file because the file will be executed by ROS. To make the file executable and runnable by any user, we will use the chmod command with the a+x parameter as follows:
$ chmod a+x cfg/chapter2.cfg
Open CMakeList.txt and add the following lines:
find_package(catkin REQUIRED COMPONENTS
  roscpp
  std_msgs
  message_generation
  dynamic_reconfigure
)

generate_dynamic_reconfigure_options(
  cfg/chapter2.cfg
)

add_dependencies(example4 chapter2_tutorials_gencfg)
Now, we are going to write our new node with Dynamic Reconfigure support. Create a new file in your src folder as follows:
$ roscd chapter2_tutorials
$ vim src/example4.cpp
Write the following code snippet in the file:
#include <ros/ros.h>
#include <dynamic_reconfigure/server.h>
#include <chapter2_tutorials/chapter2Config.h>

void callback(chapter2_tutorials::chapter2Config &config, uint32_t level) {
  ROS_INFO("Reconfigure Request: %d %f %s %s %d",
        config.int_param,
        config.double_param,
        config.str_param.c_str(),
        config.bool_param?"True":"False",
        config.size);
}

int main(int argc, char **argv) {
  ros::init(argc, argv, "example4_dynamic_reconfigure");

  dynamic_reconfigure::Server<chapter2_tutorials::chapter2Config> server;
  dynamic_reconfigure::Server<chapter2_tutorials::chapter2Config>::CallbackType f;

  f = boost::bind(&callback, _1, _2);
  server.setCallback(f);

  ros::spin();
  return 0;
}
Let's explain the code and note the important lines:
#include <ros/ros.h>
#include <dynamic_reconfigure/server.h>
#include <chapter2_tutorials/chapter2Config.h>
These lines include the headers for ROS, Parameter Server. and our config file created earlier:
void callback(chapter2_tutorials::chapter2Config &config, uint32_t level) {
  ROS_INFO("Reconfigure Request: %d %f %s %s %d",
         config.int_param,
         config.double_param,
         config.str_param.c_str(),
         config.bool_param?"True":"False",
         config.size);
}
The callback function will print the new values for the parameters. The way to access the parameters is, for example, config.int_param. The name of the parameter must be the same as the one that you configured in the example2.cfg file:
dynamic_reconfigure::Server<chapter2_tutorials::chapter2Config> server;
The server is initialized in the line where we pass the chapter2_Config configuration file:
dynamic_reconfigure::Server<chapter2_tutorials::chapter2Config>::CallbackType f;

  f = boost::bind(&callback, _1, _2);
  server.setCallback(f);
Now, we send the callback function to the server. When the server gets a reconfiguration request, it will call the callback function.
Once we are done with the explanation, we need to add lines to the CMakeLists.txt file as follows:
add_executable(chap2_example4 src/example4.cpp)

add_dependencies(chap2_example4 chapter2_tutorials_gencfg)

target_link_libraries(chap2_example4 ${catkin_LIBRARIES})
Now, you have to compile and run the node and the Dynamic Reconfigure GUI as follows:
$ roscore
$ rosrun chapter2_tutorials example4
$ rosrun rqt_reconfigure rqt_reconfigure
When you execute the last command, you will see a new window where you can modify dynamically the parameters of the node, as shown in the following screenshot:
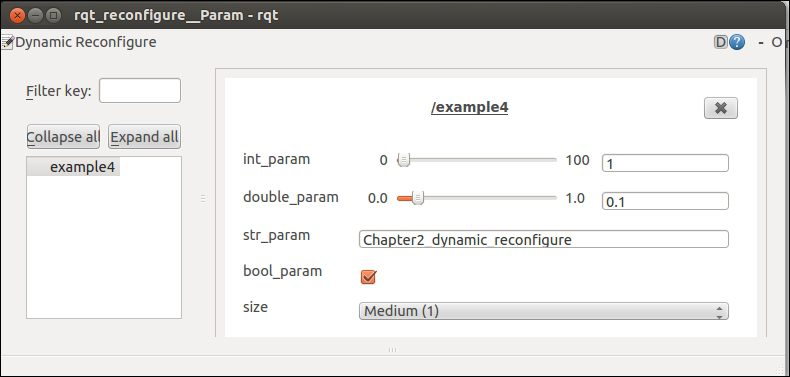
Each time you modify a parameter with the slider, the checkbox, and so on, you will see the changes made in the shell where the node is running. You can see an example in the following screenshot:

Thanks to Dynamic Reconfigure, you can program and test your nodes more efficiently and in a fast way. Using the program with hardware is a good choice and you will learn more about it in the next chapters.