
Once you have installed ROS, you certainly must be thinking, "OK, I have installed it, and now what?" In this chapter, you will learn the structure of ROS and the parts it is made up of. Furthermore, you will start to create nodes and packages and use ROS with examples using Turtlesim.
The ROS architecture has been designed and divided into three sections or levels of concepts:
- The Filesystem level
- The Computation Graph level
- The Community level
The first level is the Filesystem level. In this level, a group of concepts are used to explain how ROS is internally formed, the folder structure, and the minimum number of files that it needs to work.
The second level is the Computation Graph level where communication between processes and systems happens. In this section, we will see all the concepts and systems that ROS has to set up systems, handle all the processes, communicate with more than a single computer, and so on.
The third level is the Community level where there are certain tools and concepts to share knowledge, algorithms, and code from any developer. This level is important because ROS can grow quickly with great support from the community.
When you start to use or develop projects with ROS, you will see that although this concept can sound strange in the beginning, you will become familiar with it with time.

Similar to an operating system, an ROS program is divided into folders, and these folders have files that describe their functionalities:
- Packages: Packages form the atomic level of ROS. A package has the minimum structure and content to create a program within ROS. It may have ROS runtime processes (nodes), configuration files, and so on.
- Package manifests: Package manifests provide information about a package, licenses, dependencies, compilation flags, and so on. A package manifest is managed with a file called
package.xml. - Metapackages: When you want to aggregate several packages in a group, you will use metapackages. In ROS Fuerte, this form for ordering packages was called Stacks. To maintain the simplicity of ROS, the stacks were removed, and now, metapackages make up this function. In ROS, there exist a lot of these metapackages; one of them is the navigation stack.
- Metapackage manifests: Metapackage manifests (
package.xml) are similar to a normal package but with an export tag in XML. It also has certain restrictions in its structure. - Message (msg) types: A message is the information that a process sends to other processes. ROS has a lot of standard types of messages. Message descriptions are stored in
my_package/msg/MyMessageType.msg. - Service (srv) types: Service descriptions, stored in
my_package/srv/MyServiceType.srv, define the request and response data structures for services provided by each process in ROS.
In the following screenshot, you can see the content of the turtlesim package. What you see is a series of files and folders with code, images, launch files, services, and messages. Keep in mind that the screenshot was edited to show a short list of files; the real package has more.

Basically, the workspace is a folder where we have packages, edit the source files or compile packages. It is useful when you want to compile various packages at the same time and is a good place to have all our developments localized.
A typical workspace is shown in the following screenshot. Each folder is a different space with a different role:
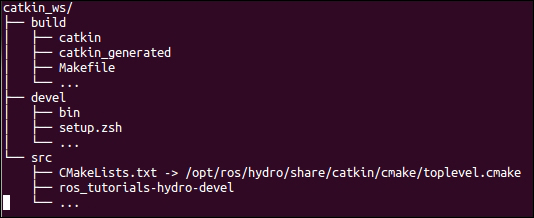
- The Source space: In the Source space (the
srcfolder), you put your packages, projects, clone packages, and so on. One of the most important files in this space isCMakeLists.txt. Thesrcfolder has this file because it is invoked by CMake when you configure the packages in the workspace. This file is created with thecatkin_init_workspacecommand. - The Build space: In the
buildfolder, CMake and catkin keep the cache information, configuration, and other intermediate files for our packages and projects. - The Development (devel) space: The
develfolder is used to keep the compiled programs. This is used to test the programs without the installation step. Once the programs are tested, you can install or export the package to share with other developers.
You have two options with regard to building packages with catkin. The first one is to use the standard CMake workflow. With this, you can compile one package at a time, as shown in the following commands:
$ cmake packageToBuild/
$ make
Tip
Downloading the example code
You can download the example code files from your account at http://www.packtpub.com for all the Packt Publishing books you have purchased. If you purchased this book elsewhere, you can visit http://www.packtpub.com/support and register to have the files e-mailed directly to you. You can also download these code files from https://github.com/AaronMR/ROS_Book_Hydro.
If you want to compile all your packages, you can use the catkin_make command line, as shown in the following commands:
$ cd workspace
$ catkin_make
Both commands build the executables in the build space directory configured in ROS.
Another interesting feature of ROS are its overlays. When you are working with a package of ROS, for example, Turtlesim, you can do it with the installed version, or you can download the source file and compile it to use your modified version.
ROS permits you to use your version of this package instead of the installed version. This is very useful information if you are working on an upgrade of an installed package. At this moment, perhaps you don't understand the utility of this, but in the next chapters, we will use this feature to create our own plugins.
Usually, when we talk about packages, we refer to a typical structure of files and folders. This structure looks as follows:
include/package_name/: This directory includes the headers of the libraries that you would need.msg/: If you develop nonstandard messages, put them here.scripts/: These are executable scripts that can be in Bash, Python, or any other scripting language.src/: This is where the source files of your programs are present. You can create a folder for nodes and nodelets or organize it as you want.srv/: This represents the service (srv) types.CMakeLists.txt: This is the CMake build file.package.xml: This is the package manifest.
To create, modify, or work with packages, ROS gives us tools for assistance, some of which are as follows:
rospack: This command is used to get information or find packages in the system.catkin_create_pkg: This command is used when you want to create a new package.catkin_make: This command is used to compile a workspace.rosdep: This command installs the system dependencies of a package.rqt_dep: This command is used to see the package dependencies as a graph. If you want to see the package dependencies as a graph, you will find a plugin called package graph in rqt. Select a package and see the dependencies.
To move between packages and their folders and files, ROS gives us a very useful package called rosbash, which provides commands that are very similar to Linux commands. The following are a few examples:
roscd: This command helps us change the directory. This is similar to thecdcommand in Linux.rosed: This command is used to edit a file.roscp: This command is used to copy a file from a package.rosd: This command lists the directories of a package.rosls: This command lists the files from a package. This is similar to thelscommand in Linux.
The package.xml file must be in a package, and it is used to specify information about the package. If you find this file inside a folder, probably this folder is a package or a metapackage.
If you open the package.xml file, you will see information about the name of the package, dependencies, and so on. All of this is to make the installation and the distribution of these packages easy.
Two typical tags that are used in the package.xml file are <build_depend> and <run _depend>.
The <build_depend> tag shows what packages must be installed before installing the current package. This is because the new package might use a functionality of another package.
The <run_depend> tag shows the packages that are necessary to run the code of the package. The following screenshot is an example of the package.xml file:

As we have shown earlier, metapackages are special packages with only one file inside; this file is package.xml. This package does not have other files, such as code, includes, and so on.
Metapackages are used to refer to others packages that are normally grouped following a feature-like functionality, for example, navigation stack, ros_tutorials, and so on.
You can convert your stacks and packages from ROS Fuerte to Hydro and catkin using certain rules for migration. These rules can be found at http://wiki.ros.org/catkin/migrating_from_rosbuild.
In the following screenshot, you can see the content from the package.xml file in the ros_tutorials metapackage. You can see the <export> tag and the <run_depend> tag. These are necessary in the package manifest, which is shown in the following screenshot:

If you want to locate the ros_tutorials metapackage, you can use the following command:
$ rosstack find ros_tutorials
The output will be a path, such as /opt/ros/hydro/share/ros_tutorials.
To see the code inside, you can use the following command line:
$ vim /opt/ros/hydro/share/ros_tutorials/package.xml
Remember that Hydro uses metapackages, not stacks, but the rosstack find command line works to find metapackages.
ROS uses a simplified message description language to describe the data values that ROS nodes publish. With this description, ROS can generate the right source code for these types of messages in several programming languages.
ROS has a lot of messages predefined, but if you develop a new message, it will be in the msg/ folder of your package. Inside that folder, certain files with the .msg extension define the messages.
A message must have two principal parts: fields and constants. Fields define the type of data to be transmitted in the message, for example, int32, float32, and string, or new types that you have created earlier, such as type1 and type2. Constants define the name of the fields.
An example of a msg file is as follows:
int32 id
float32 vel
string name
In ROS, you can find a lot of standard types to use in messages, as shown in the following table list:
|
Primitive type |
Serialization |
C++ |
Python |
|---|---|---|---|
|
|
unsigned 8-bit int |
|
|
|
|
signed 8-bit int |
|
|
|
|
unsigned 8-bit int |
|
|
|
|
signed 16-bit int |
|
|
|
|
unsigned 16-bit int |
|
|
|
|
signed 32-bit int |
|
|
|
|
unsigned 32-bit int |
|
|
|
|
signed 64-bit int |
|
|
|
|
unsigned 64-bit int |
|
|
|
|
32-bit IEEE float |
|
|
|
|
64-bit IEEE float |
|
|
|
|
ascii string (4) |
|
|
|
|
secs/nsecs signed 32-bit ints |
|
|
|
|
secs/nsecs signed 32-bit ints |
|
|
A special type in ROS is the header type. This is used to add the time, frame, and so on. This permits you to have the messages numbered, to see who is sending the message, and to have more functions that are transparent for the user and that ROS is handling.
The header type contains the following fields:
uint32 seq
time stamp
string frame_id
You can see the structure using the following command:
$ rosmsg show std_msgs/Header
Thanks to the header type, it is possible to record the timestamp and frame of what is happening with the robot, as we will see in the upcoming chapters.
In ROS, there exist tools to work with messages. The rosmsg tool prints out the message definition information and can find the source files that use a message type.
In the upcoming sections, we will see how to create messages with the right tools.
ROS uses a simplified service description language to describe ROS service types. This builds directly upon the ROS msg format to enable request/response communication between nodes. Service descriptions are stored in .srv files in the srv/ subdirectory of a package.
To call a service, you need to use the package name, along with the service name; for example, you will refer to the sample_package1/srv/sample1.srv file as sample_package1/sample1.
There are tools that exist to perform functions with services. The rossrv tool prints out the service descriptions and packages that contain the .srv files, and finds source files that use a service type.
If you want to create a service, ROS can help you with the service generator. These tools generate code from an initial specification of the service. You only need to add the gensrv() line to your CMakeLists.txt file.
In the upcoming sections, you will learn how to create your own services.