
In mobile robots, servomotors are widely used. This kind of actuator is used to move sensors, wheels, and robotic arms. A low-cost solution is to use RC servomotors. It provides a movement range of 180 degrees and a high torque for the existing servomotors.
The servomotor that we will explain in this section is a new type of servomotor designed and used for robotics. This is the Dynamixel servomotor.
Dynamixel is a lineup, high-performance, networked actuator for robots developed by ROBOTIS, a Korean manufacturer. ROBOTIS is also the developer and manufacturer of OLLO, Bioloid, and DARwIn-OP DXL. These robots are used by numerous companies, universities, and hobbyists due to their versatile expansion capability, powerful feedback functions, position, speed, internal temperature, input voltage, and their simple daisy chain topology for simplified wiring connections.
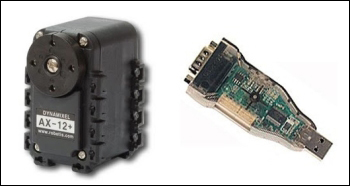
In the following image, you can see Dynamixel AX-12 and the USB interface. Both are used in this example.
First, we are going to install the necessary packages and drivers. Type the following command line in a shell:
$ sudo apt-get install ros-hydro-dynamixel-motor
$ rosstack profile && rospack profile
Once the necessary packages and drivers are installed, connect the dongle to the computer and check whether it is detected. Normally, it will create a new port with the name ttyUSBX inside your /dev/ folder. If you see this port, everything is OK, and now we can let the nodes play a little with the servomotor.
In a shell, start roscore, and in another shell, type the following command line:
$ roslaunch dynamixel_tutorials controller_manager.launch
If the motors are connected, you will see the motors detected by the driver. In our case, a motor with the ID 6 is detected and configured:
process[dynamixel_manager-1]: started with pid [3966]
[INFO] [WallTime: 1359377042.681841] pan_tilt_port: Pinging motor IDs 1 through 25...
[INFO] [WallTime: 1359377044.846779] pan_tilt_port: Found 1 motors - 1 AX-12 [6], initialization complete.
Once you have launched the controller_manager.launch file, you will see a list of topics. Remember to use the following command line to see these topics:
$ rostopic list
These topics will show the state of the motors configured, as follows:
/diagnostics
/motor_states/pan_tilt_port
/rosout
/rosout_agg
If you see /motor_states/pan_tilt_port with the rostopic echo command, you will see the state of all the motors, which, in our case, is only the motor with the ID 6; however, we cannot move the motors with these topics, so we need to run the next launch file to do it.
This launch file will create the necessary topics to move the motors, as follows:
$ roslaunch dynamixel_tutorials controller_spawner.launch
The topic list will have two new topics added to the list. One of the new topics will be used to move the servomotor, as follows:
/diagnostics
/motor_states/pan_tilt_port
/rosout
/rosout_agg
/tilt_controller/command
/tilt_controller/state
To move the motor, we are going to use the /tilt_controller/command that will publish a topic with the rostopic pub command. First, you need to see the fields of the topic and the type. To do that, use the following command lines:
$ rostopic type /tilt_controller/command

std_msgs/Float64
As you can see, it is a Float64 variable. This variable is used to move the motor to a position measured in radians. So, to publish a topic, use the following commands:
$ rostopic pub /tilt_controller/command std_msgs/Float64 -- 0.5
Once the command is executed, you will see the motor moving, and it will stop at 0.5 radians or 28.6478898 degrees.
Now, we are going to show you how you can move the motor using a node. Create a new file, c4_example4.cpp, in your /chapter4_tutorials/src directory with the following code snippet:
#include<ros/ros.h>
#include<std_msgs/Float64.h>
#include<stdio.h>

using namespace std;

class Dynamixel{
  private:
    ros::NodeHandle n;
    ros::Publisher pub_n;
  public:
    Dynamixel();
    int moveMotor(double position);
};

Dynamixel::Dynamixel(){
  pub_n = n.advertise<std_msgs::Float64>("/tilt_controller/command",1);
}
int Dynamixel::moveMotor(double position)
{
  std_msgs::Float64 aux;
  aux.data = position;
  pub_n.publish(aux);
  return 1;
}

int main(int argc,char** argv)
{
  ros::init(argc, argv, "example4_move_motor");
  Dynamixel motors;

  float counter = -180;
  ros::Rate loop_rate(100);
  while(ros::ok())
  {
    if(counter < 180)
    {
      motors.moveMotor(counter*3.14/180);
      counter++;
    }else{
      counter = -180;
    }
    loop_rate.sleep();
  }
}
This node will move the motor continuously from -180 to 180 degrees. It is a simple example, but you can use it to make complex movements or control more motors. We assume that you understand the code and that it is not necessary to explain it. Note that you are publishing data to the /tilt_controller/command topic; this is the name of the motor.