
Getting a map can sometimes be a complicated task if you do not have the correct tools. ROS has a tool that will help you build a map using the odometry and a laser sensor. This tool is the map_server (http://wiki.ros.org/map_server). In this example, you will learn how to use the robot that we created in Gazebo, as we did in the previous chapters, to create a map, save it, and load it again.
We are going to use a .launch file to make it easy. Create a new file in chapter8_tutorials/launch with the name gazebo_mapping_robot.launch and put in the following code:
<?xml version="1.0"?>
<launch>
  <param name="/use_sim_time" value="true" />
  <include file="$(find gazebo_ros)/launch/willowgarage_world.launch"/>
  <arg name="model" />
  <param name="robot_description" command="$(find xacro)/xacro.py $(arg model)" />
  <node name="joint_state_publisher" pkg="joint_state_publisher" type="joint_state_publisher" ></node>
  <!-- start robot state publisher -->
  <node pkg="robot_state_publisher" type="robot_state_publisher" name="robot_state_publisher" output="screen" >
  <param name="publish_frequency" type="double" value="50.0" />
  </node>
  <node name="spawn_robot" pkg="gazebo_ros" type="spawn_model" args="-urdf -param robot_description -z 0.1 -model robot_model" respawn="false" output="screen" />
  <node name="rviz" pkg="rviz" type="rviz" args="-d $(find chapter8_tutorials)/launch/mapping.rviz"/>
  <node name="slam_gmapping" pkg="gmapping" type="slam_gmapping">
    <remap from="scan" to="/robot/laser/scan"/>
    <param name="base_link" value="base_footprint"/>
  </node>
</launch>
With this .launch file, you can launch the Gazebo simulator with the 3D model, the rviz program with the correct configuration file, and slam_mapping to build a map in real time. Launch the file in a shell, and in the other shell, run the teleoperation node to move the robot:
$ roslaunch chapter8_tutorials gazebo_mapping_robot.launch model:="`rospack find robot1_description`/urdf/robot1_base_04.xacro"
$ rosrun teleop_twist_keyboard teleop_twist_keyboard.py
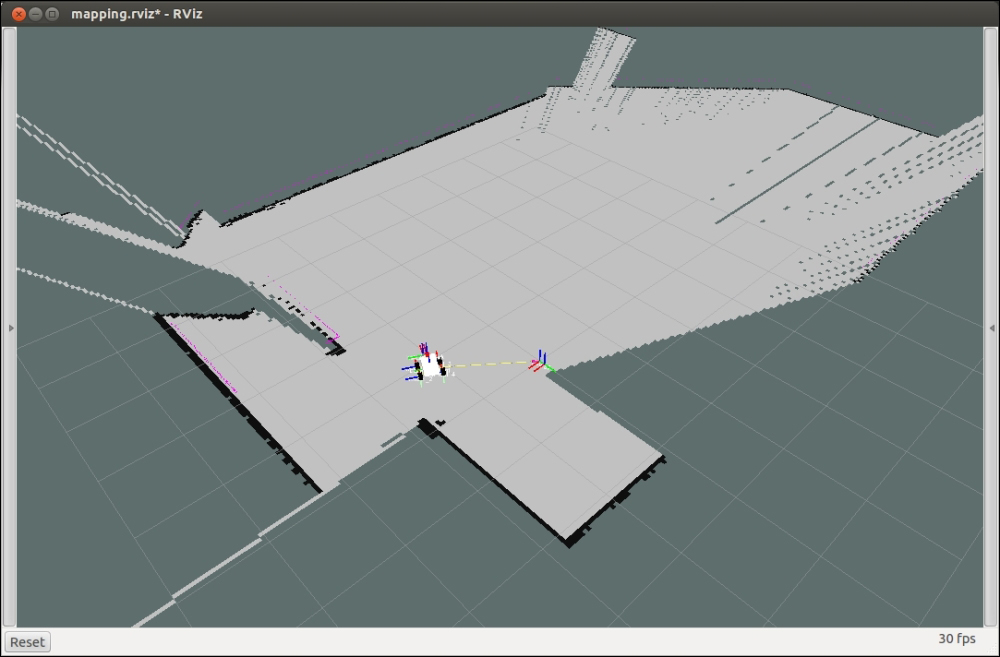
When you start to move the robot with the keyboard, you will see the free and unknown space on the rviz screen, as well as the map with the occupied space; this is known as an Occupancy Grid Map (OGM). The slam_mapping node updates the map state when the robot moves, or more specifically, when (after some motion) it has a good estimate of the robot's location and how the map is. It takes the laser scans and the odometry to build the OGM for you.
Once you have a complete map or something acceptable, you can save it to use it later in the navigation stack. To save it, use the following command:
$ rosrun map_server map_saver -f map

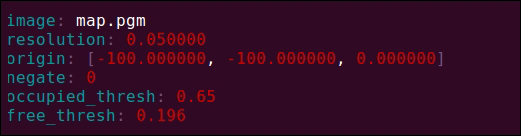
This command will create two files, map.pgm and map.yaml. The first one is the map in the .pgm format (the portable gray map format). The other is the configuration file for the map. If you open it, you will see the following output:
Now, open the .pgm image file with your favorite viewer, and you will see the map being built before you:

When you want to use the map built with your robot, it is necessary to load it with the map_server package. The following command will load the map:
$ rosrun map_server map_server map.yaml
But to make it easy, create another .launch file in chapter8_tutorials/launch with the name gazebo_map_robot.launch, and put in the following code:
<?xml version="1.0"?>
<launch>
   <param name="/use_sim_time" value="true" />
    <!-- start up wg world -->
    <include file="$(find gazebo_ros)/launch/willowgarage_world.launch"/>
    <arg name="model" />
    <param name="robot_description" command="$(find xacro)/xacro.py $(arg model)" />
    <node name="joint_state_publisher" pkg="joint_state_publisher" type="joint_state_publisher" ></node>
    <!-- start robot state publisher -->
  <node pkg="robot_state_publisher" type="robot_state_publisher" name="robot_state_publisher" output="screen" >
  <param name="publish_frequency" type="double" value="50.0" />
  </node>
    <node name="spawn_robot" pkg="gazebo_ros" type="spawn_model" args="-urdf -param robot_description -z 0.1 -model robot_model" respawn="false" output="screen" />
    <node name="map_server" pkg="map_server" type="map_server" args=" $(find chapter8_tutorials)/maps/map.yaml" />
    <node name="rviz" pkg="rviz" type="rviz" args="-d $(find chapter8_tutorials)/launch/mapping.rviz" />
</launch>
Now, launch the file using the following command and remember to put the model of the robot that will be used:
$ roslaunch chapter8_tutorials gazebo_map_robot.launch model:="`rospack find chapter8_tutorials`/urdf/robot1_base_04.xacro"
Then, you will see rviz with the robot and the map. The navigation stack, in order to know the localization of the robot, will use the map published by the map server and the laser readings. This will help it perform a scan matching algorithm that helps in estimating the robot's location using a particle filter implemented in the amcl (Adaptive Monte Carlo Localization) node.
We will see more about maps as well as more useful tools, in the next chapter.