
To launch the entire robot, we are going to create a launch file with all the necessary files to activate all the systems. Anyway, here you have a launch file for a real robot that you can use as a template. The following script is present in configuration_template.launch:
<launch>
  <node pkg="sensor_node_pkg" type="sensor_node_type" name="sensor_node_name" output="screen">
    <param name="sensor_param" value="param_value" />
  </node>

  <node pkg="odom_node_pkg" type="odom_node_type" name="odom_node" output="screen">
    <param name="odom_param" value="param_value" />
  </node>

  <node pkg="transform_configuration_pkg" type="transform_configuration_type" name="transform_configuration_name" output="screen">
    <param name="transform_configuration_param" value="param_value" />
  </node>
</launch>
This launch file will launch three nodes that will start up the robot.
Tip
Downloading the example code
You can download the example code files from your account at http://www.packtpub.com for all the Packt Publishing books you have purchased. If you purchased this book elsewhere, you can visit http://www.packtpub.com/support and register to have the files e-mailed directly to you. You can also download these code files from https://github.com/AaronMR/ROS_Book_Hydro.
The first one is the node responsible for activating the sensors, for example, the Laser Imaging, Detection, and Ranging (LIDAR) system. The parameter sensor_param can be used to configure the sensor's port, for example, if the sensor uses a USB connection. If your sensor needs more parameters, you need to duplicate the line and add the necessary parameters. Some robots have more than one sensor to help in the navigation. In this case, you can add more nodes or create a launch file for the sensors, and include it in this launch file. This could be a good option for easily managing all the nodes in the same file.
The second node is to start the odometry, the base control, and all the necessary files to move the base and calculate the robot's position. Remember that in Chapter 8, The Navigation Stack – Robot Setups, we looked at these nodes in some detail. As in the other section, you can use the parameters to configure something in the odometry, or replicate the line to add more nodes.
The third part is meant to launch the node responsible for publishing and calculating the geometry of the robot, and the transform between the arms, sensors, and so on.
The previous file is for your real robot, but for our example, the next launch file is all we need.
Create a new file in chapter9_tutorials/launch with the name chapter9_configuration_gazebo.launch, and add the following code:
<?xml version="1.0"?>
<launch>
        <param name="/use_sim_time" value="true" />
        <remap from="robot/laser/scan" to="/scan" />
        <!-- start up wg world -->
        <include file="$(find gazebo_ros)/launch/willowgarage_world.launch"/>
        <arg name="model" default="$(find robot1_description)/urdf/robot1_base_04.xacro"/>
        <param name="robot_description" command="$(find xacro)/xacro.py $(arg model)" />
        <node name="joint_state_publisher" pkg="joint_state_publisher" type="joint_state_publisher" ></node>
        <!-- start robot state publisher -->
        <node pkg="robot_state_publisher" type="robot_state_publisher" name="robot_state_publisher" output="screen" />
        <node name="spawn_robot" pkg="gazebo_ros" type="spawn_model" args="-urdf -param robot_description -z 0.1 -model robot_model" respawn="false" output="screen" />
        <node name="rviz" pkg="rviz" type="rviz" args="-d $(find chapter9_tutorials)/launch/navigation.rviz" />
</launch>
This launch file is the same that we used in the previous chapters, so it does not need any additional explanation.
Now to launch this file, use the following command:
$ roslaunch chapter9_tutorials chapter9_configuration_gazebo.launch
You will see the following window:
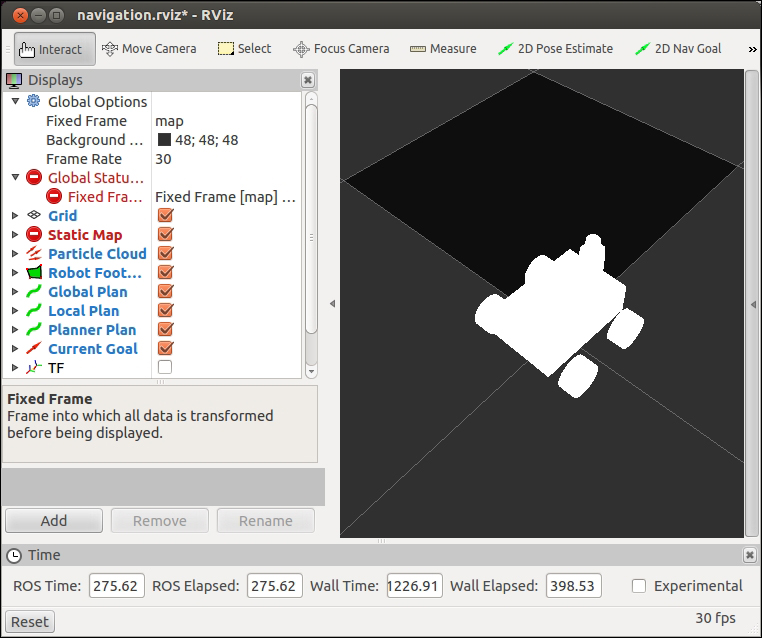
Notice that in the previous screenshot, there are some fields in red, blue, and yellow, without you having configured anything before. This is because in the launch file, a configuration file for the rviz layout is loaded along with rviz, and this file was configured in the previous chapter of this book.
In the upcoming sections, you will learn how to configure rviz to use it with the navigation stack and view all the topics.