
In this section, we are going to explain how to perform a very common application or task with a manipulator robot. A pick and place task consists of picking up a target object, which includes grasping it, and placing it somewhere else. Here, we assume that the object is initially on top of a supporting surface, which is flat or planar, such as a table, but it is easy to generalize it to more complex environments. As regards the object to grasp, we will consider a cylinder that is approximated by a box because the gripper we are going to use to grasp is very simple; for more complex objects, you will need a better gripper or even a hand.
In the further sections, we will start by describing how to set up the planning scene, which MoveIt! needs in order to identify the objects that are there, apart from the arm itself. These objects are considered during motion planning to avoid obstacles, and they can also be targets for picking up or grasping. In order to simplify the problem, we will omit the perception part, but we will explain how it can be done and integrated. Once the planning scene is defined, we will describe how to perform the pick and place task using the MoveIt! API. Finally, we will explain how to run this task in the demonstration mode, using fake controllers so that we do not need the actual robot (either simulated on Gazebo or a real one). We will also show how you can actually see the motion on the simulated arm in Gazebo while it is interacting with the simulated objects in the environment.
The first thing we have to do is define the objects in the environment since MoveIt! needs this information to make the arm interact without colliding and to reference them to do certain actions. Here, we will consider the scene shown in Figure 18:

Figure 18: Environment with manipulator and objects in Gazebo
This scene has the arm with the gripper and the RGB-D sensor as the robotic manipulator. Then, there is also a table and a can of Coke, which are the flat support surface and the cylindrical object, respectively. You can run this scene in Gazebo with the following command:
$ roslaunch rosbook_arm_gazebo rosbook_arm_grasping_world.launch
This scene is just a simple example that models a real use case. However, we still have to tell MoveIt! about the planning scene. At this moment, it only knows about the robotic manipulator. We have to tell it about the table and the can of Coke. This can be done either by using 3D perception algorithms, which take the point cloud of the RGB-D sensor, or programmatically, by specifying the pose and shape of the objects with some basic primitives. We will see how we can define the planning scene following the latter approach.
The code to perform the pick and place task is the pick_and_place.py Python program located in the scripts folder of the rosbook_arm_pick_and_place package. The important part to create the planning scene is in the __init__ method of the CokeCanPickAndPlace class:
self._scene = PlanningSceneInterface()
In the following sections, we will add the table and the can of Coke to this planning scene.
In this case, the target object to grasp is the can of Coke. It is a cylindrical object that we can approximate as a box, which is one of the basic primitives in the MoveIt! planning scene API:
# Retrieve params:
self._grasp_object_name = rospy.get_param('~grasp_object_name', 'coke_can')

# Clean the scene:
self._scene.remove_world_object(self._grasp_object_name)

# Add table and Coke can objects to the planning scene:
self._pose_coke_can = self._add_coke_can(self._grasp_object_name)
The objects in the planning scene receive a unique identifier, which is a string. In this case, coke_can is the identifier for the can of Coke. We remove it from the scene to avoid having duplicate objects, and then we add to the scene. The _add_coke_can method does that by defining the pose and shape dimensions:
def _add_coke_can(self, name):
    p = PoseStamped()
    p.header.frame_id = self._robot.get_planning_frame()
    p.header.stamp = rospy.Time.now()

    p.pose.position.x = 0.75 - 0.01
    p.pose.position.y = 0.25 - 0.01
    p.pose.position.z = 1.00 + (0.3 + 0.03) / 2.0

    q = quaternion_from_euler(0.0, 0.0, 0.0)
    p.pose.orientation = Quaternion(*q)

    self._scene.add_box(name, p, (0.15, 0.15, 0.3))

    return p.pose
The important part here is the add_box method that adds a box object to the planning scene we created earlier. The box is given a name, its pose, and dimensions, which, in this case, are set to match the ones in the Gazebo world shown earlier, with the table and the can of Coke. We also have to set frame_id to the planning frame one and the timestamp to now. In order to use the planning frame, we need RobotCommander, which is the MoveIt! interface to command the manipulator programmatically:
self._robot = RobotCommander()
We proceed similarly to create the object for the table, which is also approximated by a box. Therefore, we simply remove any previous object and add the table. In this case, the object name is table:
# Retrieve params:
self._table_object_name = rospy.get_param('~table_object_name', 'table')

# Clean the scene:
self._scene.remove_world_object(self._table_object_name)

# Add table and Coke can objects to the planning scene:
self._pose_table    = self._add_table(self._table_object_name)
The _add_table method adds the table to the planning scene:
def _add_table(self, name):
    p = PoseStamped()
    p.header.frame_id = self._robot.get_planning_frame()
    p.header.stamp = rospy.Time.now()

    p.pose.position.x = 1.0
    p.pose.position.y = 0.0
    p.pose.position.z = 1.0

    q = quaternion_from_euler(0.0, 0.0, numpy.deg2rad(90.0))
    p.pose.orientation = Quaternion(*q)

    self._scene.add_box(name, p, (1.5, 0.8, 0.03))

    return p.pose
We can visualize the planning scene objects in RViz running the following commands:
$ roslaunch rosbook_arm_gazebo rosbook_arm_grasping_world.launch
$ roslaunch rosbook_arm_moveit_config moveit_RViz.launch config:=true
$ roslaunch rosbook_arm_pick_and_place grasp_generator_server.launch
$ rosrun rosbook_arm_pick_and_place pick_and_place.py
This actually runs the whole pick and place task, which we will continue to explain later. Right after starting the pick_and_place.py program, you will see the boxes that model the table and the can of Coke in green, matching perfectly with the point cloud seen by the RGB-D sensor, as shown in Figure 19:
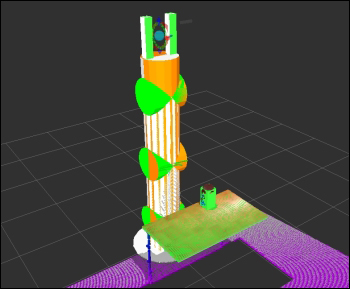
Figure 19: Point cloud seen by the RGB-D sensor of the environment
Adding the objects manually to the planning scenes can be avoided by perceiving the supporting surface. In this case, the table can be detected as a horizontal plane on the point cloud. Once the table is recognized, it can be subtracted from the original point cloud to obtain the target object, which can be approximated with a cylinder or a box. We will use the same method to add boxes to the planning scene as before, but in this case, the pose and dimensions (and the classification) of the objects will come from the output of the 3D perception and segmentation algorithm used.
This sort of perception and segmentation in the point cloud provided by the RGB-D sensor can be easily done using the concepts and algorithms. However, in some cases, the accuracy will not be enough to grasp the object properly. The perception can be helped using fiducial markers placed on the object to grasp, such as ArUco (http://www.uco.es/investiga/grupos/ava/node/26) which has the ROS wrapper which can be found at https://github.com/pal-robotics/aruco_ros.
Here, we set the planning scene manually and leave the perception part to you. As we saw, the target object to grasp and the support surface is defined on the code manually by comparing the correspondence with the point cloud in RViz until we have a good match.
Now that we have the target object defined in the scene, we need to generate grasping poses to pick it up. To achieve this aim, we use the grasp generator server from the moveit_simple_grasps package, which can be found at https://github.com/davetcoleman/moveit_simple_grasps.
Although there is a Debian package available in Ubuntu for ROS hydro, it does not support any robot properly. For that reason, we need a patched version until the following pull request is accepted. The patched version can be downloaded from https://github.com/davetcoleman/moveit_simple_grasps/pull/16.
Therefore, we need to run the following commands to add the patched branch to our workspace (inside the src folder of the workspace):
$ wstool set moveit_simple_grasps --git [email protected]:efernandez/moveit_simple_grasps.git -v server_params
$ wstool up moveit_simple_grasps
We can build this using the following commands:
$ cd ..
$ caktin_make
Now we can run the grasp generator server as follows (remember to source devel/setup.bash):
$ roslaunch rosbook_arm_pick_and_place grasp_generator_server.launch
The grasp generator server needs the following grasp data configuration in our case:
base_link: base_link

gripper:
  end_effector_name: gripper

  # Default grasp params
  joints: [finger_1_joint, finger_2_joint]

  pregrasp_posture:          [0.0, 0.0]
  pregrasp_time_from_start:  &time_from_start 4.0

  grasp_posture:             [1.0, 1.0]
  grasp_time_from_start:     *time_from_start

  postplace_time_from_start: *time_from_start

  # Desired pose from end effector to grasp [x, y, z] + [R, P, Y]
  grasp_pose_to_eef:          [0.0, 0.0, 0.0]
  grasp_pose_to_eef_rotation: [0.0, 0.0, 0.0]

  end_effector_parent_link: tool_link
This defines the gripper we are going to use to grasp objects and the pre- and post-grasp postures, basically.
Now we need an action client to query for the grasp poses. This is done inside the pick_and_place.py program, right before we try to pick up the target object. So, we create an action client using the following code:
# Create grasp generator 'generate' action client:
self._grasps_ac = SimpleActionClient('/moveit_simple_grasps_server/generate', GenerateGraspsAction)
if not self._grasps_ac.wait_for_server(rospy.Duration(5.0)):
    rospy.logerr('Grasp generator action client not available!')
    rospy.signal_shutdown('Grasp generator action client not available!')
    return
Inside the _pickup method, we use the following code to obtain the grasp poses:
grasps = self._generate_grasps(self._pose_coke_can, width)
Here, the width argument specifies the width of the object to grasp. The _generate_grasps method does the following:
    def _generate_grasps(self, pose, width):
        # Create goal:
        goal = GenerateGraspsGoal()

        goal.pose  = pose
        goal.width = width

        # Send goal and wait for result:
        state = self._grasps_ac.send_goal_and_wait(goal)
        if state != GoalStatus.SUCCEEDED:
            rospy.logerr('Grasp goal failed!: %s' % self._grasps_ac.get_goal_status_text())
            return None

        grasps = self._grasps_ac.get_result().grasps

        # Publish grasps (for debugging/visualization purposes):
        self._publish_grasps(grasps)

        return grasps
To summarize, it sends an actionlib goal to obtain a set of grasping poses for the target goal pose (usually at the object centroid). In the code provided with the book, there are some options commented upon, but they can be enabled to query only for particular types of grasps, such as some angles or pointing up or down. The output of the function are all the grasping poses that later the pickup action will try. Having multiple grasping poses increases the possibility of a successful grasp.
The grasp poses provided by the grasp generation server are also published as PoseArray using the _publish_grasps method for visualization and debugging purposes. We can see them on RViz running the whole pick and place task as before:
$ roslaunch rosbook_arm_gazebo rosbook_arm_grasping_world.launch
$ roslaunch rosbook_arm_moveit_config moveit_RViz.launch config:=true
$ roslaunch rosbook_arm_pick_and_place grasp_generator_server.launch
$ rosrun rosbook_arm_pick_and_place pick_and_place.py
A few seconds after running the pick_and_place.py program, we will see multiple arrows on the target object, which correspond with the grasp pose that will be tried in order to pick it up. This is shown in Figure 20 as follows:

Figure 20: Visualization of grasping poses
Once we have the grasping poses, we can use the MoveIt! /pickup action server to send a goal passing all of them. As before, we will create an action client:
# Create move group 'pickup' action client:
self._pickup_ac = SimpleActionClient('/pickup', PickupAction)
if not self._pickup_ac.wait_for_server(rospy.Duration(5.0)):
    rospy.logerr('Pick up action client not available!')
    rospy.signal_shutdown('Pick up action client not available!')
    return
Then, we will try to pick up the can of Coke as many times as needed until we finally do it:
# Pick Coke can object:
while not self._pickup(self._arm_group, self._grasp_object_name, self._grasp_object_width):
    rospy.logwarn('Pick up failed! Retrying ...')
    rospy.sleep(1.0)
Inside the _pickup method, we create a pickup goal for MoveIt!, right after generating the grasps poses, as explained earlier:
# Create and send Pickup goal:
goal = self._create_pickup_goal(group, target, grasps)

state = self._pickup_ac.send_goal_and_wait(goal)
if state != GoalStatus.SUCCEEDED:
    rospy.logerr('Pick up goal failed!: %s' % self._pickup_ac.get_goal_status_text())
    return None

result = self._pickup_ac.get_result()

# Check for error:
err = result.error_code.val
if err != MoveItErrorCodes.SUCCESS:
    rospy.logwarn('Group %s cannot pick up target %s!: %s' % (group, target, str(moveit_error_dict[err])))

    return False

return True
The goal is sent and the state is used to check whether the robot manipulator picks up the object or not. The pickup goal is created in the _create_pickup_goal method as follows:
def _create_pickup_goal(self, group, target, grasps):
  # Create goal:
  goal = PickupGoal()

  goal.group_name  = group
  goal.target_name = target

  goal.possible_grasps.extend(grasps)

  # Configure goal planning options:
  goal.allowed_planning_time = 5.0

  goal.planning_options.planning_scene_diff.is_diff = True
  goal.planning_options.planning_scene_diff.robot_state.is_diff = True
  goal.planning_options.plan_only = False
  goal.planning_options.replan = True
  goal.planning_options.replan_attempts = 10

  return goal
The goal needs the planning group (arm in this case) and the target name (coke_can in this case). Then, all the possible grasps are set, and several planning options, including the planning time allowed, can be increased if needed.
When the target object is successfully picked up, we will see the box corresponding to it attached to the gripper's grasping frame with a purple color, as shown in Figure 21 (note that it might appear like a ghost gripper misplaced, but that is only a visualization artifact):
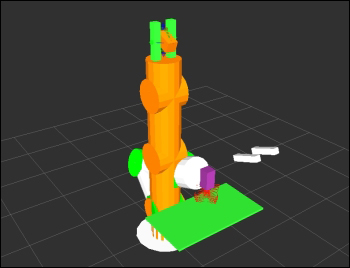
Figure 21: Arm picking up an object
Right after the object has been picked up, the manipulator will proceed with the place action. MoveIt! provides the /place action server, so the first step consists of creating an action client to send a place goal in the desired location, in order to place the object picked up:
# Create move group 'place' action client:
self._place_ac = SimpleActionClient('/place', PlaceAction)
if not self._place_ac.wait_for_server(rospy.Duration(5.0)):
    rospy.logerr('Place action client not available!')
    rospy.signal_shutdown('Place action client not available!')
    return
Then, we will try to place the object until we finally manage to do it:
# Place Coke can object on another place on the support surface (table):
while not self._place(self._arm_group, self._grasp_object_name, self._pose_place):
    rospy.logwarn('Place failed! Retrying ...')
    rospy.sleep(1.0)
The _place method uses the following code:
def _place(self, group, target, place):
    # Obtain possible places:
    places = self._generate_places(place)

    # Create and send Place goal:
    goal = self._create_place_goal(group, target, places)

    state = self._place_ac.send_goal_and_wait(goal)
    if state != GoalStatus.SUCCEEDED:
        rospy.logerr('Place goal failed!: ' % self._place_ac.get_goal_status_text())
        return None

    result = self._place_ac.get_result()

    # Check for error:
    err = result.error_code.val
    if err != MoveItErrorCodes.SUCCESS:
        rospy.logwarn('Group %s cannot place target %s!: %s' % (group, target, str(moveit_error_dict[err])))

        return False

    return True
The method generates multiple possible places to leave the object, create the place goal, and send it. Then, it checks the result to verify whether the object has been placed or not. To place an object, we can use a single place pose, but it is generally better to provide several options. In this case, we have the _generate_places method, which generates places with different angles at the position given. When the places are generated, they are also published as PoseArray, so we can see them as shown in Figure 22 with blue arrows:

Figure 22: Visualization of place poses
Once the places are obtained, the _create_place_goal method creates a place goal as follows:
def _create_place_goal(self, group, target, places):
    # Create goal:
    goal = PlaceGoal()

    goal.group_name           = group
    goal.attached_object_name = target

    goal.place_locations.extend(places)

    # Configure goal planning options:
    goal.allowed_planning_time = 5.0

    goal.planning_options.planning_scene_diff.is_diff = True
    goal.planning_options.planning_scene_diff.robot_state.is_diff = True
    goal.planning_options.plan_only = False
    goal.planning_options.replan = True
    goal.planning_options.replan_attempts = 10

    return goal
In brief, the place goal has the group (arm in this case) and the target object (coke_can in this case), which are attached to the gripper and the place or places (poses). Additionally, several planning options are provided, along with the allowed planning time, which can be increased if needed. When the object is placed, we will see the box representing it in green again and on top of the table, and the arm will be up again, as shown in Figure 23:

Figure 23: Arm after placing an object
We can do the whole pick and place task without perception in demo mode, that is, without actually actuating on the Gazebo simulation, or the real, robotic arm. In this mode, we will use fake controllers to move the arm once the motion plan has been found by MoveIt! to do the pick and place actions, including grasping the object. The same code can be used directly on the actual controllers.
In order to run pick and place in the demo mode, run the following commands:
$ roslaunch rosbook_arm_moveit_config demo.launch
$ roslaunch rosbook_arm_pick_and_place grasp_generator_server.launch
$ rosrun rosbook_arm_pick_and_place pick_and_place.py
The special part is the first launch file, which simply opens RViz and loads fake controllers instead of spawning the robotic manipulator on Gazebo. Figure 24 shows several snapshots of the arm moving and doing the pick and place after running the preceding commands:
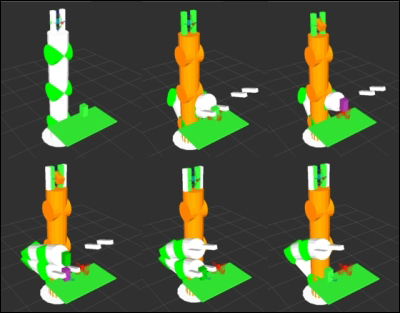
Figure 24: Arm doing pick and place task in the demo mode
Using the same code as in demo mode, we can actually move the real controllers, either in simulation (Gazebo) or using the real hardware. The interface is the same, so using a real arm or gazebo is completely equivalent. In these cases, the joints will actually move and the grasping will actually make the gripper come in contact with the grasping object (the can of Coke). This requires a proper definition of the objects and the gripper in Gazebo to work properly.
The commands to run the pick and place in this case (as shown previously) are:
$ roslaunch rosbook_arm_gazebo rosbook_arm_grasping_world.launch
$ roslaunch rosbook_arm_moveit_config moveit_RViz.launch config:=true
$ roslaunch rosbook_arm_pick_and_place grasp_generator_server.launch
$ rosrun rosbook_arm_pick_and_place pick_and_place.py
It is only the first part to launch files that changes with respect to the demo mode; it replaces demo.launch in the demo mode. In this case, we spawn the robotic manipulator in Gazebo with the environment containing the table and the can of Coke as well as the RGB-D camera. Then, the moveit_RViz.launch file opens RViz with the MoveIt! plugin, providing the same interface as with demo.launch. However, in this case, when the pick_and_place.py program is run, the arm in Gazebo is moved.