
6
Achieving Business Goals Using Campaigns
Campaigns are outbound marketing initiatives that target leads and contacts. They can take the form of direct mail, events, print ads, emails, or any other marketing outreach where you are trying to get a response from the recipients. This response can take the form of interest in a product, attending an event such as a seminar or a webinar, or clicking on an ad. Campaigns tie marketing and sales together as they help generate leads and track those leads as they convert into opportunities and, finally, into opportunity closure. This closure can either be Closed Won (a sale) or Closed Lost (a lost sale).
Campaigns use campaign members to track who is associated with a campaign. Campaign members can be leads or contacts that have been contacted for a specific marketing campaign. Campaigns can also be nested in a hierarchy. This means that you may have an overall campaign, such as 2022 Email Campaigns, and underneath it resides all the email marketing campaigns of that year. This is very useful as all the campaign statistics come under the parent, showing the overall performance of all the subcampaigns. Many third-party apps, such as email providers or event management tools, also integrate with Salesforce and tie into campaigns.
In this chapter, we will cover the following topics:
- Creating campaigns
- Adding campaign members
- Managing marketing with campaign hierarchies
- Improving campaign functionality with third-party apps
With the help of these topics, we will gain the required skills to create a campaign and see what a campaign record contains. We will learn how to create campaign members associated with a campaign and see how this looks on a lead and a contact record. We will also be able to create a campaign hierarchy and see how this helps with the reports. Finally, we will see how integrating third-party apps can make using campaigns more powerful by automating aspects of responses to a campaign.
Technical requirements
For this chapter, make sure you log in to your development org and follow along.
Creating campaigns
Campaigns are outbound marketing initiatives used by marketers. The reason campaigns are so important is that they are a primary means of obtaining leads and starting the sales cycle. You can look at campaigns as buckets that bring together leads, contacts, and opportunities.
Business use case
You are a marketing rep at XYZ Widgets. You have been tasked with delivering a webinar and you need to create the webinar campaign in Salesforce, as well as invite attendees and track their progress. Let’s see how this is done.
Creating a campaign
Let’s take a look at how to create a campaign in Salesforce and go through the various fields to include when creating a campaign:
Go to the Campaigns tab to start the process, then click on New:

Figure 6.1: Option to create a new campaign from the Campaign tab
In the following screenshot, you can see part of the campaign creation screen:
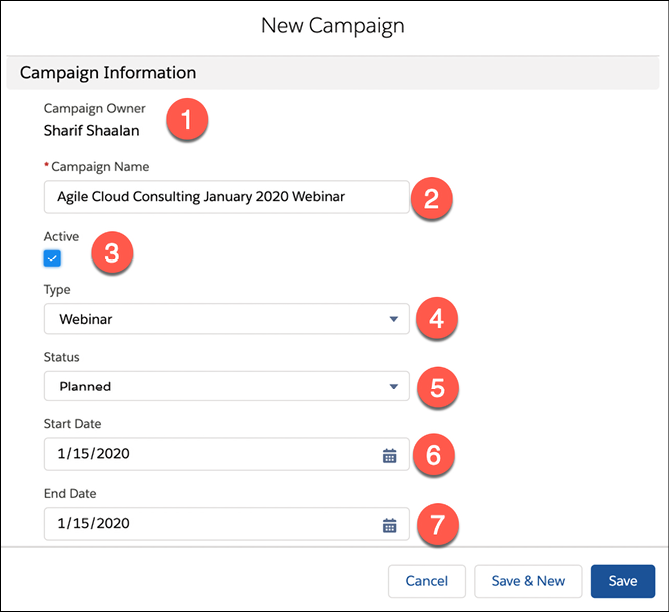
Figure 6.2: Fields on the New Campaign creation screen
As you can see in the preceding screenshot, there are several fields on this page:
- Campaign Owner: This is the name of the person that created the campaign and so owns it in Salesforce.
- Campaign Name: This is the unique name that you need to include to indicate what the campaign is used for. In this example, we used
Agile Cloud Consulting January 2020 Webinar. - Active: This checkbox is used to set the campaign as Active, which means it is currently being worked on.
- Type: This field defines the type of the campaign. This can be Email, Direct mail, Webinar, and so on. In this example, we will set it to Webinar.
- Status: This field lets us know what the current status of the campaign is. This can be Planned, In Progress, or Complete.
- Start Date: This field lets us know when the campaign is set to start.
- End Date: This field lets us know when the campaign is set to end.
In the following screenshot, you can see the rest of the fields on the campaign creation screen:

Figure 6.3: Further fields on the campaign creation screen
As you can see in the preceding screenshot, there are several more important fields to fill in:
- Expected Revenue in Campaign: This is how much revenue—closed opportunities—you expect to come by from this campaign.
- Budgeted Cost in Campaign: This is how much the campaign costs. In our example, it would be the budget you have to put on the webinar.
- Actual Cost in Campaign: This is filled in after the campaign is complete. It should note how much it actually cost to put on the webinar.
- Expected Response (%): This is how many responses from leads and contacts we expect to receive out of all of the invitations we send out.
- Num Sent in Campaign: This is how many leads and contacts are included in the campaign. This number is automatically calculated once we add campaign members in the next section.
- Parent Campaign: This is how to set up the campaign hierarchy, which we will cover in further detail in the Managing marketing with campaign hierarchies section of this chapter. This allows the numbers from the webinar campaign to come under the parent campaign.
- Save: When all the fields are filled in, you can save the campaign to create it.
The following screenshot shows you what the created campaign looks like:

Figure 6.4: Two sections on the screen for a created campaign
As you can see in the preceding screenshot, the campaign is now created. There are two important sections to note here:
- The campaign roll-up fields: These fields auto-calculate based on the leads and contacts that are added, the leads that are converted into opportunities, and the opportunities that are turned into sales. These fields are important in analyzing the Return on Investment (ROI) for a specific campaign. They allow you to see how many responses or leads you had and how many of those leads were converted into opportunities. You can then see how many of the opportunities were closed, giving you a lead-to-opportunity-to-sale ratio that indicates whether the campaign was a success or not.
- Activities: Note that you can add activities to campaigns as you could with leads, contacts, accounts, and opportunities.
Now that we have created the campaign, let’s see how we can add campaign members in the following section.
Adding campaign members
Campaign members are the leads and contacts that you reach out to be a part of your campaign. In our webinar example, this includes any leads or contacts you reach out to attend the webinar. Some members may respond and sign up for the webinar, while others may not. Out of the campaign members that respond, some may go on to make a purchase as a result of the webinar—these sales would be tied directly to the campaign and show the ROI of putting on the webinar. Let’s take a look at how to add leads and contacts to the campaign we created in the previous section.
Adding leads as campaign members
As you can see in the following screenshot, you first need to navigate to the Campaign Members section:

Figure 6.5: Option to add leads from the Campaign Members section
After navigating to the Campaign Members section, click on Add Leads.
In the following screenshot, you can see the Add Leads to Campaign page:
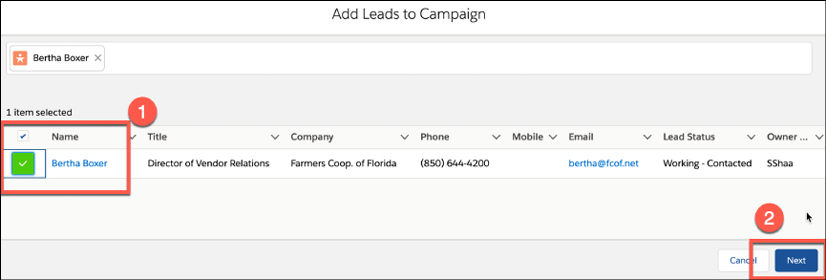
Figure 6.6: Page for selecting leads to add to a campaign
As you can see in the preceding screenshot, there are two actions to be taken:
- Choose the leads you want to add. This is done by clicking on the checkbox next to the lead name. In this example, there is only one lead, but you can add more than one lead at once.
- Click on Next to move on to the final step of adding a campaign member.
In the following screenshot, you can see the popup that will appear on your screen:

Figure 6.7: Popup for selecting Member Status when adding a campaign member
As you can see in the preceding screenshot, the default status is Sent. If the lead signs up for the webinar, this is updated to Responded. Clicking on Submit creates the campaign member record.
There is also an option to mass import leads if, for example, you have a list in a CSV file from a conference or from a marketing list that you may have purchased. The following screenshot shows this option:
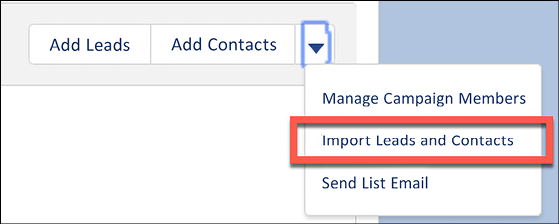
Figure 6.8: Option for importing leads to a campaign
As you can see in the preceding screenshot, if you click on the dropdown arrow next to Add Leads and Add Contacts, you will find the Import Leads and Contacts link. This takes you to an import wizard that allows you to mass-import leads or contacts as needed.
Next, let’s take a look at how to add a contact as a campaign member.
Adding contacts as campaign members
In the following screenshot, we can see what the Campaign Members list looks like now that a lead has been added:

Figure 6.9: Steps for adding contacts to a campaign
As you can see in the preceding screenshot, the lead now shows up under the Number of Members section (1). Let’s click on Add Contacts (2) to add contacts as campaign members. Note that the gear icon in the preceding screenshot (3) allows you to change the graph from a donut chart to a vertical or horizontal bar graph.
In the following screenshot, you can see the Add Contacts to Campaign page:

Figure 6.10: Steps for selecting contacts to add to a campaign
As you can see in the preceding screenshot, there are two actions to be taken:
- Choose the contacts you want to add. This is done by clicking on the checkbox next to the contact name.
- Click on Next to move on to the final step of adding a campaign member.
In the following screenshot, you can see the final screen for adding the contact as a campaign member:

Figure 6.11: Default member status when adding a contact to a campaign
As you can see in the preceding screenshot, the default status is Sent. If the contact signs up for the webinar, this is updated to Responded. Clicking on Submit creates the campaign member record.
Next, let’s take a look at how to view the campaign history of leads and contacts.
Viewing the campaign history of leads and contacts
The campaign history is a record of all the campaigns that a lead or contact has previously interacted with. Let’s take a look at how to view the campaign history of leads and contacts.
In the following screenshot, you can see that you first need to navigate to the lead that was added as a campaign member:

Figure 6.12: Viewing a lead’s campaign history
As you can see, the webinar campaign shows up under the Campaign History section of the lead. In the following screenshot, you can see a contact that was added as a campaign member:

Figure 6.13: Viewing a contact’s campaign history
As you can see, the webinar campaign shows up in the Campaign History section of the contact. Let’s take a look at one final feature of the Campaign Members section.
Sending an email to the list of campaign members
A very useful feature in the Campaign Members section is the ability to send all of the campaign members an email right from Salesforce. The following screenshot shows the Campaign Members section of the campaign:

Figure 6.14: Send List Email option from the Campaign Members dropdown
As you can see in the preceding screenshot, if you click on the dropdown arrow, there is the Send List Email option. This takes you to an email composition page, where you can write and send your email.
Now, we have seen how to create a campaign and how to add campaign members to a campaign. Next, let’s look at what campaign hierarchies are and how to use them.
Managing marketing with campaign hierarchies
Campaign hierarchies allow you to group campaigns under a top-level campaign. This can help in showing you the overall performance of a type of campaign over a year. For our webinar example, we want all the webinar campaigns that took place in 2022 to reside under a parent campaign called 2022 Webinar Campaigns. Let’s see how to do this.
In the following screenshot, you can see that the parent campaign for our January 2022 webinar is 2022 Webinar Campaigns:

Figure 6.15: Parent Campaign information on a campaign page
This means any numbers for this January campaign automatically come under this parent campaign.
In the following screenshot, we can see how the campaign hierarchy numbers show up under the parent campaign:

Figure 6.16: Campaign hierarchy information
This shows the number of leads and contacts in the child campaigns, any opportunities that result from these campaigns, and any sales that result from these opportunities, which gives us a full picture of the performance of all the webinars in 2022.
Now that we have seen how to create and use campaigns, how to add campaign members, and how the campaign hierarchy shows us the performance of our campaigns across the year, let’s look at how third-party apps contribute to automating campaigns.
Improving campaign functionality with third-party apps
So far, we have seen how campaigns work. In our example, the marketing rep chooses leads and contacts and adds them to the webinar campaign. These campaign members default to a status of Sent and when they sign up for a webinar, the status updates to Responded. How does this status change happen? Without a third-party app, it would need to be updated manually.
In the following screenshot, we can see the campaign members that we added:

Figure 6.17: Member Status field for members of a campaign
Notice that the status is set to Sent by default. There are many third-party apps available for campaigns such as webinars, events, conferences, or any other campaign use cases. Without using a third-party app, in our example, whenever a lead or contact signs up for the webinar, you would need to go into the system and update the status manually. This can be very time-consuming.
To find an appropriate third-party app, you can go to https://appexchange.salesforce.com/. AppExchange is the Salesforce store for third-party apps. You can go to AppExchange to search for and find relevant apps. Most apps allow you to test drive the app in a sandbox (test environment) for free before committing to the purchase. In the following screenshot, you can see the main AppExchange page:
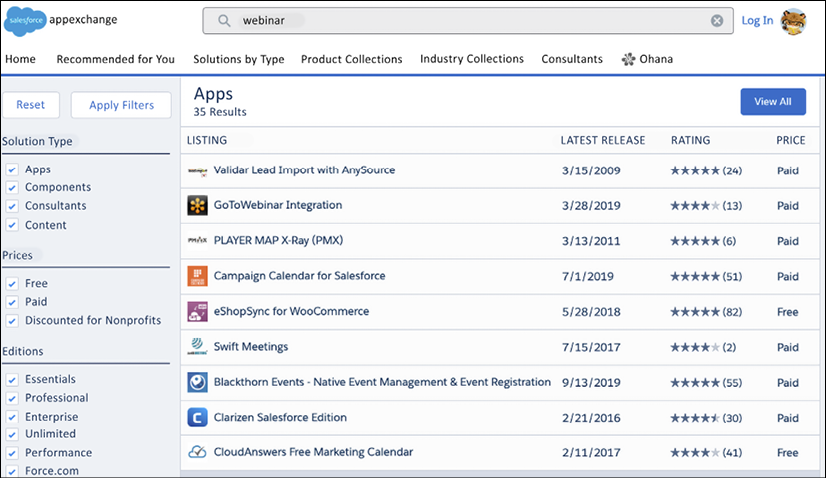
Figure 6.18: AppExchange home page
As you can see in the preceding screenshot, I entered webinar into the search box and all of the apps related to webinars that integrate with Salesforce were returned.
Assume that we have connected to a third-party webinar app that integrates with Salesforce:

Figure 6.19: Member Status field updated to Responded
Notice that when someone signs up for the webinar through the third-party app, the app integration automatically updates the status to Responded.
This is how we use third-party apps with campaigns to know whether and when a member has signed up.
Summary
In this chapter, we covered how to create campaigns and what the important input fields are on campaign records to increase our visibility of the market. We discovered that both leads and contacts can be added to campaigns, as well as how to add a lead and contact to a campaign.
We went through how to view the campaign history of both leads and contacts, and we now know what a campaign hierarchy is and how to add a campaign to a hierarchy.
Finally, we explained how third-party apps can be used to automate campaign responses, cutting out manual work that could be inefficient and unreliable due to human error. We also now know where to find third-party apps on AppExchange to automatically find out when a member signs up.
Now that we have covered sales and marketing, we will look at how Salesforce handles customer service through cases in the next chapter!
Questions
- What are the two types of campaign members that can be added to a campaign?
- Why would you want to add a parent campaign to your campaign?
- What is the name of the section where you can see campaigns related to leads and contacts?
- What field lets us know if a campaign is Active?
- Why would you want to use a third-party app with campaigns?
- What are three examples of types of campaigns?
Further reading
- Salesforce campaigns: https://help.salesforce.com/articleView?id=campaigns_def.htm&type=5
- Salesforce campaign members:https://help.salesforce.com/articleView?id=campaigns_members_working_with_parent.htm&type=5
- Campaign hierarchies: https://help.salesforce.com/articleView?id=campaigns_hierarchy_setup.htm&type=5
Join our community on Discord
Join our community’s Discord space for discussions with the authors and other readers: https://packt.link/rlptF
