
17
Approval Processes
Approval processes are a type of automation that allows users to submit Salesforce records so that they can be approved in order to continue a specific business process. The approval process has the option of sending the record to one or multiple approvers (in a round-robin fashion), as well as the ability to add submission, approval, rejection, and recall actions. Having these checks and balances on business processes allows for a more streamlined and efficient workflow. Creating and maintaining approvals is a vital part of a Salesforce admin’s day-to-day work.
In this chapter, we will cover the following topics in detail:
- Creating an approval process
- Adding entry criteria and approver selection
- Adding actions and viewing the approval steps
- Enabling email approvals
- Business use case
With the help of these topics, you will understand when and how to create an approval process. You will understand how to create an approval process, add entry criteria, select approver(s), add actions, and add approval steps. These skills will help you automate business processes for your organization, leading to higher efficiency and fewer errors being made by your users.
Technical requirements
For this chapter, log into your development organization and follow along as we create an approval process from start to finish.
Creating an approval process
An approval process is a great tool that’s used to execute business logic automatically based on a Salesforce record being submitted for approval, and then approved or rejected by another user. Knowing the capabilities of approval processes will help you come up with efficient workflows that lead to fewer clicks and cleaner data. Let’s see how this is done.
Business use case
You are the Salesforce Admin for XYZ Widgets. The sales manager has a use case where all closed sales that are $200,000 or higher and are in the negotiation/review stage need to be submitted to them for final approval. Once the deal is approved, the opportunity stage should automatically update to Closed Won. Let’s build this approval!
Approval process in action
To create the approval process, perform the following steps:
- Navigate to the Setup page | the Home tab (1) | Approval Processes (2):

Figure 17.1: Navigating to Approval Processes from the Home tab
- This will take you to the next step of creating the approval process, as shown in the following screenshot:

Figure 17.2: Navigating to the Jump Start Wizard for an approval process
There are two steps you need to follow in order to start creating the approval process, as shown in the preceding screenshot:
- Choose the object that the approval process will be applied to (1). In our case, this is the Opportunity object since we are approving sales greater than $200,000.
- Start the approval process creation by either choosing Use Jump Start Wizard or Use Standard Setup Wizard (2). We will use the Jump Start Wizard as it condenses the steps into two pages as opposed to six pages for the initial creation of the approval process.
The next page we will be taken to is the Jump Start Wizard. Now, let’s take a look at the Wizard and see how we can add entry criteria and approver selection.
Adding entry criteria and approver selection
Now, we need to add the basic approval process information, specify the entry criteria for the approval, and select the approver(s) for the approval process. Refer to the following screenshot for more details:

Figure 17.3: Important areas for adding basic approval process information
From the preceding screenshot, you can see there are four main sections, each of which has specific settings for the approval process. Let’s look at these settings in detail:
- Approval Process Information: This section allows you to add the following:
- A Name for the process. This is a label that shows up when you look at the list of all approval processes.
- A Unique Name. This is used if we need to call this process through programming code.
- An optional Email Template for when you request approval from a user. This will let you word the email as needed.
- A Submit for Approval button and a list related to Approval History. This applies to all the page layouts of the object that the approval is being built on.
- Specify Entry Criteria: This section, similar to workflow rules, allows you to enter the criteria that allow the record to enter into this approval process. For our business use case, we have two criteria:
- Opportunity Amount is greater or equal to
$200,000 - Opportunity Stage equals Negotiation/Review
- Opportunity Amount is greater or equal to
- Select Approver options: There are three options for selecting an approver:
- Let the submitter choose the approver manually: This allows the submitter to choose from all Salesforce users.
- Automatically assign an approver using a standard or custom hierarchy field: This can be the Manager field on the user record or a custom hierarchy field on the user record.
- Automatically assign to approver(s): This option allows you to assign the approval to one or more specific users. This is the option we will use for our use case since it is a specific manager to whom we need to assign the approval.
- Choosing the approver: Since we chose to automatically assign the approver in the preceding step, in this step, we will add one or multiple approvers. If multiple approvers are selected, there is an option to Approve or reject based on the FIRST response or Require UNANIMOUS approval from all selected approvers. For our business use case, we will add one approver.
After saving, we will see the following screen:
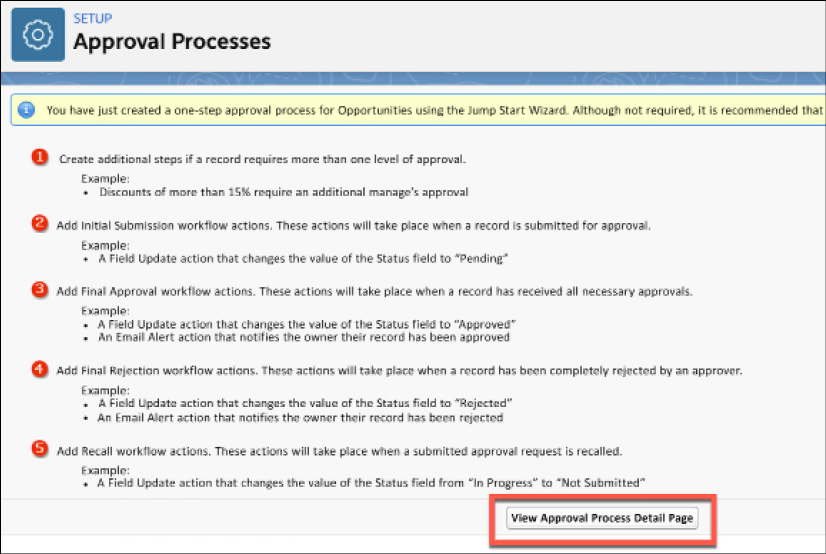
Figure 17.4: Setup page listing actions to add to an approval process
As you can see, the preceding screenshot suggests that we finish setting up this approval by adding additional actions. Let’s click on View Approval Process Detail Page to proceed.
Now, we can start adding actions and viewing the approval steps.
Adding actions and viewing the approval steps
Now that we have created the approval process, let’s look at how to add actions and view the approval steps based on our business use case. The following screenshot shows where we land after clicking on View Approval Process Detail Page:
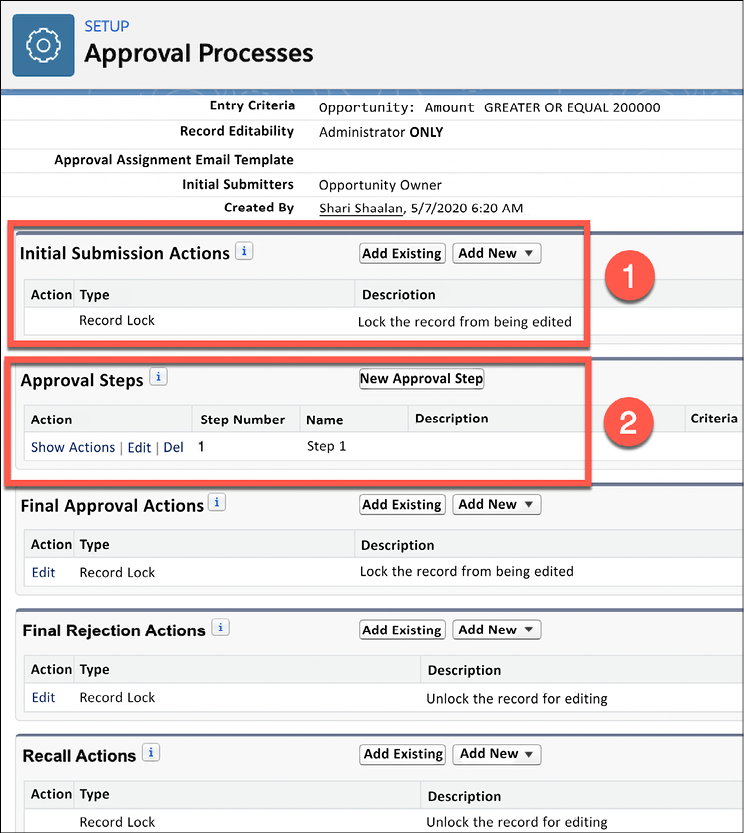
Figure 17.5: Highlighted areas of the Approval Process Detail Page
As shown in the preceding screenshot, there are multiple sections to consider:
- Initial Submission Actions: The default action when a user submits a record for approval is to lock the record from being edited. In addition to this, you can add one of the four additional actions, that is, create a task, create an email alert, update a field, or send an outbound message. For our business use case, there are no additional actions to create upon submitting an approval.
- Approval Steps: This section shows the steps needed to complete this approval. Had we added multiple approvers and the need for unanimous approval, we would see each approver here as a step. Since our business use case only has one approver, you can see this as Step 1 under Approval Steps.
Now, let’s look at Final Approval Actions:

Figure 17.6: Dropdown options for Final Approval Actions
For Final Approval Actions, we need to add one action. Since our business use case says we want the opportunity stage to automatically update to Closed Won when the record is approved, we will need to add a field update. From the Add New dropdown, select Field Update, which will take us to the following screen:
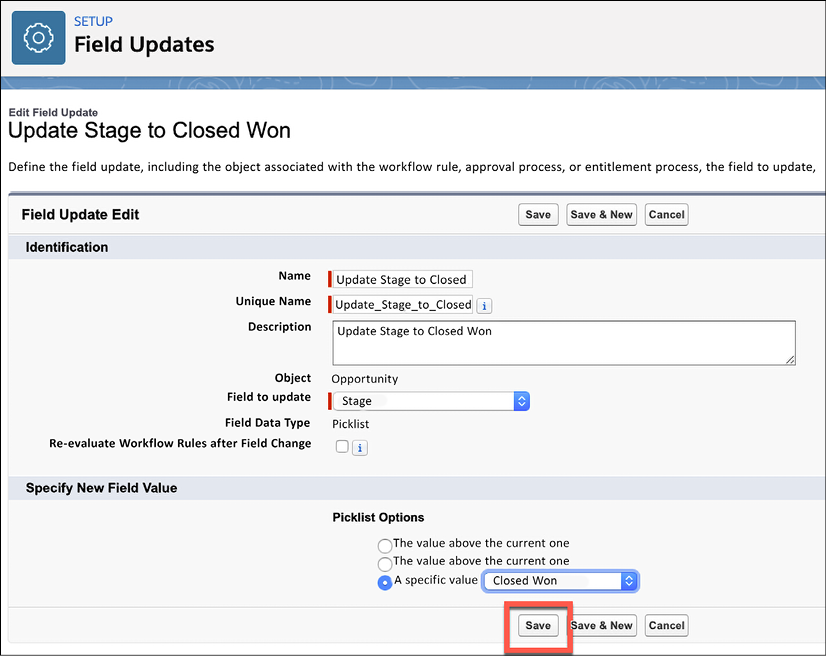
Figure 17.7: Screen for editing a field update
After adding the required information here for the field update, save it. This has been set up so that when the approver approves the record, this field update will occur and the opportunity stage will automatically change to Closed Won. After doing this, we will be sent back to the following screen:

Figure 17.8: Returning to the screen for adding actions to an approval process
As shown in the preceding screenshot, there are two more sections to cover on this page:
- Final Rejection Actions: The default rejection action is to unlock the record for editing. Along with unlocking the record, you can optionally add one of the four previously mentioned actions (Create a Task, Email Alert, Field Update, or Outbound Message).
For our business use case, there are no additional actions needed for a rejection, so we will leave this as is.
- Recall Actions: This section defines what happens if the user that submitted the record for approval decides to recall the submission. The default action is to unlock the record for editing, thus allowing the user to make changes as needed and resubmit the record for approval. Along with unlocking the record, you can optionally add one of the four previously mentioned actions (Create a Task, Email Alert, Field Update, or Outbound Message). For our business use case, there are no additional actions needed for recalling a record, so we will leave this as is.
Now that we have added the actions needed for this approval process, we need to activate the approval by clicking Activate:

Figure 17.9: Button for activating an approval process at the top right of the screen
Enabling email approvals
Although the approver(s) will get a notification and can approve the record right from inside Salesforce, we want to add an extra option to make it a little easier for our executives on the move. This option is to allow the approver to approve a record by replying to the approval request email with APPROVE or REJECT.
In the following screenshot, I navigated to Process Automation Settings to enable this feature:

Figure 17.10: Navigating to Process Automation Settings from the Home tab
As you can see, I ticked the Enable email approval response checkbox. This will now give our approver(s) another option to approve the record:

Figure 17.11: Example of an approval response email
Now that we have set up the approval process and enabled the option for an approver to approve via email, let’s test it out!
Business use case
Now that we have built the approval process, let’s test it out to see if it meets our business requirements. As a recap, the sales manager wants all closed sales that are $200,000 or higher and are in the negotiation/review stage to be submitted to them for final approval. Once the deal has been approved, the opportunity stage should automatically update to Closed Won. Let’s see how this works:
- Navigate to the Burlington Textiles Weaving Plant Generator opportunity:

Figure 17.12: Opportunity with the amount and stage sections highlighted
Here, we can see that this opportunity has an amount that is greater than $200,000 and is in the Negotiation/Review stage, so it meets the criteria for being submitted for approval.
- From the dropdown arrow in the upper-right corner, we can access and click on the Submit for Approval button. The following popup will appear:

Figure 17.13: Popup when submitting an approval above a certain amount
- The popup in the preceding screenshot allows the submitter to add a comment for the approver to see. Add a comment and click on Submit.
The opportunity has now been submitted. The following screenshot shows the list related to the Approval History of the opportunity:

Figure 17.14: Highlighted entries in the Approval History section
- As you can see, there are now two entries in the Approval History section:
- Next, let’s take a look at what the approver will see:

Figure 17.15: Items to Approve section on the approver’s home screen
As you can see, the sales manager would have to log into Salesforce.
- On the home page, there is an Items to Approve section. The following screenshot shows the screen that comes up when the sales manager clicks on the record to approve it:

Figure 17.16: Approve button found on the sales manager’s screen for a record
In the preceding screenshot, you can see all of the approval details. The sales manager has the option to Approve, Reject, or Reassign the record for approval.
- When the sales manager clicks on Approve, the following popup will appear:
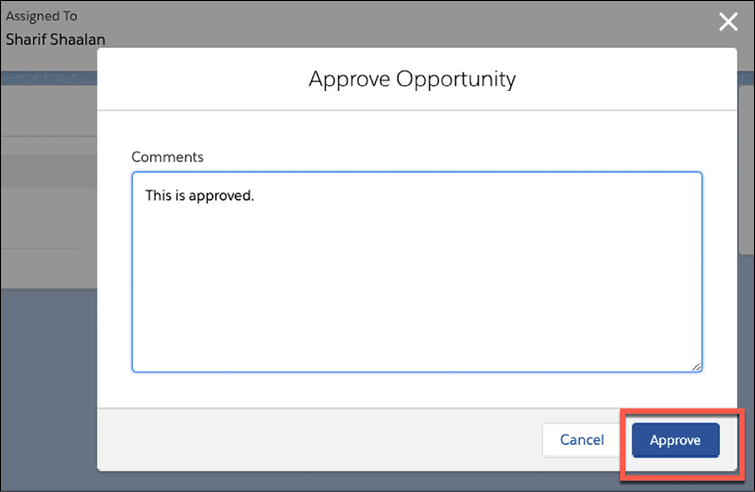
Figure 17.17: Popup when clicking on Approve
This popup allows the approver to add any comments to the approval. The sales manager will click on Approve and be brought to the following screen:
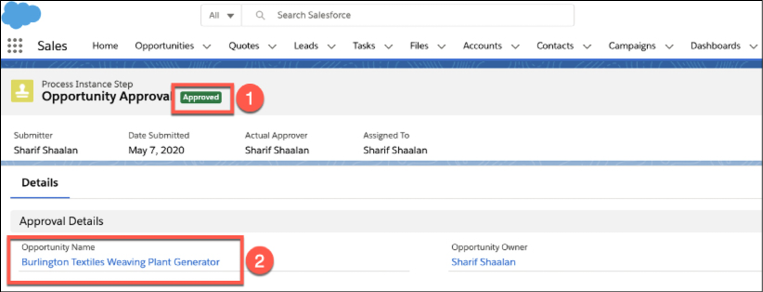
Figure 17.18: Opportunity with approval status highlighted
From the preceding screenshot, we can see that the opportunity has been approved (1).
- Let’s click on Opportunity Name (2) to see if the field update has worked. As we can see, we have been navigated back to the opportunity:

Figure 17.19: Opportunity stage after an opportunity is approved
The opportunity automatically changed to Closed Won when it was approved by the sales manager.
- Finally, let’s scroll down to see the Approval History one more time:

Figure 17.20: Approval status displayed in the Approval History section
As you can see, Step 1 has now changed from Pending to Approved.
Now that we have tested the business use case successfully, let’s go over what we have learned in this chapter.
Summary
In this chapter, we learned what approval processes are and the use cases for building approvals into our business processes. We learned how to create an approval process and define the entry criteria and select an approver. We also learned how to view approval steps, as well as add various actions based on submitting, approving, rejecting, and recalling the record.
With the use of these skills, you should be able to come up with checks and balances that control various aspects of the business process flow, as well as apply technical solutions for the approval-related requirements that come from your users. In the next chapter, we will look at a different automation tool available in Salesforce, assignment rules.
Questions
- What is the difference between the Jump Start Wizard and the Standard Setup Wizard?
- Are you able to have more than one approver on an approval process?
- Why does the record lock for editing when a user submits it for approval?
- How are the approval process and workflow rule actions similar?
- What happens to the editability of a record if a user recalls it from an approval?
- What is the last step needed for an approval process to be live and working?
- Where can an approver see all items needing approval that have been assigned to them?
Further reading
- Setting up an Approval Process:https://help.salesforce.com/articleView?id=approvals_getting_started.htm&type=5
- Submitting a Record for Approval from a Process: https://help.salesforce.com/articleView?id=process_action_submit.htm&type=5
Join our community on Discord
Join our community’s Discord space for discussions with the authors and other readers: https://packt.link/rlptF
