
16
Salesforce Flow
Salesforce Flow is a powerful tool that allows administrators to create automations and guided business processes without having to write code. You can build these powerful automations using a canvas called Flow Builder.
In this chapter we will cover:
- Introducing flow types
- Understanding Flow Builder elements
- Testing a flow
- An example of a screen flow
- An example of a record-triggered flow
- Basic best practices
We are just scratching the surface of what is possible with this tool. Flows are the future of admin-built automation, and while Salesforce previously had two other automation tools, called Workflows and Process Builder, they will be phased out over the coming years.
Salesforce Flow is an important and powerful tool for any Salesforce administrator, so you can expect this chapter to take some more time to complete. Have patience and take breaks as you work through it.
Technical requirements
For this chapter, log in to your development org and follow along with the screenshots provided. When we reach the two example flows in this chapter, it is important that you follow along and build your own flow; this will significantly help familiarize yourself with the process.
What is a flow?
Flows are automations that can be built without having to write code. They consist of series of steps, with branching decision logic, where you can define when and what you want a system to do. Below, you can see an example of a flow that we will build later in this chapter:

Figure 16.1: Example of a flow
As you can see from Figure 16.1, this flow contains steps for an input screen, a decision that splits down two pathways, and an action that is performed before completing. We can also see that the flow consists of various elements, such as Decision, Assignment, and Create Records. These are categories from which we pick the steps a flow will follow – see more about this in Understanding Flow Builder elements.
There are several different flow types that can be used for different requirements. Salesforce will ask you to pick a flow type before you begin building a flow, so let’s go through these now.
Introducing flow types
To begin creating a flow, navigate to Flows on the Setup page, and click New Flow. When you go to create a new flow, you will be prompted to select from several types, as shown in the following screenshot:
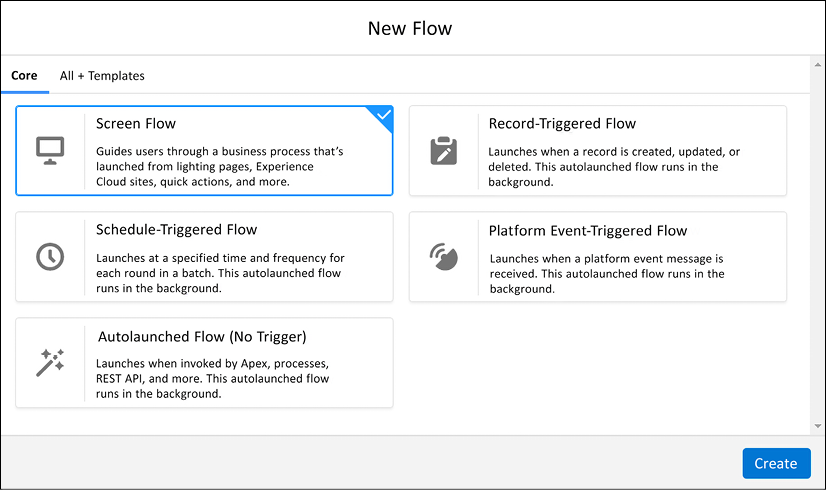
Figure 16.2: New Flow screen displaying several flow types
Each type has its own purpose and may fit different business processes or use cases better. In this chapter, we will show an example of a screen flow and a record-triggered flow, which are the two simplest types that have immediate applicability.
Screen flow
This flow type allows you to display screens to an end user to collect or show information. You can incorporate automations and database modifications within this type of flow. This flow type can be placed on Lightning pages, Experience Cloud pages, or launched from a button. An example would be if you want to quickly allow a user to enter a new account and opportunity on one screen from the Lightning utility bar. We will walk through this example later in this chapter.
Record-triggered flow
This flow type is “triggered” when a record changes. This could be on insert, update, or delete and can occur before or after an insertion or update. In contrast to the previous flow type, you cannot display screens to users in a record-triggered flow. An example of when you would use this flow type would be if you wanted to automatically generate a task for an intro call assigned to the account owner whenever a new account is created. We will walk through this example later in this chapter.
This type of flow is what you would use to replace any processes built with Process Builder and can be a substitute for Apex triggers in the right situations.
When you choose to have a record-triggered flow fire on the creation or update of a record, you can optimize the flow for Fast Field Updates or Actions and Related Records. Fast Field Updates is going to make the modification to the record before an insertion or update, whereas Actions and Related Records is going to fire after an insertion or update. Use Fast Field Updates if you are only updating the record that triggered the flow. Use Actions and Related Records if you need to do other actions or update other records in the system.
Schedule-triggered flow
A schedule-triggered flow runs on a predefined schedule (once, daily, or weekly) and is useful for when you want to run some sort of operation against a set of records on a regular basis.
Platform event-triggered flow
This is a more advanced flow type that fires based on platform events being published. This flow type is outside the scope of this book and won’t be covered here.
Autolaunched flow (no trigger)
An autolaunched flow can be called by Apex, the REST API, and other flows. It does not have any user-interface elements. This is a more advanced flow type that will not be covered in this book.
Now that we have covered the various flow types to choose from, let’s talk about the elements you will see once you reach the Flow Builder. If you remember from earlier, these elements contain all the steps we will need to build a flow.
Understanding Flow Builder elements
After you select your flow type, you will be taken to the Flow Builder canvas where you can add elements by clicking the “+” symbol. Flow elements are all the items you can place within a flow that have different purposes. They represent the “steps” of a flow. As you can see in the following screenshot, they are organized into three main categories:

Figure 16.3: Elements pane on the Flow Builder page
In this section, we will go through each of these categories in turn:
- Interaction elements are ways that a flow can interact with users or other automations in Salesforce, including Apex classes and other flows.
- Logic elements are used to design the path of your flow. These elements are where you will have your business logic to determine what screens users see and what data gets updated.
- Data elements are what we use to make changes to Salesforce data.
We will also cover flow resources, which are a separate but related concept to elements. First, let’s begin with interaction elements.
Interaction
Interaction elements are how flows interact with users (via screens) or other automations within Salesforce. These interactions can be broken down into three elements:
- Screen: Flows can present a screen to the user. You can place display text, user inputs, and much more on each screen. These are referred to as input or display components. Note that this element is only available in screen flows.
- Action: These are quick actions, custom Apex actions, and standard actions that can perform more complex tasks. One example is the ability to automatically send an email from a flow using the standard Send Email action.
- Subflow: You can use this element to call another flow. This is very helpful if you have a lot of complex logic and want to break it into smaller compartmentalized pieces. Utilization of subflows is a more advanced design technique that, while being the best practice for complicated flows, is beyond the scope of this chapter.
The second element type that you can see on the Flow Builder consists of logic elements.
Logic
Logic elements are how you define when a flow should do what. Logic element types include:
- Assignment: This is the element you use to assign a value to a variable.
- Decision: Decision elements allow you to define the criteria for when to go down different paths of a flow.
- Loop: If you have a collection variable (that is, a collection of numbers, strings, or records) and need to loop through them to perform an operation on each one of them, you will use a loop. We will not be covering loops in this book.
- Collection Sort: If you have a collection variable and want to sort it by a field within that collection, you will use this element. We will not be covering Collection Sort in this book.
- Collection Filter: If you have a collection variable and want to filter the collection to a smaller collection based on some criteria, you will use this element. We will not be covering Collection Filter in this book.
Next, we will look at the third category of elements visible on the Flow Builder, which consists of data elements.
Data
Data elements are used to make changes to the database. Data element types include:
- Create Records: This will create a record or records of a specified object. You can create records using a record variable or define individual fields.
- Update Records: This will update a record or records of a specified object.
- Get Records: This will retrieve a record or records of an object based on specific criteria.
- Delete Records: This will delete a record or records of a specified object.
- Roll Back Records: This element allows you to “roll back” any data creation, updates, or deletion that have occurred earlier in your flow. This is helpful for error handling but beyond the scope of this chapter.
Now that we have gone through different element types available under the three categories in the Flow Builder, we will turn our attention to flow resources that can be used with these elements.
Flow resources
Flow resources are where you can store and define values to be used within your flow. You can use flow resources within elements. For example, you could use a variable resource in a Create Records element to set a field to a specific value. You can create resources on the Toolbox sidebar of the Flow Canvas or directly within Flow elements. There are a bunch of different resource types:
- Variable: This is a resource that allows you to store values of many different types (see resource data types in the paragraph after this list). You can set default values for variables and update variables using assignment elements. Global variables are special kinds of variable that are available by default and start with
$. These can include a representation of the record that fired a record-triggered flow, or things like the current date, or information about the user running the flow. - Constant: This is a resource that does not change throughout the flow and can be used in calculations or decision criteria. There are some global constants that you can use, such as
$GlobalConstant.EmptyString, which represents a blank value, and$GlobalConstant.Trueand$GlobalConstant.False, which representtrueandfalsevalues in a Boolean data type. - Formula: Formulas can be used in assignment and decision elements, as well as in display text on screens or as default values. They allow you to define a dynamic value based on other variable and formula calculations. We will see formulas in action in the Building the flow subsection of Example 2: record-triggered flow later in this chapter.
- Text Template: This is a way to have a rich text template with merge fields from variables in the flow, which can be used for display text or in the body of an email (as an example).
- Choice: A choice is the representation of a single choice that can be used in several input components like picklist, radio buttons, and checkbox groups.
- Collection Choice Set: A set of choices that represent a collection of records. This is beyond the scope of this chapter.
- Record Choice Set: A set of choices that represent a filtered list of records. This is beyond the scope of this chapter.
- Picklist Choice Set: A set of choices that is populated by a preexisting picklist or multi-select picklist field on an object.
- Stage: Stages can be used in screen flows to enable enhanced navigation using custom components. This is beyond the scope of this chapter.
Flow resources can be of a number of data types including text, record, number, currency, Boolean, date, date/time, picklist, multi-select picklist, and Apex-defined. Record data types represent a record of an object including all of the field values of that record. Apex-defined data types are custom-defined in Apex classes.
Now that we have explored the elements and resources available to us when building a flow, we will look at how we can test a flow before going through two examples of flows in greater depth.
Testing a flow
When building a flow you can use the Debug functionality on the Flow Builder to test your flow. This will show you details of how your flow is executed and if any errors are encountered:

Figure 16.4: Debug button on the Flow Builder page
It will be easier to understand this when we use it on a flow that we have built together, so we will see this in action in the Testing the flow sections as we step through some examples.
A quick note on flow testing: you should always build your flows in a sandbox or developer org and test them thoroughly before deploying to production. Flows are an extremely powerful tool that can wreak havoc if used incorrectly and not tested.
In the summer ‘22 release, Salesforce announced Flow Tests (in beta), which are point-and-click tests that you can construct in order to test flows in a similar way to developers testing Apex code. This will likely become the best practice over time.
Now that we have covered the basics on flow types, elements, and resources, let’s build some flows!
Example 1: screen flow
For both examples, log in to your developer org.
We will build a screen flow that allows a user to quickly enter a basic account and opportunity from one screen.
Business use case
Sales users have been complaining that it takes them too many clicks to enter a new account and associated opportunity. They want to be able to search for an existing account or create a new account and opportunity on one screen, regardless of what tab they are on in the Sales app. To do this, we will create a screen flow and make it accessible from the utility bar.
Building the flow

Figure 16.5: Navigating to the New Flow screen from the Setup page
- On the next screen, select Screen Flow and then click Create:

Figure 16.6: Selecting a flow type and creating the flow
We are now in the Flow Builder and ready to create our flow.
- Click the “+” sign and select the Screen interaction:

Figure 16.7: Adding the Screen interaction to the flow
- We are now looking at our screen interaction. We will have to give the screen and each component a label and unique API name. Let’s start by naming the screen
Account & Opportunity Input Screenand letting the API name auto-generate. Then, give it a description:
Figure 16.8: Naming and describing the screen interaction
Now let’s drag some components from the left sidebar onto the screen, placing them where we want.
- Drag the Display Text component from the left and place it on the screen, name it
Instructions, and type up some instructions for your end user:

Figure 16.9: Developing the screen by adding a component
- Next, let’s add the Section component below the display text component to break up the inputs into two columns:
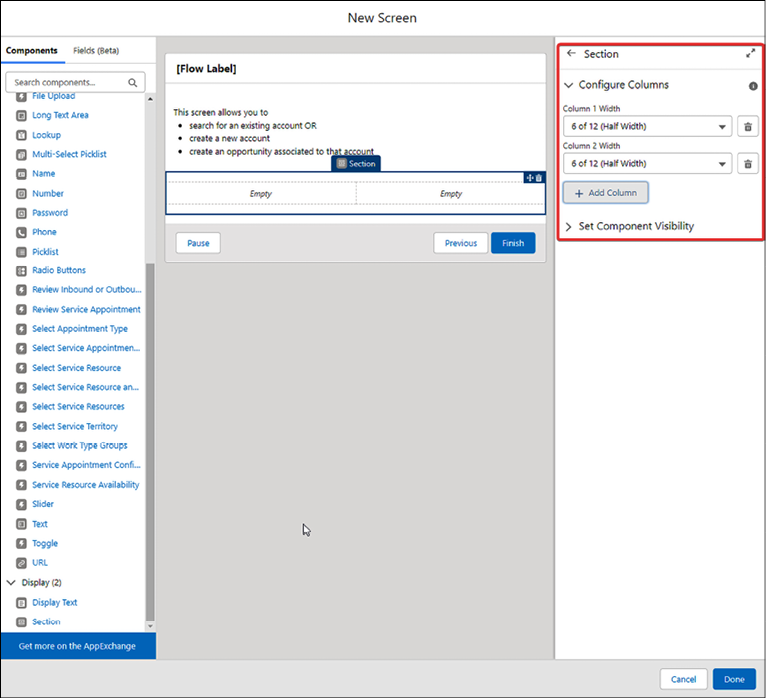
Figure 16.10: Adding another component to the screen
- Now we are going to add a “Lookup” to allow the user to search for an existing account. Drag and drop the Lookup component to the first column. We are going to have to specify what field we want this lookup component to use, so define the following:
- API Name:
AccountLookup - Field API Name:
AccountId(this is the API name of the Account lookup field on the Opportunity object) - Label:
Existing Account(this is the label that you want to display on the screen) - Object API Name:
Opportunity(this is the API name of the object where the lookup field you want to use is) - Record Id: Leave blank
- Required: Leave blank

Figure 16.11: Adding a lookup component and specifying fields
If the user does not find an existing account, we want them to be able to provide the name of the new account.
- API Name:
- We will add a Text input below the lookup. Give it the label
New Account Nameand let the API Name autofill. - Next, we are going to make this component visible only if the lookup input does not have a value. This way, if a user finds a matching existing account, they will not be asked for the name of a new account:
- Expand Set Component Visibility.
- Change When to Display Component to All Conditions are Met.
- Click New Condition.
- Select Resource, the Account Lookup screen component, and Record Id.
- Set Operator to Is Null.
- Select the value of Global Constant True.
- Click Done:

Figure 16.12: Configuring the visibility of the lookup component
This means that the New Account Name text input will only show up if the value of that lookup is
null(which means they have not found and selected an existing account).You could add additional fields to capture additional account information if you so choose, but we will move on to the opportunity information.
We are going to drag the following components into the second column in our section using the names and attributes below.
- Drag the Text component to the second column and fill in the following details:
- Label:
Opportunity Name - API Name:
Opportunity_Name - Require: Checked (true)
- Label:
- Do the same for the Currency component:
- Label:
Opportunity Amount - API Name:
Opportunity_Amount - Require: Checked (true)
- Label:
- And finally, the Date component:
- Label:
Close Date - API Name:
Close_Date - Require: Checked (true)
Your screen should now look like the following screenshot:

Figure 16.13: Developing the screen interaction with components
Optionally, you can control whether to display the header or not, as well as some buttons that affect how users navigate the form. For this flow, let’s hide the Header, the Previous button, and the Pause button:
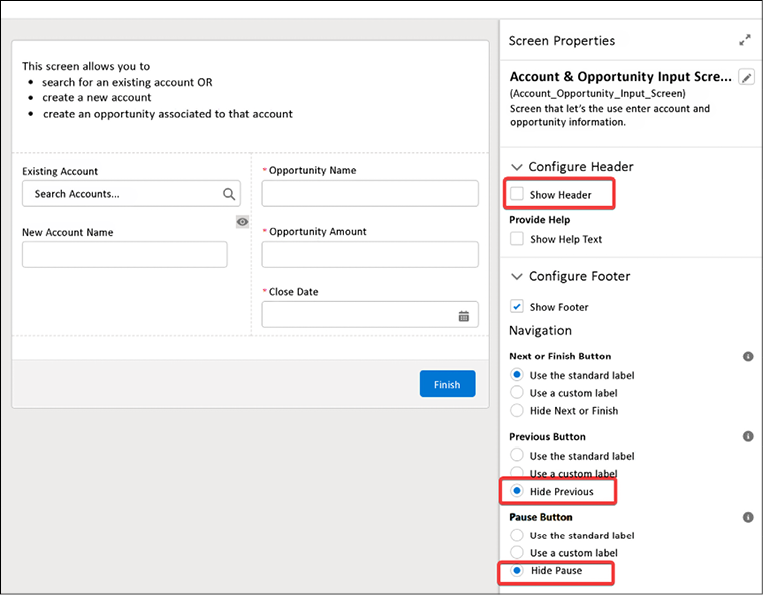
Figure 16.14: Setting the visibility options for the screen
- Label:
- Click Done in the bottom right. We have now created our screen! We still have to create the records, but first, let’s save the flow.
- Click Save in the top-right corner and name your flow
Account & Opportunity Quick Createand give it a description. Click Save. After each change, you should save your flow as there is no auto-save feature.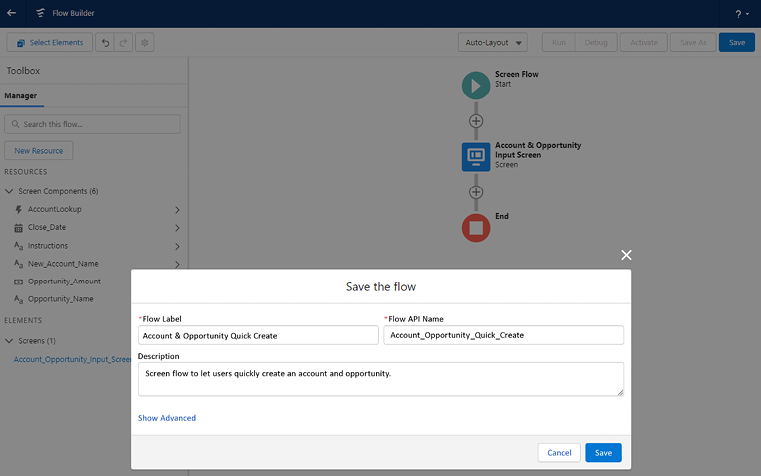
Figure 16.15: Naming the flow and its API before saving
There are now two different “paths” we can take. If the user specified an existing account, we should only create an opportunity and associate it with that selected account. If the user defined a new account name, we will create that account, then create the opportunity, and associate it to the just-created account.
To do this, we will use a decision element to determine whether an account needs to be created.
- Click the “+” sign below the screen we just created and select Decision:
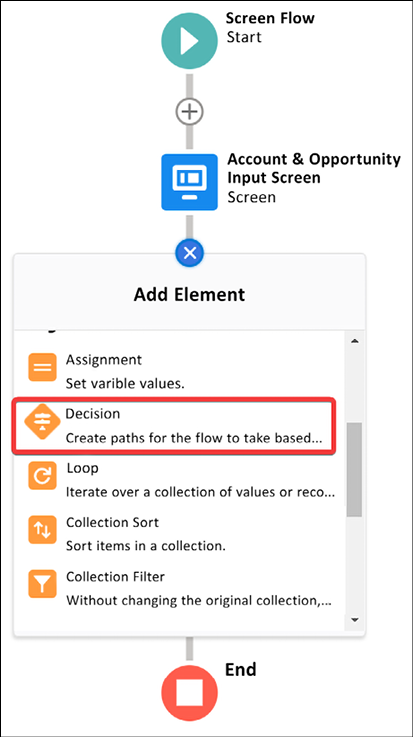
Figure 16.16: Selecting a new element for the flow
- Give your decision a label, name, and description:
- Label:
New or Existing Account - API Name:
New_or_Existing_Account - Description:
Determines whether the user selected an existing account or wants to create a new one.
On this decision screen, we see what are called “outcomes.” These are the different “paths” that our flow can go down. We will define two outcomes, one for where they selected an existing record in the lookup, and one for where they did not.
- Label:
- Enter the following for the first outcome:
- Label:
Selected Existing Account - Outcome API Name:
Selected_Existing_Account - Condition Requirements to Execute Outcome:
All Conditions Are Met (AND) - Condition(s):
- Resource: Account Lookup > Record Id (select using your mouse)
- Operator: Is Null
- Value: $GlobalConstant.False (select using your mouse)
This means that we will go down the Selected Existing Account outcome if they populated the lookup:

Figure 16.17: Configuring a possible outcome of the Decision component
- Label:
- Next, change the label of the Default Outcome to be
New Account. This will execute if the first outcome does not evaluate toTRUE. Then, click Done:
Figure 16.18: Setting the alternative outcome of the Decision element
After you do this, you will see that the flow now branches down two paths: one for where the user selected an existing account, and one for where the user wants to create a new account. (Reminder: click Save on your flow after each step.)
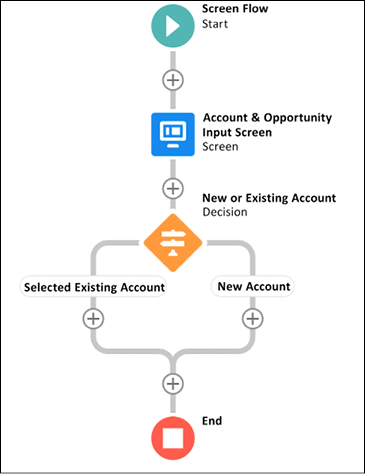
Figure 16.19: Overview of the flow showing two paths created by the Decision element
- Let’s work on the on the path where we need to create a new account. Click the “+” button in the New Account path and select the Create Records element:

Figure 16.20: Adding a Data element to one of the Decision pathways
- Populate the following:
- Label:
Create New Account - API Name:
Create_New_Account - Description:
Creates a new account - How Many Records to Create: One
- How to Set the Record Fields: Use separate resources, and literal values
- Object:
Account - Set Field Values for the Account:
- Field:
Name - Value: Under Screen Components select New Account Name. This is the value that the user provided in the New Account Name input component.
- Field:
If you are collecting any additional account information you can Add Field and map the field value from the input component you put on the screen.
- Label:
- Then, click Done:

Figure 16.21: Filling in fields for the Create Record component
This will create an account if the user wants to add a new account.
The next thing we are going to do is assign a value to a variable. We are going to create a variable to represent the account Id. In the path where they selected an existing account, we will set the variable to that selected account. In the path where we created a new account, we are going to set the variable to the account that is being created in the flow.
- First, let’s set up the variable. Click New Resource in the left-side toolbar:
- Resource Type:
Variable - API Name:
varAccountId - Description:
Id of account that was found or created. - Data Type:
Text
Leave everything else as is.
- Resource Type:
- Click Done:

Figure 16.22: Creating a variable to represent an account
Now this variable exists, and we can assign values to it.

Figure 16.23: Adding the Assignment component from the Logic element
- Set up the Assignment element as follows:
- Label:
Assign Existing Account Id - API Name:
Assign_Existing_Account_Id - Description:
assigns the account id of the identified existing account to the variable - Set Variable Values:
- Variable:
varAccountId - Operator: Equals
- Value:
Account Lookup > Record Id
- Label:
- Click Done:

Figure 16.24: Filling fields for the Assignment element
So now, if we go down the path of Selected Existing Account, that existing account’s Id will be the value of the varAccountId variable.
But what if we go down the New Account path? In this situation, we want to set varAccountId to be equal to the Id of the account we just created!
- To do this, click on Create New Account from the Create Records element that already exists and click Edit Element:

Figure 16.25: Editing the component on the other pathway of the Decision element
- At the bottom of this page, select Manually assign variables, which is going to allow us to store the Id of the created record in a variable. Populate the Variable lookup by selecting varAccountId. Then click Done:
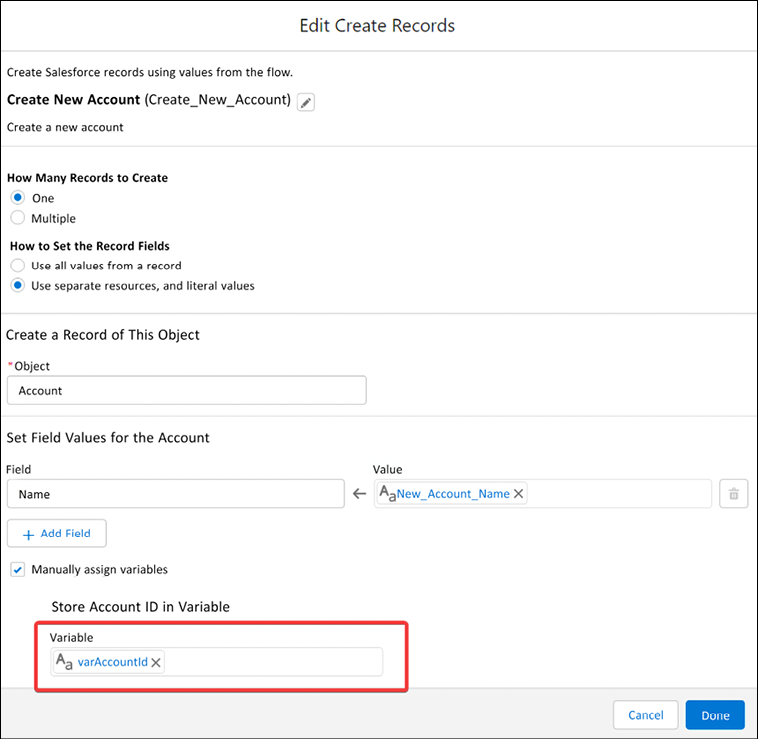
Figure 16.26: Editing the Create New Account pathway to store the account Id in the varAccountId variable
So now, regardless of whether we are selecting an existing account or creating a new account, the varAccountId variable has the right account Id in it!
- The next step is to create the opportunity record. Where the two branches merge back together, select the “+” and choose the Create Records element:
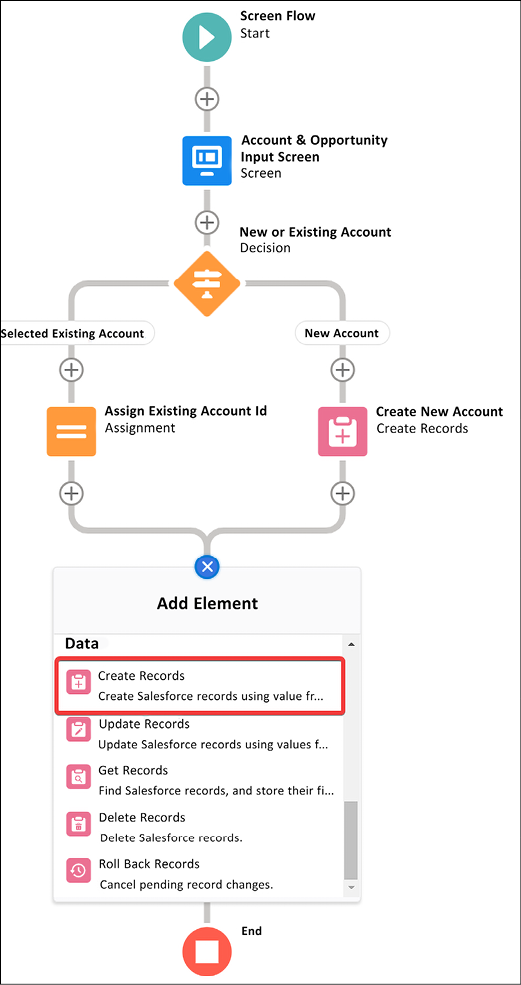
Figure 16.27: Adding a new element after the Decision pathways
- Populate the Create Records element with the following information:
- Label:
Create Opportunity - API Name:
Create_Opportunity - Description:
Creates the opportunity - How Many Records to Create: One
- How to Set the Record Fields: Use separate resources, and literal values
- Object: Opportunity
- Set Field Values for the Opportunity:
- To set Name:
- Field:
Name - Value:
Opportunity_Name(screen component)- To set Amount:
- Field:
Amount - Value:
Opportunity_Amount(screen component)- To set Close Date:
- Field:
Close Date - Value:
Close_Date(screen component)- To set Account Id:
- Field:
AccountId - Value:
varAccountId(this is the variable we assigned a value to in the previous steps)- To set Stage:
- Field:
StageName - Value:
Prospecting
- Label:
- Check that your screen looks like Figure 16.28. Then, click Done:

Figure 16.28: Configuring the Create Records component
This element will create our opportunity with the information provided by the user on the screen, as well as the account Id from either the selected account or the new account, and set the stage to Prospecting.
Make sure to Save your flow. And now, we have built our flow! Let’s review what we have done:
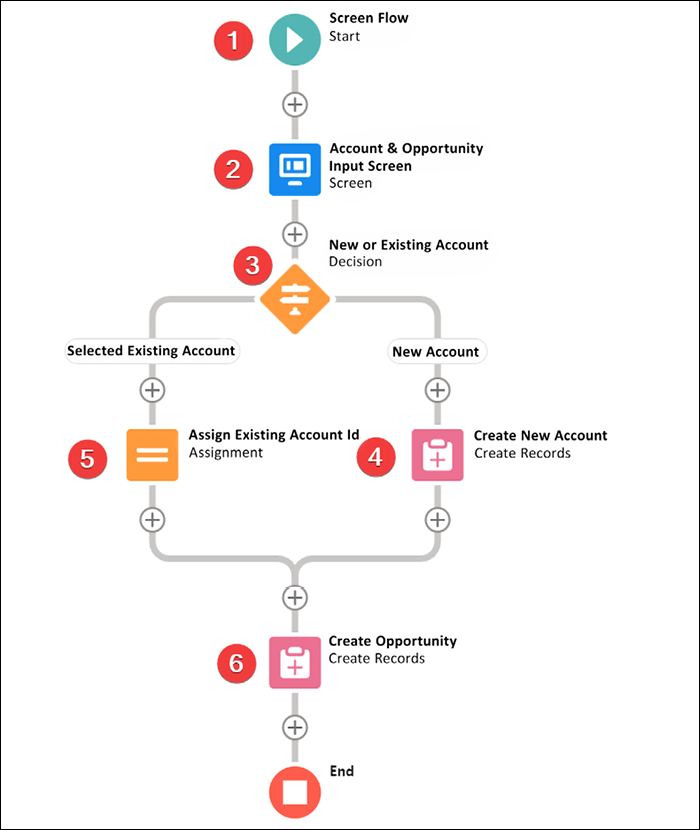
Figure 16.29: Overview of the completed flow
- The flow starts (we will get to how and where in a future step).
- The user is presented with a screen where they can look up an existing account or create a new one and enter some basic opportunity information.
- The flow determines whether the user entered an existing account or wants to create a new one.
- If the user wishes to create a new account, we create the account record and store the Id of the created account in a variable called varAccountId.
- If the user selected an existing account, we assign the Id of that existing account to the varAccountId variable.
- We create the opportunity with the information the user entered on the screen and with the account Id that is stored in varAccountId.
Now it is time to test what we have built.
Testing the flow
To test your flows, use the built-in debug tool by clicking Debug at the top-right:

Figure 16.30: Clicking Debug on the Flow Builder page
If there are input variables you can define them in the next step; otherwise click Run. When testing your flow, you should try to test every path. So for our example, let’s test the path where we select an existing account first:
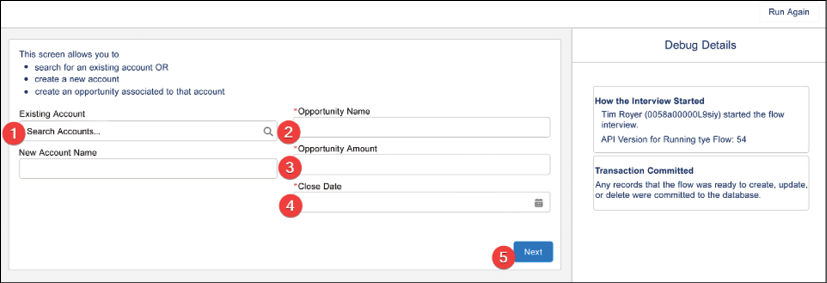
Figure 16.31: Testing the Select Existing Account pathway
- Find an existing account in your developer org and select it. When you do, you should see the New Account Name field disappear.
- Enter an opportunity name.
- Enter an opportunity amount.
- Enter a close date.
- Then click Next:

Figure 16.32: Entering an existing account into the flow
On the right sidebar under Debug Details, you will see all of the elements of the flow that you defined and the results of each step. If there are errors, they will be reflected here.

Figure 16.33: Reviewing the Debug Details pane
Let’s run it again (select Run Again at the top-right). This time create a new account instead:

Figure 16.34: Testing the other pathway of the flow
It should have run again without any issues, but if any were encountered, you will see them reflected in the Debug Details on the right-hand side.
- Resolve any errors and save your flow.
Now that the flow has been tested, we are ready to activate it and distribute it.
Distributing the flow
Once a flow has been tested you can activate it by clicking Activate at the top-right of the Flow Builder. After you activate the flow, if you want to make changes, you’ll have to click Save As and activate a new version.
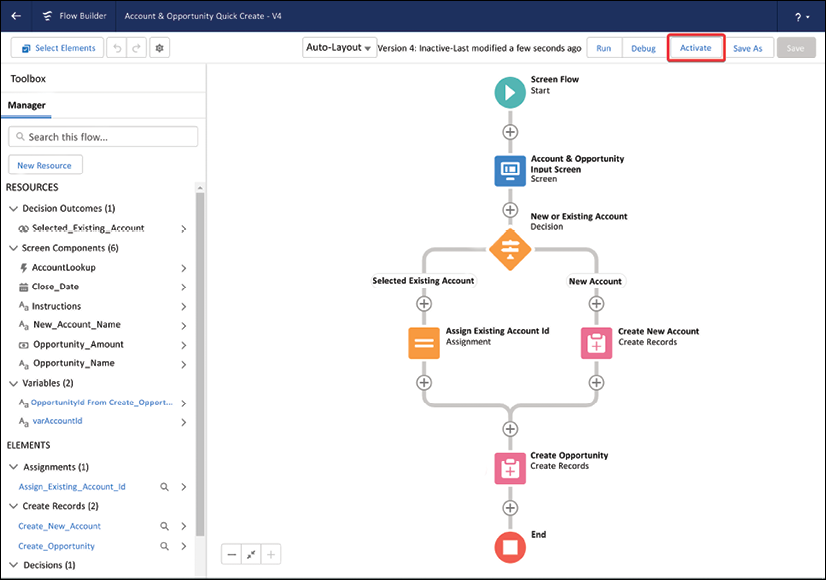
Figure 16.35: Activating the flow to use in our apps
Now that the flow is active, we can use it in our Lightning apps. Screen flows can be placed directly on a Lightning page using the Lightning App Builder, or on an Experience Cloud page. For this example, because we want the sales reps to be able to use this screen flow from anywhere in the Sales app we are going to add it to the utility bar:
- Go back to Setup.
- Go to App Manager.
- Find the Sales (Developer name: LightningSales) app, click the dropdown, and select Edit:
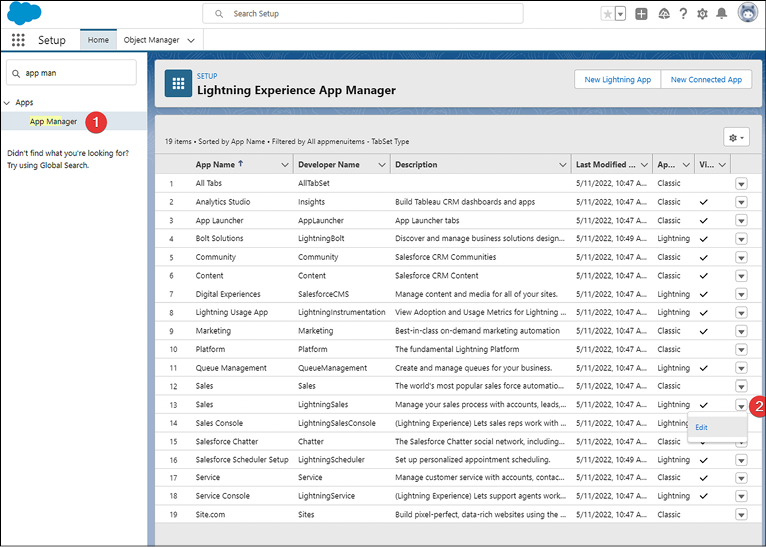
Figure 16.36: Selecting the Sales app in the App Manager for editing

Figure 16.37: Adding an item to the utility bar for the Sales app
- In the Search box, select Flow:
- You can now define the properties of the Flow utility item:
- Label:
Account & Opportunity Quick Create - Icon: Select an icon
- Panel Width:
480 - Panel Height:
480 - Flow: Account & Opportunity Quick Create (this is the flow we created)
- Layout: One Column
- Label:

Seeing it in action
We have now created a flow and distributed it by putting it on the utility bar in the Sales app. Let’s see what it looks like for end users:
- Navigate out of setup and go to the Sales app using the app launcher.
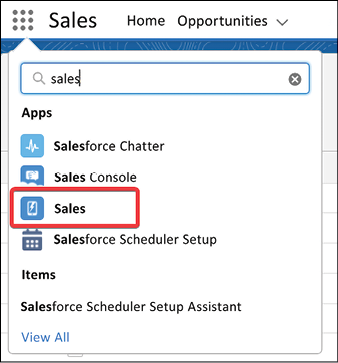
Figure 16.39: Selecting the Sales app so we can find the flow
- Once you are in the app, you should see your utility bar at the bottom now has an Account & Opportunity Quick Create action. When you click on it, you will see the flow you built. Go ahead and try it out!

Figure 16.40: Flow appearing at the bottom left of the app screen
We just successfully built a flow that will make it easier for sales reps to quickly enter account and opportunity information from anywhere in the Sales app. You can add additional fields to the flow (on the screen element and create record elements) to collect additional information.
Example 2: record-triggered flow
We will build a record-triggered flow to create different tasks for a user based on account type.
Business use case
Account managers are very busy. They would like to automatically have tasks generated for them when a new account is created. This task should be for them to onboard customers and partners.
Customer accounts should have an onboarding process that includes the user who created the account doing the following actions:
- Sending a “welcome” email, due one week after account entry
- Following up with a phone call, one week after the welcome email
Meanwhile, partner accounts should have an onboarding process that includes the user sending a “partner agreement” email within one week of account entry.
For now, we will just generate tasks for the user who entered the account, but if we wanted to enhance the process even further, we could send those emails out automatically using flows.
Building the flow
- Go to Setup > Flows and click New Flow.
- Select Record-Triggered Flow and click Create:
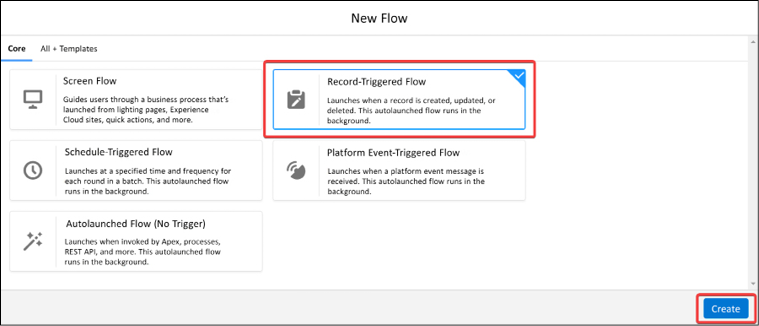
Figure 16.41: Selecting a flow type from the New Flow page
You will notice that we now see something different than when we were creating a screen flow. When we created the screen flow it took us directly to the Flow Builder canvas. For a record-triggered flow we are going to have to configure the start element first.
- Here, we define what is going to trigger our flow, as in, what update/insert/deletion to which object should cause the flow to fire? For our purposes, we want this flow to fire any time an account is created where the Type field value equals partner or customer. So set the configuration of the start element as follows:
- Object:
Account - Configure Trigger: A record is created
- Set Entry Conditions:
- Condition Requirements: Any Condition Is Met (OR)
- Conditions:
- Type Equals
Customer – Direct - Type Equals
Customer – Channel - Type Equals
Channel Partner / Reseller - Type Equals
Installation Partner - Type Equals
Technology Partner - Optimize the Flow for: Actions and Related Records
Your screen should look like the following screenshot:
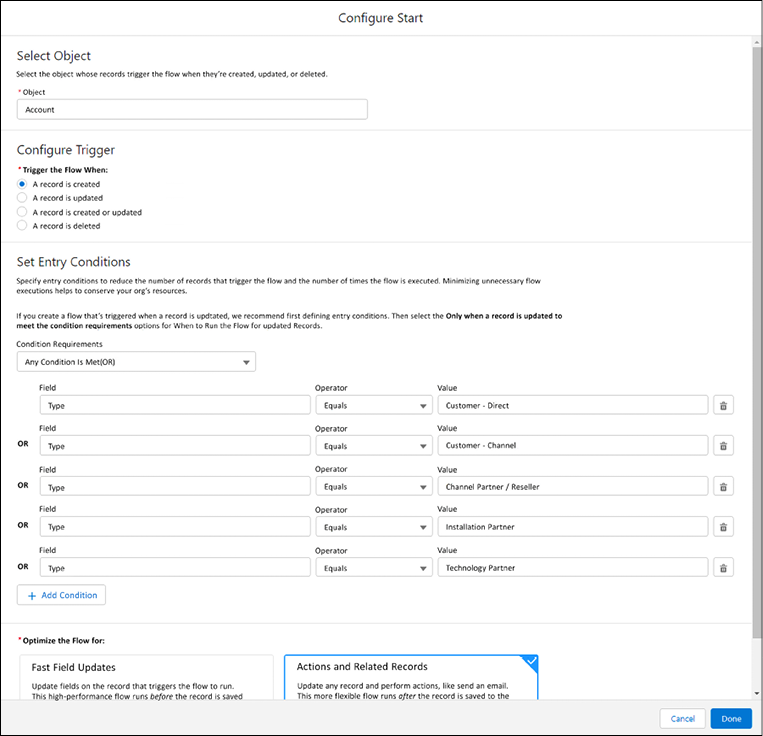
Figure 16.42: Defining the trigger for the flow
What we have done here is set up this flow to run when an account is created if it has a type of one of those five values (if you have modified the Type picklist on the Account you might have different values).
We are optimizing the flow for Actions and Related Records because we are going to create other records as part of this flow. Fast Field Updates would be used if we were just updating fields on the Account itself.
- Object:
- Click Done, and that will bring you to the Flow Builder canvas.
- Save your flow with the name
Account: Create Onboarding Tasksand give it a description. Remember to save your flow after each step. - The first thing we are going to want to do is to determine whether this account is a partner or a customer so that we can create the right tasks.
- Click the “+” and create a Decision element:
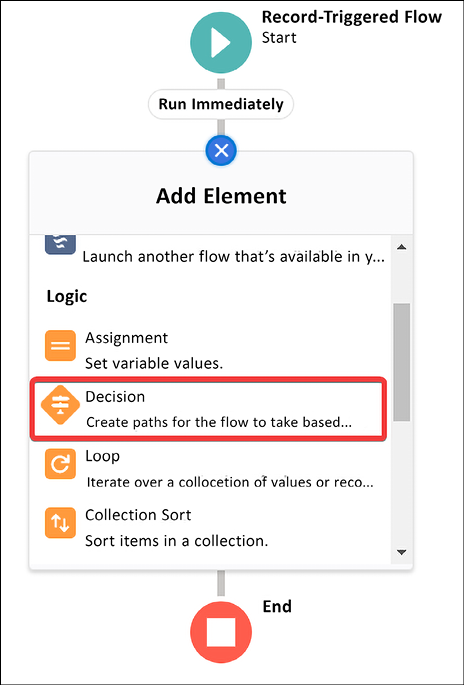
Figure 16.43: Adding a Decision element to the flow
- Set up the decision as follows:
- Label:
Customer or Partner - API Name:
Customer_or_Partner - Description:
Is this a customer account or a partner account? - First Outcome:
- Label:
Partner Account - API Name:
Partner_Account - Condition Requirements to Execute Outcome: All Conditions Are Met (AND):
- Label:
- Second Outcome (Default):
- Label:
Customer Account
- Label:

Figure 16.44: Setting the two outcomes of the Decision element
- The first outcome will execute if the account type contains the text
Partner, and the second outcome will execute in all other cases.
If you think back to when we set up the Start element, ONLY accounts that have specific partner or customer types will enter this flow, so every account that is not a partner will be a customer.
- Label:
- Click Done.
Now we have two branches, one for partner accounts and one for customer accounts. Let’s set up the partner account branch first. Thinking back to our business requirements, when a new partner account is created, the system should automatically generate one task for the user who entered the account to remind them to send the partner agreement with a due date one week after the account is entered.
Before we move on to the generation of the tasks, let’s create the formulas we will use for due dates. We need one formula to give us the date one week from now and another formula to give us the date two weeks from now:
- On the left-hand side click New Resource:

Figure 16.45: Adding a resource to the flow from the Flow Builder
- Select a Formula resource type and configure it as follows:
- Click Done:

Figure 16.46: Configuring the added resource for the flow
- Repeat step 12 but create a formula resource called
fxTodayPlusFourteenand change the formula to add 14 days instead of 7 days:
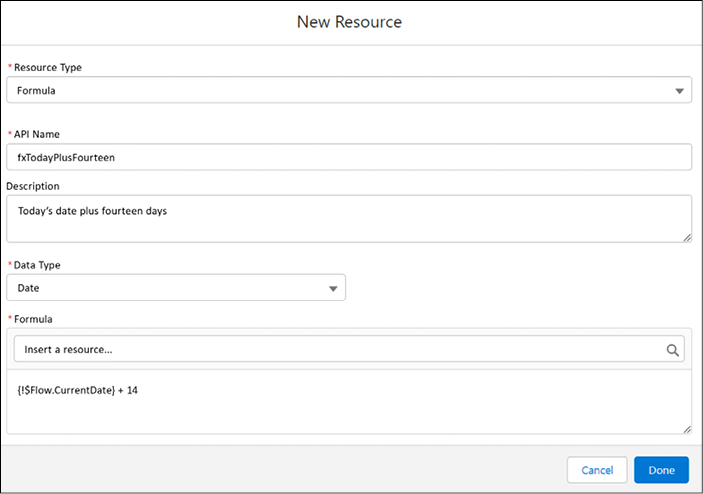
Figure 16.47: Creating a second formula resource
- We will use these two formula resources in our task creation to set due dates. Let’s move on to the task creation.
- Click the “+” in the Partner Account path and select Create Records:
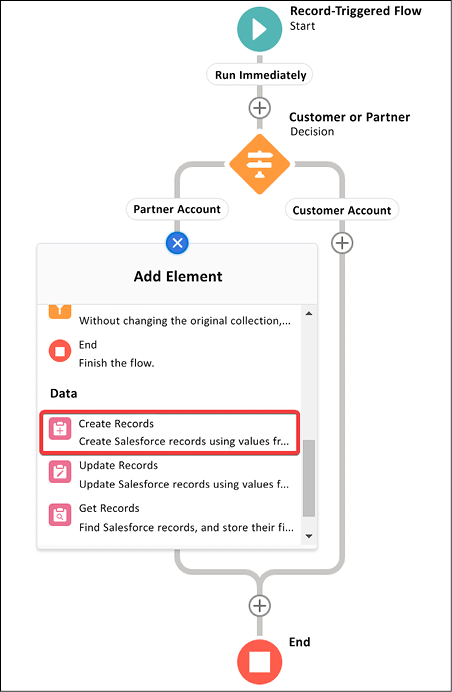
Figure 16.48: Adding a Data element to the flow
- Configure the Create Records element as follows:
- Label:
Create Partner Onboarding Task - API Name:
Create_Partner_Onboarding_Task - Description:
Creates a task for the account owner to send the partner agreement with a due date of one week from today - How Many Records to Create: One
- How to Set the Record Fields: Use separate resources, and literal values
- Create a Record of This Object:
Task
- Label:
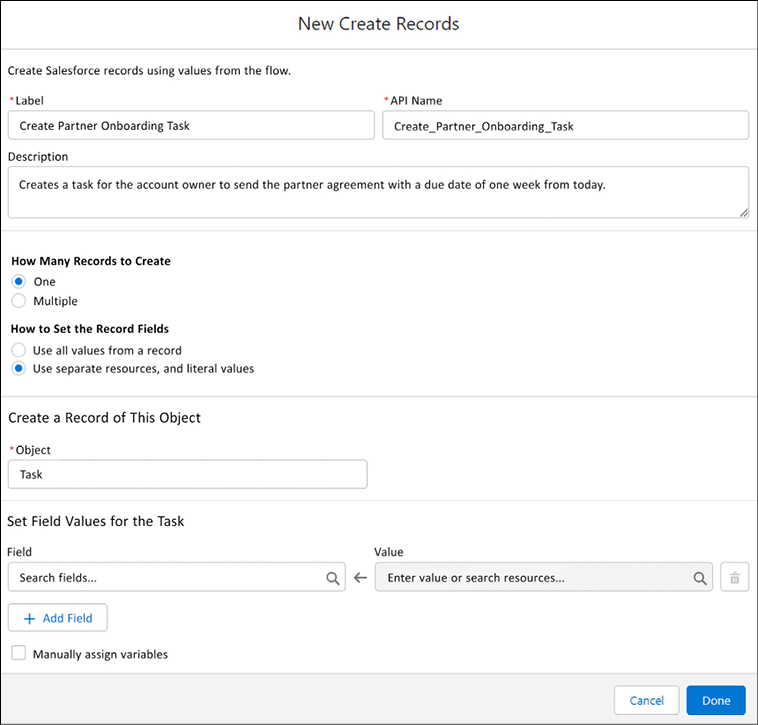
Figure 16.49: Configuring the Create Records component
- Now we are going to assign the field values for the task we are creating:
- To set Subject:
- Field:
Subject - Value:
Send Partner Agreement
- Field:
- To set Owner / Assigned To:
- Field:
OwnerId - Value:
$User > Id(this will be set to the Id of the user who triggered the flow)
- Field:
- To set WhatId (this is the record the task is associated with):
- Field:
WhatId - Value:
$Record > Id(this will set it to the Id of the record that triggered the flow, the account in our case)
- Field:
- To set the due date (ActivityDate):
- Field:
ActivityDate - Value:
fxTodayPlusSeven
- Field:
- You can optionally set other task field values.

Figure 16.50: Filling the field values for the added component
- To set Subject:
- Click Done. Now let’s deal with the tasks that should be created for a new customer account.
- Click “+” under the Customer Account path and select Create Records:

Figure 16.51: Adding a Data element to the Customer Account pathway
- Configure the Create Records element as follows:
- Label:
Create Welcome Email Task - API Name:
Create_Welcome_Email_Task - Description:
Creates a task for user to send welcome email due one week from now - How Many Records to Create: One
- How to Set the Record Fields: Use separate resources, and literal values
- Create a Record of This Object:
Task
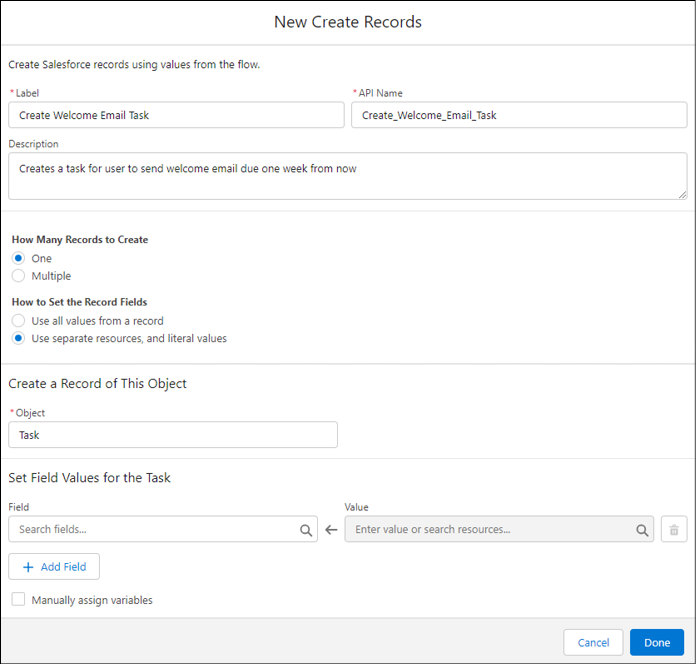
Figure 16.52: Configuring the element added to the flow
- Label:
- Now we are going to assign the field values for the task we are creating:
- To set Subject:
- Field:
Subject - Value:
Send Welcome Email
- Field:
- To set Owner / Assigned To:
- Field:
OwnerId - Value:
$User > Id(this will be set to the Id of the user who triggered the flow)
- Field:
- To set WhatId (this is the record the task is associated with):
- Field:
WhatId - Value:
$Record > Id(this will set it to the Id of the record that triggered the flow, the account in our case)
- Field:
- To set the due date (ActivityDate):
- Field:
ActivityDate - Value:
fxTodayPlusSeven
- Field:
- You can optionally set other task field values.

Figure 16.53: Configuring fields for the Create Records component on the Customer account pathway
- To set Subject:
- Click Done.
- Now we want to create another task due 2 weeks from today to remind the user to follow up with a phone call. Select the “+” below the element we just created and select a new Create Records element:

Figure 16.54: Adding a second Create Records component to issue a reminder to the user
- Configure the Create Records element as follows:
- Label:
Create Followup Phone Call Task - API Name:
Create_Followup_Phone_Call_Task - Description:
Creates a task for user to make a follow-up phone call - How Many Records to Create: One
- How to Set the Record Fields: Use separate resources, and literal values
- Create a Record of This Object:
Task

Figure 16.55: Configuring the new Create Records component
- Label:
- Now we are going to assign the field values for the task we are creating:
- To set Subject:
- Field:
Subject - Value:
Follow-up Phone Call
- Field:
- To set Owner / Assigned To:
- Field:
OwnerId - Value:
$User > Id(this will be set to the Id of the user who triggered the flow)
- Field:
- To set WhatId (this is the record the task is associated with):
- Field:
WhatId - Value:
$Record > Id(this will set it to the Id of the record that triggered the flow, the account in our case)
- Field:
- To set the due date (ActivityDate):
- Field:
ActivityDate - Value:
fxTodayPlusFourteen
- Field:
- You can optionally set other task field values.
- To set Subject:

Figure 16.56: Configuring fields for the new Create Records component
- Click Done.
Save your flow again. We have built the flow and now it’s time to test and distribute. But first, let’s recap:

Figure 16.57: Overview of the completed flow
- This is a record-triggered flow that fires on account creation if the account type is partner or customer.
- We determine whether this is a partner or customer account.
- If it’s a partner account, we create a task to send the partner agreement.
- If it’s a customer account, we create a task to send the welcome email.
- Then we create a task for a follow-up phone call (again just for the customer account).
There are several ways we could have done this, and as your flow skills evolve you will realize that what we just did was not the most efficient way. We could have used formulas to determine task subjects and eliminate one of the Create Records elements.
Once you are advanced enough in your learning to be able to use record collection variables, you will want to do inserts or updates of the same object using one Create Records element (rather than the two we used down the customer account path).
Testing the flow
Now we will test the flow using the debug feature. Click Debug in the top-right corner:

Figure 16.58: Selecting Debug from the Flow Builder
Select an existing customer account and see how the debug tool highlights the path the flow went down:

Figure 16.59: Debugging one pathway of the flow
Then debug the flow again with a partner account (you may have to create or update an existing account’s type in your org to do this).
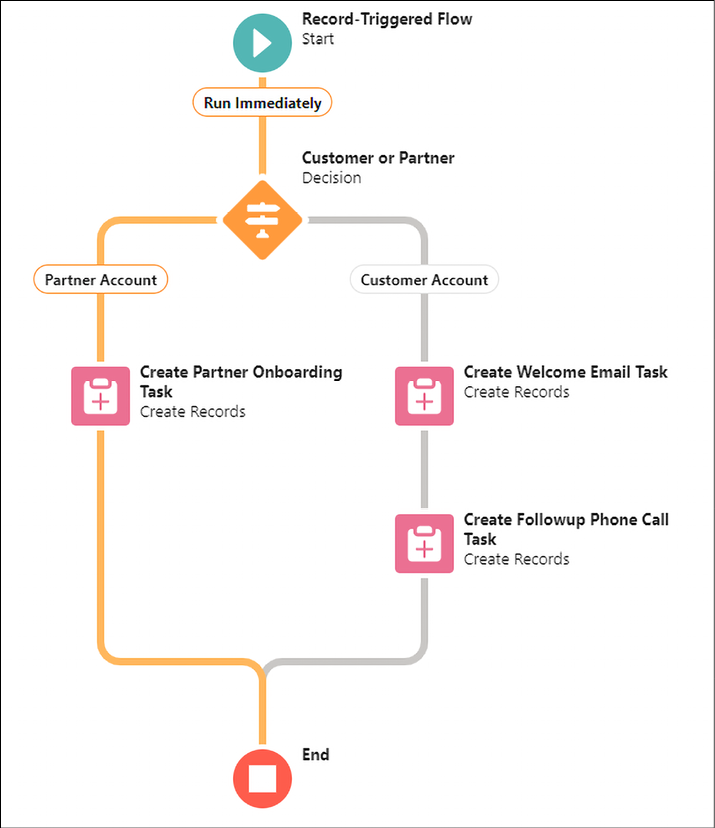
Figure 16.60: Debugging the Partner Account pathway of the flow
Resolve any errors you find when running the debug. Once everything looks good, we are ready to distribute.
Distributing the flow
Record-triggered flows are different from screen flows. Screen flows generally need to be placed somewhere in the UI (record page, utility bar, button, etc.) to be usable. A record-triggered flow fires automatically based on record updates, inserts, and deletes depending on how it is configured. So all we have to do is Activate the flow:
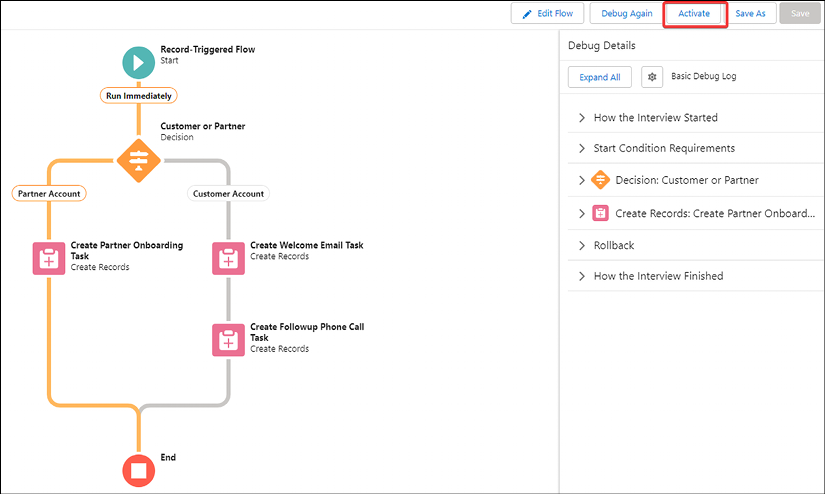
Figure 16.61: Activating the flow without having to place it in a Lightning app’s UI
Seeing it in action
Now that the flow is active, go ahead and see it in action. Get out of Setup and go create a couple of accounts, making sure that you are selecting relevant account types on creation. You should see tasks get automatically generated related to these accounts.
Great work! You have just made your users’ lives easier.
Best practices and more
We just covered the very basics of Salesforce Flow. It is an incredibly powerful tool and should be used carefully. There are tons of great blogs, Trailheads, and learning materials out there for you to develop your skills further. Here are some basic best practices (there are more best practices once you become familiar with loops, record collections, and other advanced topics):
- Be descriptive: Put descriptions in all your flow elements. It will help you and others when you have to go back to make updates or troubleshoot. Just as a developer should put comments in their code, a flow builder should use robust descriptions.
- Naming conventions: Use naming conventions for your flow resources. It makes it easier to navigate a flow and understand what is happening. The conventions used do not matter much, as long as you are consistent. Here is an example of a naming convention for flow resources:
- Variable:
var[name](varAccountIdwas an example we used earlier) - Constant:
c[name] - Formula:
fx[name](see the formulas in Example 2: record-triggered flow, such asfxTodayPlusSeven) - Text Template:
tt[name] - Stage:
st[name]
- Variable:
- Test, test, then test again: You should build flows in sandboxes and test them thoroughly before deploying. Test them using the debug tool. Test them with actual records and by walking through the business processes (in a sandbox). Have others test them too; it is easy to break stuff with a tool like this.
- Think like a developer: If you want to become great at building flows, you need to think like a developer. Flow is a development tool, just one that does not require you to know (much) syntax. To use it effectively, you should get comfortable with the basic coding concepts of variables, loops, and logic statements. Going further and understanding how triggers, classes, and methods work will allow you to build flows that do incredible things.
With these best practices in mind, it is also worth noting that there is a considerable amount more to learn. Here are some things that we did not cover:
- Other flow types besides screen flows and record-triggered flows
- How to do proper error handling in your flow
- Collections
- Asynchronous (not real-time) processing using:
- Scheduled paths
- Asynchronous paths
- How to break up flows into subflows and utilize input and output variables
- System limits and how to efficiently build flows so you do not run into them
- Using actions and invocable methods to do more complex processing or call out to external systems
There is so much to this tool that an entire book could be written about it, and we just scratched the surface. The goal of this chapter was to introduce you to Flow Builder and get you interested in learning more.
Summary
In this chapter we have uncovered one of the most exciting concepts in Salesforce, Salesforce flows. Beginning with an introduction to flows, we have progressed into learning the different flow types in Salesforce, and then the elements used in the Flow Builder. After introducing the Debug tool, we have dived deep into two examples: screen flows and record-triggered flows. For each use case, we have learned how to build, test, and distribute the flow. Finally, we have covered the best practices when building flows, as well as pointing to the vast amount of advanced concepts beyond this book.
In the next chapter, we will continue learning how to automate in Salesforce by turning our attention to approval processes.
Questions
- What are the different types of flows and what do they do?
- What are flow elements? What are the three categories of flow elements?
- When would you want to use a screen flow versus a record-triggered flow?
- After you build a screen flow, where can you surface it to users?
- Why is it important to build flows in a sandbox or developer environment, and not production?
- What are the different ways you can test a flow?
- Why is it important to include descriptions in your flow elements?
Further reading
- Salesforce help: https://help.salesforce.com/s/articleView?id=sf.flow.htm&type=5
- Building flows with Flow Builder: https://trailhead.salesforce.com/en/content/learn/trails/build-flows-with-flow-builder
Join our community on Discord
Join our community’s Discord space for discussions with the authors and other readers: https://packt.link/rlptF
