
4
Business Development with Accounts and Contacts
Accounts and contacts are the foundation of approaching a Customer Relationship Management (CRM) system. Accounts are typically organizations that you already do business with or organizations that contain opportunities that have been converted from leads and are in the sales cycle. Contacts are people within these organizations that you have already contacted for various purposes, such as sales, marketing, or billing.
The following topics are covered in this chapter:
- What are accounts and what are they used for?
- What are contacts and what are they used for?
- What are relationships and what are they used for?
With the help of these topics, we’ll learn how to create an account and see what an account record contains. We will then do the same for contacts and contact records, and lastly, we will look at creating a relationship and what a relationship record contains.
Technical requirements
For this chapter, make sure you log in to your development org and follow along with the examples. You will need to enable Contacts to Multiple Accounts for the relationships feature to work:
Understanding how accounts work
Accounts are the organizations you have saved in Salesforce. These can be customers, partners, vendors, or any other company you would want to keep track of in your system.
Business use case
You are a sales rep for XYZ Widgets. There is a customer in a legacy system that you wish to add to Salesforce. Since this customer is not a new lead, you have to enter the customer directly as an account. Let’s see how this is done.
Creating an account
In this section, we will focus on accounts as customers or potential customers. There are two ways of creating accounts:
- Creating an account by converting a lead
- Creating an account by navigating to the Accounts tab
We covered creating an account by converting a lead in Chapter 3, Creating and Managing Leads. Let’s now see how we can create an account by navigating to the Accounts tab, as well as what is contained in an account record. The following screenshot shows the main navigation page in your development org, which is where we will start:

Figure 4.1: Main navigation page for a development org
Let’s look at our first account by clicking on the Accounts tab. Once you click on the Accounts tab, you will land on the page shown in the following screenshot:
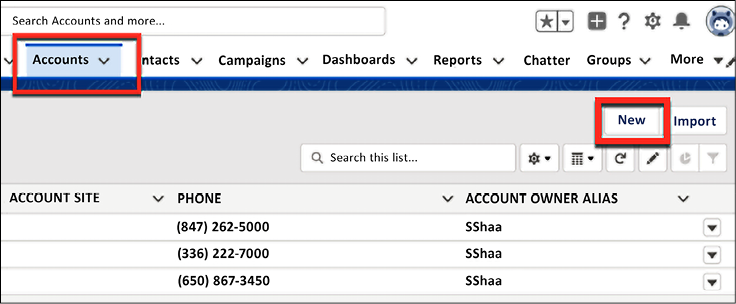
Figure 4.2: Accounts tab and option to create a new account
As we discussed in Chapter 1, Getting Started with Salesforce and CRM, you will be taken to the Recently Viewed page. Click on the New button.
In the following screenshot, I entered all of the information for the new account:

Figure 4.3: Entering information for a new account
Click Save after creating the account. I also created a contact, case, and opportunity in order to show you how these related items will look when we get to them. Creating a contact will be covered later on in this chapter and creating an opportunity and case will be covered in more detail in the Salesforce for Sales, Marketing, and Customer Relationship Management section of this book.
When you click on the newly created GenePoint account, you see a page similar to the one in the following screenshot:
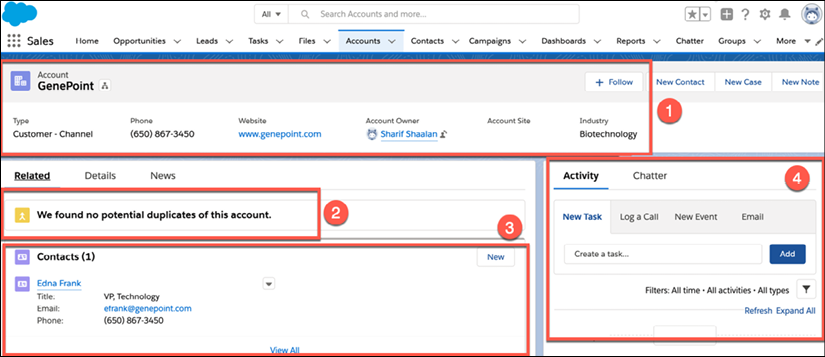
Figure 4.4: Important sections of the account overview
In the preceding screenshot, you can see that when you first open an account, you land on the Related sub-tab, where you will see a few important sections:
- Summary fields, including Type, Phone, Website, Account Owner, Account Site, and Industry
- You will notice that Salesforce automatically checks for duplicates based on the account name and lets you know whether there are any potential duplicate records
- Here, you can see all the related contacts
- You can also see the section for logging activities, as discussed in Chapter 2, Understanding Salesforce Activities
The following screenshot shows you the rest of this section:
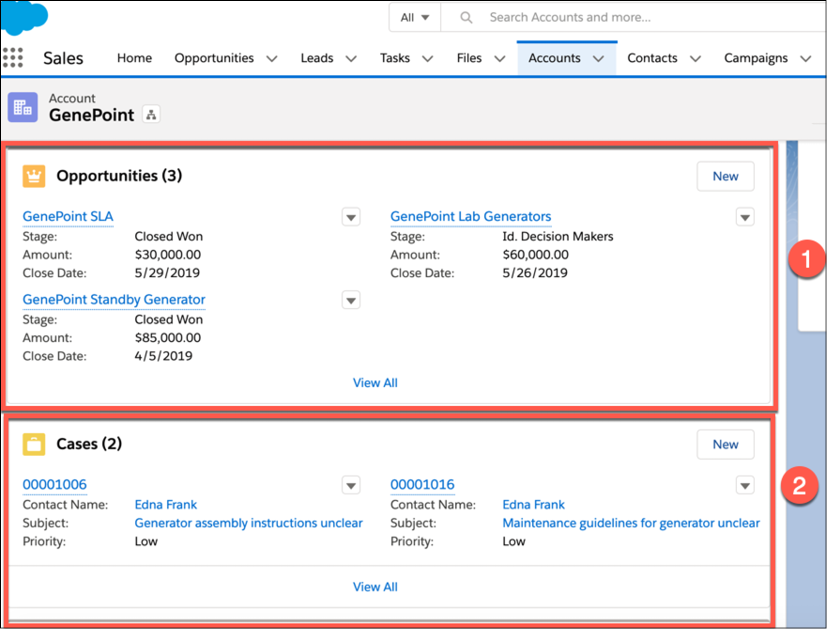
Figure 4.5: Opportunities and Cases sections found in the Related sub-tab
In the preceding screenshot, you can see two more important sections in the Related sub-tab:
- Opportunities shows all the opportunities related to this account. This is very important as these are both closed opportunities (sales) and open opportunities (potential sales that the sales rep is currently working on).
- Cases shows all the cases related to this account. Cases are related to customer service and will be covered in Chapter 7, Enhancing Customer Service with Cases.
The Related section is very important as it shows all of the non-account records, such as opportunities, contacts, and cases, that are directly related to this organization. Let’s take a look at the Details sub-tab in the following screenshot:

Figure 4.6: Details section of an account
Looking at the Details section, you will see all the fields that are directly related to the organization, such as Type, Industry, Employees, Annual Revenue, and Website, as well as the information to directly contact this organization. The following screenshot shows what the News sub-tab contains:

Figure 4.7: News section of an account
In the preceding screenshot, we can see that there is an option for the Salesforce user to log in with their Twitter account to connect directly with this company. Once this is done, it shows all of the tweets that relate to this company.
There is also a way for administrators to add a News section here that directly searches the company name on Google News and shows any related articles. This is covered in more detail in Section 2, Salesforce Administration.
In this section, we learned how to navigate to an account and what an account record contains. This is important as accounts are the organizations you do business with and are the central point of interaction within CRM. Now that we have seen what companies look like in Salesforce, let’s take a look at how the people within these companies show up in Salesforce.
Understanding contacts
Contacts are the people connected to Salesforce accounts. These can be customers, partners, vendors, or any other contacts related to the accounts you want to keep track of in your system.
Business use case
You are a sales rep for XYZ Widgets. We created an account for GenePoint in the previous section. You now have to create a contact record for the person you will be directly interacting with from GenePoint.
Creating a contact
In this section, we will focus on contacts as customers or potential customers. There are two ways of creating contacts:
- By converting a lead
- By navigating to a specific account and creating a contact related to that account
We covered creating a contact by converting a lead in Chapter 3, Creating and Managing Leads. Let’s now see how to create a contact by navigating to an account and creating one. The following screenshot shows the main navigation page in your development org, which is where we will start:

Figure 4.8: Main navigation page of a development org
Let’s now look at how we create a contact from the Accounts tab:
- First, click on the Accounts tab, which takes you to the following page:

Figure 4.9: Selecting the Accounts tab to open the Recently Viewed list
You will be taken to the Recently Viewed view, as we discussed in Chapter 1, Getting Started with Salesforce and CRM.
- Click on GenePoint to navigate to the account we looked at in the Understanding how accounts work section of this chapter, where you will see the following:

Figure 4.10: Reaching an account through the Recently Viewed view
- Under the Contacts section of the GenePoint account, you have the option to create a new contact. When you click on New, you will see a popup, as in the following screenshot:

Figure 4.11: New Contact popup and fields
Clicking on New brings up the following important fields, corresponding with the numbers in Figure 4.11:
- The Salutation of the contact you are dealing with. The dropdown options can be edited from the Setup screen in Salesforce Classic.
- The First Name of the contact
- The Last Name of the contact
- The Account Name that the contact is related to. This field is prepopulated since you are creating the contact directly from this account
- The Title field, which shows the position of the contact in the company
- The Phone field. This will usually copy over the phone number from the account Phone field
- The Home Phone field for the contact’s home phone number
- The Mobile field for the mobile number of the contact
- The following screenshot shows the rest of the contact creation screen:

Figure 4.12: Further fields when creating a new contact
In the preceding screenshot, you can see a few more important fields:
- The person that this contact reports to. This is typically another contact that exists on this account.
- The Mailing Address field of the user.
- When you click Save, this saves the contact and you will see the screen shown in the following screenshot.
You can see that the contact is now created on the GenePoint account and shows up in the Contacts section alongside the contact that was already on the account:

Figure 4.13: Contact added to the Contacts section of an account
- Click on John Doe. The following screenshot shows you what the new contact record contains:

Figure 4.14: Opening a contact record to see further details
In the preceding screenshot, you can see that when you click on this contact and go to the Related sub-tab, there are a few important sections:
- This shows your summary fields. These fields include Title, Account Name, Phone, Email, and Contact Owner.
- Here, you will notice that Salesforce automatically checks for duplicate entries based on the contact’s name and email address and lets you know whether there are any potential duplicate records.
- Here, you will see all the related accounts. We will cover these relationships in the next section.
- This is where you will see all the opportunities that are related to the contact. Opportunities will be covered in Chapter 5, Driving the Sales Cycle with Opportunities.
- Here, you will see all the cases that are related to the contact. Cases will be covered in Chapter 7, Enhancing Customer Service with Cases.
- This is where you will see all the campaigns that are related to the contact. Campaigns will be covered in Chapter 6, Achieving Business Goals Using Campaigns.
- Finally, you will also see a section for logging activities, as discussed in Chapter 2, Understanding Salesforce Activities.
- When you click on the Details sub-tab, you will see the following stored information:

Figure 4.15: Overview of the Details section of a contact
- In the preceding screenshot, you can see all of the fields you added when you created the contact. Then, click on the News sub-tab. The following screenshot shows the News section:

Figure 4.16: Viewing the News section of a contact
We can see that there is an option where the Salesforce user can log in with their Twitter account to connect directly with this contact. If this is done, this section will show all the tweets related to this contact and give the Salesforce user a look at the latest Twitter news for this contact. There is also a way for administrators to add a News section that directly searches for the contact’s name on Google News and shows any related articles here. This will be covered in the Salesforce Administration section of this book.
We have now learned how to create a new contact and what a contact record contains. This is important as contacts are the people you communicate with from the organizations that you do business with. Contacts, along with accounts, are the central point of interaction in CRM. Now that we have seen how contacts and accounts work in Salesforce, let’s take a look at a business use case where a contact may be related to multiple accounts. These connections are called relationships.
Understanding relationships
Relationships are the connections between contacts and multiple accounts in Salesforce. A contact is always connected to the account (organization) that the user works for. There are some cases where these contacts are connected to other accounts in the system, such as contractors, board members, or any other role that the contact could be connected to. Let’s see how this works.
Business use case
For our example here, let’s assume that John Doe is the sales manager at GenePoint but also sits on the board of another one of our accounts, Cardinal Inc. As the sales rep for XYZ Widgets, you will make the connection in Salesforce. Let’s see how to go about this.
Enabling relationships
The first step is to enable the Allow users to relate a contact to multiple accounts feature. As you can see in the following screenshot, I navigated to the setup and configuration section of Salesforce:

Figure 4.17: Navigating to Account Settings
There are several steps, which are shown in the preceding screenshot, to activate this feature:
- Navigate to the Home tab on the setup and configuration page.
- Click on Feature Settings.
- Click on Sales.
- Click on Account Settings.
- Check the Allow users to relate a contact to multiple accounts checkbox.
- There are also two further settings we can configure for contacts with multiple accounts. The first is what happens when we delete an organization whose contact is related to other accounts. We will select that we are blocked from deleting the account, so that the contact’s other relationships aren’t broken. The second setting is what happens when we replace the primary account for a contact. For this, we will select the option to save the previous primary account as an indirect relationship—so that we don’t delete that relationship altogether.
The next step is to add the Related Contacts list to the page layout so that we can make use of relationships, which we will describe how to do in the following section. As you can see in the following screenshot, I navigated to the setup and configuration section of Salesforce:

Figure 4.18: Navigating to the Related Contacts list
The preceding screenshot shows the steps for adding this related list:
- Navigate to the Object Manager tab under the setup and configuration page.
- Choose the Account object.
- Click on Page Layouts.
- In the appropriate layout, click on Related Lists.
- You will see the Related Contacts list in the available lists section.
- Drag the Related Contacts list to the Related Lists section of the layout.
Now that the feature is active and the list is added to the required layout, let’s look at how to add a relationship.
Adding relationships
Let’s see how this connection is made:
- Start by navigating to the John Doe contact record:

Figure 4.19: Add Relationship option on a contact record
In the preceding screenshot, we can see that in the John Doe contact record under the Related Accounts section, there is an option to add a relationship.
- Clicking on this option takes us to the following screen:

Figure 4.20: The relationship information screen for a new contact
In the preceding screenshot, you can see a few important sections:
- The Account field is for setting the account that you want to connect this contact to.
- The Roles field is the role that this contact plays in the organization; for our example, we will pick Influencer since John Doe is a board member of this organization.
- When you click Save, this saves the relationship and you will see the updated Contact screen shown in the following screenshot.
You can see that John Doe is now related to both GenePoint as the sales manager and Cardinal Inc. as an influencer:

Figure 4.21: New relationship viewed from the Contact screen
The following screenshot shows you how this relationship shows up on the Cardinal Inc. account:
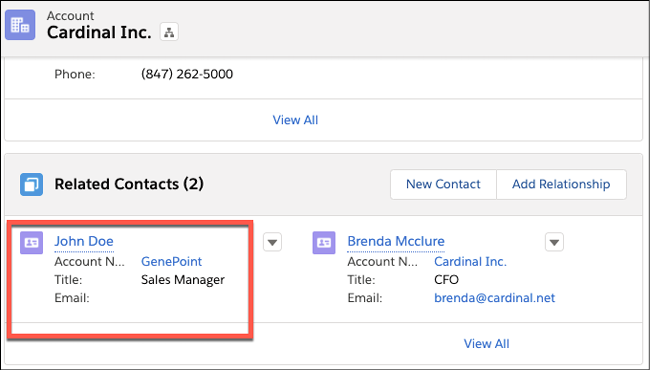
Figure 4.22: New relationship viewed from the Account screen
As you can see in the preceding screenshot, Cardinal Inc. has a Related Contacts section that shows John Doe as an influencer, along with Brenda Mcclure who works for Cardinal Inc. Let’s take a look at how to remove a relationship if needed.
Removing relationships
In the following screenshot, you can see that I navigated back to the Cardinal Inc. account:

Figure 4.23: Navigating to an account from the Contact screen
If we click on Remove Relationship next to the John Doe contact, it will lead to the following popup:

Figure 4.24: Option for removing a relationship between an account and a contact
This popup asks for confirmation that you want to delete the relationship. Clicking on Remove Relationship brings you back to the account screen:

Figure 4.25: Returning to an account to view Related Contacts
The relationship with John Doe is now gone and the Related Contacts for Cardinal Inc. has been reduced to 1.
In this section, we learned what a relationship is, how to activate the feature, how to add the Related Contacts list, how to create a relationship, how to remove a relationship, and what this relationship looks like on both the contact and account records. Let’s go over what we learned in this chapter.
Summary
After finishing this chapter, we now know what an account is, how to create one, and how to view it. We then learned what a contact is and how to create a new contact on an account record. For both the account and the contact, we learned about the important sections in the records for each, including the Related Items, Details, and News sections.
Finally, we learned about when to use a relationship and how to create a relationship between a contact and an account.
In the next chapter, we will look at opportunities—the most important part of the sales cycle in Salesforce!
Questions
- What are some use cases for the types of accounts that an organization may want to keep track of in Salesforce?
- Why would you want to create contacts related to accounts you are doing business with?
- When would you create a relationship from a contact to an account that the contact does not directly work for?
- How can you enable the Relationships feature?
- How do you remove a relationship?
Further reading
- Accounts and contacts for the Lightning experience: https://trailhead.salesforce.com/en/content/learn/modules/accounts_contacts_lightning_experience
Join our community on Discord
Join our community’s Discord space for discussions with the authors and other readers: https://packt.link/rlptF
