2
Understanding Salesforce Activities
Now that we’ve had an overview of the basics of Salesforce CRM, let’s start digging into some core functionality. This chapter covers activities. Activities are at the core of Salesforce CRM because they help you manage the relationship you have with your constituents, that is, the people you are doing business with. Activities include all the touchpoints you go through with your constituents. We will cover the main types of activities in this chapter, which are tasks, events, and emails, and how they affect the user’s workflow.
The following topics will be covered in this chapter:
- Navigating to what Salesforce defines as activities
- Creating entries for events and calendars
- Sending emails from Salesforce and exploring the email integration options
By the end of this chapter, you will have learned about tasks, events, calendar integration, and emails in Salesforce.
Technical requirements
For this chapter, log into your development organization and follow along as we learn how to create activities.
Navigating to activities
In Salesforce, activities include tasks, events, and calendars. Activities help you prioritize your time and keep up with any object. The main objects that you will use with activities are Accounts, Campaigns, Contacts, Leads, and Opportunities. Emails are another type of activity that you may use to stay in touch with your contacts and leads. Having all the touchpoints logged in Salesforce will give you a 360-degree view of your contacts and let you look at any person related to a specific Account, Contact, Opportunity, Lead, or Campaign that you may be working with.
You can also view your activities on the home page, depending on your home page’s layout. This gives you a shortcut to all of your activities. Let’s see what activities look like when they’re connected to objects:

Figure 2.1: Activity section seen from an object
Here, I have navigated to the Accounts tab and then to the GenePoint Account. On the right-hand side, you can see that there is an Activity section, which allows us to create a task, log a call, create an event, or send an email. If you navigate to any of the other tabs, you will see that the same Activity section exists.
Let’s cover each of these activity types in detail.
Tasks
Tasks are objects on your to-do list. They help you stay on top of things that you need to do and are related to the accounts you manage, deals you are working on, or marketing campaigns you may be managing.
Business use case
You are a sales representative at XYZ Widgets. Mr. Jack Rogers is a contact that is interested in buying your product. You call Jack and have a good conversation with him. After the conversation, you decide to set up a follow-up task so that you can call Jack again to gather more information on the next steps to take. Let’s see how this is done.
Creating tasks
To create a task, navigate to any object that you want to log a task for and go to the Activity section:

Figure 2.2: Creating a task
From the preceding screenshot, we can see the following steps have been taken (the numbering coincides with the areas on the right side of the steps shown in Figure 2.2):
- I search for
Mr.JackRogersand click on his Contact record. - Navigate to the Activity section.
- Fill in the subject of the task.
- Fill in the due date for when to perform this task.
- The name of the contact is pre-populated since we are on the contact record.
- Add the account that Jack is related to.
- The task is assigned to the logged-in user.
- Set the task to In Progress.
- Save the record.
After performing these steps, we can see that the task shows up in the Next Steps section:

Figure 2.3: Next Steps section
Once the task has been completed, you can check the Next Steps box to mark it as completed (label 1 in the following screenshot). You can then set up a follow-up task if needed (label 2):

Figure 2.4: Mark as complete
Notice that the task now shows up in Past Activities, as shown here:

Figure 2.5: Past Activities
Now that we have learned how to create a task, let’s take a look at how to log a call.
Logging a call
Logging a call is a type of task. It works exactly as a task does, except for two things: first, the due date always defaults to today; second, the status is always set to Completed.
Business use case
As a sales representative for XYZ Widgets, Jack Rogers calls in with a question. After the call, you want to update Salesforce with details of the call that took place.
Log a call
In the following screenshot, I navigated to the Log a Call sub-tab in order to log a call. You will notice no options for Due Date or Status:

Figure 2.6: Log a Call
This is because the Log a Call functionality is built only to log calls you’ve just completed with a client.
In this case, the due date is set to the current day and the status is automatically set to completed, as shown in the following screenshot:
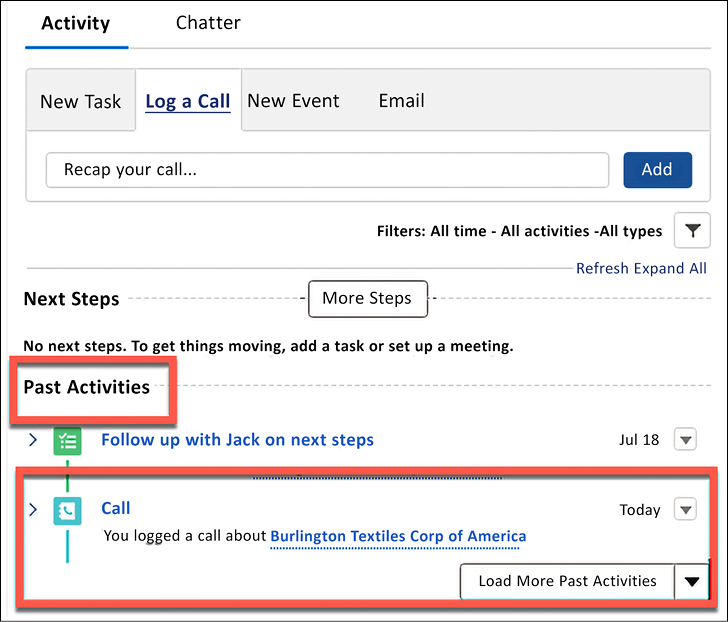
Figure 2.7: Past Activities
As you can see, when you save the call, the task automatically shows up under Past Activities.
Task list view
There are times when we’ll have a few pending tasks that need to be performed during the course of the day. To see all such outstanding tasks, navigate to the Tasks tab, where you can keep track of them. The following screenshot shows this:

Figure 2.8: Tasks tab
Take a look through the LIST VIEWS options that you can filter by. These list views will help you organize your day and view the lists of tasks you wish to work on.
Viewing tasks on the home page
Another place where you can easily access your tasks and events is your home page. The default home page layout contains two components that show activities, called Today’s Events (1) and Today’s Tasks (2):
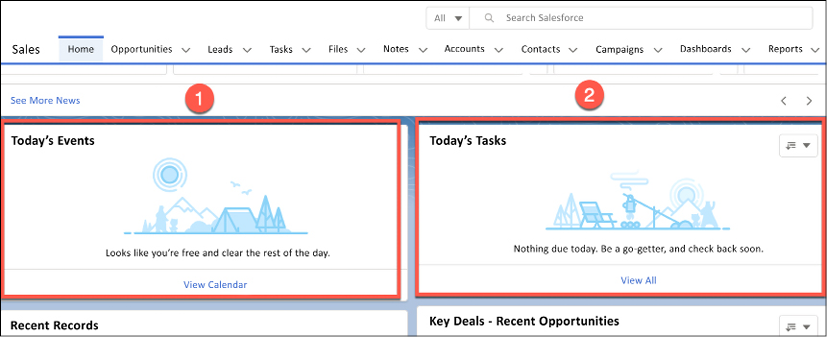
Figure 2.9: Home page view
This will show you any tasks or events that have a due date set for “today.” Now that we have covered tasks, let’s take a look at events.
Creating events and calendar entries
Events are activities that require a start date/time and an end date/time and are used to log actual meetings with a duration. An event activity is different from a task in a couple of ways:
- Events have a start date/time and an end date/time rather than just a due date. This means that when the end date and time passes, the event automatically moves to Past Activities without you needing to take any action. For ongoing tasks, you have to mark them as complete since only a date is provided – not a specific time.
- Events show up on your Salesforce calendar and will sync to Outlook or Gmail if you have the connector set up. We will cover connectors later in this chapter.
Now, let’s take a look at events in more detail.
Understanding events
Events are meetings that have a start date/time, as well as an end date/time. They let you set up meetings related to the accounts you manage, the deals you are working on, or the marketing campaigns you may be managing.
Business use case
As a sales representative for XYZ Widgets, you close a sale with Jack Rogers and want to schedule a kick-off meeting for the next steps. You enter this event in Salesforce so that it shows up on your calendar.
Creating an event
To create an event, navigate to any object that you want to log an event for and go to the Activity section:

Figure 2.10: Creating an event
Here, we have to do the following (the numbering coincides with the areas on the right side of the steps shown in Figure 2.10):
- Search for Mr. Jack Rogers.
- Go to the Activity section.
- Fill in the subject of the event.
- Fill in the start date/time of the event.
- Fill in the end date/time of the event.
- Ensure that the name of the contact is pre-populated if the user is on the contact record.
- Add the account that Jack is related to.
- Ensure that the task has been assigned to the user (this is me since I am the logged-in user).
- Enter the location of the meeting.
- Save the record.
After doing this, you’ll see that the event now shows up in the Next Steps section, as shown in the following screenshot:

Figure 2.11: Next Steps
Once the date for the meeting has passed, the event will automatically move to the Past Activities section.
This is how events work. In the next section, we’ll learn how the Salesforce calendar is aligned with these events.
Salesforce calendar
Once an event has been created, it will show up on your Salesforce Calendar, as shown in the following screenshot:

Figure 2.12: Salesforce calendar view
To navigate to your calendar, click on the Calendar tab. Here, you will see all of your events. If you have the Lightning Sync feature enabled and configured for Gmail or Outlook, your events will sync from Salesforce to those services.
Now, you are familiar with how events can be set up, how to follow up on them, and how such events can be synced to Salesforce calendars or with Gmail or Outlook. In the next section, we will learn how emails and email integration options work.
Sending emails and email integration options
Salesforce allows you to send emails directly from any standard or custom object. This takes place from the same Activity section that we used to log tasks and events.
Business use case
As a sales representative for XYZ Widgets, you want to send Jack Rogers a follow-up email after your initial conversation. You can do this directly from Salesforce as an activity! Let’s see how this is done.
Sending an email
As shown in the following screenshot, I navigated to the Activity section of the Jack Rogers contact and clicked on Email:

Figure 2.13: Sending an email
From the preceding screenshot, we can see the following (the numbering coincides with the areas on the right side of the steps shown in Figure 2.13):
- Search for Mr. Jack Rogers.
- Go to the Activity section.
- Fill in the To information. This can be a contact on the system or a free text email address.
- Add the subject.
- Add the body of the email.
- Here, you have the option to choose a template, add quick text, and attach a file.
- The activity is assigned to the user.
- Save the record, shown as follows:

Figure 2.14: Record of sent email
Once the email has been sent, it will show up in the Past Activities section.
Using Gmail integration options
Calendar integration helps you sync specific events and emails to Salesforce. This is useful so that you don’t create double entries in your email/calendar client and Salesforce. The following options are available for Gmail:
- Send through Gmail: This is for representatives who spend most of their time in Salesforce but want to use a Gmail account to send emails. Emails are composed in Salesforce but are sent through a connected Gmail account and appear in the Gmail Sent folder. When Send through Gmail is enabled, the activity history for leads and contacts includes a Compose Gmail button. Emails are logged to the records the email was sent from.
- Gmail Integration: This is for representatives who spend most of their time on their Gmail account. When emails are sent, they can select which Salesforce records to log the emails to.
- Einstein Activity Capture: This option is for users who prefer to have emails logged automatically. Einstein logs email activity from a connected client or device, including Gmail.
Using Outlook integration options
The following options are available for Outlook:
- Outlook Integration: When you work in Outlook, you can sync your emails and/or calendar events directly to Salesforce and vice versa.
- Outlook Integration with Inbox and Einstein Activity Capture: Einstein Activity Capture lets you automatically log emails and events if you have this feature turned on. Einstein is the AI portion of Salesforce that auto-suggests useful steps to take as you work.
- Email to Salesforce: This option lets users add emails to Salesforce records by copying a unique BCC email to all emails you send out.
Sending emails is a primary activity in any business. Using the preceding tools ensures that you are not entering information in multiple systems. It does this by allowing you to sync your emails and/or events with your email and calendar client. Now, let’s review what we have learned in this chapter.
Summary
Activities are at the core of CRM, so it is very important that you understand how to log your interactions with constituents.
In this chapter, we have looked at a use case for tasks and how to create and work with tasks. Then, we did the same for events, as well as looking at a use case for sending emails from Salesforce and the options we have if we wish to extend this functionality to Outlook or Gmail. All of these skills will help us in our daily interactions, which will lead to more sales!
This is a good time to review what we have learned in our development organization and see if we can answer some questions. In the next chapter, we will tackle leads!
Questions
- What type of activity should be used to set up a reminder to research an account?
- Which activity type should be used to set up an onsite meeting with a client?
- Is it possible to send an email to a client and copy someone not in the system as a contact?
- Do tasks appear on your Salesforce Calendar?
- Which tab shows all of your open tasks?
- If you use Gmail but spend most of your time in Salesforce, which integration option should you use?
- Can we log activities regarding Opportunities?
Further reading
- Trailhead Module: Manage Your tasks, events, and emails: https://trailhead.salesforce.com/en/content/learn/modules/lightning-experience-productivity/manage-your-tasks-events-and-email
- Send Through Gmail: https://help.salesforce.com/articleView?id=email_send_through_external.htm&type=5&language=en_US
- Gmail Integration: https://help.salesforce.com/articleView?id=email_int_user_overview.htm&type=5&language=en_US
- Einstein Activity Capture: https://help.salesforce.com/articleView?id=einstein_sales_aac.htm&type=5&language=en_US
- Outlook Integration with Inbox and Einstein Activity Capture: https://help.salesforce.com/articleView?id=inbox.htm&type=0
- Lightning Sync for Microsoft Exchange: https://help.salesforce.com/articleView?id=exchange_sync_admin_implement_ex_sync.htm&type=0
- Salesforce for Outlook: https://help.salesforce.com/articleView?id=outlookcrm_sfo_about.htm&type=5%20%C2%A0
- Email to Salesforce: https://help.salesforce.com/articleView?id=emailadmin_email2salesforce.htm&type=0
Join our community on Discord
Join our community’s Discord space for discussions with the authors and other readers: https://packt.link/rlptF
