
Chapter 11. Taking root with trees
- Dissecting the TreePanel widget
- Rendering in-memory data with TreePanels
- Implementing a remote-loading data TreePanel
- Adding a custom ContextMenu to TreePanel nodes
- Exercising full CRUD lifecycle for nodes
- Using a TreeEditor to edit node data
I can recall the first time I was tasked to create an application with what was known then as a TreeView. I had to allow for the navigation directory in a filesystem, which required that I allow users to modify the filenames easily. I was lucky that I had Ext JS in my toolbox to aid me in my task. Using the framework not only made things easier, but it also sped up the development time of this task dramatically.
In this chapter, you’ll learn about the Ext JS TreePanel, which is used to display hierarchical data, much like a typical filesystem. You’ll learn how to set up both static and dynamic implementations of this widget. After getting comfortable with this component, you’ll work to set up CRUD operations by use of a dynamically updating context menu and Ajax.requests to send data. This is going to be a fun chapter.
11.1. What is a tree (TreePanel)?
In the UI world, the word tree is meant to describe a widget or control that displays hierarchical data, which generally begins at some central point, known as a root. And like the botanical tree, trees in UIs have branches, which means that they contain other branches or leaves. Unlike botanical trees, computer trees have only one root.
In the computer world, this paradigm is ubiquitous and lives under our noses without much thought. Ever browse your computer’s hard disk? The directory structure is a tree structure. It has a root (any drive letter in Windows), branches (directories), and leaves (files). Trees are used in application UIs as well and are known by a few other monikers.
In other UI libraries, other names for this type of widget include TreeView, Tree UI, or simply Tree, whereas in Ext JS it’s known as the TreePanel. The reason it’s called TreePanel is because it’s a direct descendant of the Panel class. And much like the GridPanel, it isn’t used to contain any children except those it was designed for. The reason TreePanel extends from Panel is simple—convenience. This gives us the flexibility to leverage all of the Panel’s UI goodness, which includes the top and bottom ToolBars and the footer button bar.
Like the EditorGrid, TreePanels can be configured to allow the edit data but don’t have a DataWriter equivalent, which means that we must code our own Ajax.requests for CRUD actions. We’ll explore how to make a TreePanel editable and how to code for CRUD actions.
Unlike the GridPanel, however, the number of the supporting classes is quite small, which makes the configuration of a TreePanel simple in contrast, as you’ll see a little later on. On the flip side, many developers find that the server-side code and related SQL to support them are much more challenging due to the relational nature of the data.
Finally, the Ext.data classes don’t apply to TreePanels; thus, Proxies and Readers are out of the picture. This means that the data for the TreePanel must come either from memory or remotely but is limited to the same domain. Before we get down to building our first TreePanel, we’ll discuss how a TreePanel works.
11.1.1. Looking under the roots
TreePanels work by loading data via a TreeLoader class, which reads JSON-formatted data either from memory or remotely from the web server, or it can be a mixture of both. Each object in the JSON stream is converted to an instance of tree.TreeNode, which is a descendant of the Ext.data.Node class. This data.Node class is the core of all of the TreePanel data logic and includes many of the utilities such as cascade, bubble, and appendChild.
In order for the TreePanel to display the nodes visually, the TreeNode class uses the TreeNodeUI class. The root Node gets some special attention, because it’s the source of the entire structure and has its own RootTreeNodeUI class. If you want to customize the look and feel of Nodes, you extend this class.
Cool! You now have a high-level understanding of what a TreePanel is and how it works. We can start constructing our first TreePanel, which will load data from memory.
11.2. Planting our first TreePanel
As I mentioned before, coding a TreePanel, relative to the GridPanel, is pretty simple. You’ll start out by constructing the TreePanel, which loads its data from memory. This will give you more insight into what you learned some time ago.
The following listing shows how to construct a static TreePanel.
Listing 11.1. Building a static TreePanel

Yikes! Most of the code in listing 11.1 is the data to support the TreePanel. In walking through the rootNode ![]() JSON, you see that the root Node (object) has a text attribute. This is important because the text property is what the TreeNodeUI uses to display the Node’s label. When writing the server-side code to support this widget, be sure to keep this property in mind. If you don’t set
it, the Nodes may appear in the TreePanel but will have no labels.
JSON, you see that the root Node (object) has a text attribute. This is important because the text property is what the TreeNodeUI uses to display the Node’s label. When writing the server-side code to support this widget, be sure to keep this property in mind. If you don’t set
it, the Nodes may appear in the TreePanel but will have no labels.
You also see an expanded property, which is set to true. This ensures that, when rendered, the Node is expanded immediately, thus displaying its contents. You set this here so you can see the root’s childNodes immediately upon the rendering of the TreePanel. This parameter is optional; leave it out to have the Node render initially collapsed.
A children property is set on the root node ![]() , which is an array of objects. When a Node has a children array, the objects in that array will be converted to tree.Tree Nodes and populated in the parent Node’s childNodes array. A similar paradigm can be found in the Container hierarchy, where a Container has children in its item’s MixedCollection.
, which is an array of objects. When a Node has a children array, the objects in that array will be converted to tree.Tree Nodes and populated in the parent Node’s childNodes array. A similar paradigm can be found in the Container hierarchy, where a Container has children in its item’s MixedCollection.
If you walk through the rootNode’s children, you see that the first and second children have no children property but have a leaf ![]() property, which is set to true. Setting a Node’s leaf property to true ensures that this node will never contain other child Nodes, thus making it a leaf and not a branch. In this case, 'Child 1' and 'Child 2' are leaf Nodes, whereas 'Child 3' is a branch because it doesn’t have a leaf property set to true.
property, which is set to true. Setting a Node’s leaf property to true ensures that this node will never contain other child Nodes, thus making it a leaf and not a branch. In this case, 'Child 1' and 'Child 2' are leaf Nodes, whereas 'Child 3' is a branch because it doesn’t have a leaf property set to true.
The 'Child 3' Node contains one child Node, which is a leaf because—yes. It’s a leaf because its leaf property is set to true. Wow! You learn quickly. This Node has a single child, which also has a single child.
After configuring the supporting data, you move on to configure the TreePanel using an XType ![]() configuration object. This is where you see the simplistic nature of the configuration of this widget. All of these properties
should make sense to you but the root, which is what you use to configure the root Node. In this case, the topmost-level object of the rootNode JSON will be treated as the TreePanel’s root.
configuration object. This is where you see the simplistic nature of the configuration of this widget. All of these properties
should make sense to you but the root, which is what you use to configure the root Node. In this case, the topmost-level object of the rootNode JSON will be treated as the TreePanel’s root.
You can change your TreeNode icons by adding either an icon or iconCls property to the node’s configuration object, where icon specifies a direct location for an image and iconCls is the name of a CSS class for an icon style. But the iconCls property for the TreeNode works like the Panel’s iconCls configuration object and is the preferred method for changing the icon.
The last thing you do in this listing is create an instance of Ext.Window to display your TreePanel. Figure 11.1 shows what our rendered TreePanel looks like.
Figure 11.1. Our first (expanded) TreePanel with the root Node visible (left) and the root Node hidden (right)

After rendering your TreePanel, you can see the TreeNodes displayed as you laid them out in the JSON. You can expand 'Child 3' and its child Node to display the rest of the hierarchy. It’s easy to exercise the selection model by clicking a Node. If you want to hide the root Node, set rootVisible in the TreePanel configuration object to false, as depicted in figure 11.1 (left).
And there you have it, a static TreePanel in action. Simple stuff, huh? Now that we have this out of the way, we’ll move on to creating a remote TreePanel.
11.3. Dynamic TreePanels grow
Because our previous TreePanel is static, there was no need to directly create a TreeLoader. This changes with a remote-loading TreePanel. We’re going to develop a TreePanel that will use the same data that we used for our GridPanels in chapter 7, where we displayed people. It just so happens that those people are employees for “My Company” and belong to different departments. Here you’ll configure the TreePanel to utilize the server-side component to list employees by department.
Listing 11.2. Building a static TreePanel
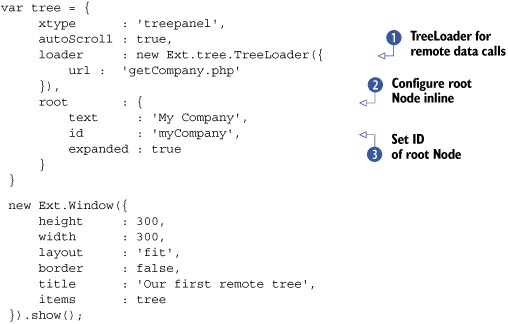
As you can see in listing 11.2, you configure a TreeLoader ![]() , which has a configuration object passed with a url property set to 'getCompany.php'. When configuring your TreePanel, replace this PHP file with your controller of choice. Before you start coding your controller, however, please allow me
to finish walking through the request-and-response cycle, which follows shortly after we look at the rendered version of this
TreePanel implementation.
, which has a configuration object passed with a url property set to 'getCompany.php'. When configuring your TreePanel, replace this PHP file with your controller of choice. Before you start coding your controller, however, please allow me
to finish walking through the request-and-response cycle, which follows shortly after we look at the rendered version of this
TreePanel implementation.
The next thing you do when configuring this TreePanel is configure the root ![]() inline. It’s extremely important to notice that you added an id
inline. It’s extremely important to notice that you added an id ![]() property to this Node. As you’ll see, this property will be used to request the child data from the server. Also notice that you set expanded to true. This will ensure that the root Node expands and loads its children as soon as it’s rendered.
property to this Node. As you’ll see, this property will be used to request the child data from the server. Also notice that you set expanded to true. This will ensure that the root Node expands and loads its children as soon as it’s rendered.
Unlike the data Store, which backs the GridPanel and other views, the TreeLoader doesn’t have the capability out of the box to connect to a remote data source. This is because the TreeLoader doesn’t have the same internal architecture as the data Store.
Last, you configure a bigger instance of Ext.Window to contain your TreePanel. Configuring the window a bit bigger for this demonstration will both increase the TreePanel’s viewing space and eliminate horizontal scrolling because of long names. Figure 11.2 shows what the rendered TreePanel looks like.
Figure 11.2. Our remote TreePanel displaying its ability to load data remotely

After rendering the TreePanel, you see the root Node (My Company) load immediately, as shown in figure 11.2 (left), displaying all of the departments in My Company. To view the employees in a particular department, click the expand icon (+), or double-click the label and you’ll see the remote loading indicator appear in place of the folder icon, as shown in the center of figure 11.2. Once the employee nodes are loaded successfully, they’ll appear below the department Node.
We went through this pretty fast. Let’s recap a bit and look at the requests being fired. We’ll discuss what the server-side controller is doing to support this implementation of the TreePanel.
11.3.1. Fertilizing the TreePanel
To analyze the client/server interaction model with the TreePanel, we’ll start with the load request fired off by the automatic expansion of the root Node, as shown in figure 11.3. Remember that you set the root’s expanded property to true and that this expands a Node when it’s rendered, thus either rendering the children if they’re in memory or firing a load request.
Figure 11.3. The post parameter of the initial Node request

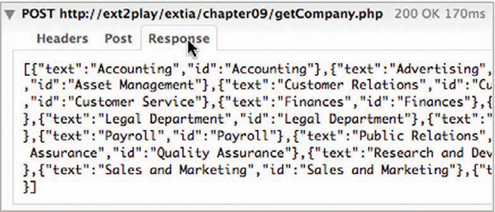
As you can see, the first request to the getCompany.php controller was made with a single parameter, node, which has a value of myCompany. Can you remember where you set that value and which property you set it to? If you said “the id property root node,” you’re correct! When an asynchronously loading Node is being expanded for the first time, the loader will use its id property to pass the child data to the controller.
The controller will accept this parameter and query the database for all nodes associated with that id and return a list of objects, as illustrated in figure 11.4. In this figure, you see an array of objects that define a list of departments. Each object has both text and id properties. How does the text property apply to the NodeUI? You’re correct! The text applies to the label of the NodeUI. Notice that the departments lack the leaf and children properties. Are these leaf or branch Nodes? Correct again. They’re branch Nodes. Because neither property is defined, they’re treated as branch Nodes. This means that when they’re initially expanded, the TreeLoader will invoke an Ajax.request, passing the department’s ID as the node parameter. The controller will accept the node parameter and return a list of employees for that department.
Figure 11.4. The results of the initial request to the getCompany.php controller
Using what you just learned, you can safely predict that when you expand the Accounting department Node, a request to the getCompany.php controller will be made with a single parameter, node, passed with a value of 'Accounting'. Let’s take a quick look at the results from the controller request, shown in figure 11.5.
Figure 11.5. The results from the Accounting department Node request

As you look at the JSON results, you see that a list of objects is returned, each with id, text, and leaf properties. Remember, that because the leaf property is set, the Nodes appear as non-expanding leaf Nodes.
Congratulations! You’ve successfully constructed static and dynamic TreePanels to display hierarchical data. You also now have a basic understanding of the client/server interaction model between the TreePanel and the web service feeding the TreePanel data.
Configuring a TreePanel for loading is just a small part of the job if you’re tasked to build a UI that offers CRUD functionality for this type of widget. Next, we’ll look at how to construct a TreePanel for these types of interactions.
11.4. CRUD on a TreePanel
To configure CRUD UI functionality, you’ll need to add much more code to the mix. After all, the TreePanel doesn’t support these features natively. Here’s what you’re going to do.
To enable CRUD actions, you’ll modify your TreePanel by adding a contextmenu listener to it, which will call a method to select the Node that was right-clicked and create an instance of Ext.menu.Menu to be displayed at the mouse cursor’s X and Y coordinates. This will be very similar to how you coded the EditorGridPanel’s context menu handler in the last chapter.
You’ll create three menu items: add, edit, and delete. Because you can only add employees to a department, you’ll dynamically change text for the menu items and enable and disable the various menu items based on the type of node that was clicked: root, branch, or leaf.
Each of the handlers will perform an Ajaxrequest to mock controllers for each CRUD action. Again, much of this will function like the CRUD for the EditorGridPanel, but it will be adapted to the TreePanel to deal with Nodes instead of rows.
Get ready. This will be the most complicated code yet. You’ll start by creating the context menu handler and the context menu factory method.
11.4.1. Adding context menus to a TreePanel
To add a context menu to the TreePanel, you must register a listener for the contextmenu event. This is super simple. Add a listeners configuration option to the Tree Panel as follows:
listeners : {
   contextmenu : onCtxMenu
}
Adding the previous code will ensure that the onCtxMenu handler will be called when the contextmenu (or right-click) event is fired.
Cool! Your TreePanel is now set up to call the onCtxMenu handler. Before you code it, you should construct a factory method to generate an instance of Ext.menu.Menu.
This will help simplify onCtxMenu quite a bit. You’ll see what I mean once you’ve finished with the factory method.
The following listing walks through constructing a context menu factory method.
Listing 11.3. Configuring a context menu factory method
var onConfirmDelete = Ext.emptyFn;
var onDelete        = Ext.emptyFn;
var onCompleteEdit  = Ext.emptyFn;
var onEdit          = Ext.emptyFn;
var onCompleteAdd   = Ext.emptyFn;
var onAddNode       = Ext.emptyFn;

var buildCtxMenu = function() {
     return new Ext.menu.Menu({
         items: [
             {
                itemId  : 'add',
                handler : onAdd
             },
             {
                itemId  : 'edit',
                handler : onEdit,
                scope   : onEdit
             },
             {
                itemId  : 'delete',
                handler : onDelete
             }
         ]
    });
}
In listing 11.3, you first set up a bunch of placeholder methods that point to Ext.emptyFn, which is the same thing as instantiating a new instance of a function but is easier on the eyes. We’re adding them now so that when we circle back and fill in these methods, you’ll know exactly where to place them.
Next, you generate the buildCtxMenu factory method, which returns an instance of Ext.menu.Menu and will be used by the onCtxMenu handler that you’ll generate next. If you’ve never seen or heard of a factory method, from a high level, it’s a method that constructs (hence the name factory) something and returns what it constructed. That’s all there is to it.
Notice that each of the menu items has no text property, but each has itemId specified. This is because the onCtxMenu will dynamically set the text for each menu item to provide feedback to the user that something may or may not be allowed. It will use the itemId property to locate a specific item in the menu’s items MixedCollection.
The itemId configuration property is similar to the id property of Components except it’s local to a child Component’s Container. This means that unlike the Component’s id property, itemId isn’t registered with ComponentMgr; thus only the parent Component has the ability to look into its item’s MixedCollection to find a child Component with a specific itemId.
Each MenuItem currently has a hardcoded handler to Ext.emptyFn as a placeholder so you can see your menu display in the UI without having to code the real handler. You’ll go on to create each handler after you develop and review the onCtxMenu handler, which is next.
Listing 11.4. Configuring a context menu factory method


In listing 11.4 you construct your onCtxMenu handler, which does quite a bit to enable your context menu to be dynamic. The first task that this handler accomplishes is selecting the Node in the UI by firing the Node’s select method. You select the Node because you’re going to need to query the TreePanel for the selected Node further on, after Ajax calls are made.
Every time the TreePanel's contextmenu event fires, it passes two arguments: the node that the event occurred on and the instance of EventObject that was generated. If bells are ringing in your ears, it’s probably because this is very similar to the GridPanel's contextmenu event, where the row in which the event occurred and an instance of EventObject are passed to the handler.
Next, you stop the browser’s default context menu from showing up by calling evtObj.stopEvent. You’ll see this pattern repeat anywhere you need to display your own context menu in place of the browser’s.
The handler then constructs the context menu by calling the buildCtxMenu factory method you created a bit ago ![]() . It stores the reference locally as this.ctxMenu so it doesn’t have to reconstruct a menu for each subsequent handler call.
. It stores the reference locally as this.ctxMenu so it doesn’t have to reconstruct a menu for each subsequent handler call.
You then create a local reference to the context menu, ctxMenu, and each of the menu items. You’re doing this for readability further on, where you manage the menu items.
After you create the local references, you move on to an if ![]() control block, where you detect the type of Node and modify the menu items accordingly. This is the bulk of the code for this handler. Here’s how this logic breaks down.
control block, where you detect the type of Node and modify the menu items accordingly. This is the bulk of the code for this handler. Here’s how this logic breaks down.
If the node that was right-clicked is the root (node.id == 'myCompany'), you configure the menu items to allow the addition of departments but disallow the deletion and editing of the company text. You also disable those menu items so they can’t be clicked. After all, you don’t want anyone to destroy an entire company by a single mouse click, do you?
Moving on, you detect whether the Node is a leaf (department). You then modify the text to allow the addition of employees and deletion of the entire department. Remember, the company needs to be able to downsize by removing an entire department if need be. You also enable all menu items.
The code will encounter the else block if the Node that was right-clicked is a leaf item. In this case, the text for the add item is modified and disabled to reflect the inability to add an employee to an employee, which would be weird. Then you modify and enable the edit and delete menu item texts.
Last, you show the context menu at the coordinates of the mouse by calling the EventObject’s getXY method. Figure 11.6 shows what the menu looks like customized for each node.
Figure 11.6. Displaying our dynamic context menu for the company (left), department (center), and employee (right) Nodes

As illustrated in figure 11.6, our context menu displays and changes for each type of Node that is right-clicked, which demonstrates how you can use the same menu to perform similar tasks with some modifications. If you wanted to not show or hide the menu items instead of enabling and disabling them, you’d swap the MenuItem enable calls for show and disable for hide. We can now begin to wire up handlers for our context menus. We’ll start with the easiest, edit.
11.4.2. Wiring up the Edit logic
You probably noticed that clicking a MenuItem resulted in nothing more than the menu disappearing. This is because you have your context menu set but no real handlers for it to call. You’ll start by creating the edit handler, which is by far the easiest to code.
This is where you’ll instantiate an instance of TreeEditor to allow for inline edits of Node names. In order to get the TreeEditor to invoke an Ajax.request to submit the modified Node name, you’ll have to set up a listener for the TreeEditor’s published complete event, which indicates that an edit has completed and the value of the Node has been changed. You’ll code for the complete handler first and then move on to create the onEdit handler, which you’ll attach to the edit MenuItem.
Here’s where you’ll start filling in some of those placeholder methods.
Listing 11.5. Configuring a context menu factory method


In listing 11.5, you create two methods that take care of the edit functionality. The first is the handler that will be called when the edit event of the TreeEditor is fired and is responsible for firing off an Ajax.request to the server to save the modification. The second is the handler that’s fired when the edit MenuItem is clicked. Here’s how they work.
When the TreeEditor fires the complete event, it passes three parameters to the listeners: a reference to the TreeEditor that fired the event, the new value, and the old value. Our onCompleteEdit ![]() event handler uses all three parameters to do its job. This method first sets a local reference to the TreePanel that’s being edited and masks its element. It then sets two more local references to the Node being edited and its ID.
event handler uses all three parameters to do its job. This method first sets a local reference to the TreePanel that’s being edited and masks its element. It then sets two more local references to the Node being edited and its ID.
Next, it fires of an Ajax.request ![]() to save the data. Notice that in the parameters configuration object of the Ajax.request, it’s passing the ID of the Node and its new name. This would be important if you had to modify a value in a database where an ID identifies Nodes.
to save the data. Notice that in the parameters configuration object of the Ajax.request, it’s passing the ID of the Node and its new name. This would be important if you had to modify a value in a database where an ID identifies Nodes.
If there are other application-specific values for that Node that you were looking to send as parameters to the server, you can find them in the attributes property of the node. Any properties that are part of the Node to create the tree are tucked away for use in the attributes property. For instance, employee Nodes could have employee-specific personal attributes, such as DOB or sex, on each Node. Obviously, this depends on the application you’re developing for. Also, if you want to send an attribute from the Node’s parent, you can access it by the Node’s parentNode property and tack it on to the params configuration object for the Ajax.request.
In the request’s success handler, the return JSON from the server is encoded and the success ![]() property is tested. If the server returns a false success property, the method reverts the value of the Node. This is helpful if an invalid value is placed per the business rules processed on the server. Likewise, if the request fails
for some reason, the failure handler
property is tested. If the server returns a false success property, the method reverts the value of the Node. This is helpful if an invalid value is placed per the business rules processed on the server. Likewise, if the request fails
for some reason, the failure handler ![]() is triggered and the Node’s text value will be reverted. Both handlers will unmask the TreePanel when they’re triggered.
is triggered and the Node’s text value will be reverted. Both handlers will unmask the TreePanel when they’re triggered.
The second method in this listing, onEdit ![]() , will be called when the edit MenuItem is clicked. It first creates a local reference for the TreePanel and the selected Node. It then creates an instance of TreeEditor
, will be called when the edit MenuItem is clicked. It first creates a local reference for the TreePanel and the selected Node. It then creates an instance of TreeEditor ![]() and sets a self (this) reference if it doesn’t exist. Notice that it configures the onCompleteEdit listener for the complete event. Last, it will set the editNode property as the selectedNode on the TreeEditor and trigger the editing of that Node by calling startEdit and passing the selectedNode’s ui.textNode reference, which will tell the TreeEditor where to render and position itself.
and sets a self (this) reference if it doesn’t exist. Notice that it configures the onCompleteEdit listener for the complete event. Last, it will set the editNode property as the selectedNode on the TreeEditor and trigger the editing of that Node by calling startEdit and passing the selectedNode’s ui.textNode reference, which will tell the TreeEditor where to render and position itself.
Triggering the edit in this manner will ensure that the TreeEditor doesn’t scroll the Node to the top of the list if the TreePanel is scrollable, thus preventing this undesired effect from happening.
Great! You have your edit logic all in place, which means you can see it in action! Refresh your page, right-click a Node, and click the edit MenuItem. I’ll follow along and show you what I see. Refer to figure 11.7.
Figure 11.7. The results of editing a Node in the TreePanel using the TreeEditor with an Ajax.request to save the data
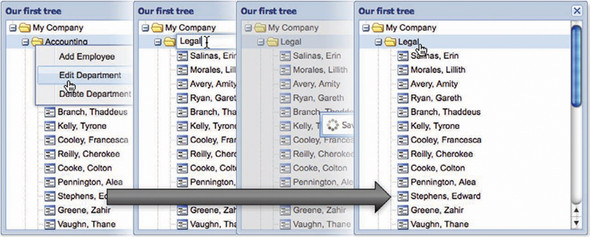
In figure 11.7, I changed the Accounting department’s name to Legal by right-clicking it, which selected the Node. I then clicked the edit MenuItem, which rendered the TreeEditor where the text of the Node is. Remember that the TreeEditor knows where to render and position itself because we passed the textNode reference of the TreeNode’s ui. I then changed the name from Accounting to Legal and pressed Enter. This caused the Node value to change and the complete event to fire, thus triggering the onComplete method. Because the server accepted the value, the TreePanel’s element was unmasked and the new value persisted in the UI. Remember that if the server had returned { success : false } or if the request had failed, the text value of the Node would have been reverted.
This wraps up the easiest of the CRUD functionality for our TreePanel. Editing names in this widget is a common task among web applications. Naturally, how you implement it depends on the business requirements. Using the TreeEditor results in a cleaner application flow by saving you from having to use an input dialog box, such as MessageBox.prompt.
Next, we’re going to ratchet up the level of difficulty by tackling the deletion of Nodes. This will be far more complex than what we’ve done previously in this chapter.
11.4.3. Tackling delete
To set up the delete functionality of your TreePanel, you’ll create a handler for the delete MenuItem. Naturally, requirements usually dictate that a confirmation dialog box be presented to the user, so you’ll have to code for user confirmation. To make things a bit easier, you’ll use the out-of-the-box MessageBox.confirm dialog box. This means that you’ll have to construct a callback method for the confirmation dialog box. The dialog box callback will trigger the Ajax.request and ultimately delete the Node if the server returns a favorable result.
Now that you have an idea of what you need to do, you can get on with coding the handler methods, as shown in the following listing.
Listing 11.6. Adding deletion functionality to your TreePanel
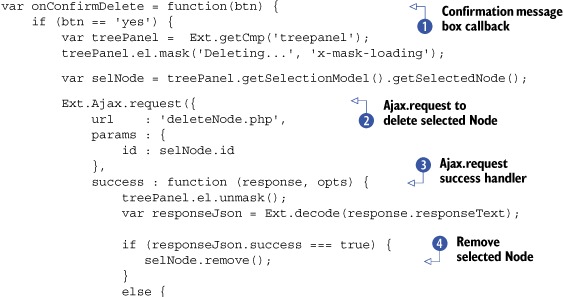

In listing 11.6, you create the two methods that take care of the delete operations of your CRUD functionality. The first method, onConfirmDelete ![]() , is the handler for the confirmation dialog box that you’ll create a little later on. If the Yes Button is clicked in the confirmation dialog box, it will mask the TreePanel and invoke an Ajax.request
, is the handler for the confirmation dialog box that you’ll create a little later on. If the Yes Button is clicked in the confirmation dialog box, it will mask the TreePanel and invoke an Ajax.request ![]() to delete the selected Node. Notice that you’re passing only the ID of the Node to the server.
to delete the selected Node. Notice that you’re passing only the ID of the Node to the server.
In our fictitious mini-application, the server would take the value of the Node ID and perform a delete operation in the database or filesystem and return something like {success:true}, which fires the request’s success ![]() handler. This removes the TreePanel’s element mask and updates the UI by removing the Node
handler. This removes the TreePanel’s element mask and updates the UI by removing the Node ![]() from the TreePanel by using the Node’s remove method.
from the TreePanel by using the Node’s remove method.
To reduce complexity for this listing, I left out the Ajax.request failure handler, which would post a failure message to the user. Naturally, when you develop your applications, you’ll want to include it. In this case, it should remove the TreePanel's element mask and alert the user that a failure occurred.
The second method you create, onDelete ![]() , is the handler for the delete MenuItem. When this method is called, it presents a confirmation dialog box by using the out-of-the-box MessageBox.confirm
, is the handler for the delete MenuItem. When this method is called, it presents a confirmation dialog box by using the out-of-the-box MessageBox.confirm ![]() method and passes in three arguments: title, message body, and callback. This presents the user with a message and two options
to proceed. Either Button will trigger the callback, but remember that to perform the deletion of the Node, the Yes Button has to be clicked.
method and passes in three arguments: title, message body, and callback. This presents the user with a message and two options
to proceed. Either Button will trigger the callback, but remember that to perform the deletion of the Node, the Yes Button has to be clicked.
Please refresh your UI and delete a Node. I’ll do the same, and we’ll discuss how things transpire. Figure 11.8 illustrates what happened when I refreshed my UI and deleted the Accounting department Node.
Figure 11.8. Deleting a Node with a confirmation box and an Ajax.request to the server

After I right-clicked the Accounting department Node, our customized context menu appeared. I then clicked the delete MenuItem, which triggered the onDelete handler. This immediately displayed the confirmation dialog box. I clicked Yes, which caused the TreePanel’s element to mask, indicating that a request was being made to delete the Node. When the server returned a favorable result, the mask was removed and the Accounting department Node disappeared.
In a real-world application, deleting a branch Node would generally require the server to recursively gather a list of all of the child nodes and remove them from the database before removing the branch node itself. A clever way to do this could be to set up a trigger in the database to call a stored procedure to delete all associated child nodes when a delete operation is performed on a container node.
Deleting Nodes from our TreePanel required a bit more effort because of the typically required confirmation dialog box. Adding a Node, however, is equally difficult because the UI code needs to know what type of node is being added. Is it a branch or leaf Node? Next, you’ll see how to code for this type of branch and have the UI react accordingly.
11.4.4. Creating nodes for our TreePanel
To create a Node using the TreeEditor, you’re going to have to do a lot of work, which makes this the hardest listing in this chapter, but the results will be pretty sweet.
Because the TreeEditor needs to bind and display on top of a Node, you’ll need to inject a Node into the TreePanel and trigger an edit operation on the Node. Once the edit of the new temporary Node is complete, an Ajax.request is fired off to the server with the name of the new Node. If the server returns favorably, the ID is set to the Node. This works similarly to the way rows are added to the EditorGrid we created last chapter.
Here’s the code for the create Node functionally.
Listing 11.7. Adding create functionality to your TreePanel

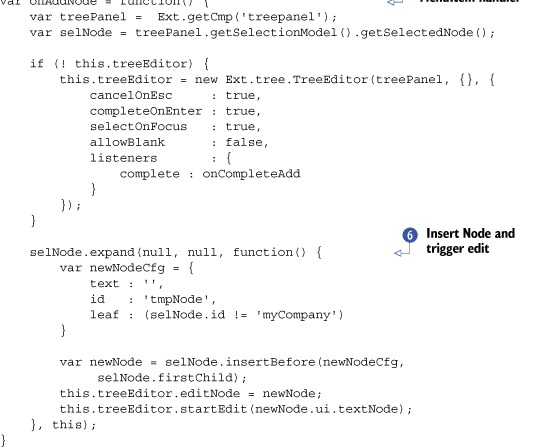
You’re doing quite a bit of work in listing 11.7 to get the create functionality to work smoothly. Just like the code for the edit operations, to reduce complexity for the listing, we omit the Ajax.request failure handler. Here’s how all of this stuff works.
The first method in the listing is the TreeEditor complete event handler, onCompleteAdd ![]() . This handler is arguably more complex than the edit TreeEditor co mplete event handler for a multitude of reasons. When this method is fired, if a new name has been entered for the Node, an Ajax.request will be fired
. This handler is arguably more complex than the edit TreeEditor co mplete event handler for a multitude of reasons. When this method is fired, if a new name has been entered for the Node, an Ajax.request will be fired ![]() . If the server responds favorably, it will return the database ID of the newly inserted node. The code will set the new Node’s ID via its setId method. This is important because it will ensure that subsequent edits to this Node will occur against the proper database record. If the server returns unfavorably, the temporary Node is removed from the TreePanel
. If the server responds favorably, it will return the database ID of the newly inserted node. The code will set the new Node’s ID via its setId method. This is important because it will ensure that subsequent edits to this Node will occur against the proper database record. If the server returns unfavorably, the temporary Node is removed from the TreePanel ![]() . This also occurs if onCompleteAdd is called without a new name
. This also occurs if onCompleteAdd is called without a new name ![]() . Having the UI coded this way ensures that phantom Nodes can’t exist in the TreePanel. If you plan on using this pattern to create Nodes, be sure to add a failure handler, which should alert the user of a failure and remove the temporary Node.
. Having the UI coded this way ensures that phantom Nodes can’t exist in the TreePanel. If you plan on using this pattern to create Nodes, be sure to add a failure handler, which should alert the user of a failure and remove the temporary Node.
The second method, onAddNode ![]() , is the handler for your add MenuItem. This method does quite a bit of work as well to provide the user with a temporary Node to add to the TreePanel. It does this by instantiating an instance of TreeEditor if it does not exist and binding the onCompleteAdd handler to its complete event. Next, it expands the selected Node. You expand
, is the handler for your add MenuItem. This method does quite a bit of work as well to provide the user with a temporary Node to add to the TreePanel. It does this by instantiating an instance of TreeEditor if it does not exist and binding the onCompleteAdd handler to its complete event. Next, it expands the selected Node. You expand ![]() the selected Node because the TreeEditor needs a home, which will be the soon-to-be-created Node.
the selected Node because the TreeEditor needs a home, which will be the soon-to-be-created Node.
Notice that you’re passing nulls as the first two parameters. You pass null because you don’t need to set them. They’re for deep expansion (to expand branches of branches) and to enable animation. You do pass the third and fourth parameters, however, a callback method and scope for which it’s to be called, which is the onAddNode method. You use a callback because the Ajax load is asynchronous, and you need to make sure that the load is complete for a branch Node and all of its children to be rendered before you can inject a new Node.
The callback method creates a Node configuration object with an empty string for the text, an id of 'tmpNode', and uses JavaScript shorthand to set the leaf value if the selected Node’s id isn’t 'myCompany'. This ensures that if the department has been selected to have a Node added to it, it will set the leaf property to true, meaning a person; otherwise it’s false, meaning a department Node. It then uses the new Node configuration to create a new TreeNode using the selected Node’s insertBefore method, passing the newNode configuration object and the selected Node’s firstChild reference to specify where to insert the new Node. Last, an edit operation is triggered on the newly created Node, giving users the ability to add a name to it.
Wow, that was a long one! Let’s refresh the UI and see our code in action, as shown in figure 11.9. In this figure, you can see the how we can use the TreeEditor to add Nodes to the TreePanel in a way that mimics operating system behavior.
Figure 11.9. Adding a new Node to our TreePanel using the TreeEditor

When I right-clicked the Accounting department Node, the dynamic context menu appeared as expected. I clicked the add MenuItem, which triggered our onAdd handler. This caused the Accounting Node to expand. After the child Nodes were loaded, a new Node was inserted and an edit operation was immediately triggered on that Node using the TreeEditor. I typed in a new employee name and pressed Enter. This caused the complete event to be fired by the TreeEditor, thus invoking the onCompleteAdd handler, which masked the TreePanel and performed an XHR (XMLHttpRequest). The server returned favorably, so the new Node stayed in the UI, and the database ID of the newly inserted Node was applied to the TreePanel. You can also implement this code to add department Nodes to the tree and add employees to that.
Great work! You now know how to construct TreePanels, feed them data from the server, and apply CRUD workflows with them. You can now add these widgets to your applications.
11.5. Summary
In this chapter, we covered quite a bit of code when discussing TreePanels and how to set up really cool CRUD interaction for nodes.
We started by talking about the TreePanel and discussed supporting classes like the TreeLoader, TreeNode, and TreeNodeUI. Remember that the TreePanel is a direct descendant of Panel and can be configured as a child for any Container. You constructed a static TreePanel, where the Nodes were read by memory, and analyzed how the JSON should be formatted.
We then moved on to build a dynamic TreePanel that loaded data from a remote data source and spent lots of time enabling full CRUD operations. To enable CRUD, you learned how to dynamically modify, enable, and disable the reusable context menu. You saw what it took to set up adding and editing with the TreeEditor class, which gives the TreePanel the ability to edit node names inline.
Until now, we’ve only scratched the surface with some of the tools of the framework: the Toolbar, Menus, and Buttons. In the next chapter, we’re going to dive deep, and you’ll learn more about how they work and how you can better put them to work for your applications.