
Chapter 13. Drag-and-drop basics
- Understanding the drag-and-drop workflow
- Dissecting the Ext JS drag-and-drop classes
- Implementing drag-and-drop override methods
- Exercising the full drag-and-drop lifecycle
One of the greatest advantages of using a graphical user interface is the ability to easily move items around the screen with simple mouse gestures. This interaction is known as drag and drop. We use drag and drop just about every time we use a modern computer without giving it a second thought. If you step back and think about it, you’ll realize how this makes our lives a lot easier.
Want to delete a file? Click and drag the file icon and drop it on the trash or recycle bin icon. Easy, right? What if you didn’t have drag and drop? How would you move a file from one location to the recycle bin? Let’s quickly ponder the possibilities. You’d first click the file to provide it focus. You could then use a keyboard key combination to “cut” the file. You’d then have to find and focus the recycle bin window and use the keyboard key combination to “paste” it in. Another option would be to click to select the file to focus it and press Delete on your keyboard, but if you’re right handed, this would require you to take your hand off your mouse. In contrast, drag and drop is much simpler, isn’t it? Now put yourself in the world of the RIA user. What if you could use drag and drop to simplify their experience?
Fortunately, Ext JS provides a means for you to do that. In this chapter, you’ll see that with a bit of elbow grease and determination, you can achieve the goal of adding drag and drop to your applications. You’ll start off by learning to apply drag and drop to basic DOM elements, which will give you the foundation for applying these behaviors to widgets such as the DataView, GridPanel, and TreePanel, which you’ll learn about in the chapter following this.
13.1. Taking a good look at drag and drop
Before drag and drop can take place, the computer must decide what can and can’t be dragged and what can or can’t be dropped upon. For instance, icons on your desktop can generally be dragged around, but other items, such as the clock on your task-bar (Windows) or menu bar (OS X) can’t. This level of control is necessary to allow the enforcement of certain workflows, as we’ll discuss in a bit.
In order to really understand drag and drop, we need to discuss the entire workflow. We’ll do this by dividing the workflow into what I like to call the drag-and-drop lifecycle, which can be broken up into three major categories: start of drag, the drag operation, and drop.
13.1.1. The drag-and-drop lifecycle
Using the desktop paradigm, any icon on the desktop can be dragged around, but only a select few can be dropped on (generally disk or folder icons) the trash or recycle bin, or icons for executables (applications). In Ext JS, the same registrations must occur for drag and drop to be possible. Any element that can participate in drag and drop must be initialized as such. For elements in the DOM to participate in drag and drop, they must, at the least, be registered as drag items and as drop targets. Once the items are registered, drag and drop can take place.
Drag operations are initiated by clicking and holding a mouse button over a UI element followed by mouse movement while the mouse button is being held. The computer decides, based on the registration described previously, whether the item that’s being clicked is draggable. If it isn’t, then nothing happens. The user can click and attempt a drag operation but with no results. But if an element is allowed to be dragged, the UI generally creates a lightweight duplicate of that object, known as a drag proxy, that’s anchored to the movements of the mouse cursor. This gives the user the feeling that they’re physically moving or dragging that item onscreen.
During each tick, or X-Y coordinate change, of the mouse cursor during the drag operation, the computer determines whether you can drop the item at that given position. If drop is possible, then some sort of visual invitation for a drop operation is displayed. In figure 13.1, you see a form of drop invitation where a file icon proxy is dragged over a folder icon on the desktop.
Figure 13.1. Desktop drag-and-drop interaction as seen in Mac OS X, where a drag proxy (left) is created upon an item drag event and a drop invitation is being displayed (right)

The drag-and-drop lifecycle ends when a drop operation occurs. A drop operation occurs when the mouse button is released after a drag operation has occurred. At this time the computer must decide what to do with the drop operation. Did the drop event occur on a valid drop target? If so, is the drop target part of the same drag-and-drop group as the drag element? Does it copy or move the item that was dragged? This decision is generally left to the application logic to decide and where you’ll be doing most of your coding.
Although it’s relatively easy to describe how drag and drop should behave, it’s orders of magnitude more difficult to implement—but not impossible. One of the keys to being able to effectively implement drag and drop is a basic understanding of the class hierarchy and the jobs that each class performs. This holds true from implementing drag and drop from the basic DOM level, as you’ll see in a bit, all the way to implementing it on Ext JS UI widgets.
Throttle up. We’re going to climb up to 30,000 feet and take a bird’s-eye view of the drag-and-drop class hierarchy.
13.1.2. A top-down view of the drag-and-drop classes
At first glance, the list of drag-and-drop classes can be a bit overwhelming. I know that when I first glanced at the list of classes in the API, I was taken aback by the options. With 14 classes, it can be considered a framework within a framework that provides functionality from the basic, such as the ability to make any DOM element draggable, to more complex features, such as the ability to drag and drop multiple nodes using what is called a proxy. The cool thing is that once you take a high-level look at the classes, it isn’t that difficult to organize the supporting classes and understand their roles.
This is where we’ll start our exploration. Figure 13.2 shows what the class hierarchy looks like. In this figure, you see the 11 drag-and-drop classes. All of the drag-and-drop functionality for the entire framework starts with the DragDrop class, which provides the base methods for everything drag and drop and is meant to be overridden. It provides only the basic tools for you to implement this behavior. It’s up to you to write the code for the entire spectrum of the implementation.
Figure 13.2. The drag-and-drop class hierarchy can be broken up into two major sections, drag (left) and drop (right).

This is the fundamental key to understanding how drag and drop works because this code design pattern is repeated throughout the drag-and-drop class hierarchy. This concept is extremely powerful because by having the basic tools to add this behavior to your application, you can easily ensure that drag and drop works for your application’s needs.
As you look down the chain of inheritance, you can see that a split, which starts with DD (left) and DDTarget (right). DD is the base class for all drag operations, whereas DDTarget is the base class for all drop operations. Both provide the base functionality for their respective behaviors. Having this split in functionality allows you to focus on specific behaviors. You’ll see this in action when we look at implementing drag and drop with DOM nodes a little later on.
As you move down the chain, you can see that Ext JS adds features progressively for the intended behavior. Table 13.1 enumerates the classes and provides a brief description of their designated task.
Table 13.1. Drag-and-drop classes
|
Drag classes |
Drop classes |
||
|---|---|---|---|
|
Name |
Purpose |
Name |
Purpose |
| DD | A base drag implementation where an element can be dragged around and dropped anywhere. This is where most DOM-level drag implementations take place. | DDTarget | The basic class to allow any element to participate in a drag-and-drop group, but it can’t be dragged around, meaning it can only have items dropped on it. |
| DDProxy | A basic drag implementation where a lightweight copy of the drag element, known as a drag proxy, is dragged around instead of the source element. It’s common practice to use this class for drag operations where a drag proxy is desired. | DropTarget | A base class that provides the empty plumbing for an element to take action when a draggable element is dropped onto this one. It’s left up to the developer to finish the implementation by overriding the notify methods. |
| DragSource | Provides a base implementation for drag and drop using status proxies and is the base class for DragZone. This can be used directly, but it’s more common to use the DragZone class (see below). | DropZone | A class that provides the means for multiple nodes to be dropped onto this element; it works best with the DragZone class. There is a TreePanel-specific implementation of this known as the TreeDropZone. |
| DragZone | This class allows for the drag of multiple DOM elements at a time and is commonly used with the DataView or ListView widget. To provide drag and drop with the GridPanel and TreePanel, each has its own implementations of this class known as the GridDragZone and TreeDragZone. | ||
There you have it, each of the drag-and-drop classes and what they’re designed to do. A drag item (DD class or subclasses) can be a drop target, but a drop target (DDTarget or subclasses) can’t be a drag item. It’s important to know this because if you ever decide on having an element being a drag item and a drop target, you must use one of the drag classes.
If you’re implementing drag and drop with generic DOM nodes, where you need to allow for one drag node at a time, you’d use DD or DDProxy, as you’ll see later in this chapter. If you’re looking to drag more than one element, you’ll want to use either the DragSource or DragZone classes. This is why the TreePanel and GridPanel have their own respective extensions or implementations of the DragZone class.
Likewise, if you’re looking to drop a single node, the DDTarget will be your drop class of choice. For multiple-node drops, the DropTarget or DropZone is required because they have the necessary plumbing to interact with the DragSource, DragZone, and their descendant classes.
Knowing what the classes are is just one piece of the puzzle. The next piece that you’ll need to know is what methods are to be overridden, which is the biggest key to successful deployment.
13.1.3. It’s all in the overrides!
As we discussed earlier, the various drag-and-drop classes were designed to provide a base framework for various drag or drop behaviors and are only part of what’s needed to make drag and drop useful. Each of the drag-and-drop classes contains a set of abstract methods that are meant to be overridden by you, the end developer.
Although all of these methods are listed in the framework API for each drag/drop class, it’s a good idea to at least briefly discuss a few of the more commonly used abstract methods that are to be overridden for the Ext.dd.DD class. This way you get a sense of what to look for in the API. Table 13.2 provides an overview of these methods.
Table 13.2. Commonly used abstract methods for drag and drop
|
Method |
Description |
|---|---|
| onDrag | Called for each onMouseMove event while the element is being dragged. If you plan to do something before an item is dragged, you may elect to override the b4Drag or startDrag methods. |
| onDragEnter | Called when a drag element first intersects another drag/drop element within the same drag/drop group. This is where you can code for drop invitation. |
| onDragOver | Called while a drag element is being dragged over. |
| onDragOut | Called when a drag element leaves the physical space of an associated drag or drop element. |
| onInvalidDrop | Called when a drag element is dropped on anything other than an associated drag or drop element. It’s a great place to inject notification to the user that they dropped a drag element in the wrong place. |
| onDragDrop | Called when a drag element is dropped on another drag/drop element within the same drag/drop group. |
Remember that Ext.dd.DD is the base class for all drag-specific elements, and as you move down the hierarchy, more features get added. The features added by the subclasses progressively override these methods for you.
For instance, there are a few “b4” (before) methods that Ext.dd.DD provides that allow you to code a behavior before something happens, such as before the mousedown event fires (b4MouseDown) and before the drag of an element occurs (b4StartDrag). Ext.dd.DDProxy, the first subclass of Ext.dd.DD, overrides these methods to create a draggable proxy just before the drag code begins to execute.
To figure out which methods you need to override to achieve a specific implementation, you’ll need to consult the API for that specific drag or drop class. Because Ext JS has a more aggressive release cycle, obviously some methods may be added, renamed, or removed, so looking at the API regularly will help you stay fresh with the current changes.
The last bit of drag-and-drop theory we need to discuss is the use of drag-and-drop groups and what they mean for implementing this behavior in your application.
13.1.4. Drag and drop always work in groups
Drag-and-drop elements are associated with groups, which is the basic constraint that governs whether a drag element can be dropped on another element. A group is a label that helps the drag-and-drop framework decide whether a registered drag element should interact with another registered drag or drop element.
Drag or drop elements must be associated with at least one group but can be associated with more than one. They’re generally associated with a group upon instantiation and can be associated with more via the addToGroup method. Likewise, they can be unassociated via the removeFromGroup method.
This is the last piece of the puzzle to understanding the basics of drag and drop with Ext JS. It’s time to start using and reinforcing what you’ve learned. We’ll start out simple by implementing drag and drop with DOM elements.
13.2. Starting out simple
We’ll begin our exploration with a plot that mimics a swimming pool setting, complete with locker rooms, a swimming pool, and a hot tub. There are constraints that we must follow. For instance, men and women nodes can only be in their respective locker rooms. All can go in the swimming pool, but only a few like to go into the hot tub. Now that you understand what we must create, we can begin coding.
As you’ll see, it’s extremely simple to configure an element to be dragged around the screen. But before we can do that, we must create a workspace to manipulate. We’ll do this by creating some CSS styles that govern how a specific set of DOM elements look and then apply drag logic to them. We’ll keep things as simple as possible to focus on the subject matter.
13.2.1. Creating a small workspace
Let’s create the markup to represent the locker rooms and people inside them. This listing is rather lengthy because of the HTML required to achieve the desired style and layout.
Listing 13.1. Creating our simple drag-and-drop workspace


In listing 13.1, you create the CSS styles and markup to set the stage for your exploration of basic DOM drag and drop. We begin by defining
the CSS that will control the styles for the lockerRoom ![]() element containers and their (people) child nodes
element containers and their (people) child nodes ![]() . Last, we set up the markup
. Last, we set up the markup ![]() to utilize the CSS.
to utilize the CSS.
Figure 13.3 shows what our locker HTML looks like rendered. In this figure, you see the HTML rendered onscreen. If you notice, when you hover the mouse cursor over a child node of a locker room element, the arrow will change into a hand. This is due to the CSS styling that we configured previously, and it provides a nice means of inviting a drag operation.
Figure 13.3. The locker room HTML rendered

Next, we’ll configure the JavaScript to allow these elements to be dragged around.
13.2.2. Configuring items to be draggable
In the following listing, you’ll configure the locker room child items to be draggable. You’ll see exactly how easy it is to do this.
Listing 13.2. Enabling drag for our elements

In listing 13.2, you configure the locker room child items to be dragged around the screen. To accomplish this, you gather a list of child
elements in the maleLockerRoom element by chaining a select call (DOM query) to the results of the Ext.get call ![]() . You then utilize Ext.each to loop through the list of child nodes and create a new instance of Ext.dd.DD
. You then utilize Ext.each to loop through the list of child nodes and create a new instance of Ext.dd.DD ![]() , passing the element reference, which enables that element to be dragged around the screen. You do the exact same thing for
the elements in the femaleLockerRoom.
, passing the element reference, which enables that element to be dragged around the screen. You do the exact same thing for
the elements in the femaleLockerRoom.
After refreshing the page, you can easily drag and drop the elements around the screen. As you can see in figure 13.4, you can drag any of the child divs around the screen, without constraints.
Figure 13.4. Drag enabled on the locker room elements without constraints

Let’s examine how Ext.dd.DD works and what it does to our DOM elements. To do this, we’ll need to refresh the page again and open up Firebug’s live HTML inspection tool. We’ll focus on Jack.
13.2.3. Analyzing the Ext.dd.DD DOM changes
Figure 13.5 shows the HTML of our drag elements just after a page refresh along with the DOM inspection view in Firebug.
Figure 13.5. Inspecting the DOM for the Jack element (highlighted) before a drag operation takes place

When looking at the Jack element (highlighted), the first thing you might notice is that it’s assigned a unique ID of "ext-gen3". Recall that in our markup, we didn’t assign an ID to this element. If the element already had its own unique ID, Ext.dd.DD would use it. But instead, in order to track this element by ID, it’s assigned one by the Ext.dd.DD’s superclass, Ext.dd.DragDrop.
Warning
If the id of the element is changed after it has been registered for drag, the drag configuration for that element will cease to function. If you plan to change the id for a particular element, it’s best to call the destroy method on the instance of Ext.dd.DD for that element and create a new instance of Ext.dd.DD, passing the new element ID as the first parameter.
Another thing that you’ll notice from looking at the HTML inspection is that no other attributes are assigned to that element. Now, let’s drag the element a little and observe the changes, as shown in figure 13.6.
Figure 13.6. Observing the changes that the drag operation makes on the Jack element

You can see that I dragged the Jack element a little. Ext.dd.DD, in turn, added a style attribute to the element, which changes the position, top, and left CSS properties. This is important to know because using Ext.dd.DD will result in a change of positioning for the element onscreen and is one of the key differences between using the Ext.dd.DD and the Ext.dd.DDProxy, which we’ll explore later on.
The last observation that we’ll discuss is the ability for the dragged elements to be seemingly dropped anywhere. At first, this may seem cool, and it is! But it’s hardly of use. In order to make this useful, we’ll have to apply constraints.
To do this, we’ll need to create some containers to drop them onto. This is where we’ll generate the pool and hot tub for these people to enjoy.
13.2.4. Adding the pool and hot tub drop targets
As before, we’ll add some CSS to stylize the HTML. Please insert the following CSS inside the style tags of your document. They’ll set the background color of the pool and hot tub to blue and red, respectively.
.pool {
    background-color: #CCCCFF;
}
.hotTub {
    background-color: #FFCCCC;
}
Now we’ll need to add the HTML to the document body. Append the following HTML markup below the locker room HTML table:
<table>
    <tr>
        <td align='center'>
            Pool
        </td>
        <td align='center'>
            Hot Tub
        </td>
    </tr>
     <tr>
         <td>
             <div id="pool" class="lockerRoom pool"/>
         </td>
         <td>
             <div id="hotTub" class="lockerRoom hotTub"/>
         </td>
     </tr>
</table>
This will give us the elements we’ll need to set up drop targets. Figure 13.7 shows what the HTML now renders to.
Figure 13.7. The Pool and Hot Tub HTML rendered onscreen

We’ve added all of the HTML that we need for now. Next you must set up the Pool and HotTub elements as DropTargets, which will enable them to participate in the drop portion of the drag and drop. You’ll add this code just after the JavaScript in listing 13.2.
var poolDDTarget   = new Ext.dd.DDTarget('pool', 'males'),

var hotTubDDTarget = new Ext.dd.DDTarget('hotTub', 'females'),
Here you set up an instance of Ext.dd.DDTarget each for the 'pool' and 'hotTub' elements. The first parameter for the DDTarget constructor is the ID of the element (or DOM reference). The second parameter is the group the DDTarget is to participate in.
Now, refresh your page, and drag and drop a male node onto the pool node or a female node onto the hot tub node. What happens when you drop the item onto the target? Yes—nothing. Why is that? Well, you set up drag items and the drop targets, which set the stage for complete drag and drop, but remember that it’s left up to you to follow through with the rest of the implementation. You must develop the code for the drop invitation and for valid and invalid drops. As you’ll see, this is precisely where most of the drag-and-drop implementation code will take place and is what we’ll do next.
13.3. Finishing our drag-and-drop implementation
As you just saw, setting up an element to be dragged around is simple, as is setting up a drop target. But unless you connect the dots, you’re left with a source and destination but no way to get there.
In order to add the drop invitation and valid and invalid behaviors, you need to refactor how you configure the elements to be dragged around. We’ll begin by adding one last CSS class, which you’ll use to turn the drop target green for the drop invitation.
.dropZoneOver {
    background-color: #99FF99;
}
As you can see, this CSS is simple. Whatever element has this class will have a green background. Next, we’ll work on refactoring the way you set up the male and female elements to be dragged around by setting up an overrides object that gets applied to each instance of Ext.dd.DD.
13.3.1. Adding the drop invitation
To add the drop invitation, you’ll have to completely replace how you initialized the drop targets before. The following listing shows what you’ll use and will set the stage for the valid and invalid drop behaviors.
Listing 13.3. Refactoring our implementation of Ext.dd.DD

In listing 13.3, you create an object, overrides, which will be applied to the instances of Ext.DD that will be created. You’ll override a total of five methods to achieve the desired results, but for now you’ll override
only onDragEnter ![]() and onDragout
and onDragout ![]() .
.
Remember that onDragEnter will be called only when a drag element first intersects a drag or drop element with the same associated group. Your implementation of this method will add the 'dropZoneOver' CSS class, which changes the background color of the drop element to green and provides the drop invitation that you want.
Likewise, the onDragOut method gets called when the drag element first leaves a drag-and-drop object with the same associated group. You use this
method to remove the invitation from the background of the drop element ![]() .
.
You then stub four methods, b4StartDrag, onInvalidDrop, onDragDrop, and endDrag, which we’ll fill in later on. We don’t do these now because I want you to be able to focus on the behaviors and constraints that we add in layers. But, in case you’re curious, we’ll use b4StartDrag to get the original X and Y coordinates of the drag element. These coordinates will be used in the onInvalidDrop method, which will set a local property to indicate that this method was fired. The onDragDrop method will be used to move the drag node from its original container to the dropped container. Last, the endDrag method will reset the position of the drag element if the invalidDrop property is set to true.
In order to use this overrides object, you have to refactor how you’re initializing the drag objects ![]() , for both male and female elements.
, for both male and female elements.
You do this because you need to prevent the drag element from being a drop target, which is why you add a third argument to
the DD constructor, which is meant to be a somewhat limited configuration object. You’ll see what I mean by limited in a bit. In that configuration parameter, you set isTarget ![]() to false, which sets the controlling behavior for this drag item to not be a drop target.
to false, which sets the controlling behavior for this drag item to not be a drop target.
Finally, you apply the overrides object to the newly created instance of Ext.DD ![]() . Earlier, I said that the configuration object is used only to set a limited number of properties. I said this because the
drag-and-drop code that exists in Ext JS today was written back in the early Ext JS 1.0 days, before most constructors applied
configuration properties to themselves. This is why you have to use Ext.apply to inject the override methods instead of setting them on the configuration object as you would for most constructors in the framework.
. Earlier, I said that the configuration object is used only to set a limited number of properties. I said this because the
drag-and-drop code that exists in Ext JS today was written back in the early Ext JS 1.0 days, before most constructors applied
configuration properties to themselves. This is why you have to use Ext.apply to inject the override methods instead of setting them on the configuration object as you would for most constructors in the framework.
We’ve just added the code for the invitation. Let’s see what happens when we try to drag a male node over the pool or hot tub (figure 13.8).
Figure 13.8. Condition al drop invitation for the male nodes

As your knowledge of drag and drop and code dictates, dragging a male node over a drop target (think onDragEnter) with the same associated group will result in a drop invitation, which is the background of the drop target turning green, as shown in figure 13.8. When you drag the element out of the same drop target (think onDragOut), the background will return to its original state, removing the drop invitation.
Conversely, dragging a male element over any other drop target, such as the hot tub, will result in no invitation. Why does this happen? There’s no drop invitation on the hot tub element because the hot tub is not associated with the males drop group.
Another thing you’ll notice is that dragging a female element over the hot tub results in a drop invitation on the hot tub element but not the pool, as shown in figure 13.9. That’s because the hot tub is associated only with females.
Figure 13.9. The conditional drop invitation for the female nodes

Although this demonstrates the drop invitation well, you still have the issue of the pool and the hot tub needing to be able to receive both male and female nodes. To do this, you must register them with an additional group. You need to call the addToGroup method, passing in an alternate group. Here’s what the pool and hot tub element DDTarget registration looks like with the addition of addToGroup calls:
var poolDDTarget = new Ext.dd.DDTarget('pool', 'males'),
poolDDTarget.addToGroup('females'),

var hotTubDDTarget = new Ext.dd.DDTarget('hotTub', 'females'),
hotTubDDTarget.addToGroup('males'),
After injecting this into your example, refresh the page. You can see that the pool and the hot tub drop elements now invite the drop, but what happens when you drop a drag element onto a valid drop target? Absolutely nothing. That’s because you didn’t code for the valid drop operation.
You’ll do this next.
13.3.2. Adding valid drop
To add the valid drop behavior to your drag-and-drop implementation, you must replace the onDragDrop method in your overrides object, as follows.
Listing 13.4. Adding valid drop to your overrides

In your onDragDrop method, you set up the code for a successful or valid drop operation. To do this, you first need to create local references for the drag and the drop elements.
Next, you hit a conditional if statement ![]() , where you test to see if the drag element’s parent node’s ID is the same as the drop target id and exercises the control where you don’t want to perform a drop operation on a drop target where the drag element is already
a child. If the drop target element is not the same as the drag element’s parent, then you allow the drop operation to occur;
otherwise, you call the onInvalidDrop method, which you’ll code shortly.
, where you test to see if the drag element’s parent node’s ID is the same as the drop target id and exercises the control where you don’t want to perform a drop operation on a drop target where the drag element is already
a child. If the drop target element is not the same as the drag element’s parent, then you allow the drop operation to occur;
otherwise, you call the onInvalidDrop method, which you’ll code shortly.
The code to physically move the drag element from one parent container to another is simple. Call the drop element’s appendChild ![]() method, passing in the drop element. Remember that even though Ext.dd.DD allows you to move the drag element onscreen, it only changes the X and Y coordinates. If you don’t move the drag element
to another parent node, it will still be a child of its original container element.
method, passing in the drop element. Remember that even though Ext.dd.DD allows you to move the drag element onscreen, it only changes the X and Y coordinates. If you don’t move the drag element
to another parent node, it will still be a child of its original container element.
Next, you call the onDragOut override ![]() , which will clear the drop invitation. Notice that you’re passing the eventObj and targetElId arguments to the onDragOut method. This is so the onDragOut method can do its job as designed.
, which will clear the drop invitation. Notice that you’re passing the eventObj and targetElId arguments to the onDragOut method. This is so the onDragOut method can do its job as designed.
Last, you clear the element’s style.position attribute. Recall that DD sets the position to relative, which isn’t needed after the node has been moved from one parent container to another.
This ends the override of the onDragDrop ![]() method. Figure 13.10 shows what this does to our page. As illustrated in this figure, we can successfully drop male and female elements onto both
the pool and hot tub drop elements, which successfully demonstrates our onDragDrop method in action.
method. Figure 13.10 shows what this does to our page. As illustrated in this figure, we can successfully drop male and female elements onto both
the pool and hot tub drop elements, which successfully demonstrates our onDragDrop method in action.
Figure 13.10. Male and female nodes can now be dropped onto the pool and hot tub drop targets.

Although it’s nice that males and females can now be dropped into the pool or hot tub, you can’t let them stay in there forever or they’ll prune. You need to be able to pull them out and put them back in the locker room. What happens if you try to drag them over their respective locker room? No invitation. Why? Correct. It’s because you haven’t registered the locker room elements as DDTargets. Let’s do that now.
var mlrDDTarget = new Ext.dd.DDTarget('maleLockerRoom', 'males'),
var flrDDTarget = new Ext.dd.DDTarget('femaleLockerRoom', 'females'),
Adding this code to the bottom of your drag/drop implementation allows the male drag elements to be invited and dropped on every drop target except for the female locker room. Likewise, female drag elements can be dropped on any drop target except the male locker room. This follows the paradigm where most public places don’t have coed locker rooms. We now have the drop operations completely developed. The last piece to this implementation is the invalid drop behavior set, which is what we’ll work on next.
13.3.3. Implementing invalid drop
We’ve implemented drop invitation and valid drop to our example set. I’m sure by now you’ve noticed that when you drop a node anywhere onscreen other than a valid drop point, the element stays stuck where it was dropped. This is because you need to set up the invalid drop behavior that will place the element back in its original position.
We’ll do this with style using the Ext.fx class. The following listing replaces the b4StartDrag and onInvalidDrop methods in the overrides object.
Listing 13.5. Cleaning up after invalid drop
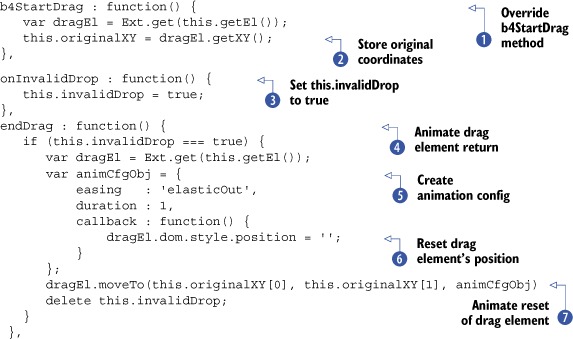
In listing 13.5, you first override the b4StartDrag ![]() method, which is called the moment a drag element is dragged. At this juncture you can store the drag element’s original
X and Y coordinates
method, which is called the moment a drag element is dragged. At this juncture you can store the drag element’s original
X and Y coordinates ![]() , which will be used for the repair operation. To repair an invalid drop means to reset the position of the drag element or proxy (as you’ll see in a bit) to its position before
the drag operation took place.
, which will be used for the repair operation. To repair an invalid drop means to reset the position of the drag element or proxy (as you’ll see in a bit) to its position before
the drag operation took place.
Next, you override onInvalidDrop ![]() , which is called when the drag item is dropped on anything other than a valid drop point, which is associated with the same
group. In that method, all you do is set the local invalidDrop property to true, which will be used in the next method, endDrag.
, which is called when the drag item is dropped on anything other than a valid drop point, which is associated with the same
group. In that method, all you do is set the local invalidDrop property to true, which will be used in the next method, endDrag.
Last, you override the endDrag method, which will perform the repair operation if the local invalidDrop property is set to true ![]() . It also uses the local originalXY property set by the b4StartDrag method. This method creates a configuration object for the animation
. It also uses the local originalXY property set by the b4StartDrag method. This method creates a configuration object for the animation ![]() .
.
In the configuration object, you set the easing to 'elasticOut', which will give the element a nice springy or elastic end to the animation, and set the duration to one second. This ensures the animation is smooth and not jerky. You also create a callback method to reset the drag element’s
style.position attribute ![]() , which ensures that the drag element fits exactly where it needs to go.
, which ensures that the drag element fits exactly where it needs to go.
Note
If you wanted to forgo the animation and just reset the position of the drag element, all onInvalidDrop has to do is set the style.position to an empty string, like so: dragEl.dom.style.position = '';.
Next, you call the drag element’s moveTo method, passing in the X and Y coordinates as the first and second parameters and the animation configuration object as the third. This invokes the animation on your drag element.
Last, you delete the local invalidDrop reference, because it’s no longer needed. You’ll need to refresh the page to see these three override methods at work.
When you drag an element and drop it anywhere other than an associated drop element, you see that it slides back to its original
position and has a cool springy effect when it gets to its target X and Y coordinates ![]() .
.
You’ve now seen what it takes to implement drag and drop with the Ext.dd.DD and Ext.DD.DDTarget classes. Next, you’ll see how to implement the DDProxy class, which is similar.
13.4. Using the DDProxy
The use of drag proxies in drag-and-drop implementation is common and is worth going over because the implementation is similar to DD but not quite the same. This is because the DDProxy allows you to drag around a lightweight version of the drag element, which is known as the drag proxy. Using the DDProxy could result in huge performance savings if the drag element is complex. Part of the performance savings comes from the fact that every instance of DDProxy uses the same proxy div element in the DOM. Remembering that the drag proxy is the element being moved around onscreen will help you understand our implementation code.
In this exercise, we’ll use the same HTML and CSS that we used before, and we’ll provide the pattern that you’ll need to use if you plan on using drag proxies in your drag-and-drop implementations.
The first thing you’ll need to do is add one more CSS rule to your page, which will style the drag proxy with a yellow background:
.ddProxy {
    background-color: #FFFF00;
}
We’ll follow the exact same flow as we did with implementing the DD class. In doing this, you’ll see that implementing the DDProxy takes a bit more code than the DD class.
13.4.1. Implementing DDProxy and drop invitation
The DDProxy class is responsible for creating and managing the X and Y coordinates of the reusable proxy element, but it’s up to you to style it and fill it with content. You’ll do this by means of overriding the startDrag method instead of the b4Drag method as you did with the DD implementation.
In the following listing, you’ll create the overrides object along with the instance of DDProxy. This listing is rather long, but you’re accomplishing quite a bit.
Listing 13.6. Implementing the drop invitation


In listing 13.6, you accomplish the tasks of stylizing the proxy, adding the drop invitation, and instantiating the instances of Ext.dd.DDProxy for each of the elements. Here’s how this all works.
The startDrag method ![]() takes care of stylizing the drag element by first adding the lockerRoomChildren and ddProxy CSS classes
takes care of stylizing the drag element by first adding the lockerRoomChildren and ddProxy CSS classes ![]() to the DragProxy element. Next, it sets the proxy’s opacity to 70 percent and duplicates the HTML contents of the drag element. It then sets
the size of the DragProxy to the size of the drag element. Then the originalXY property is set, which will be used for an invalid-drop repair operation down the road.
to the DragProxy element. Next, it sets the proxy’s opacity to 70 percent and duplicates the HTML contents of the drag element. It then sets
the size of the DragProxy to the size of the drag element. Then the originalXY property is set, which will be used for an invalid-drop repair operation down the road.
Next, you add the drop invitation by means of overriding the onDragEnter and onDragOut methods ![]() . This is exactly the same as the prior implementation. The onInvalidDrop override is the same as before as well. The last override is a stub for the onDragDrop method
. This is exactly the same as the prior implementation. The onInvalidDrop override is the same as before as well. The last override is a stub for the onDragDrop method ![]() , which you’ll fill out in just a bit.
, which you’ll fill out in just a bit.
Before you can use the drop invitation, you have to set up the drop targets for the pool, hot tub, and locker room elements:
var poolDDTarget = new Ext.dd.DDTarget('pool', 'males'),
poolDDTarget.addToGroup('females'),

var hotTubDDTarget = new Ext.dd.DDTarget('hotTub', 'females'),
hotTubDDTarget.addToGroup('males'),

var mlrDDTarget = new Ext.dd.DDTarget('maleLockerRoom', 'males'),
var flrDDTarget = new Ext.dd.DDTarget('femaleLockerRoom', 'females'),
Now that you have those set up, let’s try out the DDProxy implementation we’ve cooked up thus far. Refresh your page and drag around a drag element.
Figure 13.11 illustrates what the drag proxy looks like in action.
Figure 13.11. The DDProxy in action with one of our male drag elements

As you can see, performing a drag gesture on a draggable element produces the DragProxy, which is dragged around while the drag element itself remains stationary. You can also see that the drop invitation works. What happens when you drop the drag element on a valid or invalid drop target?
In both cases, the drag element is moved to the DragProxy’s last known coordinates, which mimics the behavior of the DD class without the valid and invalid drop behavior constraints.
Let’s add those next. The following listing wraps up our DDProxy implementation.
Listing 13.7. Adding the valid and invalid drop behaviors


In listing 13.7 you finish up the rest of our DDProxy implementation by adding the onDragDrop, b4EndDrag, and endDrag overrides.
The onDragDrop ![]() method is exactly the same as the DD implementation, where if the drop element is not the same as the drag element’s parent, you allow the drop to occur, moving
the node to the drop element. Otherwise, you call the onInvalidDrop method, which sets the invalidDrop property to true.
method is exactly the same as the DD implementation, where if the drop element is not the same as the drag element’s parent, you allow the drop to occur, moving
the node to the drop element. Otherwise, you call the onInvalidDrop method, which sets the invalidDrop property to true.
The b4EndDrag ![]() method is an intentional override using the Ext.emptyFn (empty function) reference. You do this because the DDProxy’s b4EndDrag method will hide the DragProxy before the endDrag method is called, which conflicts with the animation that you want to perform. And because it would be wasteful to allow
the DragProxy to be hidden and then show it, you prevent it from hiding by overriding b4EndDrag with a function that does nothing.
method is an intentional override using the Ext.emptyFn (empty function) reference. You do this because the DDProxy’s b4EndDrag method will hide the DragProxy before the endDrag method is called, which conflicts with the animation that you want to perform. And because it would be wasteful to allow
the DragProxy to be hidden and then show it, you prevent it from hiding by overriding b4EndDrag with a function that does nothing.
As in the DD implementation earlier, the endDrag ![]() method is tasked with doing the repair if the invalidDrop property is set to true
method is tasked with doing the repair if the invalidDrop property is set to true ![]() . But instead of animating the drag element itself, it animates the DragProxy. The animation uses the easeOut easing to allow for a smoother animation finish. The callback will hide the DragProxy and then call the highlight effect method of the drag element, animating the background from yellow to white.
. But instead of animating the drag element itself, it animates the DragProxy. The animation uses the easeOut easing to allow for a smoother animation finish. The callback will hide the DragProxy and then call the highlight effect method of the drag element, animating the background from yellow to white.
Last, if the endDrag was called with the invalidDrop property not set, it hides ![]() the proxy element from view, completing your DDProxy implementation.
the proxy element from view, completing your DDProxy implementation.
As you’ve seen, implementing the full gamut of drag and drop with generic DOM elements requires some work and understanding of basics of the drag-and-drop class hierarchy. The reward is a cool way to drag and drop elements across the screen, adding that extra bit of functionality for your users.
13.5. Summary
In this chapter we explored the basics of drag and drop and implemented two types of drag behaviors with DOM nodes, which pave the way for you to learn to implement this behavior with the UI widgets.
Along the way, we explored the basics of drag and drop and took some time to discuss its behavior model. We took a good look at the drag-and-drop mini-framework, and you learned that the classes can be grouped into two major categories: drag and drop. While discussing the class hierarchy you learned what each class is designed for.
Afterward, you learned what it takes to implement drag and drop with DOM nodes with constraints using drag groups. We discussed some of the common methods that need to be overridden to make this possible. You got to play with the cool “elastic” easing when developing the repair of the drag element.
In the last stretch, we took our basic drag-and-drop implementation and modified it to use drag proxies. You learned how to properly code a repair operation, which differs from the repair for the DD.
Next, we’ll exercise our basic knowledge of drag and drop, and you’ll learn to implement drag and drop with three UI widgets, DataView, GridPanel, and TreePanel, where you’ll learn of the different vectors for implementing this behavior.