
Chapter 8. The EditorGridPanel
- Implementing an EditorGridPanel
- Learning to exercise full data CRUD cycles
- Deploying the DataWriter
In the last chapter, you learned about the GridPanel and how it can be used to display data. We integrated a PagingToolbar into our complex GridPanel to allow us to flip through large amounts of paginated data.
In this chapter, we’ll build on our previous work to construct a working EditorGridPanel, which will allow you to modify data inline much like you can in popular desktop spreadsheet applications like Microsoft Excel. You’ll also learn how to integrate context menus and toolbar buttons with Ajax requests for CRUD operations.
You’ll start out by creating your first EditorGridPanel, where you’ll get an introduction to what an EditorGridPanel is and how edits are possible. We’ll discuss the ins and outs of setting up UI widgets for interaction to support insert and delete CRUD operations as well as how to get modified Records from the store or even reject changes. Building up an EditorGridPanel without saving the data is useless, so we’ll take advantage of this opportunity to show how to code for CRUD operations.
Afterward, we’ll integrate Ext.data.DataWriter and show how it can save you time by doing a lot of the heavy lifting and reducing the amount of code that you need to write.
This is going to be one of the most intense chapters yet.
8.1. A close look at the EditorGridPanel
The EditorGridPanel class builds on the GridPanel class, which works with the ColumnModel, to allow the use of Ext form fields to edit data on the fly without the use of a separate FormPanel. It uses the CellSelectionModel by default and has an internal event model to detect user input, such as clicks and keyboard keystrokes, to trigger the cell selection and even the rendering or repositioning of the editor fields. It can leverage the Ext.data.DataWriter class to automatically save data after it’s been edited, which we’ll explore later in this chapter.
Excited yet? Before we break ground, we should discuss what you’re going to be constructing.
We’ll expand on the complex GridPanel you constructed in the last chapter, but with some changes to allow you to edit data. The first obvious change is the use of the EditorGridPanel instead of the GridPanel widget.
Another change you’ll make is to split up the composite Address column into separate columns for each dataIndex, which will allow you to easily edit the separate address information instead of having to craft a complex editor. Figure 8.1 illustrates what your EditorGridPanel panel will look like.
Figure 8.1. A quick peek at what you’ll be constructing

In building this EditorGridPanel, you’ll leverage the necessary UI components to construct something that could be considered a mini-application, because it will have simulated CRUD (create, read, update, and delete) capabilities for Records. The reason it’s simulated is that you can’t make Ajax requests to a different domain, and in order to keep server-side code out of the picture, you need to create some static responses.
To enable CRUD, you’ll add two Buttons to the PagingToolbar that will allow you to save or reject changes. Likewise, you’ll create a usable context menu to add or delete rows based on which cell is right-clicked. This will be the most complex code thus far, and you’ll perform this in phases.
The first phase is getting the EditorGridPanel functioning. You’ll then circle back and add slices of each CRUD action, one slice at a time.
8.2. Building your first EditorGridPanel
Because you’re expanding on the complex GridPanel you built in the last chapter, you’ll see some of the exact same code and patterns. We’re doing it this way so the flow of the code is as smooth as possible. In most cases, there’ll be changes, so please take the time to read through every bit. I’ll point out all of the pertinent modifications.
Before you begin, you need to create two files that contain some JSON that will enable the simulation of server-side responses to calls you’re going to make for the CRUD actions. The first of these will be called successTrue.js and will contain
{success : true}
The second one will be called successFalse.js and will contain
{success: false}
Please save these in your project space on your development web server. Once you have that out of the way, you can begin to construct your store, as follows.
Listing 8.1. Creating our remote store
var remoteProxy = new Ext.data.ScriptTagProxy({
    url : 'http://extjsinaction.com/dataQuery.php'
});

var recordFields = [
    { name : 'id',          mapping : 'id'          },
    { name : 'firstname',   mapping : 'firstname'   },
    { name : 'lastname',    mapping : 'lastname'    },
    { name : 'street',      mapping : 'street'      },
    { name : 'city',        mapping : 'city'        },
    { name : 'state',       mapping : 'state'       },
    { name : 'zipcode',     mapping : 'zip'         },
    { name : 'newRecordId', mapping : 'newRecordId' }
];

var remoteJsonStore = new Ext.data.JsonStore({
    proxy           : remoteProxy,
    storeId         : 'ourRemoteStore',
    root            : 'records',
    autoLoad        : false,
    totalProperty   : 'totalCount',
    remoteSort      : true,
    fields          : recordFields,
    idProperty      : 'id'
});
You begin by creating your ScriptTagProxy, which will allow you to fetch data from a remote domain. You then move on to create a list of fields, which map to the data points in the raw data. Remember, these are used to create instances of Ext.data.field, which are the smallest parts of an Ext.data.Record. Notice that the last field is added to the list. Our fictitious server-side controller will use this 'newRecordId' for insert operations. We’ll discuss this further later on when we talk about saving inserted records and see why only new records will have this property.
Last, you create your remoteJsonStore, which uses your remoteProxy and recordFields. You could have set remoteJsonStore as an XType configuration object, but you’ll need that reference later on when you create some of the handlers for your CRUD actions. This will keep things simple for you down the road, I promise. For the JsonStore, you also set the idProperty to 'id', which will ensure that the data Store tracks IDs, allowing you to monitor insert operations down the road.
Your next step is to create the field editors that will be used for the ColumnModel later on, shown in the following listing.
Listing 8.2. Creating ComboBox and NumberField editors
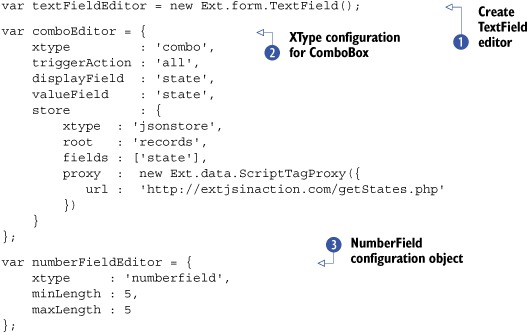
When creating your editors, you use two techniques: direct and lazy instantiation. You directly instantiate an instance of
Ext.form.TextField ![]() because you’re going to be using it multiple times, and it would be wasteful to use an XType configuration.
because you’re going to be using it multiple times, and it would be wasteful to use an XType configuration.
Conversely, the comboEditor ![]() and numberFieldEditor
and numberFieldEditor ![]() use XType configurations because they’ll be used for only a single column. The comboEditor is an XType configuration for the Ext.Form.ComboBox and has a nested XType configuration for an Ext.data.JsonStore, which uses a ScriptTagProxy so you can get a list of states from the remote database. Likewise, the numberFieldEditor is an XType configuration for the Ext.form.NumberField class. You’re using this in the ZIP Code column, so you set two basic validation rules that dictate the minimum and maximum
character lengths for the field. Because the editor is a NumberField, no alpha characters can be entered, and only values with five integers will be accepted.
use XType configurations because they’ll be used for only a single column. The comboEditor is an XType configuration for the Ext.Form.ComboBox and has a nested XType configuration for an Ext.data.JsonStore, which uses a ScriptTagProxy so you can get a list of states from the remote database. Likewise, the numberFieldEditor is an XType configuration for the Ext.form.NumberField class. You’re using this in the ZIP Code column, so you set two basic validation rules that dictate the minimum and maximum
character lengths for the field. Because the editor is a NumberField, no alpha characters can be entered, and only values with five integers will be accepted.
You can now begin creating the ColumnModel, where you’ll use the editors you just configured. As was the case for our complex GridPanel, this listing is relatively lengthy. The patterns should be obvious, however.
Listing 8.3. Creating ColumnModel

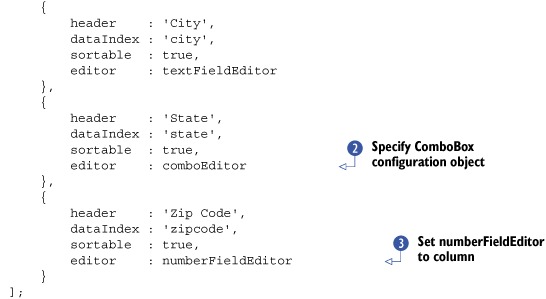
As we review the ColumnModel configuration array, you’ll see familiar properties such as header, dataIndex, and sortable. You’ll also see a new kid on the block, editor, which allows you to specify an editor for each of the Columns.
Notice that the textFieldEditor ![]() is used in four of the of the six Column configuration objects. The main reason for this is performance. Instead of using an XType configuration object and having
one instance of Ext.form.TextField instantiated for each column, the single TextField class is merely rendered and positioned where it’s needed, which saves memory and reduces DOM bloat. Consider this a performance-saving
technique. You’ll see this in action when we get around to rendering our EditorGridPanel.
is used in four of the of the six Column configuration objects. The main reason for this is performance. Instead of using an XType configuration object and having
one instance of Ext.form.TextField instantiated for each column, the single TextField class is merely rendered and positioned where it’s needed, which saves memory and reduces DOM bloat. Consider this a performance-saving
technique. You’ll see this in action when we get around to rendering our EditorGridPanel.
Last, you have the comboEditor ![]() used for the State column and the numberFieldEditor
used for the State column and the numberFieldEditor ![]() used for the ZIP Code column. Remember that because these are used only once, using an XType configuration object is okay.
used for the ZIP Code column. Remember that because these are used only once, using an XType configuration object is okay.
You now have your Store, editors, and ColumnModel configured. You can now move on to creating your PagingToolbar and EditorGridPanel, as in the following listing.
Listing 8.4. Creating the PagingToolbar and EditorGridPanel

In this code, you create the rest of your EditorGridPanel, starting with the PagingToolbar, which uses your remoteJsonStore and has the pageSize set to 50 records. Next, you create your EditorGridPanel ![]() , which has its xtype property set to 'editorgrid' and uses your columnModel, remoteJsonStore, and pagingToolbar.
, which has its xtype property set to 'editorgrid' and uses your columnModel, remoteJsonStore, and pagingToolbar.
You then move on to create the container for your EditorGridPanel, which is an instance of Ext.Window, and has its layout set to 'fit'. You use chaining to show the Window immediately after it’s instantiated.
Last, you call remoteJsonStore.load ![]() and pass a configuration object that specifies the parameters to send to the server. This ensures you start at record 0 and
limits the number of returning records to 50.
and pass a configuration object that specifies the parameters to send to the server. This ensures you start at record 0 and
limits the number of returning records to 50.
All of the pieces of the puzzle are in place for this phase. You can now render your EditorGridPanel and begin to edit data. Figure 8.2 shows the EditorGridPanel in action.
Figure 8.2. Our first EditorGridPanel
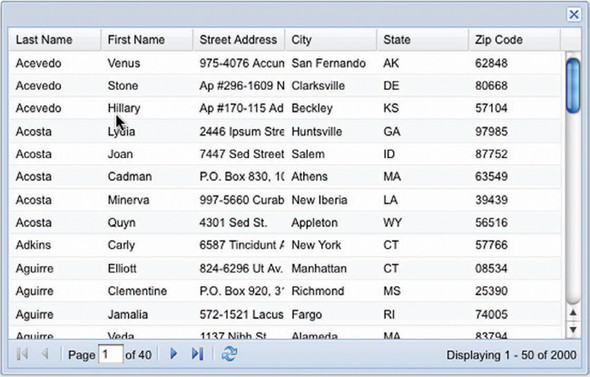
You can see that our EditorGridPanel and PagingToolbar have rendered with data just waiting to be modified. Initially this seems like a normal GridPanel. But under the covers lies a whole new level of functionality just waiting to be unleashed. We’ll take a moment to discuss exactly how you can use it.
8.3. Navigating our EditorGridPanel
You can use mouse or keyboard gestures to navigate through the cells and enter or leave editing mode.
To initiate editing mode via the mouse, double-click a cell and the editor will appear, as in figure 8.2. You can then modify the data and click or double-click another cell or anywhere else on the page to cause the blur of the editor to occur. Repeat this process to update as many cells as you wish.
You can modify how many clicks it takes to edit a cell by adding a clicksToEdit property to the EditorGridPanel configuration object and specifying an integer value. Some applications allow editing via a single click of a cell; if so, so you’d set clicksToEdit to 1 and be done.
Being a command line junkie, I feel that keyboard navigation offers you much more power than the mouse. If you’re a power user of Excel or a similar spreadsheet application, you know what I’m talking about. To initiate keyboard navigation, I like to use the mouse to focus on the first cell I want to edit. This immediately places focus exactly where I need it. I can use the Tab key or Shift-Tab key combination to move left or right. I can also use the arrow keys to focus on any cell at will.
To enter edit mode using the keyboard, press Enter, which displays the editor for that cell. While in edit mode, you can modify adjacent cells by pressing Tab to move one cell to the right or Shift-Tab to move one cell to the left.
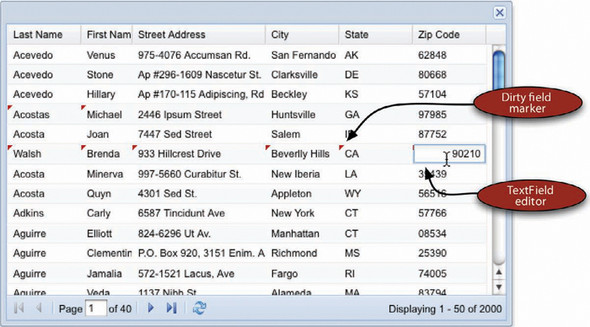
To exit edit mode, you can press Enter again or press Esc. If the data you entered or modified validates properly, the record will be modified and the field will be marked as dirty. You can see quite a few fields being modified in figure 8.3. When exiting an editor, depending whether the field has a validator and the results of the validation, the data will be discarded. To test this, edit a ZIP Code cell and enter more or fewer than five integers. Then exit edit mode by pressing Enter or Esc.
Figure 8.3. Our first EditorGridPanel with an editor and dirty field markers
You can now edit data, but the edits are useless unless you save your changes. This is where you enter the next building phase, adding the CRUD layers.
8.4. Getting the CRUD in
With EditorGridPanel, CRUD server requests can be fired either automatically or manually. Automatic requests take place whenever a Record is modified or when modifications occur and a preset timer expires in the client-side logic, firing off a request to the server. To set up automatic CRUD, you can create your own logic to send the requests, or you can do things the easy way and use the Ext.data.DataWriter class, which is exactly what you’ll do later in this chapter.
For now, we’ll focus on manual CRUD, which is when the user invokes an action via UI, such as clicking a menu Item or a Button somewhere. The reason we’re focusing on manual CRUD is that even though Ext.data.DataWriter is helpful, it won’t satisfy everyone’s needs, and going through this exercise will give you valuable exposure to what’s going on with the Store and Records when data is modified. Also, because Create and Delete are CRUD actions, you’ll explore how to insert and delete Records from the Store.
8.4.1. Adding save and reject logic
You’ll begin by creating the save and change rejection methods, which you’ll tie into Buttons that will live in your PagingToolbar. The following code is quite complicated, so please bear with me. We’ll have an in-depth discussion about it, in which I’ll walk you through just about every bit.
Listing 8.5. Setting up your save and change rejection handlers

In this listing you have two methods: onSave, which will be called when Save Changes is clicked, and onRejectChanges, which will be called when Reject Changes is clicked.
onSave contains quite a few lines to achieve your goal of data updates by means of Ajax requests. It begins with retrieving a list
of modified Records by calling the remoteJsonStore’s getModifiedRecords ![]() method, which returns a list of Record instances. In essence, whenever a Record Field is modified, it’s marked as dirty and placed into the Store’s modified list, which getModifiedRecords returns. You test to see if the length of the returned array is greater than zero, which indicates that you have data to
save. You then create an empty array, recordsToSend, which you populate by looping through the modified records using Ext.each
method, which returns a list of Record instances. In essence, whenever a Record Field is modified, it’s marked as dirty and placed into the Store’s modified list, which getModifiedRecords returns. You test to see if the length of the returned array is greater than zero, which indicates that you have data to
save. You then create an empty array, recordsToSend, which you populate by looping through the modified records using Ext.each ![]() . When calling Ext.each, you pass two parameters, the modified records list and an anonymous method, which Ext.each will call for each item in the modified list. The anonymous method takes a single parameter, record, which changes with each item in the modified list. Inside the anonymous method, you push the record.data reference, which is an object that contains every data point in the record.
. When calling Ext.each, you pass two parameters, the modified records list and an anonymous method, which Ext.each will call for each item in the modified list. The anonymous method takes a single parameter, record, which changes with each item in the modified list. Inside the anonymous method, you push the record.data reference, which is an object that contains every data point in the record.
You then mask the EditorGridPanel’s element via the mask method ![]() . You pass two properties to the mask method; the first is a message to display while the mask is visible, and the second is a CSS class that Ext JS uses to show
a spinner loading graphic.
. You pass two properties to the mask method; the first is a message to display while the mask is visible, and the second is a CSS class that Ext JS uses to show
a spinner loading graphic.
The recordsToSend reference is then overwritten with the result of the Ext.encode method call ![]() , for which you pass the original recordsToSend list. This “stringifies” your list of JSON objects so you can send it over the wire.
, for which you pass the original recordsToSend list. This “stringifies” your list of JSON objects so you can send it over the wire.
Next, you perform your Ajax.request ![]() , which is where the fun begins. You pass Ext.Ajax.request a configuration object that has three properties to get the job done.
, which is where the fun begins. You pass Ext.Ajax.request a configuration object that has three properties to get the job done.
The first is the url for which you have your successTrue.js dummy response file. Naturally, there would be some business logic here on the server side to insert or update Records. This dummy file assumes the role of a central controller for all of your CRUD operations.
The second property, params, is an object that contains the recordsToInsertUpdate property with its value set to the stringified JSON, recordsToSend. Setting the params object ensures that the XHR being lobbed over at the server has a parameter or parameters sent to it, which in this case will be one parameter. The last property of the Ajax.request single parameter is success, which is a method to be called if the server returns successful status codes, such as 200 and so on.
Because this is a simulation, you don’t check the response from the request. In here, you’d generally have some type of business logic to do something based on the results returned. For now, you unmask the grid’s element and call the remoteJsonStore’s commitChanges method.
Ext.encode is a shortcut for Ext.util.JSON.encode. Its counterpart is Ext.decode or Ext.util.JSON.decode. The Ext.util.JSON class is a modified version of Douglas Crockford’s JSON parser but doesn’t modify the Object prototype. Please see http://www.json.org/js.html for more details on Douglas Crockford’s JSON parser.
This is an important step because it clears the dirty flag from the Records and Fields that were modified, which clears the dirty flag on the modified cells within the EditorGridPanel. Failing to do this after a successful submission will result in Fields not being cleared in the UI and the modified Records not being purged from the Store’s internal modified list.
The last method, onRejectChanges, calls the remoteJsonStore’s rejectChanges method, which reverts the data to the original values in the Fields and clears the dirty flag from the UI.
The supporting methods for save and rejection are all set up. You can move on to modifying our PagingToolbar to include the two Buttons that will call these methods, as shown in the following listing.
Listing 8.6. Reconfiguring the PagingToolbar to include save and reject Buttons
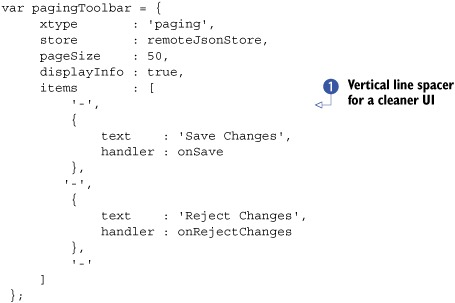
In this listing you reconfigure the PagingToolbar XType configuration object to include items ![]() , which consists of five entities. The string entities that you see with the hyphens ('-') are shorthand for the Ext.Toolbar.Separator, which will place a tiny vertical bar between toolbar child items. You’re doing this because you want to show some separation
between the Buttons and the generic PagingToolbar navigational items.
, which consists of five entities. The string entities that you see with the hyphens ('-') are shorthand for the Ext.Toolbar.Separator, which will place a tiny vertical bar between toolbar child items. You’re doing this because you want to show some separation
between the Buttons and the generic PagingToolbar navigational items.
Also in the list are generic objects, which are translated to instances of Ext.Toolbar.Button. Figure 8.4 shows the Save Changes and Reject Changes Buttons, which have their respective handlers set. As you can see in the figure, the save and reject Buttons are placed neatly inside the PagingToolbar’s center, which normally is empty space, and the Buttons are separated by neat Button separators. You can now begin to edit data and exercise your newly modified PagingToolbar functionality and newly created CRUD methods.
Figure 8.4. Our EditorGridPanel with Save Changes and Reject Changes buttons added

8.4.2. Saving or rejecting your changes
To use your save and reject buttons, you first need to modify data. Leveraging what you know about using the EditorGridPanel, change some data and click Save Changes. You should see the EditorGridPanel’s element mask appear briefly and then disappear once the save completes and the cells that are marked as dirty are marked clean or committed. Figure 8.5 shows the masking in action.
Figure 8.5. The load mask shows when save requests are being sent to the server.

Remember that your onSave method retrieved a list of modified records and used the Ext.encode method to convert the raw list of JavaScript objects to stringified JSON. It then used that JSON and posted it as the records parameter sent by the Ajax request. Figure 8.6 shows what the request and the POST parameters look like in Firebug’s XHR inspection view.
Figure 8.6. Inspecting our Ajax.request POST parameter in Firebug

As you can see in the Firebug request inspection view, the records parameter is an array of items. In this case, it’s two JavaScript objects, which represent the data records. Whenever you’re developing or debugging, always remember that you can inspect the POST and GET parameters being sent to the web server via Firebug. Also, sometimes JSON BLOBs can get enormous and extremely hard to read. What I typically do is copy the JSON from Firebug and paste it in the web form at http://JSONLint.com, which tab indents and formats the data so it’s readable.
If you were to have actual code on the server side to handle this update request, you’d read the records parameter, decode the JSON, and test to see if it’s an instance of an array. If so, you’d loop through each object inside that array and search the database for the ID that’s presented in the object instance. If the ID is in the database, you’d code the proper SQL update. Once the updates occur, you return a JSON object with {success:true} and an optional msg or errors property, which could contain a message from the server or a list of IDs for which the records could not be updated due to some business rules. You could then use the success or failure callback handlers, which you send to the Ajax.request method, to inspect what’s sent back from the server and perform commits or post error messages accordingly.
The last bit we need to discuss regarding saving modifications has to do with sorting and pagination. Remember that changing data in a sorted column throws off the sorting completely. What I typically do after a successful change in a sorted column is call the Store’s reload method, which requests a new copy of the data set from the server and fixes sorting in the UI. Remember that you’re simulating a successful server-side save, which is why you don’t reload the Store in the Ajax.request’s success handler.
You’ve saved your data and seen what it looks like going over the wire. You have yet to reject changes though. Let’s see what happens when you reject changes. To test this, modify data and click Reject Changes. What happened? Remember that the handler called the remote Store’s rejectChanges method, which looks at each Record in its modified list and calls its reject method. This, in turn, clears the dirty flag both on the Record and the UI. That’s it—no magic.
Now that you’ve seen what it takes to perform remote saves to modified Records, you’ll add create and delete functionality to your EditableGrid, which will complete your CRUD actions.
8.4.3. Adding create and delete
When configuring the UI for your save and reject functionality, you added Buttons to the PagingToolbar. Although you could add the create and delete functionality the same way, it’s best to use a context menu because it’s much smoother to delete and add from a context menu. Think about it for a second. If you’ve ever used a spreadsheet application, you know that right-clicking a cell brings up a context menu that, among other things, has insert and delete menu items. We’re going to introduce the same paradigm here.
As you did with the previously added functionality, you’ll develop the supporting methods in the following listing before you construct and configure the UI components. We’re going to ratchet up the complexity.
Listing 8.7. Constructing your delete and new Record methods

I hope you haven’t run away, but chances are that if you’re reading this right now, you’re still with me. Awesome. Some of this will look familiar to you from the save feature you added to your EditorGridPanel panel earlier.
The first method in the listing, doDelete ![]() , will be called by the delete menu item handler that you create just after it. Its only argument is rowToDelete, which is an integer indicating the index of the record that you’re to delete. This method is responsible for removing Records from the Store. Here’s how it works.
, will be called by the delete menu item handler that you create just after it. Its only argument is rowToDelete, which is an integer indicating the index of the record that you’re to delete. This method is responsible for removing Records from the Store. Here’s how it works.
This method first gets a reference to the EditorGridPanel panel via the ComponentMgr’s get method. It immediately gets the Record that the Store is to remove using the Store’s getAt method and passes the rowToDelete argument. Then it checks to see if the Record is a phantom (new Record) or not.
If it is, the Record is immediately removed ![]() from the Store, and this method is aborted with a return call. When the Record is removed from the Store, the GridView immediately shows the change by removing the Record's row in the DOM.
from the Store, and this method is aborted with a return call. When the Record is removed from the Store, the GridView immediately shows the change by removing the Record's row in the DOM.
If the Record isn’t a phantom, the grid’s element is masked, preventing any further user interaction, and provides feedback that something
is taking place. Ajax.request ![]() is then called to your server-side simulation file, successTrue.js, with the single parameter rowToDelete, which is the ID of the Record in the database. The success handler of this Ajax.request will unmask the element and remove the Record from the Store.
is then called to your server-side simulation file, successTrue.js, with the single parameter rowToDelete, which is the ID of the Record in the database. The success handler of this Ajax.request will unmask the element and remove the Record from the Store.
The onDelete handler ![]() method will query the selected cell from the selection model and request a confirmation from the user. If the user clicks
the Yes button, it will call the doDelete method. Here’s how it works.
method will query the selected cell from the selection model and request a confirmation from the user. If the user clicks
the Yes button, it will call the doDelete method. Here’s how it works.
When onDelete is first called, it gets a reference to your EditorGridPanel via the Ext.getCmp method. It then gets the selected cell via calling the EditorGridPanel’s SelectionModel.getSelectCell method. What getSelectedCell returns is an array with two values, which are the coordinates of the cell: the row and column number.
A call to Ext.MessageBox.confirm ![]() is made, passing in three arguments: title, message body, and button handler, which is an anonymous method. The button handler
determines whether the button pressed was 'yes' and calls your doDelete method, passing the first value of the cell coordinates, which is the row of the selected cell.
is made, passing in three arguments: title, message body, and button handler, which is an anonymous method. The button handler
determines whether the button pressed was 'yes' and calls your doDelete method, passing the first value of the cell coordinates, which is the row of the selected cell.
Before you move on to deploy delete, you should add the insert handler. This one is relatively small:
var onInsertRecord = function() {
     var newRecord        = new remoteJsonStore.recordType({
         newRecordId : Ext.id()
     });
     var grid             = Ext.getCmp('myEditorGrid'),
     var selectedCell     = grid.getSelectionModel().getSelectedCell();
     var selectedRowIndex = selectedCell[0];

     remoteJsonStore.insert(selectedRowIndex, newRecord);
     grid.startEditing(selectedRowIndex,0);
}
The purpose of this method is to locate the row index that was right-clicked and insert a phantom Record at the index. Here’s how it works.
First it creates a new record via a call to new remoteJsonStore.recordType. It does this by passing an object with a single property, newRecordId, which is a unique value by virtue of the Ext.id utility method call. Having this unique newRecordId will aid the server side in inserting new records and returning a mapping for the client to register real ids for each of the new Records. We’ll discuss this more a little later, when we explore what the server side could be doing with the data we’re submitting.
All data Stores have the default Record template accessible via the recordType property. Remember that to instantiate a new instance of a Record, you must use the new keyword.
Next, you create a reference, rowInsertIndex, to the row of the newly selected cell. You do this because it ends up in easier-to-read code when you use it in the following two statements.
A call is then made to the remoteJsonStore’s insert method, which requires two parameters. The first is the index for which you wish to insert the Record, and the second is a reference to an actual Record. This effectively inserts a Record above the row that’s right-clicked, emulating one of the spreadsheet features we discussed earlier.
Last, you want to initiate editing of that Record immediately. You accomplish this by a call to the EditorGridPanel’s startEditing method, passing it the row for which you inserted the new Record and 0, which means the first column.
This concludes the supporting methods for the create and delete functions. You can now move on to create the context menu handler and reconfigure the grid to listen to the cellcontextmenu event, as shown in the following listing.
Listing 8.8. Setting up your context menu handler for the EditorGridPanel

Listing 8.8 contains doCellCtxMenu ![]() , a method to handle the cellcontextmenu event from the EditorGridPanel, which is responsible for creating and showing the context menu for the insert and delete operations. Here’s how it works.
, a method to handle the cellcontextmenu event from the EditorGridPanel, which is responsible for creating and showing the context menu for the insert and delete operations. Here’s how it works.
doCellCtxMenu accepts four arguments, which are passed by the cellcontextmenu handler. They are editorGrid, a reference to the EditorGridPanel that fired the event, rowIndex and cellIndex, which are the coordinates of the cell that was right-clicked, and evtObj, an instance of Ext.EventObject.
The first function that this method performs is preventing the right-click event from bubbling upward by calling the evtObj.stopEvent, preventing the browser from displaying its own context menu. If you didn’t prevent the event from bubbling, you’d see the browser context menu on top of yours, which would be silly and unusable.
doCellCtxMenu then tests ![]() to see if the EditorGridPanel has a rowCtxMenu property and creates an instance of Ext.menu.Menu and stores the reference as the rowCtxMenu property on the EditorGridPanel. This effectively allows for the creation of a single Menu, which is more efficient than creating a new instance of Ext.menu.Menu every time the event is fired and will last until the EditorGridPanel is destroyed, as you’ll see later.
to see if the EditorGridPanel has a rowCtxMenu property and creates an instance of Ext.menu.Menu and stores the reference as the rowCtxMenu property on the EditorGridPanel. This effectively allows for the creation of a single Menu, which is more efficient than creating a new instance of Ext.menu.Menu every time the event is fired and will last until the EditorGridPanel is destroyed, as you’ll see later.
You pass a configuration object to the Ext.menu.Menu constructor, which has a single property, items, that’s an array of configuration objects that get translated to an instance of Ext.menu.MenuItem. The MenuItem configuration objects both reference the respective handlers to match the Item text.
The last two functions that this method performs are selecting the cell that was right-clicked and showing the context menu
at the correct X and Y coordinates onscreen. It does this by calling the select ![]() method of the EditorGridPanel’s CellSelectionModel and passing it the rowIndex and cellIndex coordinates. Last, you display the context menu using the coordinates where the right-click event occurred.
method of the EditorGridPanel’s CellSelectionModel and passing it the rowIndex and cellIndex coordinates. Last, you display the context menu using the coordinates where the right-click event occurred.
Before you execute your code, you’ll have to reconfigure the grid to register the context menu handler. Please add the following to your grid configuration object:
listeners : {
     cellcontextmenu : doCellCtxMenu
}
You now have everything you need to start using our new UI features. I want to see this thing in action.
8.4.4. Using create and delete
At this point, you have your insert and delete handlers developed and ready to be used. You just finished creating the context menu handler and reconfigured your grid to call it when the cellcontextmenu event is fired.
You’ll start your exploration by creating and inserting a new Record, as shown in figure 8.7.
Figure 8.7. Adding a new Record with our newly configured Insert Record menu item

As illustrated in figure 8.7, you can display the context menu by right-clicking any cell, which calls the doCellCtxMenu handler. This causes the selection to occur and displays the custom Ext menu at the mouse’s coordinates. Clicking the Insert Record menu Item forces the call to the registered handler, onInsertRecord, which inserts a new Record at the index of the selected cell and begins editing on the first column. Cool!
Now, in order to save changes, you need to modify the newly inserted Record and then click the Save Changes Button that you created earlier. Figure 8.8 shows this screen.
Figure 8.8. The UI transitions when saving our newly inserted Record

Clicking Save Changes invokes the onSave handler, which performs the Ajax.request to our mock server handler, the successTrue.js file. Figure 8.9 shows what the JSON looks like being submitted in Firebug’s XHR inspection tool.
Figure 8.9. Using Firebug to inspect the JSON being submitted for our newly inserted Record

As you can see, there’s no id associated with this Record, but there is a newRecordId property, which is a telltale sign that it’s a new Record. This property is important because the controller code on the server could use this to know that this is a new record to be inserted versus an update operation. Remember that our onSave handler is set up to handle both inserts and update operations; thus, the theoretical controller needs to be able to handle both situations. Here’s a quick overview of how things might work if you have server code to submit to.
The server would receive the records parameter and decode the JSON. It would then loop through the array and perform inserts on any of the records that have this newRecordIdProperty and return a list of database ids for the records that you’ve newly inserted. Instead of a generic return of { success : true }, it could return something much more intelligent, like a list of objects that map the newRecordId to the Record’s database id, which would look something like this:
{
   success : true,
   records : [
       {
           newRecordId : 'ext-gen85',
           id          : 2213
       }
   ]
}
Your success handler can then search the Store for the Records that you just inserted and set the Records to the database id, which effectively makes the Record a nonphantom, or a real record. The success handler code would look something like this:
success : function(response) {
     grid.el.unmask();
     remoteJsonStore.commitChanges();

     var result = Ext.decode(response.responseText);
     Ext.each(result.records, function(o) {
         var rIndex = remoteJsonStore.find('newRecordId', o.newRecordId);
         var record = remoteJsonStore.getAt(rIndex);

         record.set('id', o.id);
         delete record.data.newRecordId;
     });
}
In this snippet, you use Ext.decode to decode the returning JSON, which is the response.responseText property. You then use Ext.each to loop through the resulting array of objects. For each object in the list, you get the Record index by using the remoteJsonStore’s find method and pass two properties. The first is the field you’re searching for, which is newRecordId, and the other is the returned object’s newRecordId. You get the reference of the Record by calling the remoteJsonStore’s getAt method and pass the Record index that you just obtained. You use the Record’s set method to set the database id you just got back from the server and then move on to delete the Record’s newRecordId property. This ensures that any further modifications to that Record will only result in an update because it will pass its database id to the controller. Figure 8.10 shows what an update to the recently inserted record looks like in Firebug.
Figure 8.10. A Firebug view of a newly inserted Record followed by a subsequent update

In this figure, you can see that the newRecordId is being sent to the server for insertion. The server then returns the database id as 9999, and our newly modified success handler sets the Record’s database id and removes the newRecordId. Whoa, that’s a lot of material just for the creation of Records. What about delete? Surely that’s simpler, right?
Absolutely! Before we discuss the process of deleting records, we’ll examine how the UI works.
When you right-click a Record, an Ext.MessageBox displays to confirm the delete operation, as shown in figure 8.11. You click Yes, and an Ajax.request is made to the controller to delete the records.
Figure 8.11. The UI workflow for deleting a Record

Figure 8.12 shows what the delete request looks like in Firebug’s XHR inspection tool.
Figure 8.12. The controller request to delete a Record as viewed in Firebug’s XHR inspection tool

This works because our onDelete handler called MessageBox.confirm and will call our doDelete method, which checks to see if this is a new Record or not. Because you happened to request a deletion of a nonphantom Record, an Ajax.request was made to the central controller with one parameter, rowToDelete, which is the database id of the Record. If the record had been a phantom, the request would have never been made and the Record would have been immediately moved from the Store.
You did a lot of work to get manual CRUD operations set up for your first EditorGridPanel. In doing so, you learned more about Stores and Records and how to detect changes and save them using Ajax.requests. Along the way you got a chance to see a real-life case of an Ext confirmation MessageBox in action. Cool!
Now that you’ve learned the nuts and bolts of manual CRUD, you can switch tracks to learn how you can leverage Ext.data.DataWriter to manage CRUD operations easily and even automatically.
8.5. Using Ext.data.DataWriter
In our last example you learned how to code manual CRUD actions, which meant you had to code your own Ajax.requests. But what if you wanted the EditorGridPanel to automatically save when you’re editing? In order to do this without a Writer, you’d have to write an entire event model that fired off requests when a CRUD UI action took place. This would have to take into account exception handling, which means you’d have to code for the rollback changes. I can personally tell you that it’s a lot of work. Luckily, you don’t have to do all of this for easy and automated CRUD.
8.5.1. Enter Ext.data.DataWriter
Writer saves you time and effort by removing the requirement for you to have to code Ajax.requests and exception handling, giving you more time to do more of the important stuff, like building out the business logic for your application. Before you start coding your Writer implementation, you should have a quick review of how Writer fits into the picture.
Please recall our discussion about the operation of data Stores from the last chapter, where you learned about the flow of data from the source to the consumer. Remember that Proxy is the intermediary connection class for reads as well as writes. If this still seems a little fuzzy, figure 8.13 should help clear things up.
Figure 8.13. A depiction of the flow for data reads and writes when a data Store is used

In order to user Writer, you’ll need to reconfigure your data Store and the supporting Proxy. Instead of configuring a url property for the Proxy, you’ll create a configuration object known as the api. The proxy api is a new concept for you, and we’ll discuss it more in detail in a bit, when we review the example code.
You’ll then need to create an instance of Writer and plug it into your data Store as well as add some new configuration properties to the Store’s configuration object itself, thus completing the reconfiguration of the Store.
To reconfigure the EditorGridPanel and the CRUD actions, you’ll keep all of the UI changes but remove the supporting code for the Ajax.requests. Because you’re familiar with most of this code, we’ll be moving at a faster pace, but we’ll slow down for the new material.
8.5.2. Adding DataWriter to our JsonStore
Now that you have an understanding of what you’ll be doing, you can get out your shovels and start digging. As before, you’ll begin by reconfiguring your Store, as shown in the following listing.
Listing 8.9. Reconfiguring data Store to use Writer


In listing 8.9, you kick things off by creating a new ScriptTagProxy ![]() and pass a configuration object as the property api, which denotes URLs for each of the CRUD actions, with read being the request to load data. Instead of using the dummy successTrue.js file as a single controller, you’ll use somewhat
intelligent remote server-side code, where a controller exists for each CRUD action. Writer requires intelligent responses; thus remote server-side code was developed. Technically, you could use the same server-side
script for all of the CRUD actions, but I find it easier to create one for each action.
and pass a configuration object as the property api, which denotes URLs for each of the CRUD actions, with read being the request to load data. Instead of using the dummy successTrue.js file as a single controller, you’ll use somewhat
intelligent remote server-side code, where a controller exists for each CRUD action. Writer requires intelligent responses; thus remote server-side code was developed. Technically, you could use the same server-side
script for all of the CRUD actions, but I find it easier to create one for each action.
You then move on to create the list of fields, which gets translated into, what? Correct! Ext.data.Fields. These Fields are the lowest supporting class for the, what? Yes! The Ext.data.Record. You’re progressing in this framework nicely.
Next, you create a subclass of Ext.data.DataWriter, known as JsonWriter ![]() , which has the ability to save a request to modify a single or batch (list) of Records. In the JsonWriter configuration object, you specify writeAllFields as true, which ensures that for each operation Writer returns all of the properties, which is great for development and debugging. Naturally, you want to set this to false in production, which will reduce overhead over the wire and at the server-side and database stack.
, which has the ability to save a request to modify a single or batch (list) of Records. In the JsonWriter configuration object, you specify writeAllFields as true, which ensures that for each operation Writer returns all of the properties, which is great for development and debugging. Naturally, you want to set this to false in production, which will reduce overhead over the wire and at the server-side and database stack.
The last thing you do in this listing is reconfigure the Store. Note that everything is exactly the same except for a few property additions to enable Writer integration and some debugging capabilities.
The first addition is autoSave ![]() , which you set to false but defaults to true. If left as true, the Store would automatically fire requests for CRUD operations, which isn’t what you want just yet. I want to show you how easy it is to invoke CRUD requests with Writer now in the picture.
, which you set to false but defaults to true. If left as true, the Store would automatically fire requests for CRUD operations, which isn’t what you want just yet. I want to show you how easy it is to invoke CRUD requests with Writer now in the picture.
Next, you add the successProperty, which is used as an indication that the operation was a success or failure and is consumed by the JsonReader, which the JsonStore automatically instantiates for you. Remember, this is just like when you submitted data with the FormPanel, where you required at a minimum a return of { success : true } as the response from the web server. The same principle applies with the Store when using DataWriter. In your new remoteJsonStore, you’re specifying the successProperty of 'success', which is common and self-documenting.
The last change you make is adding a global exception event listener to your JsonStore, which is needed if you want something to occur upon any exception that the Store raises. Here, you spit all of the arguments to the Firebug console, which I use when developing with Ext.data.DataWriter because it provides a wealth of information that’s hard to find anywhere else during debugging. I highly suggest you doing the same. Trust me; it will save you time in the long run.
Cool! You’ve just re-created our ScriptTagProxy to work with your new instance of Ext.data.JsonWriter and reconfigured our Store to prevent autoSaves. Your next task is to modify the PagingToolbar and make the delete context menu handler leaner, as shown in the following listing.
Listing 8.10. Reconfiguring the PagingToolbar and delete handler
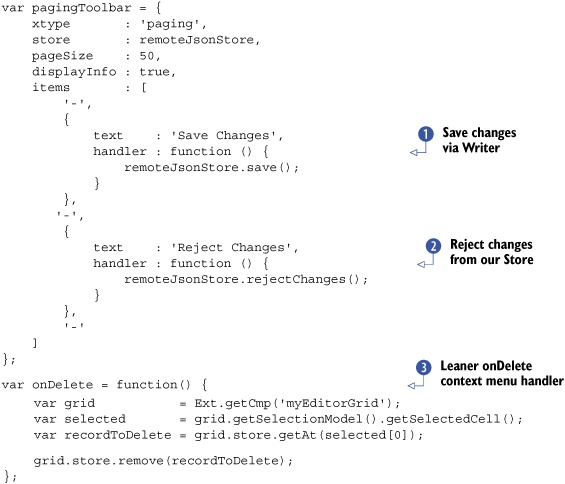
In listing 8.10, you reconfigure the PagingToolbar’s save button handler ![]() to call the save method of the data Store, which uses Writer to gather the data to save and eventually invoke a request to save changes. This effectively replaces the previous onSave handler, which is what was responsible for sending create and update Ajax.requests. This is where you start to see some of the code savings we discussed earlier. You also add an inline method to reject
to call the save method of the data Store, which uses Writer to gather the data to save and eventually invoke a request to save changes. This effectively replaces the previous onSave handler, which is what was responsible for sending create and update Ajax.requests. This is where you start to see some of the code savings we discussed earlier. You also add an inline method to reject ![]() the Store’s changes.
the Store’s changes.
Next, you refactor the onDelete ![]() context menu handler. You remove the typical confirmation dialog box to make it much leaner. You can choose to reject the
changes from here, which means that the Records that are deleted from the UI are rolled back via the rejectChanges handler you created previously. You also remove the Ajax.request code, for more code savings.
context menu handler. You remove the typical confirmation dialog box to make it much leaner. You can choose to reject the
changes from here, which means that the Records that are deleted from the UI are rolled back via the rejectChanges handler you created previously. You also remove the Ajax.request code, for more code savings.
Your changes to integrate Writer into your EditorGridPanel panel are now complete. The EditorGridPanel configuration code stays exactly the same as in listing 8.8. Let’s see Writer in action.
8.5.3. Using DataWriter
The changes you made in the previous listings where you integrated Writer were designed so you could use the same interaction to invoke a request. Now let’s see how you can reduce the amount of code when using Writer relative to creating your own Ajax.requests and handlers.
You’ll start by modifying some Records and clicking Save Changes to inspect what Writer is sending to the server. Figure 8.14 illustrates the parameters being sent for an update request in Firebug’s request inspection tool.
Figure 8.14. The result of our update request as shown in Firebug’s request inspection tool

In figure 8.14 you see the result of a request being sent to the update URL as configured in the Proxy API. Along with the usual _dc (cache buster) and callback parameters, you see id, which is a list of IDs affected, and records, which is the list of Records that were changed. You see the entire Record contents here because we set the writeAllFields configuration parameter to true.
Our server-side code then processes the list of records and returns the following JSON. The response looks like figure 8.15.
Figure 8.15. The server-side response from our update request with Writer

Notice that the successProperty, success, has a value of true, which is an indication that the server processed the data successfully. It also returned the list of records after it was processed. This is used to apply any changes that may be required by business logic. For instance, what if someone put a forbidden word as one of the values? The server could reject the change by quietly replacing that forbidden value with what was previously in that field. The UI would then update accordingly, thus completing an update cycle.
Next, you should perform an insert and see what happens. This is where things get interesting. Insert a Record via the context menu, add some values, and click the Save Changes Button in the PagingToolbar. You’ll see that a request was made to the create URL that you defined in the api configuration object for the ScriptTagProxy, as shown in figure 8.16.
Figure 8.16. Inserting a Record with Writer, as viewed in the Firebug request inspection tool
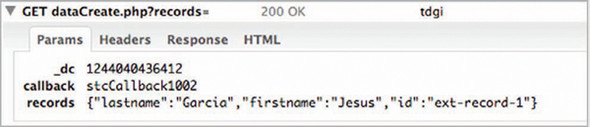
The most important item to note in the records parameter being sent to the server is the id property. Notice that the id is fictitious; its value is "ext-record-1". Because the create server-side action is different than the update action, the id parameter is ignored when the record is inserted into the database. The server then gets the id for the newly inserted record and returns the database id in return, as illustrated in figure 8.17.
Figure 8.17. Using Firebug to inspect the results of a Record insert using Writer

If an insert was successful, then the id value (along with all of the other values) returned to the browser will be applied to the recently inserted record. This ensures action requests for update and delete will submit the database id of the record moving forward. This is where you can see the added value of using Writer, because you don’t have to manage this verification logic yourself.
In our test case, you inserted a single Record. If you insert multiple Records, they’ll be submitted to the server, upon save, in an array. It’s important to note that the server must return the records in the exact same order, or the database id to record mapping or association will fail.
The delete action is the simplest, where the delete request sends a list of IDs to the host for processing. To try this out, right-click a Record, and choose Delete from the context menu. Heck, do this for a few Records. Notice how they’re removed from the store? Now click Save Changes and inspect the request in Firebug; our results are shown in figure 8.18.
Figure 8.18. The JSON parameters for a delete action request

For the delete action requests, the records parameter is a list of IDs. Let’s look at what the server side returns. Figure 8.19 shows the result from the server for the delete request.
Figure 8.19. The result of our delete action request using Writer

The server-side code takes the list of IDs, removes the records from the database, and returns the list of IDs the store is to permanently remove. And that’s all there is to delete operations.
You’ve seen how you could use Writer for CRUD operations that were invoked manually but required no special Ajax.request code and handling of your own. The last topic for discussion is automated CRUD with Writer.
8.5.4. An automated writing store
To set up Writer for automated CRUD actions, all you need to do is set the autoSave property for the data Store configuration object to true. That’s it. You already set up all of the hard stuff, if you want to call it that. Now all you need to do is exercise CRUD operations, and the Store will automatically invoke requests based on your CRUD action.
The one thing to look out for with a Store that automatically writes is that there’s no undo for actions. When data has been modified in the database, the rejectChanges method has no effect. The database reflects the latest changes. The same goes for delete and insert operations.
8.6. Summary
In this chapter you got your first exposure to the EditableGrid class and learned how it uses Ext.form.Fields to allow for editing of data on the fly. This gave you an opportunity to learn about the CellSelectionModel and some of its methods, such as getSelectedCell. You also learned how you could leverage keyboard and mouse gestures to navigate the EditorGridPanel to edit data relatively rapidly.
You learned how to manually code for CRUD operations with your own custom Ajax.request logic and used a mock controller while doing so. You added two menu items to the PagingToolbar and a context menu to the EditableGrid to allow you to insert and delete Records as well as reject changes. In doing this, you learned how to use getModifiedRecords from the Store for submission to the mock controller.
Finally, you learned how you could reduce the amount of code you need to generate by leveraging the Ext.data.DataWriter class for CRUD operations. We also discussed how to set up an automated Store with Writer.
In the next chapter, you’ll learn about another data Store–consuming component, the DataView and its descendant the ListView.