
Chapter 15. Extensions and plug-ins
This chapter covers
- Understanding the basics of prototypal inheritance
- Developing your first extension
- Getting to know how plug-ins work
- Developing a real-world plug-in
Every Ext JS developer faces the challenge where reusability becomes an issue. Oftentimes, a component of an application is required to appear more than once within the application’s usage lifetime. In much larger applications, reusability of components is paramount to performance as well as maintainability of the code itself. This is why we’ll focus on the concept of reusability with the use of framework extensions and plug-ins.
In the first section of this chapter, you’ll learn the basics of extending (subclassing) with Ext JS. You’ll begin by learning how to create subclasses with JavaScript, where you’ll get to see what it takes to get the job done with the native language tools. This will give you the necessary foundation to refactor your newly created subclass to leverage Ext.extend, implementing two different popular design patterns.
Once you’ve gotten familiar with creating basic subclasses, we’ll focus our attention on extending Ext JS Components. This is where you’ll get to have fun learning about the basics of framework extensions and solve a real-world problem by extending the GridPanel widget and seeing it in action.
When we finish the extension, you’ll learn how extensions solve problems but can create inheritance issues where similar functionality is desired across multiple widgets. Once you understand the basic limitations of extensions, you’ll convert your extension into a plug-in, where its functionality can easily be shared across the GridPanel and any descendant thereof.
15.1. Inheritance with Ext JS
JavaScript provides all of the necessary tools for class inheritance, but we as developers must take many manual steps in order to achieve this. The net result is wordy code. Ext JS makes inheritance much easier with its Ext.extend utility method. To begin learning about inheritance, you’ll create a base class.
To help you along, envision we’re working for an automobile dealership that sells two types of car. First is the base car, which serves as a foundation to construct the premium model. Instead of using 3-D models to describe the two car models, we’ll use JavaScript classes.
Note
If you’re new to object-oriented JavaScript or are feeling a bit rusty, the Mozilla foundation has an excellent article to bring you up to speed or polish your skills. You can find it at the following URL: https://developer.mozilla.org/en/Introduction_to_Object-Oriented_JavaScript.
We’ll begin by constructing a class to describe the base car, as shown in the following listing.
Listing 15.1. Constructing our base class

In listing 15.1, you create the BaseCar class constructor ![]() , which when instantiated sets the instance’s local this.octaneRequired property, adds a this.shiftTo method, and calls it, setting the local this.gear property to 'park'. Next, you configure the BaseCar’s prototype object
, which when instantiated sets the instance’s local this.octaneRequired property, adds a this.shiftTo method, and calls it, setting the local this.gear property to 'park'. Next, you configure the BaseCar’s prototype object ![]() , which contains three properties that describe the BaseCar and two methods.
, which contains three properties that describe the BaseCar and two methods.
You could use the following code to instantiate an instance of BaseCar and inspect its contents with Firebug:
var mySlowCar = new BaseCar();
mySlowCar.drive();
console.log(mySlowCar.getEngine());

console.log('mySlowCar contents:'),
console.dir(mySlowCar)
Figure 15.1 shows what the output of this code looks like in the Firebug multiline editor and console.
Figure 15.1. Instantiating an instance of BaseCar and exercising two of its methods

With our BaseCar class set, we can now focus on subclassing the BaseCar class. We’ll first do it the traditional way. This will give you a better understanding of what’s going on under the hood when we use Ext.extend later on.
15.1.1. Inheritance with JavaScript
Creating a subclass using native JavaScript is achievable with multiple steps. Rather than simply describing them, we’ll walk through the steps together. The following listing creates PremiumCar, a subclass of the BaseCar class.
Listing 15.2. Creating a subclass the old-school way

To create a subclass, you begin by creating a new constructor, which is assigned to the reference PremiumCar ![]() . Within this constructor is a call to the constructor method of the PremiumCar.superclass within the scope of the instance of PremiumCar
. Within this constructor is a call to the constructor method of the PremiumCar.superclass within the scope of the instance of PremiumCar ![]() being created (this).
being created (this).
You do this because, unlike other object-oriented languages, JavaScript subclasses don’t natively call their superclass constructor ![]() . Calling the superclass constructor gives it a chance to execute and perform any constructor-specific functions that the subclass might need. In our case, the shiftTo method is being added and called in the BaseCar constructor. Not calling the superclass constructor would mean that our subclass wouldn’t get the benefits provided by the base class constructor.
. Calling the superclass constructor gives it a chance to execute and perform any constructor-specific functions that the subclass might need. In our case, the shiftTo method is being added and called in the BaseCar constructor. Not calling the superclass constructor would mean that our subclass wouldn’t get the benefits provided by the base class constructor.
Next, you set the prototype of PremiumCar to the result of a new instance of BaseCar ![]() . Performing this step allows PremiumCar.prototype to inherit all of the properties and methods from BaseCar. This is known as inheritance through prototyping and is the most common and robust method of creating class hierarchies in JavaScript.
. Performing this step allows PremiumCar.prototype to inherit all of the properties and methods from BaseCar. This is known as inheritance through prototyping and is the most common and robust method of creating class hierarchies in JavaScript.
In the next line, you set the PremiumCar’s superclass reference to the prototype of the BaseCar class ![]() . You then can use this superclass reference to do things like create so-called extension methods, such as PremiumCar.prototype.drive. This method is known as an extension method because it calls the like-named method from the superclass prototype but from the scope of the instance of the subclass it’s attached to.
. You then can use this superclass reference to do things like create so-called extension methods, such as PremiumCar.prototype.drive. This method is known as an extension method because it calls the like-named method from the superclass prototype but from the scope of the instance of the subclass it’s attached to.
Tip
All JavaScript functions (JavaScript 1.3 and later) have two methods that force the scope execution: call and apply. To learn more about call and apply visit the following URL: http://www.webreference.com/js/column26/apply.html.
With the subclass now created, you can test things out by instantiating an instance of PremiumCar with the following code entered into the Firebug editor:
var myFastCar = new PremiumCar();
myFastCar.drive();

console.log('myFastCar contents:'),
console.dir(myFastCar);
Figure 15.2 shows what the output would look like in the Firebug multiline editor and console.
Figure 15.2. Our PremiumCar subclass in action

This output shows that our subclass performed as desired. From the console.dir output, you can see that the subclass constructor set the octaneRequired property to 93 and the drive extension method even set the gear method as "drive".
This exercise shows that you’re responsible for all of the crucial steps in order to achieve prototypal inheritance with native JavaScript. First, you had to create the constructor of the subclass. Then, you had to set the prototype of the subclass to a new instance of the base class. Next, for convenience, you set the subclass’s superclass reference. Last, you added members to the prototype one by one.
You can see that quite a few steps need to be followed in order to create subclasses with the native language constructs. Next, we’ll show how Ext.extend makes creating subclasses much easier.
15.1.2. Extending with Ext JS
There are two common patterns in using Ext.extend. The first is an older method, whose roots stem from the 1.0 days of the framework, and involves first creating the subclass constructor and then calling on Ext.extend to finish the work. The second is a more modern method, stemming from the 2.0 days of the framework, and involves having Ext.extend do all of the work.
We’ll begin by exploring the older pattern of Ext.extend. Knowing both patterns will benefit you when reading extension code from other Ext JS developers, because the usage between the two patterns varies from developer to developer. We’ll be using the previously created BaseCar class for this exercise, shown in the following listing.
Listing 15.3. Creating our first extension

In listing 15.3, you create the PremiumCar class, which is an extension (subclass) of the BaseCar class using the Ext.extend tool. Here’s how this works.
First, you create a constructor for the PremiumCar ![]() . This constructor is an exact duplicate of the previously created PremiumCar constructor.
. This constructor is an exact duplicate of the previously created PremiumCar constructor.
When thinking about extending classes, you must consider whether prototypal methods in the subclass will share the same name as prototypal methods in the base class. If they will share the same symbolic reference name, you must consider whether they’ll be extension methods or overrides.
An extension method is a method in a subclass that shares the same reference name as another method in a base class. What
makes this an extension method is the fact that it includes the execution of the base class method within itself. The PremiumCar constructor ![]() is an extension of the BaseCar constructor because of the included execution of the BaseCar constructor method. The reason you’d want to extend a method would be to reduce code duplication, reusing the code in the
base class method.
is an extension of the BaseCar constructor because of the included execution of the BaseCar constructor method. The reason you’d want to extend a method would be to reduce code duplication, reusing the code in the
base class method.
An override method is a method in a subclass that shares the same reference name as another method in a base class but doesn’t execute the same-named method from the base class. You override a method if you wish to completely discard the code that’s in the like-named method in the base class.
To complete the extension process, you call on Ext.extend ![]() , for which you’re passing three parameters: subclass, base class, and what’s known in the community as an overrides object. Here’s how this works.
, for which you’re passing three parameters: subclass, base class, and what’s known in the community as an overrides object. Here’s how this works.
Ext.extend first sets the subclass’s prototype to the result of a new instance of the base class, which is like what we did when creating our subclass manually. Ext.extend then applies the symbolic references of the overrides object to the prototype of the subclass. The symbolic references in the overrides object take precedence over those in the base class’s prototype. This is similar to us manually adding the members when we created our subclass earlier.
You can see that it took only two steps to extend the BaseCar class: create the constructor for the subclass and use Ext.extend to tie everything else together. It not only took less work on your part, but the amount of code you had to write was much smaller and easier to digest, which is one of the lesser-known benefits of using Ext.extend to subclass.
Now that you have your PremiumCar configured using Ext.extend, you can see it in action using Firebug. You can do so using the exact same code you used when exercising your manually created subclass:
var myFastCar = new PremiumCar();
myFastCar.drive();

console.log('myFastCar contents:'),
console.dir(myFastCar);
Figure 15.3 shows what it looks like in the Firebug console. Looking at that figure, you can see that Ext.extend adds some convenience references to the subclass. These can be useful from within the instance of the class. They’re references to the constructor and superclass methods. The override method is useful if you want to change members for the instance of the class that you’ve instantiated.
Figure 15.3. The results of the instantiation of the PremiumCar class

You’ve just successfully extended a class using what’s known as an old-fashioned method, which consists of creating a constructor and then calling on Ext.extend to copy the prototype from the base class to the subclass and apply the overrides object to the subclass’s prototype. This pattern of extending works perfectly fine and many use it, but there’s a much more modern pattern that we’ll be using, which allows us to reduce the extension to a single step and provide the constructor inside the overrides object.
The following listing shows the exact same extension with the modern Ext.extend implementation pattern.
Listing 15.4. Implementing Ext.extend with the modern pattern

In this implementation of Ext.extend, you pass two arguments. The first is a reference to the base class, and the second is the overrides object to be applied
to the subclass’s prototype. That’s it. The biggest difference between the first implementation and this one is that you’re including the constructor ![]() method inside the overrides object. Ext JS is smart enough to know to use this method to create a constructor for you. Last,
notice that the PremiumCar reference is the result of the Ext.extend method call.
method inside the overrides object. Ext JS is smart enough to know to use this method to create a constructor for you. Last,
notice that the PremiumCar reference is the result of the Ext.extend method call.
By now, you’re probably wondering what makes this pattern better than the first. The single and most compelling reason is code readability. For many, it’s easier to digest and read code formatted in this way. For this reason, many developers have created classes from scratch by means of extending Object, instead of creating a constructor and then a prototype object.
Here’s how you create a simple class using this newer pattern:
var NewClass = Ext.extend(Object, {
    someProperty : 'Some property',
    constructor  : function() {
        NewClass.superclass.constructor.call(this);
    },
    aMethod      : function() {
       console.info("A method has executed.");
    }
});
By now, you understand how to use the utility method Ext.extend to create subclasses. You learned that Ext.extend provides a means for creating subclasses with fewer steps compared to the traditional JavaScript method. You also got a chance to explore the two most common Ext.extend patterns used by Ext JS developers. For the rest of this book, we’ll be using the modern pattern.
Next, you’ll use your newly gain knowledge and learn how to extend Components.
15.2. Extending Ext JS Components
Extensions to the framework are developed to introduce additional functionality to existing classes in the name of reusability. The concept of reusability drives the framework, and when utilized properly it can enhance the development of your applications.
Some developers create preconfigured classes, which are constructed mainly as a means of reducing the amount of application-level code by stuffing configuration parameters into the class itself. Having such extensions alleviates the application-level code from having to manage much of the configuration, requiring only the simple instantiation of such classes. This type of class is great, but only if you’re expecting to stamp out more than one instance of this class.
Other extensions add features such as utility methods or embed behavioral logic inside the class itself. An example of this would be a FormPanel that automatically pops up a MessageBox whenever a save operation failure occurs. I often create extensions for applications for this very reason, where the widget contains some built-in business logic.
My favorite kind of extension is what I like to call a composite widget, which combines one or more widgets into one class. An example of this would be a Window that has an embedded GridPanel or a FormPanel that embeds a TabPanel to spread its fields over multiple panels.
This is the type of extension that we’ll focus on now, where we’ll merge a GridPanel with a Menu.
15.2.1. Thinking about what we’re building
When I work to construct an extension, I often take a step back and try to analyze the problem from all facets, as I do with puzzles. I do this because I view the creation of extensions as a way to solve issues. Sometimes these problems can be extremely complex, such as the creation of a dynamic wizard-like widget that has numerous workflow rules that must be controlled by the UI. Oftentimes I use extensions to solve the problem of reusability. This will be our focus for the rest of the chapter.
When thinking about common tasks during application development, I often wonder how such tasks can be made easier through an extension. One task that comes to mind is that end developers must code for the destruction of loosely coupled widgets, such as Menus or Windows, when their parent component is destroyed.
You experienced this when we explored the creation of a GridPanel, where you attached a Menu and configured it to display when the grid’s contextmenu event fires. Recall that you had to manually configure the Menu to destruct upon the GridPanel’s destruction. If you extrapolate this task over the span of an application where many GridPanels coupled with Menus are to be rendered onscreen, you can easily visualize the amount of code duplication required to make this work. Before you start coding, let’s take a moment to analyze the problem and come up with the best possible solution.
In order to mitigate this code-duplication risk, we’ll have to create an extension to the GridPanel that will automatically handle the instantiation and destruction of the Menu. But what other features can we add to this extension to make it more robust?
The first thing that comes to mind is the differences in the selection getter and setter methods for RowSelectionModel and CellSelectionModel. RowSelectionModel has selectRow and getSelected whereas CellSelectionModel has selectCell and getSelectedCell. It would be great if our extension could handle this variation in the GridPanel’s selection models. Such a feature would reduce the amount of code in the application layer.
With a clear picture of the issues we’re going to solve, we can begin the construction of our first Ext JS extension.
15.2.2. Extending GridPanel
To extend the GridPanel class, we’ll leverage the Ext.extend method, using the modern pattern. To give you an overview of our extension, the following listing contains the template for the extension that we’ll create.
Listing 15.5. The template for our GridPanel extension

Listing 15.5 contains the template for our extension and provides four methods that will be applied to the subclass’s prototype. The first
is the constructor ![]() , which will be our vector to extend the GridPanel. Let’s take a moment to analyze why we’re extending via the constructor method. Because this is such an important topic, we’ll discuss the differences in the hope that you can make an educated
choice when you decide to create extensions in your projects.
, which will be our vector to extend the GridPanel. Let’s take a moment to analyze why we’re extending via the constructor method. Because this is such an important topic, we’ll discuss the differences in the hope that you can make an educated
choice when you decide to create extensions in your projects.
Earlier in this book when we discussed the Component lifecycle, you learned of the initComponent method, which is meant to augment the constructor and is intended to be a place for developers to extend components. You learned that initComponent is executed inside the Component class’s constructor, but only after a few crucial setup tasks for the Component have taken place. These tasks include the caching and application of the configuration object properties to the instance of the class, the setup of base events, and the registration of the instance of Component with the ComponentMgr class.
Knowing this, you can make an educated decision as to where to extend an Ext JS Component. To make this decision, you must figure out if configured instances of the subclass will ever need to be cloned via the cloneConfig utility method. If so, then extending via the constructor is the best choice. Otherwise, extending via the initComponent method will work. If you’re unsure, then default to extending via the constructor. Also, it’s important to point out that all non-Component classes don’t have an initComponent method; extending via constructor is the only option.
If you look at the rest of the extension template, you’ll see three other methods in the overrides configuration object. The
first, onCellContextMenu ![]() , is the method that will respond to the cellcontextmenu events and will ultimately display the menu. The reason for choosing the cellcontextmenu event over the rowcontextmenu event is that with the cellcontextmenu event, you get the row and column coordinates for which the event occurred, which will help your extension understand how
to select the row or cell. The rowcontextmenu event provides only the row where the event occurred and is unusable when taking the CellSelectionModel into consideration.
, is the method that will respond to the cellcontextmenu events and will ultimately display the menu. The reason for choosing the cellcontextmenu event over the rowcontextmenu event is that with the cellcontextmenu event, you get the row and column coordinates for which the event occurred, which will help your extension understand how
to select the row or cell. The rowcontextmenu event provides only the row where the event occurred and is unusable when taking the CellSelectionModel into consideration.
Tip
The arguments passed to the onCellContextMenu utility method can be found in the Ext.grid.GridPanel API documentation, under the cellcontextmenu events section.
The next template method, getSelectedRecord ![]() , is a utility for getting the selected record despite the cell or row selected. This method takes into account the selection
model and leverages the correct selection model getter method. Last, the onDestroy
, is a utility for getting the selected record despite the cell or row selected. This method takes into account the selection
model and leverages the correct selection model getter method. Last, the onDestroy ![]() method extends the GridPanel’s own onDestroy method. This is where you’ll code the automatic destruction of the Menu.
method extends the GridPanel’s own onDestroy method. This is where you’ll code the automatic destruction of the Menu.
Your template class is now set and ready to be filled in. You’ll start with the constructor in the following listing.
Listing 15.6. Adding the constructor to our extension

Our constructor extension method takes care of automatically creating the instance of the Menu widget for us, but in an intelligent manner. The very first task is executing the superclass (GridPanel) constructor ![]() method within the scope of the instance of this subclass.
method within the scope of the instance of this subclass.
Next, in order to facilitate the automatic instantiation of the Menu widget, the method needs to know whether the local menu reference is present and if it’s already an instance of Ext.menu.Menu ![]() or not. This simple test allows for three different implementation possibilities for this subclass.
or not. This simple test allows for three different implementation possibilities for this subclass.
You can pass either a Menu configuration object
new CtxMenuGridPanel({
     // ... (other configuration options)
     menu : {
         items : [
            { text : 'menu item 1' },
            { text : 'menu item 2' }
         ]
     }
});
or an array of MenuItem configuration objects
new CtxMenuGridPanel({
   // ... (other configuration options)
    menu :[
         { text : 'menu item 1' },
         { text : 'menu item 2' }
     ]
});
or an instance of Ext.menu.Menu as the menu configuration
var myMenu = new Ext.menu.Menu({
items : [
     { text : 'menu item 1' },
     { text : 'menu item 2' }
    ]
});

new CtxMenuGridPanel({
    menu : myMenu
});
Having this type of flexibility for the implementation of the subclass plays into the framework’s culture. Truth be told, part of this flexibility comes from the Menu widget itself, whose constructor will accept a configuration object or array of MenuItem configuration objects. Also notice that the local this.menu reference is overwritten if an instance of Ext.menu.Menu is created.
At the end of this constructor, you configure the local this.onCellContextMenu method as the cellcontextmenu event handler ![]() . Notice that the scope for the event handler is set to this, or the instance of your GridPanel subclass. Therefore, onCellContextMenu will need the local this.menu reference to manage the display of the Menu widget itself.
. Notice that the scope for the event handler is set to this, or the instance of your GridPanel subclass. Therefore, onCellContextMenu will need the local this.menu reference to manage the display of the Menu widget itself.
Next you’ll construct an event handler method.
Listing 15.7. Constructing the onCellContextMenu event handler method
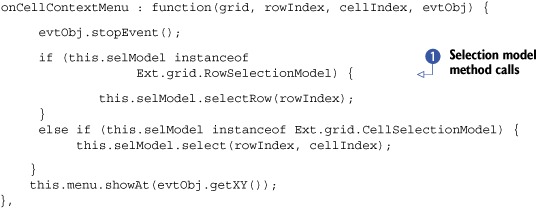
In order to properly select the cell or row being right-clicked, the event handler method needs to determine which selection
model the GridPanel is using. You can determine this by using the generic JavaScript instanceof operator. If the selection model is a RowSelectionModel ![]() , the selectRow method is being used; if it’s a CellSelectionModel, the select method is being used.
, the selectRow method is being used; if it’s a CellSelectionModel, the select method is being used.
Having such logic in the contextmenu event handler brings another level of flexibility to this extension. You can also use the same logic to determine what selection getter method to use, which is what you’ll do in the following listing.
Listing 15.8. Creating the getSelectedRecord utility method
getSelectedRecord : function() {
     if (this.selModel instanceof Ext.grid.RowSelectionModel) {
         return this.selModel.getSelected();
     }
     else if (this.selModel instanceof Ext.grid.CellSelectionModel) {
         var selectedCell = this.selModel.getSelectedCell();
         return this.store.getAt(selectedCell[0]);
     }
},
In this getSelectedRecord utility method, the Record related to the currently selected cell or row will be returned. Again, you’re using the instanceof operator to determine what type of selection model is being used and to return result of the proper getter method call.
At this point, you have all but one method filled in. The last method, onDestroy, will handle the automatic cleanup for your extension, calling for the destruction of the menu if it exists.
onDestroy : function() {

     if (this.menu && this.menu.destroy) {
         this.menu.destroy();
     }
     CtxMenuGridPanel.superclass.onDestroy.apply(this, arguments);
}
In this extension method, you inspect for the presence of a local this.menu reference and check to see if that reference contains a destroy reference. If both of these conditions are true, then you execute its destroy method. Recall that the destroy method initiates the destruction phase of a Component’s lifecycle, purging any DOM nodes that the loosely coupled Menu might have created. Last, you execute the superclass onDestroy method within the scope of this instance of your subclass, completing the extension.
Like all of the Ext JS widgets, you should register the extension with Ext.ComponentMgr to allow for the lazy instantiation of our extension with XTypes. To perform this registration, you’ll execute Ext.reg and pass the XType string to identify your subclass and the reference to your subclass itself. These statements are placed at the very end of a class’s creation:
Ext.reg('contextMenuGridPanel', CtxMenuGridPanel);
With our extension completed, we can next create an implementation of it and see it in action.
15.2.3. Our extension in action
When discussing the constructor to our GridPanel extension, we talked about the three different patterns for implementation, where the menu reference for the configuration object can be set to an array of MenuItem configuration objects, an instance of Menu, or a configuration object designed for an instance of Menu. For this implementation, we’ll choose the first pattern, which is an array of MenuItem configuration objects. This will give us an opportunity to see an automatic instantiation of Menu as coded in our extension’s constructor.
We’ll start with the creation of the remote JsonStore in the following listing.
Listing 15.9. Creating the remote JsonStore for our extension implementation
var remoteProxy = new Ext.data.ScriptTagProxy({
   url : 'http://extjsinaction.com/dataQuery.php'
});

var recordFields = ['firstname','lastname'];

var remoteJsonStore = new Ext.data.JsonStore({
    proxy         : remoteProxy,
    id            : 'ourRemoteStore',
    root          : 'records',
    autoLoad      : true,
    totalProperty : 'totalCount',
    remoteSort    : true,
    fields        : recordFields
});

var columnModel = [
    {
        header    : 'Last Name',
        dataIndex : 'lastname'
    },
    {
        header    : 'First Name',
        dataIndex : 'firstname'
    }
];
Next, you’ll create a generic handler for the MenuItems and the implementation of our extension.
Listing 15.10. Implementing our extension

In listing 15.10, you first create a generic handler for the MenuItems that you’ll configure later. This will provide visual feedback that you’ve successfully clicked a MenuItem. Notice that it leverages the extension’s getSelectedRecord ![]() utility method to gain a reference to the record selected by the right-click event.
utility method to gain a reference to the record selected by the right-click event.
Next, you create an XType configuration object for the extension by setting the generic object’s xtype ![]() property to 'contextMenuGridPanel', which is the string you registered with ComponentMgr. All of the configuration options are common to the GridPanel. Notice that you’re using the CellSelectionModel instead of the default RowSelectionModel. This gives you an opportunity to test both the onCellContextMenu event handler and the getSelectedRecord utility method to see if they can leverage the correct selection getter and setter methods.
property to 'contextMenuGridPanel', which is the string you registered with ComponentMgr. All of the configuration options are common to the GridPanel. Notice that you’re using the CellSelectionModel instead of the default RowSelectionModel. This gives you an opportunity to test both the onCellContextMenu event handler and the getSelectedRecord utility method to see if they can leverage the correct selection getter and setter methods.
The very last configuration item, menu, is an array of objects. Recall that your extension’s constructor will automatically create an instance of Ext.menu.Menu for you if configured. This is the first time you get to see how taking the trouble to generate such an extension can save time.
To render this onscreen, let’s wrap the extension in a Window:
new Ext.Window({
    height : 200,
    width  : 300,
    border : false,
    layout : 'fit',
    items  : grid,
    center : true
}).show();
To implement your extension, all you need to do is right-click any cell. This will invoke the display of the automatically instantiated Menu widget and select the cell that was right-clicked, using the onCellContextMenu event handler method. Next, click any of the MenuItems, which will invoke the generic onMenuItemClick hander. This will exercise the extension’s getSelectedRecord utility method.
The contents of the selected Record will be displayed in the MessageBox as coded in the onMenuItemClick handler method. See figure 15.4.
Figure 15.4. Our extension

With this implementation of our extension, you didn’t have to create an instance of Menu and set up an event handler to display the Menu. You didn’t have to configure the destruction of the Menu, either. Our extension takes care of all of the dirty work for us, requiring only the configuration an array of MenuItem configuration objects.
You’ve just seen our extension in action. Clearly, we solved a problem where code duplication would occur often in a large application. The extension solves this problem and automates a few of our actions. Although our extension solved the problem of code duplication, it does have some limitations that may not be apparent but are important to understand.
15.2.4. Identifying the limitations of extensions
For a moment, put yourself into this situation: You’re building an application that requires the GridPanel, EditorGridPanel, and PropertyGridPanel. You’re required to attach context menus to each of these types of widgets. You already made an extension to GridPanel to make the task of attaching menus easier.
So here’s the question: How do you get the same easy menu functionality across the other types of grids? To put this into context, figure 15.5 illustrates the GridPanel class hierarchy, including our ContextMenuGridPanel extension.
Figure 15.5. The GridPanel class hierarchy with our ContextMenuGridPanel extension

This diagram illustrates that the EditorGridPanel and ContextMenuGridPanel both extend GridPanel. How can we solve this problem? One solution would be to extend EditorGridPanel and PropertyGridPanel to carry over this functionality. That would make the class hierarchy look like that shown in figure 15.6.
Figure 15.6. A proposed class hierarchy, where code duplication is possible

To achieve this solution, you could either elect to duplicate code or perhaps even stitch together some type of cross-inheritance model. No matter what the solution, it’s not going to be elegant or useful.
The only real solution to this problem is a plug-in.
15.3. Plug-ins to the rescue
Plug-ins solve this exact problem by allowing developers to distribute functionality across widgets without having to create extensions; they were introduced in Ext JS version 2.0. What also makes plug-ins powerful is the fact that you can have any number of them attached to a Component.
The basic anatomy of a plug-in is simple and can be defined as a generic object with an init method:
var plugin = {
    init : function(parent) {

    }
}
If you can recall the initialization phase of the Component lifecycle, you’ll remember that at the end of the Component constructor execution, any configured plug-ins are brought to life. The Component executes each plug-in’s init method and passes itself (this) as the only argument.
From a plug-in’s perspective, I like to think of the Component that a plug-in is attached to as the plug-in’s parent. When a plug-in’s init method is executed the first time, it’s aware of its parent Component, and this is a crucial time for the plug-in to perform any work that may be required before a Component is rendered. An example of this is the attaching of event handlers.
Before we convert our extension to a plug-in, I want to show you a much more flexible and powerful plug-in design pattern.
15.3.1. A robust plug-in design pattern
When I develop plug-ins, I use a more complex but thorough pattern compared to the simple example shown previously. I do so because there are times where it’s necessary to add methods to the parent Component itself. Also, it’s our responsibility to code any cleanup actions, such as the destruction of any loosely coupled widgets.
Before we implement this pattern on a large scale, we should look at a skeleton and discuss it; see the following listing.
Listing 15.11. A thorough plug-in design pattern
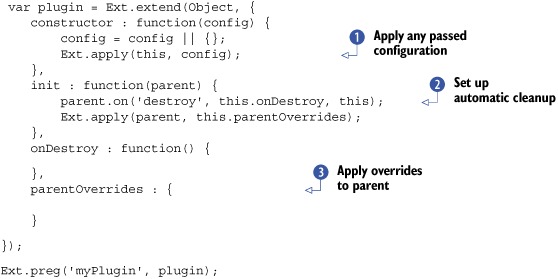
As you can see, this plug-in pattern is a bit more involved than the first but is much more robust. You start out with the
extension of Object and have a full constructor, where the configuration properties passed are applied to the instance of the class ![]() . This works exactly like most of the classes in the framework.
. This works exactly like most of the classes in the framework.
Next is the init method, which automatically registers the local onDestroyMethod as a handler ![]() for the parent Component’s destroy event. onDestroy is where you’d want to place your plug-in’s cleanup code. Also, notice that you’re applying the local parentOverrides
for the parent Component’s destroy event. onDestroy is where you’d want to place your plug-in’s cleanup code. Also, notice that you’re applying the local parentOverrides ![]() object to the parent Component. Having this capability means that you can extend on the fly, or add methods and properties to the parent Component. Not all plug-ins add members to the parent Component, but this mechanism provides a means to do so if you need to.
object to the parent Component. Having this capability means that you can extend on the fly, or add methods and properties to the parent Component. Not all plug-ins add members to the parent Component, but this mechanism provides a means to do so if you need to.
Note
All methods applied to the parent Component will execute with the scope of the parent Component.
In the last bit, you execute Ext.preg, which registers the plug-in with Ext.ComponentMgr as what’s known as a PType, or plug-in type, and is exactly like an XType. Although this last step isn’t necessary for a plug-in to be used, it allows for lazy instantiation by the framework.
Now that you know the basics of plug-ins, we can begin work to convert our extension to a plug-in.
15.3.2. Developing a plug-in
Our plugin needs to be able to do exactly what the extension was capable of. This includes the instantiation of a Menu and attaching the cellcontextmenu to the parent Component to be able to display the Menu. It also needs to manage the destruction of the Menu when the parent Component is destroyed. We can’t leave out the getSelectedRecord utility method, which means we’ll get to exercise the application of the parentOverrides object of our plug-in design pattern.
A lot of the code we’ll assemble will come from the extension we created earlier. This means that we can move a bit faster, focusing on how the plug-in works. The following listing is the template for our plug-in.
Listing 15.12. The template for our plug-in
var GridCtxMenuPlugin = Ext.extend(Object, {
    constructor : function(config) {

    },
    init : function(parent) {

    },
    onCellContextMenu : function(grid, rowIndex, cellIndex, evtObj) {

    },
    onDestroy : function() {

    },
    parentOverrides : {
        getSelectedRecord : function() {

        }
    }
});

Ext.preg('gridCtxMenuPlugin', GridCtxMenuPlugin);
In the plug-in template in listing 15.12, you add the onCellContextMenu handler method, which, just like in our extension, will handle the display of the menu and proper selection. You also add the getSelectedRecord utility method to the parentOverrides object. This will give you an opportunity to exercise adding a method to a parent Component on the fly.
Our template is set. We can begin filling in the methods. We’ll start with the constructor and the init methods, shown in the following listing.
Listing 15.13. Adding the constructor and init methods to our plug-in

For the constructor method, you use the constructor from the pattern where you apply the passed configuration object to the instance of the plug-in. This will be useful because when you implement this plug-in, you’ll be configuring the menu on the plug-in itself.
In the init method, you set a local this.parent ![]() reference to the parent Component. This is useful for methods on the plug-in itself that need to do something to or with the parent Component.
reference to the parent Component. This is useful for methods on the plug-in itself that need to do something to or with the parent Component.
Next, an if block tests to see if the parent Component is an instance of the GridPanel widget ![]() . This type of test allows this plug-in to work only with GridPanels or any descendant thereof and is the type of control pattern to use to prevent the accidental use of plug-ins for widgets
that they aren’t designed for.
. This type of test allows this plug-in to work only with GridPanels or any descendant thereof and is the type of control pattern to use to prevent the accidental use of plug-ins for widgets
that they aren’t designed for.
Inside this block, the creation of a Menu widget and registration of related event handlers ![]() will occur just like for our extension. The difference is that a destroy handler is added to allow the plug-in to destroy the Menu widget.
will occur just like for our extension. The difference is that a destroy handler is added to allow the plug-in to destroy the Menu widget.
The first two methods are filled in. In the next listing, you’ll fill in the last three.
Listing 15.14. Adding the last three methods to our plug-in
onCellContextMenu : function(grid, rowIndex, cellIndex, evtObj) {
    evtObj.stopEvent();

    if (grid.selModel instanceof Ext.grid.RowSelectionModel) {
         grid.selModel.selectRow(rowIndex);
    }
    else if (grid.selModel instanceof Ext.grid.CellSelectionModel) {
         grid.selModel.select(rowIndex, cellIndex);
    }
    this.menu.stopEvent(evtObj.getXY());
},
onDestroy : function() {
    if (this.menu && this.menu.destroy) {
        this.menu.destroy();
    }
},
parentOverrides : {
    getSelectedRecord : function() {
        if (this.selModel instanceof Ext.grid.RowSelectionModel) {
            return this.selModel.getSelected();
       }
       else if (this.selModel instanceof Ext.grid.CellSelectionModel) {
           var selectedCell = this.selModel.getSelectedCell();
           return this.store.getAt(selectedCell[0]);
       }

    }
}
The first of the last three methods, onCellContextMenu, will be called within the scope of the instance of the plug-in as registered in the init method. It works almost exactly like the similarly named method on our extension, except it references the parent Component via the first argument.
The onDestroy method too will execute within the scope of the instance of the plug-in and will destroy the menu accordingly. The parentOverrides object contains the getSelectedRecord utility method that’s applied to the parent Component by the plug-in’s init method. Remember that this method will execute within the scope of the parent Component.
The construction of the plug-in is now complete. It’s time to put it into action.
15.3.3. Our plug-in in action
To exercise our plug-in, we’ll construct a GridPanel that will use a lot of the same code from the previous GridPanel implementation. The difference is that we’ll configure the plug-in, which will contain the Menu configuration. Replacing the Menu configuration on the GridPanel will be the plugin.
We’ll begin by creating the data Store. A lot of this is repeat code, so we’ll be moving relatively fast.
Listing 15.15. Constructing the data Store
var remoteProxy = new Ext.data.scriptTagProxy({
   url : 'http://tdgi/dataQuery.php'
});

var recordFields = ['firstname','lastname'];

var remoteJsonStore = new Ext.data.JsonStore({
    proxy         : remoteProxy,
    id                : 'ourRemoteStore',
    root              : 'records',
    autoLoad          : true,
    totalProperty     : 'totalCount',
    remoteSort        : true,
    fields            : recordFields
});
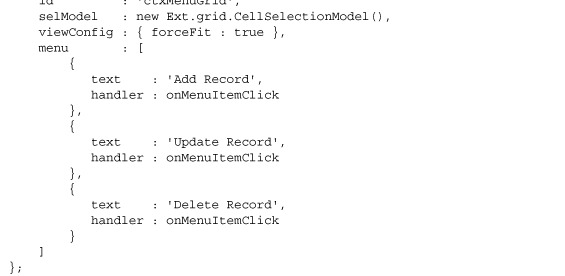
In the next listing, we’ll create the generic MenuItem handler and configure a plug-in.
Listing 15.16. MenuItem handler and plug-in
var onMenuItemClick = function(menuItem) {
   var ctxMenuGrid = Ext.getCmp('ctxMenuGrid'),
   var selRecord = ctxMenuGrid.getSelectedRecord();
   var msg = String.format(
        '{0} : {1}, {2}',
        menuItem.text,
        selRecord.get('lastname'),
        selRecord.get('firstname')
   );

   Ext.MessageBox.alert('Feedback', msg);
};

var ctxMenuPlugin = {
    ptype : 'gridCtxMenuPlugin',
     menu : [
        {
           text    : 'Add Record',
           handler : onMenuItemClick
        },
        {
           text    : 'Update Record',
           handler : onMenuItemClick
        },
        {
           text    : 'Delete Record',
           handler : onMenuItemClick
        }
    ]
};
Along with the creation of the generic Menuitem handler, we configure the plug-in using a PType configuration object. Ext JS will use this to lazy-instantiate an instance of the plug-in we created and registered with the string "gridCtxMenuPlugin". Again, this is just like XTypes for Components.
Last, we’ll create the GridPanel that will use the plug-in and display it onscreen.
Listing 15.17. Configuring and showing the GridPanel
var columnModel = [
     {
        header    : 'Last Name',
        dataIndex : 'lastname'
     },
     {
        header    : 'First Name',
        dataIndex : 'firstname'
     }
];

var grid = {
    xtype      : 'grid',
    columns    : columnModel,
    store      : remoteJsonStore,
    loadMask   : true,
    id         : 'ctxMenuGrid',
    viewConfig : { forceFit : true },
    plugins    : ctxMenuPlugin
};

new Ext.Window({
    height : 200,
    width  : 300,
    border : false,
    layout : 'fit',
    items  : grid,
    center : true
}).show();
In listing 15.17, we configure a GridPanel XType object that uses the ctxMenuPlugin that we configured earlier and display it via an Ext.Window. In this implementation, we configured only one plug-in via the plugins reference. If we had more than one, we’d configure an array of plug-ins such as plugins : [ plugin1, plugin2, etc].
Rendering this onscreen, you can see that we have the exact same functionality as our GridPanel extension, as shown in figure 15.7.
Figure 15.7. Our first plug-in

If you want to read the source code for other plug-ins, you can look at the Ext JS SDK examples/ux directory, which has a few examples of plug-ins. Using the pattern that we just implemented, I contributed two plug-ins.
The first, shown in figure 15.8, is known as the TabScrollerMenu (TabScrollerMenu.js), which adds a Menu to scrolling TabPanels, allowing users to select and focus a TabPanel much easier than having to scroll. To see this plug-in in action, navigate to the <your extjs dir>/examples/tabs/tab-scroller-menu.html URL in your browser.
Figure 15.8. The TabScrollerMenu

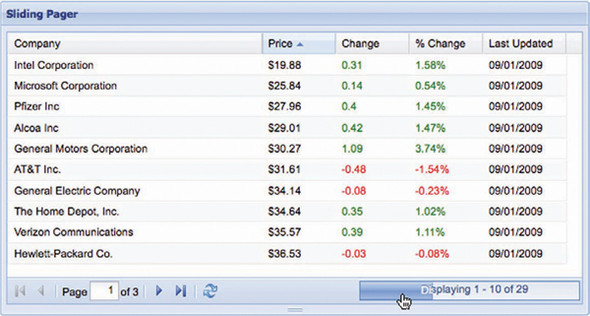
The second, shown in figure 15.9, is known as the ProgressBar PagingToolbar (ProgressBarPager.js), which adds an animated ProgressBar to the PagingToolbar widget, making the PagingToolbar much nicer to look at. To view this plug-in in action, point your browser to <your extjs dir>/examples/grid/progress-bar-pager.html.
Figure 15.9. A plug-in that adds an animated ProgressBar to the PagingToolbar
This concludes the exploration of plug-ins. By now, you have the necessary basics to create plug-ins that can enhance functionality in your projects. If you have an idea for a plug-in and aren’t too sure if it’s been done before, visit us at the Ext JS forums via http://extjs.com/forum. An entire section is dedicated to user extensions and plug-ins, where fellow community members have posted their work, some of which is completely free to use.
15.4. Summary
In this chapter, you learned how to implement the prototypal inheritance model using the basic JavaScript tools. During that exercise you got to see how this inheritance model is constructed step by step. Using that foundational knowledge, we refactored our subclass using the Ext.extend utility method and implemented the two most popular extend patterns.
Next, we took all of our foundational knowledge and applied it to the extension of an Ext JS GridPanel and created a composite GridPanel and Menu component. This gave us an opportunity to discuss which vector to extend from, constructor or initComponent, and you learned how extensions can assist with reusability in your applications.
Last, we analyzed how extensions can be limited when reusability needs to span multiple widgets. You got to see this in action when we studied how the added features found in our newly created GridPanel extension could not be easily applied to descendants of the GridPanel, such as the EditorGridPanel. In order to mitigate this problem, we converted the code in our GridPanel extension into a plug-in that could be applied to a GridPanel or any descendant thereof.
Next, you’ll learn how to use all of the knowledge we’ve gathered thus far in this book and learn the trade secrets of building complex applications.