Appendix 3 Introducing the SAS Windowing Environment
This appendix is intended to help you start using SAS in the windowing environment. SAS automatically starts in the windowing environment on a PC. This appendix discusses the following topics:
- viewing initial windows in the environment
- creating a SAS program
- submitting a program
- saving a program
- opening a saved program
- printing a program
- printing and saving output
Note: A PDF version of this appendix, in color, can be found at support.sas.com/publishing/authors/Schlotzhauer.html.
The windowing environment has subtle updates with releases of SAS. The updates might include additional choices in menus or other new features. This appendix describes the windowing environment for SAS 9.2. If you are using a different release of SAS, the appearance of and features for your environment might be different. In this situation, the best source of information is the online Help for your release. Look for a tutorial that introduces you to the SAS windowing environment for your release.
Viewing the Program Editor Window
Saving, Including, and Printing Programs
When SAS starts in the windowing environment, it automatically opens the Editor, Log, Output, and Explorer windows. After you run a program, the Results window displays a table of contents for your output. Figure A3.1 shows an example of the automatic windows:
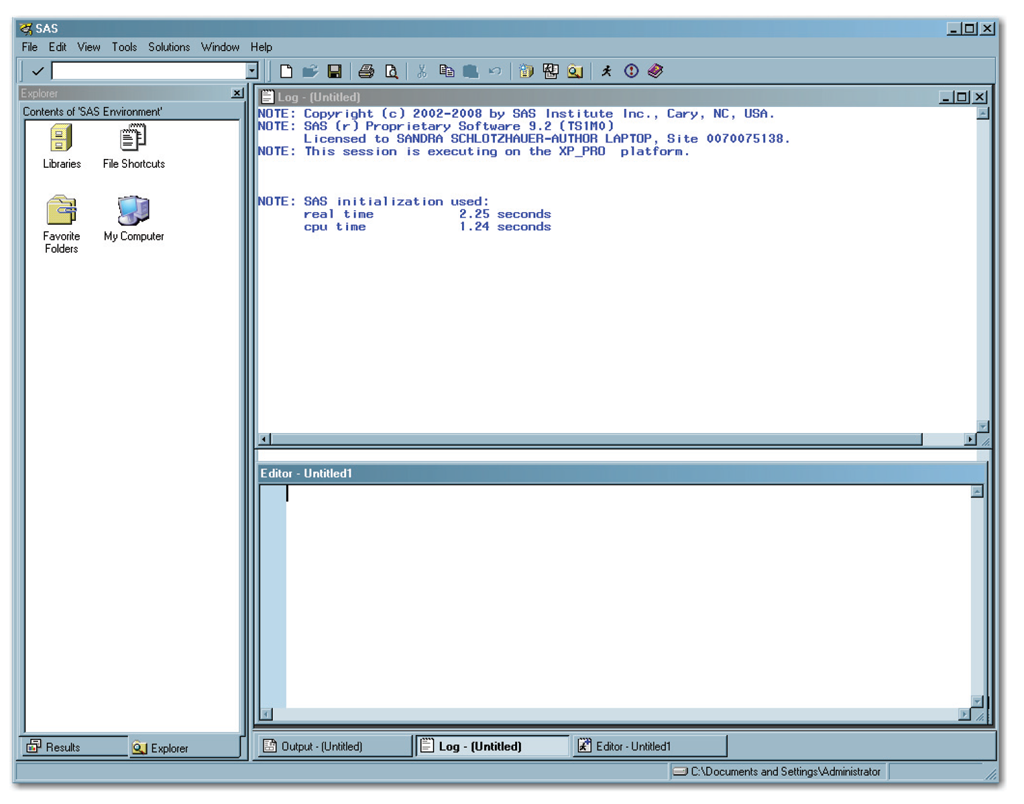
The Log window is active. Only one window is active at a time in the environment. The active window displays the window title in a different color from the other windows.
On a PC, SAS automatically opens the Enhanced Editor window. For other operating systems, SAS displays the Program Editor window, which has fewer features, and the features vary by operating system and release of SAS. The rest of this appendix refers to the Enhanced Editor window as the Editor window.
The Log window shows the SAS log, which includes notes, warnings, and error messages. Figure A3.1 shows the messages that appear when SAS starts.
The Output window is behind the Editor and Log windows when SAS starts. You can activate this window by clicking the Output tab at the bottom.
The command bar, which appears above the Explorer window, is where you enter commands. This is most useful for experienced users, and is not discussed in this appendix. As you become familiar with SAS, you might want to use this bar. Until then, you can hide it. In the command bar, type the following:
command close
Then, press ENTER. The command bar disappears.
Several icons appear on the toolbar between the top of the windows and the menu bar. As you learn SAS, you might want to customize the toolbar. All of the automatic choices in the toolbar are also available from the menu bar. The last toolbar choice (the book with a question mark) displays the SAS Help and Documentation window.
You can use the Explorer window to locate files that contain programs or data sets. Close the window by clicking the X in the upper right corner.
The simplest approach for creating SAS programs is to type the text in the Editor window. To enter text in the window, simply start typing. Press ENTER when you want to start a new line.
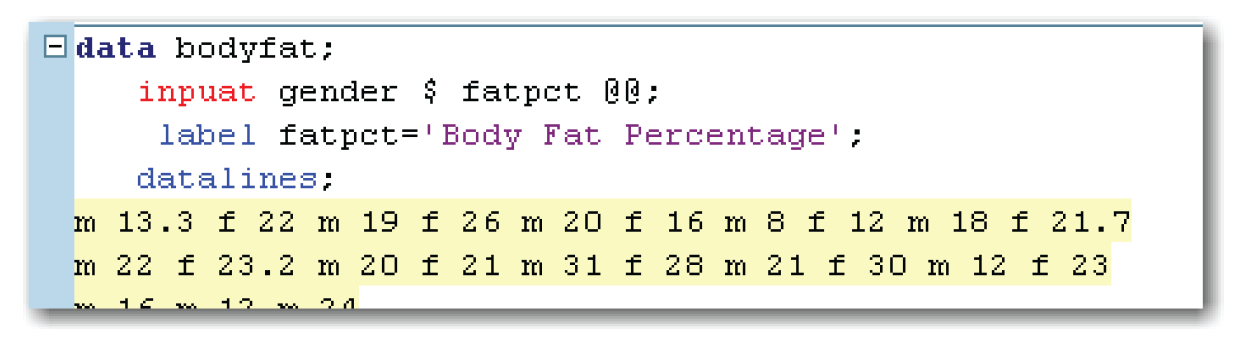
This window uses color-coding. Figure A3.2 shows an example of the color-coding, using the program from Chapter 1 of this book.

The list below summarizes some useful features of the Editor window:
- SAS groups statements for DATA and PROC steps. You can collapse or expand the step by clicking on the – or + sign, respectively. The statement that starts each step appears in dark blue. Figure A3.2 shows the words DATA, PROC PRINT, and PROC MEANS in dark blue.
- Data lines are highlighted in yellow.
- Text for titles or labels appears in violet.
- SAS statement names and options appear in medium blue. For example, Figure A3.2 shows the INPUT, LABEL, and DATALINES statements in medium blue.
- Figure A3.3 shows how the Editor window highlights errors in red.
Viewing the Program Editor Window
For operating systems other than the PC, SAS automatically uses the Program Editor window. Although you can view this window on the PC by selecting View→Program Editor, you are likely to find the Editor window more helpful. Figure A3.4 displays the Program Editor window with the program from Chapter 1.

SAS follows the same approach as most PC applications. After selecting text, you can edit, copy, cut, and paste using either menu choices or CTRL keys.
To copy, select the text. Then, either select Edit→Copy, or press CTRL+C.
To paste, either select Edit→Paste, or press CTRL+V.
To cut, select the text. Then, either select Edit→Cut, or press CTRL+X.
To undo your most recent edit, either select Edit→Undo, or press CTRL+Z.
Figure A3.5 shows these choices.

When you want to submit the SAS code, select Run→Submit, or click the Submit icon, or press the F3 key. (The Submit icon on the toolbar is the “running” icon that shows a person running.)
Figure A3.6 shows the choices from the Run menu.

Suppose you submit a program, and then you decide to change it. Perhaps you want a different title, you want to use different options, or you need to fix an error.
On a PC, the Editor window still contains your program after you submit it. You can change the code, and then submit it again.
On other operating systems, the Program Editor window does not contain your program after you submit it. The simplest way to recall your program is to select Run→Recall Last Submit as shown in Figure A3.6.
Saving, Including, and Printing Programs
To save a program, select File→Save, or click the Save icon on the toolbar (the diskette). This displays the Save As window. Navigate to the location where you want to save the program, enter a filename, and select Save. The appearance of the Save As window might differ depending on your operating system.
To include a saved program, select File→Open Program, navigate to the location where the program is saved, select the program, and select Open. You can also start by clicking the Open icon on the toolbar (the open folder). Alternatively, use the Explorer window to click to the location where the program is saved, and then double-click on the program name. SAS displays the saved program in the Editor window.
To print a program, select File→Print, or click the Print icon on the toolbar (the printer). The Print window displays, its appearance might differ depending on your operating system. Select the printer and other options (such as the number of copies to print), and then click OK.
After you run a program, SAS displays the results in the Output window, and displays a table of contents in the Results window. Figure A3.7 shows the windowing environment after running the program for Chapter 1. (The Explorer window is still available. Simply click on the tab, and it displays.)

To print all of the output, click in the Output window so that it is the active window. Then, select File→Print, and follow the same steps for printing a program.
To print only a portion of the output, click on the output that you want to print in the Results window. Then, select File→Print, and follow the same steps for printing a program.
To save all of the output, click in the Output window so that it is the active window. Then, select File→Save, or click the Save icon on the toolbar. The Save As window displays. Navigate to the location where you want to save the output, enter a filename, and select Save. The appearance of the Save As window might differ depending on your operating system.
When saving output, SAS provides several choices for the type of file. Selecting a List file saves the output in a format specific to SAS. If you plan to include the output in a document or presentation, you might want to save it as an RTF file.
To save only a portion of the output, click on the output that you want to save in the Results window. Then, select File→Save, and follow the same steps for saving all of the output.
The simplest way to save graphs is to use the Results window. Expand the table of contents in the Results window to find the graph that you want to save. Click to select the graph, select File→Save, and then follow the same steps for saving tables.
Similarly, the simplest way to print graphs is to use the Results window. Expand the table of contents in the Results window to find the graph that you want to print. Click to select the graph, select File→Print, and then follow the same steps for printing tables.