
Chapter 11
Automating Your Work with Macros
In the course of your work with Excel you may find yourself having to carry out the same data entry tasks repeatedly, such as entering your company's name and address at the top of many of your spreadsheets. Rather than having to perform that recurring (and irritating) chore over and over again, you can compose a macro instead to enter that information.
A macro is a little program saved to your spreadsheet, one that automatically executes a set of Excel commands at your instruction and thus spares you the need to execute them. At the click of a mouse or the tap of a keyboard shortcut, the commands play themselves out—and do so far more swiftly than you could type or click them.
For example, you may have put together a custom list (see Chapter 2) of your business clients, and if you're doing well, the list may be lengthy. A macro can copy that list into your workbook in a flash, without asking you to drag that fill handle down 50 rows worth of names. Or perhaps you want to be able to apply a set of formatting changes to a range. A macro can handle that assignment pronto, too.
The Two Kinds of Macros
A macro can be constructed in one of two ways. One is to put it together by deploying the Visual Basic for Applications (VBA) programming language built into Excel, a method that can let you build highly complex sequences of commands, including actions you can't execute through Excel's standard complement of buttons. But breathe easy—we're not going to turn you into a VBA honcho here (though you'll be happy to know that the Apresscatalog lists several books on just this subject if you want to learn more about it).
The other approach—which is whole lot easier—is to activate the macro-recording process, and then simply execute the commands you want the macro to play back, just as you would under normal data entry conditions. Once you're done you can save the macro and play it back whenever you wish. Let's see how that works.
Composing a Macro
In order to see what macros have to offer, let's return to the example with which we introduced the chapter. Your company often identifies its workbooks by posting its name and address somewhere near the top of Sheet 1, something like what's shown in Figure 11–1.
Figure 11–1. It pays to advertise: Your company logo
Again, this set of information appears at the top of many of your spreadsheets, and you're getting slightly fed up with having to type it all those times.
That's where the macro comes in, and here's how it works:
- Click the
Viewtab, chooseMacros, and then click theMacrosdrop-down arrow, as in Figure 11–2.
Figure 11–2. Click that arrow to reveal the Macros drop-down menu.
- Click
Record Macro…, and you'll see the dialog shown in Figure 11–3.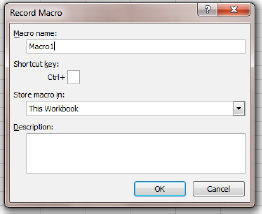
Figure 11–3. The Record Macro dialog
- Type a name for the macro in the
Macro namefield. A multiword name must be linked by an underscore (e.g.,Company_Logo), but in the interests of simplicity, we'll call our macroLogo. We'll discuss the optionalShortcut keyandStore macro infields a bit later, but note here that you can enter a summary of what the macro does in theDescriptionfield (though this is optional).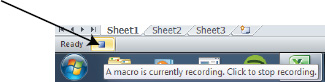
Figure 11–4. In the studio: The macro recording is in progress
- Then click
OK. Note the small blue rectangle that appears in the lower-left corner of the worksheet, an indicator that you've entered macro-recording mode; this is the button you'll click to stop recording. Hover your mouse over the button and you'll see the message shown in Figure 11–4. - Then simply click in cell A1 (you should click your mouse in A1 even if you're in it already, for technical reasons) and type the logo in cells A1:A3, as you would normally. I've used Arial Black 14-point font here, but you can choose your own formatting. If you've mistyped a word, just correct it and keep going.
- When you've completed typing the logo, click that blue macro button. That stops the recording and saves what you've done. The macro is now available to use.
- Save the workbook under the name “Macro lesson.” Here you need to save the workbook as an Excel Macro-Enabled Workbook, which I'll explain next.
About Saving a Workbook with a Macro
Normally, saving an Excel workbook is a pretty straightforward thing: you activate the Save command (typically by either clicking the Save button on the Quick Access toolbar or pressing Ctrl+S), call up the familiar Save As window, assign a name to the workbook, and decide where you want to save it (see Figure 11–5).
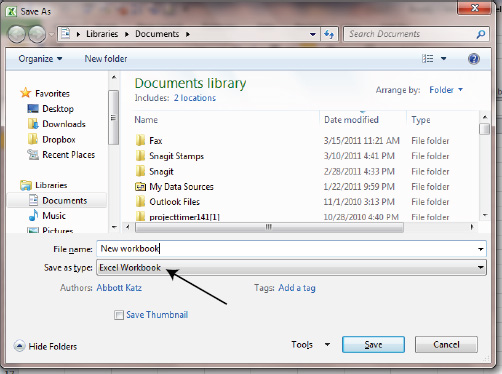
Figure 11–5. You've seen it all before: What you see when you save a workbook for the first time. Note the default Excel Workbook selection by “Save as type.”
But when you begin to save a workbook containing a macro, something else happens.
- Start the save process, and when you click
Save, you'll see the message shown in Figure 11–6.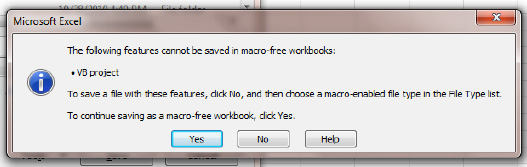
Figure 11–6. You'll see this message when you try to save a workbook containing a macro.
- The reference to “VB project” points to the macro(s) in the workbooks, which are automatically written in VBA, as discussed. If you want to save the workbooks with any macros, click
No. You'll be brought back to theSave Aswindow. - When you get there, click the
Save As typedrop-down arrow and clickExcel Macro-Enabled Workbook, as in Figure 11–7.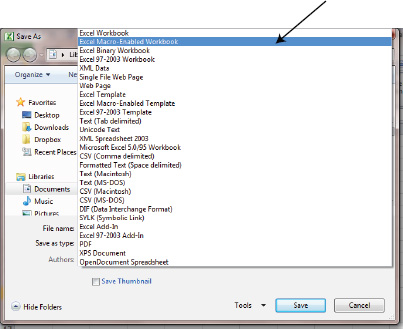
Figure 11–7. Where to save a workbook in which a macro is stored
- Then click
Save.
Playing Back the Macro
Now let's see how the macro works.
- First, because our macro is going to enter the company logo in cells A1:A3, delete the logo we've just typed there.
- Then click
View, and click theMacrosbutton (or click the down arrow and selectView Macros, as shown in Figure 11–8, but that's a bit long–winded).
Figure 11–8. The View Macros option
- You'll next see the
Macrodialog. ClickRun, as shown in Figure 11–9. The macro should execute immediately and very swiftly—a lot quicker than you could enter the logo manually, in fact.

Figure 11–9. There's the logo macro.
What We've Done
That's basically it. Let's quickly review the process:
- Enter macro-recording mode.
- Execute the commands on the worksheet you want the macro to capture.
- Stop recording (you'll want to remember this step, because if you neglect to click the stop-recording button, all your subsequent spreadsheet actions will be recorded to the macro, too).
When you're ready to play the macro back, open the Macro dialog box shown previously in Figure 11–9, click the name of the macro you want to execute (because you can record multiple macros on the same worksheet), and click Run.
Relative References in a Macro
The macro we've just designed transports the cell pointer to A1, where it then begins the process of automatically entering the logo. And by default the macro will always travel to cell A1, and then start to do its thing.
Well, of course it will, you'll likely reply; isn't that exactly where we want the macro to start? Yes it is—and what that means in turn is that no matter where the cell pointer happens to be positioned before you trigger the macro, it will start back in cell A1 just the same. If you've landed the cell pointer in cell ZA458102—or any other cell in the worksheet for that matter—and you then run the macro, the logo will nevertheless return to cells A1:A3. And that's usually just what you want.
But sometimes you want a macro to start up in a cell that depends on where the cell pointer is currently situated. Consider this follow-up example: because your worksheets exhibit various layouts, there may be times when you want to place your logo in different areas on the worksheet—that is, different ranges. As a result, you'll want a macro that will let you click in the first cell in which you want the logo to appear and have it enter the logo starting right with that cell, rather than automatically making its way back to cell A1. If you click in cell G3, you'll want the macro to inscribe the logo in G3:G5. Zoom over to R13 instead, and the macro will deliver the logo to R13:R15—in other words, in whatever cell you've started the process.
In order to give your macro this sort of flexibility, you need to work with the Use Relative References feature (shown in Figure 11–10).
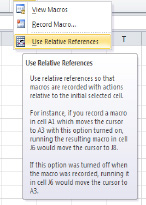
Figure 11–10. Where to find the Use Relative References option
Take a close look at the caption accompanying the Use Relative References selection. What it's telling you is that this macro option maneuvers the cell pointer (called the cursor in the caption) to cells relative to wherever you've started the macro. Thus, if you record a relative-reference macro in A1 and then click in A3, when you play it back the macro will always move two cells to the right of whatever cell you've started in.
Thus, in our case, where we want to be able to post our logo in whichever cell we've clicked, we need to use the Use Relative References option. Let's try it.
- First, click in any cell on the worksheet—again, any cell, because the macro we're about to record will execute starting in any cell in which we click, because of relative referencing.
- Then activate Use Relative References by clicking
View, clicking theMacrosdrop-down arrow, and choosingUse Relative References. - Then enter macro-recording mode precisely as before, by clicking
View
Macros(drop-down arrow) Record Macro. - Name the macro (say,
Logo2) in the resultingRecord Macrodialog box, clickOK, and type the logo information as per our first macro. - Click the stop-recording button, and you're done.
Playing back the macro is identical to our earlier macro example, with one difference: before running this macro, we need to click precisely in the cell in which we want the first line of the logo—Gidget's Widgets—to appear. That's because while our first macro was programmed to start its logo-writing activity in cell A1—no matter where the cell pointer happened to be at the macro's outset—here, the Use Relative References feature instructs the macro not to travel to a specific cell (A1), but rather to begin wherever the cell pointer happens to find itself.
Thus, if you're currently in cell L3 and click View ![]()
Macros ![]()
View Macros, click the macro name (Logo2), and click Run, the logo will appear in cells L3:L5. Click in a different cell (say, B12), run the macro again, and the Gidget's Widgets logo will install itself in B12:B14.
Saving a Macro to the Personal Macro Workbook
Whenever you record a macro, it automatically makes itself available to any other open workbooks, to be used there as well. Thus, if you're working with the “Macro lesson” workbook, and you open a second workbook and click View ![]()
Macros ![]()
View Macros there, you'll see the dialog shown in Figure 11–11.
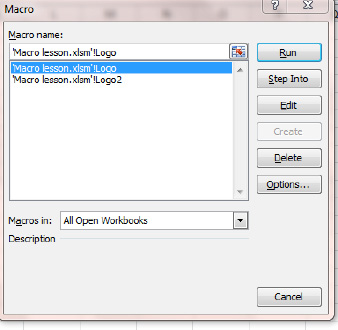
Figure 11–11. The macros from the open “Macro lesson” workbook are usable in any other open workbook.
You can click Run and activate either of the macros shown in the figure, even as you're working in a different workbook.
But what if you want a macro to always be available to every workbook, without having to actually open any other workbook in particular? You can make that happen by recording macros and saving them to what's called the Personal Macro Workbook, a hidden workbook that opens whenever you access Excel. Any macro stored there can be called upon by any other workbook that's currently open. It works like this:
- When you begin to record a macro, click the down arrow by
Store macro in. You'll see the options shown in Figure 11–12.
Figure 11–12. How to store a macro in the Personal Macro Workbook
- Click
Personal Macro WorkbookandOK, and then record the macro as usual.
You don't even have to save the actual workbook in which you've devised the macro, because the macro is being saved to the Personal Macro Workbook (but if you're prompted to save the Personal Macro Workbook itself, you should).
Now whenever you open any workbook and click View ![]()
Macros ![]()
View Macros, you'll immediately be presented with the macros saved to the Personal Macro Workbook (see Figure 11–13).
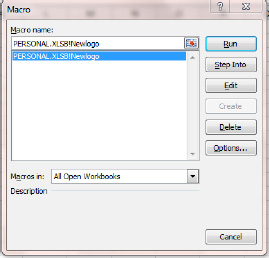
Figure 11–13. All that's left to do is click Run.
Deleting a Macro
If you want to delete a macro, just return to the Macro dialog box, click the macro you want to remove, and click Delete (see Figure 11–14).

Figure 11–14. Where to delete a macro
Once you clickDelete, a cautionary prompt appears (see Figure 11–15), something that often happens when you're about to delete an important Excel object.Click Yes if you're sure you want to delete the macro. But click No here, because we want do something else with the Logo macro—namely, edit it.
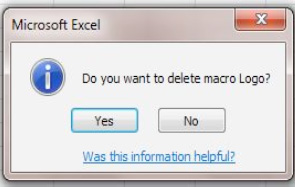
Figure 11–15. The prompt for deleting a macro
Editing a Macro by Tweaking It in VBA
What if your macro contains a mistake, or you just want to change it? What if, for example, you really wanted the Gidget's Widgets logo to exhibit 10-point text instead of its current 14-point size?
The simplest way to modify the macro would be record it over again and delete the original. That might work if your macros are likely to be brief, but that scenario is still a bit bothersome—and once a macro gets a bit lengthier, the prospect of a do-over is less appealing still, in part because in the process of rerecording the macro you might very well make another mistake.
Is there an alternative? Yes—you can edit the macro in VBA.
Now, as mentioned, I'm not going to teach you the VBA language here; rather, we're just going to take a look at it and explore some easy ways to tweak it in order to edit a macro.
VBA: Written Behind the Scenes
It's far from obvious, but whenever you record a macro of the sort demonstrated here, its commands are also transcribed simultaneously in the VBA language, on a separate worksheet that's usually hidden. But once you reveal that worksheet, you'll see the Logo and Logo2 macros as they appear in VBA translation, so to speak, giving you the chance to actually rewrite the script and affect the ways in which the macros play out.
Exposing the VBA Worksheet
Revealing that hidden VBA worksheet is easy. Just click View ![]()
Macros (down arrow) ![]()
View Macros, and in the Macro dialog click Logo, and then click Edit (see Figure 11–16).
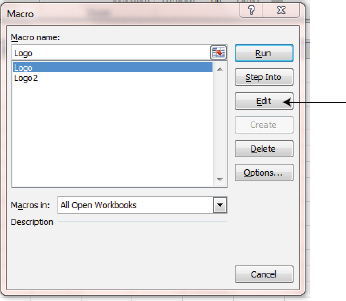
Figure 11–16. Clicking Edit will take you to the worksheet's Visual Basic window.
When you do, you'll see the macro as shown in Figure 11–17 (the window here has been maximized in the figure).

Figure 11–17. The Logo macro in VBA
Now that may look pretty scary at first glance, but take a closer look. Many of the VBA entries will start to make more sense when you study the terms they use. Note, for example, the reference to "Gidget's Widgets" (see the first arrow in the figure) beneath the line that reads Range ("A1").Select. That means that the macro selects cell A1 and proceeds to enter “Gidget's Widgets” there.
Now look at the line that reads as follows (see the bottom arrow in Figure 11–17):
.Size = 14
You'll probably, and correctly, interpret that bit of programming code as an instruction to change the font size of the logo to 14 points, as our macro specified. But what that also means is that you can simply click the number 14, delete it, and type, say, 10 instead. That editing change will downsize the logo text to 10 points the next time you run the macro. And if you delete Widgets and replace it with Gadgets, the next time you run the macro you'll see “Gidget's Gadgets” in cell A1. Try it.
NOTE: Keep in mind that after you make such changes, you can close that VBA window; the rest of the workbook displaying your logo will nevertheless remain open, and you can try the macro again and continue to work on that worksheet.
Once you study how the VBA code operates, you'll be able to make small changes like these pretty easily. And it beats having to record the whole macro over again.
Activating a Macro with a Keyboard Shortcut
Until now we've been triggering our macros with a series of mouse clicks, an ever-so-slightly tedious routine that can be streamlined by designating a keyboard shortcut to do the job instead. You can assign a shortcut key to a macro either during the macro design process or retroactively. Let's look at these options.
First, recall that when you compose a macro, you're brought to the Record Macro dialog box, shown in Figure 11–18. Notice the Shortcut key option, which enables you to designate a key that teams with the Ctrl key. Pressing that combination will start the macro.

Figure 11–18. The Shortcut key option: A speedy way to initiate a macro
You can assign a shortcut key to a macro that you've already created as well. Here's how:
- Click
View Macros(you needn't click the arrow), and click the name of the macro to which you want to assign the shortcut key. You'll see the dialog shown in Figure 11–19.
Figure 11–19. Click the name of the macro to which you want to assign the shortcut key.
- Click Options, and you'll be brought to the dialog shown in Figure 11–20.

Figure 11–20. The Macro Options dialog
- Just enter your key selection, and click
OK. - You then have to click the close button on the remaining
Macrodialog box (that X in the upper right-hand corner), because oddly enough, there's noCloseorOKbutton available in it.
NOTE: You can select any keyboard key as the shortcut key—even one that's already been assigned to an existing Excel action (e.g., C, which in combination with Ctrl serves as the standard Copy shortcut key). But don't worry—if you assign such a key to the macro, the macro will only play its shortcut role in that particular workbook. Ctrl+C will continue to work as Copy on other workbooks. Ctrl+E and Ctrl+J are unassigned, and thus available without having to “borrow” from an existing shortcut. You can also supplement a shortcut with the Shift key—for example, you can assign Ctrl+Shift+W to a macro.
A Note on Macro Security
You often hear about Internet viruses that infiltrate your computer from a variety of sources. Files containing macros are often prime suspects as virus bearers, so Excel allows you to decide what kind of defense you want mount against these potentially unwanted intruders.
Excel's anti-macro-virus defense system is headquartered in what's called the Trust Center, which you can visit by clicking File ![]()
Options ![]()
Trust Center. Once you get there, click the Trust Center Settings… button and then Macro Settings. You'll see the options shown in Figure 11–21.

Figure 11–21. Where to modify macro acceptance settings
The figure shows Excel's default setting, which will open a downloaded workbook after disabling its macros. When this happens, you'll see the prompt shown in Figure 11–22.

Figure 11–22. By default the macros are disabled.
By clicking Enable Content, you'll be able to activate the macros, however. But if you select the Disable all macros without notification option in the Trust Center, no macros in downloaded workbooks can be turned on. Needless to say, if you're only working with your own macros, or with workbooks sent your way from the proverbial trusted sources, you'll probably want to opt for the disable-with-notification setting, or even enable all macros.
Summary
A macro is a great way to speed a routine Excel task. Just record and save it, and the commands you've executed will be played back at your request—and in all your workbooks, if you save the macro to the Personal Macro Workbook. Remember the role relative references play in the macro-recording process too, and your data entry activities will be simplified significantly.
Also, don't be too wary about the VBA editing option. Remember that your recorded macros are automatically rendered into VBA, and by perusing that code you'll begin to recognize the opportunities it affords to let you make small but important adjustments to the macros you've already recorded.