The objectives of this chapter are to:
Introduce the IntelliMorph layout technology.
Explain how the license and configuration systems in Microsoft Dynamics AX 2009 affect application functionality throughout the system.
Describe the security framework and discuss data security.
Dynamics AX 2009 is targeted at companies and organizations whose size, geography, language, complexity, and lines of business vary widely. Securing and configuring the Dynamics AX system correctly has a significant impact on how the system can be implemented and used and on how it performs.
This chapter describes how the Dynamics AX application runtime implements configuration and security and how these concepts determine the interface that the user sees. IntelliMorph is the unique technology used to design and develop Dynamics AX application forms, reports, menus, and menu items. It includes essential framework elements that influence the rendering of the user interface by enforcing licensing, configuration, and security restrictions. The licensing and configuration frameworks give you the option to license application modules, thus providing access to various application areas. You can also enable and disable functionality independently of the licensing.
This chapter discusses security in the context of the application runtime, and it also offers details about important security aspects to consider when developing your application. Near the end of this chapter, we cover data security, which makes it possible to differentiate business data access across user profiles. This feature enables you to construct queries to extend the table permission options available in Microsoft SQL Server. The feature that differentiates business data access is the record level security framework.
Although Dynamics AX is an international product with support for multiple countries, languages, company sizes, and industries within the same deployment, it is also a productive development platform that ensures a uniform yet very configurable and automatically arranged layout of application functionality. The unique presentation technology is based on model element properties, licensing, configuration and security settings, and personalization, which together lay out the presentation controls on forms, reports, menus, menu items, and corresponding Web elements for each individual user. The technology is called IntelliMorph, and it works with both the rich client and the Web client types in Dynamics AX.
A primary driver of the IntelliMorph technology design is support for international distribution, but with a different approach than other enterprise resource planning (ERP) products; IntelliMorph needs to be ready for multiple countries in multiple languages within the same deployment, and it has to offer the same user experience, regardless of the user interface language. These requirements necessitate the design of a metadata-driven and property-driven user interface in which forms, reports, menus, and menu items react to both global and local configuration and security settings. A positive side-effect of this design is that users can personalize the interface in multiple ways. The personalization capability has been extended even further in Dynamics AX 2009, in which individual users can choose from the following options:
Reference all rich client forms as individual favorites to which they can attach any query.
Show or hide controls.
Change the size of forms and controls.
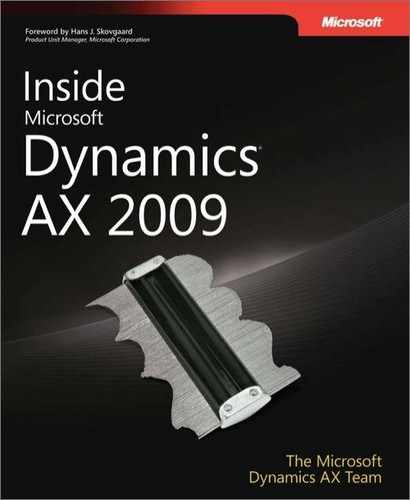
IntelliMorph automatically arranges functionality based on licensing, configuration and security, and personalization—without programmable changes. Figure 13-1 illustrates the filtering structure for the layout of elements such as forms, reports, menus, and Web pages.

The layout includes the license code that opens the parent configuration key, which holds either the security key references or the configuration key children to the security keys. Security keys determine access to the menu items that reference available functionality for user groups and individual users. The final factor in the interface experience is personalization, which allows the user to modify the user interface by hiding, showing, and configuring the presentation controls.
We describe the elements and their interactions and dependencies in greater detail in the following sections, and we also drill down on personalization options.
Note
The presentation and layout of the user interface are not limited to support for IntelliMorph technology; they also provide a rich set of design options for developing Windows forms with many different control types, such as ActiveX and list view controls. You can also customize Dynamics AX reports with the Visual Report Designer, which allows you to visually design a report while using both the X++ syntax and the properties window for arranging and formatting.
Understanding how IntelliMorph works can help you develop the run-time presentation for application extensions. If you follow the best practice design rules and patterns, you can optimize your use of the IntelliMorph technology and ensure a uniform application run-time interface. The best practice principles focus on using the default property settings for the presentation controls that determine how to present elements and functionality. They also cover the general use of labels, field groups, extended data types, auto groups, security and configuration keys, and menu items. The standard Dynamics AX application is developed using all the best practice rules and patterns, which provide a uniform way of interacting with the application and the underlying business logic. Chapter 3, describes the Best Practices tool in depth. You can find details on best practice rules and patterns in the Microsoft Dynamics AX 2009 SDK, on MSDN.
Designing application forms can be a very time-consuming task if you always design from scratch, especially if your application must run in a multiple-language deployment. To avoid this time and effort, you should follow the best practice of creating forms and reports by dragging as often as possible and setting very few properties manually. If the system’s default property values don’t suit your needs, you can customize almost any property to fit your application.
When you design the layout of a form for which a table or view is used as the underlying data source, you find that the same field groups and field structures in the original Tables and Views nodes are in the Application Object Tree (AOT). This allows you to drag these field groups and field structures from the form’s Data Sources node directly to the form’s Design node. You should configure the Data Sources to use the Dynamics AX AutoJoin system to ensure that data is synchronized when two forms are linked. When you work with the layout and property settings, you must keep the Auto or Default settings. These settings optimize the use of the auto-arrange technology and limit the need to move pixels to unify and align the form presentation with the rest of the application.
When designing forms, you should adhere to the recommendations in the following list whenever possible to optimize the use of the auto-arrange technology. Most patterns are property settings on the form design.
Use default settings, especially for the attributes Left, Top, Width, Height, Frame, WindowResize, WindowType, and HideToolbar.
Use the DataGroup attribute when using tables or views as Data Sources.
When using the DataGroup attribute, change the AutoDataGroup property to Yes. This setting adjusts the overall behavior based on the data source behavior.
Use labels instead of hardcoded strings.
Add Help text (status bar Help) as labels instead of hardcoded strings.
Use the TitleDatasource property to provide a better and more visible data experience for the user.
Set the AutoDeclaration property to Yes if the control features must be accessible from X++ code.
Use the AutoJoin system where possible.
If your customers require a unique user experience, you could completely remodel the user interface—no design restrictions prevent you from taking that step. One disadvantage of such an overhaul is that training, flexibility, and upgrading become more complex.
IntelliMorph is even more important for reports than for forms. The best practices for reports primarily involve retaining the default settings for properties. When you design a report, however, you often don’t know much about the environment in which the report will execute. The following examples illustrate the types of information you won’t have at design time:
The size of the paper in the user’s printer
The length or content of the labels according to the user’s installation profile and language
The names of the fields disabled by security and configuration key settings
The length of the fields (extended data types) in the user’s installation
The sort order of the data sent to the report
Whether the user wants to print using the subtotals setting or just the totals setting
The default settings for font and font size
The number of records in the tables from which the report gets its data
Reports can be broadly classified into internal or external reports. Internal reports are circulated and viewed only inside the organization. In such reports, the report presentation and format aren’t critical. Some examples of internal reports are Ledger Transaction List, Project Profitability Statement, bank transactions, and so on. External reports are circulated external to the organization, so their format and layout are important. Such reports include Purchase Orders, Sales Invoices, Vendor Check Payments, and so on. Such reports are usually printed on preprinted stationery and require precision design. Both internal and external reports can be created using the Auto design or Generated design reporting features of Dynamics AX. You can use Auto design for all internal reports and Generated design for external reports that can’t be implemented with Auto designs because they require precise design and layout capabilities such as the following:
Reports that are forms with externally determined layouts and where the information is expected to display in specific positions.
Reports that are forms for which the design is likely to be adjusted to the customer needs at deployment time. Invoices are one example. Most controls should have their positions fixed (not set to Auto) to simplify moving them by using the Visual Report Designer.
You should follow these design patterns whenever possible:
Use default property settings, especially for orientation, width, label, width of label, and other formatting information because fixed settings cause the report controls to disregard the IntelliMorph auto-arrange technology available from the property window.
Use the Auto design report type when possible.
IntelliMorph provides numerous options for personalizing Dynamics AX forms. These options allow you to move controls, set properties on controls, and add extra fields to forms. Forms are customized at application run time, and settings are saved on a per-user basis. You can invoke the personalization options from multiple places, depending on the type of personalization desired. The personalization options use the same framework whether a column is hidden via the Command entry on the menu bar, moved within the form runtime by using the mouse, or renamed by using the advanced personalization form.
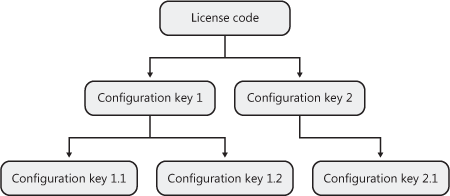
The advanced personalization form, shown in Figure 13-2, provides the user with customization options.

By using this form, the user can change the tab page order, move elements around, remove fields, add additional fields from existing form Data Sources, rename the field, prevent the field content from being edited, change the default field length, and even choose among multiple versions of the form presentation. The personalization settings can also be shared. For example, a department that wants a common presentation that differs from the standard company presentation but doesn’t want to modify the global form layout could have all users personalize their form settings in the same way.
To make user personalization work, you must define different levels of personalization by using the form design properties AllowUserSetup and AllowAdd. Four levels of personalization are presented in Table 13-1.
Table 13-1. Personalization Levels
Personalization Level | Description | AllowUserSetup | AllowAdd |
|---|---|---|---|
Limit user personalization of forms | User can change only the size and position of the form, not the properties of individual controls. Position and size of the form are saved (the size is saved if SaveSize is set to Yes), so an entry for this form is in the SysLastValue table even though no personalization is allowed. | No | No |
Enable customization of controls | User can change the behavior of individual controls but can’t move them or add new controls. Personal values can be defined for Enabled, Visible, Skip, Width, and Label. | Restricted | No |
Enable customization of layout | User can adjust properties on controls and move controls between containers, move controls from within the Setup form by dragging or by using the navigation buttons, and move grid columns within the grid by dragging them directly onto the form. This feature lets the user create a tab page that encompasses all the information normally entered for a given record or grid, so most forms you create should support this level of personalization. | Yes | Restricted |
Enable customization of layout and content | User can customize layout and add new fields from the Setup form. To support this level of personalization, all code must be moved to the data source fields. Added controls don’t have any code. The properties are the default values for this type of control and data. Only data fields can be added, not any unbound controls or controls bound to display methods. | Yes | Yes |
The personalization levels also depend on how the form’s X++ code is written. For example, if you override the methods that take the position of the control into account, the kernel can automatically restrict the user setup level.
Dynamics AX allows licensing of application modules, multiple user types, languages, server technology, the Web framework, database logging, record level security, development tools, run-time execution, and integration frameworks. The system elements and application modules are locked by license codes that must be unlocked by license keys.
Unlocking a license code is the initial step in configuring the Dynamics AX system because the license codes reference the configuration key that links to the physical functionality. You unlock the license code by using the License Information form, shown in Figure 13-3, which you access from AdministrationSetupSystemLicense Information.

You enter the license codes manually or import them by clicking the Load License File button. All the license codes and license files available for import are supplied by Microsoft through the Microsoft Partner Program.
The license codes are validated individually based on the license holder name, the serial number, the expiration date, and the license key being entered or imported. The validation process either accepts the license key and updates the status field with counts, names, or OK or returns a negative result in the Infolog form.
Note
Standard customer licenses don’t contain an expiration date. Licenses for other uses, such as evaluation, independent software vendor projects, education, and training, do include an expiration date. When a license reaches its expiration date, the system changes execution mode and becomes a restricted demo product for a limited amount of time.
The license code elements are created in the AOT and divided into five tab pages—System, Modules, Partner Modules, Web, and Languages—based on type of functionality, as shown in Figure 13-3. The grouping is determined by a license code property, and the SysLicenseCodeSort table and its createSortIdx method handle sorting inside the groups. The Partner Modules tab allows you to include licensed partner modules. Partners can sign an agreement with Microsoft that gives other partners and customers the opportunity to purchase and request partner-developed functionality. Contact your local Microsoft subsidiary for more information about this program.
The licensing framework can also track dependencies among various licenses. A license can have up to five different prerequisites. Adding a prerequisite for a license ensures that the Application Object Server (AOS) tracks the license dependencies. So if your application depends on multiple licenses, you don’t need to check whether a particular license exists in your code.
The license codes reside at the top of the configuration hierarchy, which is the entry point for working with the configuration system that surrounds all the application modules and system elements available within Dynamics AX. The configuration system is based on approximately 200 multiple configuration keys that enable and disable functionality in the application for the entire deployment. Each license key controls access to a specific set of functions; when a key is disabled, its functionality is automatically removed from the database and the user interface. The application runtime renders presentation controls only for menu items that are associated with the active configuration key or where no configuration key is available.
The relationship between license codes and configuration keys is very comprehensive. An individual license key not only enables a variety of configuration keys but also removes the visibility of configuration keys and their functions throughout the entire system if the license key is not valid. Removing configuration keys with invalid license keys reduces the configuration complexity. For example, if a license key is not entered or not valid in the license information form (accessed from Administration/Setup/System), the Configuration form hides it and displays only the valid license keys and the configuration and security keys that depend on them. This functionality reduces the number of security keys you need to configure when you create user groups. (We talk more about user groups, which are essential to the security subsystem, later in this chapter.) Figure 13-4 shows the system-wide configuration hierarchy followed by most functionalities within an implementation—except those that don’t comply with best practices for developing Dynamics AX application modules.
The configuration hierarchy might seem complex. However, easy-to-use administrator checklists and forms, such as the License Information, Configuration, and Permission forms, reduce the initial complexity.
The application modules and the underlying business logic that license codes and configuration keys enable are available when Dynamics AX is deployed. Everything from forms, reports, and menus to data elements and the Data Dictionary, as well as the entire development environment, is already present in the product, existing in a temporary state in which the elements don’t affect the enabled functionality.
Using the configuration hierarchy shown in Figure 13-4, you can enable parent configuration keys with valid license keys to appear in the global configuration form by navigating to AdministrationSetupSystemConfiguration. The parent configuration keys controlled by the license codes appear with a red padlock overlay and can’t be disabled; any configuration key children displayed below the parent can be changed. Parent configuration keys with no children are not available from the configuration form.
Note
Parent configuration keys can exist without an attached license key. These are available for the administrator to enable or disable at all times from within the Configuration form.
The Dynamics AX configuration philosophy is to enable functionality as needed. The consequence of this philosophy is that the system starts minimized by default, with all child configuration keys disabled. An example of the Configuration form and the minimized approach is shown in Figure 13-5.

As a more detailed example, consider a company buying the Trade module license code. The company wants most of the functionality in the module, but it doesn’t do business with other countries. The company therefore chooses to disable the Foreign Trade configuration key.
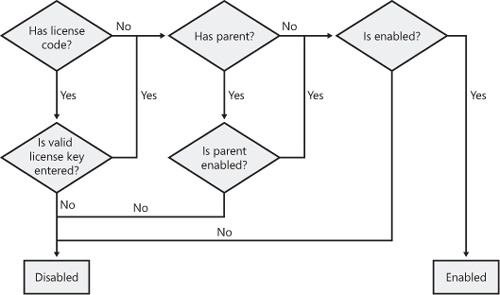
By using the configuration key flow chart shown in Figure 13-6, an administrator can determine whether a configuration key is enabled, and if not, what it would take to enable it, which depends the configuration key’s parent.
An important part of the application development process is mapping extensions to the configuration-based security frameworks that integrate the extensions into the complete solution. Correctly using the configuration keys throughout the system can make enterprise-wide deployment flexible and economical, with divisions, regions, or sites all using the same deployment platform and customizing local deployment by using configuration keys rather than by developing specific customizations in each installation. You can’t entirely avoid individualized development, however, because of the nature of businesses and their development needs.
Configuration keys affect the Data Dictionary, the presentation, and the navigation infrastructure directly, meaning that you can reference a configuration key property on all relevant elements. Table 13-2 lists the elements that can be directly affected by configuration keys.
Table 13-2. Configuration Key References
Grouping | Element Types |
|---|---|
Data Dictionary | Tables, including fields and indexes Maps Views Extended data types Base enumerations License codes Configuration keys Security keys Perspectives |
Windows presentation and navigation | Menus Display: Menu items Output: Menu items Action: Menu items |
Web presentation and navigation | URL: Web menu items Action: Web menu items Display: Web content Output: Web content Web menus Weblets |
Documentation references | System documentation Application developer documentation Application documentation HTML Help files |
When a configuration key is enabled, the functionality associated with that configuration key is enabled. This means that appropriate menu items, submenu items, tables, buttons, and fields are enabled when the configuration key is turned on. A user has access only to those areas that the administrator has granted access to and that have been enabled by the configuration key.
Figure 13-7 illustrates a frequently used security hierarchy in which the configuration key is the gatekeeper for interaction with the functionality underneath.

The hierarchy is based on security keys that, working together with user groups, act as permission gates that allow users to see, invoke, and work with the user interface, business logic, and rules represented by menu items, submenu items, tables, buttons, and fields.
This introduction to the security hierarchy provides a high-level overview of the concept. The particular hierarchy shown in Figure 13-8 demonstrates how the LedgerBasic configuration key opens for a subset of the vendor functionality that is managed by a subhierarchy of security keys. The subhierarchy is the link to functionality such as the Purchase Order form and the Vendor form that are referenced via display menu items. These display menu items explicitly reference specific tables to decrease the complexity of configuring security.

This illustration doesn’t depict all possible elements and combinations within the security hierarchy, which would include such things as reports, classes, Web elements, or an explanation of how to invoke country-specific functionality for an individual user.
The security framework within Dynamics AX uses Integrated Windows authentication and Active Directory to authenticate user and system interactions before they are authorized by the Dynamics AX security framework. Using Integrated Windows authentication allows automatic logon to the Dynamics AX application without collecting user name and password information.
A Windows-authenticated user can be associated with only one Dynamics AX user. The application role for the individual Dynamics AX user is determined by the user groups with which the role is associated. The application role also defines the user interface actions that a user is authorized to perform and the data that the user is authorized to view and modify. You can create an application role by adding all the necessary functionality to one user group, or you can create a collection of user groups that define the entire application role. A user group can contain multiple Dynamics AX users, and each Dynamics AX user can be part of multiple user groups, as shown in Figure 13-9.

Note
Integrated Windows authentication is the only authentication scheme available in Dynamics AX 4.0. The option to work with the SQL Server authentication, available in versions earlier than 4.0, no longer exists.
The Dynamics AX security framework is composed of users, company accounts, domains, user groups, table and field permissions, and record level security. The organization of application security in Dynamics AX is associated with security keys and their relationships with menu items, form controls, tables, and fields, which together operate as the connection layer between the application logic and the application role configuration. The security keys reduce the complexity of setting up the overall security of individual user groups per domain because the references to configuration keys can remove unused functionality. Parent security keys can enable or disable entire application modules for user groups. Subcategories of application modules are structured by using the method that matches the main menu structure.
The flow chart in Figure 13-10 illustrates how authorization is validated for an individual user group and how configuration keys and parent security keys affect the final security access.

Note
Configuration keys and parent security keys are element properties that are added to the individual security key. When adding the properties, you can use only one of the two properties at a time because a configuration key indicates that the security key is the parent, and the parent property indicates that the security key is a subcategory.
When you create security keys, the parent security keys function as the application module keepers for the underlying child security key categories: Daily, Setup, Journals, Inquiries, Reports, Periodic, Miscellaneous, and Tables. These categories define the user interface for the substructure of the application module within the Dynamics AX main menu. This arrangement makes it easy to relate the main menu items with the security elements when you’re configuring user group permissions.
The security keys control the initial permission levels to functionality within the application, but they depend on the menu items and the table permissions framework for detailed security configuration. The permissions are assigned to user groups within their corresponding domains using the following five permission levels:
No access. Members of the user group can’t access the item or any subitems that the item controls.
View access. Members of the user group are allowed to view the item, but they can’t use it.
Edit access. Members of the user group are allowed to view and use the item.
Create access. Members of the user group are allowed to view and use the item, and they can also add new items.
Full control. Members of the user group are allowed to view the item, but they can’t create, delete, or edit. Members can also provide additional rights in special cases if full access is given to the administration items.
If you set the access level for a menu item or security key to full control, all children of the selected node are automatically set to full control. If you set the access level to anything other than full control, the children do not inherit the permissions automatically. In such cases, you can use the cascade functionality by clicking the Cascade button. Clicking the Cascade button automatically grants the same access level to all the nodes in the subtree under the node.
Note
The security framework presents only the user interface elements that the user has access to, and it handles the appropriate access level for individual users. Security is applied on the user interface, which is the user’s entry to the application through menus, menu items, reports, and forms.
Permission levels are assigned and accessible from the user group permission form, which facilitates the entire permission assignment process beyond simple node creation.
The process for applying the security framework to the Dynamics AX application includes the following seven steps, which must be performed after the licensing and generic configuration is completed:
Create company accounts.
Create domains.
Create user groups.
Create users.
Set permissions for user groups and domain combinations.
Set table and field access.
Set record level security.
Configuring the security of a Dynamics AX application involves the use of domains. A domain is a collection of one or more company accounts that allow you to define user groups with the same permissions in a company with several subsidiary businesses, while allowing the same user groups to have other permissions within other companies. Domains make it easier to maintain user group security when several companies use the same security profile.
Domains allow great flexibility in the configuration of user group permissions. A domain can generate a strict security policy, in which each user group in each domain is a distinct entity with absolutely no access between groups or domains, or it can allow one user group company account access to similar group data, forms, and modules across multiple domains. The latter option simplifies the access configuration of corporate services such as controllers, multisite planners, human resource functions, and other functions that centralize or share assignments and tasks. Figure 13-11 illustrates how domains and user groups can work together in multiple ways within the same security framework.

The domain security key SysOpenDomain controls access to information about users, user groups, company accounts, and domains. Using the domain security key in user groups provides access to records in all domains.
Note
Dynamics AX includes only one domain by default: Admin. The Admin domain always includes all companies. It can’t be removed, and no companies can be deleted. Use the Admin domain for any user groups that need access to all companies. When the license key domain isn’t purchased, domains are still visible and functioning, but access is limited to the Admin domain.
Permissions and user rights are granted to groups, allowing the system administrator to define a set of users that share common security privileges. When you add a user to a group, you give the user all the permissions and user rights assigned to that group. By default, user groups can’t access any menus, reports, forms, tables, or fields in Dynamics AX unless the administrator grants them access. User groups can be shared among all Dynamics AX users.
Note
A user who is a member of more than one group inherits the higher permission level of the two groups. A user can’t access the application without being added to at least one user group.
When configuring group permissions, the system administrator works with a hierarchical security tree that represents all the available security keys and includes application module access, individual permission levels, and Help text that explains the security element. The User Group Permissions form allows you to configure high-level permissions and very detailed permission levels for individual user groups. Figure 13-12 shows the configuration interface that system administrators work with to assign permissions.

You can use the User Group Permissions form to display the security elements by selecting one of the following Viewing filters, which are available near the top of the form:
Security. Windows-relevant security elements, sorted alphabetically
Security (including Web). All security elements, including Web-specific elements (such as activity centers, deployment options, and cross functions), sorted alphabetically
Country/region-Specific. Legacy functions relevant for individual countries and regions, sorted alphabetically
Main Menu. Functions structured according to the main menu within the Dynamics AX application runtime
These elements are the main overview elements, but additional filters are available if the menu node doesn’t have a parent, such as Task Panes or Tools. If the preceding criteria are met, you can present customized menus automatically in the filter.
If you set the permission level to Full Control on the parent node key, security key children, menu items, and tables inherit the same permissions. However, if you set any other permission level, permissions are not inherited below the parent menu item. If a permission level is required for the entire subtree, the Cascade button grants the current permission level when clicked.
Important
If you change permissions for a user group, especially if you demote permissions, you should instruct all group members to restart the Dynamics AX client so that the permission changes take effect. If a group member doesn’t restart his or her instance of the client, you should use the Online Users form, found in the Administration module, to kill the user’s session. Keep in mind that killing a session through the Online Users form immediately terminates the session, so if the user has open transactions, they are rolled back.
Within any enterprise, some users are restricted from working with certain sensitive data because of confidentiality, legal obligations, or company policy. In Dynamics AX, authorization for access to sensitive data is managed via the table-based record level security (RLS) framework that builds on the restrictions enforced by user group permissions. With user group permissions, you restrict access to menus, forms, and reports for group members. The RLS framework allows you to add additional restrictions to the information displayed in reports and on forms. The Dynamics AX application runtime automatically applies these restrictions when the application requests data from the database table included in the RLS framework. You include the restrictions by extending the WHERE clause within the SQL statement with the defined RLS query details.
Common uses of record level security include the following situations:
Allowing members of a sales user group to see only the accounts they manage
Prohibiting financial data from appearing on forms or reports for a specific user group
Prohibiting account details or account IDs from appearing on forms or reports for a specific user group
Restricting form and report data according to location, country, or region
When you enable record level security, you select user groups and the appropriate database table by using the Record Level Security Wizard, and then you execute a query that specifies the fields and criteria to be applied. The query criteria are specified using the generic Query form and are added to the individual database table that you chose with the wizard. Record level security is configured per company, so the wizard and criteria definitions must be executed for each company.
Important
If an application role that uses multiple user groups has record level security applied on a certain table within a company account, maximum access is given to the role. For example, if one user group has no record level security for the Customer table and another user group allows users to see only a subset of the Customer table, the user has access to all customers.
Use the following process for enabling record level security for a user group for a particular database table:
Start the Record Level Security Wizard.
Select a user group.
Select tables.
Complete the wizard.
Mark an available table, and then click Query.
Add the query criteria.
By default, the tables in the wizard are presented based on the TableGroup property with the value set to Main, and they are grouped according to the parent security key matching the main menu structures. Setting the value to Main results in a subset of the tables. However, you can expand the selection by clicking Show All Tables.
The kernel automatically invokes the RLS framework when criteria have been applied to database tables. In certain situations, such as those in the following list, you might need to do additional work to invoke the RLS framework:
When using display and edit methods
When using a FormListControl, FormTreeControl, or TableListControl control to show data
When using a temporary table as a data source
Whenever you use a display or edit method to return a value from another row, you must evaluate the business impact of displaying the data. To avoid displaying particular information, you need to perform an explicit authorization in X++ code to check permissions before calling these methods. The following code shows an explicit authorization.
Note
For more security-related information on using display and edit methods, refer to the Microsoft Dynamics AX 2009 SDK.
If you don’t want to display certain query data that populates a FormListControl, FormTreeControl, or TableListControl control, you must manually activate record level security, as shown here.
public void run
{
    CustTable custTable;
    super();
    // Ensure that record-level security is used.
    custTable.recordLevelSecurity(true);
    while select custTable
    {
        listView.add(custTable.name);
    }
} |
When the form cache is filled with data from a temporary table, you must ensure that the data conforms to the record level security you’ve set. This includes tables declared as temporary in the code, as illustrated in the following code example, and tables in the AOT whose Temporary property is set to Yes.
Record level security is not required in the following situations:
When the value is calculated
When the value is based only on fields in the current record
In this section we cover the Trustworthy Computing features of Dynamics AX, focusing on how they affect security coding. We describe table permissions, code access security, impersonation in batch execution, and the best practice rules for ensuring deployment-wide compliance. Find out more about this subject in the white paper "Writing Secure X++ Code" from the Microsoft Download Center: http://www.microsoft.com/downloads/details.aspx?displaylang=en&FamilyID=5e050494-1613-4b3a-9363-d69d60c56877.
The table permissions framework provides security for tables that reside in the database and are available through the AOT. Annotating specific create, read, update, and delete operations on tables, combined with assigning user group permissions on tables, enables the AOS to authorize individual user permissions on tables.
The AOSAuthorization property specifies the operations that can be performed on a table when combined with user permissions set on the User Group Permissions form. Figure 13-13 shows the table property form and values for AOSAuthorization.

The AOSAuthorization property is an enumeration with the possible values described in Table 13-3.
Table 13-3. AOSAuthorization Values
Value | Description |
|---|---|
None | No AOS authorization validation is performed (default value). |
CreateDelete | Create and delete authorization validation is performed on the AOS. |
UpdateDelete | Update and delete authorization validation is performed on the AOS. |
CreateUpdateDelete | Create, update, and delete authorization validation is performed on the AOS. |
CreateReadUpdateDelete | All operations are validated on the AOS. |
To secure the database tables even further, you must have a set of data manipulation language (DML) validation routines at the AOS server location when inserting, reading, updating, or deleting records from the database tables. The following four system-defined methods are included in the Override Method group to support the routine validation, located in the AOT under Data DictionaryTableMethods:
AOSValidateDelete
AOSValidateInsert
AOSValidateRead
AOSValidateUpdate
Table 13-4 describes the behavior of the AOS when authorizing an authenticated user on a table, including the user group permissions setting and the AOSAuthorization property value.
Table 13-4. AOSAuthorization Property Values
Property Value | ||||||
|---|---|---|---|---|---|---|
None | Create | Read | Update | Delete | ||
User Group Access Value | No access | Success | Failure | Failure | Failure | Failure |
View | Success | Failure | Success | Failure | Failure | |
Edit | Success | Failure | Success | Success | Failure | |
Create | Success | Success | Success | Success | Failure | |
Full control | Success | Success | Success | Success | Success | |
The code access security (CAS) framework provides methods that can make dangerous APIs more secure against invocation attempts by nontrusted code (code that doesn’t originate in the AOT). If you extend the CodeAccessPermission class, a derived class can determine whether code accessing the API is trusted by checking for the appropriate permission.
If the API executes on the server tier, the impact of malicious code that could exploit the API is more severe in a shared environment, so you must secure the API. To secure a class that executes on the server tier, follow these steps:
Derive a class that can’t be extended from the CodeAccessPermission class.
Create a method that returns the class parameters.
Create a constructor for all the class parameters that store permission data.
Override the CodeAccessPermission::isSubsetOf method to compare the derived permission class with CodeAccessPermission to determine the existence of the required permissions for invoking the API you want to secure.
Override the CodeAccessPermission::copy method to return a copy of an instance of the class created in the first step. This step helps prevent the class object from being modified and passed to the API that is being secured.
Call the CodeAccessPermission::demand method before executing the API functionality that you’re securing. The method checks the call stack to determine whether the permission required to invoke the API has been granted to the calling code.
Additional information about code access security and securing APIs is available in the Microsoft Dynamics AX 2009 SDK.
Dynamics AX 2009 introduces a new and more secure type of batch framework that is completely server bound. Rather than having to start a client and open the Batch Processing form, you can now schedule a batch job so that the server automatically picks up and executes it at a given time.
A batch job can be composed of multiple batch tasks that can be executed in sequence or in parallel. For a batch task to run on the server using the new batch framework, the job must use the runAs function. When this type of batch processing is used, the user who initiates the batch processing can’t interact with the batch task or view its output. In addition, the task must not access any client-side resources while executing.
Dynamics AX 2009 also continues to support batch processing that doesn’t use the runAs function and requires the client to execute. And if you need to, you can easily update old batch-enabled classes to use the runAs function.
Note
When you move batch tasks to the runAs function, you must ensure that there are no additional Dynamics AX application runtime interactions.
To identify possible runtime interactions, use any of the following approaches:
Perform a manual code review.
Identify transition exceptions in the Infolog by converting the X++ class to a server-bound batch job (as in the following syntax example), submitting the X++ class for batch processing, and checking the Infolog for transition exceptions.
Identify client/server interactions using the client/server trace by submitting the unmodified X++ class for batch processing and checking the client/server trace for client/server interactions.
If you discover any runtime interactions, you should eliminate them by refactoring the application logic involved. When the class is ready to use the runAs function, you must override a method shown to return true, as shown here.
The Best Practice tool can help you validate your application logic and ensure that it complies with the Trustworthy Computing initiatives. The rules that apply to Trustworthy Computing are grouped under General ChecksTrustworthy Computing in the Best Practice Parameters dialog box, as shown in Figure 13-14. The Best Practice Parameters dialog box is accessible from ToolsOptions.
