The objectives of this chapter are to:
Introduce the Role Center.
Provide insight into the framework and components of Role Centers.
Offer a detailed look at the development and customization of Role Centers.
A tremendous amount of information and functionality are available to people who work with Microsoft Dynamics AX. Role Centers have been developed to help users manage that information, enabling them to prioritize their tasks and make quick business decisions.
Role Centers are available in Enterprise Portal and the Dynamics AX client. The Role Center is the home page the user sees when he or she starts Dynamics AX or Enterprise Portal. The Role Center displayed is based on the user profile that the user is assigned to.
Each Role Center is made up of different Web parts that display job-specific business information and the Dynamics AX functionality that the person regularly uses. For example, the Role Center for a sales manager, the Dynamics AX persona Kevin, includes a list of key performance indicators (KPIs) that Kevin needs to see every day; a business overview that shows him KPI trends over time; a chart that shows him his sales pipeline; a list of Quick Links that take him directly to the forms, reports, and Web sites he uses regularly; and a list of alerts and work tasks that he needs to act on. The Web parts in Kevin’s Role Center are (optionally) interactive, enabling him to drill down into the overview information he sees to get to the underlying data with a few mouse clicks. Figure 8-1 shows Kevin’s Role Center.

Developers can create new Role Centers and customize the out-of-the-box content, predefined cubes, and analytical views that ship with Role Centers. Users can personalize the personal view of their Role Center to suit their day-to-day work.
This chapter describes Role Centers and the Role Center framework. It describes the process that a developer follows—and the building blocks that he or she has to work with—to customize an out-of-the box Role Center or to build a new one. The chapter concludes with a discussion of adding users to user profiles (Role Center authentication and authorization) and of security.
Note
This chapter assumes that you have installed Enterprise Portal and Role Centers. For more information on installing Enterprise Portal and Role Centers, see the Dynamics AX Implementation Guide. You can access that guide through the Using Dynamics AX site at http://www.microsoft.com/Dynamics/AX/using/ax_installationinfo.mspx.
Before we go into the details of Role Centers, let’s take a look at some of the key benefits of using them. With Role Centers, users can do the following:
View business data at a glance. Users can monitor and analyze business performance using actionable business intelligence, such as KPIs, charts, and reports directly in the Role Center. Having this information at their fingertips allows users to take action quickly and to drill down into details and transactions as necessary.
Boost productivity and improve effectiveness. Role Centers provide a single, integrated view of the job-specific information and tasks employees need to make informed business decisions.
Prioritize their tasks. Role Centers can help users keep critical tasks, projects, and orders on track with notifications and alerts initiated by automated workflows that are displayed in the Role Center.
Get up to speed quickly. The familiar user interface offers intuitive navigation and makes it easy to find information, helping to minimize training time.
Personalize Role Centers. Users can easily personalize Role Centers to fit their own unique work style and information needs.
In this section, we take a brief tour of the underlying technology components that make up Role Centers. In subsequent sections, we discuss these components in detail.
The Enterprise Portal framework forms the foundation for Role Centers; Role Center development takes place within this framework. (To read more about Enterprise Portal, see Chapter 7.) Windows SharePoint Services and Microsoft Office SharePoint Server form the Role Center front end, allowing developers and users to customize and personalize a Role Center. The Dynamics AX Reporting and Business Intelligence framework enables you to develop reports, KPIs, and other business intelligence that can appear in a Role Center. The Role Center framework itself consists of the following parts:
User profiles
Role Center Web parts, such as Cues, Quick Links, Business Overview, Dynamics Report Server Report, and Dynamics Unified Worklist
Metadata store for Cues, Quick Links, and Business Overview Web parts, and user profiles in the AOT; and the import/export mechanism for Cues Quick Links, and user profiles
Run-time style, navigation, and interaction adaptors for the client and Enterprise Portal, and run-time detection and rendering of Role Centers as the start page
Figure 7-2, in Chapter 7, shows the high-level architectural components of the Role Center.
The Enterprise Portal framework and the Reporting and Business Intelligence framework use .NET Business Connector to access the metadata stored in AOD files (represented by the Application Object Tree, or AOT) and the transactional data stored in the Dynamics AX database. The framework uses the ADOMD.NET data provider to get analytical data from OLAP.
Role Centers are built with Enterprise Portal and Reporting and Business Intelligence framework components in Windows SharePoint Services using ASP.NET. The same Role Center page is rendered with the appropriate themes and navigation based on the client platform (the Dynamics AX client or Enterprise Portal) on which it is hosted.
When a user accesses a Role Center through Enterprise Portal, the master page detects the user profile of the current users, retrieves the associated Role Center page for that user profile, and renders it in Enterprise Portal. A Role Center is just like any other Web part page in Windows SharePoint Services.
When a user accesses Dynamics AX through the client, a Web browser control that is hosted for the home tab displays the appropriate Role Center page from the Windows SharePoint Services site. The top and left navigation are stripped off the Web page, and a header with Role Center as the caption and a Personalize This Page link are added. The Dynamics AX client Role Center style sheets are applied so that the Role Center looks like other client user interface components. Any links in the Cue, Quick Links, and Dynamics Report Server Report Web parts point to client list pages or forms. The browser control detects the navigation event for these links and when clicked opens the respective client list page or form. If there are any hyperlinks that point to other Web pages, they open in a new browser window so that the client Role Center is never replaced with other pages in the Dynamics AX client.
Developers can quickly customize Role Centers to add business-specific and industry-specific content, making Role Centers even more useful for businesses and the people who run them. In this section, we describe how to customize the Role Centers that ship with Dynamics AX 2009 and how to build a new one.
Role Centers are based on the personas that represent the goals and behavior of a real group of Dynamics AX users. Each of the 33 persona-based Role Centers that ship with Dynamics AX 2009 can be deployed to customers with no additional changes as soon as setup tasks have been performed.
Tip
You can see a full list of Role Centers, get an overview of the roles, and download details about the default information that is displayed for the role on the Using Microsoft Dynamics AX site at http://www.microsoft.com/dynamics/ax/using/ax_rolecenterreference.mspx.
As a developer or an administrator, you can also customize a Role Center for all users in a particular role. Users can further personalize their personal view of the Role Center. Other users associated with the Role Center don’t see the customizations other users have made.
You can edit a Role Center page, just as you can any other page in Enterprise Portal. However, only the Role Center page associated with the current user’s role is displayed. If you want to modify other Role Center pages, you must locate them directly in Windows SharePoint Services. You can see a list of Role Center pages at http://<server>/sites/DynamicsAx/Enterprise%20Portal/Forms/AllItems.aspx. You can also see the list of all available Role Centers under AdministrationSetupUser Profiles. Just click the button View Role Center in the Dynamics AX client.
Role Center names begin with RoleCenter. The exception is the EPDefaultRoleCenter page, which is the Role Center displayed for users who are not assigned to a specific role. Click the page name to modify the page.
We explain how to customize the data underlying the Web parts in a Role Center in the upcoming "Role Center Web Parts" section.
In this section, we describe the high-level steps that developers and planners undertake when creating a new Role Center. For step-by-step instructions, see the Microsoft Dynamics AX 2009 SDK at http://msdn.microsoft.com.
The first step in creating a new Role Center is to identify the type of content you want to display in the Role Center, along with the layout of that content. If you need to display higher-level analytical information, you must create the KPIs and measures and dimensions in Microsoft SQL Server Analysis Services.
Note
Measures and dimensions comprise the OLAP cubes that Analysis Services uses to contain the data you use to build KPIs and other analytical information. In Dynamics AX, measures are referred to as indicators. For a detailed description of OLAP cubes and Analysis Services, see MSDN.
The second step is to decide how the data is to be seen in the Role Center. For example, your team might decide that the data is to be displayed as a list of KPIs comparing current results with the target, and that it is displayed as a report. Or you might decide that the data should be displayed as a time comparison versus prior performance, in a chart.
The third step is developing the content. You can add a wealth of content to a Role Center, including Cues, Quick Links, Dynamics Report Server Report, Business Overview, and Dynamics Unified Worklist Web parts, KPIs, and other indicators. We discuss each content type in more depth later in this chapter.
The fourth step is to build the Role Center page in Enterprise Portal. You can create a Web part page in Enterprise Portal using any of the page templates available in Windows SharePoint Services. Just add the Role Center Web parts and set their properties to point to the right content, as described in the preceding steps.
Finally, you create the Web menu item pointing to the URL of the page you’ve just created. You mark the HomePage property of the Web menu item to Yes and assign this Web menu item as the Role Center in the user profile. You can read more about creating a user profile in the "User Profiles" section later in this chapter. Figure 8-2 shows the high-level flow of development activities for a Role Center.

Now that you have a high-level view of what Role Centers are, how they behave, and the basic development tasks that are involved in creating them, we’ll tell you about the content—basically, the Role Center Web parts—that you can add to or customize in a Role Center.
A cue is a visual representation of invoices, purchase orders, accounts receivable, and so on. By providing greater visibility into the amount of work that needs to get done, a cue can help users prioritize their work. The Cues Web part mimics a pile of paper by visually representing each task as if it were lying on a desk. A Cue is not only a visual indicator; it acts as a shortcut that enables users to drill down into the list pages where they can take action.
Both developers and users can create Cues from any list page or form in the Dynamics AX client. To do so, define the filter that you want to apply, and save it as a Cue from the Advanced Filter folder (at FormsList Pages) or directly from the list page. You can also perform more-complex tasks by defining the Cue so that it displays additional information. For example, you can add the sum of an invoice amount and a warning symbol to a Cue when a certain condition is met.
To define the filter, you can use the SysQueryRangeUtil class functions. Take, for example, the user persona Alicia. Imagine that you want to display all purchase orders where she is the order taker (this is a field on the Purchase Order form). In the filter, you set the order-taker field value equal to the user ID of the person currently logged on. The purchase orders are automatically filtered to display only those Alicia has taken.
Or imagine that the user persona April wants an indicator of how many vendor invoices are due for payment in the upcoming week because she pays invoices weekly. This indicator lets her know how many checks she needs to produce and allows her to plan her time accordingly. She can also drill down into the list of these vendors to initiate payment. The filter you use must allow April to define the date range so that whenever this filter is run, it displays the invoices for a particular week.
To meet these needs, the SysQueryRangeUtil class comes with a default set of filtering functions, such as currentEmployeeId, and many date functions. You can extend this class by creating your own methods and using them in the advanced filter. Here’s an example.
Field – Order Taker , Criteria - (OrderTaker == currentEmployeeId()) Field – Date Opened, Criteria -(greaterThanDate(-8)) |
The information about Cues is stored in the CuesQuery and CueQuerySecurity tables.
A Cue stores the menu item from which it was created. So when the user clicks the Cue in the Dynamics AX client Role Center, the Cue returns to the list page or form that is linked to that menu item and then applies the filter.
When the Cue is displayed in Enterprise Portal, it gets the corresponding Enterprise Portal page from the WebMenuItem property of the menu item in the AOT and links to it; when the user clicks the Cue in Enterprise Portal, the Web page is displayed. If WebMenuItem is empty, the Cue is not linked to an Enterprise Portal page and just displays the Cue with information but without a link.
When creating a Cue, an administrator or developer can specify which user profiles can view it. Only users who belong to the profile and have access to the associated menu item (in the Dynamics AX client) or Web menu item (in Enterprise Portal) can view the Cue. Users who don’t belong to the specified profiles or who don’t have access to the menu item that the Cue is linked to can’t view the Cue. Figure 8-3 shows the design-time and run-time rendering for Cues.

Quick Links is a Web part that displays a collection of links to Dynamics AX client list pages or forms, to Enterprise Portal Web pages, or to any Web URLs. Users can create shortcuts to their most frequently accessed forms, reports, pages and Web links, and organize them in one or more Quick Link Web parts in their Role Center.
Administrators or developers can create links that are common to all users in a profile. For developers and administrators, a drop-down menu to pick Shared or Personal mode is displayed. For users, only Personal mode is allowed, so this drop-down menu isn’t displayed to them. Users can create only personal links, ones that are just for them.
The Add Links dialog box displays links from the main menu of the Dynamics AX client or from the Dynamics QuickLaunch Web part of Enterprise Portal. The desktop links are displayed in the Quick Links Web part only when the Role Center is rendered in the Dynamics AX client. These links are not displayed when the Role Center is displayed in Enterprise Portal. When you add a link to Enterprise Portal, you can specify whether or not it is displayed in the Dynamics AX client Role Center. If set to Yes, the Enterprise Portal link appears in both the Dynamics AX client and the Enterprise Portal Role Centers. If not set to Yes (checked), the link appears only when the Role Center is rendered in Enterprise Portal. The third type of link—that is, any Web URL—is displayed in both modes.
Quick Links are stored in the SysQuickLinks and SysQuickLinksOrder tables. A Quick Links Web Part stores the Quick Links group ID and default title label. The group ID is used to identify the links that need to be displayed from the SysQuickLinks table.
When a new Quick Links Web Part is added to the Role Center, it automatically adds a globally unique identifier (GUID) as the group ID. But you can rename the GUID to a readable string so that later you can manage these link groups (importing or exporting them, or deleting them) easily from the dialog box at BasicSetupRole CentersEdit Cue Links. One or more Quick Links Web Parts can point to the same group ID and display the same set of links.
If a user removes the links or changes their order while in Personal mode, the links displayed to a different user in the same Web part are not affected. The links are security trimmed, so if a user doesn’t have access to the links, they are not displayed in the Quick Links Web Part. The Manage Links dialog box displays all the links and their status, such as Hidden or No Access. Figure 8-4 shows the Quick Links design-time and run-time rendering.

Key performance indicators (KPIs) are valuable to businesses, helping employees evaluate the progress made against measurable goals for key business metrics. Perhaps most useful is the ability for a business to compare a given KPI against a benchmark, helping managers assess the present state of the business compared with previous performance, say, during the preceding year. The Business Overview Web part shows the performance of one or more KPIs over an established time period, with the goal of helping users assess the present state of their business in comparison with a prior period.
The Business Overview Web part supports two modes of display: Business Overview and KPI List. In Business Overview mode, the Web part displays the indicator (e.g., Revenue), Time Periods (e.g., current quarter versus preceding quarter), and the Current and Previous values plus the changes in the values. The Business Overview mode is used for time comparison. In KPI List mode, the Web part displays the indicator (e.g., New Leads), Goal (e.g., 1), and Status and Trend; it is used for measuring progress toward a goal. In this section, we discuss the Business Overview Web part. We go into more depth about the KPI List Web Part later in this chapter.
You can customize and personalize the Business Overview Web part by using a predefined list of indicators and time periods for three roles: developers, administrators, and users. Developers can add more time periods and indicators to the Business Overview Web part. Users can further personalize this Web part and add or remove indicators according to their needs.
You can define each indicator to display the measure in detail in a given dimension and to be linked to a detailed report. In addition, you can configure the Business Overview Web part to display the indicators for the current company or for all companies in the organization, as well as the currency in which the amount indicators are displayed. Figure 8-5 shows the Business Overview Web part design-time and run-time rendering.

Dynamics AX comes with a predefined list of indicators, including Goal, Status, and Trend expressions. As we mentioned earlier in the chapter, indicators are defined as measures in Analysis Services cubes. If you want to modify a measure or create a new one, you can use the Business Intelligence Development Studio (BIDS) tool that comes with Analysis Services. Details on modifying and creating measures are beyond the scope of this book. If you decide to modify or create a measure, please read the Microsoft Dynamics AX 2009 Business Intelligence Cube Reference Guide for guidance. The guide is available for download on the Using Microsoft Dynamics AX site at www.http://microsoft.com/dynamics/ax/using.
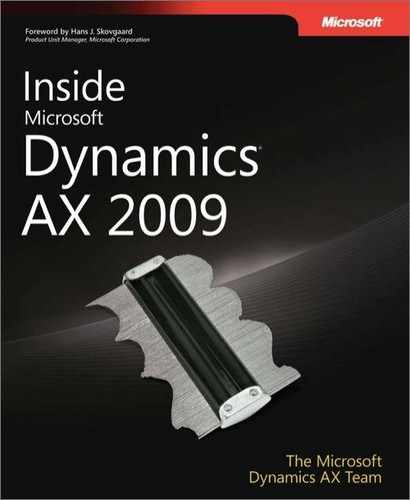
The Business Overview Web part comes with a list of predefined time periods—for example, This Month vs. Last Month, This Quarter vs. Last Quarter, and so on—that are used for comparison. Developers and administrators can extend this list through the Time Periods form: Administration/Setup/Business Analysis/OLAP/Time Periods. Figure 8-6 shows the Time Periods form.
To add a new time period, add a new record to the Time Periods form and set the Period ID, Description, Display Name, Current Period MDX, and Previous Period MDX. You can also create an item as a template and use it in the Multidimensional Expressions (MDX) for the time period.
Note
If you create template records, they won’t be visible in the Business Overview Time Period drop-down menu. They are used only to enable the reuse of MDX across many time periods. For example, if you want to display an indicator comparing Last Month with Last Year Last Month, and if this time period setup isn’t available out-of-the-box, you can add it. In the Time Periods form, create a new record and set the parameters as follows.
The Current period and Previous period MDX in the preceding example use a template expression already created with the name CurrentMonth. Templates are a great way to simplify and reuse MDX. %CurrentMonth% refers to an entry on the General tab in the Time Periods form, where:
The Business Overview Web part uses an Office Data Connection (.odc) file to connect to Analysis Services. By default, it uses /Sites/DynamicsAX/Data Connections/Dynamics AX.odc. You can change this to point to any .odc file using the Business Overview Web part Properties pane. By default, the Web part uses the current user authentication to connect to Analysis Services.
If you have Enterprise Portal and Role Centers installed on one machine and Analysis Services installed on another, you must enable Kerberos-constrained delegation to allow the authentication flow across machine boundaries for this multi-hop scenario. To learn more about Kerberos, refer to the "Kerberos Authentication" section later in this chapter. Alternatively, you can configure the .odc file to use the application pool’s credential to connect to Analysis Services using NTLM, and use the user’s alias for authorization.
The .odc file XML looks like this:
If you’re using Kerberos, you must modify this .odc file and append ;SSPI=Kerberos to the odc:ConnectionString element. The result would look like this:
<odc:ConnectionString>Provider=MSOLAP.3;Integrated Security=SSPI;Persist Security Info=True;Data Source=Server1;Initial Catalog=Dynamics AX;SSPI=Kerberos </odc: ConnectionString> |
To use the application’s pool account for authentication and authorization to connect to Analysis Services, instead of the user’s credentials, you must add the following element to the .odc file XML.
Alternatively, if you want to connect to Analysis Services using the application’s pool account instead of the user’s credentials, but you still want to use the user’s name for authorization, you must add the following element.
The Dynamics Unified Worklist Web part in Role Centers keeps the work flowing between people by displaying all time-based information in one central place. The worklist allows users to take direct action on each item.
Dynamics AX has three different pieces of information—alerts, work items, and activities—that are time-based and assigned to a specific user. Combining and surfacing these pieces of information in a Unified Worklist reminds users of important information and tasks that await their action.
The Unified Worklist provides a flexible layout, allowing users to decide how to organize and display information. Users can configure the worklist to display at 100 percent or 50 percent width, depending on the layout. They can also decide whether to display, for example, all content or just Approvals and Tasks, Alerts, or Activities. The Unified Worklist also comes with a toolbar, which you can turn on or off, used to filter and group items. The Dynamics Unified Worklist Web part also comes into play when you are using the workflow infrastructure in Dynamics AX. Refer to Chapter 9, for further details. Figure 8-7 shows the Dynamics Unified Worklist Web part.

The Dynamics Report Server Report Web part is used to display Dynamics AX reports in Role Centers that are created in Microsoft SQL Server Reporting Services. Reporting Services reports provide rich designer tools and flexibility that allow you to create a variety of reports (summary reports, drill-down reports, charts, or details reports) and to get data from a transactional database or from Analysis Services cubes.
If you need to display or link to a report or chart in a Role Center, you must develop a Reporting Services report. The report has to connect to OLAP or OLTP to get the data.
To build the report, you use the Dynamics AX report development tools and then create a menu item in the AOT that is of objecttype SQLReportLibraryReport to refer to the report. Finally, you point the Dynamics Report Server Report Web part to the menu item you’ve created in the AOT, and the report renders in the Role Center.
The Dynamics Report Server Report Web part gets the report name and label from the menu item that it’s pointing to. First, it verifies whether the user has access to the menu item. If so, the label of the menu item is set as the title for the Dynamics Report Server Report Web part. The Web part gets the company, the user’s language setting in Dynamics AX, the Report Manager URL, and the root folder, and then it constructs the URL for rendering the report.
It sets the constructed URL as the URL for an IFRAME (windowless inline floating frame) and then renders the IFRAME. The parameters that are set in the report Web part or passed through the query string are also set on the report.
The Dynamics Report Server Report Web part also supports the Microsoft Office SharePoint Server (MOSS) Filter consumer interface. So the report can be connected to a MOSS Filter, and parameters can then be passed from the Filter Web part to the Dynamics Report Server Report Web part.
If you need to pass parameters to the report through a query string, you can do so in the URL with this syntax:
For example, in the Dynamics Report Server Report Web part, set the parameter selector value to Report1. And let’s say the report has a parameter defined with the name CashInflowvsCashOutflow_EndDate. In that case, the query string is the one shown here.
http://axepdemo/sites/DynamicsAx/Enterprise%20Portal/RoleCenterCEO. aspx?WCMP=CEU&Report1.Parameters.CashInflowvsCashOutflow_EndDate=01/01/2009 |
The underlying report can be opened in a new browser window by clicking Open in a New window link displayed in the Dynamics Report Server Report Web part menu. (The Web part menu is a drop-down menu located in the upper-right corner of the Web part.) Figure 8-8 shows the Dynamics Report Server Report Web part design-time and run-time rendering.

Refer to the Chapter 11, for further details on creating and managing Dynamics AX reports.
All the Role Centers work with Windows SharePoint Services, but two Role Centers light up with MOSS-specific components that come with the Microsoft Enterprise Client Access License (CAL): the CEO and the Sales and Marketing Executive Role Centers. If you have MOSS Enterprise, these Role Centers use the MOSS KPI list and filter instead of the equivalent functionality provided in the Windows SharePoint Services version of these Role Centers. (In the Windows SharePoint Services version of these Role Centers, that functionality is provided by Reporting Services.)
Using MOSS for these two Role Centers offers users some benefits:
With MOSS, you can change the filter at a page level; in Windows SharePoint Services, you need to change the filter at the Web part level.
MOSS uses a KPI list to display the KPIs, so the user can easily personalize the list to add or change KPIs. Windows SharePoint Services uses Reporting Services to display the same KPIs, so to change the KPIs you have to edit the report.
The other advantage of using MOSS is that you can use Excel Services or other business intelligence components; out-of-the-box Role Centers don’t use Excel Services. Except for this one difference, all other built-in Role Centers behave the same way in Windows SharePoint Services and MOSS.
MOSS has built-in features that allow you to manage and display KPI information in various ways. KPI indicators can be derived from a variety of sources: Windows SharePoint Services lists, Excel workbooks, data in Analysis Services, and manually entered information. For Role Centers, KPI information from Analysis Services can be used to quickly gauge the business access and compare the actual value to a target value. A KPI List Web Part is a navigation component that can be added to a Role Center, enabling the user to build an easy-to-use selection system for the KPIs needed most often. The KPI List Web Part provides a set of visual indicators to help the user be more aware of current performance status. The user can also build multiple lists, organizing KPIs based on personal criteria and requirements specific to a role-based view of the organization.
Filters enable dashboards to be personalized by using shared parameters among Web parts on a dashboard. Adding a Dynamics Report Server Report Web part or KPI list to a Role Center renders a Reporting Services report or KPI. But what if you want to limit (or filter) the data displayed in the Web part based on a selection made at the page level? Filter Web parts that come with MOSS are handy for this situation.
For example, suppose you have two Dynamics Report Server Report Web parts on a page. Each displays a different view of company sales data. One displays a matrix report, and one shows a graph. It can be cumbersome to filter the date of each Web part separately, so a Date Filter Web part could be very helpful in assigning a date to each report at the same time.
Here’s how to use a Filter Web part: after one or more Dynamics Report Server Report Web parts are added to the Web page, place a Date Filter Web part on the page and connect the Filter Web part to the Dynamics Report Server Report Web parts. This connection is necessary so that the Dynamics Report Server Report Web parts know when a date is entered into the Filter Web part. Once the Filter Web part is connected to the Dynamics Report Server Report Web parts, a date can be entered in the Filter Web part, and the reports are updated accordingly. You could connect the Filter Web part to Analysis Services cubes to get the possible values for the parameters. They could get the connection from the connected Web part or from an .odc file.
A user profile represents a persona in the customer model and a typical user of the system. It stores the default settings and configuration options of Role Centers for users of the same type.
Administrators create user profiles for each set of users who perform similar job functions. For example, Accounts Receivable Clerk is a job function or a typical user function—a persona—and in a given company, any number of users could perform this job function. The administrator can create one user profile for the Accounts Receivable Clerk persona, assign a Role Center to that user profile (a Web menu item of type URL with the HomePage property set to Yes) and add the users who perform the Accounts Receivable Clerk job to that user profile.
A system administrator assigns the user to a user profile in either the User form (AdministrationCommon FormsUsers) or in the User Profiles form (AdministrationSetupUser Profiles). A user can be assigned to the same profile in all companies, to different user profiles in different companies, or to no profile.
When the user logs on to the system, the corresponding Role Center is displayed, based on the user’s current company and user profile. If the user changes the company in the business application, the Role Center for that company for that user is displayed. If a user isn’t associated with any user profile, the default Role Center is displayed. You can set which Role Center page should be used as the default Role Center in the User Profiles form in the Dynamics AX client.
You can also copy the user profiles from one system to another by exporting one or more of the user profiles to an XML file in the file system or to the AOT. When you export the user profile to the AOT, it creates a node under AOTResources with the name Profile_<ProfileID>. You can then export this as an .xpo file. On the other machine, you can import directly from the file system or from the AOT.
The user profiles that come with Dynamics AX are stored under AOTResources. Dynamics AX imports these user profiles from the AOT into your system during the Initialize Role Center Profiles step of the installation process. If you skipped this step, you can always initialize it from BasicRole CenterInitialize Role Center Profiles.
Dynamics AX uses Integrated Windows authentication to authenticate users. When a user logs on to a Windows desktop and then uses the Dynamics AX client application or Enterprise Portal, that user’s Windows authentication is used automatically to authenticate and authorize the user without prompting for the user’s credential again.
Integrated Windows authentication can use either NTLM or Kerberos authentication methods. The authentication method could also be configured as Negotiate, which is a wrapper for Kerberos and NTLM that allows the client application to select the most appropriate security support provider for the situation.
When the user accesses a Web page, Internet Information Services (IIS) sends the NTAuthenticationProvider configuration (one or more of Negotiate, Kerberos, and NTLM) for that Web site from the IISMetabase as a WWW-Authenticate header. For example, if Negotiate, NTLM is configured as NTAuthenticationProvider, the client negotiates with the server to determine whether to use Kerberos or NTLM for authentication. If the client doesn’t support the Negotiate method, the client uses NTLM.
With NTLM, the user name and password (credentials) are hashed before being sent across the network. When you enable NTLM, the client browser proves its knowledge of the password through a cryptographic exchange with your Web server that involves hashing. So although the Web server could use this information to authenticate the user and access the resources that are available on the Web server, it can’t act on behalf of the user and access resources in other machines.
NTLM works fine for regular Enterprise Portal pages because the resources it accesses are all on the same Web server and it uses a trusted account to connect to the Application Object Server (AOS). The AOS doesn’t use the user’s credential to access the transactional database.
As mentioned earlier, Role Centers are powered by Enterprise Portal and use Analysis Services and Reporting Services components. If Analysis Services and Reporting Services are installed on the same box as the Web server, NTLM is enough. But if these components are installed on different machines than the Web server, NTLM doesn’t work—because Analysis Services and Reporting Services require user credentials to authenticate and authorize them. When a user authenticates to a Web server and that Web server then needs to impersonate the user against another service on a different machine, the user’s authentication ticket is "hopping" across two services. To establish a session with the second server (Analysis Services or Reporting Services), the primary server (Web) must be authenticated on behalf of the client’s user account and authority level. In scenarios where there is a double hop, NTLM doesn’t work. You have to use Kerberos authentication.
Kerberos authentication uses tickets that are encrypted and decrypted by secret keys and don’t contain user passwords. These tickets are requested and delivered in Kerberos messages. Two types of tickets are used: ticket-granting tickets and service tickets. A ticket-granting ticket is issued for a specific client and can be reused by the client in requests for additional service tickets for the same service. Each service ticket issued by the ticket-granting service is for a specific service on a specific host computer.
The Kerberos protocol includes a mechanism called delegation of authentication. When this mechanism is used, the client (the requesting service) delegates authentication to a second service by informing the Key Distribution Center that the second service is authorized to act on behalf of a specified Kerberos security principal. The second service can then delegate authentication to a third service.
Administrators could also constrain this delegation to specify and enforce application trust boundaries by limiting the scope in which application services can act on a user’s behalf. This flexibility to constrain a service’s authorization rights helps improve application security design by reducing the opportunities for compromise by untrusted services.
For more information on setting up Kerberos delegation, see the white paper "Configuring Kerberos Authentication with Role Centers," available for download on the Using Microsoft Dynamics AX site at www.http://microsoft.com/dynamics/ax/using.
Role Centers have four levels of security. Two are at the back end: transactional databases (OLTP) and cubes in Analysis Services (OLAP); two are at the front end (Windows SharePoint Services and Reporting Services).
Figure 8-9 shows the Role Center security configuration options you can set, depending on your usage and deployment topology.
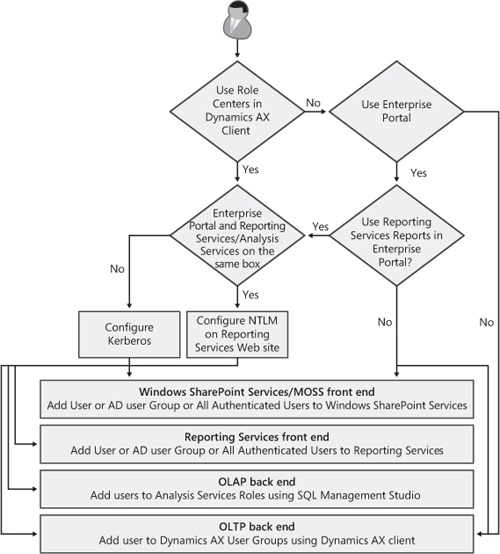
For the OLTP system, the user must have access to Dynamics AX. The user’s Active Directory account is added to the appropriate user groups in Dynamics AX. At a minimum, the user must be a member of EP_Int, an out-of-the-box Enterprise Portal user group, or have equivalent permission through other groups. EP_Int controls the user’s access level to all Dynamics AX content, such as tables, rows, Web content, Web menu items, and Web modules, and it is secured through security keys, record level security (RLS), and the Trust Policy file (TPF).
If the Role Center displays content from Analysis Services cubes, the user must be granted permission in Analysis Services. A number of default Analysis Services roles are created in the Dynamics AX Analysis Database. You can use one of these roles or create your own, and add either the individual Analysis Database user account or user groups to these roles. Using Analysis Database user groups simplifies the user administration task in Analysis Services, and the groups can be reused for granting permission in Windows SharePoint Services and Reporting Services later. So essentially you use Dynamics AX user groups to secure Dynamics AX OLTP content, and Analysis Database groups for securing Windows SharePoint Services, Analysis Services, and Reporting Services.
The user must also have permission to view the Enterprise Portal site used for Role Centers. The permissions for this site control access to the Web site and its document libraries, lists, and pages. At a minimum, the user must have read permission. The Windows SharePoint Services site-level permission doesn’t affect the user’s access level to Dynamics AX content. A user who has only read permission on the Windows SharePoint Services site can create and edit records if he or she has write access to content through a Dynamics AX user group. So if you’re planning to use Windows SharePoint Services document management and collaboration functionality, you need to grant specific permission to users. You can add an individual Analysis Database user account or user groups and grant specific Windows SharePoint Services permissions. If you’re going to use the site just for Role Centers and will use Enterprise Portal for accessing Dynamics AX content, adding the All Authenticated Users group and giving the members read permission is good enough.
Finally, the user must have permission to view the reports in Reporting Services. The Reporting Services user groups control access to the Reporting Services Web sites and adding, modifying, and designing reports. At a minimum, the user must have browse permission. The permission level granted in Reporting Services doesn’t affect the OLTP or OLAP access level. It only controls what reports the user can see and update in Reporting Services. If you plan to use other Reporting Services functionality, such as allowing users to publish reports, you need to grant specific permission to users. You can add an individual Analysis Database user account or user groups and grant specific Reporting Services permissions. If you’re going to use the site just for Role Centers and Enterprise Portal for displaying reports, adding the All Authenticated Users group and giving the members browse permission is sufficient.