The objectives of this chapter are to:
Explain how to create wizards with the same look and feel as the standard wizards in Microsoft Dynamics AX 2009.
Demonstrate how to use the RunBase application framework to implement new business transaction jobs.
A wizard is a special form of user assistance that automates a single task or a set of tasks. A wizard presents users with a series of pages to collect information necessary to complete a task. Wizards are especially useful for complex or infrequent tasks that the user might have difficulty learning or doing and for tedious, frequently performed tasks. The first part of this chapter shows how to build a simple wizard to create inventory items.
The second part of the chapter examines the RunBase framework. The RunBase framework supports business transaction jobs, such as exchange rate adjustment or inventory closing. The framework helps developers write new business transaction jobs by supplying all the programming infrastructure so that the developer can focus solely on the business logic. This chapter implements a sample RunBase class that sends bike-tuning service offers to customers via e-mail.
The wizard framework supplies the programming infrastructure to create wizards with a consistent look and feel. When developing wizards, you should follow some simple guidelines to ensure that all the wizards you create have the same general style and are as helpful as possible to the user. For example, all wizards should clearly state their purpose on the first page and present a very limited set of choices and controls on every subsequent page. Figure 6-1 shows a sample first page.

You should provide enough instructions to users to make the concepts the wizard implements easy to understand. Consider using graphics as well as text, as shown in Figure 6-2, to explain complex concepts.

The user should be able to finish the entire task within the wizard itself. Don’t confuse users by redirecting them to other forms to complete the wizard. Include default values or settings (as shown in Figure 6-3) wherever possible. If you can, enable the Finish button as soon as the wizard has collected enough information to skip the rest of the wizard pages. Try to minimize the number of decisions the user must make.

Figure 6-3. Wizard page showing default values for Auto Create Label, Label File ID, and Enumerated Value of user-defined dimension
Make sure the wizard clearly states the actions it will take and how the user should proceed when the wizard has been completed. You can present this information on the last page of the wizard as fixed text with a summary of the selected values and settings, as shown in Figure 6-4.

The Wizard Wizard is a special wizard in Dynamics AX that helps you create wizards that have the same look and feel as the standard wizards in Dynamics AX. You open the Wizard Wizard, shown in Figure 6-5, from the Dynamics AX menu bar: click ToolsDevelopment ToolsWizardsWizard Wizard.

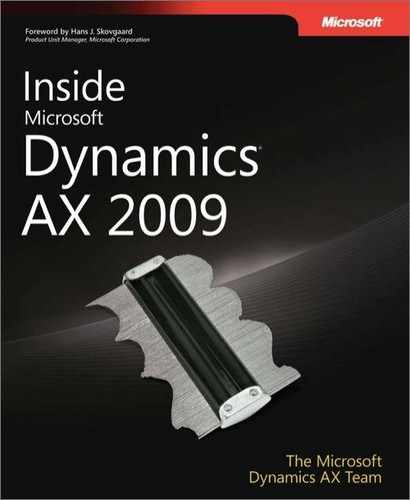
As shown in Figure 6-6, the wizard asks you to choose between two types of wizards: a standard wizard, for any kind of job, and a default data wizard, especially designed to help the user create basic default data in the system. This section demonstrates how to use the Wizard Wizard to create a standard wizard that is available from the navigation pane and the area page of Dynamics AX.
Note
An area page contains menu items that link to frequently used forms for the selected module. Area pages are accessed from the navigation pane.
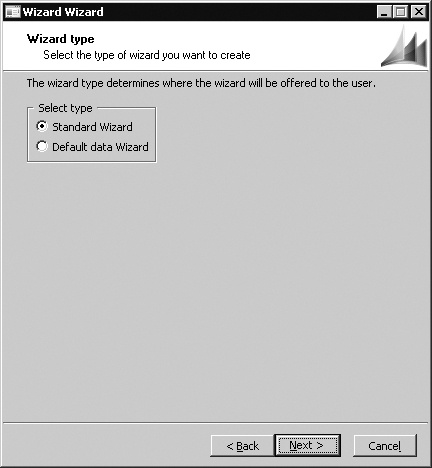
When you enter a name for your wizard on the next page (shown in Figure 6-7), you can see how the names of the elements that are created in the Application Object Tree (AOT) are suffixed with either Wizard or DefaultDataWizard, depending on the type of wizard.
In the last step before the summary page, Setup, you enter the number of steps you want in your wizard, as shown in Figure 6-8. This number includes the Welcome page and the Summary page. If you change your mind about the number of steps you want after completing the wizard, you can change the elements generated by the wizard in the AOT.

Because this sample wizard doesn’t include any complicated selections, the summary page, shown in Figure 6-9, is rather short.

The Wizard Wizard creates a private project, shown in Figure 6-10, that contains three new elements, described from top to bottom:
A class for holding the business logic of the wizard and the logic for running the wizard in the framework. The class extends either SysWizard or SysDefaultDataWizard, depending on the type of wizard.
A form with the user interface of the wizard.
A display menu item to start the wizard. The menu item starts the class that starts the form.

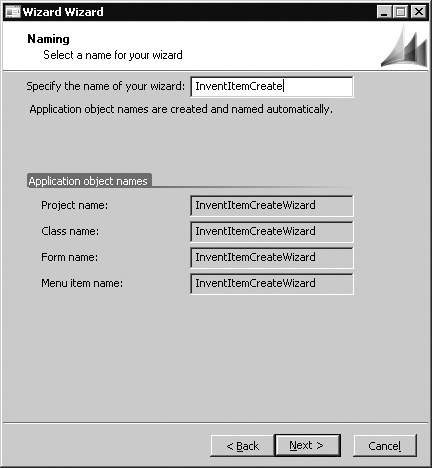
After creating the basic frame for your new wizard, the next step is to add labels. To open the Label Editor, click ToolsDevelopment ToolsLabelLabel Editor. The Label Editor is shown in Figure 6-11.
The Label Editor creates labels in your default language. The Setup tab allows you to set the default language and displays the default label file in which new labels are stored. (If there is no default label file, you must create one with the Label File Wizard, located in Tools Development ToolsWizardsLabel File Wizard, and then you must select it as the default on the Setup tab.) You can change these default settings. Read more about the Label Editor in Chapter 3.
Labels are identified with an ID consisting of the label file name and a counter. The label IDs displayed depend on any existing labels and your choice of label file. In Table 6-1, a default label file—USR—results in the label IDs @USR1, @USR2, @USR3, and so on.
Table 6-1. Label IDs and Labels
Label ID | Label |
|---|---|
@USR1 | Create inventory item wizard. |
@USR2 | This wizard helps you create a new inventory item. |
@USR3 | Item identification. |
@USR4 | Item number and description. |
@USR5 | Select proper group relationships for the item. |
@USR6 | Create inventory item. |
@USR7 | This is all the wizard needs to know to create the inventory item. |
@USR8 | Click Finish to create and save the item. |
Press Ctrl+N to create the new labels shown in Table 6-1. The label ID is generated automatically when you provide text in the Label field; the Description field is optional.
Take note of the label numbers you’re given so that you can use them in your code if you have label numbers other than those listed in the table. You can also use the Label Editor to search for previously created labels based on their content.
Next you can add selection fields to the wizard you created and write the logic to create the inventory item. You edit the wizard form by using the AOT. In the AOT, scroll to the name of the wizard form you want to design and right-click it. Select Properties, and then set the Caption property of the form design to @USR1.
Right-click TabPage:Step1, select Properties, and then change the Caption property from "Step 1 Title" to @USR1. Add a StaticText control to TabPage:Step1 by right-clicking it and selecting New ControlStatic Text. A Text property appears in the properties list; set it to @USR2.
On TabPage:Step2, change the Caption property from "Step 2 Title" to @USR3. Set the HelpText property to @USR4.
Now you can begin adding input fields. In this example, the user must be able to enter an item ID, item name, and item description. Start by investigating the types of item IDs. The table in which items are stored is called InventTable. Look up the item ID on the table, open the properties, and note that the extended data type of the field is ItemId. Using this extended data type directly in the wizard will cause a problem, because the extended data type has a relationship with InventTable; the drop-down list for the extended data type displays existing item IDs associated with the field. You must find the name of the parent of the extended data type for use in the new wizard.
Locate the extended data type in the AOT and examine the properties. You can see that the type extends the ItemIdBase extended data type; because this type doesn’t have any database relationships, you can safely use it in the wizard. In other situations, if you can’t find a suitable extended data type, you can either create one or change the LookupButton property of the form control to Never.
Right-click TabPage:Step2, point to New Control, and then click StringEdit. Open the properties of the new field and change the Name property to ItemId, change the ExtendedDataType property to ItemIdBase, and change the AutoDeclaration property to Yes. (Setting the AutoDeclaration property to Yes allows you to easily address the control by using X++ code later; the runtime automatically creates an object handle, which allows access to the control.)
Repeat this procedure to add a field for the ItemName of InventTable. The ExtendedDataType type should be Name. Remember to set the AutoDeclaration property to Yes.
Finally, add the inventory description field. Give it the name ItemDescription. The inventory item description field is in the InventTxt table, not in InventTable as in the previous case, so you must open InventTxt to determine the extended data type. As you can see from the Txt field on the table, the extended data type is ItemFreeTxt. Supply this type in the ExtendedDataType property. Again, remember to set the AutoDeclaration property to Yes.
On the third page of the wizard, the user should be able to link the item to the mandatory item group, inventory model group, and dimension group. To make this possible, open the properties list for TabPage:Step3 and change the Caption property from "Step 3 Title" to @SYS1177, reading "Groups," and change the HelpText property to @USR5. Using the procedure described earlier, add three fields to the page with the following extended data types: ItemGroupId, InventModelGroupId, and InventDimGroupId. Name the fields to match the extended data type name, and remember to set the AutoDeclaration property to Yes.
The fourth page of the wizard is dedicated to prices. For this example, you add a sales price field. Change the Caption property of the fourth tab from "Step 4 Title" to @SYS73780, reading "Pricing," and change the HelpText property to @SYS87796, reading "Set up sales prices." Add a RealEdit control with the extended data type Price to the tab. Change the Name property to Price and remember to set the AutoDeclaration property to Yes.
On the fifth and final page, you add a short summary that describes what the wizard does when the user clicks Finish. Change the Caption property of the tab from "Step 5 Title" to @USR6. Add a StaticText control to the tab. Change the Name property to TxtFinish, change the AutoDeclaration property to Yes, change the Width property to Column Width, change the Height property to Column Height, and remove the text value from the Text property. Because this summary text is composed of several sentences with more than one label, you need to write X++ code to set the text. You must add the code to the setTexts method on the form, as shown here.
Next, you set up the navigation for the wizard. You need to implement three simple rules:
The Next button must not be enabled on the Item Identification page if an item ID hasn’t been entered.
The Next button must not be enabled on the Groups page unless all three fields have a value.
The Finish button must be enabled as soon as the Groups page is filled in. It isn’t mandatory for the user to enter a price, so the user can safely skip that step.
Start in the class declaration of the InventItemCreateWizard class by defining macro variables so that you can address the tabs by name rather than by number, as shown in this example.
public class InventItemCreateWizard extends SysWizard
{
    #define.Welcome(1)
    #define.Id(2)
    #define.Groups(3)
    #define.Prices(4)
    #define.Finish(5)
} |
To make the Finish button available before the last page, override the hasFinishButton method by right-clicking the InventItemCreateWizard class, clicking Override Method, and choosing hasFinishButton. Set the return value to true, as shown here.
The setupNavigation method describes the initial navigation settings that apply when the wizard is opened. To override this method, use the following code.
To enable the Next button when an item ID has been entered, find the ItemId control on the form and override the textChange method with the following code.
On the Groups page, all three fields must be filled in before the Next button is enabled. Create a single method on the form, in the Methods section directly under the form name node, to control the values Next and Finish, as shown here.
Override the textChange method of each of the three controls on the Groups page as follows.
Also override the modified method of each of the three controls as follows.
public boolean modified()
{
    boolean ret;
    ;
    ret = super();

    element.enableNextOnGroups();

    return ret;
} |
Before you can write the business logic to create the inventory item, you must create methods on the form to return the selected values from the controls you’ve added, as shown in the following code.
You can now write the X++ code that uses the selections made in the wizard and creates the inventory item. You insert the following code in the run method of the Wizard class.
You could include calls to validateWrite of the tables to ensure that the wizard uses the same validation rules that are used when a user creates a new item from the Item form. This ensures that the validations required to create an item are consistent, regardless of where you create a new item.
To make the wizard available from the area page and the navigation pane in Dynamics AX, you must add the menu item to the main menu in the AOT. First, you must associate the menu item with a configuration key and a security key.
Open properties for the menu item, and change the ConfigurationKey property to LogisticsBasic. The SecurityKey property must match the position of the menu item on the main menu or navigation pane, so set SecurityKey to InventPeriodic. Because the wizard adds data to the system, you must also change the NeededAccessLevel property to Add. Finally, change the Label property of the menu item to @USR1 and the HelpText property to @USR2.
Now you can add the menu item to the main menu. The main menu consists of several submenus; you add the wizard menu item to the Inventory Management submenu. In the AOT, expand Menus, right-click Invent, point to New, and then click Menu Item. Right-click the new menu item, and then select Properties. Make sure that MenuItemType is set to Display, and set MenuItemName to InventItemCreateWizard. Then drag the menu item to the Periodic folder. Save the menu, and then restart the Dynamics AX client to make the new menu item appear in the navigation pane and the area page. When the menu item is saved in the main menu, it is visible in the navigation pane and the area page, which are different views of the main menu.
Default data wizards are targeted especially for creating base data in the system. An example is the Unit Creation Wizard available from BasicSetupUnitsUnitsFunctionsUnit Creation Wizard. A default data wizard has one step more than a standard wizard. In this additional step, you must choose from two types of default data wizards:
Set up several groups of tables.
Set up one group of tables.
If you select the first type of default data wizard, a grid on the second tab allows the user to select the areas in which to run the wizard. You typically use the second type of default data wizard for complex wizards that will operate on only a few tables. This kind of wizard is typically started from the main form for the table for which it creates data, and not from the menu.
Use the RunBase framework throughout Dynamics AX whenever you must execute a business transaction job. Extending the RunBase framework allows you to implement business operations that don’t have default support in the Dynamics AX application. The RunBase framework supplies many features, including dialog boxes, query windows, validation-before-execution windows, the progress bar, client/server optimization, pack-unpack with versioning, and optional scheduled batch execution at a given date and time.
Classes that use the RunBase framework must inherit from either the RunBase class or the RunBaseBatch class. If the class extends RunBaseBatch, it can be enabled for scheduled execution in batch mode.
In a good inheritance model, each class has a public construction mechanism, unless the class is abstract. If the class doesn’t have to be initialized, use a static construct method. Because X++ doesn’t support method name overloading, you should use a static new method if the class must be initialized further upon instantiation. Static new methods have the following characteristics:
They are public and static.
Their names are prefixed with new.
They are named logically or with the arguments that they take. Examples include newInventTrans and newInventMovement.
They usually take nondefault parameters only.
They always return a valid object of the class type, instantiated and initialized, or throw an error.
Note
A class can have several new methods with different parameter profiles. The NumberSeq class is an example of a class with multiple new methods.
The default constructor (the new method) should be protected to force users of the class to instantiate and initialize it with the static construct or new method. If new has some extra initialization logic that is always executed, you should place it in a separate init method.
To allow other business operations to run your new business operation, you might want to run it without presenting any dialog boxes to the user. If you decide not to use dialog boxes, you need an alternative to them to set the values of the necessary member variables of your business operation class.
In Dynamics AX classes, member variables are always protected. In other words, they can’t be accessed outside of the class; they can be accessed only from within objects of the class or its subclasses. To access member variables from outside the class, you must write accessor methods. The accessor methods can get, set, or both get and set member variable values. All accessor methods start with parm. In Dynamics AX, accessor methods are frequently referred to as parm methods.
Best Practice
A Dynamics AX best practice is not to use separate get and set accessor methods. The accessor methods are combined into a single accessor method, handling both get and set, in a pattern called the property method pattern. Accessor methods should have the same name as the member variable that they access, prefixed with parm.
The following is an example of what a method implementing the property method pattern could look like.
public NoYesId parmCreateServiceOrders(NoYesId _createServiceOrders =
createServiceOrders)
{
;
    createServiceOrders = _createServiceOrders;

    return createServiceOrders;
} |
If you want the method to work only as a get method, change it to something such as this.
And if you want the method to work only as a set method, change it to this.
public void parmCreateServiceOrders(NoYesId _createServiceOrders =
createServiceOrders)
{
;
    createServiceOrders = _createServiceOrders;
} |
When member variables contain huge amounts of data (such as large containers or memo fields), the technique in the following example is recommended. This technique determines whether the parameter is changed. The disadvantage of using this technique in all cases is the overhead of an additional method call.
public container parmCode(container _code = conNull())
{
;
    if (!prmIsDefault(_code)
    {
        code = _code;
    }

    return code;
} |
Tip
From the X++ editor window, you can access a template script to help you create parm methods. Right-click the editor window, point to Scripts, point to Template, point to Method, and then click Parm. A dialog box appears in which you must enter the variable type and name of the member variable that you want the parm method to give access to. You can also access the script by pressing Shift+F10 in the editor window and then selecting Scripts.
When you want to save the state of an object with the option to reinstantiate the same object later, you must use the pack-unpack pattern. The RunBase framework requires that you implement this pattern to switch the class between client and server (for client/server optimization) and to present the user with a dialog box that states the choices made at the last execution of the class. If your class extends the RunBaseBatch class, you also need to use the pack-unpack pattern for scheduled execution in batch mode.
The pattern consists of a pack method and an unpack method. These methods are used by the SysLastValue framework, which stores and retrieves user settings or usage data values that persist between processes.
Note
A reinstantiated object is not the same object as the saved object. It is a copy of the object with the same values as the packed and unpacked member variables.
The pack method must be able to read the state of the object and return it in a container. Reading the state of the object involves reading the values of the variables needed to hydrate and dehydrate the object. Variables used at execution time that are declared as member variables don’t have to be included in the pack method. The first entry in the container must be a version number that identifies the version of the saved structure. The following code is an example of the pack method.
Macros must be defined in the class declaration. CurrentList is a macro defined in the ClassDeclaration holding a list of the member variables to pack. If the variables in the CurrentList macro are changed, the version number should also be changed to allow safe and versioned unpacking. The unpack method can support unpacking previous versions of the class, as shown in the following example.
If any member variable isn’t packable, the class can’t be packed and reinstantiated to the same state. If any of the members are other classes, records, cursors, or temporary tables, they must also be made packable. Other classes that don’t extend RunBase can implement the pack and unpack methods by implementing the SysPackable interface.
When the object is reinstantiated, it must be possible to call the unpack method, which reads the saved state and reapplies the values of the member variables. The unpack method can reapply the correct set of member variables according to the saved version number, as shown in this example.
The unpack method returns a Boolean value that indicates whether the initialization succeeded.
As mentioned earlier in this section, the pack and unpack methods have three responsibilities:
Switching a RunBase-derived class between client and server.
Presenting the user with final choices made when the class was last executed.
Scheduling the execution of the class in batch mode.
In some scenarios, it is useful to execute specific logic depending on the context in which the pack or unpack method is called. You can use the isSwappingPrompt method on RunBase to detect whether the pack or unpack method is called in the context of switching between client and server. The isSwappingPrompt method returns true when called in this context. You can use the isInBatch method on RunBaseBatch to detect whether the unpack method is called in the context of executing the class in batch mode.
In this section, you create an extension of the RunBase class to send bike-tuning service offers to customers via e-mail. Each bike-tuning offer could result in the creation of a service order transaction. To follow this example, you must have created an extended data type and a number sequence for bike-tuning service orders, as described in Chapter 5.
Note
To send e-mail messages, you must first set up the e-mail parameters in Dynamics AX. You access the e-mail parameters from AdministrationSetupE-Mail Parameters. To run the example without sending e-mail messages, omit the bits that use the SysMailer class.
Start by creating the labels you need. Open the Label Editor from ToolsDevelopment Tools LabelLabel Editor. The label numbers that appear in the Label Editor depend on your existing labels and choice of label file. This example refers to the labels as @USR9, @USR10, and @USR11. Press Ctrl+N to create the labels shown in Table 6-2.
Table 6-2. Bike-Tuning Label Numbers and Text
Label Number | Text |
|---|---|
@USR9 | Bike-tuning offers. |
@USR10 | Create bike-tuning offers. |
@USR11 | Send bike-tuning offers to existing customers via e-mail. |
Keep in mind that you need to use label numbers in your code, so don’t forget the ones you’re given.
To store information about the generated service orders, a simple table with only two fields must be created. If you’re not confident in your ability to create new tables, the Microsoft Dynamics AX 2009 software-development kit (SDK) offers detailed information about creating tables.
The table must be created with the following properties.
Name | BikeServiceOrderTable |
Label | @SYS79051 The label reads "Service Orders." |
Add two fields to identify the service order and the customer. The fields must have the following properties.
Name | CustAccount |
ExtendedDataType | CustAccount |
Name | BikeServiceOrderId |
ExtendedDataType | BikeServiceOrderId |
Finally, add an index with the following properties to the table.
Name | ServiceOrderIdx |
AllowDuplicates | No |
DataField | BikeServiceOrderId |
Now you can begin to create the business transaction class itself. Create a new class that extends the RunBase class, as shown in this example.
Implement the two abstract pack and unpack methods of RunBase. For now, you’ll make a very simple implementation to be able to compile the class. You’ll make the final implementation with the correct class members later. Insert to-do comments in the code, as shown in the following example, so that compile log messages remind you to revisit the methods.
public container pack()
{
;
    //TODO Make the final implementation.
    return conNull();
}

public boolean unpack(container _packedClass)
{
;
    //TODO Make the final implementation.
    return true;
} |
To enable the example for execution, you must implement the run method. Because it’s too early to add the business operation, you implement an empty method, as shown here.
You must implement a static method that returns a description of what the class does. This method sets the title of the dialog box and can also be used for different kinds of user interface presentations on the class. The description method must effectively be executed on the tier from which it is called, so define it as client server. Use one of the labels created earlier, as shown in this example.
Next, you create a custom static constructor as shown here.
public static BikeTuningOffers construct()
{
    BikeTuningOffers    bikeTuningOffers;
    ;

    bikeTuningOffers = new BikeTuningOffers();

    return bikeTuningOffers;
} |
To force users of the class to use your constructor rather than the default constructor (new), make the default constructor protected. Right-click the class, point to Override Method, click N5ew, and change the method as shown here.
To enable your job to run from a menu item, you must create the static constructor that is called by the menu item that you’ll eventually create. This is the method with the name main, and it should look like this.
public static void main(Args args)
{
    BikeTuningOffers    bikeTuningOffers;
    ;

    bikeTuningOffers = BikeTuningOffers::construct();

    if (bikeTuningOffers.prompt())
    {
        bikeTuningOffers.run();
    }
} |
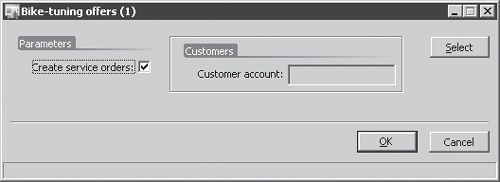
In the main method, you call the prompt method of the framework. This method opens the user dialog box. It returns true if the user clicks OK and the values entered are free of errors. The run method of the framework starts the actual job.
The user dialog box should allow the user to choose whether to create service orders automatically for each bike-tuning offer sent to customers via e-mail. To make this option available, you must have two global member variables in the class declaration. One is the dialog box field object shown in the dialog box, and the other is a variable used to store the value entered in the dialog box field. The changed class declaration looks like this.
public class BikeTuningOffers extends RunBase
{
    DialogField dialogCreateServiceOrders;

    NoYesId     createServiceOrders;
} |
The RunBase framework sets up the basic dialog box by using the dialog framework, so you must add your dialog box field to the dialog box by overriding the dialog method. The following code sample displays what the system gives you when you override the dialog method.
protected Object dialog(DialogRunBase dialog, boolean forceOnClient)
{
    Object ret;

    ret = super(dialog, forceOnClient);

    return ret;
} |
Rewrite this code as shown here so that it is more readable and follows the general pattern for the method.
Now add your field to the dialog box, as shown in the following code. Dialog box fields are objects of the DialogField class.
protected Object dialog()
{
    DialogRunBase   dialog;
    ;

    dialog = super();

    dialogCreateServiceOrders = dialog.addField(typeId(NoYesId), "@SYS79091",
"@SYS79091");

    return dialog;
} |
To use the values entered in the dialog box, you must retrieve them from the dialog box fields and store them in member variables. When the user clicks OK or Cancel, the framework calls the getFromDialog method to retrieve and save the values. Implement an override of this method as follows.
public boolean getFromDialog()
{
    boolean ret;
    ;
    ret = super();

    createServiceOrders = dialogCreateServiceOrders.value();

    return ret;
} |
When the user clicks OK, the framework calls the validate method. Although further validation isn’t necessary for this example, the following code shows how to implement an override that prevents the user from running the job without selecting the Create Service Orders check box.
public boolean validate()
{
    boolean ret;
    ;
    ret = super();

    if (ret && createServiceOrders == NoYes::No)
    {
        ret = checkFailed("You cannot run the job without creating service orders.");
    }

    return ret;
} |
You can view the user dialog box, shown in Figure 6-12, by opening the class. Right-click the class in the AOT, and then click Open.

You can now write the sendOffers method that contains your business operation as follows.
To call the sendOffers method, you must add it to the run method, which, as you might remember, is called from the value main if the user clicks OK in the dialog box and the values pass validation. The run method follows a specific pattern, as shown here.
This pattern ensures that the transaction is carried out within the scope of a database transaction and that the execution can recover from a deadlock or update conflict in the database. The run method calls validation again because someone could call run without showing the dialog box. In run, an error is thrown to completely stop the execution if validation fails. (Using the class without showing the dialog box is discussed later in this section.) When you add the call to the sendOffers method that holds your business operation, the run method looks like this.
Now is a good time to revisit the pack and unpack methods. Start in the class declaration by setting up the member variables you want to store. In this example, you store the createServiceOrders variable. State the version number of the current set of member variables. The version number allows you to add new member variables later and still retrieve the old settings from the last execution of the operation. Also, you can specify the version number to be treated as the first version of the member variable list in the #Version1 declaration. This allows you to treat another version as the first version, which you might choose to do if you simply want to ignore a range of older versions. The first version is typically version 1.
When more variables are stored in the #CurrentList macro, separate each variable by a comma.
You must change the pack method to follow this specific pattern.
And you must change the unpack method to follow this pattern.
You also need to make the following change to your implementation of the dialog method to show the old values in the dialog box fields.
Notice that you call the addFieldValue method rather than the addField method. The addFieldValue method allows you to pass a default value to the dialog box field. The RunBase framework ensures that the variable is set to the value saved in the SysLastValue framework at this point in time.
To make the operation available from the area page and the navigation pane, you must create a menu item for the operation. The menu item must be attached to a configuration key and a security key.
To create a new configuration key, open the AOT and expand Data Dictionary, right-click Configuration Keys, and then select New Configuration Key. Right-click the new configuration key and select Properties to open the property sheet. Change the name to BikeTuningOffers, and add the label number @USR9 to the Label field. The label should read "Bike-tuning offers." If you want to make the configuration dependent on another configuration key, you should fill in the ParentKey property. For this example, make the configuration key dependent on the Quotation configuration key by entering QuotationBasic in the ParentKey property field.
You should choose the security key property for the menu item from the existing security keys. The chosen security key must match the position of the menu item on the area page or in the navigation pane. For example, if you want to put your menu item under Accounts ReceivablePeriodic, the security key must be CustPeriodic.
With the configuration and security keys in place, you’re ready to create the menu item. In the AOT, expand Menu Items, right-click Action, and then select New Menu Item. Right-click the new menu item, and then select Properties. Fill out the properties as described in the Table 6-3.
Table 6-3. Bike-Tuning Menu Item Properties
Value | Explanation | |
|---|---|---|
Name | BikeTuningOffers | Name of the menu item as it appears in the AOT. |
Label | @USR10 | The label should read, "Create bike-tuning offers." |
HelpText | @USR11 | The label should read, "Send bike-tuning offers to existing customers via e-mail." |
ObjectType | Class | Type of object opened by the menu item. |
Object | BikeTuningOffers | Name of the object opened by the object. |
RunOn | Server | Execute the job on the server tier. |
ConfigurationKey | BikeTuningOffers | The new configuration key that you just created. |
SecurityKey | CustPeriodic | The security key chosen according to the position of the menu item on the area page or in the navigation pane. |
Tip
You can drag the class node in the AOT onto the Action node under Menu Items to create a new menu item with the same name as the class and the ObjectType and Object properties already defined.
Now add the menu item to the Accounts Receivable submenu. In the AOT, expand Menus, right-click Cust, point to New, and then click Menu Item. Right-click the new menu item, and then select the Properties tab. Change Name to BikeTuningOffers. Change MenuItemType to Action, and MenuItemName to BikeTuningOffers. Finally, move the menu item to the Periodic folder of the menu. Save the menu, and then restart the Dynamics AX client to make the new menu item appear in the navigation pane and on the area page.
Suppose you want to run the Bike-Tuning Offers business operation directly from another piece of code without presenting the user with a dialog box. To do so, you must implement property methods according to the property method pattern. This pattern allows you to set and get the properties that would otherwise be inaccessible because member variables in Dynamics AX are protected.
Start by writing a parm method for the property as follows.
public NoYesId parmCreateServiceOrders(NoYesId _createServiceOrders =
createServiceOrders)
{
    ;
    createServiceOrders = _createServiceOrders;

    return createServiceOrders;
} |
This job demonstrates how you can run the operation without showing the dialog box.
As mentioned earlier in this chapter, X++ doesn’t support method name overloading, and you should avoid using default parameters on constructors. You must create individually named new methods with different parameter profiles instead.
In the preceding example, you created an instance of the class and set the necessary parameters. Imagine that there is one more parameter in your class that indicates a certain customer account number for creating bike offers. Add a new member variable to the class declaration, and then add the new parameter method, like this.
Suppose that the customer record contains information about the option to create service orders with bike offers. For example, imagine that offers are not sent to the customer if the customer has been stopped for new transactions. Because you want to avoid using default parameters in the construct method, you must call both of these parm methods when you create an instance based on a customer record.
Running the business operation from a job with a specific customer would look like this.
This code is a good candidate for the static new pattern, so implement a static newCustTable method on the BikeTuningOffers class to create an instance based on a customer record, as shown here.
Now change your job to a simpler version to be assured that the class gets properly instantiated and initialized.
Adding a query to the business operation class allows the user to select a range of targets to apply the operation to, such as sending bike-tuning offers to selected customers. To use the query, you must be able to create an instance of QueryRun. Start by adding QueryRun as a member variable, as shown here.
To initialize the QueryRun object, override the initParmDefault method, as shown in the following code. This method is called by the RunBase framework if no saved object state is found by the SysLastValue framework via the unpack method.
public void initParmDefault()
{
    Query   query;
    ;

    super();

    query = new Query();
    query.addDataSource(tableNum(CustTable));

    queryRun = new QueryRun(query);
} |
You must modify the pack method, as shown in the following example, so that you can save the state of the QueryRun object.
Consequently, you must also modify the unpack method to reinstantiate the QueryRun object, as shown here.
To make the QueryRun object available for presentation in the dialog box, override the queryRun method to return your QueryRun object, as shown in the following code.
To show the query in the dialog box, you must override the showQueryValues method to return the value true, as follows.
If you open the class now, you can see that the query is embedded in the dialog box, as shown in Figure 6-13.
Finally, you must change your business logic method, sendOffers, so that it uses the QueryRun object, as shown here.
Typically, you want to execute business operation jobs on the server tier because these jobs almost always involve several database transactions. However, you want the user dialog box to be executed on the client to minimize client/server calls from the server tier. Fortunately, the RunBase framework can help you run the dialog box on the client and the business operation on the server.
To run the business operation job on the server and push the dialog box to the client, you should be aware of two settings. On the menu item that calls the job, you must set the RunOn property to Server; on the class, you must set the RunOn property to Called From. Figure 6-14 shows where to set the RunOn property of a class.
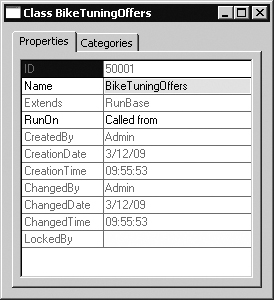
When the job is initiated, it starts on the server, and the RunBase framework packs the internal member variables and creates a new instance on the client, which then unpacks the internal member variables and runs the dialog box. When the user clicks OK in the dialog box, RunBase packs the internal member variables of the client instance and unpacks them again in the server instance.