
The objectives of this chapter are to:
Describe how to customize Microsoft Dynamics AX 2009 inventory tables and classes to implement new inventory dimensions.
Explain how to customize forms in Dynamics AX.
Describe how to customize reports in Dynamics AX.
Explain how to customize the number sequence classes in Dynamics AX to implement a new number sequence.
Dynamics AX allows you to customize an application by changing or adding metadata or modifying the application’s source code. The unique layering feature ensures that you can always return to the point at which you began to make modifications or restore the original metadata and X++ code.
The next section of this chapter describes how to customize Dynamics AX to include a set of new inventory dimensions by customizing a set of tables and classes. The new dimensions automatically appear in forms and reports without requiring you to change the original code or metadata of any of these elements.
The chapter also describes form and report customizations. The sales order form is modified to include a product image, and the sales invoice report is modified to include promotional text.
The last section of the chapter explains how to customize the number sequence classes to enable the use of a new number sequence, which is useful for creating invoice numbers, voucher numbers, and so on.
By default, Dynamics AX 2009 comes with nine default inventory dimensions. (The user can define additional inventory dimensions.) Dimensions describe the characteristics of items or item lots. Item dimensions might include characteristics such as configuration, model, and size. Item lots might have storage dimensions, such as site, warehouse, location, or pallet, or they might be identified by a serial number and batch number. The site dimension is new in Dynamics AX 2009.
The following customization scenario describes how to customize tables and classes used by the inventory dimension feature to implement two new item dimensions that describe a specific bicycle configuration: frame size and wheel size. This description isn’t an exhaustive list of elements that you must change; instead, it offers guidelines for finding the elements necessary to customize the full implementation of a new inventory dimension.
When implementing new inventory dimensions, your first task is to create extended data types for each of the dimensions. Doing so provides the following benefits:
To apply the inventory dimensions to multiple tables, you define the type just once and then apply it to each table.
The Label property, the HelpText property, and a few constraints can be defined on the data type, ensuring consistent behavior and appearance of fields of the same type.
If the type is declared as a parameter or a return type for a method, you can declare variables of the type in X++ code to optimize IntelliSense responsiveness and to improve the readability of the code.
This scenario defines a table in which a field of the specific type is part of the primary key. You can define the relationship to this table on the extended data type and subsequently instruct the application runtime to provide lookups and Go To The Main Table Form support.
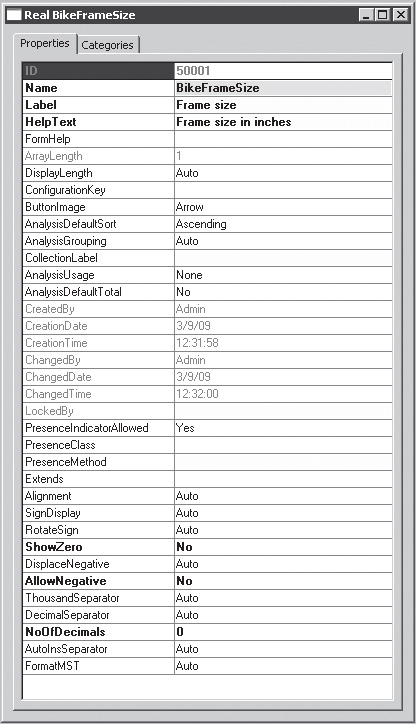
In this example, you enter the Data Dictionary in the Application Object Tree (AOT) and create a BikeFrameSize extended data type and a BikeWheelSize extended data type. Table 5-1 lists the property settings that deviate from the default settings.
Figure 5-1 shows the property sheet for the BikeFrameSize extended data type, accessible by clicking Properties on the context menu for the type.
Best Practices
Creating labels for text in the Label and HelpText properties is, of course, a best practice, but the text in this example is written as a literal (as opposed to referencing a label) to improve readability.
Next, create two tables, named BikeFrameSizeTable and BikeWheelSizeTable, in which the frame and wheel sizes for each item can be stored. In addition to the specific inventory dimension types, the tables also contain an ItemId field and a Name field. The ItemId and dimension in each table constitute the table’s primary index.
Table 5-2 lists the BikeFrameSizeTable property settings that deviate from the default settings. (The property settings for BikeWheelSizeTable are identical except for the BikeWheelSize field and its extended property type.)
Table 5-2. Field Property Settings
Property | ItemId | BikeFrameSize | Name |
|---|---|---|---|
Type | String | Real | String |
ExtendedDataType | ItemId | BikeFrameSize | Name |
Mandatory | Yes | Yes | No (default) |
AllowEdit | No | No | Yes (default) |
Create a unique index on both tables. For BikeFrameSizeTable, name the index FrameIdx and make it contain the ItemId field and the BikeFrameSize field. For BikeWheelSizeTable, name the index WheelIdx and make it contain the ItemId field and the BikeWheelSize field. Declare the indexes as the PrimaryIndex on the respective tables. In the AOT, the fields and the indexes appear as shown in Figure 5-2.

In addition to the fields and index shown in Figure 5-2, you should also set properties in the tables for caching, form references, and so on, and the table should contain field groups and methods for checking the validity of the fields. However, it is beyond the scope of this chapter to describe these enhancements. The Microsoft Dynamics AX 2009 software development kit (SDK) contains guidelines and best practices for creating tables.
After you define the tables, you should update the extended data types to reflect their relationship to the individual tables, as shown in Figure 5-3.
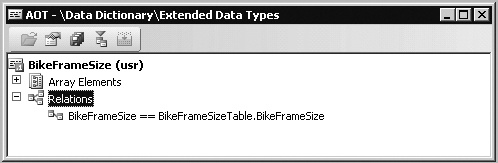
This relationship instructs the Dynamics AX runtime to provide lookup and Go To The Main Table Form functionality when fields of these types appear on forms. The application runtime uses the related table as the data source for the lookup form and also to find the main table form from the FormRef property on the table. You must therefore create forms for the BikeFrameSizeTable and BikeWheelSizeTable tables and menu items to open the forms. These menu items are added to the FormRef properties on the corresponding tables. You could design the forms to mirror the form shown in Figure 5-4. See the Microsoft Dynamics AX 2009 SDK for general information on designing forms.

To store transactions with the new inventory dimensions, the dimensions must be added to the InventDim table. You do this by creating two new fields, BikeFrameSize and BikeWheelSize, of the corresponding type on the InventDim table. You should also add these fields to the unique DimIdx index because any combination of inventory dimensions can exist only once in the InventDim table.
The display of inventory dimensions in almost any form in the Dynamics AX application is based on field groups and where the content of the field group in the form is built at run time. The forms runtime in Dynamics AX builds the group from the list of fields in the associated field group defined on the InventDim table. Therefore, by adding the new fields to the InventoryDimensions field group on the InventDim table, you make the two new fields available in almost any form that displays inventory dimensions. Position the fields in the field group based on where you want them to appear relative to the other dimensions, as shown in Figure 5-5.

Figure 5-5 shows usr flags on the AutoReport and ItemDimensions field groups, indicating that the custom fields have been added to these groups as well. The AutoReport group is modified so that it prints the new dimensions if you create an auto report by clicking Print on a form; the ItemDimensions group is modified because the new dimensions are considered to be item dimensions.
Although the inventory dimensions are now available in any form because of the interpretation of the field groups by the Dynamics AX forms runtime, the fields still aren’t visible or editable because they aren’t enabled in any inventory dimension group. Moreover, the two new inventory dimensions automatically appear in the Dimension Groups form because the inventory dimension feature also interprets the InventoryDimensions field group on the InventDim table to find all the currently available inventory dimensions. To make the form work with the new dimensions, you merely state whether the new dimensions are item dimensions. You do this by adding the new dimensions to the isFieldItemDim method on the InventDim table, as shown in the following X++ code. The added lines are shown in bold.
The new dimensions will be available for setup in the Dimension Groups form, which is reached through the navigation pane under Inventory ManagementSetupDimensions Dimension Groups. The dimensions are located in the Item Dimensions grid, as shown in Figure 5-6.

You can enable new dimensions by setting up dimension groups, but you won’t see them yet in the forms. The inventory dimension feature uses a temporary table named InventDimParm to carry certain information, such as whether a dimension has the following attributes:
Is enabled
Is an item dimension
Is a primary stocking dimension
Is visible
Serves as a filter-by term
Serves as a group-by term
Serves as an order-by term
The dimension groups are enabled and controlled by reflecting each inventory dimension as a boolean flag field on the InventDimParm table and then matching the corresponding fields in the X++ code. For example, when a dimension group is queried to determine which dimensions are active, an InventDimParm record is returned where the corresponding flag field is set to true for the active dimensions. The remaining flags are set to false. You must therefore add a frame-size flag and a wheel-size flag to the InventDimParm table, as shown in Table 5-3.
Table 5-3. BikeFrameSizeFlag and BikeWheelSizeFlag Property Settings
Property | BikeFrameSizeFlag | BikeWheelSizeFlag |
|---|---|---|
Type | enum | enum |
Label | Frame size | Wheel size |
HelpText | View by frame size | View by wheel size |
ExtendedDataType | NoYesId | NoYesId |
Enum | NoYes | NoYes |
You should also add the new fields to the FixedView and View field groups defined on the InventDimParm table, because they are used in forms from which it is possible to specify whether a dimension should be visible.
When you add fields to the table and field groups, you must map the new fields on the InventDim table to the corresponding fields on the InventDimParm table in the X++ code. To do this, you modify the dim2DimParm method on the InventDim table, as shown in the following X++ code. The added mappings of BikeFrameSize and BikeWheelSize appear in bold.
You must make the same modification to the dimParm2Dim method on the same table to map InventDimParm fields to InventDim fields.
The customizations made so far allow the new dimensions to be enabled on dimension groups and presented in forms. However, you should also consider customizing the following tables by adding inventory dimensions to them:
BOMTmpUsedItem2ProducedItem
InventCostTmpTransBreakdown
InventDimCombination
InventSumDateTrans
InventSumDeltaDim
PBADefault
PBATreeInventDim
PriceDiscTmpPrintout
InterCompanyInventDim
Whether and how you should customize these tables depends on the functionality you’re implementing. Be sure to examine how the inventory dimensions are implemented and used for each of the tables before you begin customizing.
Because of the generic implementation of the inventory dimension concept using the InventDim and InventDim Parm tables, a substantial number of queries written in X++ use just a few patterns to select, join, and filter the inventory dimensions. So that you don’t have to repeatedly copy and paste the same X++ code, these patterns exist as macros that you can apply in your code. To modify these queries, you simply customize the macros and then recompile the entire application to update the X++ code with the new dimensions.
You should customize the following macros:
InventDimExistsJoin
InventDimGroupAllFields
InventDimJoin
InventDimSelect
The bold text in the following X++ code shows the changes that you must make to the InventDimExistsJoin macro to enable the two new dimensions for all exists joins written as statements involving the InventDim table.
The three remaining macros are just as easy to modify. Just remember to recompile the entire application after you make your changes.
In addition to macro customizations and the customizations to the previously mentioned methods on the InventDim table, you must implement and customize lookup, validation, and defaulting methods. These include methods such as the InventDim::findDim lookup method, the InventDim.validateWriteItemDim validation method, and the InventDim.initFromInventDimCombination defaulting method. The necessary changes in the InventDim::findDim lookup method for the new inventory dimensions are shown in bold in the following X++ code.
Notice the use of the inventDimDevelop macro in the preceding method. This macro contains only the following comment:
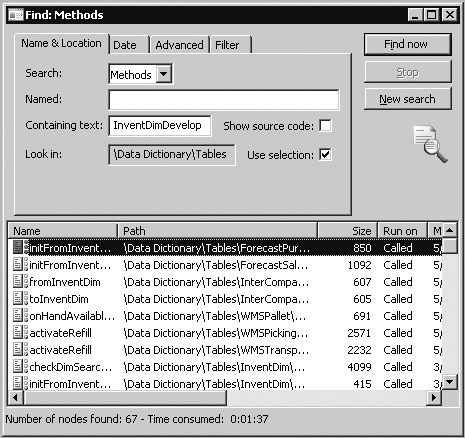
Performing a global search for use of the inventDimDevelop macro should be sufficient to find all the X++ code that you must consider when implementing a new dimension. This search returns all the methods that require further investigation. Figure 5-7 shows results of a search for the use of the macro on all tables.
Best Practices
Inserting the inventDimDevelop macro in X++ code when it makes a direct reference to an inventory dimension is considered a best practice. Doing so makes implementing new dimensions easier.
Most of the methods you find when searching for the macro are lookup, validation, and defaulting methods, but you also see methods that aren’t in these categories. Such methods include those that modify the Query object, such as the InventDim::queryAddHintFromCaller method, and methods that describe dimensions, such as InventDimParm.isFlagSelective. You should also review these methods when investigating the X++ code.
Tip
Although the inventory dimension feature is implemented with the inventDimDevelop macro to direct developers to the methods they need to change, you might encounter methods with no macro included or tables, forms, or reports for which the inventory dimensions are not used generically. We therefore advise you to use the cross-reference system on an existing dimension that has the same behavior as the new dimension to determine its use and review it appropriately. You should also investigate whether the new dimension is or should be available in the same element.
Like most of the elements in the AOT, forms can be customized to include additional information and actions, such as fields and buttons, and to fulfill user requirements. The design and behavior of a form are provided by a combination of the form and the tables that are bound to the form.
Best Practices
Even though you can implement all necessary customizations by modifying just the form, we don’t recommend this approach. As a best practice, you should implement application customizations at the lowest level possible, preferably through changes to a table or a class rather than through changing specific forms.
The best way to implement forms is to keep most of the business logic and design decisions in tables and classes, focusing only on the positioning of fields and menu items when designing the form. This approach has several advantages:
X++ code in forms is executed on the client tier only; X++ code in table methods can be executed on the server tier to optimize performance.
Customizations made to a form are restricted to that form; customizations made to a table or a class apply to all forms that use that table or class as a source of data. This results in a consistent user experience wherever the table is used.
When a form is customized, the entire form is copied to the current layer; customizations to tables and classes are more granular. When fields, field groups, and methods are customized, a copy of the specific element is in the current layer only. This makes upgrading to service packs and new versions easier.
X++ customizations to the validate, default, and database trigger methods on forms, such as create, validateWrite, and write, affect only the records that are modified through the user interface. If records are modified somewhere other than that form, then that customized form’s X++ code doesn’t execute.
The following actions be customized only on the form, not by customizing a table:
Enable and disable fields and other user interface elements (Enabled = Yes/No)
Show and hide fields and other user interface elements (Visible = Yes/No)
However, you should consider having a table or a class method determine the business logic on the form. An example of this is shown in the following lines of X++ code from the InventTable form, in which a method on the table determines whether a field can be edited.
By moving these decision-making methods to a table or class, you make them available to other forms.
The rich client user interface in Dynamics AX is made up of forms that are declared in metadata and often contain associated code. Ideally, you should customize these forms as changes to metadata and make any changes at the lowest level (i.e., table level rather than form level) possible to ensure the greatest amount of metadata and code reuse.
The most visible change from Dynamics AX 4.0 to Dynamics AX 2009 is the change from a predominantly multiple-document interface (MDI) to a predominantly single-document interface (SDI). Forms with a WindowType property value of Standard (the default) are now SDI forms, and the WindowType values of ListPage and ContentPage have been added to fill the Workspace content area to provide a navigation experience similar to that in Microsoft Office Outlook. The different WindowType values share the same object model, metadata, and method overrides, so form customization skills are applicable across all forms.
Metadata customization is preferred over code customization because metadata changes (also called deltas) are easier to merge than code changes.
When customizing forms, you should be aware of the important properties, the metadata associations, and the metadata inheritance that is being used to fully define the form and its contents.
You edit the metadata in Dynamics AX by using the AOT. The base definitions for forms contained within the AOTForms node is composed of a hierarchy of metadata that is located in other nodes in the AOT. To fully understand a form, you should investigate the metadata associations it makes. For example, a form uses tables that are declared in the AOTData DictionaryTables node, security keys that are declared in the AOT Data DictionarySecurity Keys node, menu items that are declared in the AOTMenu Items node, queries that are declared in the AOTQueries node, and classes that are declared in the AOTClasses node.
You need to be aware of the inheritance within the metadata used by forms. For example, tables use Base Enums, Extended Data Types, and Configuration Key. A simple example of inheritance is that the Image properties on a MenuItemButton are inherited from the associated MenuItem if they aren’t explicitly specified on that MenuItemButton. Table 5-4 shows important examples of pieces of metadata that are inherited from associated metadata.
Table 5-4. Examples of Metadata Inheritance
Type of Metadata | Sources |
|---|---|
Labels and HelpText | MenuItem→MenuItemButton Control Base Enum→Extended Data Type→Table Field→Form DataSource Field→Form Control (The Base Enum Help property is the equivalent of the HelpText property found in the other types.) |
Relations | Extended Data Type→Table |
Security keys | Table Field→Table→Form Control MenuItem→MenuItemButton Control Form→Form Control |
Configuration keys | Base Enum→Extended Data Type→Table Field→Form DataSource Field→Form Control |
Image properties (e.g., NormalImage) | MenuItem→MenuItemButton Control |
Inheritance also occurs within forms. Controls that are contained within other controls receive certain metadata property behaviors from their parents unless different property values are specified, including HTMLHelpFile, HTMLHelpTopic, Security Key, Configuration Key, Enabled, and the various Font properties.
Dynamics AX 2009 has a number of new navigation capabilities in the form of area pages and the address bar to complement the existing navigation pane (sometimes referred to as the "WunderBar"). In terms of metadata, the area pages and address bar are mostly just additional methods of exposing the existing menu metadata defined in the AOTMenus and AOTMenu Items nodes. The modules are defined in AOT MenusMainMenu, and you can follow the menu structure from that starting point. For example, the Accounts Receivable module is represented by the AOTMenusMainMenuCust MenuReference and is defined as AOTMenusCust.
The menu metadata for list pages and content pages has some small changes. A primary list page is implemented as a submenu with IsDisplayedInContentArea=Yes, MenuItemType=Display, and MenuItemName populated. A secondary list page, a list page that adds ranges to a primary list page, is implemented as a menu item under the submenu of its primary list page. The list pages and content pages are navigation places, so all their menu item and submenu references are set to IsDisplayedInContentArea=Yes so that they appear in the Places group in the area pages and the Places section in the navigation pane. The other menu items in the root of each module’s menu definition are displayed in the Common Forms group in the area pages and in the root of the Forms section in the navigation pane.
Many properties are available to developers, but some are more important than others. Table 5-5 describes the most important form design properties, and Table 5-6 describes the most important form data source properties.
Table 5-5. Important Form Design Metadata Properties
Property | Explanation |
|---|---|
Caption | The caption text shown in the title bar of a standard form or in the Filter Pane of a list page. |
TitleDataSource | The data source information displayed in a standard form’s caption text and used to provide filter information in the caption text of a list page. |
WindowType | Standard - (Default) A standard SDI form that opens as a separate window with a separate entry in the Windows taskbar. ContentPage - A form that fills the Workspace content area. ListPage - A special style of ContentPageused to display records in a simple way that provides quick access to filtering capabilities and actions. It requires at least an Action Pane and a Grid. Workspace - A form that opens as an MDI window within the workspace. Workspace forms should be developer-specific forms. Popup - A form that opens as a subform to its parent. Popup forms don’t have a separate entry in the Windows taskbar and can’t be layered with other windows. |
AllowFormCompanyChange | Specifies whether the form allows company changes when used as a child form with a cross-company dynalink. No - (Default) Form closes if parent form changes its company scope. Yes - Form dynamically changes company scope as needed. |
HTMLHelpFile | Specifies the path to the Help topic file. |
HTMLHelpTopic | Specifies the topic to use from the referenced Help file. |
Table 5-6. Important Form DataSource Metadata Properties
Property | Explanation |
|---|---|
Name | Named reference for the data source. A best practice is to use the same name as the table name. |
Table | Specifies the table used as the data source. |
CrossCompanyAutoQuery | No - (Default) Data source gets data from the current company. Yes - Data source gets data from all companies (e.g., retrieves customers from all companies). |
JoinSource | Specifies the data source to link or join to as part of the query. For example, in the SalesTable form, SalesLine is linked to SalesTable. Data sources joined together are represented in a single query whereas links are represented as a separate query. |
LinkType | Specifies the link or join type used between this data source and the data source specified in the JoinSource property. Joins are required when two data sources are displayed in the same grid. Joined data sources are represented in a single query whereas a linked data source is represented in a separate query. Links Delayed - (Default) A pause is inserted before linked child data sources are updated, enabling faster navigation in the parent data source because the records from the child data sources are not updated immediately. For example, the user could be scrolling past several orders without immediately seeing each order line. Active - The child data source is updated immediately when a new record in the parent data source is selected. Continuous updates consume lots of resources. Passive - Linked child data sources are not updated automatically. The link is established by the kernel, but the application developer must trigger the query to occur when desired by calling "ExecuteQuery" on the linked data source. Joins InnerJoin - Selects records from the main table that have matching records in the joined table, and vice versa. There is one record for each match. Records without related records in the other data source are eliminated from the result. OuterJoin - Selects records from the main table whether or not they have matching records in the joined table. An outer join doesn’t require each record in the two joined tables to have a matching record. ExistJoin - Selects a record from the main table for each matching record in the joined table. NotExistJoin - Selects records from the main table that don’t have a match in the joined table. |
InsertIfEmpty | Yes - (Default) A record is automatically created for the user if none is present. No - The user needs to manually create the first record. This setting is often used when a special record creation process or interface is used. |
Dynamics AX 2009 makes greater use of images and icons throughout the application to provide the user with additional visual cues. Icons are used extensively in list pages to help users identify specific actions. The metadata properties used to associate images and icons with buttons, menus (menu items), and other controls depends on their location. Table 5-7 describes the metadata properties used for the three common image locations.
Table 5-7. Image Metadata
You should customize forms with code only as a last resort. Customizing with metadata is much more upgrade friendly since metadata change conflicts are straight forward to resolve whereas code change conflicts need deeper investigation that sometimes involves creating a new merged method that attempts to replicate the behavior from the two original methods.
When you start to customize Dynamics AX, the following ideas may provide good starting points for investigation:
Leverage examples in the base Dynamics AX 2009 codebase by using the Find command on the Forms node in the AOT (Ctrl+F).
Refer to the system documentation entries (AOTSystem Documentation) for information about system classes, tables, functions, enumerations, and other system elements that have been implemented in the AX kernel.
When investigating the form method call hierarchy for a suitable location to place customization code, add a debug breakpoint in the Form Init method and step through the execution of method overrides. Note that control events (e.g., clicked) do not trigger debugging breakpoints. An explicit breakpoint (i.e., "breakpoint;") keyword is needed in the X++ code.
To enable simpler code maintenance, the following rules should be followed:
Utilize the table and field functions of FieldNum (e.g., fieldnum(SalesTable, SalesId)) and TableNum (e.g., tablenum(SalesTable)) when working with form data sources.
Avoid hard coding strings by using sys labels (e.g., throw error("@SYS88659");) and functions like FieldStr (e.g., fieldstr(SalesTable, SalesId)) and TableStr (e.g., tablestr(SalesTable)).
Use as few method overrides as possible. Each additional method override has a chance of causing merge issues during future upgrades, patch applications, or code integrations.
When X++ code is executed in the scope of a form, there are some form-specific global variables created in X++ to help developers access important objects related to the form. These global variables are described in Table 5-8.
Table 5-8. Form-Specific Global X++ Variables
Form method overrides allow developers to influence the form life cycle and how the form responds to some user-initiated events. The most important form method overrides are described in Table 5-9. The two most overridden form methods are Init and Run.
Table 5-9. Form Method Override Explanations
Method | Explanation |
|---|---|
Init | Called when the form is initialized. Prior to the call to super, much of the form (FormRun) is not initialized, including the controls and the query. Commonly overridden to access the form at the earliest stage possible. |
Run | Called when the form is initialized. Prior to the call to super, the form is initialized but isn’t visible to the user. Commonly overridden to make changes to form controls, layout, and cursor focus. |
Close | Called when the form is being closed. Commonly overridden to release resources and save user settings and selections. |
CloseOk | Called when the form is being closed via the Ok command/task, such as when the user clicks a CommandButton with a Command property of Ok. Commonly overridden on dialog forms to perform the action the user has initiated. |
CloseCancel | Called when the form is being closed via the Cancel command/task, such as when the user clicks a CommandButton with a Command property of Cancel. Commonly overridden on dialog forms to clean up after the user indicates that an action should be cancelled. |
CanClose | Called when the form is being closed. Commonly overridden to ensure that data is in a good state before the form is closed. Returning false aborts the close action and keeps the form open. |
Form data source and form data source field method overrides allow developers to influence how the form reads and writes its data and allows developers to respond to user-initiated data-related events. The most important form data source method overrides are described in Table 5-10. The five most overridden form data source methods are Init, Active, ExecuteQuery, Write, and LinkActive.
Table 5-10. Form Data Source Method Override Explanations
Method | Explanation |
|---|---|
Active | Called when the active/current record changes, such as when the user clicks a different record. Commonly overridden to enable and disable buttons based on whether or not they are applicable to the current record. |
Create | Called when a record is being created, such as when the user presses Ctrl+N. Commonly overridden to change the user interface in response to a record creation. |
Delete | Called when a record is being deleted, such as when the user presses Alt+F9. Commonly overridden to change the user interface in response to a record creation. |
ExecuteQuery | Called when the data source’s query is executed, such as when the form is run (from the super of the form’s Run method) or when the user refreshes the form by pressing F5. Commonly overridden to implement the behavior of a custom filter added to the form. |
Init | Called when the data source is initialized during the super of the form’s Init method. Commonly overridden to add or remove query ranges or change dynalinks. |
InitValue | Called when a record is being created. Record values set in this method count as original values rather than changes. Commonly overridden to set the default values of a new record. |
LeaveRecord | Called when the user is moving focus from one data source join hierarchy to another, which can happen when the user moves between controls. Commonly overridden to coordinate between data sources, but developers are encouraged to use the ValidateWrite and Write methods where possible. ValidateWrite and Write are called immediately after LeaveRecord. |
LinkActive | Called when the active method in a dynalinked parent form is called. Commonly overridden to change the user interface to correspond to a different parent record (element.args().record()). |
MarkChanged | Called when the marked set of records changes, such as when the user multi-selects a set of records. Commonly overridden to enable/disable buttons that work on a multi-selected (marked) set of records. |
ValidateDelete | Called when the user attempts to delete a record. Commonly overridden to provide form-specific deletion event validation. Return false to abort the delete. Use the ValidateDelete table method to provide record deletion validation across all forms. |
ValidateWrite | Called when the record is being saved, such as when the user presses the Close or Save buttons or clicks a field from another data source. Commonly overridden to provide form-specific write/save event validation. Return false to abort the write. Use the ValidateWrite table method to provide record write/save validation across all forms. |
Write | Called when the record is being saved after validation has succeeded. Commonly overridden to perform additional form-specific write/save event logic such as updating the user interface. Use the Write table method to respond to the record write/save event across all forms. |
Three commonly used form data source field method overrides are described in Table 5-11. The most overridden form data source field method is the Modified method.
Table 5-11. Form Data Source Field Method Override Explanations
Method | Explanation |
|---|---|
Modified | Called when the value of a field changes. Commonly overridden to make a corresponding change to the user interface or to change other field values. |
Lookup | Called when the Lookup button of the field is clicked. Commonly overridden to build a custom lookup form. Use the EDT.FormHelp property to provide lookup capabilities to all forms. |
Validate | Called when the value of a field changes. Commonly overridden to perform form-specific validation needed prior to saving or to validate. Return false to abort the change. Use the ValidateField table method to provide field validation across all forms. |
The following example illustrates how to customize the sales order form to allow a user to upload and display an image of a custom order. In this example, a customer must be able to place an order for a bike through Enterprise Portal and upload a sketch of the bike at the same time. An example of a customer-supplied bike image is shown in Figure 5-8.

This image must be stored in the database and attached to the sales order line. Sales order lines are stored in the SalesLine table. You could add a new field to the SalesLine table of the type container and store the image in this field, but this example uses the document management functionality in Dynamics AX. The image is therefore stored in the DocuValue table with a reference to a record in the DocuRef table from the image record in DocuValue to the SalesLine record. The relationship and multiplicity among the three tables is shown in Figure 5-9.

In this example, a document type named Image stores the attached file in the disk folder. The Image document type is shown in Figure 5-10. The Document Type form is located in the navigation pane, BasicSetupDocument ManagementDocument Types.

Any uploaded image is therefore stored in the document management system; a user can view the image by either clicking the Document Handling icon on the status bar or choosing Document Handling on the Command menu. The user sees the dialog box shown in Figure 5-11, in which the image can be viewed, modified, or deleted, and additional notes or documents can be attached.

You can display the image directly by placing it on a separate Image tab on the sales order form. Figure 5-12 shows an order for a bike with a frame size of 21 inches and a wheel size of 28 inches. The user can click the Image tab to view the uploaded bike image and confirm that it matches the ordered item before confirming the sales order. The Sales Order form (AOTFormsSalesTable) is located in the navigation pane, Accounts ReceivableSales Order.

The following two example implementations describe how to use the document management tables as data sources in the form and how to create a separate method on the SalesLine table. These examples demonstrate customization of the SalesTable sales order form and the SalesLine table.
One way to display the image is to apply the DocuRef and DocuValue tables as data sources for the SalesTable form. The following example creates a DocuRef data source based on the relationship among the SalesLine, DocuRef, and DocuValue tables shown in Figure 5-9. The DocuRef data source relates to the DocuRef table and is joined to the SalesLine data source. Additionally, a DocuValue data source is created to connect to the DocuRef data source. Table 5-12 shows additional properties of the data sources.
The properties JoinSource and LinkType allow the DocuRef and DocuValue records to be fetched when the user moves from one line to another. The remaining properties disable editing of the records.
You can attach multiple files, documents, and notes to a SalesLine record by using the document management feature, but the goal of this example is to display an image from a linked document named Image. You can limit the retrieved records from the DocuRef table by adding a range to the query used by the DocuRef data source. You do this by customizing the Init method on the DocuRef data source, as shown here.
public void init()
{
    super();

    docuRef_ds.query().dataSourceTable(
                       tableNum(DocuRef)).addRange(
                       fieldNum(DocuRef,TypeId)).value(queryValue('Image'));
} |
This X++ code limits the query so that it retrieves only records from the DocuRef table in which the TypeId field is equal to the value ‘Image’.
Note
The use of a constant such as the word Image is not a best practice. The value must be retrieved from a configuration table so that the user can decide the naming. ‘Image’ is hard coded in the preceding example only to improve the readability and limit the scope of the example.
The image is displayed by using a window control, which is placed in a tab control, as shown in Figure 5-13.

Although the image is stored in the File field on the DocuValue table, to display the image you can’t simply link the field as a DataField value on the window control property sheet. The image must be parsed to the control by using a method on the control in X++ that uses the FormWindowControl object. The AutoDeclaration property on the FormWindowControl object is therefore set to Yes so that the forms designer automatically declares an object handle with the same name. This handle can be used in X++ and manipulated at run time because the form application runtime automatically ensures that it is a handle to the FormWindowControl object. The Width and Height properties are set to Column width and Column height so that the image takes up all the space on the tab.
The last step is to parse the retrieved image from the DocuValue table to the BikeImage FormWindowControl object. You can do this when a DocuValue record buffer is present. This record must contain an image that is stored in the database, and the X++ code should be placed in the active method on the DocuValue data source and look like the following.
This code determines whether a value exists in the File field and, if so, instantiates an image object and parses the File field value to the image object. This object is then parsed by using the Image method to the FormWindowControl object that displays the image. If the File field doesn’t contain a value, the imageResource method on the FormWindowControl object is called with a value of 0 to clear the control of any previous content. The active method is executed only if a DocuValue record has been retrieved. However, if a user moves from an order line with an image to an order line without an image, the image isn’t cleared because the active method isn’t executed. If you add the following line to the active method on the SalesLine data source, the image is cleared when a new order line becomes active and before the DocuRef and DocuValue records are retrieved.
The customizations described in this section make it possible to display the image on the Image tab. This solution has one downside, however. Whenever a user moves from one order line to another or a line is created or saved, calls are made from the client to the server, and lookups are made in the database for the DocuRef and DocuValue data sources. You can see this by turning on the client/server or SQL trace option in the Options dialog box, which you access from the Tools menu. The next section addresses this issue and offers a solution—decreasing the number of client/server calls and lookups in the database.
The following example implements a solution similar to the previous example, but it results in calls to the server and the database only when the image is actually displayed.
The TabPage control must be added to the SalesTable form and contain a FormWindowControl with property settings similar to those in the preceding example. The DocuRef and DocuValue tables are not, however, added as data sources for the form. Instead, this example retrieves the image—the only element shown on the Image tab—from the database only when the user chooses to display the content of the Image tab. You configure this by adding the following X++ code to the pageActivated method on the TabPage control.
This code is very similar to the code added to the DocuValue active method, but in this case the value is retrieved from a bikeImage method on the SalesLine table. The bikeImage method is a new method created on the SalesLine table with the following content.
The select statement in the bikeImage method is a combination of the two lookups in the database produced by the runtime shown in the first sample implementation, which used data sources. However, the statements in this method are joined. The bikeImage method could simply be implemented in the SalesTable form, but implementing it on the SalesLine table allows it to be reused in other forms or reports and executed on the server tier, if required.
The advantage of this implementation method is that both database lookups and calls from the client to the server are reduced by half. And because calls are made only when the Image tab is activated, they aren’t made when a user simply moves through the order lines without viewing the content of the Image tab. The disadvantage, however, is that the user can’t personalize the form or move the display of the image to another tab because retrieval of the image is dependent on activation of the Image tab.
Reports, like forms, can be customized to include and exclude information, and you can modify their design and layout. As with forms, the design and layout of a report depend on settings on the table and on the report itself. The best practice is, once again, to keep as much of the business logic as possible with the table methods or metadata. The X++ code in reports must deal with the functionality for the specific report. All other X++ code must generally be implemented on the table to be reused by other areas in the application. Here are some of the advantages to such an approach:
Customizations made to a report are isolated; customizations made to a table affect all reports using that table, resulting in a consistent user experience wherever the table is used.
Customization of a report copies the entire report to the current layer; customizations made to tables are more granular because customization of fields, field groups, and methods results in a copy of the specific element to the current layer only. This makes upgrading to service packs and new versions easier.
Methods in reports always execute on the tier where the report is generated; methods on tables can be targeted to execute on the server tier. Where a report is generated is controlled by the RunOn property on the menu item that starts the report. The property can be set to Client, Server, or Called From.
The example in this section demonstrates how to customize the sales order invoice report named SalesInvoice (AOTReportsSalesInvoice). The invoice is customized to include promotions based on items listed on the invoice. The promotion appears below each item on the invoice associated with a promotion. Figure 5-14 shows an example of an invoice that displays a promotion for a water bottle.

Like the forms example, this example uses the document management feature in Dynamics AX. You use document handling to store the text and image in the database. The information is attached to the item table as two different types of document information, named PromoText and PromoImage, for storing the text and image. Figure 5-15 shows the PromoText and PromoImage document types.
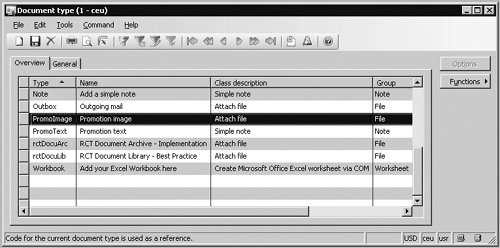
Figure 5-16 shows the text and image attached to an item named PB-Bike.

The X++ code used to display the promotion on the invoice looks up the item in the InventTable table and searches the document handling for documents of type PromoText and PromoImage to print on the invoice. If neither type is attached to the item, no promotion information prints.
Before you customize the SalesInvoice report for this example, you must decide where in the design of the report to place the printing of the promotion. The printed information should be printed for each invoiced item, so you must place it under the CustInvoiceTrans section group because the CustInvoiceTrans table contains the invoiced items. The CustInvoiceTrans section group contains a reference body section that can print other pieces of reference information, such as from inventory dimensions or the packing slip lines posted when the invoiced item is shipped. The promotion resembles this kind of information in terms of when and how it is printed.
This example, therefore, creates a new section group within the reference body section below the existing three groups. The new section group must reference a table type so that it can be invoked when a record buffer of the same type is sent to the report by using the element.send method. The DocuRef table stores the promotion text, and the DocuValue table stores the promotion image with an association created in the DocuRef table.
Although the storage of the text and image results in the creation of DocuRef records, the choice of DocuRef as the reference table type for the new section group isn’t an optimal solution. First, the information is stored as two records in the DocuRef table, but the text and image should be printed side by side for this example. The element.send method should be called only once, parsing in only a single record buffer. Also, two other section groups already use DocuRef as the table type, so using this type might result in the other section groups getting invoked as well when the promotion prints. You could prevent this by introducing a variable to control which section group to invoke, but then you would have to customize even more of the report, making it harder to upgrade the report when a new version or service pack is installed.
Both of the DocuRef records are, however, related to the same InventTable record, so you can use this table as the type for the section group, and an InventTable record buffer is sent to the report to print the promotion text and image. Figure 5-17 shows the new section group, named InventTable, and its positioning within the report.

When the promotion text and image print, an InventTable record buffer is sent to the report. For this reason, this example implements two methods to return the text and image by using an InventTable record buffer. The methods can be implemented directly in the report, but because the methods are not report specific—and therefore can be reused in other reports, or even forms—they are implemented as instance methods on InventTable. The following code shows the new methods. The PromotionImage method is implemented like the BikeImage method in the forms example discussed earlier. However, the PromotionImage method must look in only the DocuRef table to find the text.
Both methods are implemented as display methods to allow them to bind directly to report controls and to print the information.
The next step is to bind the methods to report controls. A new body section named BodyInventTable is created in the InventTable section group, and several of its properties are altered, as shown in Table 5-13.
The NoOfHeadingLines property must be set to 0 because the text and image must not include any headings when printed. The Line property settings create a border around the promotion.
In the body section, a string control, named PromotionText, and a bitmap control, named PromotionImage, are added and bound to the two new InventTable methods. The properties shown in Table 5-14 are changed on the two controls.
Table 5-14. PromotionText and PromotionImage Property Settings
Property | PromotionText | PromotionImage |
|---|---|---|
Left | Auto (right) | |
Width | 70.00 char | 2.0 inch |
Height | 2.0 inch | |
DynamicHeight | Yes | |
ShowLabel | No | No |
Table | InventTable | InventTable |
DataMethod | PromotionText | PromotionImage |
The ShowLabel properties are set to No because no headings should be printed. The PromotionText control is set to a fixed width of 70 characters with a dynamic height so that the text won’t be truncated. The PromotionImage has a fixed size of 2 inches by 2 inches and is right-justified on the page.
The last step is to look up an InventTable record buffer based on the invoiced item and then send the buffer to the report. You do this with the following new method on the BodyReference body section.
void printInventTable()
{
    InventTable inventTable = custInvoiceTrans.inventTable();
    if (inventTable.RecId)
    {
         element.send(inventTable);
    }
} |
The method uses the InventTable lookup method on the CustInvoiceTrans table, which returns a record buffer for the invoiced item, which the method subsequently sends to the report.
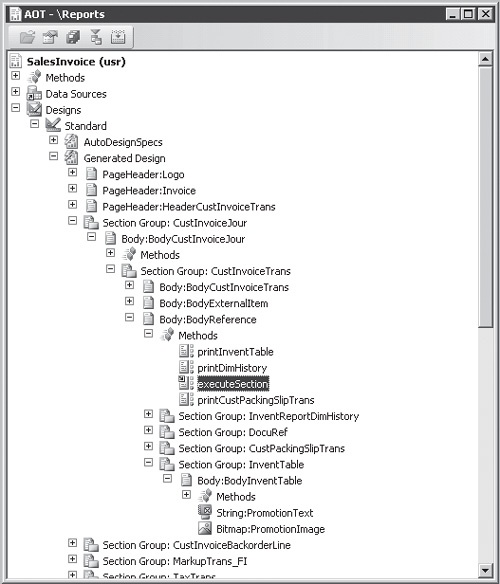
The preceding method should be called from the executionSection method on the same body section. The following method is therefore customized by including the call to the printInventTable method.
void  executeSection()
{;
    this.printCustPackingSlipTrans();
    this.printDimHistory();
    this.printInventTable();
} |
The positioning of the body section, report control, and report methods is shown in Figure 5-18.
After the completion of all the customizations to the SalesInvoice report and the addition of new methods to InventTable, the report prints the promotion below each invoiced item on the report, as shown in Figure 5-14.
The solution thus far has one flaw: it prints an empty BodyInventTable body section if there is no document reference for the PromoText and PromoImage document types, which causes an empty box to appear below each item on the invoice. You could easily fix this by altering the printInventTable method to include a check for text or images, as shown in the following change to the printInventTable method.
This code ensures that the InventTable record buffer is sent to the report only if the PromotionText method or the PromotionImage method returns a value.
In terms of performance, this change isn’t optimal because methods could be executed twice if a promotion were added to the InventTable record. This could result in as many as five round-trips to the database for each printed invoiced item: two from the printInventTable method, two when printing the values, and one when the report runtime determines the height of the PromotionText control.
A better solution is to cache the returned values from the PromotionText and PromotionImage methods when they are called in the printInventTable method and then use the cached values instead of retrieving them from the database when printing the PromotionText and PromotionImage controls.
The cache variables must be added to the classDeclaration of the report, so the following lines are inserted there.
The printInventTable method is modified to store the returned values from the PromotionText and PromotionImage methods on the InventTable record buffer in the newly created variables, as shown in the following copy of the method.
In addition to these two new display methods, PromotionText and PromotionImage are created to return the values of the variables. The following code samples show these methods, implemented in the BodyInventTable body section.
With these two methods named similarly to the InventTable methods, you must remove only the value in the Table property on the PromotionImage and PromotionText report controls to enable the report to retrieve the value from the local report methods instead of the InventTable methods. You can even remove the display method modifiers from the two InventTable methods because they are no longer used as display methods.
When you print the report again, no empty BodyInventTable body sections appear, and the printing of this specific section is optimized. The report will never result in more than two round-trips to the database for each invoiced item. The only disadvantages are that return types of the methods on the InventTable and the equivalent methods on the report should be kept synchronized, and these return types should again be kept synchronized with the types of the cache variables. This synchronization wasn’t necessary earlier in the example, before the values in the report were cached.
In Chapter 6, the sample X++ code shows that a service order feature must have a number sequence to generate a unique identification number. To achieve this, you must customize the number sequence class, setting up the relationship between a module and a number sequence reference, and also associating the number sequence reference with the extended data type in which you want to store a number from the sequence.
When you want to create a new number sequence, you must first create an extended data type. The ID of the type is used as the identifier for the number sequence reference, so it must be unique. Figure 5-19 shows a string data type named BikeServiceOrderId.

The properties on the extended data type are set to create a type with a maximum length of 20 characters, as shown in Table 5-15.
Table 5-15. BikeServiceOrderId Property Settings
Property | Settings |
|---|---|
Type | String |
Label | Service order |
HelpText | Service order ID |
StringSize | 20 |
To implement a number sequence reference for service orders and assign it a specific service order number sequence, you must make changes to a NumberSeqReference class. To implement the reference in the Accounts Receivable module, among other references used by the sales order functionality, you add the following lines of X++ code to the loadModule method on the NumberSeqReference_SalesOrder class.
These are the only modifications necessary to set up a new number sequence reference. The reference is available in the Accounts Receivable parameter form, and a number sequence can be created automatically by using the Number Sequence Wizard. You start the Number Sequence Wizard by clicking the Wizard button in the Number Sequences form located in the navigation pane under BasicSetupNumber SequencesNumber Sequences.
The numRef table buffer in the preceding example is of a NumberSequenceReference table type. This table contains several fields that can be set depending on the reference you want to create. These fields are described in Table 5-16.
Table 5-16. NumberSequenceReference Field Explanations
Field | Explanation |
|---|---|
DataTypeId | The ID for the reference. Use the ID of the extended data type. |
ConfigurationKeyId | The configuration key that must be enabled for the reference to display. The configuration key should be set only if it is different from the key associated with the extended data type. |
ReferenceLabel | The number sequence reference label should be set only if it is different from the label on the extended data type. |
ReferenceHelp | The number sequence reference user interface Help field should be set only if the Help text is different from text in the HelpText property on the extended data type. |
DataTypeSameAsId | Indicates that the reference can use the number from another number sequence. To make this possible, set the ID for the reference to the listed number sequence. This setting is usually applied to voucher references that use the ID of the journal as the voucher number. |
GroupEnabled | Indicates that the reference is enabled for use with number sequence groups. This setting should be specified only if the reference can be set up for each number sequence group. |
SortField | The position of the reference in the list. Use a sufficiently high number to avoid conflict with other or future references within the same module. |
WizardLowest | The default value for the Smallest field when creating the number sequence with the Number Sequence Wizard. |
WizardHighest | The default value for the Largest field when creating the number sequence with the Number Sequence Wizard. |
WizardManual | The default value for the Manual field when creating the number sequence with the Number Sequence Wizard. |
WizardContinuous | The default value for the Continuous field when creating the number sequence with the Number Sequence Wizard. |
WizardAllowChangeDown | The default value for the To A Lower Number field when creating the number sequence with the Number Sequence Wizard. |
WizardAllowChangeUp | The default value for the To A Higher Number field when creating the number sequence with the Number Sequence Wizard. |
WizardFetchAheadQty | The default value for the Quantity Of Numbers pre allocation field when creating the number sequence with the Number Sequence Wizard. This field also enables the pre allocation number sequence feature, but it can’t be used in combination with a sequence marked Continuous. |
Finally, the following method is implemented on the SalesParameters table. The method returns the new number sequence reference and should be used in the X++ code that requires numbers from the number sequence.