Adding a User Account with Admintool
To perform administrative tasks such as adding user accounts, the administrator must be logged in as the superuser (root) or be a member of GID 14 (sysadmin).
Note
When you’re adding or modifying user accounts, Admintool edits the files /etc/passwd, /etc/shadow, and /etc/group. As root, you could edit these files directly, but this is not recommended. Errors in any of the files could cause adverse effects on the system. See Chapter 16, “System Security,” for a complete description of these files.
The first step in setting up a new user account is to have the user provide the information you will need to administer this account. You’ll also need to set up proper permissions so that the user can share information with other members of his department. To start, you’ll need to know the user’s full name, department, and any groups with which the user will be working. I like to sit down with the user and fill out an information sheet (like the one shown in Table 13.2) so that I have all the information I’ll need when I set up the account.
Exercise 13.1 Adding a New Login User
To add a new user login account, follow this procedure:
1. |
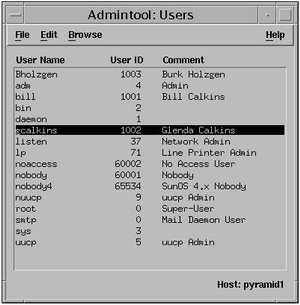
Start up Admintool as a member of the sysadmin group by typing admintool at the command prompt. The Users window appears, as shown in Figure 13.1. |
2. | |
3. |
Fill
in the text boxes in the Add User window. Table 13.3 describes the information needed. If you aren’t sure how to complete a field, click the Help button to see field definitions for this window. |
4. |
| Item | Description |
|---|---|
| User Name | Enter a unique login name that will be entered at the Solaris login prompt. Choose a name unique to your organization. The name can contain 2–8 uppercase characters (A–Z), lowercase characters (a–z), or digits (0–9) but no underscores or spaces. The first character must be a letter, and at least one character must be a lowercase letter. |
| User ID | Enter the unique user ID (discussed in Chapter 16). Admintool automatically assigns the next available UID; however, in a networked environment, make sure this number is not duplicated by another user on another system. All UIDs must be consistent across the network. The UID is typically a number between 100 and 60002, but it can go as high as 2147483647. See the note in the description for Primary Group regarding UIDs greater than 60000. |
| Primary Group | Enter the primary group name or GID (group ID) number for the group to which the user will belong. This is the group the operating system will assign to files created by the user. Group 10 (staff) is a predefined group that is sufficient for most users. GIDs can range from 0 to 60002, but they can go as high as 2147483647. Note: Previous Solaris software releases used 32-bit data types to contain the user IDs (UIDs) and group IDs (GIDs), but UIDs and GIDs were constrained to a maximum useful value of 60000. Starting with the Solaris 2.5.1 release and compatible versions, the limit on UID and GID values has been raised to the maximum value of a signed integer, or 2147483647. UIDs and GIDs over 60000 do not have full functionality and are incompatible with many Solaris features, so avoid using UIDs or GIDs over 60000. |
| Secondary Groups | (Optional) Enter the names or GIDs, separated by spaces, of any additional groups to which the user belongs. A user can belong to as many as 16 secondary groups. |
| Comment | (Optional) Enter any comments such as the full username or phone number. |
| Login Shell | Click this button to select the shell the user will use, such as /bin/csh. If nothing is selected, the default shell is the Bourne shell (/bin/sh). Interactive logins can be prevented by specifying /bin/false as the login shell. (In addition, this locks the account.) This is particularly useful for FTP-only user accounts. |
| Password |
Click this button to specify the password status. Selectable options are as follows:
|
| Min Change | (Optional) Enter the minimum number of days allowed between password changes. This is intended to prevent a user from changing the password and then changing it back a few seconds later, which would defeat the concept of password aging. The default is 0. |
| Max Change | (Optional) Enter the maximum number of days the password is valid before it must be changed; otherwise, the account is locked. Leaving the field blank means the password never has to be changed. |
| Max Inactive | (Optional) Enter the maximum number of days an account can go without being accessed before it is automatically locked. A blank field means the account remains active no matter how long it goes unused. |
| Expiration Date | (Optional) Enter the date when the user account expires. None means there is no expiration. |
| Warning | (Optional) Enter the number of days to begin warning the user before the password expires. A blank means no warning is given. |
| Create Home Dir check box | Check this box to have the user’s home directory automatically created. |
| Path | Use the Path field to point to an existing directory or to specify a new directory to create. |
Note
Users can type the UNIX command passwd at the command prompt to change their passwords. See Chapter 16 for additional information on setting passwords.


