Minimum System Requirements for Solaris Web Start
If you want to run Solaris Web Start, your computer must have the following:
128MB of RAM to use Web Start’s graphical user interface. At least 96MB of RAM is required to use Web Start’s command-line interface.
A 1.05GB startup disk just to run Solaris Web Start, after which the program determines whether your system has enough disk space to install the products you selected. 2GB of disk space is recommended for installing server software.
Installing Solaris Using Web Start
Solaris Web Start lets you take advantage of the ease and convenience of a GUI installation. However, you can use Web Start in either of two ways:
Graphical user interface (GUI) Requires a local or remote CD-ROM drive or network connection, frame buffer, keyboard, and bitmapped monitor.
Command-line interface (CLI) Requires a local or remote CD-ROM drive or network connection, keyboard, and monitor.
To start a Web Start installation, boot up the system from the Solaris 9 Installation CD-ROM, as follows:
ok boot cdrom
Note
Throughout the following sections, I refer to the individual discs of the CD-ROM media set. With Solaris 9, the media also is shipped on DVD. The DVD disc contains the equivalent of the following CD-ROMs:
Solaris 9 Installation CD-ROM
Solaris 9 Software CD-ROM (1 of 2 and 2 of 2)
Solaris 9 Languages CD-ROM
Solaris 9 Documentation CD-ROMs (1 of 2 and 2 of 2)
Solaris 9 Software Supplemental CD-ROM
If you are using the DVD media, this single disc will be used in place of the CD-ROMs I describe.
If, during bootup, Web Start detects a frame buffer for the system, it uses the GUI; if it does not detect a frame buffer, it uses the CLI. In the examples that follow, I’ll be using the GUI interface, but the content and sequence of instructions in the GUI and the CLI are the same.
After the system boots from the CD-ROM, Web Start starts the appropriate user interface and asks for some general system identification informa-tion. You are asked for the same information that the suninstall interactive installation asked for in Chapter 6, except the system uses a different GUI with a slightly different look and feel. To see an explanation of the information you are asked for, refer to Chapter 6.
After the system boots from the CD-ROM, you’ll be asked for the language in which to run the install. Select the number corresponding to the language you want to use.
The system will continue booting from the CD-ROM, and the window shown in Figure 8.1 displays.
Figure 8.1. The Web Start startup window.

As shown in Figure 8.1, Web Start is asking you to provide a partition on which to place the installation software. This partition should be empty, so on a disk that has already been partitioned, an existing swap partition works well. The partition must be at least 512MB. In the example, the system has found the existing swap partition named c0t0d0s3 and has determined that it is large enough to hold the software. I typed y to use this partition. You’ll see a message that the mini-root is being copied to the partition. The miniroot is a small version of the Solaris operating system that will be used for the installation. After taking several minutes to copy the software onto the empty partition (approx 385MB), the system will reboot, and the Welcome window shown in Figure 8.2 displays.
Figure 8.2. The Welcome window.

Note
If the disk has never been formatted, you will be asked to format the disk before the Solaris installation software is copied onto it. When asked to format the disk, type Y. Next you’ll be asked to enter a size for the swap slice; the default is 512MB. It will also ask you if the swap slice can start at the beginning of the disk. Placing this swap partition at the beginning of the disk will provide the most flexibility when you partition the disk later during the installation process. If you place the swap partition anywhere else, you’ll need to position your other partitions around it, which could limit the size of some of your partitions. Also, placing the swap partition in a location other than slice 0 makes the partitioning process more difficult because you need to size the partitions not by megabytes, but by entering values for the beginning and ending cylinders. When asked if the slice can begin at the beginning of the disk, answer Y. It will simplify the installation process.
Click the Next button to continue. The Network Connectivity window displays, as shown in Figure 8.3.
Select whether or not this computer will be networked. The default selection is Non-networked. After making your selection, click the Next button to continue. The DHCP window will appear, as shown in Figure 8.4.
Specify whether or not you want to use DHCP to configure the network interfaces for this system. In the example, I selected No to configure the interfaces manually and then clicked on the Next button to continue. The Host Name window appears, as shown in Figure 8.5.
Enter a hostname for your system and click the Next button to continue. In the example, I entered a hostname of ultra5. After clicking on the Next button, the IP Address window appears, as shown in Figure 8.6.
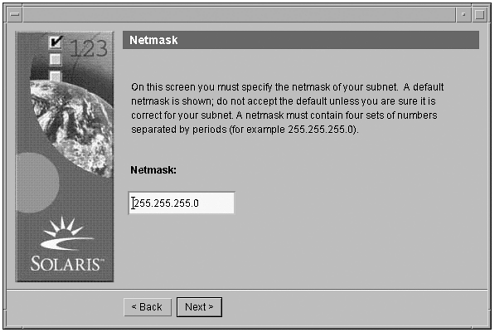
If you specified the system to use DHCP, you will not see this window. When asked earlier if I wanted to use DHCP, I selected No and will now configure the network interface manually. Enter the IP address for your system in the empty field and click the Next button to continue. The Netmask window will appear, as shown in Figure 8.7.
Enter your netmask value in the blank field and click the Next button. The IPv6 window will appear, as shown in Figure 8.8.
Figure 8.8. The IPv6 window.
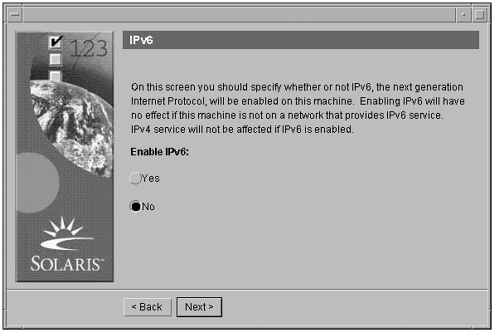
Specify whether or not IPv6 should be enabled on this system. In the example, I selected No and clicked on the Next button. The Default Router window appears next, as shown in Figure 8.9.
In a networked environment, you can select a default route, which provides a bridge between two networks that will forward traffic between the two networks. In my case, I want to get out to the Internet from this system through my router. You can either let the installation program try to find a default route, or you can specify one. The software can only locate a default route if the system is on a network that has a router that broadcasts itself. For the example, I selected Specify one, so after clicking on the Next button, a window appears that enables me to specify a default route, as shown in Figure 8.10.
Figure 8.10. Enter the address for the default router.
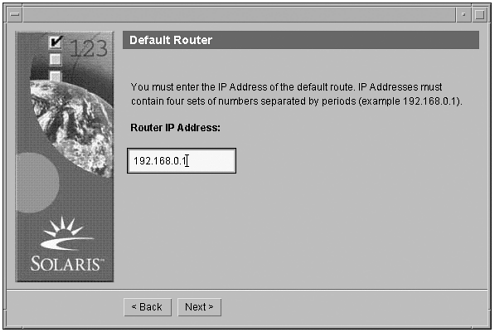
Enter the address for the default router in the blank field and click the Next button to continue.
Note
This step only configures the default route, not DNS. After the Web Start installation starts, you’ll be able to access the Internet via a browser during the installation process. You might have trouble accessing web sites, however, without first setting up the /etc/nsswitch.conf and /etc/resolv.conf files. This process is described in Chapter 23, “Name Services.”
The next window that appears enables you to specify whether or not Kerberos Security will be enabled on this machine, as shown in figure 8.11.
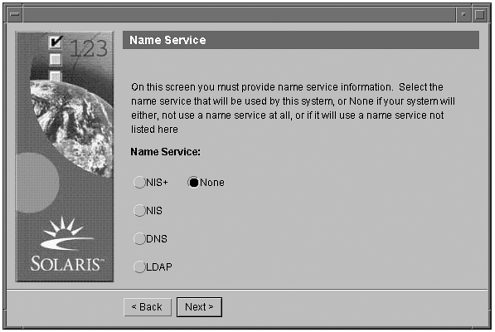
I selected No and clicked the Next button. The Name Service window appears, as shown in Figure 8.12.
In the example, I kept the default name service selection of None. After making a selection, click the Next button. The Time Zone window appears, as shown in Figure 8.13.
Depending on which method you select, you will be prompted by additional windows to input your particular time zone. After you’ve completed the Time Zone window, you’ll see the Date and Time window displayed in Figure 8.14.
Verify the date and time and make corrections as needed. After you’re finished, click the Next button. The next window that appears enables you to enter the root password for the system, as shown in Figure 8.15.
Enter the root password that you want to use on the system in both empty fields and click the Next button. The Power Management window will appear, as shown in Figure 8.16.
Make your selections for power management and click the Next button to continue. The Proxy Server Configuration window will appear, as shown in Figure 8.17.
A network proxy is used to provide security between this system and the Internet. In the example, I used the default because I have a direct connection to the Internet via my router. After making your selection, click the Next button. The Confirm Information window will appear, as shown in Figure 8.18.
Check all the settings. If you need to change anything, you can click the Back button and make the change. If you’re satisfied with the settings, click the Confirm button. The system will begin the configuration, and the installation will continue.
The installation kiosk will display after the configuration is complete. The kiosk environment is displayed in Figure 8.19. Notice the Welcome window in the lower-right corner of the screen. In Figure 8.19, I clicked Applications on the left side of the kiosk and opened a terminal window. Notice that you can also access documentation and other programs from this area of the kiosk. In addition, there is an option to Send Kiosk to Background. If the kiosk ever covers a dialog box, click this item to put the kiosk in the background. This places the kiosk behind all the other windows.
Figure 8.19. Placing the kiosk in the background.

To continue the installation, click the Next button at the bottom of the Welcome window. The Installer Options window, as shown in Figure 8.20, displays in the kiosk.
In the Installer Options window, select whether you want the system to eject the CD-ROM and reboot after the installation. Click the Next button to continue. The Specify Media window displays, as shown in Figure 8.21.
Notice that you can select the network, HTTP, or a local tape as install media in addition to the CD/DVD. I’ll describe installing from the network in the next section when I describe Web Start Flash.
In this example, I selected CD/DVD and clicked the Next button. The Insert Disc window appears, as shown in Figure 8.22. The CD-ROM player will eject, and you’ll need to install the CD-ROM labeled Solaris 9 Software 1 of 2 and click OK to proceed.
After the system reads the CD-ROM, you’ll be asked to select either an Upgrade Install or an Initial Install, as shown in Figure 8.23. Both of these options are described in Chapter 6.
In the example, I selected the default Initial Install and clicked the Next button. The Select Type of Install window appears next, as shown in Figure 8.24.
I selected a Custom Install, which will provide me with a choice of which Solaris products to install. After making my selection, I clicked on the Next button. The Select Software Localizations window appears, as shown in Figure 8.25.
Note
If, at the start of this process, you allowed the installation software to be placed in a swap partition other than 0, you will not have the option to select the Default Install. The file systems must be laid out manually if the swap partition is anywhere other than slice 0.
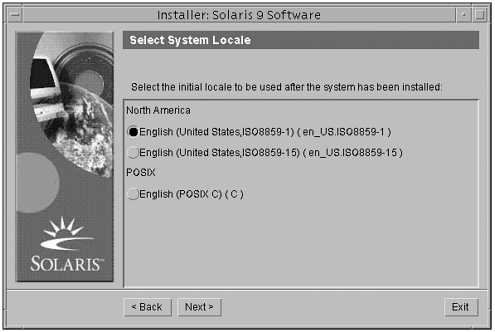
Select the geographic regions and software localizations that you want to install. When you’ve completed your selections, click the Next button. The next screen is the Select System Locale window, shown in Figure 8.26. It asks you to select the initial locale to be used after the system has been installed.
After selecting the locale, click the Next button. The Select Products window will display, as shown in Figure 8.27. This is not where you select the operating system software groups to install, only additional software from the CD-ROMs listed such as documentation and items from the supplemental CD-ROM.
Figure 8.27. The Select Products window.

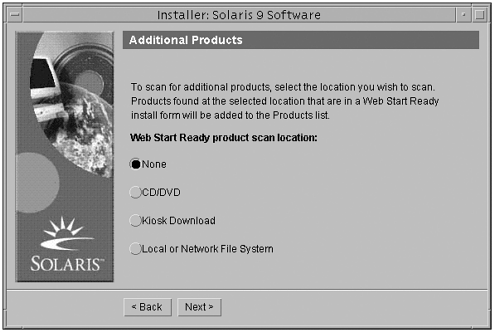
After selecting all the products you want to install, click the Next button. The Additional Products window displays, as shown in Figure 8.28.
If you have additional, third-party products to install, select the media or location from which you want to install them.Your selection will be scanned, and any products that have been packaged in a Web Start–ready format will be added to the Products list. Locations that you can specify are as follows:
None Select the None option if you don’t want to scan for additional products.
The local CD/DVD Insert the disc that contains the additional products.
Kiosk download Web Start–ready packages located in the /webstart/kiosk/download directory.
Local or network file system Specify the path to the network file system from which you will install additional software products.
After making your selection, click the Next button. The 64-Bit Selection window will appear, as shown in Figure 8.29.
If your system supports the 64-bit environment and you want to use products in their 64-bit architecture, select Yes and then click the Next button to continue. The Select Solaris Software Group window will appear, as shown in Figure 8.30.
Refer to the section “Using the Interactive Installation Process suninstall: SPARC” in Chapter 6 for a complete discussion about selecting the appropriate software group.
Select your software group and click the Next button to continue. The Disk Selection window appears, as shown in Figure 8.31.
Select the disk(s) onto which you want to install the software and click the Next button to continue. If the disk you selected has data on it, you will be asked if you want to preserve this data. Select Yes or No and then click the Next button to continue.
Next you’ll see a window indicating that the installation program is gathering disk space requirements. After it has been verified that you have enough disk space to hold the selected software, the Lay Out File Systems window displays, as shown in Figure 8.32.
If you’re satisfied with the disk partition scheme displayed, click the Next button. For this example, I wanted to modify the partition scheme, so I highlighted the disk (c0t0d0) and then clicked the Modify button. The Disk Modification window displays next, as shown in Figure 8.33.
I’ve added entries for the following file systems: /, /var, /opt, /usr, and /export/home, as shown in Figure 8.34.
Figure 8.34. My changes in the Disk Modification window.
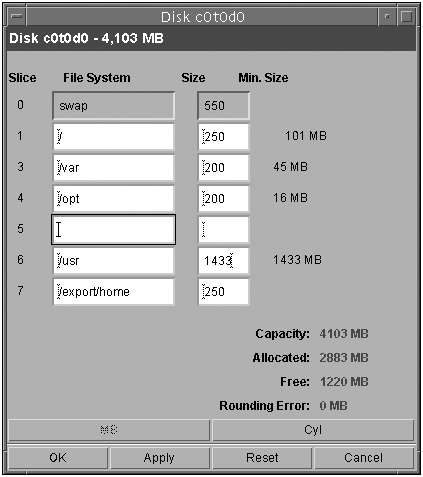
After making the modifications, click the OK button to apply the changes. You’ll see the Lay Out File Systems window again, and the modifications are displayed as shown in Figure 8.35.
Verify the changes and click the Next button to continue. The Ready to Install window displays, as shown in Figure 8.36, summarizing your selections.
If everything looks okay, click the Install Now button. The Installing window appears, as shown in Figure 8.37.
Status messages and the name of each package being installed are displayed above the progress bars. The duration of the install depends on the software groups selected and the speed of the installation media.
As additional CD-ROMs are required, you are prompted to remove a CD-ROM and install the required CD-ROM. You’ll see a window indicating the progress of the installation for each CD-ROM. When the installation is complete, the CD-ROM ejects, and an installation summary window displays. Each product that was installed is listed, along with a status message indicating whether the installation was successful.


