
Contents
Overview of Accelerated Life Test Designs
Often in reliability studies, the product reliability at use conditions is so high that the time required to test the product until it fails is prohibitive. As an alternative, you can test the product in conditions that are more extreme than normal use conditions. The extreme conditions enable the product to degrade and fail sooner, making a reliability study possible. Results are used to predict product reliability at normal use conditions.
The Accelerated Life Testing Design platform can be used to design experimental plans for accelerated life testing (ALT) experiments. The ALT Design platform can be used to design initial experiments, or augment existing experiments. Augmenting designs is useful if you want to obtain more data, so that you can decrease the variance associated with predicting product reliability.
The ALT Design platform can create designs for situations involving one or two accelerating factors. For two accelerating factors, you can choose to include the interaction. You can use D-optimality or two types of I-optimality criterion.
The process requires estimates of acceleration model parameters. Since those parameters might not be known in advance, you can specify prior distributions to account for the uncertainty. Designs can be created for either Lognormal or Weibull life distributions.
Using the ALT Design Platform
1. To launch the ALT Design platform, select DOE > Accelerated Life Test Design.
Figure 11.2 Initial ALT Design Window
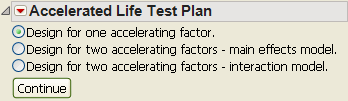
2. Select one or two accelerating factors.
For two factors, you can choose to include the interaction between the factors.
3. Click Continue.
A window appears for specifying details of the accelerating factor or factors.
Figure 11.3 Accelerating Factor Details Window

4. Fill in these options:
Factor Name
Enter a name for the accelerating factor.
Number of Levels
Enter the number of levels of the factor to include in the experiment.
Factor Transformation
Select a transformation for the factor. The options are Arrhenius Celsius, Reciprocal, Log, Square Root, and Linear.
Low Usage Condition
Enter a value for the low usage conditions.
High Usage Conditions
Enter a value for the high usage conditions.
5. Click Continue.
A window appears for specifying additional information about the assumed distribution and desired experimental conditions.
Figure 11.4 Distribution Details

6. Fill in these options:
Factors
Enter the values of the accelerating factor levels.
Distribution Choice
Select the failure distribution, either Weibull or LogNormal.
Prior Mean
Enter the acceleration model parameters. These values can be either a best guess or the estimates of the parameters from an analysis of previously obtained data.
Prior Variance Matrix
Enter variances and covariances for the acceleration model parameters. These values can be either a best guess or the estimated variance matrix from an analysis of previously obtained data.
Ignore prior variance
Select this option to ignore variances and covariances for model parameters. When the variances and covariances are ignored, the design is created for the specific fixed parameters entered under Prior Mean. The resulting design is said to be a locally optimal design. This design will be good if the prior mean parameters are close to the true values. However, the design will not be robust to mis-specified parameters. When the variances and covariances are used, a multivariate normal prior distribution is assumed for the acceleration model parameters. This is useful when the values entered under Prior Mean are estimates or guesses, and you want the design to reflect the associated uncertainty.
Diagnostic Choices
Enter values for the following:
Time range of interest are values for which you want an estimated probability of failure. For example, if you are interested in the probability of failure by 100,000 hours, then enter 100,000 for both the lower and upper ranges.
Probability of interest is the value for which you want an estimated time of failure. For example, if you are most interested in obtaining the time until 10% of units fail, then enter 0.1.
Design Choices
Enter values for the following:
Length of Test is the length of time to run the experiment.
Number of Units Under Test is the number of units in the experiment. If augmenting a previous experiment, enter the number of units from the previous experiment plus the number of units that you want to run for the next experiment. If designing an initial experiment, enter the number of units that you want to run.
7. Click Continue.
New outline nodes appear as shown in Figure 11.5.
Figure 11.5 Additional Outline Nodes

Candidate Runs
Enter the minimum and maximum number of runs allowed at each level of the acceleration factor. If augmenting a previous experiment, enter the number of units already run at each level for the Minimum Units.
Parameter Variance for Balanced Design
Gives the expected variances and covariances for the acceleration model parameters after running and analyzing the balanced design (same number of runs at each level of the acceleration factor). These values are valid under the assumption that the values for the prior mean and variance are correct.
These values can be compared to the ones entered under Prior Variance Matrix, to see whether the balanced design can improve the variances of the parameter estimates. They can also be compared to the final parameter variances for the optimal design, after clicking Make Design.
Distribution Profiler
Use the profiler to visualize the probability that a unit will fail at different values of the acceleration factor and time.
8. Click Update Profiler to update the profiler if changes are made to the distribution choice, means, variances, design choices, or candidate runs.
9. Click Make Design to create the optimal design and display the results.
Figure 11.6 Design Results

The information below describes the results you get after clicking Make Design.
The Design report gives the expected number of failures for each level of the acceleration factor. Also given is the probability that none of the units at this setting will fail.
The Parameter Variance for Optimal Design report gives the variances and covariances for the acceleration model parameters for the optimal design. These values are valid under the assumption that the values for the prior mean and variance are correct. These values can be compared to those under Parameter Variance for Balanced Design to determine whether the optimal design is able to reduce the parameter variances more than the balanced design.
The Optimality Criteria report gives the values of the optimality criterion for the optimal design. For more information about the optimality criterion, see Platform Options.
The Make Design button updates the optimal design if any changes are made to the distribution choice, prior means or variances, design choices, or candidate runs.
The Make Test Plan button creates a data table with the acceleration factor levels and the number of units to include in the experiment for each level.
The Make Table button creates a table that can be used for data collection during the experiment.
Platform Options
The red triangle menu for Accelerated Life Test Plan has the following options:
Simulate Responses
Adds simulated responses to the table when you click Make Table.
ALT Optimality Criterion
Gives three choices for design optimality:
Make D-Optimal Design creates a design that minimizes the variance of the model coefficients.
Make Time I-Optimal Design creates a design that minimizes the prediction variance when predicting the time to failure for the probability given in Diagnostic Choices.
Make Probability I-Optimal Design creates a design that minimizes the prediction variance when predicting the failure probability for the times given in Diagnostic Choices.
Advanced Options
Gives the N Monte Carlo Spheres option, which affects the speed and accuracy of numerical integration. For more information, see Advanced Options for the Nonlinear Designer in Nonlinear Designs.
Example
This example shows how to use the Accelerated Life Test Design to augment an existing design.
An accelerated life test was performed, and the results are in the Capacitor ALT.jmp sample data table (in the Design Experiment folder). Fifty units were tested at each of three temperatures (85o, 105o, and 125o Celsius) for 1500 hours. The resulting model is used to predict the probability of failure at 100,000 hours at normal use conditions of 25o.
1. Open the Capacitor ALT.jmp data table in the Design Experiment folder.
2. Run the Fit Life by X table script.
3. In the Distribution Profiler, enter 25 for Temperature and 100,000 for hours.
The profiler is shown in Figure 11.7.
Figure 11.7 Distribution Profiler for Capacitor Model

The predicted probability of failure at 100,000 hours at 25o is 0.00358, with a confidence interval of 0.00056 to 0.0227. The analyst wants to decrease the width of the confidence interval. To do so, the experiment needs to be augmented with additional data.
To augment the design in the optimal way, use the Accelerated Life Test Design platform. Follow the steps below to use the platform:
1. Select DOE > Accelerated Life Test Design.
2. Select Design for one accelerating factor and click Continue.
3. Enter Temperature for Factor Name.
4. Enter 5 for Number of Levels.
5. Enter 25 for both Low Usage Condition and High Usage Condition.
6. Click Continue.
7. Enter 85, 95, 105, 115, and 125 for the Temperature Level Values.
8. Select Weibull for Distribution Choice.
9. Under Prior Mean, enter the acceleration model parameters from the Fit Life by X Estimates report. See Figure 11.8.
– Enter -35.200 for Intercept.
– Enter 1.389 for Temperature.
– Enter 1.305 for scale.
Figure 11.8 Fit Life by X Estimates

In the Fit Life by X output, under the Estimates report, is the Covariance Matrix report. Note the variances for the acceleration model parameters are 22, 0.025, and 0.013. These values will be compared to our final results at the end.
10. Enter 100,000 for both boxes for Time range of interest.
11. Enter 1500 for Length of Test.
12. Enter 300 for Number of Units Under Test. The previous experiment used 150 units, and the next experiment uses 150 units, for a total of 300.
The completed window is shown in Figure 11.9.
Figure 11.9 Completed Window

13. Click Continue.
14. To account for the units in the previous experiment, enter the following under Candidate Runs.
– Enter 50 for Minimum Units for 85o.
– Enter 50 for Minimum Units for 105o.
– Enter 50 for Minimum Units for 125o.
15. From the red triangle menu for Accelerated Life Test Plan, select ALT Optimality Criterion > Make Probability I-Optimal Design.
16. Click Make Design.
The optimal experimental design is returned, along with other results. See Figure 11.10.
Figure 11.10 Optimal Design
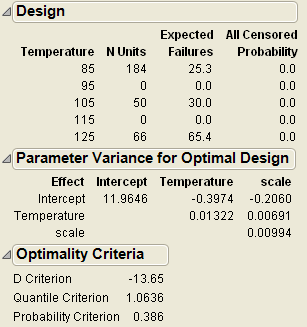
The optimal design is computed based on the Number of Units Under Test, Candidate Runs, and other information that you specified earlier. The optimal design consists of the following number of units at each temperature level:
• 184 units at 85o. Since the previous experiment used 50 units, 134 additional units are needed.
• 0 units at 95o. The next experiment will not utilize any units at this level.
• 50 units at 105o. Since the previous experiment already used 50 units, no additional units are needed.
• 0 units at 115o. The next experiment will not utilize any units at this level.
• 66 units at 125o. Since the previous experiment used 50 units, 16 additional units are needed.
As we entered earlier, a total of 134+16=150 units are used for the new experiment.
An estimate of the acceleration model parameters variances is given. Note that, due to the additional data, all three variances are smaller than before from the original Fit Life by X report.
In the Profiler, enter 25 for Temperature and 100,000 for Time. The estimated probability of failure is 0.00357, with an estimated confidence interval of 0.00106 to 0.01201. This interval is narrower than the one from the previous experiment, as a result of the additional units to be tested.
To decrease the interval further, try entering more than 300 units to be tested.
..................Content has been hidden....................
You can't read the all page of ebook, please click here login for view all page.