
In this book, we are going to dive into the Sencha Ext JS 5 world and explore real-world examples. We will also build a complete application from scratch, from the wireframe phase until the deployment in production.
Throughout this book, we are going to develop an application to manage a DVD rental store. In this chapter, we will introduce the application and describe its capabilities. You will also learn how to organize the files of the application, which is going to be built throughout the chapters of this book. This chapter will also present the mockup (wireframe) of the application and how to start organizing the screens (which is a very important step and some developers forget to do it). In this chapter, we will cover:
- Preparing the development environment by installing the required software
- Presenting the application and its capabilities
- Creating mockups/wireframes of each screen
- Creating the structure of the app using Sencha Cmd
- Creating the loading page (splash screen)
The application that we are going to develop has a very simple architecture. We are going to use Ext JS 5 on the frontend, which is going to communicate with a server-side module using Ajax/JSON, which will then communicate with a database.
The following diagram encapsulates the preceding paragraph:
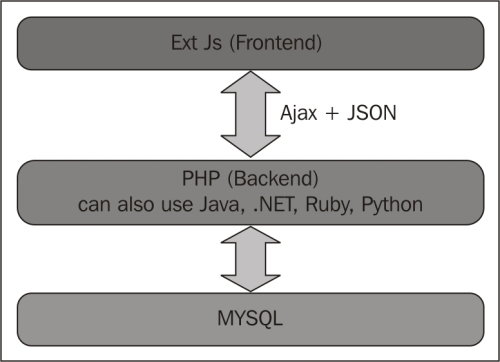
The server-side module will be developed using PHP. You need not worry if you don't know PHP. We are going to use very basic code (no frameworks), and we are going to focus on the programming logic that needs to be implemented on the server side. This way, you can apply the same logic using any other programming language, such as Java, ASP.NET, Ruby, Python, or any other (that supports the exchange of data in JSON or XML format as this is the communication format used by Ext JS). For the database, we will use MySQL. We will also use the Sakila sample schema (http://dev.mysql.com/doc/sakila/en/), a free MySQL sample database, which is perfect to demonstrate how to work with Create, Read, Update, and Delete/Destroy (CRUD) operations on a database table and also use more complex operations, such as views and stored procedures (we will learn how to handle all this information with Ext JS).
Note
If you are a Java developer, you can find some sample code on how to integrate Java with Ext JS at http://goo.gl/rv76E2 and http://goo.gl/nNIRuQ.
Also, we will need to have Sencha Cmd installed (we have already installed Sencha Cmd during Chapter 1, Sencha Ext JS Overview). However, we still need to execute some extra steps to have it configured. Once configured, we will be able to create the application structure, customize the theme, and also make the production build. Sencha Cmd requires having Ruby compatible with versions 1.8 or 1.9 (version 2.x will not work). We also need to have Apache Ant installed (and because Apache Ant is built with Java, we also need to have Java installed and configured in our computer).
After we have finished implementing the application, we will customize the theme, and because of this, we will need to install Ruby (1.8 or 1.9) and the Sass and Compass gems.
To deploy the application, we need a web server. If you do not have any web server installed on your computer yet, do not worry. In this book, we will use Xampp as the default web server.
We will also need a browser to run our application in. The recommended ones are Firefox (with Firebug) or Google Chrome.
If you do not have any of the software or technologies mentioned previously installed on your computer, don't worry. To summarize all the tools and software we need to have installed prior to starting the fun, here is a list with the links where you can download them and find installation instructions (all items are available for Windows, Linux, and Mac OS):
- A browser with a debugger tool:
- Firefox with Firebug: https://www.mozilla.org/firefox/ and http://getfirebug.com/
- Google Chrome: www.google.com/chrome
- Web server:
- Database:
- MySQL: http://dev.mysql.com/downloads/mysql/
- MySQL Workbench: http://dev.mysql.com/downloads/tools/workbench/
- MySQL Sakila sample database: http://dev.mysql.com/doc/index-other.html and http://dev.mysql.com/doc/sakila/en/index.html
- Sencha Command required tools:
- Ruby: http://www.ruby-lang.org/en/downloads/
- Sass: http://sass-lang.com/
- Compass: http://compass-style.org/
- Java JDK (Java 7 or later): http://www.oracle.com/technetwork/java/javase/downloads/index.html
- Java environment variables: http://docs.oracle.com/javase/tutorial/essential/environment/paths.html
- Apache Ant: http://ant.apache.org/bindownload.cgi
Of course, we also need Ext JS SDK and Sencha Cmd, which we downloaded and installed in Chapter 1, Sencha Ext JS Overview.
Note
To help you configure the required development environment in order to be able to create the application from this book, here is a video that demonstrates it step by step (step by step done for Windows environment—the Linux and Mac OS setup is very similar): http://youtu.be/B43bEnFBRRc.