
First, let's start with the basics. Whenever we need to implement a complex screen, we need to start with the simplest component we can develop. When this component is working, we can start incrementing it and add more complex capabilities. So first, we need to create a Model to represent the film table. In this chapter, we are going to use the MVVM approach, so we can dive into capabilities we have not covered in previous chapters. Once we have this part of the code working, we can work with the relationships between the category, language, and actor tables.
First, we are going to create the Model to represent the film table. Let's not worry about the relationships this table has for now.
We need to create a new class named Packt.view.film.FilmsGrid, as follows:
Ext.define('Packt.model.film.Film', {
    extend: 'Packt.model.staticData.Base', //#1

    entityName: 'Film',

    idProperty: 'film_id',

    fields: [
        { name: 'film_id' },
        { name: 'title'},
        { name: 'description'},
        { name: 'release_year', type: 'int'},
        { name: 'language_id'},
        { name: 'original_language_id'},
        { name: 'rental_duration', type: 'int'},
        { name: 'rental_rate', type: 'float'},
        { name: 'length', type: 'int'},
        { name: 'replacement_cost', type: 'float'},
        { name: 'rating'},
        { name: 'special_features'}
    ]
});
As all Sakila tables have the last_update column, we will extend Packt.model.staticData.Base to avoid declaring this field in every single Model we create that represents a Sakila table. The staticData.Base class also extends Packt.model.Base, which contains the schema and proxy details for our models.
For the fields, we will have the same ones we have in the film table.
Our next step is to create a ModelView that will contain a Store that will load the collection of films. Let's create a Store named films (remember that the Store name is always the plural of the name of the Model—if you want to follow the Sencha naming convention) inside the ViewModel, as follows:
Ext.define('Packt.view.film.FilmsModel', {
    extend: 'Ext.app.ViewModel',

    alias: 'viewmodel.films',

    stores: {
        films: {
            model: 'Packt.model.film.Film', //#1
            pageSize: 15,   //#2
            autoLoad: true, //#3
            session: true   //#4
        }
    }
});
We need to create a file named FilmsModel.js inside the app/view/film folder and put the preceding code inside the file.
In the films Store, we are declaring the model as usual (#1), and we are also declaring pageSize as 15 (#2), meaning we will use the PagingToolbar in the Films data grid, and we will retrieve sets of 15 films per unit time to display in the GridPanel.
The autoLoad configuration is also set to true (#3). As the ViewModel is created once the View is instantiated, the Store will be loaded once the View is created as well.
At last, we have a session configuration (#4). We have not worked with sessions so far in this book. When we worked with CRUD in the preceding chapter, we used the Store to save the data. In this chapter, we are going to work with associated data, and a session can be really helpful when we need to save data from different models. The session will be created in the View. Having session: true declared inside a Store inside the ViewModel links the Store with the session of the View. We will discuss how this works later on in this chapter.
Now that we have the Model and the ViewModel with the Store, we need to create FilmsGrid, which we can do as follows:
Ext.define('Packt.view.film.FilmsGrid', {
    extend: 'Packt.view.base.Grid', //#1
    xtype: 'films-grid',

    bind : '{films}',  //#2

    reference: 'filmsGrid', //#3

    columns: [{
        text: 'Film Id',
        width: 80,
        dataIndex: 'film_id'
    },{
        text: 'Title',
        flex: 1,
        dataIndex: 'title',
     renderer: function(value, metaData, record ){  //#4
            metaData['tdAttr'] = 'data-qtip="' +
                    record.get('description') + '"'; //#5
            return value;
        }
    },{
        text: 'Language',
        width: 100,
        dataIndex: 'language_id'
    },{
        text: 'Release Year',
        width: 110,
        dataIndex: 'release_year'
    },{
        text: 'Length',
        width: 100,
        dataIndex: 'length',
        renderer: function(value, metaData, record ){ //#6
            return value + ' min';
        }
    },{
        text: 'Rating',
        width: 70,
        dataIndex: 'rating'
    }]
});
As our application starts to grow, we notice that we use some of the configurations in different components. For example, for most of the GridPanels, we use a toolbar with the Add, Edit and Delete buttons, or we can use a toolbar with the Add button and have the Edit and Delete buttons inside the grid as Widget Columns (or Action Columns). As all tables from the Sakila database have the Last Update column, this column is also common to all the GridPanels we use to list information from Sakila tables. For this reason, we can create a super GridPanel (as we did specifically for the static data module). So, for the Films GridPanel, we will extend from base.Grid (#1) that we will create next.
Having declared the ViewModel already, we can bind the films Store in this grid as well (#2). To make our job easier later, we will also declare reference for this grid (#3).
Then, we have the columns mapping dataIndex with the field of the Film Model. When we want to manipulate the information that is going to be displayed in the grid, we can use the renderer function. For the length column, we want to display the length and 'min' because the length of a film is based in minutes. So, we can return the value itself (length) concatenated to the string we want (#6).
Inside the renderer function, we can also use other fields to manipulate the information by retrieving the desired field from record. For example, inside the renderer function (#4) of the title column, we want to display a tooltip with the film's description (#5) when the user does a mouse over on the title column. But we are not changing the value that is going to be displayed, which is title (value parameter of the renderer function) itself.
To create the base Grid class, we are going to create a new base folder named base inside app/view so that we can place all our base classes. Then we are going to create a new file named Grid.js with the following content:
Ext.define('Packt.view.base.Grid', {
    extend: 'Ext.grid.Panel',

    requires: [
        'Packt.util.Glyphs'
    ],

    columnLines: true,
    viewConfig: {
        stripeRows: true
    },

    initComponent: function() {
        var me = this;

        me.columns = Ext.Array.merge(
            me.columns,
            [{
                xtype    : 'datecolumn',
                text     : 'Last Update',
                width    : 150,
                dataIndex: 'last_update',
                format: 'Y-m-j H:i:s',
                filter: true
            },{
                xtype: 'widgetcolumn',
                width: 50,
                sortable: false,
                menuDisabled: true,
                widget: {
                    xtype: 'button',
                    glyph: Packt.util.Glyphs.getGlyph('edit'),
                    tooltip: 'Edit',
                    handler: 'onEdit'   //#1
                }
            },{
                xtype: 'widgetcolumn',
                width: 50,
                sortable: false,
                menuDisabled: true,
                widget: {
                    xtype: 'button',
                    glyph: Packt.util.Glyphs.getGlyph('destroy'),
                    tooltip: 'Delete',
                    handler: 'onDelete'  //#2
                }
            }]
        );

        me.callParent(arguments);
    }
});
We have created a similar class to this one in Chapter 7, Static Data Management. However, this class has something different. In lines #1 and #2 we are declaring a handler that is going to be handled in the ViewController. Working with MVVM and Widget Columns is much simpler than working using the MVC approach because we do not need to fire a custom event; we can simply declare the onEdit and onDelete methods inside the ViewController.
Let's go back to the FilmsGrid class and add the RowExpander plugin. The film table has more columns than the ones we are displaying inside the FilmsGrid class. We can use the RowExpander plugin to display other information.
We are going to add the following code inside the FilmsGrid class, as follows:
plugins: [{
    ptype: 'rowexpander',
    rowBodyTpl: [
        '<b>Description:</b> {description}</br>',
        '<b>Special Features:</b> {special_features}</br>',
        '<b>Rental Duration:</b> {rental_duration}</br>',
        '<b>Rental Rate:</b> {rental_rate}</br>',
        '<b>Replacement Cost:</b> {replacement_cost}</br>'
    ]
}]
We need to configure a template to display the extra information we want. In this case, we are displaying the description of the film and some other information that could not fit on the columns, such as the rental information.
Note
For more information about the template, you can visit http://docs.sencha.com/extjs/5.0/5.0.0-apidocs/#!/api/Ext.Template and http://docs.sencha.com/extjs/5.0/5.0.0-apidocs/#!/api/Ext.XTemplate.
Unfortunately, it is not possible to use the RowExpander plugin with the associated models. If we want to display associated data, we can use the SubTable plugin. It is also not possible to use the RowExpander and SubTable plugins at the same time.
With the preceding code, a new column will be added in the Grid so that we can see this extra information:

In Chapter 6, User Management, we handled the relationship between the User and Group models using a hasOne association by adding a new field in the User Model (creating a User Model section). We will learn a different way to display a hasOne association in the grid in this chapter.
A film has a
hasOne association with language (language has a hasMany association with film). We will display the language name instead of language_id using a renderer function as demonstrated in the following code:
dataIndex: 'language_id',
renderer: function(value, metaData, record ){
   var languagesStore = Ext.getStore('staticData.Languages'), //#1
   var lang = languagesStore.findRecord('language_id', value);//#2
   return lang != null ? lang.get('name') : value;            //#3
}
We will take advantage of the fact that the Languages Store was created within the global scope of the application (which we created in Chapter 7, Static Data Management) and use this. This way, we do not need to load the language name from the server again. So, we are going to retrieve the Store (#1) using the store manager and search for the Language Model that has language_id, which we are looking for (#2). If the value exists, then we display it; otherwise, we display the language_id parameter anyway (#3).
Even though Ext JS has the capability to load the information from the server and parse using the association capability, is it worth using it in this scenario since we already have a Store with the values we need loaded? If we do use association, it means that more data will be loaded from the server, and some of them can be duplicated for a different Model (in this case, all films have language_id as 1, which is English). So the same language Model would be loaded several times, and the JSON we would load from the server would be larger.
Next, we are going to declare a PagingToolbar. Inside the FilmsGrid class, we are going to add the following code:
dockedItems: [{
    dock: 'bottom',
    xtype: 'pagingtoolbar',
    bind : {
        store: '{films}' //#1
    },
    displayInfo: true,
    displayMsg: 'Displaying films {0} - {1} of {2}',
    emptyMsg: "No films to display"
}]
The PagingToolbar is a special toolbar that is bound to a Store. For this reason, we need to specify the Store (#1). In this case, it will be the same Store we declared in FilmsGrid.
Since we are using the PagingToolbar, it is important to remember a few things. Ext JS provides tools to help us to page the content, but let's emphasize the word "provide". Ext JS will not do the paging for us if we retrieve all the records from the database at once.
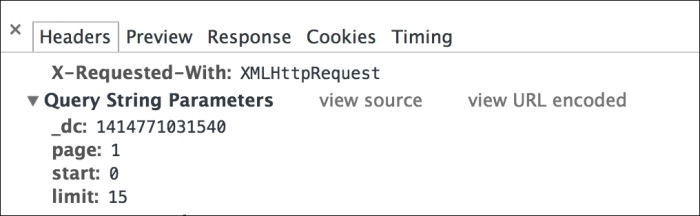
If we take a look at the request Ext JS sends to the server, we will find that it sends three extra parameters when we use the PagingToolbar. These parameters are start, limit, and page. For example, as we can see, when we load the GridPanel information for the first time, start is 0, limit is the pageSize configuration we set on the Store (in this case, 15), and page is 1. The following figure exemplifies this:
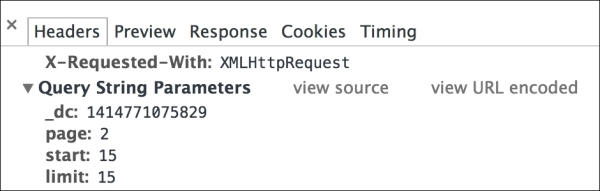
When we click on the next page of the GridPanel, start will be 15 (0 + limit (15) = 15), limit will have the value 15 (this value does not change unless we change pageSize dynamically), and page will be 2. This is demonstrated by the following figure:
Note
There is a third-party plugin that can change pageSize dynamically according to the user's selection at https://github.com/loiane/extjs4-ux-paging-toolbar-resizer.
These parameters help us to page the information on the database as well. For example, for MySQL, we only need start and limit, so we need to get them from the request, as follows:
$start = $_REQUEST['start'];
$limit = $_REQUEST['limit'];
Then, when we execute the SELECT query, we need to add LIMIT $start, $limit at the end (after the WHERE, ORDER BY, GROUP BY clauses, if any):
$sql = "SELECT * FROM film LIMIT $start, $limit";
This will bring the information we need from the database.
Another very important detail is that the PagingToolbar displays the total number of records we have on the database:
$sql = "SELECT count(*) as num FROM film";
So, we also need to return a total property on the JSON with the count of the table:
echo json_encode(array(
  "success" => $mysqli->connect_errno == 0,
  "data" => $result,
  "total" => $total
));
Then Ext JS will receive all the information required to make the paging work as expected.
We need to be careful because if we use a different database, the query to page the information directly from the database is different.
If we were using the Oracle database, the SELECT query with paging would be as follows:
SELECT * FROM
  (select rownum as rn, f.* from
    (select * from film order by film_id) as f
  ) WHERE rn > $start  and rn <= ($start + $limit)
This would be much more complicated than MySQL. Now let's see Microsoft SQL Server (SQL Server 2012):
SELECT  *
FROM ( SELECT ROW_NUMBER() OVER ( ORDER BY film_id ) AS RowNum, *
          FROM films
        ) AS RowConstrainedResult
WHERE   RowNum > $start
    AND RowNum <= ($start + $limit)
ORDER BY RowNum
In SQL Server 2012, it is simpler:
SELECT * FROM film
ORDER BY film_id
OFFSET $start ROWS
FETCH NEXT $limit ROWS ONLY
In Firebird, it is also simpler than MySQL:
SELECT FIRST $limit SKIP $start * FROM film
So be careful with the SQL syntax if you are using a different database than MySQL.