
Under the app/view directory, we will create a new folder to organize all the source code related to the Login screen named login. Inside the login folder, we will also create a new file named Login.js. In this file, we will implement all the code that the user is going to see on the screen.
Inside view/login/Login.js, we will implement the following code:
Ext.define('Packt.view.login.Login', { // #1
    extend: 'Ext.window.Window',       // #2

    xtype: 'login-dialog',             // #3

    autoShow: true,                    // #4
    height: 170,                       // #5
    width: 360,
    layout: {
        type: 'fit'                    // #7
    },
    iconCls: 'fa fa-key fa-lg',        // #8
    title: 'Login',                    // #9
    closeAction: 'hide',               // #10
    closable: false,                   // #11
    draggable: false,                  // #12
    resizable: false                   // #13
});
On the first line (#1), we have the definition of the class. To define a class, we use Ext.define, which (define) is a method call of the Ext singleton class, and which takes two arguments: the class name (#1) and the object literal with the configuration of the class (#2–#13).
We also need to pay attention to the name of the class. This is the formula suggested by Sencha in Ext JS MVC projects: App Namespace + package name + name of the JS file. In the previous chapter, we defined the namespace as Packt (the name of the application we passed as parameter for the sencha generate app command). If we open an existing file that was created by Sencha Cmd (the app/view/main/Main.js file) for example, we will note that the name of the class starts with Packt. So all the classes we are going to create through out this book will start with the namespace Packt.
We are creating a View for this project, so we will create the JS file under the view folder. For organization purposes, we created a subfolder named login. And then, the name of the file we created is Login.js; therefore, we will lose the .js and use only Login as the name of the View. Putting it all together, we have Packt.view.login.Login, and this will be the name of our class. It is very important that the class name follows the directory layout as explained; otherwise, we can get an error in the code saying Ext JS did not find the class. The following screenshot shows the dependency between the project directory layout and the class name:

Then, we say that the login class will extend from the Window class (#2). Recapitulating what we have covered in Chapter 1, Sencha Ext JS Overview, we can use inheritance in Ext JS. The login class will inherit the behavior from the Window class (it is a subclass of the Component class). The window component represents a pop up that is rendered centralized in the browser.
Tip
For more information about the window component, please access http://docs.sencha.com/extjs/5.0.0/apidocs/#!/api/Ext.window.Window. And for more details on inheritance, please read http://goo.gl/v4bmq8.
We also assign this class: xtype (#3). The xtype class is a shorter name that can be used to instantiate the class instead of using its full name. We can also use the configuration alias instead of xtype.
The alias for a class that extends from a component always starts with widget, followed by the alias or xtype class we want to assign. If we want to use the alias configuration instead of xtype, we could use alias: 'widget.login-dialog' instead of xtype: 'login-dialog'. The result will be the same; it is just a matter of personal preference.
The naming convention for xtype and alias is lowercase. It is also important to remember that the alias must be unique in an application. In this case, we want to assign the xtype class login to this class so that later we can instantiate this same class using its alias (which is the same as xtype). For example, we can instantiate the Login class in five different ways:
- Option 1: Using the complete name of the class, which is the most used method:
Ext.create('Packt.view.login.Login'), - Option 2: Using
aliasin theExt.createmethod:Ext.create('widget.login-dialog'), - Option 3: Using
Ext.widget, which is shorthand forExt.ClassManager.instantiateByAlias:Ext.widget('login-dialog'), - Option 4: Using
xtypeas an item of another component:items: [ { xtype: 'login-dialog' } ] - Option 5: Using the
newkeyword:new Packt.view.login.Login();
In this book, we will use the options 1, 3, and 4 the most. Options 1, 2, 3, and 5 return a reference to the instantiated component.
Option number 5 is not a good practice. Although options 4 and 5 were the only way to instantiate classes until Ext JS 3, the other options were introduced in Ext JS 4, and option 5 became deprecated.
Then we have the autoShow configured to true (#4). Consider the following line of code:
Ext.create('Packt.view.login.Login'),When we execute the preceding code, an instance of the Login class will be created (and if we need to, we can store this reference in a variable to manipulate it later). As the Login class is a subclass of the Window class, it inherits all its behavior, and one if its behaviors is that the window is not displayed automatically when instantiated. If we want to display the Window class (or any of its subclasses in the application), we need to call the show() method manually, as follows:
Ext.create('Packt.view.login.Login').show();An alternative to the preceding code is to have the autoShow configuration set to true. This way the Window class (or the login class in our case) will be automatically displayed when we instantiate it.
We also have the height (#5) and width (#6) of the window.
We set layout as fit (#7). Recapitulating, the fit layout is used when the parent container (in this case, Login) has only one child, and this child will occupy all the available space of the parent container. As our Login window will have two fields inside it (username and password), these two fields need to be placed inside the form subclass . In this case, the form subclass will be the child of the Login class.
We are setting iconCls (#8) to the Login window; this way, we will have an icon of a key in the header of the window (we will set up the icons later in this chapter). We can also give a title to the window (#9), and in this case, we chose Login.
There are also the closeAction (#10) and closable (#11) configurations. The closeAction will tell if we want to destroy the window when we close it. In this case, we do not want to destroy it; we only want to hide it. And the closable configuration tells us whether we want to display the X icon on the top-right corner of the window. As this is a Login window, we do not want to give this option for the user (the user can only try to submit the username and password to log in to the application).
Note
What is the difference between the methods close, hide, and destroy? The close method closes the panel, and by default, this method removes it from the DOM and destroys the panel object and all its descendant components. The hide method hides the component, setting it to invisible (it can be made visible again by calling the show method). And the destroy method cleans up the object and its resources, but removes it from the DOM and frees the object so that it can be cleaned by the garbage collector.
We also have the draggable (#12) and resizable (#13) configurations. The draggable configuration controls whether the component can be draggable throughout the browser space. When the resizable configuration is set to true (its default value), the user can scroll over the corner of the component and resize it.
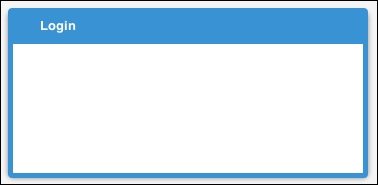
So far, this is the output we have—a single window with a blank icon in the top-left corner with the title Login (we will set up all the icons later in this chapter):
The next step is to add the form with the username and password fields. We are going to add the following code to the Login class (after line #13):
items: [
{
    xtype: 'form',          //#14
    bodyPadding: 15,        //#15
    defaults: {             //#16
        xtype: 'textfield', //#17
        anchor: '100%',     //#18
        labelWidth: 60      //#19
    },
    items: [
        {
            name: 'user',
            fieldLabel: 'User'
        },
        {
            inputType: 'password', //#20
            name: 'password',
            fieldLabel: 'Password'
        }
    ]
]
As we are using the fit layout, we can only declare one child item inside the Login class. So we are going to add a form (#14) inside the Login class. Note that here we are using option 4 presented earlier. When declaring items in Ext JS, this is usually the way we instantiate the components (using option 4). We added a body padding to the form body (#15), which is going to add a space between the form and the window border, making it look prettier.
As we are going to add two fields to the form, we probably want to avoid repeating some code. That is why we are going to declare some field configurations inside the defaults configuration of the form (#16); this way, the configuration we declare inside defaults will be applied to all items of the form, and we will need to declare only the configurations we want to customize. As we are going to declare two fields, both of them will be of the type textfield (#17).
The default layout used by the form component is the anchor layout, so we do not need to make this declaration explicit. However, we want both fields to occupy all the horizontal available space of the body of the form. That is why we are declaring the anchor as 100% (#18).
While the fit layout allows you to render only one child component that will occupy all the available space within the parent container, the Anchor layout enables you to anchor child containers relative to the parent container dimensions. In this case, we want the text fields to occupy 100 percent of the horizontal space available in the form. If we wanted the text fields to occupy only 70 percent of the available horizontal space, we could set the anchor config to 70%.
By default, the width attribute of the label of the textfield class is 100 pixels. This is too much space for a label User and Password, so we are going to decrease this value to 60 pixels (#19).
And finally, we have the user textfield and the password textfield. The configuration name is what we are going to use to identify each field when we submit the form to the server.
There is only one detail missing: when the user types the password into the field, the system cannot display its value—we need to mask it somehow. That is why inputType is 'password' (#20) for the password field because we want to display bullets instead of the original value—and the user will not be able to see the password value.
Note
Other input types can be used with the textfield as well. Input types of HTML5, such as email, url, and tel can be used as well. However, if the application is being executed from an older browser (or a browser that does not support the input type), Ext JS automatically changes it to its default value, which is text. For more information about HTML5 input types and browsers that support each type, please visit http://www.w3schools.com/html/html5_form_input_types.asp.
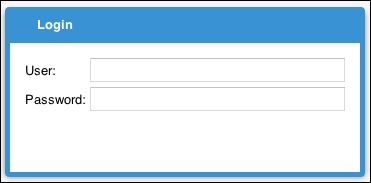
Now we have improved our Login window a little more. This is the output so far:
The field component in Ext JS provides some client-side validation capability. This can save time and also bandwidth (the system will only make a server request when it is sure the information has the basic validation and we also do not need to wait for the server to validate the input). It also helps to point out to the user where they have gone wrong in filling out the form. Of course it is also good to validate the information again on the server side for security reasons, but for now we will focus on the validations we can apply to the form of our Login window.
Let's brainstorm some validations we can apply to the username and password fields:
- The
usernameandpasswordmust be mandatory—how are you going to authenticate the user without a username and password? - The user can only enter alphanumeric characters (A-Z, a-z, and 0-9) in both fields
- The user can only type between 3 and 25 chars on the
usernamefield - The user can only type between 3 and 15 chars on the
passwordfield
So let's add into the code the ones that are common to both fields:
allowBlank: false, // #21
vtype: 'alphanum', // #22
minLength: 3,      // #23
msgTarget: 'under' // #24
We are going to add the preceding configurations inside the defaults configuration of the form as they all apply to both fields we have. First, both need to be mandatory (#21), second, we can only allow the user to enter alphanumeric characters (#22), and the minimum number of characters the user needs to input is three (#23). Then, a last common configuration is that we want to display any validation error message under the field (#24).
And the only validation customized for each field is that we can enter a maximum of 25 characters in the User field:
name: 'user',
fieldLabel: 'User',
maxLength: 25
And a maximum of 15 characters in the Password field:
inputType: 'password',
name: 'password',
fieldLabel: 'Password',
maxLength: 15
After we apply the client validations, we will have the following output just in case the user went wrong in filling out the Login window:

If you do not like the error message being displayed under the field, we can change the place where the error message appears. We just need to change the msgTarget value. The available options are: title, under, side, and none. We can also show the error message as a tooltip (qtip) or display them in a specific target (innerHTML of a specific component).
For the side option, for example, the red exclamation mark will be displayed on the side of the field, and when the user does a mouseover on it, the tooltip with the error message is displayed. Once the input is valid (the user enters more characters in the User field or deletes some characters from the Password field, the error message disappears automatically).
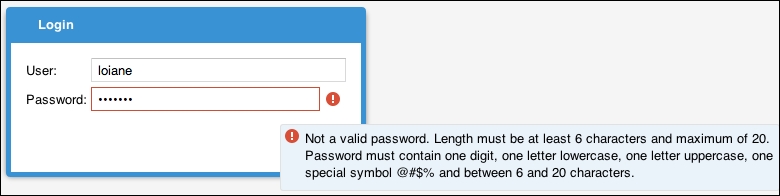
Many systems have a special format for passwords. Let's say we need the password to have at least one digit (0-9), one letter lowercase, one letter uppercase, one special character (@,#,$,%, and so on) and its length between 6 and 20 characters.
We can create a regular expression to validate that the password is being entered into the app. And to do this, we can create a custom VType to do the validation for us. To create a custom VType is simple. For our case, we can create a custom VType called customPass, as follows:
Ext.apply(Ext.form.field.VTypes, {
    customPass: function(val, field) {
        return /^((?=.*d)(?=.*[a-z])(?=.*[A-Z])(?=.*[@#$%]).{6,20})/.test(val);
    },
    customPassText: 'Not a valid password.  Length must be at least 6 characters and maximum of 20. Password must contain one digit, one letter lowercase, one letter uppercase, one special symbol @#$% and between 6 and 20 characters.'
});
The name of our custom VType is customPass, and we need to declare a function that will validate our regular expression. And customPassText is the message that will be displayed to the user just in case the incorrect password format is entered.
Note
To learn more about regular expressions, please visit http://www.regular-expressions.info/.
The preceding code can be added anywhere in the code, inside the init function of a Controller, inside the launch function of app.js, or even in a separate JavaScript file (recommended) where you can put all your custom Vtypes.
Note
The VType is a singleton class that contains a set of commonly used field validation functions and provides a mechanism to create reusable custom field validations. For more information about this class and the default validations supported by Ext JS, please visit http://docs.sencha.com/extjs/5.1/5.1.0-apidocs/#!/api/Ext.form.field.VTypes.
Create a new file named CustomVTypes.js under the app directory. Add the preceding code to this file. Now, we need this file to be loaded with our application as well. But hold your instincts to manually include this JavaScript file in the index.html file. We are going to follow best practices!
Locate the following code around line 110 of the app.json file inside the masteringextjs folder:
"js": [
    {
        "path": "app.js",
        "bundle": true
    }
],
To make our CustomVTypes.js file automatically load with our application, we simply need to add the following highlighted code:
"js": [
    {
        "path": "app.js",
        "bundle": true
    },
    {
        "path": "app/CustomVTypes.js",
        "includeInBundle": true
    }
],
The includeInBundle configuration tells Sencha Cmd that this file needs to be added to the final .js file that is generated.
Only one file can have the bundle: true configuration. This means that it is the main file of the application.
Now, let's apply the custom VType to our code. Add the following code to the password field:
vtype: 'customPass',
msgTarget: 'side'
Also, change the message target for the password field. As the error message is quite long, it will not look nice with the message target under. This will be the result after we apply the custom vType:
Until now, we created the Login window, which contains a form with two fields and it is already being validated as well. The only thing missing is to add the two buttons, Cancel and Submit.
We are going to add the buttons as items of a toolbar, and the toolbar will be added on the form as a docked item. The dockedItems can be docked to either the top, right, left, or bottom of a panel (both form and window components are subclasses of a panel). In this case, we will dock the toolbar at the bottom of the form. Add the following code right after the items configuration of the form:
dockedItems: [
    {
        xtype: 'toolbar',
        dock: 'bottom',
        items: [
                xtype: 'tbfill' //#25
            },
            {
                xtype: 'button', //#26
                iconCls: 'fa fa-times fa-lg',
                text: 'Cancel'
            },
            {
                xtype: 'button', //#27
                formBind: true,  //#28
                iconCls: 'fa fa-sign-in fa-lg',
                text: 'Submit'
            }
        ]
    }
]
If we take a look back to the screenshot of the Login screen that we first presented at the beginning of this chapter, we will notice that there is a component for the translation/multilingual capability. And after this component, there is a space and then we have the Cancel and Submit buttons. As we do not have the multilingual component yet, we can only implement the two buttons, but they need to be at the right end of the form, and we need to leave that space. That is why we first need to add a tbfill component (#25), which is going to instruct the toolbar's layout to begin using the right-justified button container.
Then we will add the Cancel button (#26) and then the Submit button (#27). We are going to add an icon to both buttons (iconCls) that we will add to our CSS file later in this chapter.
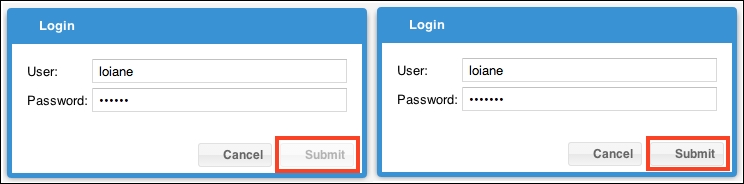
We already have the client validations, but even with the validations, the user can click on the Submit button, and we want to avoid this behavior. That is why we are binding the Submit button to the form (#28); this way, the button will only be enabled if the form has no error from the client validation.
In the following screenshot, we can see the current output of the Login form (after we added the toolbar) and also verify the behavior of the Submit button:
Tip
When we want to add a toolbar with buttons in a form, we can add it using the configuration buttons as well. For more information, please access http://goo.gl/X38h8Q.
To execute the code we have created so far, we need to make a few changes in the Application.js file.
First, we need to declare the views we are using (only one in this case), as follows:
views: [
    'login.Login'
],
And the last change is inside the launch function. In the preceding chapter, we left a console.log message where we needed to instantiate our initial view; now we only need to replace the console.log message with the Login instance (#1):
me.splashscreen.next().fadeOut({
    duration: 1000,
    remove:true,
    listeners: {
       afteranimate: function(el, startTime, eOpts ){
            Ext.widget('login-dialog'), //#1
        }
    }
});
Now that Application.js is OK, and we can execute what we have implemented so far!
Dynamic class loading was introduced in Ext JS 4. It provides an integrated dependency management capability, and it is very useful, especially when working on the development (local) environment (it also plays an important role in the final production build). This capability is also one of the reasons why option 5 for instantiating classes in Ext JS (using the keyword new) became deprecated and not a best practice.
What does dynamic loading mean? It means that we do not need to load all Ext JS SDK classes prior to load our application. For example, for the Login window, we are using the Window, Form, and TextField classes from the Ext JS SDK. To execute our application, we do not need the source code of the grid, tree, and charts. Do you agree?
Still on the Login window example, when our application is loaded, Ext JS will read that the 'login.Login' view needs to be loaded. As all the application source code is inside the app folder, and the views are inside the app/view folder, the Ext JS loader will expect to find the app/view/login/Login.js file, and inside this file it expects to find the 'Packt.view.login.Login' class definition (this is why it is very important to follow the naming conventions we introduced earlier). The Ext JS loader will then see that this class inherits from the Ext.window.Window class, and if this class was not loaded yet, it is going to figure out all its dependencies (from the extend and requires declarations—we will discuss requires in a bit) and load them until we have all the source code required to execute the application loaded (and it will do this recursively until all code is loaded).
For example, when you try to execute the application, open the Chrome Developer Tools (Ctrl + Shift + I or Command + Shift + I) or Firebug for Firefox (enable all panels) and open the Network tab. We will be able to see all files that were loaded for our application, as follows:
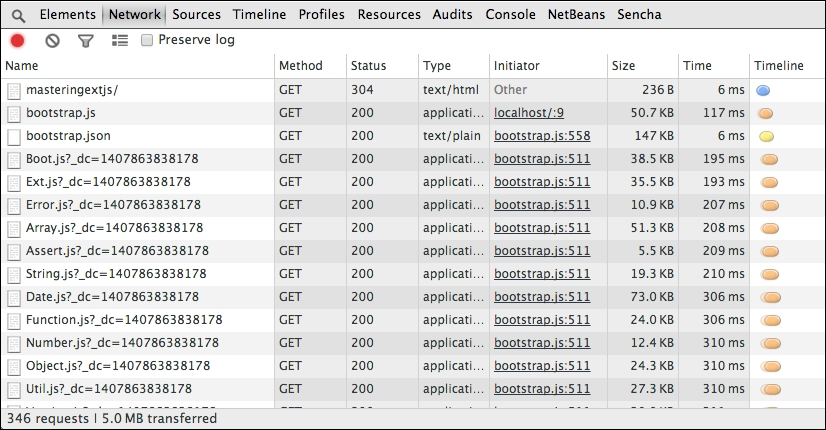
We know that 5MB is scary for only a Login screen, but we will solve this issue when we do the production build later on this book. We do not need to worry about it for now.
What will happen later when we do the production build is that Ext JS will know which classes from the SDK need to be included in the final JavaScript file, will concatenate everything into a single file, and will also obfuscate it. If you try to open any of the files listed in the preceding screenshot, you will be able to read the source code (and it will be pretty and indented as the development source code should be).
Using icons on the application improves its look and feel, it makes the application look prettier, and users usually enjoy it. However, unless we get (or buy) icons with different sizes, the icons are 16 x 16 pixels big. With the introduction of CSS3, one of the new features is called CSS3 Web Fonts (http://www.w3schools.com/css/css3_fonts.asp), which allow us to use fonts that are not installed on the user's computer.
This feature allowed developers to create a new type of icons, called Glyph icons, which are not actually icons, but fonts where each character looks like an icon (similar to the Webding font, http://en.wikipedia.org/wiki/Webdings).
Using Glyph icons is great because we can change the size and color of the icon to match the application's theme. Whenever possible, we will use Glyph icons in our application. There is an open source and free font that is used widely by modern applications (HTML5 applications) called Font Awesome, and we are going to use this in our project as well.
So the first step is downloading the Font Awesome files from http://fortawesome.github.io/Font-Awesome/. Click on the Download button. The file that is going to be downloaded is a .zip file. Unzip it. Copy the fonts folder and paste it inside the resources folder of the masteringextjs application. Copy the scss folder and paste it inside the sass/etc folder. Rename the scss folder to fontAwesome. This is how the sass/etc and resource folders will look after the changes:

We are almost there! Open the sass/etc/fontAwesome/_variables.scss file, and change the variable $fa-font-path to the following value:
$fa-font-path: "../resources/fonts" !default;
This is to tell Sass where we placed the font files.
Now all we have to do is open the sass/etc/all.scss file and add the following code in the first line of the file:
@import "fontAwesome/font-awesome";
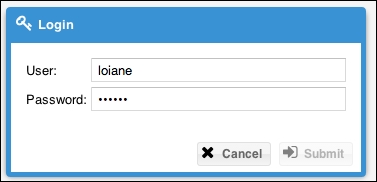
If you are running sencha app watch in the terminal application, you should note that the application was rebuilt and we are ready to see the icons in our application. The following is how the Login screen will look:
The next step is to add some action to the Cancel and Submit buttons.
Note
To learn more about Sass variables and import capabilities, please visit http://sass-lang.com/guide.
We have created the view for the Login screen so far. As we are following the MVC architecture, we are not implementing the user interaction on the View class. If we click on the buttons on the Login class, nothing will happen, because we have not implemented this logic yet. We are going to implement this logic now on the Controller class.
In Ext JS 5, we have two options to do this: use the default MVC architecture or use the MVVM architecture pattern (or a hybrid pattern).
In the preceding chapter, we covered an introduction of the MVC architecture in Ext JS. Let's refresh our memory quickly of how MVC works:

The Model represents the information that is being used by the application. The View is what the user will see on the screen—the components. In each interaction of the user with the application, the components will fire events. The Controller is where we are going to handle the events and execute any logic that is needed; the Controller is going to manage the information (Model) and also manage the View (and the interaction between the View and Model).
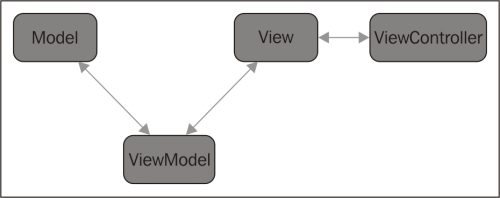
In Ext JS 5, Sencha introduced this new pattern called Model View ViewModel (MVVM), which is shown in the following diagram:

What happens in the MVVM is that using this pattern, it is much easier to control the View and the Model if they are bound. For example, consider that we have a data grid where we list some contacts. When we select a contact and click on the Edit button, we want the application to open a pop up about the title that will be the name of the contact and the pop up will also have a form that will display the contact details for editing. If we use the default MVC pattern, we will need to control the way the View (data grid, pop up, and form) interacts with the Model (contact information). The MVVM (which is based on the MVC) introduces a new abstraction entity that is the ViewModel. The ViewModel mediates changes between the View and the associated Model.
However, with this new pattern and new ViewModel abstraction, Sencha also introduced an abstraction for the controller, which is bound to the View, called the ViewController. The ViewController is very similar to the traditional controller of the MVC pattern, which is as follows:
However, as we learned in Chapter 2, Getting Started, the controllers of the MVC pattern are created in the scope of the application, and they are unique instances (meaning a single instance of each controller of the application). As long as the application is running, the controllers are also alive.
The ViewModel and ViewController are part of the component (we learned about component in Chapter 1, Sencha Ext JS Overview). As long as the View is alive, they are also alive. When the View is destroyed, they also get destroyed. This means that we can save some memory (if we do not have many instances of the same View at once).
Do not worry if you do not understand all these concepts 100 percent right now. We will learn how to use them and how they work with some examples, and throughout this book we will use these different options of architecture so that we can learn how each one works, and maybe you can choose the one you like the most or the one that is going to fit your project best.
Let's stop to think a little bit. Logging in is performed once during the application's lifetime. There are three things we can do in the application: log in to start using it, use its capabilities, or log out (because we clicked on the logout button or the session expired). Once we have logged in, we are in, and that is it.
In the previous topic we learned that the ViewModel and the ViewController are destroyed once the View is destroyed. So, instead of having a controller for the login alive during the application's lifetime, we can have a controller that will be alive only during the time that the login View is alive. For this reason, for the Login screen, we will use the ViewController.
The first step is creating the JavaScript file. Inside app/view/login, we will create the LoginController.js file. Inside this file, we will implement the following code, which is only a base of the ViewController class we are going to implement:
Ext.define('Packt.view.login.LoginController', { // #1
    extend: 'Ext.app.ViewController',            // #2
    alias: 'controller.login',                   // #3

    onTextFieldSpecialKey: function(field, e, options){ }, // #4

    onTextFieldKeyPress: function(field, e, options){ }, // #5

    onButtonClickCancel: function(button, e, options){ }, // #6

    onButtonClickSubmit: function(button, e, options){ }, // #7

    doLogin: function() { }, // #8

    onLoginFailure: function(form, action) { }, // #9

    onLoginSuccess: function(form, action) { } // #10
});
As usual, on the first line of the class, we have its name (#1). Following the same formula we used for the view/login/Login.js, we will have Packt (app namespace) + view (name of the package) + login (name of the sub package) + LoginController (name of the file), resulting in Packt.view.login.LoginController.
The ViewController classes need to extend from Ext.app.ViewController (#2) so that we will always use this parent class for our ViewController.
We also need to give an alias to this ViewController (#3). Aliases for ViewControllers start with 'controller', followed by the alias we want to assign (remember that the alias is always in lowercase).
For #4–#10, we have the signature of some methods we will implement until the end of this chapter. We will go through each of them later.
Now that we have the base of our ViewController ready, we need to bind the ViewController to its View, which is the Login View. Going back to the Packt.view.login.Login class, we are going to add the following configuration to the class:
controller: 'login',
The preceding configuration will bind the ViewController class to the Login class life cycle. Note that we are using the alias we defined in #3.
If you try to execute the code, it will throw an error. This is because Ext JS does not know which ViewController class has the login alias (since this alias is not a native of the framework; we are creating it). To make it work, we need to add the following code to the login class as well:
requires: [
    'Packt.view.login.LoginController'
],
This will tell the Ext JS loader that it also needs to be loaded when loading the Login class. Ext JS will load this class and all its dependencies. By the time Ext JS parses the controller: 'login' code, it will have registered the login alias for a controller and it is going to be OK.
Our next step now is to start listening to the Login window events. First, we are going to listen to the Submit and Cancel buttons.
As we are using a ViewController class and not a Controller (MVC), we need to add listeners inside the Login class. First, let's do it for the Cancel button, as follows:
xtype: 'button',
iconCls: 'fa fa-times fa-lg',
text: 'Cancel',
listeners: {    click: 'onButtonClickCancel'}
This code means that when a user clicks on the Cancel button, the onButtonClickCancel method from the Login ViewController class will be executed. So let's implement this method! Back to the LoginController class, we already know that this is the method we are going to implement:
onButtonClickCancel: function(button, e, options){}But how do we know which are the parameters the method can receive? We can find the answer to this question in the documentation. If we take a look at the click event in the documentation (Button class), this is what we will find:
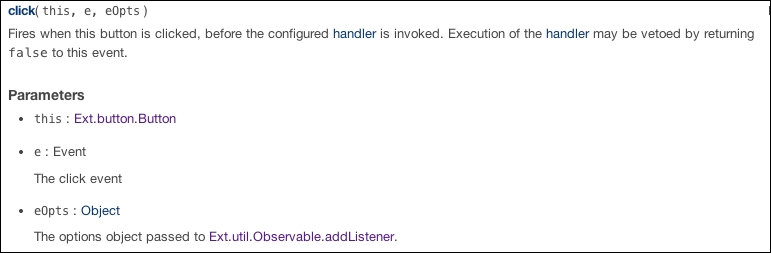
This is exactly what we declared. For all the other event listeners, we will go to the docs and see which are the parameters the event accepts, and then list them as parameters in our code. This is also a very good practice. We should always list out all the arguments from the docs even if we are only interested in the first one (or even none). This way, we always know that we have the full collection of the parameters, and this can come in very handy when we are doing maintenance on the application.
Note that we also want to listen to the Submit button click. The onButtonClickSubmit method has the same signature as the onButtonClickCancel method. Let's go ahead and also add the listener to the Submit button, as follows:
xtype: 'button',
formBind: true,
iconCls: 'fa fa-sign-in fa-lg',
text: 'Submit',
listeners: {    click: 'onButtonClickSubmit'}
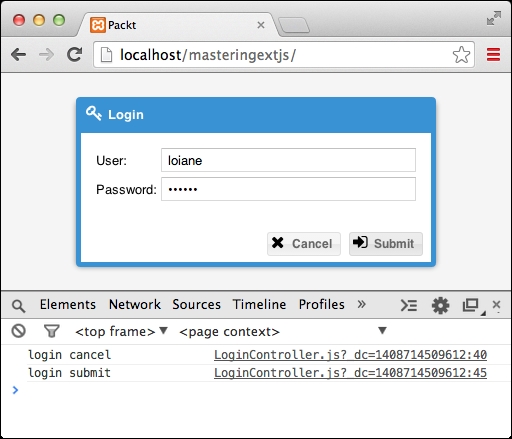
Let's do a quick test to see if everything is working as expected so far:
onButtonClickCancel: function(button, e, options){
    console.log('login cancel'), // #1
},

onButtonClickSubmit: function(button, e, options){
    console.log('login submit'),  // #2
},
For now, we are only going to output a message on the console to make sure our code is working. So, we are going to output 'login submit' (#2) if the user clicks on the Submit button, and 'login cancel' (#1) if the user clicks on the Cancel button.
Let's go ahead and try it. Click on the Cancel button and then on the Submit button. This should be the output:
Let's remove the console.log messages and add the code we actually want the methods to execute. First, let's work on the onButtonClickCancel method. When we execute this method, we want it to reset the Login form.
So this is the logic sequence we want to program:
- Get the form reference
- Call the
resetmethod to reset the form
If we take a look at the parameters we have available on the onButtonClickCancel method, we have button, e, and options, and none of them provides us with the form reference. So what can we do about it?
The ViewController class has an interesting way of getting a reference of the Login class or any of its children, which uses the method lookupReference(reference) from the ViewController class. To be able to use this method, all we have to do is add a reference for the form in the Login View class:
xtype: 'form',
reference: 'form',
With this reference, we will be able to call the this.lookupReference('form') method directly to retrieve the form reference. With the form reference, all we have to do is call the method reset() from the form class. The complete code for the onButtonClickCancel method would be:
onButtonClickCancel: function(button, e, options){
    this.lookupReference('form').reset();
},Now we need to implement the onButtonClickSubmit method. Inside this method, we want to program the logic to send the User and Password values to the server so that the user can be authenticated.
We can implement two programming logics inside this method: the first one is to use the submit method that is provided by the Form Basic class, and the second one is to use an Ajax call to submit the values to the server. Either way, we will achieve what we want to do. For this example, we will use the default form submit call.
These are the steps we need to perform in this method:
- Get the Login form reference
- Get the Login window reference (so we can close it once the user has been authenticated)
- Send Login information to the server
- Handle the server response, as follows:
- If the user is authenticated, display application
- If not, display error message
We already know how to get the form reference. This is how onButtonClickSubmit will look:
onButtonClickSubmit: function(button, e, options){
    var me = this;
    if (me.lookupReference('form').isValid()){ // #1
        me.doLogin();              // #2
    }
},
So first, before doing anything, we will make sure the user has entered all the required information (user name and valid password (#1)). If everything is OK, then we call a helper method that will handle the authentication (#2), as follows:
doLogin: function() {
    var me = this,
        form = me.lookupReference('form'),

    form.submit({
        clientValidation: true,        // #3
        url: 'php/security/login.php', // #4
        scope: me,         // #5
        success: 'onLoginSuccess',     // #6
        failure: 'onLoginFailure'      // #7
    });
},
First, just to make sure the data we are trying to submit is valid (we will call this doLogin method from another method as well, so to be sure we are sending valid data to server is never too much!), we set the clientValidation configuration as true to validate the information one more time (#3). Then we have the url that is going to be called (#4). The success (#6) and failure (#7) callbacks were declared as separate functions, which belong to the ViewController class, and that is why the scope is the ViewController class (#5).
Tip
We could implement the success and failure methods inside the submit call as well (as showed by the example in the documentation http://docs.sencha.com/extjs/5.0.0/apidocs/#!/api/Ext.form.Basic-method-submit). But we do not know how much code we will need to handle the authentication. Working with scoped callbacks is better because our code stays organized, with better readability.
If we try to run this code, the application will send the request to the server, but we will get an error as response because we do not have the login.php page implemented yet. That's OK because we are interested in other details right now.
With Firebug or Chrome Developer Tools enabled, open the Network tab and filter by the XHR requests. Make sure to enter a username and password (any valid value so we can click on the Submit button). This will be the output:
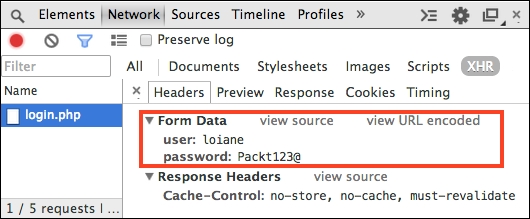
Note that the user and password are being sent as form data. This information is useful to handle the information on the server side (which in our case is the PHP code).
Before we start coding the login.php page, we need to add two tables to the Sakila database. These two tables are going to represent the users and also the group that the user can belong to. In our project, a user can belong to only one group, as shown in the following figure:

- First, we are going to create the
Grouptable, as follows:CREATE TABLE IF NOT EXISTS `sakila`.`Groups` ( `id` INT NOT NULL AUTO_INCREMENT , `name` VARCHAR(45) NOT NULL , PRIMARY KEY (`id`) ) ENGINE = InnoDB;
- Then, we are going to create the
Usertable containing the indexes and also theforeign keyto theGrouptable:CREATE TABLE IF NOT EXISTS `sakila`.`User` ( `id` INT NOT NULL AUTO_INCREMENT , `name` VARCHAR(100) NOT NULL , `userName` VARCHAR(20) NOT NULL , `password` VARCHAR(100) NOT NULL , `email` VARCHAR(100) NOT NULL , `picture` VARCHAR(100) NULL , `Group_id` INT NOT NULL , PRIMARY KEY (`id`, `Group_id`) , UNIQUE INDEX `userName_UNIQUE` (`userName` ASC) , INDEX `fk_User_Group1_idx` (`Group_id` ASC) , CONSTRAINT `fk_User_Group1` FOREIGN KEY (`Group_id` ) REFERENCES `sakila`.`Groups` (`id` ) ON DELETE NO ACTION ON UPDATE NO ACTION) ENGINE = InnoDB; - The next step is to insert some data into these tables:
INSERT INTO `sakila`.`Groups` (`name`) VALUES ('admin'),
INSERT INTO `sakila`.`User` (`name`, `userName`, `password`, `email`, `Group_id`)
VALUES ('Loiane Groner', 'loiane', '$2a$10$2a4e8803c91cc5edca222evoNPfhdRyGEG9RZcg7.qGqTjuCgXKda', '[email protected]', '1'),
As the password will be saved hashed on the database, the value $2a$10$2a4e8803c91cc5edca222evoNPfhdRyGEG9RZcg7.qGqTjuCgXKda corresponds to the value Packt123@. We will be hashing our password for more security in the user administration module.
Now we are ready to start developing the login.php page.
Since we have part of the Ext JS code to send the login information to the server, we can implement the server-side code. As mentioned in the first chapter of this book, we are going to use PHP to implement the server-side code. But if you do not know PHP, do not worry because the code is not going to be complicated, and we are going to use pure PHP as well. The goal is to focus on the programming logic we need to use on the server side; this way we apply the same programming logic to any other server-side language that you like to use (Java, .NET, Ruby, Python, and so on).
The first step is to create the file that is going to be responsible for connecting to the database. We are going to reuse this file in almost every PHP page that we are going to develop.
Create a new folder named php under the project's root folder, and under php, create a new folder named db. Then, create a new file named db.php:
<?php
$server = "127.0.0.1";
$user = "root";
$pass = "root";
$dbName = "sakila";

$mysqli = new mysqli($server, $user, $pass, $dbName);

/* check connection */
if ($mysqli->connect_errno) {
    printf("Connect failed: %s
", mysqli_connect_error());
    exit();
}
?>
The connection is pretty straightforward. We simply need to inform the server (which is going to be localhost), the databases username and password, and also the database name that we want to connect to. And at last, we can check whether the connection was done successfully or any error occurred.
Note
For more information about MySQLi, please visit http://php.net/manual/en/book.mysqli.php.
Finally, we can create the login.php file under the php/security folder. So let's start implementing it, as follows:
require("../db/db.php"); // #1
require("PassHash.php"); // #2

session_start();         // #3

$userName = $_POST['user']; // #4
$pass = $_POST['password']; // #5

$userName = stripslashes($userName); // #6
$pass = stripslashes($pass);         // #7

$userName = $mysqli->real_escape_string($userName); // #8
$sql = "SELECT * FROM USER WHERE userName='$userName'"; // #9
First, we need to require the db.php file to connect to the database (#1). We are also going to require the PassHash.php file (#2). This file contains the check_password method, which will compare the password entered by the user with the one that is stored in the database (hashed).
Then, we start a session (#3)—we are going to store the username on the session later.
The next step is to retrieve the user and password values sent by the form submit method from Ext JS (#4 and #5).
The stripslashes function removes the backslashes from the given string (#6 and #7). For example, if the user value is "Loiane's", the return of stripslashes will be "Loiane's".
Tip
These two steps help a little bit to ensure the security of the application; however, they are not enough. It is very important to sanitize the user input in the server so that we do not store or try to execute SQL statements with malicious input. For the purpose of this book, we will not apply this technique to keep the server-side code simple, so even though you do not know PHP, you will be able to read and understand the logic behind it and implement something similar in the server-side language of your choice. However, be aware that in real-world applications, it is very important to apply this step, especially if you are releasing your application to the general public (not for internal use only).
There is a project called Open Web Application Security Project (OWASP), which is free and open source that provides a set of libraries and APIs to apply security techniques in your application. There are subprojects available for .NET, Java, and PHP, tutorials on how to avoid XSS attacks and SQL injections, and how to prevent other security vulnerabilities. For more information, please visit https://www.owasp.org.
Then, we prepare the $username variables for the SQL statement using the function real_escape_string (#8), which escapes special characters in a string for use in a SQL statement.
Next, we prepare the SQL query that is going to be executed (#9). It is a simple SELECT statement that is going to return a result matching the given username.
Let's continue with the next part of the code:
if ($resultDb = $mysqli->query($sql)) { //#10

  $count = $resultDb->num_rows; //#11

  if($count==1){ //#12

        $record = $resultDb->fetch_assoc(); //#13

         //#14
        if (PassHash::check_password($record['password'],$pass)){
            $_SESSION['authenticated'] = "yes"; //#15
            $_SESSION['username'] = $userName; //#16

            $result['success'] = true; //#17
            $result['msg'] = 'User authenticated!'; //#18
        } else{
            $result['success'] = false; //#19
            $result['msg'] = 'Incorrect password.'; //#20
        }
  } else {
    $result['success'] = false; //#21
    $result['msg'] = 'Incorrect user or password.'; //#22
  }
  $resultDb->close(); //#23
}
Next, we need to execute the SQL query, and we are going to store the result set in the resultDb variable (#10). Then, we are going to store data according to whether the result set returned any rows within the result set (#11).
Now comes the most important part of the code. We are going to verify whether the result set returned any rows. As we passed the username, the number of rows returned within the result set must be exactly 1. So, if the number of rows is equal to 1 (#12), we need to see whether the hashed password stored in the database matches the password entered by the user, but first, we need to retrieve this information from the record that was fetched from the database (#13).
The PassHash class is responsible for hashing the password, making it a little bit more secure to save the hashed password in the database (instead of the plain password), for decrypting the hashed password from the database ($record['password']), and for comparing to the password the user entered in the login page (#14).
Note
For now, you can get the complete code for PassHash.php from the source code downloaded from this book. In Chapter 6, User Management, we will go through it line by line.
If the password entered by the user and the decrypted hash password from the database match, it means the user can be authenticated. We are going to store the username of the authenticated user (#16) in the Session and also the information that the user is authenticated (#15).
We also need to prepare the result that we are going to return to Ext JS. We are going to send back two pieces of information: the first one is about whether the user is authenticated (#17)—in this case "true"—and we can also send back a message (#18).
If the password entered by the user and the one from the database do not match, then we also need to return something to Ext JS. The success is going to be false (#19), and we are going to return a message so that we can display to the user (#20).
If the username does not exist in the database (number of rows returned within the result set is different from 1), we are also going to send back a message to Ext JS saying the username or password informed by the user is incorrect (#22). Therefore, the success information will be false (#21).
Then, we need to close the result set (#23).
Now, the third and last part of the code of login.php:
$mysqli->close(); // #23

echo json_encode($result); // #24
We need to close the database connection (#23), and we are going to encode the result that we are going to send back to Ext JS in the JSON format (#24).
And now, the login.php code is complete. We cannot forget to add <?php before the preceding code.
We already took care of the server-side code. Now, we need to go back to the Ext JS code and handle the response from the server.
Success and failure in Ext JS has two different concepts. The form handles it in a way and the Ajax request handles it in a different one. This can be a little bit confusing, so we are going to implement requests to the server using the form submit (as this example) and also the Ajax request so that we can learn how to implement the proper code using both ways.
For the form, the server needs to return the success: true information so that the callback to be executed is a successful one. For failure, the server needs to return success: false, which can be returned if any communication error might have occurred (page nor found, exception on server, and so on). For the Ajax request, it does not matter whether success is true or false; it is going to execute the success callback; only if any communication error occurs is it going to execute the failure callback.
Let's handle the success callback first. In the event of success, the onLoginSuccess method is going to be executed. In this case, we want to close the Login window and display the main screen of the application, as follows:
onLoginSuccess: function(form, action) {
    this.getView().close();             //#1
    Ext.create('Packt.view.main.Main'), //#2
}
The Window class has a method called close that we can call to close the window. The question is how to get the reference of the login window class. The ViewController class is directly bound to it, and we can reference the Login class itself by calling the method getView of the ViewController class (#1). Then, we can create the main screen by instantiating the Main class (#2) that was created by Sencha Cmd when we created the application. We are going to reuse this class to create our main screen.
Tip
With the preceding approach, there is a flaw with the security of the code. A smart user who understands how Ext JS works can access the main page using a code similar to the preceding one even if the user is not authenticated. A more secure way would be to redirect to a page that holds the application (calling the Main class directly). As we are working with an example here, that is OK. However, keep that in mind when developing a real application!
In the event of failure, there are two cases that we need to handle: the first one is if the user was not authenticated because the user does not exist or because the password is incorrect. The second one is if there is any communication failure (for example, error 404). Our onLoginFailure method will look like the following code:
onLoginFailure: function(form, action) {

  var result = Ext.JSON.decode(action.response.responseText, true); //#3

  if (!result){ //#4
      result = {};
      result.success = false;
      result.msg = action.response.responseText;
  }

  switch (action.failureType) {
      case Ext.form.action.Action.CLIENT_INVALID:  //#5
          Ext.Msg.show({
            title:'Error!',
            msg: 'Form fields may not be submitted with invalid values',
            icon: Ext.Msg.ERROR,
            buttons: Ext.Msg.OK
        });
      break;
      case Ext.form.action.Action.CONNECT_FAILURE:  //#6
        Ext.Msg.show({
            title:'Error!',
            msg: 'Form fields may not be submitted with invalid values',
            icon: Ext.Msg.ERROR,
            buttons: Ext.Msg.OK
        });
         break;
      case Ext.form.action.Action.SERVER_INVALID:  //#7
          Ext.Msg.show({
            title:'Error!',
            msg: result.msg, //#8
            icon: Ext.Msg.ERROR,
            buttons: Ext.Msg.OK
        });
  }
},
Before we dive into the failure callback, note that both onLoginFailure and onLoginSuccess receive two parameters: form and action. Where do they come from?
If we take a look at the documentation, specifically on the submit method of the Form class (Ext.form.Panel), we will see that this submit method is calling the submit method from the class Ext.form.Basic (which is the class that actually contains all methods to handle form actions). If we take a look at the submit method from the
Ext.form.Basic class (http://docs.sencha.com/extjs/5.0/5.0.1-apidocs/#!/api/Ext.form.Basic-method-submit), we will see a code similar to ours as an example. If we read the description, it says that this submit method is a shortcut to the doAction method from the same class.
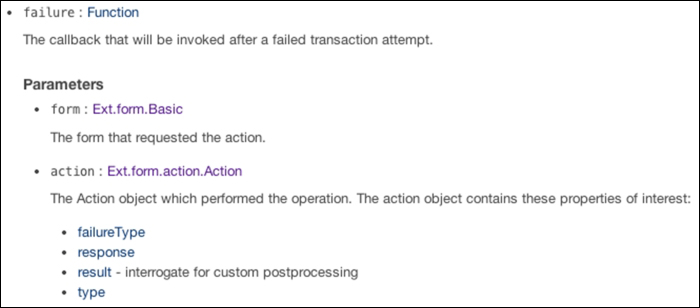
If we open the documentation for this method (http://docs.sencha.com/extjs/5.0/apidocs/#!/api/Ext.form.Basic-method-doAction), we will be able to see the parameters we used for the form submit call (url, success, and failure callbacks, among others) and also the parameters that both success and failure callbacks receive—form and action—as follows:
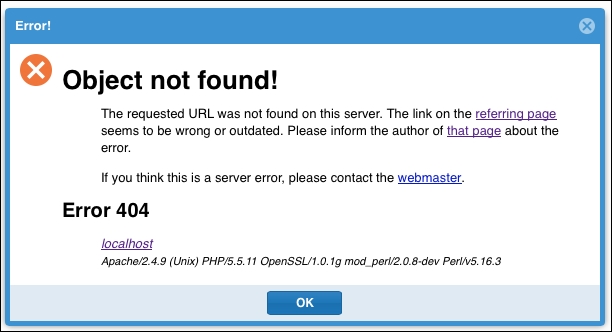
The action parameter contains four attributes inside it. For our failure callback, we are interested in two of them: failureType and response. Let's analyze response first. Add the following code (console.log(action);) to the first line of the failure callback, and try to submit an incorrect user or password in the Login screen. Before submitting to the server, open Chrome Developer Tools or Firebug to see what is going to be logged, as follows:

Inside the response, note that there is responseText with JSON that we returned from the server. So, the first thing we are going to do is decode this JSON (#3). After we decode it, we will be able to access result.success and result.msg. We also need to be careful about one detail: we do not know what is going to be returned from the server. We always hope that is our success and msg information; however, we cannot be sure of it. If any other error is returned, it is also going to be returned inside action.response.responseText, and it cannot have the JSON format we are expecting (cannot be a JSON either). If this happens, Ext.JSON.decode will fail, and it will throw an exception. We can silence the exception (passing true as the second parameter to the Ext.JSON.decode function, and the result will have the value null), but we still need to handle it. And it is what we do when checking whether the result variable is null (#4). If it is null, we are instantiating the result and assigning some values (the msg will receive the error sent by the server).
After that, we will use the action failureType to see what type of error occurred. As failureType is code, Ext JS has some constants defined that are more developer friendly (Ext.form.action.Action.CLIENT_INVALID, for example). If failureType is 'client' (#5), then we will display an error message in an alert pop up with an error icon. If a connection error happened with the server, then (#6) will handle it by displaying an error alert pop up as well. And if any exception or success is returned as false, (#7) will handle it. As we treated the return of the server to display the custom error message or any other message, we can simply display result.msg on the alert pop up (#8).
Try entering a wrong user or password again and see what happens. Change login.php url to login.php (or change to any other url), or inside the db.php file, enter the incorrect password to connect to the database to simulate an error, and here's what you will see:
This way, we can handle all kind of server responses; not only the ones we are waiting for, but also any exceptions!
Note that in (#5), (#6), and (#7) we are using the same error alert pop up, so code is repeated. Alert errors like this are used in different places of the application. As we are going to handle more Ajax requests and form submits in other screens of the application as well, the code in (#3) and (#4) will be repeated as well. For this reason, we can create a Util class that will encapsulate this code and provide us with the means to reuse it. Besides the reuse pro, it is also good to establish a pattern to be followed by the application, such as working out the JSON format that the server needs to return to Ext JS. This will make the application more organized, and it is also good when working in a team (usually each developer has their own pattern that they like to follow, and this way, we follow the same pattern for the same application, and it will not look as though it was implemented by different developers).
So let's go ahead and create our first Util class. We will name it Packt.util.Util. For this reason, we are going to create a new file named Util.js, and we are also going to create a new folder named util under the app folder, as follows:
Ext.define('Packt.util.Util', {

    statics : { //#1

        decodeJSON : function (text) { //#2
            var result = Ext.JSON.decode(text, true);
            if (!result){
                result = {};
                result.success = false;
                result.msg = text;
            }

            return result;
        },

        showErrorMsg: function (text) { //#3
            Ext.Msg.show({
                title:'Error!',
                msg: text,
                icon: Ext.Msg.ERROR,
                buttons: Ext.Msg.OK
            });
        }
    }
});
All methods will be inside the statics declaration (#1). As we learned in Chapter 1, Sencha Ext JS Overview, we can simply call Packt.util.Util.decodeJSON for example, without needing to instantiate the Packt.util.Util class. The decodeJSON method (#2) contains the code to handle the JSON decoding, and the method showErrorMsg (#3) contains the code to display an error pop up alert with the content passed in the text parameter.
Let's rewrite the onLoginFailure method by using the Util class, as follows:
onLoginFailure: function(form, action) {

    var result = Packt.util.Util.decodeJSON(action.response.responseText);

    switch (action.failureType) {
        case Ext.form.action.Action.CLIENT_INVALID:
            Packt.util.Util.showErrorMsg('Form fields may not be submitted with invalid values'),
            break;
        case Ext.form.action.Action.CONNECT_FAILURE:
       Packt.util.Util.showErrorMsg(action.response.responseText);
            break;
        case Ext.form.action.Action.SERVER_INVALID:
            Packt.util.Util.showErrorMsg(result.msg);
    }
},
Instead of 36 lines of code, now we have only 15, and the readability is better as well! In case we need to maintain this code, we can make the changes in the Util class, and the changes will be applied everywhere in the code that the class is being used! Best practices make our code really cool!
One last detail: we need to add the Packt.util.Util class in the requires declaration of the ViewController class as well:
requires: [
    'Packt.util.Util'
],
This is because of the dynamic loading we discussed earlier in this chapter. If we try to execute the preceding code without having the Util class loaded, we can get an error.