
The application we are going to develop throughout this book is very common to other web systems you are probably used to implementing. We will implement a DVD Rental Store management application (that is why the use of the Sakila sample database). Some of the features of the application are the security management (able to manage users and their permissions within the application), which manage actors, films, inventory, and rental information.
Ext JS will help you to achieve your goal. It provides beautiful components, a complete architecture, the possibility to reuse components (and decreases our work), and a very complete data package (that makes it easier to make connections to the server side and send and retrieve information).
We will divide the application into modules, and each module will be responsible for some features of the application. In each chapter of this book, we will implement one of the modules.
The application is composed of:
- A splash screen (so the user does not need to see a blank screen while the application is still launching)
- A main screen
- A login screen
- User administration screen
- MySQL tables management (for categories, and combobox values—static data)
- Content management control
For each of the modules and screens mentioned in the preceding list, we will create mockups, so we can plan how the application will work. Here, you will learn more about each one of them.
Our application will have a splash screen, so the user does not need to see a blank page while the application is still loading the required files and classes prior to its initialization. Here's a screenshot that illustrates a splash screen aptly:

We will cover the implementation of this screen later in this chapter.
After the application is fully loaded, the first screen the user will see is the login screen. The user will be able to enter the User Name and Password. There is also a multilingual combobox, where the user can choose the language of the system (multilingual capability). Then, we have the Cancel and Submit buttons, as shown in the following screenshot:

The Cancel button resets the Login form and the Submit button will trigger an event that will create an Ajax request and send the user credentials to the server for authentication. If the user is successfully authenticated, then we display the main screen; otherwise, we display an error message.
We will cover the implementation of the login screen in Chapter 3, The Login Page.
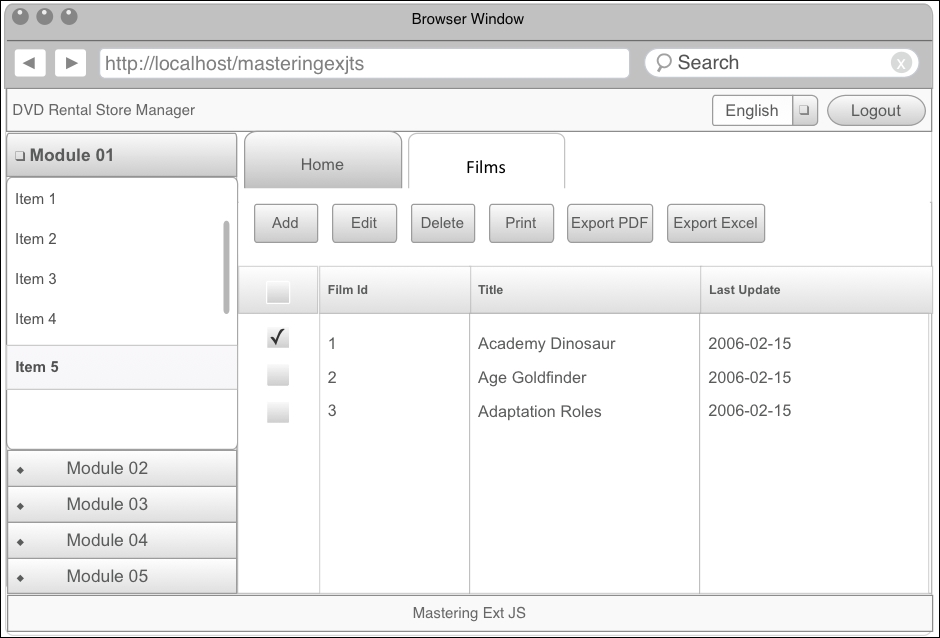
The general idea of the application is to have a main screen that will be organized using border layout. Border Layout is divided into five regions: north, south, east, west, and center, of which all but the east region are demonstrated in the following diagram:
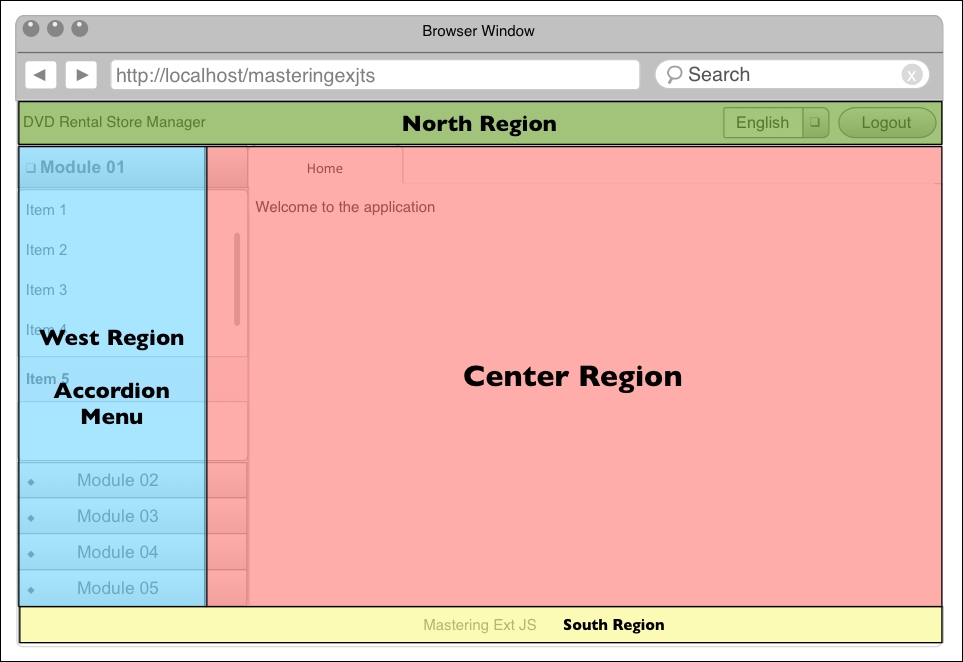
In the Center Region, we will have a tab panel, and each tab represents a screen of the application (each screen will have its own layout)—only the first tab can not be closed (Home) tab. In the North Region we will have a header with the name of the application (DVD Rental Store Manager), the multilingual combobox (if the user wants to change the current language of the application) and a Logout button. In the South Region, we will have the footer with a copyright message (or it can be the name of the company or developer that implemented the project). And in the West Region, we will have a dynamic menu (we will implement user control management). The menu will be dynamic and will be rendered based on the permissions that the user has in the application.
The main screen will look somewhat like the following mockup:

We will cover the implementation of the main screen and the multilingual and logout capabilities in Chapter 4, The Logout and Multilingual Capabilities. And in Chapter 5, Advanced Dynamic Menu, we will cover how to generate a dynamic menu.
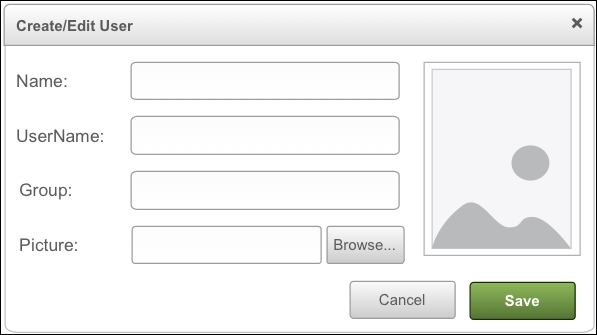
In the user control management, the user will have access to create new users and new groups and assign new roles to users. The user will be able to control the system permissions (which user can see which modules in the system). This is how the Create/Edit User page looks:
We will cover the implementation of user administration in Chapter 6, User Management.
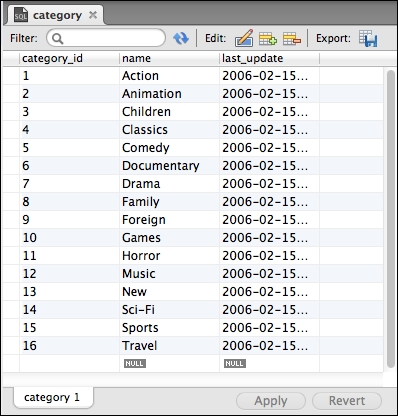
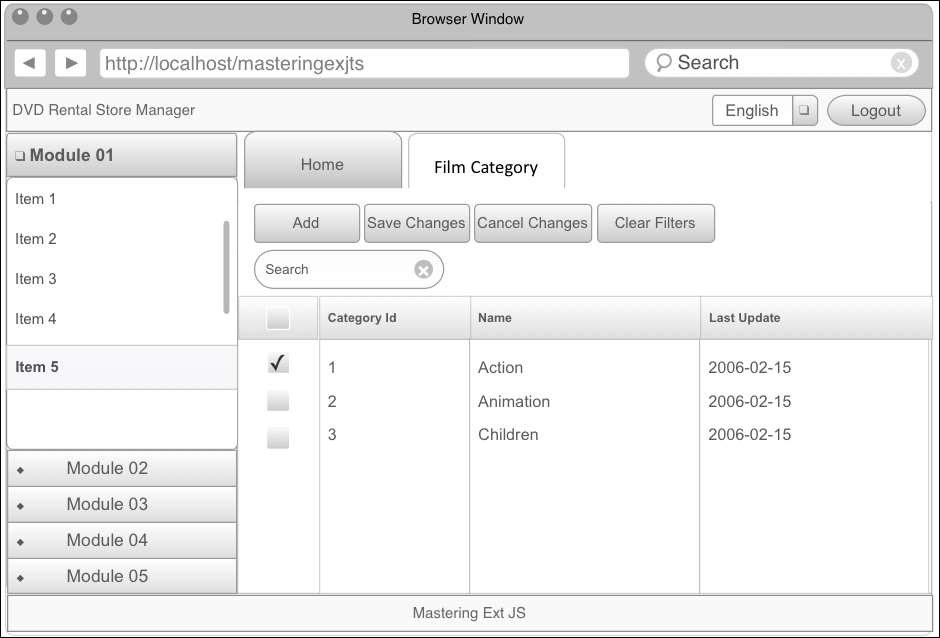
Every system has information that is considered static data, such as film categories, film language, combobox options, and so on. For these tables, we need to provide all CRUD options and also filter options. The screens from this module will be very similar to the Edit Table Data option from MySQL Workbench., as shown in the following screenshot:
The user will be able to edit the data in the rows of the grid, similar to what can be done in MS Excel. Once the user is done making the changes, they can click on the Save Changes button to save all modified data to the server and database. The following is how the Browser Window view looks:
We will cover the implementation of this module in Chapter 7, Static Data Management.
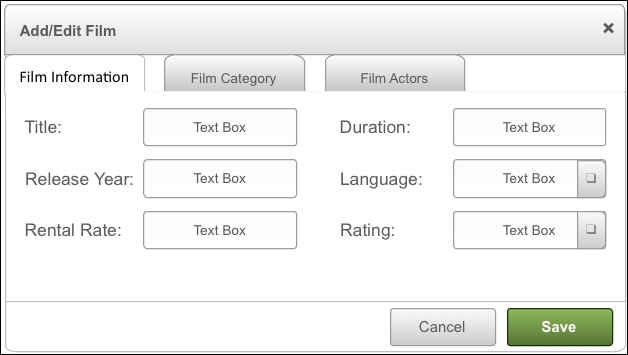
In this module, the user will be able to see and edit the core information from the system. As most of the database tables we will be handling in this module have a relationship with other tables, the editing of the information will be more complex, involving the master-detail relationship. Usually, we will present the information to the user in a data grid (a list or a table), and the addition of the information will be made in such a form that it will be displayed inside a pop-up window.
It is also very important to remember that most of the screens from a module will have similar capabilities, and since we are going to build an application with a lot of screens, it is important to design the system to be able to reuse as much code as possible, making the system easy to maintain and easy to add new features and capabilities to. The following screen depicts the capabilities we have discussed in this section:
When clicking on Add or Edit, a new pop-up window will open to edit the information, as follows:
We will cover the implementation of this module in Chapter 8, Content Management, and Chapter 9, Adding Extra Capabilities.
In the charts module, we will create a chart in Ext JS. For the same chart information, the user will be able to generate different types of charts. The user will also be able to export the chart to an image, SVG, or PDF, as follows:

We will cover the implementation of this module in Chapter 9, Adding Extra Capabilities.